Table of Contents
When DFdiscover receives pages which it cannot recognize, it stores them in a special folder where they can be reviewed using the Image Router functionality in DFexplore. One or more users must be assigned this regular task.
DFdiscover will fail to recognize pages when there is no barcode (e.g. memos, letters, cover pages), or when the barcode is obscured (e.g. by fax noise, a coffee stain, something printed over it).
Without a readable barcode, DFdiscover cannot automatically identify the study. Thus all unidentified pages are stored in this same special folder. If several studies are running concurrently, the individuals who review and identify pages using the Image Router must be sufficiently familiar with all studies to correctly route each page. Unidentified pages can be received by fax, through DFsend or as email attachments.
Study CRFs are not difficult to identify correctly unless the barcode is missing altogether. In such cases the contents and design of the CRF may be enough to correctly identify it. If not, selecting > provides information about the sender, which may assist in determining the destination study for the page.
DFdiscover creates missing plate and overdue visit queries for required CRFs and visits that have not arrived (as specified in the study visit map). Thus queries may be generated for pages that have been transmitted by the sites but are currently awaiting identification in the Image Router folder. A recommended procedure is to always ensure that no CRFs are awaiting Image Router identification before DF_QCupdate is scheduled to run.
The Image Router is used to:
Review all unidentified pages.
Get context (determine when the document arrived and where it came from).
Delete pages that are not needed (e.g. fax cover sheets, blank pages).
Print non-CRF pages or save them to a PDF file.
Fix any document transmission problems (e.g. flip, rotate, truncate, cut pages).
Identify CRFs and other subject documents and forward them to the correct study database.
Three factors determine what a user can do in the Image Router:
Router Permission. Permission to use Image Router is typically granted to a small number of users at the DFdiscover server site. Users with router permission can start the router and view, print, delete and check the context of all unidentified pages that arrive to the DFdiscover server. They can also identify and send pages to any study on the server, even if they have no other study permissions.
Study Status. DFdiscover and study administrators can place temporary or permanent restrictions on a study by changing it's status to: disabled, read-only, restricted, or both restricted and read-only. CRFs cannot be sent to studies that are disabled or in read-only mode.
DFdiscover and Study Administrators. Only DFdiscover and study administrators can send pages to a restricted study. If a study is also in read-only mode, or is disabled, not even administrators can send pages to the study.
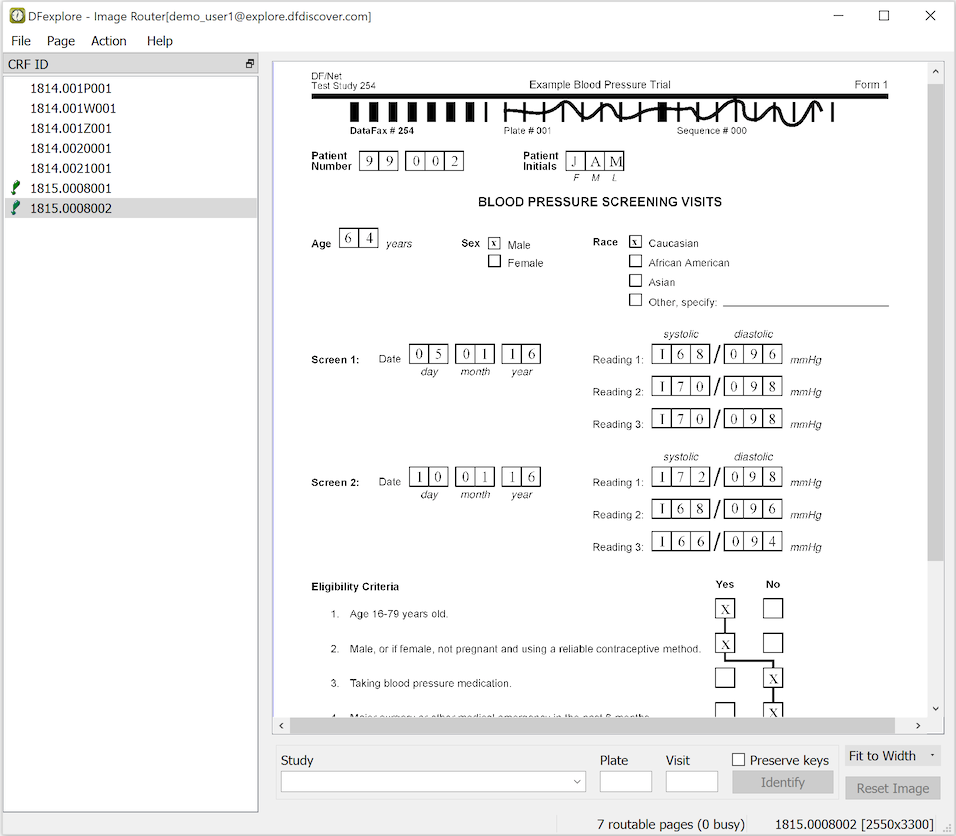
To start Image Router, click in the study selection dialog. This button is visible only if you have permission to use the Image Router.
Each page, shown in the CRF ID page list,
is identified by a unique image name (the CRF ID).
This image name has the format yyww.ffffppp,
where yy is the year, ww is the week,
ffff is a sequential document transmission ID,
and ppp is the page number within the transmission.
Image Router can be used concurrently by multiple users.
Pages are locked and released as each user traverses the page list.
When a page is selected it, and all other pages in the same document transmission,
are locked - this prevents other users from processing pages from the same document.
Small icons reflect the current status of each page in the page list. An exclamation mark signifies a page that is locked by the current user, a lock icon identifies a page that is currently locked by another user, and a red X icon indicates a page that has been processed (routed to a study, deleted, or saved). The user's login name and the DFdiscover server name are shown in the title, and a message at the bottom of the screen tracks the number of pages to be routed, the number of pages locked by other users (busy), and the current image name and size in pixels (width x height).
Image Router workflow typically proceeds in three simple steps:
select a page,
perform image processing (e.g. rotation, flip, etc.) on that page, and
identify the "keys" (study, plate and visit) for the page, using the input fields and controls at the bottom of the screen.
For pages that are not study CRFs, it is also possible to print or discard them.
Pages without barcodes may also be identified, provided you are able to determine the study, plate and visit numbers using other features. As an aid to identification the image can be resized from 50-200% using the Zoom option. This has no effect on the size of the image stored in the study database.
If most pages have similar keys the Preserve keys check box can be used to prevent the key fields (study, plate and visit) from being cleared after each new page is identified.
If a set of pages all have the same keys and do not require image processing, they can be identified together in one step by making multiple selections from the page list before clicking .
Image Router sends all identified pages to the new record queue for the respective study where they join other pages that were identified automatically from their barcodes.
Use the menu to access generic Image Router functions. Remember that Image Router is a sub-window of DFexplore. You can move to and from DFexplore using menu items from the menu.
Select to refresh the page list with any unidentified pages that may have arrived since the current session began. Image Router does not automatically update the list of CRF IDs in the page list.
Select to open the study selection dialog and select a study for concurrent access in another instance of DFexplore, while keeping the Image Router window active.
This menu accesses the functions that allow you to manipulate pages (rotate, shift, flip, cut, truncate, and reset) before sending them to the study database.
For DFdiscover to properly identify and read a CRF, the signature line (horizontal line at the top of the CRF) first has to be located and placed in a standard, expected position. Without this standard positioning, DFdiscover will have difficulty locating, and reading, the data fields positioned on the remainder of the CRF. Under normal circumstances, DFdiscover does all of this automatically. For CRFs that cannot be automatically identified, user intervention using the functions in this menu is needed.
This menu also contains functions for navigating to other pages, printing pages and determining where each page came from (context).
Select to correct page rotation. This is needed if the page signature line at the top of a study CRF is not horizontal. Page rotation usually results from failure, at the transmitting site, to adjust the page guides snugly against the sides of the CRF pages when they are being scanned by the fax machine.
Instructions for this operation appear in the status line at the bottom of Image Router window. Click the left mousebutton on the top-left end of the horizontal signature line and then click again on the top-right end of this line (or click the right mousebutton to cancel this operation). When the operation is complete, the screen updates to show the realigned image. Click to undo this operation, and try again.
Use when the page does not need to be rotated, but instead only needs to be shifted vertically. Shift is used to register the upper-left corner of the page signature line.
To shift a page click the left mousebutton anywhere on the top edge of the horizontal signature line (or click the right mousebutton to cancel this operation). The vertical location of the mouse pointer is important - the horizontal position is ignored. After clicking the left mousebutton once, the screen updates with the shifted image. Click to undo the shift and try again.
Selecting turns the page upside down, by rotating it 180°. Selecting it a second time returns the page to its original position.
Occasionally a page may be received that is really 2 pages (or more) joined together. This can occur if the transmitting scanner is slipping while pulling consecutive pages through the document feeder. In the Image Router window this is evident because the page length is much greater than the length of a single page. In such cases, it is necessary to cut the long page into individual pages at the appropriate page boundaries.
![[Warning]](../../imagedata/warning.png) | Warning |
|---|---|
The Cut action cannot be undone. |
Selecting overlays a horizontal line on the page. Move this line to the desired cut position (representing the bottom of the first page) and click the left mousebutton to register the cut point, or click the right mousebutton to cancel.
After the cut point is registered a confirmation dialog appears. A page cut operation cannot be reversed. Click to confirm the page cut or to abort the action.
On rare circumstances, the original page may contain more than 2 consecutive pages. In this case, simply select the second page (the bottom portion of the original page) and repeat this procedure to cut again (and maybe again).
The size of the page (width x length, in pixels) is shown in square brackets at the bottom of the screen. After a CRF has been shifted to the top of the page signature line it should not be longer than 1050 pixels in standard definition (approximately 1120 pixels if the source document was A4 size), or 3150 pixels in high definition. Any other length suggests that there are either multiple concatenated pages (in which case the page should be cut) or there is "noise" (unneeded content) at the end of the page. In such cases, examine the bottom of the page to see if it contains noise. If it does, select to remove the excess length.
Click to undo the operation and restore the original page length.
Fax machines that can accommodate pages wider than 8.5 inches require their paper guides set to 8.5 inches for proper scanning of letter-size pages into DFdiscover. If the guides are set too wide, the paper can tilt or shift, resulting in skewed or abnormally wide images. When pages like this are received, they generally appear in the router because they are wider than the width of a US letter-size page. To route a wide page, trim the width of a page by selecting . Two dashed vertical lines appear over the document spaced 8.5 inches apart. Using the mouse, position the lines over the area of the page to preserve. Click the left mousebutton to keep the area between the lines, and discard the page area that lies outside these two lines, or click the right mousebutton to cancel the operation. Click to undo the operation.
To rotate a page 90° clockwise select , or counter-clockwise by selecting . Each time the option is selected, the current page is rotated 90° in the specified direction. This is useful when a sender sends a page in landscape orientation and it needs to be put into portrait orientation. Click to undo all operations on the page, or rotate the page in the opposite direction to return it to it's previous orientation.
It is possible to process landscape pages by rotating them into portrait orientation and scaling them to fit the width of a portrait page. This is performed using or . Select the appropriate menu item to apply the needed rotation. The page is rotated and then scaled to fit the width of a portrait US letter page.
To print one or more pages, highlight the page or pages from the page list and select . The operating system print dialog is displayed. Change the necessary print settings before printing.
To export one or more pages in a PDF file, highlight the page or pages from the page list, and select . The operating system's standard file save dialog is displayed. Specify a file name and save.
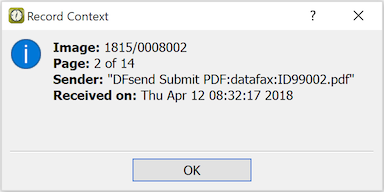
This function provides information that may aid in determining the source of an unidentified page. It provides the page number within the document, the date and time on which the document was received, and the sender identification header - which is usually the sender's fax number, an email address, or username from a DFsend user).
Select this function, or , to undo all Rotate, Scale, Shift, Flip, Trim and Truncate manipulations that have been applied to the current page; the only exception is Cut, which cannot be undone. Reset is also performed automatically when a different page is selected before identifying the current one to send it to the desired study database. Once a page has been identified, page manipulations are permanent.
This menu contains all of the functions that routes pages to a study and remove pages from the Image Router. All actions are immediate. Once committed they cannot be undone.
Most CRF pages can be aligned, identified and routed to the appropriate study database in a single step by selecting . Follow the directions at the bottom of the window to identify the CRF page signature line. The page is then rotated and shifted (if necessary) and another attempt is made to read the barcode. When this has been done, enter or correct the keys (Study, Plate and Visit) as needed and click .
If the plate is defined as having the visit number in the barcode it must be entered before clicking ; an error message appears otherwise. Alternatively, when the visit number is the first data field on the plate, the Visit key should be left blank - it is silently ignored if a value is entered.
A Right-Click mousebutton aborts the Rotate/Shift/Identify action. Once is selected, the action is committed and cannot be undone. The page is sent for ICR processing and routed to the designated study database. There is a brief pause while this is being done. Then the page is removed from the page list, and the next unidentified page is displayed (if there is one).
Select to move a page to a specified file name on the local computer. Specify the destination location for the file using the operating system's standard file dialog. Moved files are removed from the DFdiscover server and stored in PNG format on the local computer. This may be appropriate for documents of a personal, or non-study, nature.