Table of Contents
If you are planning to view, enter, or modify data while not connected to the internet (offline), you must in advance, while connected to the internet, download the data to local storage on your device.
There are two ways to download data to local storage. The first way is from the Storage & Syncing page, accessed via the application menu. The second is from the Subjects page.
Log in to DFcollect while online. Navigate to the study you
intend to work with offline,
click  to open the Application Menu, and select from the dropdown menu. This displays the list of sites and subjects you have access to and whether they have been downloaded to local storage.
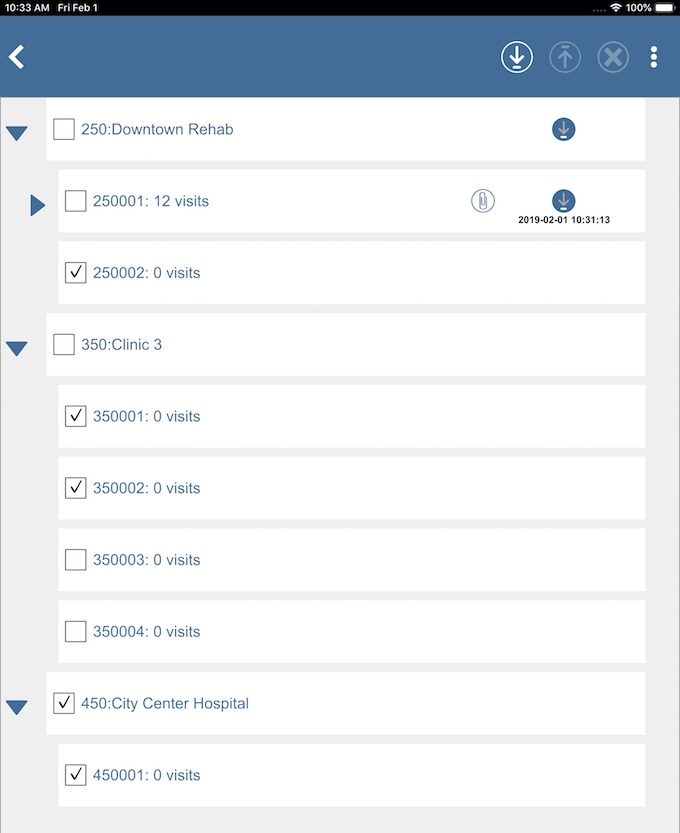
You select the sites or subjects to download by clicking the checkbox in front of the site number or subject ID.
Click ![]() to expand a site or a subject. You can also expand the subjects and visits if they have been downloaded to local storage. Click
to expand a site or a subject. You can also expand the subjects and visits if they have been downloaded to local storage. Click ![]() to collapse the expanded items.
to collapse the expanded items.
After identifying the site(s) and/or subject(s) to download,
click  to start the download to local storage.
A Download Progress dialog opens while the download is in progress and closes automatically when complete.
to start the download to local storage.
A Download Progress dialog opens while the download is in progress and closes automatically when complete.
The data are now available to view and modify while offline.
![[Important]](../../imagedata/important.png) | Store only the data needed |
|---|---|
|
While it can be tempting to include all of the permitted sites and subjects in local storage, this is not recommended. Depending upon the network speed, it can take a considerable amount of time to download the requested subjects and attached documents. It will also require local storage in which to keep the downloaded content. Finally, when you are online again, a comparison must be done against each record in local storage to determine if it needs to be uploaded, and if yes, to upload it again. It is far more efficient to download only the subjects or sites that you will require while working offline. |
The icon  to the right of a site name indicates this site has downloaded data in local storage. The
  icon to the right of the subject ID indicates that it has been downloaded, and includes the date and time it was downloaded. The
  icon next to the subject ID indicates this subject also has documents downloaded.
The Studies, Sites, and Subjects pages also indicate which data has been downloaded to local storage. The icon to the right of the subject ID is updated to show . The same icon is displayed in the Studies page. In the Sites page the same icon is also displayed along with the number of subjects downloaded.
To refresh existing downloaded data, repeat the above steps to re-download.
Log in to DFcollect while online. Navigate to the study and
site of interest.
Click ![]() to the right of the subject ID to select that
subject for download.
The download icon updates to
to the right of the subject ID to select that
subject for download.
The download icon updates to
![]() indicating that the subject is selected for download.
You may select multiple subjects at a time.
Then click in the header to start downloading the selected subjects. The number in the header to the left of the header download button indicates the number of subjects chosen to download. Once downloaded, the icon to the right of
each subject ID is updated to .
The same icon is displayed in the Studies page. In the Sites page the same icon will also be displayed along with the number of subjects downloaded.
indicating that the subject is selected for download.
You may select multiple subjects at a time.
Then click in the header to start downloading the selected subjects. The number in the header to the left of the header download button indicates the number of subjects chosen to download. Once downloaded, the icon to the right of
each subject ID is updated to .
The same icon is displayed in the Studies page. In the Sites page the same icon will also be displayed along with the number of subjects downloaded.
To refresh existing downloaded subject data, repeat the above steps to re-download.
To use DFcollect offline, you can simply login while not connected to the internet, or you can set DFcollect to be offline even if you are connected to the internet (Wi-Fi or cellular).
To set DFcollect to be offline, on the login page, click  and select . Slide Offline Only to the right (on). After logging in, you will see a red line across the top of the page to indicate that you are offline.
If you leave Offline Only off and are not connected to the internet while in DFcollect, the Save button in the header of the CRF will display as ![]() to indicate that you are offline.
to indicate that you are offline.
After data have been downloaded to local storage, the process of data entry is the same while offline as it is while online,
except for how data is saved.
Instead of being saved to the server, the data is saved to local storage on your device, shown by  in the header of the CRF.
When a CRF is saved successfully offline, in the visits and plates page, there is an additional  icon next to a plate (when the visit is expanded) or next a visit (when the visit is collapsed). Likewise, the icon also appears in the Subjects and Sites page. When data for a new subject is added while offline, in the Subjects page you will see
  along with the icon next to the newly created subject. Once you are back online, the data must be submitted to the server.
To submit data to the server that was entered while offline,
click in the page header and select . In this view, you select the subjects or sites you want to upload
(generally this would be all of them),
then click  to submit data to server.
An Upload Progress dialog appears
while the upload is in progress and closes automatically when complete. The icon will no longer appear next to that subject and site, confirming
that the data has been saved on the server.
to submit data to server.
An Upload Progress dialog appears
while the upload is in progress and closes automatically when complete. The icon will no longer appear next to that subject and site, confirming
that the data has been saved on the server.
A data conflict may occur if there were changes made to data
on the server after data were downloaded to local storage,
and then inconsistent changes are submitted back to the server
from local storage.
Conflicts must be resolved by either verifying that the server values
are correct or submitting the local storage values to the server.
Conflicts are indicated by a  .
.
To resolve the conflict, open the CRF with the conflict and click ![]() in the header of the CRF to display the Conflict details. Review the conflicts listed and click or to indicate which data to keep,
and then click to submit the data to the server.
in the header of the CRF to display the Conflict details. Review the conflicts listed and click or to indicate which data to keep,
and then click to submit the data to the server.
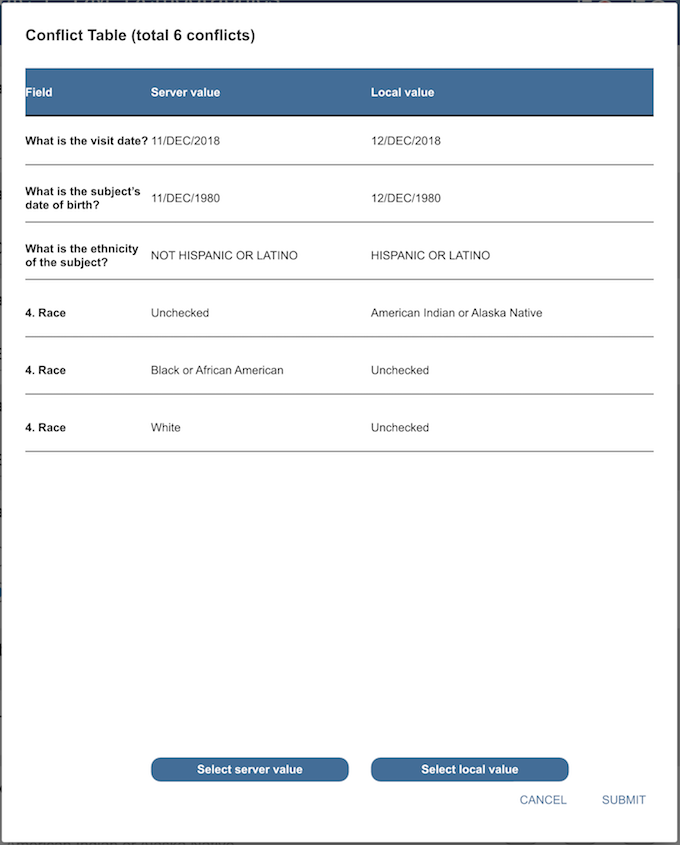
If the local value is selected, the fields with changed data will have a pending reason attached automatically to indicate the data change. The reason detail shows both server and local data value. If the server value is selected, the data on the server will not change and no reasons will be added.
Data in local storage is not automatically deleted after it is submitted. Instead it must be explicitly deleted. Before deleting, ensure that all local changes have been successfully submitted to the server.
To delete data from local storage,
click in the page header and select .
Select the site(s) and/or subject(s) to delete, click  in the header, and click when prompted. The data will no longer be available offline.
If subject data has been added or modified while offline and not yet submitted to the server, it must be submitted before you delete it from local storage. If you forget to do this and try to delete the data in local storage, you are notified that you are deleting records from storage that have not been submitted to the study server.
| Submit all offline data before deleting |
|---|---|
|
If you click , you are choosing to ignore the warning and the data saved to local storage will be lost. This might be useful if you are testing, or performing training, and the test data should not be saved centrally. But this is an uncommon situation. In general, you must ensure that all locally stored data is submitted before it is deleted. |
Click to cancel deleting the data from local storage.