Table of Contents
- 1.1. What is DFexplore?
- 1.2. What type of computer do I need?
- 1.3. What type of web browser do I need?
- 1.4. Is data transmission over the internet secure?
- 1.5. What kind of response time can I expect?
- 1.6. How complicated is this going to be?
- 1.7. Is any subject data stored on my local hard drive?
- 1.8. Can anyone impersonate me within DFexplore?
- 1.9. What if I forget my password?
- 1.10. How hard is it to navigate among the various study forms for each subject?
- 1.11. Can I use DFexplore for more than one study at a time?
- 1.12. If I don't like this, or don't have time for it, can I switch to another method of data collection / entry?
- 1.13. What are the technical requirements if I choose to fax?
- 1.14. How do I get started?
- 1.15. After I connect to a study how do I enter subject data?
- 1.16. What do I do when I'm finished entering subject data?
DFexplore is a computer application used to enter, review and modify subject data, and to submit it over the internet to a DFdiscover server at the study coordinating site. This type of data entry is commonly referred to as Electronic Data Capture or EDC. DFexplore is part of the DFdiscover clinical trial management system, which also supports data collection by paper, scanned document and fax. All methods can be used in the same study. EDC has been described as having the advantage of providing immediate help to data collection users, resulting in more complete and accurate data entry, and fewer queries from the study coordinating site.
To help realize these benefits and facilitate the transition from paper forms to EDC, DFexplore has been designed with:
intuitive navigation, using a subject binder analogy,
data entry screens that can match the equivalent paper forms,
help in the form of status icons, color coding, messages and interactive edit checks,
a Query window used to read and respond to queries from the study coordinating site,
a Reason window used to explain unusual data values (and thus avoid queries), and
a Missing Value window used to mark fields with standard missing value codes
Versions of DFexplore are available for: Windows 10, macOS 10.14 (Mojave) or later, and Linux. If you plan to use DFexplore on more than one computer you will need to install the appropriate version on each computer.
Your trial coordinating site may have more detailed instructions regarding computer needs.
DFexplore is a standalone application. It does not rely on a specific web browser. It is downloaded and run on your local computer.
DFexplore can also be deployed through an application server hosted by the study sponsor. This deployment, known as DFnavigator, works in current versions of the Edge, Chrome, Firefox and Safari browsers, and possibly others.
DFexplore communicates with the DFdiscover server via encrypted communication on port 443. This port must be open on any firewalls between the local computer and the study server.
The security of the communication is based upon 3 industry standard technologies:
Communication protocols, namely TLS 1.2 or 1.3,
Strong encryption ciphers, and
Independent certification and confirmation of the server.
This is industry-standard technology that encrypts the bi-directional communication using a 'certificate of trust' provided by the server. It is the same technology used by banks and the majority of secure, global web services.
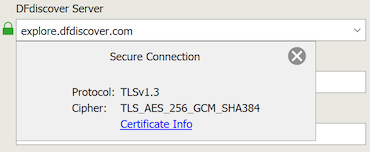
You can visually confirm that the communication is secure by examining the details of the communication protocol and encryption cipher. Click the green lock icon next to the DFdiscover Server during login.
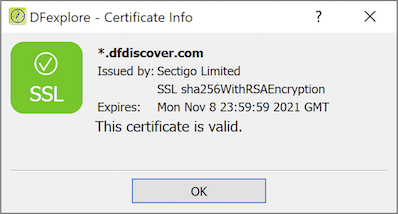
You can also examine the certificate of trust. After login, select > and look for the green checkmark.
As with all internet applications, response time and speed depends primarily on the speed of and traffic on your internet connection, and to a lesser extent on the distance between you and the study DFdiscover server (the distance itself is not the factor, but is generally impacted by the number of intermediate connections between the endpoints, and that can be a factor).
If you have a cable internet connection, you can expect login times in the range of 5 to 20 seconds and then 1 to 4 seconds to display each new page in the data entry window. Fibre connections are much quicker. Once a page is on the screen, moving between data fields is very fast, with essentially no delay. [1]
With a little practice, you should find that completing data collection pages in DFexplore is as easy as completing a printed version of the same page. In addition, the guidance provided by color coding (e.g. illegal values appear red) and the messages displayed by data consistency checks help you identify problems that can be corrected immediately or explained by entering a reason for unusual values. This advantage over paper forms helps you avoid queries and requests for corrections from the study coordinating site, thus saving you time in the long run.
No; all subject data is sent to and retrieved from the DFdiscover server. As a result, you can access the study from any computer on which DFexplore has been installed. Different users can access their studies from shared computer(s), as each user is uniquely identified by a username and password combination.
Your username plus a password constitute your unique electronic signature. By protecting your electronic signature, and making sure you logout of DFexplore before leaving a computer, you can ensure that no one can impersonate you and perform data entry that is attributed to you.
Permission to read, write and modify subject data is defined by the study coordinating site for each username. These permissions determine which study, sites, subjects, visits and individual data pages each user can create, view and modify. It would not be uncommon for more than one person to have permission to enter data for the same subject at a given clinical site; however, all data entry is recorded with your username, date and time. Thus a complete history is maintained of all database transactions.
You can independently reset your password provided that:
you have a current email address registered on the server you are trying to access, and
the sponsor has enabled resetting of passwords from the login dialog on that server.
If these conditions are satisfied, follow these steps in the login dialog to reset your password. [2]
-
Enter the value for DFdiscover Server and your Username.
Click Forgot Password?.

In the Reset Password panel, enter your email address; this must match the email address previously defined for you on this server.
Click .
The confirmation message A temporary password has been emailed to you is displayed if the email address matches.
A temporary single-use password is sent to the email address. Allow several minutes for the email to arrive.
Enter the emailed, one-time password in the Password field and click .
Specify, and confirm, a new permanent password.
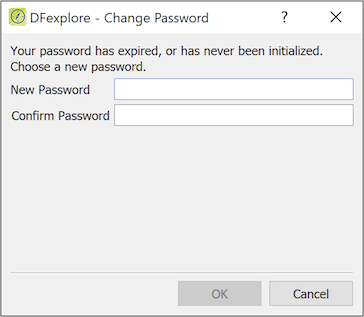
Click to complete the password reset steps and proceed with login.
A subject binder, complete with printed forms organized by study visits from beginning to end, with tabs identifying each visit, is quite easy to use.
DFexplore follows this subject binder analogy in Data View. When you open a clinical site (like walking into your office) you see a list of subject icons (like subject binders on a shelf). Double-clicking a subject icon opens the binder to reveal the list of visits that comprise all subject visits from beginning to end of the study.
Double-clicking a visit opens that section of the binder to show the data collection pages for that visit. When you are finished reviewing or entering data, double-clicking an open visit or subject binder closes it.
Each visit, and page within a visit, has a text label describing what it is, and colored icons that identify whether it is required or optional, blank or containing data, and, if data is present, whether it is complete or incomplete.
In addition to the Data View, there is a Queries View that lets you review data queries from the central office and jump to each relevant data field, where you can enter a reply, explain or correct the data value.
This familiar organization, along with the use of icons and color, makes navigating the study forms as easy as using a printed subject binder - perhaps even easier.
Yes. The login screen asks you to specify the unique name of the DFdiscover server at the study coordinating site. Once you connect to the desired server you see a list of all studies you are permitted to access.
It is possible to participate in one or more studies with a single coordinating site and also possible to participate in studies at more than one coordinating site. In all cases the software behaves the same; only the study data entry forms differ.
DFdiscover is capable of supporting EDC and paper data collection forms (faxed, scanned, emailed) within the same study, with no additional study setup work. Further, the design of the paper forms and data screens are identical and are completed in the same step; thus switching a clinical site from DFexplore to completing and scanning paper forms is certainly possible, and provides a fall-back position for sites that are unable to perform EDC. Of course, it is also possible to move in the other direction, switching from paper and scanning to EDC.
There are many brands and manufacturuers of fax machines and scanning devices. It is not possible to recommend one specific model. However, almost all devices currently available are able to provide these minimum functions:
Save scans to PDF, version 1.3 or higher. Scans of multiple pages can be saved to one document
Offer 200 (or 300) dpi scan resolution. 200 dpi is more than sufficient resolution for documents containing primarily text
If you are scanning, being able to email directly from the device saves time and creates a more efficient workflow. Having an email interface and network connection are important
Greyscale scanning is preferred. Color may be useful but will generate scan documents that are very large and should be avoided unless absolutely necessary
Each document scan has a maximum file size limit of 25 MB
First you need to download and install DFexplore following the instructions provided by the study coordinating site.
After installation, on starting DFexplore and in the login dialog, enter the name of the DFdiscover server, your username, and your password; all of these values are provided by the study coordinating site.
After successful login you are presented a list of the studies in which you are participating, each with a status indicating whether the study is currently available or off-line for maintenance. If a study is available, double-clicking the study entry connects to the study database.
If you are not already in the Data View, select > . The clinical sites for which you have permission are listed on the left side of the screen. Double-clicking a site opens it to reveal the list of subject binders. Double-clicking a subject binder opens it to reveal the study visit tabs, and double-clicking a tab opens the visit to reveal the data entry pages for that visit. You can then enter data, add reasons to explain unusual values, and reply to outstanding queries.
When you are finished with a page, to save your work in the study database at the coordinating site, click one of 3 save buttons at the bottom of the data entry window: (to indicate that data entry is complete), (to indicate that some fields are incomplete or some queries remain to be answered), or (to indicate that you have not yet finished your work with the page and want to finish it before it is reviewed by the study coordinating site).
You can close a visit by double-clicking the open visit tab, and close a subject by double-clicking the subject icon. Only one subject binder can be open at a time; opening a new one automatically closes the open one (if any). When you are finished entering data for all subjects, logout by selecting > .
[1] Your administrator may have enabled local caching of study setup information (but never data) for one or more studies that you have permission to access. This will shorten start times for repeated uses of the same study. There is nothing that you need to do to enjoy this benefit.
You can clear all locally cached study setup information by selecting > . This is recommended, for example, when you stop working with a specific study.
[2] Please directly contact the sponsor's DFdiscover administrator for assistance in resetting your password, if
you do not have a current email address registered on the sponsor's server, or
the sponsor has not enabled resetting of passwords from the login dialog on that server.