Table of Contents
When the DFdiscover administrator created your account, they defined a user profile for you. That profile includes your name, your mailing address, your contact information and your password.
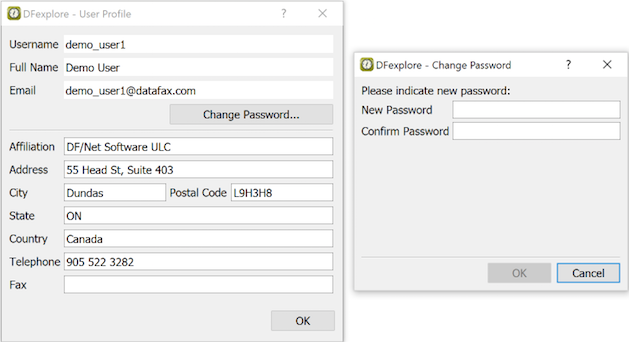
You can examine your current user profile by choosing > .

Values below the horizontal rule can be edited. It is not possible to change your Username, Full Name, or Email [8]. Edited values are saved when clicking .
You can change your password at any time by clicking . The dialog requires you to enter a new password and then re-type it to confirm the changed password.
DFexplore saves several attributes of your current session so that those attributes can be automatically applied when you login again. Session settings are unique to a specific username, DFdiscover server and study. Further they are stored on the local computer. This combined flexibility allows you to have different settings for different studies, different servers and different local computers.
The session attributes that are saved include:
Window layout, window size and dialog positions
Preferences
Proxy configuration settings
The appearance and behavior of many features and dialogs within DFexplore can be customized with application preferences. Select > to access these preferences.
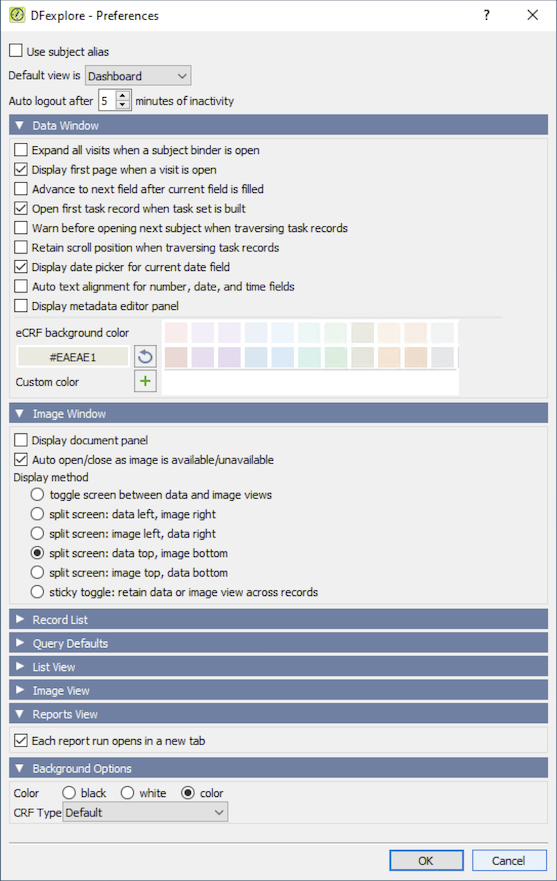
Preferences are user and study specific. Changes are applied immediately and are preserved across sessions. Some preferences may refer to parts of DFexplore for which you do not have permission, and will thus be irrelevant.
A description of each of the preference settings follows.
Use subject alias: By default, the numeric subject identifier is displayed. If subject alias is defined at the study setup level, enable this setting to use the subject alias in place of the numeric id.
Default view is: There are several views in DFexplore. From the drop-down list, choose the view that you would like to open by default each time you start DFexplore.
-
Auto logout after XX minutes of inactivity: An automatic timeout, after a period of inactivity, is required to meet regulatory requirements and protect subject confidentiality. Study administrators specify a default and maximum time period for each study. You can change this default to any value up to the maximum.
The data window is visible in Image View as well as Data View.
-
Expand all visits when a subject binder is open: If this preference is checked all visits are also opened to show the CRF pages they contain. Otherwise, subject binders open to show all study visits but all visits are closed.
-
Display first page when a visit is open: If this preference is checked, the data screen is automatically loaded with the first page of the visit when a new visit is opened.
-
Advance to next field after current field is filled: By default, the focus remains on each field until you press the Tab or Return to advance to the next data field. Enable this preference to automatically advance to the next data field when the response for the current field is filled.
-
Open first task record when task set is built: If this preference is selected the first data record is opened automatically when a new task is selected; otherwise, you must open the first task record manually by selecting the desired subject binder.
-
Warn before opening next subject when traversing task records: This preference is relevant if you have access to record selection tasks and is used to ensure that you are aware of transitions from records for one subject to records for a different subject.
-
Retain scroll position when traversing task records: This preference is relevant to users who have access to record selection tasks. It is useful when the task involves a review a fields near the middle or bottom of each page, as it prevents the normal scroll to the top of each new page.
-
Display date picker for current date field: For fields that require a date value, enabling this preference displays a calendar widget next to the field when it gets the focus. Date values can be entered by selecting them from the calendar widget or via normal data entry.
-
Auto text alignment for number, date and time fields: The font used for data entry may not exactly fill the space available in the data entry field. Checking this preference causes the data value to re-draw after entry so that it "fills" the data entry field. This is purely a visual preference and has no impact on the data values.
-
Display metadata editor panel: The metadata editor panel is an optional view of the Query, Reason, Metadata and Help windows. Enabling this preference displays the metadata editor panel and hides the separate Query, Reason and Metadata panels, expanding the subject binder list.
-
eCRF background color: For an eCRF data entry page, choose the color pair that is used to background fill the alternating rows of data entry fields. Commonly used color pairs are presented or you can specify a custom color.
The image window is visible in Image View as well as Data View.
-
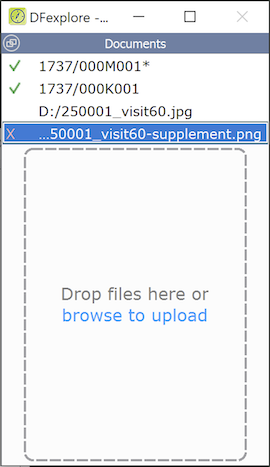
Display document panel: The document panel is a convenience interface, expediting the action when many documents require uploading. Enabling this preference displays the document panel as part of the image window. The document panel can also be detached from the image window and positioned independently.
The document panel lists each previously attached document by name and with a green checkmark. The document panel also includes a drag-drop area where documents from the local computer can be attached. Such documents that have been attached and not yet saved are shown with an empty square. Before saving, such documents can also be deleted by highlighting the row and clicking the red 'X'. If there are enough documents listed that the drag-drop area is not visible, new documents can be dropped on any part of the panel.
-
Auto open/close as image is available/unavailable: If checked, images/documents are automatically displayed when a page having such images is selected. When this preference is selected the presentation of the data and image window is further refined by the Display method choice:
-
toggle screen between data and image views: Switching between data and image views is performed using the blue image button in the bottom-right corner of the screen, but the data view will always appear on switching to a new page in the subject binder.
-
split screen: data left, image right: If an image is attached to the current data record, split the screen horizontally and display the data window to the left and the image window to the right.
-
split screen: image left, data right: If an image is attached to the current data record, split the screen horizontally and display the image window to the left and the data window to the right.
-
split screen: data top, image bottom: If an image is attached to the current data record, split the screen vertically and display the data window on the top and the image window on the bottom.
-
split screen: image top, data bottom If an image is attached to the current data record, split the screen vertically and display the image window on the top and the data window on the bottom.
-
sticky toggle: retain data or image view across records: Switching between data and image views is performed using the blue image button in the bottom-right corner of the screen, and the last setting remains in effect when switching to a new page in the subject binder.
-
The Record List appears to the left of the main window. It's primary purpose is to aid navigation of sites, subjects, visits and plates.
-
Display visit as number:label, number, label: Each subject visit has both a number and a descriptive label. This preference determines how a visit is identified when a subject binder is opened.
-
Display plate as number:label, number, label: Each plate has both a number and a descriptive label. This preference determines how the pages within subject visits are identified when a visit is opened.
-
Display site as number:label, number, label: Each site has both a number and a descriptive label. This preference determines how sites appear in the record list.
Record navigation: This preference determines whether the contents of the list wille be displayed as nested sites, subjects, visits, and plates, or as a linear list.
-
Use external or internal: This preference is relevant to users who are allowed to create new queries and determines the default usage type in the query creation dialog. External queries are directed to clinical sites, while internal queries are not.
-
Type clarification or correction: This preference is relevant to users who are allowed to create new queries and determines the default response type in the query creation dialog. Clarification queries are used to request a reply to a question, while correction queries are used to request a correction to one or more data fields.
-
Display field name as description, name or alias, and optionally prepended with the field number: Specify column labels for the list view data table. These labels can display the field description, field name or field alias, and may optionally include the field's data entry tab order number.
-
Display coded field as code or label: For fields that have codes and labels, e.g. 1=male, 2=female, this preference determines whether the code or label is displayed.
-
Display date field as default, calendar, julian, and apply imputation rule: Dates may be shown exactly as entered into the study database (default), in calendar format (with 4 digit years), or as a julian number. In addition any imputation rules that have been specified for partial dates may be applied if the calendar or julian format is selected.
-
Fill cell with field color: Each cell in the data table can be presented with the same color used in Data View and Image View.
-
Expand text fields: If cells in the data table are too small to display the entire data field, enabling this preference expands the cell when it has the focus so that it can display all of its contents.
When a CRF page is re-submitted users perform duplicate resolution by loading the existing data record, comparing it with the new image, and correcting any data fields that need to be updated. During this process users can select the image count button at the bottom of the screen to review the previous and new CRF images. Alternatively either or both of the following preferences can be used to display the image review dialog automatically:
-
When the existing record is loaded: Check this option if you want to compare the old and new CRF images before reviewing and correcting any data fields.
-
When the revised record is saved: Check this option if you want to delay image comparison until after reviewing, correcting and saving the data record.
-
Each report run opens in a new tab: Check this option to have the output from each report run, or explain, appear in a new tab. If this option is not checked, the output from each report run, or explain, appears in the same tab, overwriting any previous output.
-
Color black, white or color: Are data fields displayed on a black, white or color background? Color is useful if color CRFs have been imported in DFsetup to create the data screen backgrounds.
-
CRF Type: Different versions of some or all of the CRF pages can be imported during study setup. This preference allows you to select the version of the CRFs to be used for both the data entry screens and when printing CRFs or creating PDFs.