Table of Contents
User permissions to access studies, perform data entry, run reports, etc. are specified by defining study roles. Only DFdiscover and study administrators can create study roles and assign them to users (see DFadmin - Users). This chapter describes how study roles are created and the full array of specific permissions they encompass.
Select the Roles tab.
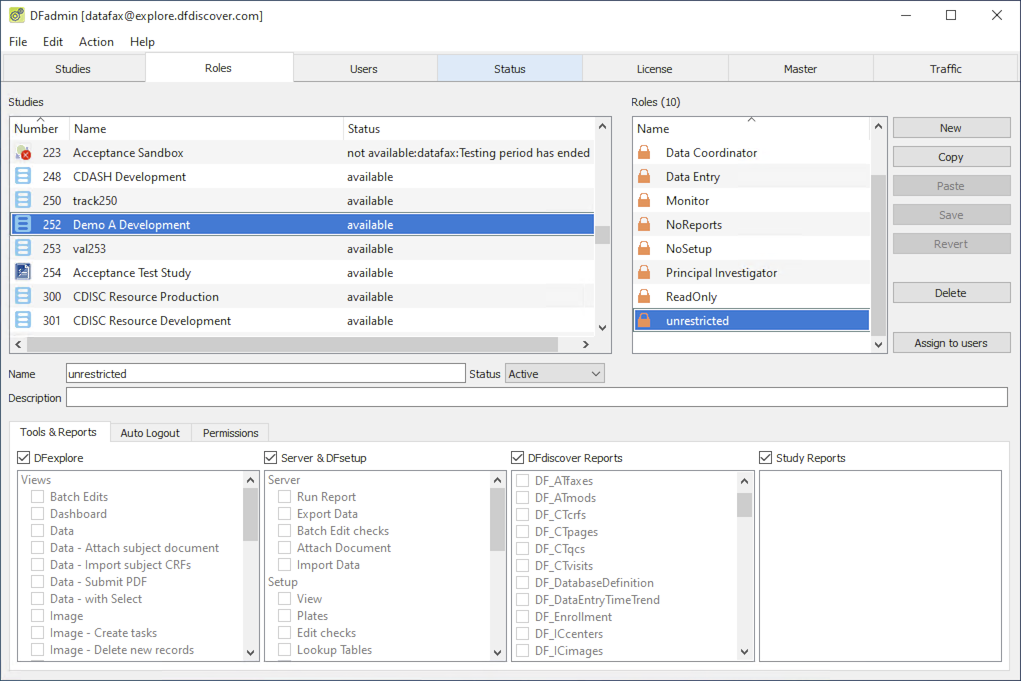
Roles belong to studies. Selecting a study from the Studies list reveals the current roles for that study in the Roles list. In this example 8 roles for study number 252 are listed. Role names are case-sensitive and must be unique within a study.
While roles must be defined separately for each study they can be easily copied and pasted from one study to another. Any changes made to role specifications apply only to the study within which the changes are made. Thus, it is possible for 2 roles to have the same name but different permissions in different studies.
The drop-down is used to switch any role between active and inactive states at any time, without losing the role definition. Users who are granted many roles within a study have permissions associated with their active roles, and if all roles have been made inactive, they are not able to use the study at all.
Role Buttons
New | Add a new role to the selected study. |
Copy | Copy the selected role into memory. |
Paste | Paste the most recently copied role to the current study. |
Save | Save a new or modified role in the current study. |
Revert | Undo all modifications to the current role. |
Delete | Delete the selected role from the current study. Deleting a role also removes the role from each user's role assignment list. If a role is deleted and then redefined it will be necessary to reassign it to all users who need it. |
Assign to users | Grant users access to a role. |
![[Note]](../../imagedata/note.png) | When do role changes take effect? |
|---|---|
|
Roles can be added, modified and switched between active and inactive at any time, including while users are logged in and working in the study. A user's permission for all studies is evaluated on login to DFexplore and thus the user's DFexplore instance must be restarted for any changes to take effect. |
To add a new role to a study, select the study and click . Study status must be available before roles can be added, edited or deleted.
Enter a unique role name and click . Each role name in a study must be unique (case sensitive).
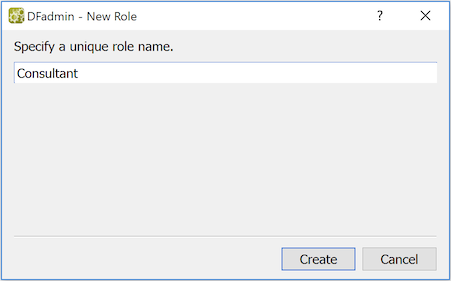
The new role name is added to the study roles list, but the role has no permissions and has not been assigned to any users.
Another way to add a new role is to copy and paste one from the same or another study.
Select a role and click to copy it to the clipboard. Paste it any number of times into the same or different studies by selecting the study and clicking . Each time a role is pasted, you are prompted to specify a unique role name. If a role with the same name already exists you are required to enter a new, unique name for the role being pasted.
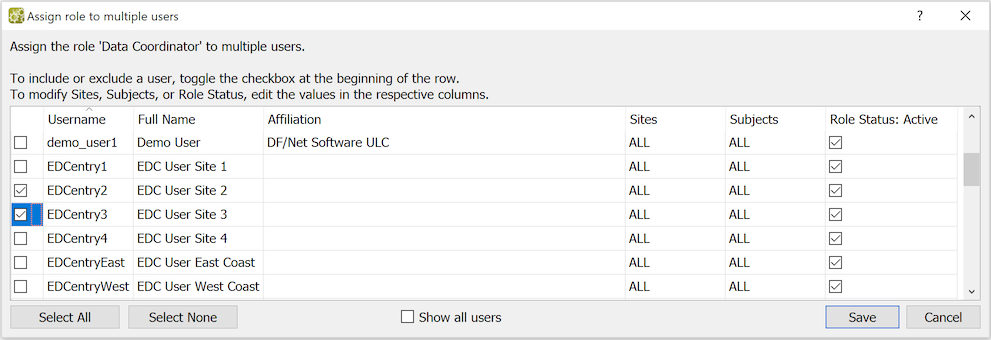
If any users have been assigned the copied role the following dialog will appear when it is pasted.
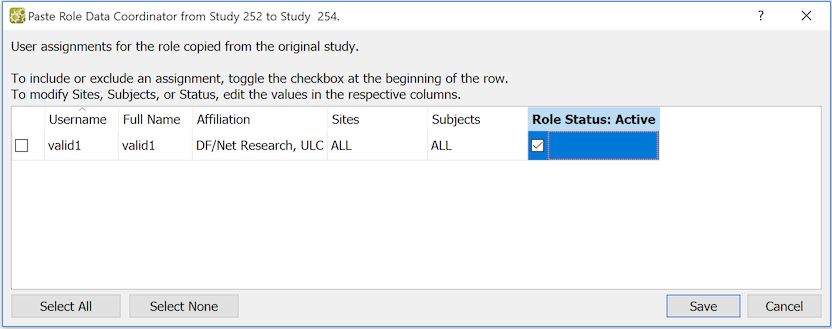
The dialog lists all users who have the copied role, and is used to apply these same role assignments, or modifications of them, when saving the new role. The checkbox in the first column beside each user must be checked to assign the pasted role to the user. By default, this checkbox is off for all users. and can be used to check and uncheck this box for all users. It is also possible to edit the Sites, Subjects and Role Status specifications for each user before saving the role and user role assignments.
Click to add the role to the study along with all of the selected user role assignments. Click to cancel both the user role assignments and the addition of the role to the study.
If any of the users could not be assigned the role, due to overlapping role permissions or because the user was locked by another administrator, the role and user role assignments will be saved with the exception of rejected user role assignments (if any).
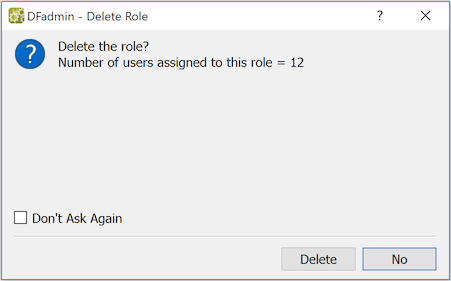
A role can be deleted at any time by selecting . When a role is deleted, the confirmation dialog displays the number of users currently assigned the role.
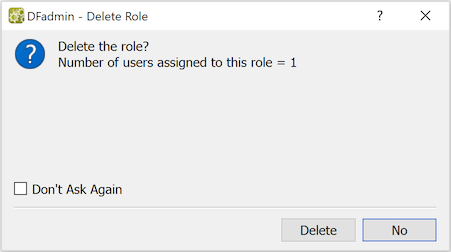
A role can be deleted while users with that role are working in DFexplore. They will not be affected until the next time they login.
Deleting a role deletes both the role definition and user assignments. If a role is deleted and then re-defined it will be necessary to reassign it to all users who need it.
If you need to temporarily disable a role change the role status to inactive rather than deleting it.
This section of the Roles tab is used to specify permissions for DFexplore, DFsetup, some study server operations, standard DFdiscover reports and custom study reports. If the box at the top of each of these 4 sections is checked permission is granted to all items in that section. When the same box is unchecked permission is granted by checking each item individually.
| Note |
|---|---|
|
Using a right mouse click or the keyboard accelerators Ctrl+A or Ctrl+Shift+A, all items in the current section can be checked or unchecked simultaneously. |
The meaning of the individual items is described below.
The DFexplore View menu is the gateway to the main functional modules that make up this application. Some users may only need access to a few of these modules. The following permissions grant access to each DFexplore view and to specific features within each view.
Batch Edits | Create or retrieve, run and review output from batch edit checks |
Dashboard | Enable the DFexplore dashboard |
Data | Perform data management operations using tasks and subject binders |
Data - Attach subject document | Add a document to associate with a particular subject data record |
Data - Import subject CRFs | Allow user to import a PDF file of scanned CRF images |
Data - Submit PDF | Allow user to make a secure transmission of scanned CRFs and source documents to the DFdiscover server, as an alternative to faxing or emailing |
Data - with Select | Allow access to the following options under in Data View:
|
Image | Enter data from CRFs received by fax, email or DFsend |
Image - Create tasks | Allow user to create new data entry tasks within Image View for specified users and study roles |
Image - Delete new records | Allow user to delete records in Image View that have not yet been saved to the study database |
Image - Raw data entry | Allow user to enter a specified number of new records for specified visits or plates using Image View, but without images |
List | Spreadsheet viewer, data exports, DFsas job exports |
List - Create views | Create and save record and field selection criteria in named views |
List - Import Data | Import data from external files |
Queries | Review data queries |
Reasons | Review reasons added to explain data values |
Reports | Run DFdiscover and custom study reports |
Reports - Create lists | Save a list of reports and report options for subsequent execution |
Schedule | Review the current site/subject visit schedule and scheduling requirements |
Status | Review current status and workflow level of all records in the study database |
| Data - with Select Permission |
|---|---|
|
In an EDC study this permission should be granted to data management staff only. Clinical sites should not have this permission. In addition to restricting access to the Select menu permissions described above, users without this permission also have the following restrictions:
|
Permissions to print and save CRFs, data and report output are under the following permission controls:
Blank CRFs | Print and save blank CRFs in Data view |
Completed CRFs | Print and save CRFs containing data values in Data view |
Data | Print and save data and metadata records in List, Queries and Reasons views. Print and save database statistics in Status View. |
DFsas jobs | Create, modify and export DFsas jobs in List View |
Images | Print and save images in Data view, Image View and List View |
Reports | Print and save reports in Reports View |
Developer | Reload edit checks and lookup tables, and trace edit check execution |
May disable edit checks | Permission to turn off edit check execution while reviewing records and performing data entry |
Show query status detail | Display internal notes and complete status labels in: Queries View, the Query window within Data view, and in the Queries & Reasons review and approval dialogs. |
Run Report | permission to run DFreport |
Export Data | Permission to run DFexport.rpc and/or DFexport |
Batch Edit checks | Permission to run DFbatch |
Attach Document | Permission to run DFattach |
Import Data | Permission to run |
Permission to use DFsetup to view study setup specifications or be able to create and modify them is granted as follows:
View | Read-only permission for all study setup files |
Plates | Modify Plates, Fields, Styles and CRFs |
Edit checks | Modify Edit checks |
Lookup Tables | Modify Lookup tables |
Sites | Modify clinical sites database |
Missing Map | Modify Missing value codes and labels |
Sort Map | Modify Query sort order for Query Reports |
Visit Map | Modify subject follow-up schedule |
Conditional Terminations | Modify Conditional termination of subject follow-up |
Conditional Cycles | Modify Conditional visit cycles |
Conditional Visits | Modify Conditional visits |
Conditional Plates | Modify Conditional plates |
Query Titles | Modify Query Report titles |
Query Covers | Modify Query Report covers |
Query Messages | Modify Query Report messages |
CRF Type Map | Modify mapping of CRF to categorical type |
CRF Background Map | Modify sharing of CRF background across visit definitions |
Query Category Map | Modify Query category value codes and labels |
Study Logo | Not currently used |
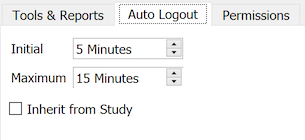
After a specified period of inactivity, DFexplore and DFsetup automatically exit, logging out the current user.
Different specifications can be entered for each role, or they can be inherited from the study level specification, entered in the DFadmin Studies dialog. Initial is the initial setting users have on first login, after which the user may use > to change it to any value between 1 minute and the specified 'Maximum'. Maximum can be any value from 1 to 1440 minutes (24 hrs).
When users change their auto logout setting it is retained for the next login session
unless it is reset using edit check function dfpref, which is
typically used in DFopen_study or DFopen_patient_binder.
If Maximum is reduced at some point during the study,
any retained values that are greater than the new maximum
will be reduced to the new maximum when the user logs in.
For each role, permission to view, create, modify and delete data and metadata (queries and reasons) must be specified by entering one or more rows in the permissions table. Multiple rows will be needed if permissions differ by visits and/or plates. It is illegal to include a visit/plate combination in more than one row; i.e. conflicting permissions for the same record cannot be defined.
When working in the permissions table, the tab and arrow keys may be used to select a cell for editing, and the space bar is used to toggle through the options associated with each check box. Keyboard accelerators (Ctrl+A or Ctrl+Shift+A) are used to toggle all check boxes in the row (on or off).
Example 7.1. Database Permissions
The following example shows typical permissions for clinical sites.

Status | Use the check box at the beginning of each row to activate or deactivate the database permissions defined in the row. When the box is checked the permissions are active, i.e. included in the role definition and applied to users with that role. |
Get Visits | The entry in this cell determines the visits/assessments to which the permissions apply. One or more visits in the range 0 to 65535 may be specified, like this: 0,2,5-10,101. ALL or *(asterisk) may be entered to represent all visit/assessment numbers. |
Get Plates | The entry in this cell determines the plates to which the permissions apply. One or more plates in the range 1 to 501 may be specified, like this: 1-10,21-29,55,68. ALL or *(asterisk) may be entered to represent all possible plate numbers. |
Get Levels | The 'Get Levels determine which data records a user can see in DFexplore. Data records at other levels will be hidden to users with this role. One or more levels in the range 0 to 7 may be specified, like this: 0-3,5,6. ALL or *(asterisk) may be entered to represent all possible levels, and -(dash) represents no levels. If a user has permission to see a data record they automatically have permission to see all of the queries and reasons attached to that record regardless of the levels of the queries and reasons. In DFexplore new blank pages and new pending records have workflow level 0. Thus, without level 0, a DFexplore user would not be able to see blank pages or new pending records, which means they would not be able to enter new data records or complete new pending data records. Typically, only those individuals responsible for original data entry should have access to level 0 records. |
Show Hidden Fields | Fields defined as hidden in DFsetup can be made available in specified roles. The options include all or none. Hidden fields can be made available on some plates but not on others by defining multiple rows, with the desired visit/plate combinations. |
Show Internal Queries | Internal queries are typically not made available to the clinical sites. However, it may be desirable to reveal internal queries after they have been resolved, thus the following options are available: all, resolved and none. If no permission to view internal queries exists, but the role includes full permissions to create and modify queries, internal queries will always be visible to the user working with that role. If no permission to view internal queries exists, and the role includes partial (e.g. edit check only) permissions to create and modify queries, internal queries can be created by an edit check but do not become visible to a user working with that role. To make internal queries available on some plates but not on others, multiple rows can be defined with the desired visit/plate combinations. |
Modify Levels |
The 'Modify' levels determine which data records can be modified in DFexplore. Data records at other levels can be viewed but not changed (provided they are included in the user's 'Get' levels). One or more levels in the range 0 to 7 may be specified, like this: 0-3,5,6. ALL or *(asterisk) may be entered to represent all possible levels, and -(dash) represents no levels. In DFexplore level 0 is used for both new blank pages and new pending records. Thus, a user with Get permission for level 0 records, who does not have Modify permission for level 0, will be able to see blank and new pending records, but will not be able to change them. Permissions specified for queries and reasons only apply to data records the user is allowed to modify. The level of the query or reason itself is irrelevant. If a data record can be changed, query and reason permissions take effect for all queries and reasons on that data record, regardless of the metadata record levels. And if a data record cannot be changed neither can the metadata on that record, even for queries and reasons that are at modify levels. This dependence on the level of the data record also applies to the auto-resolution of missing value and illegal value queries, as described under Query permissions below. |
Write Levels | The 'Write' levels determine the workflow levels at which data, queries and reasons may be saved in the study database. One or more levels in the range 0 to 7 may be specified, like this: 0-3,5,6. ALL or *(asterisk) may be entered to represent all possible levels, and -(dash) represents no levels. Write levels are applied separately within each row of the role definition; and can thus be different for different visit/plate combinations. When a data record is saved in Validate or DDE mode the data and all metadata records (both old and new) are written at the user's current working level, whether the records have been modified or not. When working in Modify mode only modified records are saved at the user's working level; unmodified records remain at their current level. As a result, the data and its associated queries and reasons can move to different levels. When working in Edit mode the level remains unchanged for data records, whether they are modified or not, and also remains unchanged for metadata records that are not modified, but new and modified queries and reasons are saved with the level of the data record. Users at the clinical sites should typically have Write levels 0-1. This allows them to enter new records with status pending (level 0) and ensures that all saves with status final or incomplete are moved to level 1. Alternatively, clinical sites can be restricted to Write level 1 only to prevent them from creating new pending records; forcing all records to be saved at level 1 with status Final or Incomplete. A user restricted to write level 0 would be able to create and modify new pending records, but cannot raise them to status incomplete or final. This might be used if an investigator needs to review and approve data entry performed by others before it is elevated to Incomplete or Final status. |
Data | Permission to (C)reate, (M)odify, and (D)elete data records, and to mark records (M)issed are specified separately by checking the box corresponding to each of these functions. If none of these boxes is checked the role will allow DFexplore users to retrieve the data records specified under the Get specifications, but will not allow them to make any changes to these records.
The Modify check box has a middle state,
denoted by a dash or shading (depending on platform).
This signifies that the user is allowed to change a record's
status and level but not modify any of the data fields.
This feature is useful for site monitors who need to perform source verification,
and perhaps add queries, but not change data values.
Typically, such users will use predefined tasks which will retrieve the records
that need to be reviewed, and move them to a designated level when they click a
save button to indicate that the review was completed.
This mode allows data fields to be modified by edit checks that might be used
within the task to update hidden fields on each plate that is reviewed with the
user, date and time of the review, or other information obtained from
the reviewer
using edit check functions Checking the (P)assword required box indicates that the user must enter their password to save records and attach documents (using the > action) with the visit and plate numbers defined on that row. This applies to all record transactions, whether performed in Data View or Fax View, and whether creating a new record, saving a modified record, marking a record or assessment missed, changing image status in the Review Images dialog, or deleting an image or data record. If a password is required, on performing one of the above actions, the user is presented with a dialog in which to enter their password, and the operation is completed only if the correct password is entered. For plates with an eSignature module where the record is eligible for signing, saving the record will prompt the user for both username and password on the first signing, then just password on subsequent signings in a given DFexplore session. Once the credentials are accepted, the eSignature fields are automatically populated. Refer to Study Setup User Guide, eSignature Module and 21 CFR Part 11 Compliance for further details. For the following operations users are always required to enter their password, regardless of role specifications:
If the credentials are not accepted, the user is prompted to re-enter their credentials. If they fail to do so in the configured number of attempts, they are automatically logged out and a notification email is sent to the DFdiscover administrator.
It is also possible to require entry of the user's password in an edit check
using function |
Queries | Query permissions are granted by checking the box associated with (C)reate, (M)odify, (D)elete, (A)pprove and (R)eply. Each of these permissions has three levels: not allowed (unchecked), allowed (checked), and allowed only when performed by an edit check (shaded or dashed). DFexplore includes a number of rules for automatically changing query status. These rules and the permissions required to enable them are described below.
When these conditions are met the following rules are applied in order until a rule is met. For Illegal value queries:
For missing value queries:
Typically roles assigned to DFexplore users at the clinical sites should allow them to: (R)eply to queries (checked), (C)reate, (M)odify and (D)elete queries only when this is performed by an edit check (shaded or dashed), and not allow them to (A)pprove replies to queries (unchecked); while roles assigned to central data management staff should allow them to: (C)reate, (M)odify, (D)elete and (A)pprove queries (checked), but not (R)eply to queries (unchecked). |
Reasons | Reason permissions are granted by checking the box associated with (C)reate, (M)odify, (D)elete, and (A)pprove. Each of these permissions has three levels: not allowed (unchecked), allowed (checked), and allowed only when performed by an edit check (shaded or dashed). As for queries, reason permissions only take effect on data records the user can modify, and the level of the reason record itself is ignored. Typically roles assigned to DFexplore users at the clinical site should allow them to: (C)reate and (M)odify reasons (checked), but not allow them to (A)pprove reasons (unchecked) unless there are also edit checks that create reasons for them (shaded or dashed); while roles assigned to central data management staff should allow them to: (A)pprove reasons (checked), but perhaps not (C)reate or (M)odify them, except when this is done by an edit check (shaded or dashed).
If a user has permission to approve reasons,
any reasons they create or modify will be automatically approved, whether created
manually or by function
If users do not have permission to approve reasons any reasons they create or modify
will be saved with the pending status, whether created
manually or by function
Users with shaded or dashed permission cannot approve reasons themselves,
but approved reasons can be created by edit checks. For these users
reasons created/modified by Automatic "Set by Edit check" reasons, which are created when an edit check changes a data field, are automatically approved for all user regardless of reason approval permission, but these reasons can be over-ridden within the edit check using the dfaddreason function to create a custom reason with a specified status. |
| Effect of Get Restrictions on Edit checks |
|---|---|
|
Restrictions on records the user can Get (i.e. see), specified by Visit, Plate and Level, have implications for edit checks in DFexplore. A user must be able to at least view a data record before edit checks can see it. Any reference to a field the user does not have permission to view returns missing in an edit check. This restriction does not apply to DFbatch. |
| Invalid database permissions |
|---|---|
|
A row that is highlighted in red indicates:
|
To add a new database permission:
Select the first empty row in the permissions table.
Enter the visit/plate combination to which the permissions apply.
Enter the remaining permission specifications. Press Enter or Tab to check the validity of the specifications.
If none of the values appear in red, the row will be accepted as valid, the delete icon (
 )
will appear in the last column, and a new empty
row will be added to the permissions table.
)
will appear in the last column, and a new empty
row will be added to the permissions table.
When all of the rows needed to define the database permissions for the role have been completed, select > to save the permissions. Any changes made to the permissions are not saved until they are saved explicitly in this way.
To delete a specific database permission specification (table row),
click the corresponding delete icon
( ).
A confirmation dialog is displayed,
warning you of the number of users who are affected by this modification
to the role definition.
Click to confirm and proceed with the deletion; otherwise,
click to cancel the deletion.
Permissions can be changed by clicking and overwriting the value or changing the check box state (checked, shaded/dashed or unchecked), followed by pressing Enter or Tab to verify that the value is valid.
Rows highlighted in red, indicate errors in role definition. Role errors can occur because an individual value specification is invalid, or because a visit/plate combination overlaps with the combination specified in another row. Invalid specifications cannot be saved. Permissions containing both errors and some new or modified entries that are valid can be saved, but rows containing errors are dropped if they were newly defined, and are returned to their previous valid values if the error was introduced by a modification.
A role can be assigned to any or all users by selecting the role and clicking . A confirmation dialog is displayed listing all users currently using this study, their full name, affiliation and user settings. You may modify sites, subjects or role status from this dialog.
If you want to see a list of all users, mark Show all users.
Select the users to receive this role assignment (or select all using ) and click .
Study roles, permissions, role assignments to users, and user contact information
can be imported from a text file.
Import will overwrite any matching specifications that already exist.
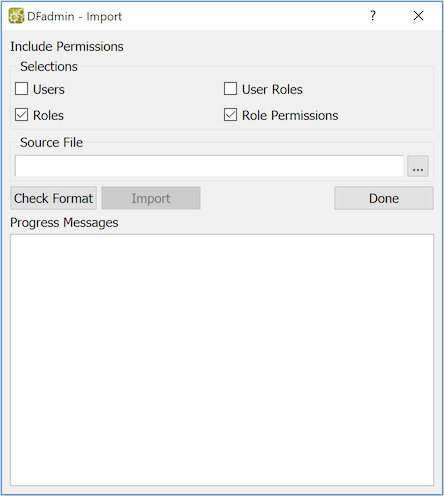
The import dialog includes options for selecting the
type of records to be imported (i.e.
Users, User Roles, Roles and Role Permissions) from the import file
as illustrated in Example 7.2, “Import Roles”.
The import file must be formatted as described in
Table 14.20, “DFuserdb.log”, excluding the Record Time Stamp and Modifier fields.
Importing Users, Roles and Permissions
Select >
Specify the types of data to import. This is specified by checking or unchecking the items in the Selections section of the dialog.
-
Specify the Source File name or pick a file by clicking .
-
Click . Any invalid entries are displayed. is enabled only if there are no invalid records.
-
Click . Progress and errors messages (such as overlapping permissions) are displayed while importing.
-
Click to dismiss the dialog.
Study roles, permissions, role assignments to users, and user contact information
can be exported to a text file.
Export can overwrite or append its output to the specified file.
The output file format is described in Table 14.20, “DFuserdb.log”.
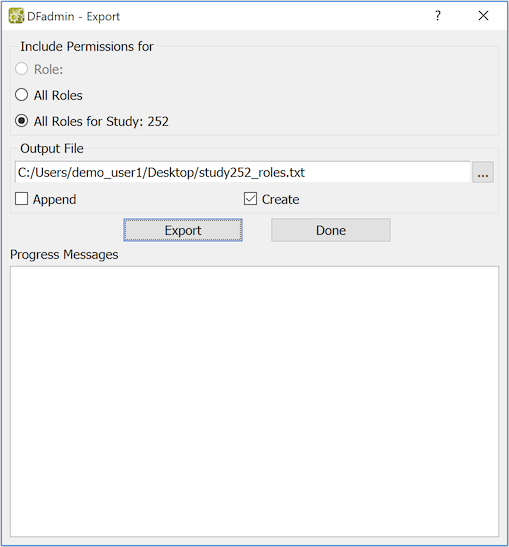
Exporting Users, Roles and Permissions
Select the study, user or role to be exported (if export is to be limited to a single user, study or role).
Select > .
Select the users, studies or roles to be exported (all or currently selected study, user or role).
Specify an Output File name or pick the file using the file selection button.
Select Append to write the exported data to the end of file, or Create to overwrite the file with the exported data.
Click . Progress and errors messages are displayed while exporting.
Click to close the Export dialog.