Table of Contents
This chapter covers login, generic features and provides an introduction to the main window used to display CRF plates and define data fields.
DFsetup is available for Windows 10, macOS 10.14 (Mojave) or later, and Linux.
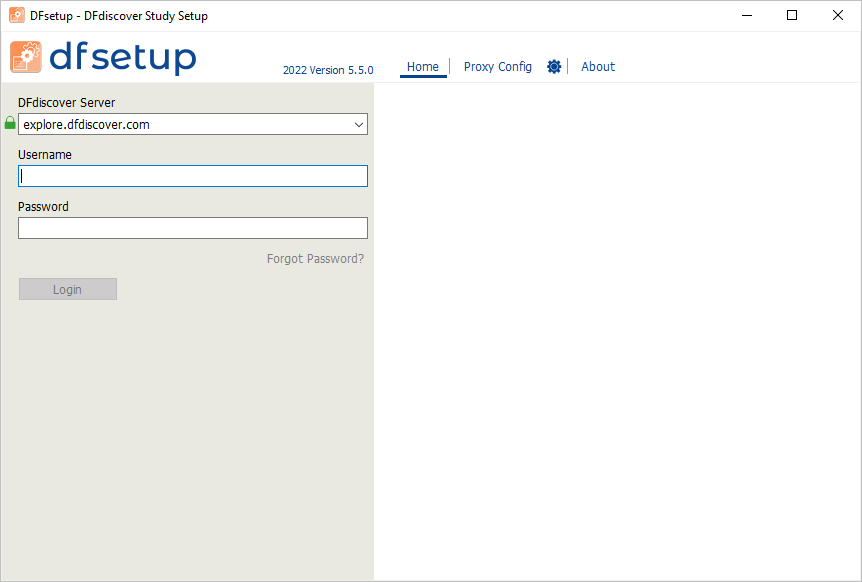
Starting DFsetup displays the login screen. Enter the value of the DFdiscover Server provided by the study coordinating site. If the system administrator has defined a customized login screen, the contents of the right-side panel refresh to show this screen. A green lock icon also appears next to the DFdiscover Server field. The icon is confirmation that a secure connection with the server has been established. Optionally, click the icon and review the details of the connection.
Optional: In some configurations, your local IT infrastructure may require a proxy server for applications that connect to the internet. Your local IT department will supply the necessary information. To configure local proxy server settings, click Proxy Config at the top of the login screen. Complete the required fields in the sub-dialog. Click Home to return.
Your Username and Password will be the same for all DFdiscover programs (DFsetup, DFexplore and DFsend) that you have permission to use on the specified server, but may differ across servers. Enter them in the matching fields and click .
The administrator of the DFdiscover Server may have enabled two-factor authentication for your login account. If it is enabled, after successful authentication the login screen updates to request the security code. Independently you will receive an email with the 6-digit security code. The email is sent to the email address on file for the account. Enter the 6-digit security code in the field labeled Please enter the security code that we just sent you. After entering the code, click again to complete login.
DFdiscover includes password aging, an FDA regulatory requirement. Password expiry may be any time between 1-9999 days and is set by the DFdiscover Administrator in DFadmin. After the expiry period has elapsed you will be prompted to reset your password the next time you login. To reset your password, enter the server name and your login name into the login dialog, then click and select . You are asked for your email address, which must match the email address for you on this server. A single-use password will be emailed to the address, which can then be used to complete the password reset operation.[1]
In the login dialog, can be used to access version information about DFsetup. After successful login, the DFsetup user guide may be accessed from Topics in the same login dialog or > from the application menu.
If login is successful you will see the study selection dialog.

Each study database is identified by a number and a name.
Only studies for which you have been granted some level of access will be listed.
Select a study and click to create, edit or review the study setup information.
This dialog will timeout if a study is not selected within 60 seconds.
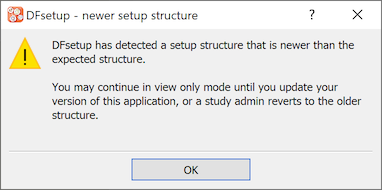
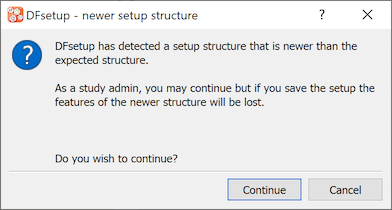
The properties of a study setup adhere to a specification that lists all of them, what attributes and values they have, and how they are related. This specification is internally identified with a setup version that is defined by DF/Net Research, Inc.. Users will likely never know this exists. The exception to this occurs when DF/Net Research, Inc. changes the specification. This may occur from time to time when new properties are added to a study definition (a new data type for example). Note that these are not properties that a user would define as part of study setup and during their daily use. Instead these are properties that apply to every study definition at a structural level.
When such changes are necessary, they are always introduced in a non-destructive way so that new application versions and study definitions take advantage of them in a seamless way. It may however be difficult to achieve a seamless result when a new study definition is opened with an older version of the DFsetup application. For example, the new study definition may include a property that the older version application does not recognize. To ensure that new properties are not accidentally deleted, DFsetup detects when an older version of DFsetup is being used to read a new version of a study setup definition, and it presents one of two options:
For the standard user, changes are not permitted and the user is able to view the existing setup definition.
For the admin user, changes are permitted and the user is able to edit and save the existing setup definition. In this case the version of the setup definition is "downgraded" to the version that matches the older DFsetup application. Any changes that were made to include new properties will be lost when the setup definition is saved.
The preferable solution is for all users to stay up-to-date with their DFdiscover applications. When this is true, the version mismatch can never occur and the user will never see these dialogs.
If the study is available and you have permission to access any of the study setup components, the access mode dialog appears.

The modes are ordered, bottom-to-top, by increasing complexity and permission. View Only places no restrictions on access by others while Developer Access requires exclusive use.
The first 3 modes can be used by only one person at a time.
Some modes may be unavailable because they are not permitted or the mode is already in use.
To avoid blocking other users, select the least restrictive mode that is compatible with your objectives.
DFsetup provides 5 access modes. The modes, as listed in the dialog, are presented from most capable at the top to least capable at the bottom. A study role may not include permission to use all of the access modes. Select the lowest mode needed to accomplish the task at hand, to avoid blocking other users.
The following is a description of each mode that includes intended use, user permission requirements, and the restrictions it imposes on other study setup and database functions.
| Developer Access | |
| Use |
For a full description of how development - production study links are created and used refer to Link. |
| Permissions |
|
| Restrictions |
|
| Exclusive Access | |
| Use |
|
| Permissions |
|
| Restrictions |
|
| Normal Access | |
| Use |
|
| Permissions |
|
| Restrictions |
|
| Configuration Files | |
| Use |
|
| Permissions |
|
| Restrictions |
|
| View Only | |
| Use |
|
| Permissions |
|
| Restrictions |
|
DFsetup communicates with the DFdiscover server using HTTPS on port 443. This port must be open on any firewalls between the local computer and the study server.
This is industry-standard technology that encrypts the bi-directional communication using a 'certificate of trust' provided by the server. It is the same technology used by banks and the majority of secure, global web services.
You can visually confirm that the communication is secure. Select > and look for the green checkmark.

If your login was successful the main window will be displayed.

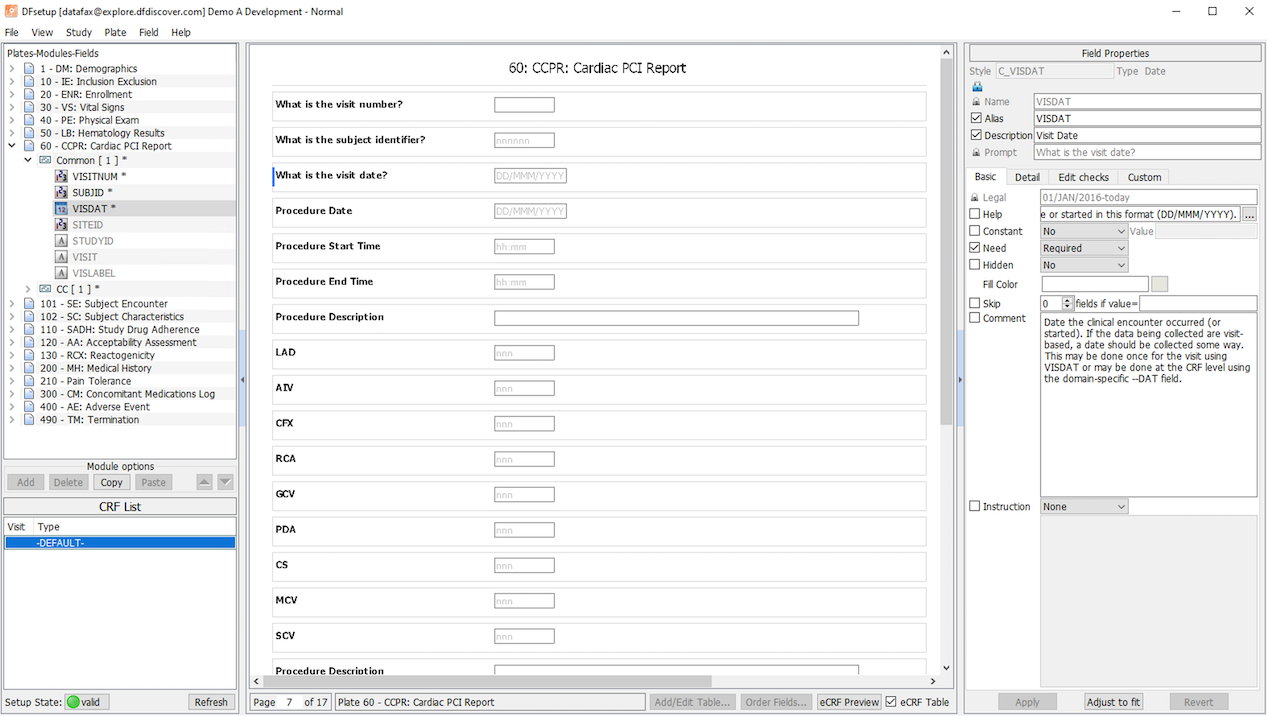
The main DFsetup window has 3 major components, which are from left to right:
a plate-module-field navigation window which lists the CRF plates that have been imported or added as eCRFs, each of which can be opened to show the list of modules and data fields defined on that plate,
the CRF image window which shows the CRF plates that have been imported or added as eCRFs and the modules and data fields that have been defined for data entry, and
the field properties window which shows the properties that have been specified for the current field (highlighted in the CRF image window). When a change is made and at the bottom of this window become active. Select to undo all changes made to the field since the last Apply, and select to save changes to your computer memory. Changes to field properties are not saved to the study server until you select > .
The main window title bar shows: the user, DFdiscover server and study names, and whether there are any unsaved changes to the study setup.
The main window footer always includes the current page number, plate label, the button, the button, a button used to switch between the , , and views, and a eCRF Table checkbox. Plate View with eCRF Table checked is the default view. When you switch to a new view, that view is remembered across plates and sessions.
On the left side is the Setup State button. This button displays a colored icon of yellow or red if setup problems are detected and green if setup is valid (no problems). If problems are present, a problem count will also be displayed to the right of the icon. Clicking on this button will open a window at the bottom of the screen listing each problem type and details. If no problems are present, the window will open but be empty. Clicking again will hide the window.
When problems are detected, the Setup State icon displays the status of the most critical problem in either yellow or red. The setup problem window displays an entry for each problem with its respective type (Warning or Error) and details. When both Errors and Warnings exist in setup, the Errors are always displayed first.
Problems are displayed in the Setup State window with their corresponding problem type, plate and, if applicable, field number. A brief description of the problem follows. Double-clicking any problem entry automatically takes the user to the problem plate. If the problem exists for a specific field, that field becomes highlighted/active on the current plate.
It is possible to resolve each problem while the problem window remains open. Each time a problem is resolved, the problem entry disappears from the list and the problem count drops. The Setup State window is automatically updated. It is not necessary to save setup in order to update the Setup State window/problem count.
It is possible to change the visibility of features in the main window via several keyboard shortcuts, in addition to using the and options. For each of these keys, the appearance is changed only while the key is pressed; the original appearance is restored as soon as the key is released.
H hides the data field widgets to show the underlying CRF image.
R changes the field widgets to show the 'need' property for all fields on the current page: solid = essential, stippled = required, and outlined = optional.
M hides all fields except those belonging to same module instance as current field.
I hides all modules except those that are instances of the same root module as current module.
C hides all module names from CRF view.
Selecting the option from the button at the bottom of the main window switches the center window to a preview of the current CRF plate as an eCRF data entry screen.
This preview shows a CRF without a background as it would appear in DFexplore and an approximation of how it would appear in DFweb and DFcollect. For CRFs with a background, this preview shows an approximation of how the CRF would appear in DFcollect (with all screens included on one page). With eCRF Table checked, any tables defined on the plate will be displayed. With eCRF Table unchecked, any tables defined will not be displayed, and the preview will show an approximation of how the eCRF appears in DFweb and DFcollect where tables are not supported.
This view is useful for reviewing and comparing the appearance of CRF plates across different DFdiscover data collection and management applications.
Click any field in the center window to put that data field in the Field Properties panel where changes can be made.
Selecting at the bottom of the main window toggles the center window between the CRF view (shown above) where the focus is on 1 data field at a time, and the Field List view (shown below) where the field properties of all data fields defined on the current plate can be reviewed.

This view is useful for reviewing and comparing data field properties.
Click any column name to sort the table on that column.
Right-click any column name and then select Show/Hide columns to select the field properties to be displayed.
The cells of the spreadsheet are view only. Clicking anywhere in a row puts that data field in the Field Properties panel where changes can be made.
Data fields are defined in the main window (Main Window - CRFs). This is fully described in Defining Data Fields. All of the other setup components: visit map, missing value codes, edit checks, etc., are defined using separate dialogs available from the menu, as described in View Menu.
This section lists all menu options available from the menubar at the top of the main window.
Preferences - DFsetup user preferences
Link - manage development-production study links
Print - print annotated CRFs, style, module and field properties
Save as PDF - save annotated CRFs, style, module and field properties as PDF files
Save - save all changes to the DFdiscover server
Export Setup - export study setup as Excel, JSON or XML file
Verify All - check setup specifications for obvious errors
Review Changes - show unsaved changes made to field specifications
New Study - start another DFsetup session
Close Study - close connection to the current study
Exit - quit DFsetup
Modules - module and field definitions
Plates - plate specifications
Styles - create and manage data styles
Edit checks - edit check editor
Lookup Tables - lookup table editor
Sites - specify clinical sites
Missing Value Codes - specify missing value codes
Query Category Map - design custom query categories
Sort Map - set query sort order for Query Reports
Lookup Tables Map - lookup table map editor
Visit Map - subject scheduling and CRF plate requirements
Page Map - plate/visit labels for Query Reports
CRF Type Map - create CRF types to categorize CRFs
CRF Background Map - specify which visits share the same background
Conditional Terminations - rules for ending subject follow-up
Conditional Cycles - specify cycle requirement rules
Conditional Visits - specify visit requirement rules
Conditional Plates - specify plate requirement rules
Query Titles - titles for Query Reports
Query Covers - cover sheets for Query Reports
Query Messages - messages for Query Report cover sheets
Global Settings - general study specifications
Import CRFs - import blank CRF plates from PDF/PS files
Import Definitions - import style and field definitions from other studies
Add eCRF Plate - add a new eCRF plate
Modify Plate Number - change plate number for current CRF page
Delete Plate - remove current plate definitions
[1] There is a timer in the Password Reset dialog, which closes the dialog after 60 seconds of inactivity for DFexplore, DFsend and DFsetup.