Release 5.5.1
Copyright © 2022 DF/Net Research, Inc.
All rights reserved. No part of this publication may be re-transmitted in any form or by any means, electronic, mechanical, photocopying, recording, or otherwise, without the prior written permission of DF/Net Research, Inc. Permission is granted for internal re-distribution of this publication by the license holder and their employees for internal use only, provided that the copyright notices and this permission notice appear in all copies.
The information in this document is furnished for informational use only and is subject to change without notice. DF/Net Research, Inc. assumes no responsibility or liability for any errors or inaccuracies in this document or for any omissions from it.
All products or services mentioned in this document are covered by the trademarks, service marks, or product names as designated by the companies who market those products.
Google Play and the Google Play logo are trademarks of Google LLC. Android is a trademark of Google LLC.
App Store is a trademark of Apple Inc.
Oct 03, 2022
Table of Contents
- Preface
- 1. Introduction
- 2. DFdiscover Study Files
- 3. Shell Level Programs
- 3.1. Introduction
- 3.2. User Credentials
- 3.3. Organization of Reference Pages
- 3.4. Alphabetical Listing
- DFaccess.rpc — Change access to a study database or , or query their current access status.
- DFattach — Attach one or more external documents to keys in a DFdiscover study
- DFaudittrace — Used by the DF_ATmods report to read study journal files. DF_ATmods produces an audit trail report showing database modifications for the specified study.
- DFbatch — Process one or more batch edit check files
- DFcompiler — Compile study-level edit check programs and output any warnings and/or errors encountered in the syntax.
- DFdisable.rpc — Disable a study database server or incoming fax daemon to make them unavailable to clients and incoming faxes
- DFenable.rpc — Enable a study database server or incoming fax daemon following a previous
- DFencryptpdf — Protect a PDF file by encrypting it with the specified password
- DFexport — Client-side, command-line interface for exporting data by plate, field or module; exporting change history; or exporting components of study definition
- DFexport.rpc — Export data records from one or multiple plates from a study data file
- DFfaxq — Display the members of the outgoing fax queue
- DFfaxrm — Remove faxes from the outgoing fax queue
- DFget — Get specified data fields from each record in an input file and write them to an output file
- DFgetparam.rpc — Retrieve and evaluate the value of the requested configuration parameter
- DFhostid — Display the unique DFdiscover host identifier of the system
- DFimageio — Request a study CRF image from the database
- DFimport.rpc — Import database records to a study database from an ASCII text file
- DFlistplates.rpc — List all plate numbers used in the study
- DFlogger — Re-route error messages from non-DFdiscover applications to
syslog, which in turn writes the messages to the system log files, as configured in/etc/syslog.conf. - DFpass — Locally manage user credentials for client-side command-line programs.
- DFpdf — Generate bookmarked PDF documents of CRF images
- DFpdfpkg — Generate multiple bookmarked PDF files for specified subject IDs or sites
- DFprint_filter — Format input file(s) for printing to a PostScript® capable printer, and print to a specified printer
- DFprintdb — Print case report forms merged with data records from the study database
- DFpsprint — Convert one or more input CRF images into PostScript®
- DFqcps — Convert a Query Report, previously generated by DF_QCreports, into a PDF file with barcoding, prior to sending the report to a study site
- DFreport — Client-side, command-line interface for executing reports
- DFsas — Prepare data set(s) and job file for processing by SAS®.
- DFsendfax — Fax or email a plain text, PDF, or TIFF file to one or more recipients
- DFsqlload — Create table definitions and import all data into a relational database
- DFstatus — Display database status information in plain text format
- DFtextps — Convert one or more input files into PDF
- DFuserdb — Perform maintenance operations on the user database
- DFversion — Display version information for all DFdiscover executables (programs), reports, and utilities
- DFwhich — Display version information for one or more DFdiscover programs, reports and/or utilities
- 4. Utility Programs
- 4.1. Introduction
- 4.2. Alphabetical Listing
- DFaddHylaClient — Create the symbolic links necessary for accessing HylaFAX on a DFdiscover server
- DFauditdb — Add or reload journal files to DFaudit.db sqlite database.
- DFcertReq — Request an SSL certificate signing for DFedcservice.
- DFclearIncoming — Clean out the fax receiving directory, processing all newly arrived faxes
- DFcmpSchema — Apply the data dictionary rules against the study database
- DFcmpSeq — Determine the appropriate values for each
.seqYYWWfile - DFisRunning — Determine if the DFdiscover master program is currently running on the licensed DFdiscover machine
- DFmigrate — Upgrade study setup and configuration files from an old DFdiscover version to the current version.
- DFras2png — Convert Sun raster files in the study pages directory into PNG files
- DFshowIdx — Show the per plate index file(s) for a specific study
- DFstudyDiag — Report (diagnose) the current status of a study database server
- DFstudyPerms — Report, and correct, the permissions on all required DFdiscover sub-directories and files for a study
- DFtiff2ras — Convert a TIFF file into individual PNG files
- DFuserPerms — Import and update users and passwords, and optionally import roles, role permissions, and user roles
- 5. Edit checks
- 5.1. Introduction
- 5.2. Language Features
- 5.3. Database Permissions
- 5.4. Language Structure
- 5.5. Variables
- 5.6. Missing/Blank Data
- 5.7. Arithmetic Operators
- 5.8. Conditional Execution
- 5.9. Built-in Functions and Statements
- 5.9.1. Edit check Function Compatibility Notes
- 5.9.2.
dfaccess - 5.9.3.
dfaccessinfo - 5.9.4.
dfalias2id - 5.9.5.
dfask - 5.9.6.
dfbatch - 5.9.7.
dfcapture - 5.9.8.
dfcenter - 5.9.9.
dfclosestudy - 5.9.10.
dfdate2str - 5.9.11.
dfday - 5.9.12.
dfdirection - 5.9.13.
dfentrypoint - 5.9.14.
dfexecute - 5.9.15.
dfgetfield - 5.9.16.
dfgetlevel/dflevel - 5.9.17.
dfgetseq - 5.9.18.
dfhelp - 5.9.19.
dfid2alias - 5.9.20.
dfillegal - 5.9.21.
dfimageinfo - 5.9.22.
dflegal - 5.9.23.
dflength - 5.9.24.
dflogout - 5.9.25.
dfmail - 5.9.26.
dfmatch - 5.9.27.
dfmessage/dfdisplay/dferror/dfwarning - 5.9.28.
dfmetastatus - 5.9.29.
dfmode - 5.9.30.
dfmoduleinfo - 5.9.31.
dfmonth - 5.9.32.
dfmoveto - 5.9.33.
dfneed - 5.9.34.
dfpageinfo - 5.9.35.
dfpassword - 5.9.36.
dfpasswdx - 5.9.37.
dfplateinfo - 5.9.38.
dfpref - 5.9.39.
dfprefinfo - 5.9.40.
dfprotocol - 5.9.41.
dfrole - 5.9.42.
dfsiteinfo - 5.9.43.
sqrt - 5.9.44.
dfstay - 5.9.45.
dfstr2date - 5.9.46.
dfstudyinfo - 5.9.47.
dfsubstr - 5.9.48.
dftask - 5.9.49.
dftime - 5.9.50.
dftoday - 5.9.51.
dftool - 5.9.52.
dftrigger - 5.9.53.
dfuserinfo - 5.9.54.
dfvarinfo - 5.9.55.
dfvarname - 5.9.56.
dfview - 5.9.57.
dfvisitinfo - 5.9.58.
dfwhoami - 5.9.59.
dfyear - 5.9.60.
int
- 5.10. Query operations
- 5.11. Reason operations
- 5.12. Lookup Tables
- 5.13. Looping
- 5.14. User-Defined Functions
- 5.15. Examples and Advice
- 5.16. Optimizing Edit checks
- 5.17. Creating generic edit checks
- 5.18. Debugging and Testing
- 5.19. Language Reference
- 6. Batch Edit checks
- 7. Writing Your Own Reports
- 8. DFsas: DFdiscover to SAS®
- 9. DFsqlload: DFdiscover to Relational Database Tables
- A. Copyrights - Acknowledgments
- A.1. External Software Copyrights
- A.1.1. DCMTK software package
- A.1.2. Jansson License
- A.1.3. Mimencode
- A.1.4. RSA Data Security, Inc., MD5 message-digest algorithm
- A.1.5. mpack/munpack
- A.1.6. TIFF
- A.1.7. PostgreSQL
- A.1.8. OpenSSL License
- A.1.9. Original SSLeay License
- A.1.10. gawk
- A.1.11. Ghostscript
- A.1.12. MariaDB and FreeTDS
- A.1.13. QtAV
- A.1.14. FFmpeg
- A.1.15. c3.js
- A.1.16. d3.js
Table of Contents
For software support, please contact the DFdiscover team:
via email,
<help@dfnetresearch.com>;visit our website, www.dfnetresearch.com.
A number of conventions have been used throughout this document.
Any freestanding sections of code are generally shown like this:
# this is example code
code = code + overhead;
If a line starts with # or %, this
character denotes the system prompt and is not typed by the user.
Text may also have several styles:
Emphasized words are shown as follows: emphasized words.
Filenames appear in the text like so:
dummy.c.Code, constants, and literals in the text appear like so:
main.Variable names appear in the text like so:
nBytes.Text on user interface labels or menus is shown as: Printer name, while buttons in user interfaces are shown as .
Menus and menu items are shown as: > .
Table of Contents
This guide is for programmers, and for those who aspire to be. It covers DFdiscover file formats and those tools that are executed at the shell level. As a result, some familiarity with the UNIX operating system and UNIX shell level programming is assumed.
If this is your first encounter with UNIX we strongly recommend that you look for a good UNIX programming book in your local bookstore. We would not hesitate to recommend The UNIX Programming Environment by Kernighan and Pike, and The Awk Programming Language by Aho, Kernighan and Weinberger. The former is an excellent introduction to writing UNIX shell scripts, while the latter describes awk, a simple C-like language which is ideal for manipulating data files. All of the tools described in these 2 books come as standard components of the UNIX operating system.
In the remaining chapters of this guide we will describe:
DFdiscover Study Files. A description of the location and format of all study files (including the configuration and data files) used in all DFdiscover studies
Shell Level Programs. Over a dozen shell level commands for doing such things as:
exporting data records from a study database
selecting individual data fields
reformatting exported data records
importing data records from other sources into a DFdiscover study database
sending and managing faxes
getting study configuration parameters
These programs can be used in shell scripts to create your own programs. When combined with standard UNIX commands (like awk, sed, grep, etc.) they provide an extremely powerful and flexible way of creating study report programs.
Utility Programs. Descriptions of several infrequently used, yet useful, utility programs that can simplify some DFdiscover management tasks.
Edit checks. A programming language for writing and executing edit checks that occur in real-time during data validation.
Batch Edit checks. An extension of the edit checks language that permits execution of edit checks in batch, non-interactive mode.
DFsas: DFdiscover to SAS®. An environment for generating SAS® job and data files from a DFdiscover study database and study schema.
DFsqlload: DFdiscover to Relational Database Tables. A program that creates relational database tables from a DFdiscover study database and study schema.
The following cribsheet is for DFdiscover programmers and summarizes all relevant DFdiscover database limits and formats. This cribsheet is to be used in conjunction with the information that follows in this chapter.
| Description | Limit | Comments |
|---|---|---|
| DFdiscover Study Number |
1-999
| The suggested range for study numbers is 1-249 as study numbers of 250-255 are reserved for DFdiscover test and validation studies (e.g. ATK = 254). With the appropriate software license, study numbers 256-999 are available for defining EDC studies. |
| Plate Number | 0-501, 510, 511 | Plates 501 and 511 are reserved by DFdiscover for Query Reports and can not be re-defined at the user level. Plate 0 references the new record queue. Plate 510 is reserved by DFdiscover for Reason records. |
| Visit/Sequence Number (barcoded) | 0-511 | |
| Visit/Sequence Number (first data field) |
0-65535
| Any data field representing the visit/sequence number must be defined in the database as field #6 using DFdiscover schema numbering. |
| Site Number |
0-21460
| This limit applies to the site number only. A subject identifier is concatenated to the site number to obtain the subject ID. |
| Subject ID Number |
0-281474976710655
| For subject IDs that are composed of site # + ID #, this limit applies to the concatenated value of the two. This field could contain 15 digits at maximum. |
| Any numeric value |
-2147483647-2147483647
| Any numeric field, except the subject ID field, can contain 10 digits at maximum, which include any leading sign and decimal point. This limit applies to the following DFdiscover field types, which have a base numeric value: numeric, visual analog scale (VAS), choice codes, check codes. |
| Query Use | 0 = none 1 = external 2 = internal | |
| Query Type | 0 = none 1 = Q&A (clarification) 2 = refax (correction) | |
| Query Category Code |
1=missing, 2=illegal, 3=inconsistent, 4=illegible, 5=fax noise, 6=other, 21=missing page, 22=overdue visit, 23=edit check missing page, 30-99=user-defined problem type
| |
| Query Status |
0=pending review, 1=new, 2=in unsent report, 3=resolved, NA, 4=resolved, irrelevant, 5=resolved, corrected, 6=in sent report
| |
| Query Detail Field | max 500 characters | |
| Query Note Field | max 500 characters | |
| Missed Data Log Explanation Field | max 500 characters | |
| Default Date Format | YY/MM/DD | |
| Validation Level (system) | 0-7 | Level 0 represents new, not yet entered, records |
| Validation Level (user) | 1-7 | A user cannot assign a validation level of 0 to a data record. |
| Maximum Data Record Length | 16384 ASCII (4096 UNICODE) characters | This is the maximum length that the system can accept and includes 55 characters of overheard maintained by the system. Therefore, the length of data record available for user-defined fields is 55 characters less. |
| Maximum DFsas Record Length | 2048 characters | DFsas is unable to process input files for SAS® greater than this size. |
Table of Contents
This chapter describes the files maintained under each DFdiscover study directory. It starts with a brief overview of the top-level directories and then describes the files kept under each directory in detail. A similar chapter, System Administrator Guide, DFdiscover System Files, describes the files located under a DFdiscover installation directory.
The following directories are part of a standard DFdiscover study definition.
bkgd. This directory holds CRF background images created by DFsetup. Three files are created for each study plate. These include the plate background used by DFsetup (plt###), the data entry screen used by DFexplore (DFbkgd###), and a background used when printing CRFs containing database values from DFprintdb or DFexplore (DFbkgd###.png).![[Note]](../../imagedata/note.png)
Note This directory must not be used to store any other files. Extraneous files will be deleted when CRF images are published from a development study to its production study, or when reverting a development study to the current state of its production study.
data. This directory holds the study data files, queries data file, and journal files. The following files are described in detail later in this chapter in The studydatadirectory:plt###.dat- per plate data files. the study data files are created from the data recorded on the study CRFsDFqc.dat- the Query database. the quality control data file contains all field level queries added to flag CRF problems and request data clarifications from investigatorsDFreason.dat- reason for change records. the reason for change data file contains all field level reasons for data changes clarifying, if required, why a field's data value was changedDFin.dat- the new records database. the new record queue contains all records that have been received and ICRed by the DFdiscover software but not yet validatedplt###.dat- missed records. missed records serve as placeholders in data files indicating that requested data records will never be availableplt###.ndx- per plate index files. per plate index files that speed database searching and hold record lock informationYYMM.jnl- monthly database journal files. the journal files record all database transactions and provide an audit trail of additions and modificationsDFaudit.dbsqlite audit trail. sqlite version of the journal files
dfsas. This directory contains any stored SAS® jobs that were created from DFexplore.dfschema. This directory contains any stored DFschema files which are used to track changes to the study setup. These are used by DFaudittrace to generate records for DF_ATmods.drf. This directory contains any .drf files (DFdiscover Retrieval Files) created by server-side tools, including reports and the program DFmkdrf.jnl. The common .drf files created by DFdiscover reports include:-
DupKeys.drf. Lists any duplicate primary keys found in the database by the last execution of DF_XXkeys. -
VDillegal.drf. Lists any illegal visit dates found in the database by the last execution of DF_XXkeys. -
VDincon.drf. Lists any inconsistent visit dates found in the database by the last execution of DF_XXkeys. -
DFunexpected.drf. Lists any unexpected data records found in the database by the last execution of DF_QCupdate.
-
ecbin. Any study specific scripts or programs that are run by edit check functiondfexecute()and any Plate Arrival Trigger scripts defined in the DFsetup Plates View, must be stored in the study levelecbindirectory. Executables can also be stored in the DFdiscover levelecbindirectory for use in all studies. The study levelecbindirectory has priority if the same program or script is stored in both locations.ecsrc. This directory contains the edit check files:DFeditsand any other edit check source files referenced in 'include' statements. Include files can also be stored in the DFdiscover levelecsrcdirectory. The study levelecsrcdirectory has priority if the same include file is stored in both locations.lib. All study configuration files, created through both the DFadmin and DFsetup tools, are located in this directory. The following files are described in detail later in this chapter in The studylibdirectory:DFccycle_map- conditional cycle map . Defines cycles that may be required, unexpected or optional, depending on specified database conditions (optional).DFcenters- sites database . Study sites database includes information on all clinical sites participating in the study.DFcplate_map- conditional plate map . Defines plates that may be required, unexpected or optional, depending on specified database conditions (optional).DFcterm_map- conditional termination map . Defines database conditions that signal termination of subject follow-up (optional).DFcvisit_map- conditional visit map . Defines visits that may be required, unexpected or optional, depending on specified database conditions (optional).DFCRFType_map- CRF type map . Defines categories for different CRF background types (e.g. translations) (optional).DFcrfbkgd_map- CRF background map . Defines visits with CRF backgrounds used across multiple visits (optional).DFedits.bin- published edit checks . The "published" equivalent of the edit checks - for use by DFexplore clients only (optional).DFfile_map- file map . Specifies each unique CRF plate used in the study.DFlut_map- lookup table map . Defines and associates lookup table names with directory names of lookup tables. Also includes definition for query lookup table, if it exists (optional).DFmissing_map- missing value map . Missing value codes (and labels) used in the study (optional).DFpage_map- page map . Used to specify descriptive labels to replace the visit/sequence and plate numbers that are used by default to identify problems on the Query Reports (optional).DFqcsort- Query and CRF sort order . Specifies a sort order for queries as written on Query Reports. The default is to sort by field number within plate number within visit/sequence number within subject ID (optional)..DFreports.dat- reports history . Personal file of DFdiscover report commands (and options) corresponding to reports which the user runs in the reports tool (optional).DFschema- database schema . Study database schema (or dictionary) describes all variables on all plates, as specified in the setup tool.DFschema.stl- database schema styles . Study database schema (or dictionary) describes all variable styles defined for the study in the setup tool.DFserver.cf- server configuration . Configuration file for the study database server.DFsetup- study definition . This is a JSON format file maintained and used by DFsetup to record all study setup information, including all plate, style and variable definitions.DFsubjectalias_map- subject alias map . Used to specify descriptive labels to optionally replace the numeric subject ID used as an identifier throughout DataFax.DFsubjectalias_map.log- subject alias change log . Log all changes to the mapping of subject ID to subject alias over the course of a study.DFtips- ICR tips . This file contains the coordinates, field type and legal values for all variables defined on all plates. It is used by the ICR software to create the initial data record from new CRF pages that arrive by fax.DFvisit_map- visit map . This file describes the scheduling of subject assessments during the trial and the CRF pages expected at each assessment.DFwatermark- watermark . This file describes watermarks used for printed output assigned by role.QCcovers- Query cover pages . This file contains formatting information to be included in a Query Report cover sheet. To include a cover sheet for a Query Report, QCcovers must first be defined.QCmessages- Query Report messages . This file contains messages to be included in Query Report cover sheets. More than one message may be included in a single Query Report, however, DF_QCreports expects the cover sheet information and all messages to fit on a single page.QCtitles- Query Report titles . This file describes how the report title and each title of the 3 sections of a DFdiscover Query Report are to be customized. DF_QCreports checks for the existence of this file and will use it if it exists, otherwise standard titles will be produced.DFqcproblem_map- Query category code map . This file contains all the system-defined and user-defined query category codes.DFreportstyle- DFdiscover Report styling . This file contains styling "instructions" for reports, excluding Legacy reports. Styling includes font choices and colors used in graphs and charts.
lut. This directory contains all study specific lookup tables. Lookup tables can also be stored in directory lut at the DFdiscover level. Study level files have priority if a lookup table with the same file name is stored in both locations. Lookup table file names must be associated with an edit check name inDFlut_map(found in the study/libdirectory) before they can be used in edit checks.-
pages. This directory holds all standard (SD) resolution (100 dpi) CRF image and supporting document files for all CRF pages received or uploaded during the study. Each CRF page received as a fax or PDF is stored as a PNG file (Sun Rasterfile in pre-2014 DFdiscover releases), and requires about 25K bytes of disk space (i.e. 40 CRF pages per MB). Supporting documents can be audio, video, DICOM or PDF files and will be in their native format.DFdiscover creates subdirectories, below the study pages directory, in which to store the CRF image files. These subdirectories are named by the year and week (in
yywwformat) in which the CRFs arrived. For example, a study which started on January 1, 1995 would have subdirectories named: 9501, 9502, 9503, etc. through to the end of the trial.Within each of the
yywwsubdirectories, the individual CRF page files are named by the concatenation of the sequence number of the fax (starting at 0001 each week) in which they arrived during that week, and their page number within the fax. The file-naming format isffffppp. For example, if the first fax to arrive in the week of 9501 contained 3 pages, it would be represented by the following files beneath the study pages directory:9501/0001001,9501/0001002, and9501/0001003. Theffffpart of the file name is a sequential value constructed from 4 characters, each character taken from the alphabet:0 1 2 3 4 5 6 7 8 9 B C D F G H J K L M N P Q R S T V W Y Z
This is essentially the digits 0 through 9 followed by the uppercase letters A through Z, with the exception of the letters A, E, I, O, U, and X. This part of the file name thus lies between 0001 and ZZZZ, which allows for a total of 30x30x30x30-1 = 809,999 faxes per week. Example file names within a week include:
00010055th page of 1st fax000B0011st page of 10th fax000Z01111th page of 29th fax00100022nd page of 30th fax01C00044th page of 1230th fax
-
pages_hd. This directory holds all higher (HD) resolution (300 dpi) CRF images and supporting document files received or uploaded during the study. DFdiscover creates subdirectories and stores the files in the same manner as thepagesdirectory. reports. It is recommended that all study specific reports, i.e. those programs which have been created specifically for a particular clinical trial, are stored in the study reports directory. This helps to standardize maintenance across studies.Documentation for study specific reports must also be stored in this directory in a file named
.info, which uses the same format used to document the standard DFdiscover reports. The specific requirements of this file and its format are described in Writing Documentation for Study Specific Reports.reports/QC. This directory is used to store the standard DFdiscover Query Reports, created by DF_QCreports. The files and directories maintained under this directory are briefly described below.ccc-yymmdd
The naming convention for Query Reports is a zero padded 3 digit site ID (if the site ID is greater than 999, it will be a 4 digit number), followed by a dash, and then the date on which the report was created. For example: 055-150815 would identify a Query Report created for site 55 on Aug 15, 2015. Thus you can tell from a Query Report name, both whom it was created for and when.
Although this is helpful it does have one disadvantage, namely, it means that you cannot create more than one Query Report per day for an individual clinical site. If you do, the earlier one will be over-written. However, since Query Reports are sent to the clinical sites, and this isn't something you should do more than about once a week, and certainly not more than once a day, this approach to naming Query Reports works.
Query Reports remain under
QCuntil they are sent to the clinical sites. Thus any reports that you see at this level have not been transmitted to the study clinics.QC/sentQuery Reports are moved to this directory after they have been successfully sent to their respective clinical sites.
QC/internalDF_QCreports is also able to create named, internal Query Reports, which can include subjects from more than one site. These reports are written directly to this directory.
QC_LOG
This is a plain ASCII file that lists any error messages reported during the last execution of DF_QCreports.
QC_NEWThis is a plain ASCII file that lists the Query Reports created by the most recent execution of DF_QCreports.
SENDFAX.log
This is a plain ASCII file in which DF_QCfax records the success or failure of its attempts to fax Query Reports to the clinical sites.
SENDFAX.qup
This is a plain ASCII file that lists all Query Reports which have been queued up for transmission to the clinical sites.
other files
Occasionally, DF_QCreports might be halted in mid-execution, by a power failure, or some other problem. In such cases it may not have time to remove the temporary files that it creates in the process of generating the Query Reports. These files generally contain a process ID#; for example you might see files that look like this
18273_N.refax,18273_N.qalist. These temporary files can, and should, be removed.work. The work directory contains temporary files, DFdiscover retrieval files and summary data files. It is important to be aware of the files that DFdiscover creates and maintains in this directory so that programmers do not inadvertently overwrite them.-
Temporary Files. The work directory is used for temporary files created by various reports and is the recommended location for temporary files created by study specific reports and for data files exported using DFexport.rpc. If DFexport.rpc is used to export study data files to this directory, or create temporary files here in the process of generating study specific reports, you need to be very careful in your selection of temporary file names, so that simultaneous execution of different programs does not result in temporary file name conflicts. A useful strategy is to include the process ID plus some part of the program name in all temporary file names, and also to check for and create a lock directory for any programs that should not be executed simultaneously by more than one user.
Because the work directory is used for temporary file creation by various DFdiscover programs, you might find temporary files that were not removed because a program failed to complete due to a power failure or some other problem. Any file that is several days old, and has what looks like a process id number as part of it's name, is probably a temporary file left over when a program failed to complete successfully. Such files can be removed. This should be done periodically to clean up the study work directory.
-
Summary Files. The work directory contains a number of summary data files created by DF_XXkeys and DF_QCupdate and used by other programs including DF_QCreports and DF_PTvisits. The following files are described in detail later in this chapter in The study
workdirectory:
-
The data, pages, and pages_hd
directories must be owned by user datafax, with read, write and execute
permissions for owner, and read and execute permissions for group.
The bkgd,
dde,
frame,
lib,
reports, and
work directories must have read, write
and execute permissions set for all users of the study group (typically this
will be UNIX group studies).
These permissions are set by DFadmin on those directories which it creates when the study is first registered. The utility program DFstudyPerms is available for diagnosing and correcting study permission problems. A detailed list of study files and directories checked by this program can be found at System Administrator Guide, Maintaining study filesystem permissions
Each file documented in this section is described with the following attributes:
Table 2.1. File attributes
| Heading | Description |
|---|---|
| Usual Name | the file name that is usually given to files having this format. Some files are kept at the DFdiscover directory level while others are kept separately with each study directory. |
| Type | one of: "clear text" or "binary". Clear text files can be reviewed with any text editor. |
| Created By | the name of the DFdiscover program(s) that create and modify this file. If you need to edit the contents of the file, use the program listed here. |
| Used By | the name of the DFdiscover program(s) that reference or read this file. |
| Field Delimiter | how fields within a record are delimited. Typically, the delimiter is a single character. |
| Record Delimiter | how records within the file are delimited. Typically, the delimiter is a single character. |
| Comment Delimiter | how comments within the file are delimited. If comments are not permitted within the file, "NA" is indicated. |
| Fields/Record |
the expected number of fields per record.
If the number of fields varies across records,
the minimum number is given, followed by a +.
|
| Description | a detailed description of the meaning of each field. |
| Example | one or more example records from the file. |
A DFdiscover Retrieval File (DRF) is an ASCII file in which each record identifies the subject ID, visit or sequence number and CRF plate number (in that order, | delimited) and optionally the image ID corresponding to a record in the study database.
DFdiscover retrieval files are created by DFexplore, DFdiscover reports, and the DFdiscover programs DFmkdrf.jnl and DFexport.rpc.
DFdiscover retrieval files created by DFexplore and DFdiscover reports and
programs reside in the study drf
directory. It is also recommended that DRFs created using DFexport.rpc also
be saved to the study drf
directory. All DRFs must end with the
.drf
extension. Exercise caution when selecting DRF names to avoid conflicts with
those DRF file names generated by DFdiscover applications.
Below is a description of
the DRF file format.
Table 2.2. Data Retrieval Files (DRF)
| Usual Name | filename.drf |
| Type | clear text |
| Created By | DFexport.rpc, DFmkdrf.jnl, DFexplore |
| Used By | DFexplore |
| Field Delimiter | | |
| Record Delimiter | \n |
| Comment Delimiter | # |
| Fields/Record | 3+ |
| Description |
Data records have the common fields and characteristics defined in Table 2.3, “DFdiscover Retrieval File field descriptions”. |
| Example |
This is an example of a DRF listing all primary records having one or
more queries attached to them. The DRF filename
99001|1|2
99001|1011|9
99002|1|2
99002|22|5
99002|1011|9
99004|1|2
|
Table 2.3. DFdiscover Retrieval File field descriptions
| Field # | Contains | Description |
|---|---|---|
| 1 | subject/case ID | this is a number in the range of 0-281474976710655 used to uniquely identify
each subject/case in the study database |
| 2 | visit/sequence number | a number in the range of 0-21460, that uniquely identifies each
occurrence of a visit number for a subject ID |
| 3 | plate number | a number in the range of 1-501 that uniquely identifies the plate to be included in the DRF. |
| 4 | image identifier | the value in this optional field is the unique identifier of the CRF image identified by the keys in the first 3 fields. This field is used to identify a specific instance of a CRF when there are one or more secondaries having the same key fields. |
| 5 | optional text | this field can be used to provide a short descriptive message to DFexplore users. The text is displayed in the message window at the bottom of DFexplore when the data record is selected in the DFexplore record list. |
The study data directory holds all study data files, including the plate files that correspond to CRF plates, the query data file and the database transaction journals. These files are managed by the study database server and should not be accessed directly. Instead the records required should be exported from the study database to another file, as described in DFexport.rpc, and then read from the exported file.
Data records should never be added to these database files without doing so through the study database server. The program DFimport.rpc is available and is the recommended method of sending new or revised data records to the study database server.
Occasionally you may need to make extensive changes to an entire database file. The typical scenario is a change to one or more of the study CRFs to add or remove fields. In this case the plate definitions originally entered in the setup tool also need to be changed to match the new structure of the corresponding data files. This is a major operation. It requires that the study server be disabled while the database and setup definitions are being changed, and that the effected data files be re-indexed before the study database server is re-enabled.
The following sections describe data and index files ending with
.dat and .idx suffixes.
Very rarely, you may notice files having the same name but with
.tad or .xdi suffixes.
These files are temporary files created and managed by the database
server.
They are present while the server performs sorting and garbage collection
on a particular data file.
As such they should be treated in the same manner as the other data and index
files - basically, do not touch them.
Typically, this is not a problem because the files are present for only a
second or two.
Table 2.4. plt###.dat - per plate data files
| Usual Name | plt###.dat | |||
| Type | clear text | |||
| Created By | DFserver.rpc | |||
| Used By | DFserver.rpc | |||
| Field Delimiter | | | |||
| Record Delimiter | \n | |||
| Comment Delimiter | NA | |||
| Fields/Record | 9+ | |||
| Description |
After first validation, new records are moved from
to the study database files,
All database records are stored in free-field format with a
Data
records have the common fields and characteristics described in
Table 2.5, “ | |||
| Example |
Here is an example of a plate 4 data
record after level 1 validation to database file
1|1|9145/0045001|099|4|1|0123|egb|92/01/01|high blood pressure|
Dr. Smith|92/01/10 10:23:23|92/01/10 10:23:23|
The text fields have been entered and record status has been set to
|
Table 2.5. plt###.dat field descriptions
| Field # | Contains | Description |
|---|---|---|
1 (DFSTATUS) | record status | Enumerated value from the list 1=final, 2=incomplete, 3=pending, 4=FINAL, 5=INCOMPLETE, 6=PENDING, 0=missed |
2 (DFVALID) | validation level | Enumerated value from the list 1, 2, 3, 4, 5, 6, 7 |
3 (DFRASTER) | raster name |
the fax image id from which this data record was derived, if there was a
fax image.
The image id is always in the format
YYWW/FFFFPPP or YYWWRFFFFPPP,
where YY is the year (minus the century) in which the image
id was created, WW is the week of the year,
FFFF is a sequential base 30 value, in the range 0001-ZZZZ,
representing the fax arrival order within the week,
and PPP is the page number within the fax
(also see pages).
If the image id contains a slash (/) in the 5th
character position, then the image id is for a fax.
Pre-pending this image id with the value of the
PAGE_DIR variable for the study creates a
unique pathname to the file containing the fax image.
If the image id contains R in the 5th character
position, then the image id is for a raw data entered record, and in fact
there is no image.
|
4 (DFSTUDY) | study number | the DFdiscover study number (must be constant across all records for the
same study). Legal limit is 1-999. |
5 (DFPLATE) | plate number | the plate number as identified in the barcode of the CRF. Within each data file, this field has a constant value. Legal limit is 1-501. |
6 (DFSEQ[a]) | visit/seq number | the visit or sequence number of this occurrence of a plate for a subjects
id. Legal limit is 0-511 if defined in the barcode, and
0-65535 if defined as
the first data field on the page.
|
| 7 | subject ID | the subject identifier. Legal limit is 0-281474976710655.
subject
identifiers are composed of site # + subject ID. This limit applies to the
concatenated value of the two, where the site # legal limit is
0-21460.
|
| 8 to N-3 | data | data fields from the corresponding CRF page |
N-2 (DFSCREEN) | record status | Enumerated value from the list
1=final, 2=incomplete,
3=pending.
This record status mimics the status recorded in the first field except that
there is no distinction between primary and secondary. |
N-1 (DFCREATE) | creation date | the creation date and time stamp in the format
yy/mm/dd hh:mm:ss.
The creation date and time stamp are added to the record the first time it is
validated to a level higher than 0.
It is never modified after initial addition to the record. |
N (DFMODIFY) | last modification date | the last modification date and time stamp in the format
yy/mm/dd hh:mm:ss
The initial value for this field is the same as the creation date.
Each time any data within the record is modified, the modification stamp
is updated.
It is not updated if only the record's validation level has changed. |
[a] Field 6 has this name only if the field is defined to be in the barcode; otherwise, the name is user-defined. | ||
Table 2.6. plt###.dat - missed records
| Usual Name | plt###.dat |
| Type | clear text |
| Created By | DFserver.rpc |
| Used By | DFserver.rpc |
| Field Delimiter | | |
| Record Delimiter | \n |
| Comment Delimiter | NA |
| Fields/Record | 11 |
| Description |
If a CRF is reported missing, and is not expected to ever arrive (e.g. because
the subject missed a visit, or refused a test), it can be registered in the
study database using DFexplore.
These records have a status of |
| Example |
Here is an example of a missed data record 0|7|000/0000000|099|4|1|0123|1|subject was on vacation|92/01/10 10:23:23|92/01/10 10:23:23|
|
Table 2.7. Missed record field descriptions
| Field # | Contains | Description |
|---|---|---|
1 (DFSTATUS) | record status | Enumerated value - always contains a 0
for missed records, which is equivalent to the record status lost
|
2 (DFVALID) | validation level | Enumerated value from the list 1, 2, 3, 4, 5, 6, 7 |
3 (DFRASTER) | image name | always contains 0000/0000000 for missed records.
This is simply a placeholder value as there is no CRF image. |
4 (DFSTUDY) | study number | the DFdiscover study number (must be constant across all records for the same study) |
5 (DFPLATE) | plate number | the plate number |
| 6 | visit/seq number | the visit or sequence number |
| 7 | subject ID | the subject identifier |
| 8 | reason code | Enumerated value - the reason that the CRF was missed, selected from
the following list: 1=Subject missed visit, 2=Exam or test not
performed, 3=Data not available, 4=Subject refused to continue, 5=Subject moved away, 6=Subject lost to
follow-up, 7=Subject died, 8=Terminated -
study illness, 9=Terminated -
other illness, 10=Other reason |
| 9 | reason text | an additional, optional explanation as to why the CRF was missed |
10 (DFCREATE) | creation date | the creation date and time stamp in the format
yy/mm/dd hh:mm:ss |
11 (DFMODIFY) | last modification date | the last modification date and time stamp will always be the same as the creation date and time stamp as missed records are never modified once created (changes, if necessary, are made by deleting the existing missed record and creating another one) |
Table 2.8. DFqc.dat - the Query database
| Usual Name | DFqc.dat |
| Type | clear text |
| Created By | |
| Used By | DFserver.rpc, DFexplore, DFbatch, DF_CTqcs, DF_ICqcs, DF_ICrecords, DF_PTcrfs, DF_PTqcs, DF_QCreports, DF_QCsent, DF_QCstatus, DF_QCupdate |
| Field Delimiter | | |
| Record Delimiter | \n |
| Comment Delimiter | NA |
| Fields/Record | 22 |
| Description |
The query data file, DFqc.dat, is maintained by the study server in the same manner as the CRF data files, DFin.dat and plt*.dat. All query records have exactly the same format, across all DFdiscover studies. Each query record has 22 fields, of which 5 (fields 4-8) are the keys needed to uniquely identify each record. Multiple queries are permitted per field provided their category codes are unique. As for study data files, you should always use DFexport.rpc to export the query database before using it. For this purpose, DFqc.dat has been assigned a DFdiscover reserved plate number of 511.
Table 2.9, “ |
| Example |
An example of a newly added query that is to be included in the next Query Report sent to the originating site (the line break is for presentation purposes only): 1|1|0000/0000000|20|10|999|2100101|6|21|000000|0||1. Sample collection date |11/10/05|1|2|||user1 06/05/27 11:35:57|user1 06/05/27 11:35:57||1|
An example of a query that was sent out in a Query Report and has now been resolved: 5|4|0000/0000000|20|397|2030|1415412|11|14|060424|31|1|A2. Whole Blood 1ml ID # ||1|2|||brian 06/03/23 12:57:20|brian 06/03/23 12:57:20|barry 06/05/11 14:10:04|1|
|
Table 2.9. DFqc.dat field descriptions
| Field # | Contains | Description | |||
|---|---|---|---|---|---|
1 (DFSTATUS) | record status | current status of the query. Legal values are: 0=pending (review), 1=new, 2=in unsent report, 3=resolved NA, 4=resolved irrelevant, 5=resolved corrected, 6=in sent report, 7=pending delete | |||
2 (DFVALID) | validation level | validation level at which the query was created or last modified. The query validation level matches the level of the data record upon export only when the DFexport.rpc -m option is used. | |||
3 (DFRASTER) | raster name | must contain "0000/0000000". Any references to actual raster names will result in the deletion of those rasters if the referencing query is deleted. | |||
4 (DFSTUDY) | study number | the DFdiscover study number. Again, this number is constant across all records for one study. | |||
5 (DFPLATE) | plate number | the plate number of the record that this query is attached to | |||
6 (DFSEQ) | visit/seq number | the visit or sequence number of the record that this query is attached to | |||
7 (DFPID) | subject ID | the subject identification number | |||
8 (DFQCFLD) | query field number | the data entry field to which this query is attached
| |||
9 (DFQCCTR) | site ID | the site ID that the query was sent to or will be sent to. This is determined when the query is created. Also, it is checked, and updated if necessary to account for a subject move, each time DF_QCupdate is executed. | |||
10 (DFQCRPT) | report number | the Query Report that the query was written to. The Query Report number is always in the format yymmdd, for the year, month, and day the report was created. If the query has not yet been written to a report, the value is 0. | |||
11 (DFQCPAGE) | page number | the page number of the Query Report, on which the query appears, or 0 if it has not yet been written to a report. | |||
12 (DFQCREPLY) | reply to query | the reply entered by an DFexplore user in the format name yy/mm/dd hh:mm:ss reply The maximum length of this field is 500 characters. It is blank when a new query is created, or when an old query is reset to new. This field cannot be created or edited in DFexplore by users who do not have adequate permissions. When a new reply is entered, the query status is changed to pending. | |||
13 (DFQCNAME) | name | a description of the data field that is referenced by this query. Although this field can be edited when the quality control report is being added, its default value is taken from the "Description" part of the variable definition entered in the Setup tool. The maximum length of this field is 150 characters, but only the first 30 appear on quality control reports. | |||
14 (DFQCVAL) | value | the value held in the data field when the query was added. If the query is subsequently edited and the value of the data field has changed, this field is updated with the new value. The maximum length of this field is 150 characters. For overdue visit queries, this field contains a julian representation of the date on which the visit was due (expressed as the number of days since Jan 1,1900). | |||
15 (DFQCPROB) | category code | the numeric category code. Legal values are: 1=missing value, 2=illegal value, 3=inconsistent value, 4=illegible value, 5=fax noise, 6=other problem, 21=missing plate, 22=overdue visit, 23=EC missing plate, 30-99=user-defined category code. | |||
16 (DFQCRFAX) | refax code | refax request code. Should the CRF page, which this query references, be re-sent? Legal values are: 1=no (clarification query type), 2=yes (correction query type). | |||
17 (DFQCQRY) | query | any additional text needed to clarify the query to the investigator who will receive the Query Reports. The maximum length of this field is 500 characters. Note: the category code label from field 15 is included automatically and is often all that is needed. | |||
18 (DFQCNOTE) | note | any additional text needed to describe the problem when it is resolved. The maximum length is 500 characters. | |||
19 (DFQCCRT) | creation date | the creator, creation date and time stamp of the query in the format name yy/mm/dd hh:mm:ss The creation date and time stamp are added when the query is first created. | |||
20 (DFQCMDFY) | last modification date | the modifier, last modification date and time stamp in the format name yy/mm/dd hh:mm:ss The initial value for this field is the same as the creation date. Each time the query is modified, the modification stamp is updated. | |||
21 (DFQCRSLV) | resolution date | the resolver, resolution date and time stamp in the format name yy/mm/dd hh:mm:ss Until the query is resolved, this field is blank | |||
22 (DFQCUSE) | usage code | Legal values are: 1=send to site (these queries are formatted into a Query Report and sent to the appropriate study site), 2=internal use only (these queries do not appear in site Query Reports). |
Table 2.10. DFreason.dat - reason for change records
| Usual Name | DFreason.dat |
| Type | clear text |
| Created By | DFserver.rpc |
| Used By | DFserver.rpc |
| Field Delimiter | | |
| Record Delimiter | \n |
| Comment Delimiter | NA |
| Fields/Record | 12 |
| Description |
Data fields may require that a change to the value in the field be supported by a reason for the change. This reason information is recorded in . The contents of the record fields are described in Table 2.11, “Reason for data change record field descriptions”. |
| Example |
Here is an example of a reason data record 1|3|000/0000000|254|4|1|0123|9|phone|information provided by physician over the phone|nathan 03/01/10 10:23:23|nathan 03/01/10 10:23:23 It indicates that field 9 was changed because of the reason "information provided by physician over the phone". |
Table 2.11. Reason for data change record field descriptions
| Field # | Contains | Description |
|---|---|---|
1 (DFSTATUS) | record status | valid status codes include: 1=approved, 2=rejected, 3=pending |
2 (DFVALID) | validation level | Enumerated value from the list 1, 2, 3, 4, 5, 6, 7. This is the record's last validation level when the reason was created or modified. |
3 (DFRASTER) | image name | always contains 0000/0000000 for reason for
data change records.
This is simply a placeholder value as there is no CRF image. |
4 (DFSTUDY) | study number | the DFdiscover study number (must be constant across all records for the same study) |
5 (DFPLATE) | plate number | the plate number |
6 (DFSEQ) | visit/seq number | the visit or sequence number |
7 (DFPID) | subject ID | the subject identifier |
8 (DFRSNFLD) | reason field number | the data entry field number this reason note refers to. This numbering does not correspond directly to the DFdiscover schema numbering, but instead is offset by 3, so for example, the ID field which is always database field number 7 will always report the reason field number as 4. This is identical to the behavior of the field number reported in queries. |
9 (DFRSNCDE) | reason code | an optional coding of the reason for data change.
Although this code field contains textual data, it should be possible to
use it as a categorical variable.
The code will typically come from the first field of the
REASON lookup table, if it is defined.
|
10 (DFRSNTXT) | reason text | required text that provides the reason for the data change. The maximum length of this field is 500 characters. |
11 (DFRSNCRT) | creation date | the creator, creation date and time stamp in the format
name yy/mm/dd hh:mm:ss.
This field is completed when the reason for data change is first
created. |
12 (DFRSNMDF) | last modification date | the modifier, last modification date and time stamp in the format
name yy/mm/dd hh:mm:ss.
The initial value for this field is the same as the creation date. Each time
the reason note is modified, the modification stamp is updated.
|
Table 2.12. DFin.dat - the new records database
| Usual Name | DFin.dat |
| Type | clear text |
| Created By | DFserver.rpc |
| Used By | DFserver.rpc |
| Field Delimiter | | |
| Record Delimiter | \n |
| Comment Delimiter | NA |
| Fields/Record | 5+ |
| Description |
Each initial data record, created by the ICR software when it scans a CRF page, is passed to the study database server which appends it to this file. These are called "new records". All new records have the common fields and attributes identified in
Table 2.13, “ The first 5 fields are added by the process that ICRed the page. The 4th and 5th fields were read from the barcode at the top of each CRF page. Dependant upon the success of the ICR algorithm, subsequent fields in each new record may or may not be filled in. If a fax image is particularly difficult to read, it is possible that only the first five fields will appear in the new record. The first three fields, in addition to being delimited, are also in fixed column positions. The record status begins in the first column and is one column wide. The validation level begins in the third column and is one column wide. The raster name begins in the fifth column and is 12 columns wide. Columns two and four contain the field delimiter. |
| Example |
Here is an example of a new data record from 0|0|9145/0045001|099|4|1|0123||92/01/01||| This record has new record status, has not yet been validated, contains the data from fax image $(PAGE_DIR)/9145/0045001, and belongs to study 99, plate 4, visit 1, and subject ID 123. |
Table 2.13. DFin.dat field descriptions
| Field | Contains | Description |
|---|---|---|
1 (DFSTATUS) | record status | Enumerated value - always contains a 0
for new records, which is equivalent to the record status new
|
2 (DFVALID) | validation level | Enumerated value - always contains a 0
for new records, which indicates that the record has only been validated
by the ICR software |
3 (DFRASTER) | image name | the fax image from which this data record was derived.
The value for this field will always be in the format
yyww/ffffppp.
Prepending this name with the value of the
PAGE_DIR variable for the study creates a
unique pathname to the file containing the fax image |
4 (DFSTUDY) | study number | the DFdiscover study number (must be constant across all records for the same study) |
5 (DFPLATE) | plate number | the plate number as identified in the barcode of the CRF |
Table 2.14. YYMM.jnl - monthly database journal files
| Usual Name | YYMM.jnl |
| Type | clear text |
| Created By | DFserver.rpc |
| Used By | DF_ATfaxes, DF_ATmods, DF_WFcrfs, DF_WFqcs |
| Field Delimiter | | |
| Record Delimiter | \n |
| Comment Delimiter | NA |
| Fields/Record | 11+ |
| Description |
The study database server adds a record to the current study database journal file, each time that a data record is written to the study database, including when:
Separate journal files are kept for each study, and within a
study, a new journal file is created for each month. The naming scheme for
journal files is
The fields within each journal record are defined as described in
Table 2.15, “ |
| Example |
Following is an example of a complete journal record.
The line breaks are for presentation purposes only.
980312|132426|valid1|d|1|1|9807/0047008|254|5|24|99001|ABC|06/07/97| 171|097|172|096|2|055.1|121.5|2||1143|00|*|*|*|1|1|*|1|1| 98/03/12 13:24:26|98/03/12 13:24:26| |
Table 2.15. YYMM.jnl field descriptions
| Field # | Contains | Description |
|---|---|---|
| 1 | date stamp | A date stamp, in YYMMDD format,
identifying when the data record was written to the database |
| 2 | time stamp | a time stamp, in HHMMSS format,
identifying when the data record was
written to the database. Hours are reported in 24-hour notation. |
| 3 | username | the username of the person who wrote the record to the database. This is the login name of the user who modified the record. |
| 4 | record type | Enumerated value - indicates the type of the journal record.
Possible values are:
d for data record,
q for query record,
r for reason record,
s for the beginning of a setup restructuring, and
S for the end of a setup restructuring.
|
| 5-11 | record keys | fields 5 through 11 contain the first 7 fields from the data record. |
| 12+ | record data fields | the remaining data fields (8 to the end of the record) follow. |
Table 2.16. DFaudit.db sqlite audit trail
| Usual Name | DFaudit.db |
| Type | binary |
| Created By | DFserver.rpc, DFauditdb |
| Used By | DFserver.rpc, DFedcservice, DF_SBhistory |
| Field Delimiter | NA |
| Record Delimiter | NA |
| Comment Delimiter | NA |
| Fields/Record | NA |
| Description |
All journal records are stored additionally in a sqlite database. The database contains table DFaudit and indexes. Columns in the DFaudit table match the output from DFaudittrace: CREATE TABLE IF NOT EXISTS dfaudit ( dftype TEXT NOT NULL, -- 1 type: N=new, C=changed field, D=deleted dfdate INTEGER NOT NULL, -- 2 date: yyyymmdd dftime TEXT NOT NULL, -- 3 time: hhmiss dfuser TEXT NOT NULL, -- 4 user dfsubject INTEGER, -- 5 subject dfvisit INTEGER, -- 6 visit dfplate INTEGER NOT NULL, -- 7 plate dffieldid INTEGER, -- 8 unique field id: data(=0), query(>0), reason(<0) dffieldchange INTEGER, -- 9 changed field: data(0, unique id), query(field#), reason(field#) dfstatus INTEGER, -- 10 data, query and reason status dflevel INTEGER, -- 11 validation level dfmaxlevel INTEGER, -- 12 maximum validation level reached dfcategory TEXT, -- 13 missed record code, query category, reason code dfuse TEXT, -- 14 missed record text, query usage, reason text dfoldval TEXT, -- 15 old value dfnewval TEXT, -- 16 new value dffieldnum INTEGER, -- 17 field number dffielddesc TEXT, -- 18 field description dfoldlbl TEXT, -- 19 old coded field label dfnewlbl TEXT, -- 20 new coded field label dfuid INTEGER) -- 21 internal use for database restructure CREATE INDEX IF NOT EXISTS dfidx_date ON dfaudit (dfdate, dfsubject) CREATE INDEX IF NOT EXISTS dfidx_user ON dfaudit (dfuser) CREATE INDEX IF NOT EXISTS dfidx_fuid ON dfaudit (dfuid) CREATE INDEX IF NOT EXISTS dfidx_fid ON dfaudit (dffieldid) CREATE INDEX IF NOT EXISTS dfidx_fnum ON dfaudit (dffieldnum) CREATE INDEX IF NOT EXISTS dfidx_keys ON dfaudit (dfsubject, dfvisit, dfplate) CREATE INDEX IF NOT EXISTS dfidx_vst ON dfaudit (dfvisit) CREATE INDEX IF NOT EXISTS dfidx_plt ON dfaudit (dfplate) CREATE INDEX IF NOT EXISTS dfidx_sta ON dfaudit (dfstatus, dflevel) CREATE INDEX IF NOT EXISTS dfidx_lvl ON dfaudit (dflevel)
DFserver.rpc opens |
Table 2.17. plt###.ndx - per plate index files
| Usual Name | plt###.ndx |
| Type | binary |
| Created By | DFserver.rpc |
| Used By | , DFshowIdx |
| Field Delimiter | NA |
| Record Delimiter | NA |
| Comment Delimiter | NA |
| Fields/Record | NA |
| Description |
Every study data file has a corresponding index file that the study server uses to track the current status and location of each record in the data file. The index entry for a particular data record includes the value of the key fields id, plate, and visit/sequence number, the record status, the validation level, the offset of the beginning of the record into the data file, and the length of the data record. When searching for a data record by keys, it is much more efficient for the database server to search the index file for matching keys and then use the offset and length to extract the data record from the data file. Each time an existing data record is modified or a new record is added, a new entry is made at the end of the index file for the new, modified copy of that record, and the status of the old index entry (if there was one) is changed to indicate that it has been superseded by a new entry.
Index and data files are sorted (on id and visit/sequence number) by the study
database server, each time the server exits.
Before sorting, an index file has
The first 32 bytes of an index file are header information, consisting of four
4-byte numbers that identify attributes of the file as a whole,
as described in Table 2.18, “
The 32 bytes of header information are followed by the actual index entries.
Each index entry is 32 bytes in size and is described in
Table 2.19, “ Each index entry contains 8 bytes for the subject ID, 2 bytes for the visit number, 2 bytes for the plate number, 4 bytes for the offset into the data file, 2 bytes for the record length, a status byte and 13 bytes of padding. The status byte encodes three pieces of information: the record status (equivalent to the numeric value of the first byte of the data record), the record validation level (equivalent to the numeric value of the third byte of the data record), and the status of the index entry. This is encoded as illustrated in Figure 2.1, “Encoding for bits within the status byte”. The record status contains the same values as those allowed in the record status field of the data record, namely 0 through 7 (binary 111). Similarly, the validation level will take on the same values as those allowed in the validation level of the data record, again 0 through 7. The index status contains the value 2 if this is a new index entry, 1 if the index entry has been superseded by a newer one, and 0 otherwise. The size of all index files should always be a multiple of 32 bytes. |

This directory contains the edit check source files.
Table 2.20. DFedits - edit checks
| Usual Name | DFedits |
| Type | clear text |
| Created By | DFsetup |
| Used By | DFexplore |
| Field Delimiter | NA |
| Record Delimiter | NA |
| Comment Delimiter | # |
| Fields/Record | NA |
| Description |
This file contains the edit checks that are defined for this study. The edit check language is fully described in Edit checks. |
| Example |
edit SetInit()
{
    if ( dfblank( init ) && !dfblank( init[,0,1] ) )
        init = init[,0,1];
}
edit AgeOk()
{
    number      age;
    if ( !dfblank( p001v03 ) && !dfblank( p001v04 ) )
    {
        age = ( p001v03 - p001v04 ) / 365.25;
...
|
This directory contains the study configuration files, those files that make this study unique from every other DFdiscover study.
Table 2.21. DFcenters - sites database
| Usual Name | DFcenters | ||||||
| Type | clear text | ||||||
| Created By | DFsetup | ||||||
| Used By | all study tools and the standard reports including: DF_CTqcs, DF_CTvisits, DF_PTcrfs, DF_QCfax, DF_QCfaxlog, DF_QCreports, DF_QCupdate, DF_SScenters, DF_XXtime, and DF_qcsbyfield | ||||||
| Field Delimiter | | | ||||||
| Record Delimiter | \n | ||||||
| Comment Delimiter | NA | ||||||
| Fields/Record | 11+ | ||||||
| Description |
Each DFdiscover study has a sites database that records where each participating site is located, who the contact person is, and what subject ID number ranges are covered by each site ID.
Each site typically corresponds to a different clinical site, but this is
not required. If necessary, a single clinical site may be defined as 2 or more
sites, each corresponding to a different participating clinical investigator
at that site. The sites database consists of one record per site ID. The field
definitions are described in Table 2.22, “Field definitions for
Each site ID must be a number in the range
Each comma inserts a one-second pause in the dialing sequence. This can be helpful when leaving a local PBX or waiting to dial an extension.
A valid email address may also be supplied in place of or together with a
primary fax number. The email address must be specified
using the notation
If more than one email and/or fax number is specified, each must be separated by a single space. Comma separators are not permitted. Subject ID ranges are specified in fields 11 through the end of the record. There is no limit to the number of range fields that can be given. Each range field contains a minimum subject ID and maximum subject ID separated by exactly one space character. For example, |101 199| indicates that subject IDs 101 through 199 inclusive are to be included for the site. Individual subject IDs that are disjoint from any range are indicated by setting both the minimum and maximum ids to the actual subject ID. For example, |244 244|301 399|401 420| includes subject IDs 244, 301 through 399 inclusive, and 401 through 420 inclusive.
In the event that subject IDs are incorrectly entered in data
records, there should always be a 'catch-all' site listed that receives all
subject IDs that do not fall into any of the other subject ID ranges.
This site is indicated by the phrase
| ||||||
| Example |
A single sites database record for a site that is responsible for
subject IDs 1101 through 1149, and 1151 through 1199 inclusive.
011|Lisa Ondrejcek|DFnet|140 Lakeside Avenue, Suite 310, Seattle, Washington, 98122|1-206-322-5932|country:USA;enroll:100|1-206-322-5931|Lisa Ondrejcek|1-206-322-5931||1101 1149|1151 1199 |
Table 2.22. Field definitions for DFcenters
| Field # | Description | Required | Maximum Size |
|---|---|---|---|
| 1 | site ID | yes | 5 digits |
| 2 | Contact | yes | 30 characters |
| 3 | Name | yes | 40 characters |
| 4 | Address | no | 80 characters |
| 5 | Fax | no | 4096 characters |
| 6 | Attributes including Start Date, End Date, Enroll Target, Protocol Effective Date (x5),
Protocol Version (x5)
This field contains zero of more semi-colon ( | no | 4096 characters |
| 7 | Telephone (site) | no | 30 characters |
| 8 | Investigator | no | 30 characters |
| 9 | Telephone (investigator) | no | 30 characters |
| 10 | Reply to email address | no | 80 characters |
| 11+ | Subject ID ranges | yes | 30 digits,1 space |
Table 2.23. DFccycle_map - conditional cycle map
| Usual Name | DFccycle_map |
| Type | clear text |
| Created By | DFsetup |
| Used By | DF_QCupdate |
| Field Delimiter | | |
| Record Delimiter | \n |
| Comment Delimiter | # |
| Fields/Record | 2+ |
| Description |
This table describes the conditional cycle map file structure and provides an example. It does not describe all of the syntax and rules related to this feature. Usage instructions for all 4 conditional maps is fully described in Study Setup User Guide, Conditional Maps. The file contains one or more specifications, each consisting of a condition definition followed by one or more actions to be applied if the condition is met. Entries in the file have the general appearance of: IF|Visit List|Plate|Field|Value AND|Visit List|Plate|Field|Value [+-~]|List of conditional cycles
Each condition may be followed by one or more action statements. Each of these statements begins with: '+' to indicate that the cycles are required, '-' to indicate that the cycles are unexpected, or '~' to indicate that the cycles are optional, when the condition is met. There is no limit to the number of condition/action entries that may be included but the order in which the conditions appear may be important, because in the event of a conflict, the action specified by the last entry, applicable to each cycle, is the action that will be applied. This point is illustrated in the following example. |
| Example |
IF|0|1|22|6
+|2,5,8
-|3,6,9
~|4,7,10

IF|0|1|22|5
AND|0|9|13|>0
AND|0|9|36|!1
+|11

IF|1|3|9|~^A
-|11
This example, consists of 3 conditional specifications. They are applied in the order in which they are defined. The first specification indicates that, if field 22 on plate 1 at visit 0 equals 6, then cycles 2, 5 and 8 are required; cycles 3, 6 and 9 are not expected; and cycles 4, 7 and 10 are optional. The second specification indicates that, if field 22 on plate 1 at visit 0 equals 5, and field 13 on plate 9 at visit 0 is greater than zero, and field 36 on plate 9 at visit 0 is not equal to 1, then cycle 11 is required. The third specification indicates that, if field 9 on plate 3 at visit 1 begins with the capital letter "A", then cycle 11 is not expected. If both conditions 2 and 3 are met cycle 11 will be considered unexpected because, when a conflict occurs, the last condition wins. |
Table 2.24. DFcvisit_map - conditional visit map
| Usual Name | DFcvisit_map |
| Type | clear text |
| Created By | DFsetup |
| Used By | DF_QCupdate |
| Field Delimiter | | |
| Record Delimiter | \n |
| Comment Delimiter | # |
| Fields/Record | 2+ |
| Description |
This table describes the conditional visit map file structure and provides an example. It does not describe all of the syntax and rules related to this feature. Usage instructions for all 4 conditional maps is fully described in Study Setup User Guide, Conditional Maps. The file contains one or more specifications, each consisting of a condition definition followed by one or more actions to be applied if the condition is met. Entries in the file have the general appearance of: IF|Visit List|Plate|Field|Value AND|Visit List|Plate|Field|Value [+-~]|List of conditional visits
Each condition may be followed by one or more action statements. Each of these statements begins with: '+' to indicate that the visits are required, '-' to indicate that the visits are unexpected, or '~' to indicate that the visits are optional, when the condition is met. There is no limit to the number of condition/action entries that may be included but the order in which the conditions appear may be important, because in the event of a conflict, the action specified by the last entry, is the action that will be applied. This point is illustrated in the following example. |
| Example |
IF|0|1|22|6
+|10-19
-|20-29
~|30

IF|0|1|22|5
AND|0|9|13|>0
AND|0|9|36|!1
+|40

IF|1|3|9|~HIV
-|40
This example, consists of 3 conditional specifications. They are applied in the order in which they are defined. The first specification indicates that, if field 22 on plate 1 at visit 0 equals 6, then visits 10 to 19 are required, visits 20 to 29 are unexpected, and visit 30 is optional. The second specification indicates that, if field 22 on plate 1 at visit 0 equals 5, and field 13 on plate 9 at visit 0 is greater than zero, and field 36 on plate 9 at visit 0 is not equal to 1, then visit 40 is required. The third specification indicates that, if field 9 on plate 3 at visit 1 contains the literal string "HIV", then visit 40 is not expected. If both conditions 2 and 3 are met, visit 40 will be considered unexpected because, when a conflict occurs, the last condition wins. |
Table 2.25. DFcplate_map - conditional plate map
| Usual Name | DFcplate_map |
| Type | clear text |
| Created By | DFsetup |
| Used By | DF_QCupdate |
| Field Delimiter | | |
| Record Delimiter | \n |
| Comment Delimiter | # |
| Fields/Record | 2+ |
| Description |
This table describes the conditional plate map file structure and provides an example. It does not describe all of the syntax and rules related to this feature. Usage instructions for all 4 conditional maps is fully described in Study Setup User Guide, Conditional Maps. The file contains one or more specifications, each consisting of a condition definition followed by one or more actions to be applied if the condition is met. Entries in the file have the general appearance of: IF|Visit List|Plate|Field|Value AND|Visit List|Plate|Field|Value [+-~]Visit List|List of conditional plates
Each condition may be followed by one or more action statements. Each of these statements begins with: '+' to indicate that the plates are required, '-' to indicate that the plates are unexpected, or '~' to indicate that the plates are optional, at the specified visits, when the condition is met. There is no limit to the number of condition/action entries that may be included but the order in which the conditions appear may be important, because in the event of a conflict, the action specified by the last entry, applicable to each plate, is the action that will be applied. This point is illustrated in the following example. |
| Example |
IF|0|1|22|6
+10,20|50,51
-10,20|40,41
~10,20|15

IF|0|1|22|5
AND|0|9|13|>0
AND|0|9|36|!1
+91-95|16

IF|1|3|9|yes
-91|16
This example, consists of 3 conditional specifications. They are applied in the order in which they are defined. The first specification indicates that, if field 22 on plate 1 at visit 0 equals 6, then at visits 10 and 20: plates 50 and 51 are required, plates 40 and 41 are not expected, and plate 15 is optional. The second specification indicates that, if field 22 on plate 1 at visit 0 equals 5, and field 13 on plate 9 at visit 0 is greater than zero, and field 36 on plate 9 at visit 0 is not equal to 1, then at visits 91-95 plate 16 is required. The third specification indicates that, if field 9 on plate 3 at visit 1 contains exactly the string "yes", and nothing more, then plate 16 is not expected at visit 91. If both conditions 2 and 3 are met plate 16 will be considered unexpected at visit 91, but required at visits 92-95, because, when a conflict occurs, the last condition wins. |
Table 2.26. DFcterm_map - conditional termination map
| Usual Name | DFcterm_map |
| Type | clear text |
| Created By | DFsetup |
| Used By | DF_QCupdate |
| Field Delimiter | | |
| Record Delimiter | \n |
| Comment Delimiter | # |
| Fields/Record | 1+ |
| Description |
This table describes the conditional termination map file structure and provides an example. It does not describe all of the syntax and rules related to this feature. Usage instructions for all 4 conditional maps are fully specified in Study Setup User Guide, Conditional Maps. The file contains one or more specifications, each consisting of a condition definition followed by one action to be applied if the condition is met. Entries in the file have the general appearance of: IF|Visit List|Plate|Field|Value AND|Visit List|Plate|Field|Value A or E
Each condition is followed by either the letter 'A' (abort all follow-up), or
'E' (early termination of the current cycle).
The termination date is defined as the visit date of the visit that triggered the condition,
specifically the visit specified in the |
| Example |
IF|0|1|22|6
A

IF|6|1|22|5
AND|6|9|13|>0
AND|6|9|36|!1
E
This example, consists of 2 conditional specifications. The first specification indicates that, if field 22 on plate 1 at visit 0 equals 6, then all follow-up terminates as of the visit date for visit 0. Visits scheduled to occur before this date are still expected, but visits scheduled following this date are not. The second specification indicates that, if field 22 on plate 1 at visit 6 equals 5, and field 13 on plate 9 at visit 6 is greater than zero, and field 36 on plate 9 at visit 6 is not equal to 1, then the current cycle terminates, i.e. the cycle in which visit 6 is defined; with the termination date being the visit date of visit 6. Any visits in this cycle (or in previous cycles) that were scheduled to occur before the termination date are still expected, but visit within this cycle scheduled following this date are not. On termination of a cycle, subject scheduling proceeds to the next cycle in the visit map, if there is one. |
Table 2.27. DFCRFType_map - CRF type map
| Usual Name | DFCRFType_map |
| Type | clear text |
| Created By | DFsetup |
| Used By | DFbatch, DFprintdb, DFimport.rpc, DFexport.rpc, DFcmpSchema DFcmpSchema |
| Field Delimiter | | |
| Record Delimiter | \n |
| Comment Delimiter | NA |
| Fields/Record | 2 |
| Description |
Each record in the CRF type map has two fields, an acronym or short form (1st field), and a descriptive label (2nd field). The CRF type acronym and label appear in the Import CRFs dialog. The CRF type label appears in the DFexplore Preferences dialog. This file is optional. If it does not exist, CRF Types are not used for this study. |
| Example |
PAPER|Print Version CHINESE|Chinese ENGLISH|English SWEDISH|Swedish FRENCH|French SPANISH|Spanish |
Table 2.28. DFcrfbkgd_map - CRF background map
| Usual Name | DFcrfbkgd_map |
| Type | clear text |
| Created By | DFsetup |
| Used By | DFprintdb |
| Field Delimiter | | |
| Record Delimiter | \n |
| Comment Delimiter | NA |
| Fields/Record | 3 |
| Description |
Each record in the CRF background map has three fields: the visit number with the background to be repeated (1st field), the list or range of visit numbers where the background will be repeated (2nd field), and an optional comment field (3rd field). This file is optional. If it does not exist, the default CRF will be displayed for visits not tagged during the Import CRFs step. If no default CRF has been imported, the CRF background will be blank for untagged visits. |
| Example |
10|11,13-14,16-17,19-20|Quarterly visits 12|15,18|Annual visits 22|25,28|Annual lab work |
Table 2.29. DFedits.bin - published edit
checks
| Usual Name | DFedits.bin |
| Type | binary |
| Created By | DFsetup, DFcompiler |
| Used By | DFexplore |
| Field Delimiter | NA |
| Record Delimiter | NA |
| Comment Delimiter | NA |
| Fields/Record | NA |
| Description |
This file contains an internal, binary equivalent
of the edit checks stored in the plain text
The This file is the only edit checks file used by DFexplore. |
Table 2.30. DFfile_map - file map
| Usual Name | DFfile_map |
| Type | clear text |
| Created By | DFsetup |
| Used By | DFserver.rpc |
| Field Delimiter | | |
| Record Delimiter | \n |
| Comment Delimiter | NA |
| Fields/Record | 4 |
| Description |
The file map lists all of the unique plate numbers used in a particular study database. The study server uses this file at start-up to determine which database files it may need to initialize and allocate file descriptors for. In addition to the listed plate numbers, the study server also allocates file descriptors for the new records file () and the query data file ().
The format of this file is one record for each plate defined in the
study setup.
Each record has 4 fields.
The first field of the record is the plate number, leading zero-padded to three
digits.
The second field is a textual description of the plate from the user-supplied
definition in DFsetup. The textual part is displayed in the plate selection
dialogs that can be found in various study tools.
The third field identifies how the visit/sequence number key field is coded for
that plate. A code of The records in the file map do not have to be sorted in increasing plate number order as the file is internally sorted by the study database server at start-up time. |
| Example |
001|Dosage of Study Drug (DOST-2)|2|2 002|Concomitant Medication (COM)|1|2 003|Written Consent (CONS-w)|1|2 005|Diagnosis (DSM-III-R)|1|2 006|Psychiatric History (PSH)|1|2 200|Death Report|1|1 |
Table 2.31. DFlogo.png - study logo, for reports
| Usual Name | DFlogo.png |
| Type | PNG |
| Created By | NA |
| Used By | DFexplore |
| Field Delimiter | NA |
| Record Delimiter | NA |
| Comment Delimiter | NA |
| Fields/Record | NA |
| Description |
A study logo is a small PNG file, maximum dimension is 64 pixels tall and 128 pixels wide. The study logo is displayed in the top-left corner of report output in DFexplore, in the data entry screen header of DFweb, in the studies list displayed during login, and in several DFadmin dialogs. If no study logo is available, the study name is written to the header of each report output.
The study logo must be created outside of DFdiscover - there is no interface
for creating it.
Once the file is created, it must be copied to the study folder and saved as
|
Table 2.32. DFlut_map - lookup table map
| Usual Name | DFlut_map |
| Type | clear text |
| Created By | DFsetup |
| Used By | DFexplore, DFbatch |
| Field Delimiter | | |
| Record Delimiter | \n |
| Comment Delimiter | NA |
| Fields/Record | 2 |
| Description |
Lookup tables are used to select results from a list of pre-defined values and insert them into DFdiscover data fields. Lookup tables can also be defined for the query, query note, and reason fields to allow users to select pre-specified text for these fields. Lookup tables are described in Lookup tables. A study setup may use multiple lookup tables and so the lookup table map is used to associate simple table names with more complex and lengthy full pathnames of the actual lookup tables.
Each record in the lookup table map has a lookup table name, followed by a
The special table names |
| Example |
QC|DF_QClut QCNOTE|DF_QCnotelut QCREPLY|DF_QCreplylut REASON|DF_Reasonlut MEDS|meds.dict COSTART|costart.dict WHO|who.dict |
Table 2.33. DFmissing_map - missing value map
| Usual Name | DFmissing_map | |||
| Type | clear text | |||
| Created By | DFsetup | |||
| Used By | DFbatch, DFprintdb, DFimport.rpc, DFexport.rpc, DFcmpSchema, DF_QCupdate, DF_XXkeys, DF_stats, DFsas | |||
| Field Delimiter | | | |||
| Record Delimiter | \n | |||
| Comment Delimiter | NA | |||
| Fields/Record | 2 | |||
| Description |
Each record in the missing value map has two fields, the missing value code (1st field), and a descriptive label for the code (2nd field). The missing value code appears verbatim in any data field which has been identified as missing with that code. The missing value map lists all missing value codes used in the study. These codes can be entered into any data field by selecting the desired code from the list available under > in DFexplore.
Note that the field delimiter,
This file is optional. If it does not exist, a single missing value of
| |||
| Example |
*|Not Available .|Not Applicable -|Temporarily Unavailable .U|Unknown |
Table 2.34. DFpage_map - page map
| Usual Name | DFpage_map |
| Type | clear text |
| Created By | DFsetup |
| Used By | DF_QCreports, DFexplore |
| Field Delimiter | | |
| Record Delimiter | \n |
| Comment Delimiter | NA |
| Fields/Record | 3 |
| Description |
This file is optional for a study. If defined, it must be located
in The first record in a page map contains only a single field which specifies a text label to be used as a title over the queries. The default label is: PLATE SEQNO This label appears at the top of the Fax/Refax List and Question & Answer List sections of the Query Reports. The remaining records describe the text labels to be used in place of the default plate and visit number identifiers.
The first field is the plate number, the second field is the visit/sequence
number, and the third field is the substitution to be used for that plate and
visit/sequence combination. The third field can contain
When a Query Report is created, those queries whose plate and visit numbers match the first and second fields, will be identified on the Query Report by the label which appears in the third field.
If either the first field or second field contains a For more information, see Study Setup User Guide, Page Map. |
| Example |
PAGE (PLATE-SEQ)
018|001|MED VISIT1
*|001|VISIT1 (%P-%S)
025|*|TERM (%P-%S)
*|*|(%P-%S)
Note how the last rule catches all plate and visit/sequence pairs that were not previously matched. |
[a] To implement | |
Table 2.35. DFqcsort - Query and CRF sort order
Table 2.36. DFqcproblem_map - Query category code map
| Usual Name | DFqcproblem_map |
| Type | clear text |
| Created By | DFsetup |
| Used By | DFbatch, DFprintdb, DFimport.rpc, DFexport.rpc, DFcmpSchema, DF_QCupdate, DF_XXkeys, DF_stats, DFsas, DFexport |
| Field Delimiter | | |
| Record Delimiter | \n |
| Comment Delimiter | NA |
| Fields/Record | 4 |
| Description |
Each record in the Query category code map has four fields, the category code (1st field), the descriptive label (2nd field), the auto-resolve value (3rd field), and the sort value (4th field). The query category code appears verbatim in any data field which has been assigned a query with that code. The pre-defined categories are assigned integer codes from 1-6 and 21-23 (inclusive). User-defined categories must be assigned integer codes ranging from 30-99 (inclusive). Category codes must be unique. The problem labels must have a length ranging from 1-20 characters (inclusive), must be unique, and are case insensitive. The auto-resolve field may be set to No (0) or Yes (1). With auto-resolve set to Yes, an outstanding query with this category code will be automatically resolved if a new reason is added to the corresponding data value. The sort value may be set to any integer value between -2147483648 and 2147483647. Category types are sorted in ascending order by sort value, then by code. The query category code map lists all query category codes in the study. A query with one of these types can be entered into any data field by selecting the desired type from the category code list available under > in DFexplore. When a new study is started, the file is created. By default, the file is populated with the following: 1|Missing|1|0 2|Illegal|1|0 3|Inconsistent|1|0 4|Illegible|1|0 5|Fax Noise|1|0 6|Other|1|0 21|Missing Page|0|0 22|Overdue Visit|0|0 23|EC Missing Page|0|0
|
| Example |
1|Missing|1|0 2|Illegal|1|0 3|Inconsistent|1|0 4|Illegible|1|0 5|Fax Noise|1|0 6|Other|1|0 21|Missing Page|0|0 22|Overdue Visit|0|0 23|EC Missing Page|0|0 30|Clinical QC|1|1 50|Needs Review|0|1 37|Refuted|1|2 |
Table 2.37. .DFreports.dat - reports history
| Usual Name | .DFreports.dat |
| Type | clear text |
| Created By | DFexplore |
| Used By | DFexplore |
| Field Delimiter | | |
| Record Delimiter | \n |
| Comment Delimiter | # |
| Fields/Record | 9+ |
| Description |
Users create and save report history lists (including options) in much the same way that they create and save task lists. The reports history list for ail study users is stored in this file
in the study History lists are created in DFreport by executing the desired reports and then saving the history list. There is no text-based interface to this file or its contents. |
Table 2.38. DFschema - database schema
| Usual Name | DFschema[a]
| ||||
| Type | clear text | ||||
| Created By | DFsetup | ||||
| Used By | DF_QCupdate, DF_ICschema, DF_ICrecords, DF_SSvars, DF_SSschema, DFcmpSchema, DFimport.rpc, DFsas, DFsqlload | ||||
| Field Delimiter | \n | ||||
| Record Delimiter | \n\n | ||||
| Comment Delimiter | NA | ||||
| Fields/Record | 5+ | ||||
| Description |
The schema, or data dictionary, is generated/updated automatically by
DFsetup whenever a save is required for the study definition.
Each field is composed of a key letter (with a
leading The defined key letters and corresponding field types are listed in the Table 2.40, “Schema codes and their meaning”.
The
The scheduling attribute is unused by most programs except for
DF_QCupdate which searches the schema file for date fields which
use the
Each study schema begins, in order, with records defining values for the
%z DFSTUDY_USER1 TITLE
defines %y TITLE Acme Pharma Next Gen Skin Rejuvenator
defines
Thereafter, each new plate definition begins with a record defining values
for the
This is followed by records for each variable in that plate.
Each variable has a record that begins with an | ||||
| Example |
%S 254 %N 12 %B 1990 %Y 0 0 %Z 40 %P 1 %p Blood Pressure Screening Visits %n 35 %t simple %E 1 %R PrintCRF.shx %I 1 %i 10 %V DFstatus1 %v DFSTATUS %D DFdiscover Record Status %T choice SimpleChoice %A required %W 1 %L 0~6 %C 0 lost %C 1 final %C 2 incomplete %C 3 pending %C 4 FINAL %C 5 INCOMPLETE %C 6 PENDING %I 2 %i 11 %V DFvalid1 %v DFVALID %D DFdiscover Validation Level | ||||
[a] This file is present for users and programs that require backwards compatibility and are not able to read the JSON study definition. This file may be removed in a future release. | |||||
Table 2.39. DFschema.stl - database schema styles
| Usual Name | [a] |
| Type | clear text |
| Created By | DFsetup |
| Used By | DFsetup |
| Field Delimiter | \n |
| Record Delimiter | \n\n |
| Comment Delimiter | NA |
| Fields/Record | 2+ |
| Description |
This file is very much like the study schema,
Note that the style schema lists only field types that are defined by the style itself. It omits those definitions that are specified at the variable level. |
| Example |
%S 254 %N 51 %I 1 %T int SimpleNumber %A optional %I 2 %T date SimpleDate 1940 0 %A optional %W 8 %F dd/mm/yy %I 3 %T string SimpleString %A optional %I 4 %T choice SimpleChoice %A optional %L $(choices) %l 0 %c 0 |
[a] This file is present for users and programs that require backwards compatibility and are not able to read the JSON study definition. This file may be removed in a future release. | |
Table 2.40. Schema codes and their meaning
| Code | Relevance | Meaning |
|---|---|---|
| S | Study | DFdiscover study number |
| a | Study | production study number |
| b | Study | development study number |
| B | Study | year in which study database was defined |
| e | Study | Run edit checks in View mode |
| N | Study | the total number of user-defined plates in the setup (this
excludes plate 0 (new records), plate 510 (reasons for data change), and
plate 511 (queries). In DFschema.stl file this
represents total number of styles defined in the study |
| U | Study | DFdiscover version used to create setup |
| u | Study | DFdiscover version used on last setup change |
| Y | Study | reason is required for data change for specified fields (0=per field), for all fields (2=always), or for no field (1=never). These values are followed by the value for the 'Only if changing a non-blank value' setting; 0=no, 1=yes. |
| Z | Study | field description maximum length (25 or 40) |
| M | Study | number of new patients to be listed in patient binder |
| m | Study | enable Start New Subject dialog |
| P | Plate | plate number |
| n | Plate | total number of fields per plate; this includes the 6 DFdiscover default fields present on all records (i.e., DFstatus, DFcreate, DFmodify, etc.) |
| p | Plate | plate label |
| E | Plate | is the sequence number predefined (code
1) or is it the first data field
(code 2)? |
| R | Plate | plate arrival trigger. This tag identifies an executable shell script or program, located in the study ecbin or DFdiscover ecbin directories, which is executed on plate arrival. |
| t | Plate | does plate trigger early termination; "simple" = plate does not trigger early termination, "term" = plate triggers early termination |
| I | Field/Style | the field order number or the style index in the
DFschema.stl file |
| i | Field | the number that uniquely identify fields within a study |
| V | Field/Style | alias |
| v | Field/Style | name |
| D | Field/Style | description |
| g | Field/Style | the minimum validation level after which any changes to the data value will require a reason. This code is optional, or may be present and have the value 0, in which case a reason for a data change is never required. If a minimum validation code between 1-7 is present, it will be followed by the value for the 'Only if changing a non-blank value' setting; 0=no, 1=yes. |
| h | Field/Style | field visibility |
| L | Field/Style | legal values; where $(ids) has been used as a
legal range definition for patient id variables, the literal
$(ids) will be reported. |
| A | Field/Style | field optionality |
| F | Field/Style | format |
| H | Field/Style | help message |
| W | Field/Style | maximum number of stored characters |
| w | Field/Style | maximum number of displayed characters |
| J | Field/Style | edit check(s) on field entry |
| K | Field/Style | edit check(s) on field exit |
| j | Field/Style | edit check(s) on plate entry |
| k | Field/Style | edit check(s) on plate exit |
| c | Field/Style | code value and label definition for no choice |
| C | Field/Style | code value and label definition |
| s | Field/Style | number of fields to skip and condition |
| T | Field/Style | a compound value containing, in order:
|
| r | Field/Style | field's module name, instance number and description. |
| X | Field/Style | is field constant (0=no, 1=yes) and constant value (if constant) |
| y | Study/Plate/Field/Style | value for a custom property (tag) |
| z | Study/Plate/Field/Style | tag for a custom property, useful to replace a standard name |
Table 2.41. DFsetup - study definition
| Usual Name | DFsetup | |||
| Type | JSON | |||
| Created By | DFsetup | |||
| Used By | DFsetup, DFexplore, DFprintdb | |||
| Field Delimiter | NA | |||
| Record Delimiter | NA | |||
| Comment Delimiter | NA | |||
| Fields/Record | NA | |||
| Description |
The setup file contains the study definition in JSON format that can be read and written efficiently by DFsetup. It keeps the internal state of the program together with all of the information about study, page, and variable definitions. Many other study configuration files, such as the ICR tips file and study database schema, are constructed from this internal representation.
|
Table 2.42. DFserver.cf - server configuration
| Usual Name | DFserver.cf |
| Type | clear text |
| Created By | DFadmin |
| Used By | DFserver.rpc |
| Field Delimiter | = |
| Record Delimiter | \n |
| Comment Delimiter | # |
| Fields/Record | 2 |
| Description |
Each study database server is configured by this file.
The study server configuration keywords and their meanings are given in
the Table 2.43, “ |
| Example |
STUDY_NUMBER=254 STUDY_NAME=DFdiscover Acceptance Test Study STUDY_DIR=/opt/studies/val254 PAGE_DIR=$(STUDY_DIR)/pages WORKING_DIR=$(STUDY_DIR)/work PRINTER=hp4000 THRESHOLD=500000 STUDY_URL=http://www.ourstudy.com/index.html LOCAL_CACHE=1 VERSION_STRICT=0 AUTO_LOGOUT=5|30 ADD_IDS=1|| VERIFY_IDS=0| |
Table 2.43. DFserver.cf configuration keywords
| Keyword | Meaning |
|---|---|
STUDY_NUMBER | the unique study number identifier. Legal values are in the range
1 to 999 inclusive. |
STUDY_NAME | a descriptive name or acronym for the study. This name appears, among other places, in the toolbox frame label. Its recommended length should be no more than 20 characters. |
STUDY_DIR | the study root (highest-level) directory. All other study related
directories should be sub-directories of this directory and should accomplish
this by referencing $(STUDY_DIR) in their value.
This directory, by default, is writable by both user and group and is owned by
datafax. |
PAGE_DIR | the root directory for all CRF image files. This directory has
sub-directories named by year and week within year. Within each of these
sub-directories each CRF page image is numbered sequentially by page number
within fax number.
By default, this directory is defined as
$(STUDY_DIR)/pages
and is writable only by user datafax. |
WORKING_DIR | the root directory for all study specific temporary or work files. Any
temporary files created by report programs should be written in this directory.
By default, this directory is defined as
$(STUDY_DIR)/work
and is writable only by user datafax and group. |
PRINTER or PRINT_CMD | default printer for the study. |
THRESHOLD | the minimum number of Kilobytes of free disk space in the partition containing the study data directory. During normal operation, the study server will exit when the free disk space in this partition drops below the threshold value. Further connections to the study server will fail until additional disk space is made available or the threshold is reduced. |
AUTO_LOGOUT | a compound value expressed as two numbers delimited with a
|.
Both numbers represent a time interval expressed in minutes.
The first number is the minimum number of minutes that any study user can
choose for their auto logout interval; the second is the maximum number of
minutes.
|
VERSION_STRICT | a true (1) or false (0) value specifying whether the study server accepts client connections from the current minor release version only, or client connections with any minor release version. The major release version must always match. |
LOCAL_CACHE | a true (1) or false (0) value specifying whether the study server allows a client application to cache, in local storage, setup information (but never data) about the study. |
STUDY_URL | for future use only, and is currently not used. |
ADD_IDS | for future use only, and is currently not used. |
VERIFY_IDS | for future use only, and is currently not used. |
Table 2.44. DFsubjectalias_map - subject alias map
| Usual Name | DFsubjectalias_map |
| Type | clear text |
| Created By | DFsetup |
| Used By | All DFdiscover applications, except for legacy reports |
| Field Delimiter | | |
| Record Delimiter | \n |
| Comment Delimiter | NA |
| Fields/Record | 2 |
| Description |
This file is optional for a study. If defined, it must be located
in
The file contains zero or more rows, each row containing 2 fields and
the fields are delimited by For more information, see Study Setup User Guide, Subject Alias Map. |
| Example |
150040|T1-B-40 150041|T1-B-41 150042|T1-B-42 150043|T1-B-43 150044|T1-B-44 150045|T1-B-45 200006|T2-A-6 200007|T2-A-7 200008|T2-A-8 200009|T2-A-9 200010|T2-A-10 |
[a] There are a few exceptions, for example subject aliases are not implemented in any legacy reports. | |
Table 2.45. DFsubjectalias_map.log - subject alias change log
| Usual Name | DFsubjectalias_map.log |
| Type | clear text |
| Created By | DFserver.rpc; |
| Used By | DFserver.rpc |
| Field Delimiter | | |
| Record Delimiter | \n |
| Comment Delimiter | NA |
| Fields/Record | 7 |
| Description |
This file is optional for a study. If defined, it must be located
in
The file contains zero or more rows, each row containing 7 fields where
the fields are delimited by |
| Example |
200703|174748|userB|n|500003|T5-B-3| 200703|180202|userB|n|250009|T2-A-259| 200703|180219|userB|c|250009|T25-A-9|T2-A-259 200722|112345|userA|d|200004||T2-A-4 200722|112345|userA|d|200005||T2-A-5 |
Table 2.46. Field definitions for DFsubjectalias_map.log
| Field # | Description | Required | Maximum Size |
|---|---|---|---|
| 1 | Date | yes | 6 digits |
| 2 | Time | yes | 6 digits |
| 3 | Name | yes | up to 16 characters |
| 4 | Log Type (n = new alias, c = change alias, d = delete alias); for new, field 6 is required; for change, fields 6 and 7 are required; for delete, field 7 is required | yes | 1 character |
| 5 | Subject ID | yes | 15 digits |
| 6 | Subject Alias (new) | no | 30 UNICODE characters |
| 7 | Subject Alias (old) | no | 30 UNICODE characters |
Table 2.47. DFtips - ICR tips
| Usual Name | DFtips |
| Type | clear text |
| Created By | DFsetup |
| Used By | DFinbound.rpc |
| Field Delimiter | \n |
| Record Delimiter | .\n |
| Comment Delimiter | # |
| Fields/Record | 3+ |
| Description |
The purpose of this file is to document the location, size, and type of each data field on each study plate. This information is parsed and used by during its ICR processing of each CRF image file.
The tips file begins with 4 comment lines which identify the study number,
name, number of CRF plates that have been defined and the date on which
the tips file was created. This is followed by
the keyword The above header information is followed by N plate definitions, where N is the number of unique plates defined for the study. Each plate definition begins with plate specific information followed by M variable definitions, where M is the number of variables defined on that plate. Each variable definition includes: the data field number and unique name, the data type, legal values (if any were specified), the size of the boxes, or VAS line, used to record the data field, and its location on the CRF image that was used to define the plate in DFsetup.
Each field in the tips file has a leading keyword separated from the value by a
The plate specific keywords are listed in
Table 2.48, “ |
| Example |
# Study Number: 253 # Study Name: Demo Study 253 # Total Pages: 14 # Created: Wed Dec 1 12:33:29 2004 DELIMITER | PAGE 1 PLATE 1 # Blood Pressure Screening Visits SEQ_CODE 1 PREOP echo "$image $data" >> /tmp/test DO_ICR 2 # FAX: plt001 FIELD 1 # ID001 TYPE int LEGAL $(ids) PART 106 84 2 50 25 PART 167 84 3 74 25 . FIELD 2 # PINIT001 TYPE string skip PART 380 84 3 74 25 . FIELD 3 # AGE TYPE int LEGAL 21-90 PART 79 182 2 50 25 . FIELD 4 # SEX TYPE choice LEGAL 0,1,2, blank PART 0 0 0 0 0 # blank PART 277 189 1 1 15 # male PART 277 212 1 2 15 # female . FIELD 5 # RACE TYPE choice LEGAL 0-65535 PART 0 0 0 0 0 # no choice PART 464 188 1 1 15 # Caucasian PART 464 213 1 2 15 # African American PART 464 238 1 3 15 # Asian PART 464 263 1 4 15 # Other . FIELD 6 # RACEOTH TYPE string skip PART 588 257 1 107 26 . FIELD 7 # S1DATE TYPE date FORMAT dd/mm/yy DATES 1940 0 LEGAL 01/01/01-today PART 172 330 2 49 25 PART 232 330 2 50 25 PART 295 330 2 49 25 |
Table 2.48. DFtips plate specific keywords
| Keyword | Description |
|---|---|
| PAGE | an internal page number that simply sequences the plate definitions |
| PLATE | the unique plate number that is being defined |
| SEQ_CODE | a code to indicate whether the visit/sequence number is in the barcode or the first data field. Legal values are: 1=barcoded, 2=first data field. |
| PREOP | a shell command that is to be executed before the ICR processing for any occurrences of this plate begins. This keyword is optional. |
| POSTOP | a shell command that is to be executed after the ICR processing for any occurrences of this plate ends. This keyword is optional. |
| DO_ICR | a code that indicates whether or not ICR processing should be performed on occurrences of this plate. Legal values are: 1=yes perform ICR, 2=no do not perform ICR. |
Table 2.49. DFtips variable specific keywords
| Keyword | Description | ||||
|---|---|---|---|---|---|
| FIELD | the data field number as it is sequenced on the form. This will not be the same number as the field number that the data value is eventually stored in. The first data field is the visit/sequence number if SEQ_CODE=2; otherwise, the first data field is the subject ID. Hence to determine the actual field number in the database record, add 5 if SEQ_CODE=2; and add 6 if SEQ_CODE=1. | ||||
| TYPE | data field type. Legal values are: int=integer, string=text fields, date=date, choice=choice, check=check, vas=visual analog scale, and numeric=a rectangular box containing 2 or more digits. The numeric data type is internal to the tips file and is not used anywhere else in DFdiscover. They are defined in DFsetup as strings with pre-printed numerals, although they can also be used for hand-written numbers. The type record ends in the keyword 'skip' if the field is not to be ICRed. Strings and hidden fields (i.e. fields which do not appear on the paper CRF) will be automatically marked as ICR skips by DFsetup. | ||||
| FORMAT | the format, if any, that is to be applied to the ICRed value before it is added to the database record. Typical values include: mm/dd/yy (which inserts the '/' delimiters into dates), nn.n (which inserts a decimal point). | ||||
| DATES | the pivot year and imputation method to be used for interpreting 2-digit
years (applicable only if the current field is of type date). The imputation
method is one of:
| ||||
| LEGAL | the legal value definition for the field. This is the same definition defined in the study schema. If an ICRed value is illegal, the value for that field is left blank in the data record generated by the ICR software. | ||||
| PART | defines the location, size and coding for each part of the data field. String, check, numeric and VAS fields consist of just one part but choice fields have a part definition for each choice box and dates and ints may be comprised of more than one separate parts. Each part record consists of 5 or 6 space delimited components. For all field types the first 2 components are the x and y location of the field on the CRF plate, with x increasing from left to right and y increasing from top to bottom. The location is given in units corresponding to standard fax resolution (i.e. 102 units per inch horizontally and 98 units per inch vertically). For each part the x value is 8 units left of the first box or VAS line, and the y value gives the location of the middle of the box or VAS line. The meaning of the remaining components depends on the field type. For int, date, and string fields they are: the number of boxes in the part, the total length of the part (enclosing all boxes) and the height of the part. For numeric fields they are: the maximum number of digits in the data field, the total length of the rectangular box and height of the box. For VAS scales they are: the length of the scale, the minimum and maximum values at the ends of the scale, and the precision (i.e. number of decimal places) in the stored value. For check fields they are: the number of boxes (always 1), the code value to be stored in the database if the box is not check, the code if checked, and the edge dimension of the box. And for choice fields they are: the number of boxes (always 1), the code value to be stored in the database if the box is checked, and the edge dimension of the box. For check and choice fields each box is assumed to be square. Choice fields also have a special PART record in which all components are zero expect for the 4th one which specifies the code value stored in the database if none of the choice boxes are checked. |
Table 2.50. DFvisit_map - visit map
| Usual Name | DFvisit_map |
| Type | clear text |
| Created By | DFsetup |
| Used By | DF_QCupdate, DF_ICvisitmap, DF_SSvisitmap |
| Field Delimiter | | |
| Record Delimiter | \n |
| Comment Delimiter | NA |
| Fields/Record | 12 |
| Description |
The visit map file describes the subject assessments to be completed during the study, the timing of these assessments, and the pages of the study CRFs which must be completed at each assessment. Each assessment is identified by a visit type. There must always be a baseline visit which is typically the date on which the subject qualified for entry to the trial and was randomized. There must also be a termination visit which ends study follow-up. Between baseline and termination there are often several scheduled visits, subject diaries, laboratory tests, and perhaps a few unscheduled visits. At each of these visits there will be a set of required (and possibly optional) forms to be completed.
Each visit is defined in a single record of the visit map.
The fields in each record are described in
Table 2.51, “ For additional information regarding visit maps, refer to Standard Reports Guide, DF_QCupdate and Study Setup User Guide, Visit Map. |
| Example |
A simple 4-visit visitmap: 0|B|Baseline|1|9 (mm/dd/yy)|0|0| 1 2 3 4 5 6 7 8||99|3 4 1 2 5 6 8 7 10|S|One Week Followup|9|9 (mm/dd/yy)|7|0| 9 10 14|||| 20|S|Two Week Followup|9|9 (mm/dd/yy)|14|0| 9 10|||| 30|T|Termination Visit|9|9 (mm/dd/yy)|21|0| 11 12||||
|
Table 2.51. DFvisit_map field descriptions
| Field # | Contains | Description | ||||
|---|---|---|---|---|---|---|
| 1 | visit number | the unique visit number, which can be any number between 0 and 65535 inclusive. For all scheduled visits, (types P, B, S, T), the numerical value of visit numbers must correspond to the sequential ordering of the visits in time. | ||||
| 2 | visit type | a 1 character code for the type of visit. Legal values are enumerated in Table 2.52, “Visit codes and their meaning”. | ||||
| 3 | visit label | a short (maximum 40 character) textual description of the visit that will be used in quality control reports to identify the visit when it is overdue. | ||||
| 4 | visit date plate | the plate on which the visit date can always be found. This must be one of the required plates listed in field 8. Obviously other plates will have visit dates, however, this is the one that will be used when visit dates (potentially conflicting) appear on several pages of the same visit. | ||||
| 5 | visit date field & format | the data field number of the visit date on the plate identified in field 4 and its format. The allowable date formats include any combination of yy (year), mm (month), and dd (day) so long as each occurs exactly once. Delimiter characters are optional between the 3 parts. Note: this date field must be defined using the VisitDate attribute. | ||||
| 6 | visit due day | the number of days before/after the baseline visit that the visit is scheduled. The baseline visit must have a value of 0, and pre-baseline visits must have negative values. | ||||
| 7 | visit overdue allowance | the number of days that a scheduled visit is allowed to be late. Visits are considered overdue if they have not arrived within this number of days following the visit due day. | ||||
| 8 | required plates | a space character delimited list of plate numbers for CRFs that are required to be completed on this visit (maximum 1200 characters). | ||||
| 9 | optional plates | a space character delimited list of plate numbers for CRFs that may be completed on this visit, but are not required (maximum 1200 characters). | ||||
| 10 | missed visit notification plate | a plate number which if received, indicates that the visit number coded on that plate was missed, and hence that Query Reports should not complain that this visit is overdue, or that it has missing pages. | ||||
| 11 | termination window | for visit type W, a termination window is required and may be one of the
following forms:
| ||||
| 12 | display order | a comma- or space-delimited range list of required and optional plate numbers. The order specified here determines the order in which pages within a given visit are to be displayed in the DFexplore subject binder. |
Table 2.52. Visit codes and their meaning
| Code | Meaning | Scheduled | When Required |
|---|---|---|---|
| C | cycle | no|yes | cycles are used to group visits. For additional information regarding cycle entries, refer to Study Setup User Guide, Cycle Specifications. |
| X | screening | no | if subject enters the trial (baseline arrives) |
| P | scheduled pre-baseline visit | yes | before arrival of baseline visit |
| B | baseline | yes | can be scheduled from a pre-baseline visit |
| S | scheduled follow-up | yes | scheduled from the baseline visit |
| O | optional follow-up | no | not required |
| r | required by time of next visit | no | before arrival of the next visit |
| T | cycle termination visit | yes | scheduled from the baseline visit |
| R | required by time of termination visit | yes | on termination if scheduled pre-termination |
| E | early termination of current cycle | no | if early termination event occurs |
| A | abort all cycles | no | if abort event occurs |
| F | final visit (terminates all cycles) | no | terminate multi-cycle visit maps |
| W | study termination window | yes | absolute date scheduling of final visit |
Table 2.53. DFwatermark - watermark
| Usual Name | DFwatermark |
| Type | clear text |
| Created By | DFadmin |
| Used By | DFexplore, DFpdf, DFpdfpkg |
| Field Delimiter | | |
| Record Delimiter | \n |
| Comment Delimiter | NA |
| Fields/Record | 9 |
| Description |
The In determining which watermark to use, the records are searched in sequential order from the beginning of the file. The first record to match, based upon the current user's role and the role(s) in the record, is selected. |
| Example |
draft|Draft watermark|DRAFT|20|255,0,0|50|1|1|unrestricted,Sites
|
Table 2.54. DFwatermark field descriptions
| Field # | Contains | Description |
|---|---|---|
| 1 | name | The unique name for the watermark. |
| 2 | description | A description of how and why the watermark is used for this role. |
| 3 | watermark text | The text of the watermark. |
| 4 | size | The point size of the font. |
| 5 | color | The color of the watermark in RGB space in the format 0-255,0-255,0-255. |
| 6 | transparency | The transparency of the watermark as a percentage from 0 (opaque) to 100 (transparent). |
| 7 | position | The placement of the watermark on the page - 1=top, 2=center or 3=bottom. |
| 8 | frame | A flag to indicate if the watermark is framed (1) or not (0). |
| 9 | roles | A comma delimited list of roles that may use this watermark. |
Table 2.55. QCcovers - Query cover pages
| Usual Name | QCcovers | |||
| Type | clear text | |||
| Created By | text editor | |||
| Used By | DF_QCreports | |||
| Field Delimiter | NA | |||
| Record Delimiter | NA | |||
| Comment Delimiter | # | |||
| Fields/Record | NA | |||
| Description |
External Quality Control report cover sheets can be included by defining
them in the file A cover sheet begins with a <FOR center="#list"> tag to identify the site(s) that are to receive the cover sheet. It is legal for some sites to receive cover sheets while others do not, and for different sites to receive different cover sheets.
Cover sheets are defined using a
If more than one cover sheet is defined and a site ID is included in the
Sites not specified in either
| |||
| Example |
The following is an example of an English and French version of a cover sheet for an international trial, where sites 20 to 29 inclusive use French, and all other sites use English. <FOR centers="1~19,30~300"> <TEXT font="^P12 fB"> -------------------------------------------------------------- PLEASE DELIVER THIS FAX TO THE FITNESS STUDY COORDINATOR TO: <WHO> Site <CENTER>: <WHERE> <DATE> </TEXT> </FOR> <FOR centers="20~29"> <TEXT font="^P12 fB"> -------------------------------------------------------------- DONNEZ CE RAPPORT AU COORDINATOR DE RECHERCHE POUR FITNESS, S'IL VOUS PLAIT TO: <WHO> Site <CENTER>: <WHERE> <DATE> </TEXT> </FOR>
|
Table 2.56. QCmessages - Query Report messages
| Usual Name | QCmessages | |||
| Type | clear text | |||
| Created By | text editor | |||
| Used By | DF_QCreports | |||
| Field Delimiter | NA | |||
| Record Delimiter | NA | |||
| Comment Delimiter | # | |||
| Fields/Record | NA | |||
| Description |
Cover sheets may include messages for all or specified site IDs. Messages
are stored in the file
The file
It is unnecessary to define a cover sheet in order to use messages. If a
message is specified for a site which has not been defined in
| |||
| Example |
In the following example all site IDs (1 to 300 inclusive) receive the announcement of an upcoming meeting. For site IDs 1, 4, 22 to 24, and 127, this is followed by an important message regarding their lack of response to data queries. <FOR center="1~300"> <TEXT font ="^P12 fB"> -------------------------------------------------------------- PLEASE NOTE: </TEXT> <TEXT font="^P10 fCW"> The next FITNESS Study investigator's meeting will be held on October 9-10, 1999 in Orlando, Florida. Location and times will follow at a later date. </TEXT> </FOR> <FOR center="1,4,22~24,127"> <TEXT font="^P12 fB"> -------------------------------------------------------------- IMPORTANT! </TEXT> <TEXT font="^P10 fCW"> We have not received any corrections related to the Quality Control reports we have sent to your site over the last 2 months. Please make every attempt to resolve the outstanding data queries as soon as possible. By protocol and agreement with the FDA, all adverse events must be reviewed by us within 3 days of each subject assessment. If you are having problems of any kind, please let us know. </TEXT> </FOR>
|
Table 2.57. QCtitles - Query Report titles
| Usual Name | QCtitles | |||
| Type | clear text | |||
| Created By | text editor | |||
| Used By | DF_QCreports | |||
| Field Delimiter | NA | |||
| Record Delimiter | NA | |||
| Comment Delimiter | # | |||
| Fields/Record | NA | |||
| Description |
The external or internal report title and sub-titles for each of the 3 sections (Subject Status, Refax List, Q & A List) of a DFdiscover Quality Control report may be specified in this file. DF_QCreports checks for the existence of this file and will use it if it exists, otherwise standard titles will be produced.
Title specifications must be formatted exactly as shown in the examples
to
follow. The opening and closing tags must appear on new lines by themselves,
with no leading or trailing text outside of the tag. Anything entered outside
of a tagged block is ignored. The Tags are only recognized if they begin a new line. Nothing is to precede the tag symbol '<'. No space is allowed within the opening and closing tag except before the word "font". The "font" value must be enclosed in double quotes.
Limited font specifications may be included within the opening tag as
listed in Table 2.58, “ The font specification is optional. By default, font
The variables enumerated in Table 2.59, “Variables available for use in QCcovers, QCmessages, and QCtitles” may be included in the external and internal report titles which appear at the top of each page, but not in the sub-titles for the 3 parts of the report (status, refax and question & answer lists).
| |||
| Example |
Here is an example of a # TITLE AT THE TOP OF EACH PAGE OF AN EXTERNAL QUERY REPORT <EXTERNAL font="^P12 fB"> FITNESS STUDY REPORT <NUM> for: <MON> <DAY>, <YEAR> at <TIME> TO: <WHO>, <WHERE> </EXTERNAL> # TITLE AT THE TOP OF EACH PAGE OF AN INTERNAL QUERY REPORT <INTERNAL font="^P12 fB"> INTERNAL QC REPORT: <NAME> page <PAGE> created: <YEAR>-<MON>-<DAY> </INTERNAL> #SUB-TITLE ABOVE THE SUBJECT STATUS LIST (Part 1 of a standard external Query Report) <STATUSLIST font="^P10 fB"> SUBJECT VISIT SCHEDULE: Note: *identifies subjects with data queries. </STATUSLIST> #SUB-TITLE ABOVE REFAX LIST (Part 2 of a standard external Query Report) <REFAXLIST font="^P10 fB"> CRF CORRECTIONS: Initial and date each correction. Refax all corrected pages without delay. </REFAXLIST> # SUB-TITLE ABOVE THE QUESTION AND ANSWER LIST (Part 3 of a standard external Query Report) <QALIST font="^P10 fB"> QUERIES: Print your response below each question and fax back this page. </QALIST>
|
Table 2.59. Variables available for use in QCcovers, QCmessages, and QCtitles
| Variable | Use in External | Use in Internal | Meaning | ||
|---|---|---|---|---|---|
<STUDYNAME> | yes | yes | study name | ||
<SITE>
[a] | yes | no | site ID | ||
<WHO> | yes | no | primary site contact | ||
<WHERE> | yes | no | site affiliation | ||
<MAIL> | yes | no | site mailing address | ||
| yes | no | primary fax number (to which Query Reports are sent) | ||
<FAX2> | yes | no | secondary fax number | ||
<PHONE1> | yes | no | primary contact's phone number | ||
<PI> | yes | no | principal investigator | ||
<PHONE2> | yes | no | principal investigator's phone number | ||
<REPLYTO> | yes | no | email address to which replies made to emailed Query Reports will be sent | ||
<NUM> | yes | no | external report name composed of site ID, date (yymmdd), and page, e.g. 025-080115-01. | ||
<NAME> | yes | yes | external report name composed of site ID and date only, e.g. 025-080115 | ||
<PAGE> | yes | yes | page number of Query Report | ||
<DAY> | yes | yes | two-digit day of month | ||
<MON> | yes | yes | three-character month of year | ||
<YEAR> | yes | yes | four-digit year | ||
<WKDAY> | yes | yes | three-character day of week | ||
<TIME> | yes | yes | time of day (hh:mm:ss AM/PM), e.g. 01:12:22 PM | ||
<DATE> | yes | yes | date (ddd mmm dd hh:mm:ss yyyy), e.g. Tue Jan 15 14:34:07 2018 | ||
[a] The variable
| |||||
Table 2.60. DFreportstyle - DFdiscover Report styling
| Usual Name | DFreportstyle |
| Type | clear text |
| Created By | text editor |
| Used By | DFdiscover reports, excluding Legacy reports |
| Field Delimiter | NA |
| Record Delimiter | NA |
| Comment Delimiter | NA |
| Fields/Record | NA |
| Description |
The file contains two optional sections, a
|
| Example |
<script type="application/json" id="dfreportjson">{
"palettes": {
    "Corporate": ["#26456e", "#3a87b7", "#b4d4da", "#1c5998", "#67add4", "#1c73b1", "#7bc8e2"],
    "Diverging" : ["#000066", "#6699ff", "#ffff00", "#3333ff", "#99ccff", "#ffff99", "#cc9900",
    "# 3366ff", "#ccccff", "#ffff66", "#663300"],
    "Monochrome": ["#1a1a1a", "#666666", "#b3b3b3", "#333333", "#808080", "#cccccc", "#4d4d4d",
    "#999999", "#e6e6e6"],
    "Color blind": ["#006ba4", "#ff800e", "#595959", "#5f9ed1", "#c85200", "#898989", "#a2c8ec",
    "#ffbc79", "#cfcfcf"]
}
}</script>
<style id="dfreportcss">
/* Body font */
body {
    font: 100% arial, sans-serif;
}
/* Title font */
.contextText.reportNameText {
    font: italic bold 1.5em Helvetica, serif;
}
/* Heading font */
.c3-title {
    font: 1.2em Helvetica, serif;
}
/* Axis label font */
.c3-axis-y-label, .c3-axis-x-label {
    font: normal 1.2em Helvetica, sans-serif;
}
</style>
|
This directory contains all the lookup tables used in the study.
Table 2.61. Lookup tables
| Usual Name | None |
| Type | clear text |
| Created By | text editor |
| Used By | DFexplore, DFbatch |
| Field Delimiter | | |
| Record Delimiter | \n |
| Comment Delimiter | NA |
| Fields/Record | 1+ |
| Description |
A lookup table is a simple ASCII file. If it is anything other than this, an error message will appear on the command-line upon starting DFbatch.
Each lookup table file must be associated with a symbolic table name in the lookup table map
in order to be used by the Within a lookup table, each record has at least 1 field. The first field is a short acronym (the search field), and the subsequent fields are the lookup text. If the record has only one field, it is the search and the result field (this is useful for spell checking). If the record has 2 fields, the first field is the search key and the second is the return value. An example query lookup table with two fields is illustrated below.
Records may also have 3+ fields (e.g COSTART tables, MedDRA), where the
first field is the search key and all other fields are returned as a single
delimited string that can be parsed using the Within the lookup table structure, the search field is typically short but has no maximum length. The lookup text fields have no maximum length; however, they are truncated to the maximum length of the data field into which they are inserted. Multi-field lookup tables can also support a more flexible structure as illustrated below. These lookup tables contain 3 header rows which define the structure of the table.
If a lookup table is defined for a study data field, the defined lookup text can be retrieved in 2 ways. If the user remembers the acronym (first field) the lookup value can be entered by typing the acronym in the current data field and pressing Enter. The acronym is then replaced with the value from the matching lookup table record. Matching on the acronym is performed case-insensitive. Alternatively the user can simply press Enter without giving an acronym, to pop-up a scrolling list of all acronyms and their lookup text, and then click on the desired choice. |
| Example |
a|before AA|auto accident (MVA) A&P|anterior & posterior abd|abdomen abg|arterial blood gases ac|before meals acid phos|acid phosphatase ACLF|adult congregate living facility ACTH|adrenocorticotrophic hormone acute MI|acute myocardial infarction ad|right ear Ad|up to Ad lib|as desired BaE|barium enema Ba|barium BB|blood bank BCP|biochemical profile BE|barium enema BEE|basal energy expenditure |
This directory contains summary files created by DF_QCupdate, DFdiscover retrieval files, and temporary files created during the execution of reports and other programs.
Table 2.62. DFX_ccycle - cycle conditions met
| Usual Name | DFX_ccycle |
| Type | clear text |
| Created By | DF_QCupdate |
| Used By | DF_PTvisits |
| Field Delimiter | | |
| Record Delimiter | \n |
| Comment Delimiter | NA |
| Fields/Record | 4+ |
| Description |
This file records the conditions defined in the conditional cycle map that were met for each subject. It is updated each time DF_QCupdate is run.
Table 2.63, “ |
| Example |
The following example shows 3 conditions (1,4 and 6), that were met for subject 11020. These conditions were met at visits 10,5 and 60 respectively, with data values 2, 98 and 0 respectively. To determine the actions triggered by these conditions we would need to consult the conditional cycle map to determine which cycles are affected by each condition. 11020|10|1|2 11020|5|4|98 11020|60|6|0
|
Table 2.63. DFX_ccycle conditional cycle map conditions that were met
| Field # | Contains | Description |
|---|---|---|
| 1 | Subject ID | subject ID number |
| 2 | Visit Number | visit or sequence number at which the condition was met, taken from the IF statement if the condition includes both IF and AND statements |
| 3 | Condition Number | condition number, from the order in which conditions are defined in the conditional cycle map |
| 4+ | data value(s) | the database value(s) that resulted in the condition being met, for each IF and AND statements defined in the condition (in statement order) |
Table 2.64. DFX_cvisit - visit conditions met
| Usual Name | DFX_cvisit |
| Type | clear text |
| Created By | DF_QCupdate |
| Used By | DF_PTvisits |
| Field Delimiter | | |
| Record Delimiter | \n |
| Comment Delimiter | NA |
| Fields/Record | 4+ |
| Description |
This file records the conditions defined in the conditional visit map that were met for each subject. It is updated each time DF_QCupdate is run.
Table 2.65, “ |
| Example |
The following example shows 3 conditions (1,4 and 6), that were met for subject 11020. These conditions were met at visits 10,5 and 60 respectively, with data values 2, 98 and 0 respectively. To determine the actions triggered by these conditions we would need to consult the conditional visit map to determine which visits are affected by each condition. 11020|10|1|2 11020|5|4|98 11020|60|6|0
|
Table 2.65. DFX_cvisit conditional visit map conditions that were met
| Field # | Contains | Description |
|---|---|---|
| 1 | Subject ID | subject ID number |
| 2 | Visit Number | visit or sequence number at which the condition was met, taken from the IF statement if the condition includes both IF and AND statements |
| 3 | Condition Number | condition number, from the order in which conditions are defined in the conditional visit map |
| 4+ | data value(s) | the database value(s) that resulted in the condition being met, for each IF and AND statements defined in the condition (in statement order) |
Table 2.66. DFX_cplate - plate conditions met
| Usual Name | DFX_cplate |
| Type | clear text |
| Created By | DF_QCupdate |
| Used By | DF_PTvisits |
| Field Delimiter | | |
| Record Delimiter | \n |
| Comment Delimiter | NA |
| Fields/Record | 4+ |
| Description |
This file records the conditions defined in the conditional plate map that were met for each subject. It is updated each time DF_QCupdate is run.
Table 2.67, “ |
| Example |
The following example shows 3 conditions (1,4 and 6), that were met for subject 11020. These conditions were met at visits 10,5 and 60 respectively, with data values 2, 98 and 0 respectively. To determine the actions triggered by these conditions we would need to consult the conditional plate map to determine which plates are affected by each condition. 11020|10|1|2 11020|5|4|98 11020|60|6|0
|
Table 2.67. DFX_cplate conditional plate map conditions that were met
| Field # | Contains | Description |
|---|---|---|
| 1 | Subject ID | subject ID number |
| 2 | Visit Number | visit or sequence number at which the condition was met, taken from the IF statement if the condition includes both IF and AND statements |
| 3 | Condition Number | condition number, from the order in which conditions are defined in the conditional plate map |
| 4+ | data value(s) | the database value(s) that resulted in the condition being met, for each IF and AND statements defined in the condition (in statement order) |
Table 2.68. DFX_cterm - termination conditions met
| Usual Name | DFX_cterm |
| Type | clear text |
| Created By | DF_QCupdate |
| Used By | DF_PTvisits |
| Field Delimiter | | |
| Record Delimiter | \n |
| Comment Delimiter | NA |
| Fields/Record | 4+ |
| Description |
This file records the conditions defined in the conditional termination map that were met for each subject. It is updated each time DF_QCupdate is run.
Table 2.69, “ |
| Example |
The following example shows 3 conditions (1,4 and 6), that were met for subject 11020. These conditions were met at visits 10,5 and 60 respectively, with data values 2, 98 and 0 respectively. To determine the actions triggered by these conditions we would need to consult the conditional termination map to determine which cycles are affected by each condition. 11020|10|1|2 11020|5|4|98 11020|60|6|0
|
Table 2.69. DFX_cterm conditional termination map conditions that were met
| Field # | Contains | Description |
|---|---|---|
| 1 | Subject ID | subject ID number |
| 2 | Visit Number | visit or sequence number at which the condition was met, taken from the IF statement if the condition includes both IF and AND statements |
| 3 | Condition Number | condition number, from the order in which conditions are defined in the conditional termination map |
| 4+ | data value(s) | the database value(s) that resulted in the condition being met, for each IF and AND statements defined in the condition (in statement order) |
Table 2.70. DFX_keys - key fields for all required plates
| Usual Name | DFX_keys |
| Type | clear text |
| Created By | DF_XXkeys |
| Used By | DF_CTvisits, DF_PTcrfs, DF_QCupdate |
| Field Delimiter | | |
| Record Delimiter | \n |
| Comment Delimiter | NA |
| Fields/Record | 5 |
| Description |
This file records the key fields from all required plates found in the database. It is updated each time DF_XXkeys is run.
Table 2.71, “ |
| Example |
The following example shows 4 records for subject 1044, for plates 3,2,1 and 2 respectively at visits 51,61,92 and 211 respectively. All plates have status 1=final and are at validation level 7. 1044|3|51|1|7 1044|2|61|1|7 1044|1|92|1|7 1044|2|211|1|7
|
Table 2.71. DFX_keys key fields from all required plates
| Field # | Contains | Description |
|---|---|---|
| 1 | Subject ID | subject ID number |
| 2 | Plate number | CRF plate number |
| 3 | Visit Number | visit or sequence number |
| 4 | Status | 1-7 |
| 5 | Validation level | 1-7 |
Table 2.72.
DFX_schedule - subject scheduling and visit status
| Usual Name | DFX_schedule |
| Type | clear text |
| Created By | DF_QCupdate |
| Used By | DF_QCreports, DF_PTmissing, DF_PTvisits |
| Field Delimiter | | |
| Record Delimiter | \n |
| Comment Delimiter | NA |
| Fields/Record | 16 for cycle records, and 18 for visit records |
| Description |
This file records the current scheduling and status of all cycles and visits defined in the study visit map, for each subject. It is updated each time DF_QCupdate is run.
Table 2.73, “field definitions for cycle records in |
| Example |
The following example shows the current status for one subject (id=1031) in a study having 3 cycle. The screening cycle consists of visits 91 and 92. The in-study cycle is required and has 8 visits beginning with pre-baseline visit 51 and ending with early termination visit 81. The end cycle contains a single abort visit (visit number 80). 1031|1|0|C|S|1|7||||||03/09/21|37884|| 1031|1|0|91|X|1|7|||||||03/09/21|37884||| 1031|1|0|92|X|1|1|||||||03/09/28|37891||| 1031|1|1|C|R|1|7||||||~03/10/07|37900|| 1031|1|1|51|P|1|7|||||||03/10/05|37898|03/10/05|37898| 1031|1|1|0|B|4|0|-1|10|51|||||||| 1031|1|1|61|r|1|1|||||||04/01/06|37991||| 1031|1|1|3|S|2|1|||||||04/01/06|37991||| 1031|1|1|6|S|1|0|||||||04/04/07|38083||| 1031|1|1|9|S|1|0|||||||04/07/07|38174||| 1031|1|1|12|T|1|0|||||||04/10/06|38265||| 1031|1|1|81|E|3|0||||||||||| 1031|1|2|C|E|0|0|||||||||| 1031|1|2|80|A|3|0|||||||||||
|
Table 2.73. field definitions for cycle records in DFX_schedule
| Field # | Contains | Description |
|---|---|---|
| 1 | Subject ID | subject ID number |
| 2 | Site ID | clinical site number |
| 3 | Cycle Number | cycles are numbered sequentially within the visit map, using 0 for screening, if present, and starting at 1 for the first in-study cycle. |
| 4 | C | the capital letter C appears in this field to distinguish cycle records from visit records |
| 5 | Cycle Type | cycles are defined in the visit map as one of: S=screening, R=in-study required, O=in-study optional, C=in-study conditional, and E=end |
| 6 | Cycle Need | cycle need, after applying all conditional and termination rules, can be one of: 0=unknown, 1=required, 2=next required cycle, 3=optional, and 4=excluded |
| 7 | Cycle Status | the current status of the cycle (as of the date on which DF_QCupdate was last run) can be one of: 0=not done, 1=overdue, 7=done, 8=cycle has terminated, 9=cycle was aborted |
| 8 | Condition need | cycle need set by a condition in the conditional cycle map; one of: 0=optional, 1=required, -1=excluded |
| 9 | Condition number | the number of the condition as defined within the conditional cycle map |
| 10 | Condition sequence number | visit or sequence number at which the condition was met (from IF statement) |
| 11 | Start date | scheduled start date for the cycle |
| 12 | Start day | scheduled start day (days since Jan 1,1900) for the cycle |
| 13 | Baseline date | baseline visit date for the cycle |
| 14 | Baseline day | baseline visit day (days since Jan 1,1900) for the cycle |
| 15 | Termination date | termination date for the cycle |
| 16 | Termination day | termination day (days since Jan 1,1900) for the cycle |
Table 2.74. field definitions for visit records in DFX_schedule
| Field # | Contains | Description |
|---|---|---|
| 1 | Subject ID | subject ID number |
| 2 | Site ID | clinical site number |
| 3 | Cycle Number | cycles are numbered sequentially within the visit map, using 0 for screening, if present, and starting at 1 for the first in-study cycle. |
| 4 | Visit/Sequence Number | a unique subject assessment number in the range 0-65535 |
| 5 | Visit Type | one of the 12 supported visit types: X=screening, P=pre-baseline, B=baseline, S=scheduled follow-up, T=cycle termination, W=cycle termination windows, F=final, O=optional, E=early cycle termination, A=abort all follow-up, R=required on termination, and r=required on next scheduled visit |
| 6 | Visit Need | visit need, after applying all conditional and termination rules, can be one of: 0=unknown, 1=required, 2=next required visit, 3=optional, and 4=excluded |
| 7 | Visit Status | the current status of the visit (as of the date on which DF_QCupdate was last run) can be one of: 0=not done, 1=overdue, 2=recorded as missed, 7=done, 8=done and cycle terminates, 9=done and aborts all follow-up |
| 8 | Condition need | visit need set by a condition in the conditional visit map; one of: 0=optional, 1=required, -1=excluded |
| 9 | Condition number | the number of the last condition met within the conditional visit map |
| 10 | Condition sequence number | visit or sequence number at which the condition was met (from IF statement) |
| 11 | Missed Visit Plate | plate number of missed visit plate received for this visit |
| 12 | Early Termination Plate | plate number of early cycle termination plate received for this visit |
| 13 | Conditional Termination Number | the number of the last condition met in the conditional termination map |
| 14 | Start date | scheduled due date |
| 15 | Start day | scheduled due day (days since Jan 1,1900) |
| 16 | Visit date | actual date on which the visit was performed |
| 17 | Visit day | actual day (days since Jan 1,1900) on which the visit was performed |
| 18 | Days Post-Termination | a positive number indicates that the visit was performed this many days following termination |
Table 2.75. DFX_time1 - date and time from receipt to last modification
| Usual Name | DFX_time1 |
| Type | clear text |
| Created By | DF_XXtime |
| Used By | DF_CTcrfs, DF_PTqcs, DF_WFfaxes |
| Field Delimiter | | |
| Record Delimiter | \n |
| Comment Delimiter | NA |
| Fields/Record | 21 |
| Description |
This file records the date and time each CRF page was processed from fax arrival to last record modification. It is updated each time DF_XXtime is run. A related file, named DFX_dfin, contains the same information as DFX_time1, for records that are still in the DFdiscover new queue. These records have not been validated and entered into the study database and thus may contain ICR errors in the key fields.
Table 2.76, “ |
| Example |
The following example shows 4 records for subject ID 1501.
The first 2 records are for plate 1 at visit 0, and the second 2 records are for plate
2 at visit 1. In both cases the first record is the primary and the second is a
secondary record. In all 4 records the fax arrival date is missing. This will be the
case if the record was not submitted by fax or email, but instead entered using raw
data entry or ASCII record import, or if the
|
Table 2.76. DFX_time1 timing data for each CRF page
| Field # | Contains | Description |
|---|---|---|
| 1 | Site ID | clinical site number |
| 2 | Subject ID | subject ID number |
| 3 | Visit Number | visit or sequence number |
| 4 | Plate Number | CRF plate number |
| 5 | Record Status | 1-6,0: 1=final, 2=incomplete, 3=pending, 4=FINAL, 5=INCOMPLETE, 6=PENDING, 0=missed |
| 6 | Record Validation Level | 1-7 |
| 7 | fax name | yyyywwssss: yyyy=year, ww=week of the year, ssss=order number of fax within the week |
| 8 | visit date | date the visit occurred, from DFX_visit.date, in yy/mm/dd format |
| 9 | fax date | date the fax was received in yy/mm/dd format |
| 10 | creation date | date the data record was created, in yy/mm/dd format |
| 11 | modification date | date the data record was last modified, in yy/mm/dd format |
| 12 | visit julian day | date the visit occurred, from DFX_visit.date, in days since Jan 1,1900 |
| 13 | fax julian day | date the fax was received in days since Jan 1,1900 |
| 14 | creation julian day | date the data record was created, in days since Jan 1,1900 |
| 15 | modification julian day | date the data record was last modified, in days since Jan 1,1900 |
| 16 | fax time | time the fax was received in hh:mm:ss format |
| 17 | creation time | time the data record was created in hh:mm:ss format |
| 18 | modification time | time the data record was last modified in hh:mm:ss format |
| 19 | fax minutes | time the fax was received, in number of minutes into the day (0-1440) |
| 20 | creation minutes | time the data record was received, in number of minutes into the day (0-1440) |
| 21 | modification minutes | time the data record was last modified, in number of minutes into the day (0-1440) |
Table 2.77.
DFX_visit.dates - value in the database of all visit dates
| Usual Name | DFX_visit.dates |
| Type | clear text |
| Created By | DF_XXkeys |
| Used By | DF_CTvisits, DF_PTcrfs, DF_QCupdate |
| Field Delimiter | | |
| Record Delimiter | \n |
| Comment Delimiter | NA |
| Fields/Record | 5 |
| Description |
This file records the value of all dates in the database that use the VisitDate attribute. Only one date using the VisitDate attribute may appear on each CRF plate, but different plates for the same visit may contain VisitDate fields, and thus it is possible to have more than one record in for each visit for any given subject. A related file, named , records the preferred visit date for each visit, as defined in the study visit map. These 2 files are updated each time DF_XXkeys is run.
Table 2.78, “ |
| Example |
The following example shows 5 records for subject ID 1127, for visits 0,3,6,51. Note that there are 2 entries for visit 51, one from plate 10 and one from plate 13. 1127|0|03/08/19|37851|3 1127|3|03/11/20|37944|5 1127|6|04/02/18|38034|5 1127|51|03/08/10|37842|10 1127|51|03/08/10|37842|13
|
Table 2.78. DFX_visit.dates the value of all dates using the VisitDate attribute
| Field # | Contains | Description |
|---|---|---|
| 1 | Subject ID | subject ID number |
| 2 | Visit Number | visit or sequence number |
| 3 | date | the date value in the format used by the VisitDate attribute |
| 4 | julian value | This is a modified julian value for the date, calculated as the number of says since Jan 1,1900. |
| 5 | Plate Number | The plate on which the visit date is recorded. |
Table of Contents
- 3.1. Introduction
- 3.2. User Credentials
- 3.3. Organization of Reference Pages
- 3.4. Alphabetical Listing
- DFaccess.rpc — Change access to a study database or , or query their current access status.
- DFattach — Attach one or more external documents to keys in a DFdiscover study
- DFaudittrace — Used by the DF_ATmods report to read study journal files. DF_ATmods produces an audit trail report showing database modifications for the specified study.
- DFbatch — Process one or more batch edit check files
- DFcompiler — Compile study-level edit check programs and output any warnings and/or errors encountered in the syntax.
- DFdisable.rpc — Disable a study database server or incoming fax daemon to make them unavailable to clients and incoming faxes
- DFenable.rpc — Enable a study database server or incoming fax daemon following a previous
- DFencryptpdf — Protect a PDF file by encrypting it with the specified password
- DFexport — Client-side, command-line interface for exporting data by plate, field or module; exporting change history; or exporting components of study definition
- DFexport.rpc — Export data records from one or multiple plates from a study data file
- DFfaxq — Display the members of the outgoing fax queue
- DFfaxrm — Remove faxes from the outgoing fax queue
- DFget — Get specified data fields from each record in an input file and write them to an output file
- DFgetparam.rpc — Retrieve and evaluate the value of the requested configuration parameter
- DFhostid — Display the unique DFdiscover host identifier of the system
- DFimageio — Request a study CRF image from the database
- DFimport.rpc — Import database records to a study database from an ASCII text file
- DFlistplates.rpc — List all plate numbers used in the study
- DFlogger — Re-route error messages from non-DFdiscover applications to
syslog, which in turn writes the messages to the system log files, as configured in/etc/syslog.conf. - DFpass — Locally manage user credentials for client-side command-line programs.
- DFpdf — Generate bookmarked PDF documents of CRF images
- DFpdfpkg — Generate multiple bookmarked PDF files for specified subject IDs or sites
- DFprint_filter — Format input file(s) for printing to a PostScript® capable printer, and print to a specified printer
- DFprintdb — Print case report forms merged with data records from the study database
- DFpsprint — Convert one or more input CRF images into PostScript®
- DFqcps — Convert a Query Report, previously generated by DF_QCreports, into a PDF file with barcoding, prior to sending the report to a study site
- DFreport — Client-side, command-line interface for executing reports
- DFsas — Prepare data set(s) and job file for processing by SAS®.
- DFsendfax — Fax or email a plain text, PDF, or TIFF file to one or more recipients
- DFsqlload — Create table definitions and import all data into a relational database
- DFstatus — Display database status information in plain text format
- DFtextps — Convert one or more input files into PDF
- DFuserdb — Perform maintenance operations on the user database
- DFversion — Display version information for all DFdiscover executables (programs), reports, and utilities
- DFwhich — Display version information for one or more DFdiscover programs, reports and/or utilities
The DFdiscover distribution includes several programs that can be executed on
their own from a command line, or combined in shell scripts to build
other programs (e.g. to export data sets for systems, or create study specific
reports).
All of the programs described in this section can be found in the
DFdiscover executables directory,
/opt/dfdiscover/bin
with the exception of DFmkdrf.jnl and DFmkdrf.ec which are in
/opt/dfdiscover/ecbin.
Permission to run these programs is controlled by UNIX file permissions that are set on DFdiscover installation to execute for user 'datafax' and users in group 'studies', but not for 'other' users.
The remainder of this chapter is a reference for each shell program.
DFdiscover includes many programs. Some operate only on a database server computer (referred to as server-side) while others operate on a user's desktop computer (referred to as client-side). The application of user login and permissions varies slightly in these two environments.
Interactive client-side programs like DFexplore, DFsetup, DFsend and DFadmin require the user to interactively provide a valid username and password each time they connect to a database server.
Conversely, the majority of the shell programs require a UNIX-like shell environment to function, and hence they may only be executed directly on a DFdiscover database server machine. Access to specific database information is granted based upon the DFdiscover permissions assigned to the user, where the user is identified by their UNIX login name.
Starting with release 2014.0.0, DFdiscover includes a third type of program. Programs of this type require a command line environment to execute and can be run from either the user's desktop computer (client-side) or from the database server computer (server-side). These programs are DFbatch, DFpdfpkg and DFexport. To authenticate, they require the same credentials that an interactive program does, specifically the username and password required to connect to a database server. Since there is no visual login dialog, these programs require a different interaction for authenticating, and there are two solutions for the user:
command-line options, the user can specify
-S,servername-Uandusername-Cwhen the program is run, orpasswordenvironment variables, the user can set the variables
DFSERVER,servernameDFUSERandusernameDFPASSWDbefore the program is run.password
Specification of command-line options takes priority if both command-line options and environment variables are supplied. It is not possible to mix solutions using a subset of command-line options and a complimentary set of environment variables. If any command-line option is specified, the expectation is that the command-line solution is preferred; otherwise, the environment variable solution is required.
In many circumstances, it is poor practice to display or store
a plain text password.
Including a password in a shell script or in a cron job is not secure
behavior, and is not recommended.
Hence we strongly recommend that users do not use either the
-C command-line option
or the passwordDFPASSWD
environment variable.
Instead, we encourage users to make use of the
DFpass program to locally manage their DFdiscover
passwords.
After creating a matching entry with DFpass, a user does not need to
subsequently specify a password with either
password-C or
passwordDFPASSWD .
password
The recommended practice then is to create/manage passwords locally using
DFpass and subsequently use either the two command-line options,
-S and
servername-U , or the two
environment variables
usernameDFSERVER and
servernameDFUSER .
username
Use of locally managed passwords is limited to the DFattach, DFbatch, DFpdfpkg, DFexport, DFreport and DFuserPerms programs.
When determining the authentication credentials to use for one of DFbatch, DFpdfpkg or DFexport, the order of evaluation is as follows and only the first matching combination, if any, is used:
If all three command line options
-S,servername-Uandusername-Care specified, use them.passwordIf all three environment variables
DFSERVER,servernameDFUSERandusernameDFPASSWDare defined, use them.passwordIf both of the command line options
-Sandservername-Uare specified, use them together with the matching password entry previously stored via DFpass.usernameIf both of the environment variables
DFSERVERandservernameDFUSERare defined, use them together with the matching password entry previously stored via DFpass.username
The description of each program in this reference is divided into sections.
Name. The official name of the program.
The program name is case sensitive and must be typed exactly as specified. This section also provides the brief purpose of the program.
Synopsis. Lists all of the valid options for the program invocation.
Each option is either optional or required. Most options are, not surprisingly, optional, a few are required, and yet others may require one option from a specific subset. Each option type is indicated with a particular notation. Except for some required options, a program option begins with
-and is followed by an option letter. In some cases this may be enough to select the option; in other cases, the option letter will be further followed by an option string.Option Letter An option letter may be given different meanings in different programs. There is no requirement that the same option letter infers the same meaning when used across different programs.
Table 3.1. Notation for program options
Notation Meaning {study}
Required. The program will not function without the specification of this option. The option must be provided at the specified location in the list of options. [-o]
Optional. The option may be omitted. The program will function, albeit differently, with or without this option. [-o
string]Optional, with an additional option string. The option may be omitted, however when it is used, the option letter must be immediately followed by a space and the option string. The option string generally ends at the next white-space character, however some option strings may contain spaces, and may or may not require that such strings be delimited by ".{ [-s] | [-u] }
One of the options from the specified subset is required. [ [-s #] | [-u #] ]
Several options are possible but only zero or one from the specified subset may be used.
Description. Describes the program purpose in greater detail.
This section describes exactly how the program works in terms of environment, input requirements, output format, dependencies, etc. It may also include detailed information about the program behavior for commonly used combinations of options.
Options. Detailed listing of available options, their use, and their meaning.
Examples. Illustrates the program options and output by way of example(s).
See Also. Lists other reference materials, typically other programs, that are relevant to the program. This in an optional section.
Limitations. Describes any limitations in the use or capabilities of the program. This in an optional section.
DFaccess.rpc
DFaccess.rpc — Change access to a study database or , or query their current access status.
Synopsis
DFaccess.rpc
{
[-s study]
| [-inbound]
}
[
[-ro]
| [-rw]
| [-enable]
| [-q]
]
[
[-restrict reason string]
| [-disable reason string]
]
Description
DFaccess.rpc provides the same functionality from the command line that is available
in the DFadmin Status View.
Like all shell level programs, DFaccess.rpc can be executed by datafax or
any other user with a UNIX login account who is in group studies.
Read-Only Mode. While a study is in read-only mode DFexplore and DFsetup can be used to view but not change study data and setup information. Studies are typically put into Read-Only mode because data collection is complete, all queries have been resolved, and the data has been verified against source documents. Statistical analysis may be ongoing or an FDA audit may be in progress thus the study cannot be disabled, but no further changes are expected or allowed.
By design, read-write access to a study database is only granted to tools that write new data records or update existing data records. All other tools have read-only access. Thus when is used to switch a study sever to read-only mode only those tools that normally have read-write access will be affected. This includes the following:
Table 3.2. Software Components Affected by Read-Only Mode
| Program | When Database Server is in Read-Only Mode |
|---|---|
| DFbatch | exits without executing any edit checks |
| DFimport.rpc | exits without importing any records |
| DFinbound.rpc | incoming pages barcoded for the study are moved to the system-wide
identify directory
|
| DFqcsent.rpc | will not run because the Query database cannot be updated |
| DFexplore | the study can be used in view-only mode but pages cannot be sent to the study from the unidentified fax router |
| DFsetup | can be used in view-only mode |
| DFadmin | can be used by DFdiscover and study administrators to view and change study access |
| DF_ICqcs | the -r (repair) option cannot be used |
| DF_QCfax | faxes can be sent but post-processing to move external reports to the sent directory and to mark queries as having been sent will fail |
| DF_QCreports | external reports that include refax (correction) and/or Q&A (clarification) queries cannot be created because the Query database cannot be updated |
| DF_QCsent | will not run because the Query database cannot be updated |
| DF_QCupdate | will not run because the Query database cannot be updated |
When a study is put into read-only mode it will remain in that mode until
reset using DFadmin or with the -rw option.
While a study is in read-only mode, any incoming pages barcoded for that study
will be moved to DFrouter's identify directory.
Restricted Access.
Access to a study can be restricted for DFdiscover and study administrators only
using the -restricted option. While a study is restricted
other users are not allowed to login, even in view-only mode.
When a study is restricted using or DFadmin users who are logged in will be able to continue working until they log off, but only administrators will be able to make new login connections.
While a study is restricted, any incoming pages barcoded for the study will be processed normally and sent to the study new fax queue, but only DFdiscover and study administrators will be able to view or process them.
A study may be made both restricted and read-only, but these options cannot be used together on the same command line, it requires 2 separate executions of ; the order is not important.
When a study is put into restricted mode it will remain in that mode until
reset using DFadmin or with the -enable option
or until the study server is restarted.
Disabled Access.
A study database may be disabled, making it unavailable to all users,
using the -disable option.
While a study is disabled, any incoming pages barcoded for the study will be held until the study is enabled, and will not show up in the study new fax queue until processing is triggered by the arrival of the next fax received by the DFdiscover server. It is not necessary for the next fax to contain pages barcoded for the study in question or for any study.
When a study is disabled it will remain in that mode until
reset using DFadmin or with the -enable option.
To complete a change in access mode, must be the only client accessing the server. Thus fails if there are any tools with open connections to the study server.
Options
-s study | the study number |
-inbound | used when changing the status of , which processes incoming faxes and PDF files |
-ro | change the database server to read-only mode |
-rw | change the database server to read-write mode |
-enable | reverses -disable or -restrict to return the study or to normal access |
-q | query the state of the database server or |
-restrict reason string | restrict the database server making it available to DFdiscover and study administrators only, and displaying the reason string in study selection dialogs |
-disable reason string | disable the database server making it unavailable to all users, and displaying the reason string in study selection dialogs |
Exit Status
DFaccess.rpc exits with one of the following statuses:
0 | The mode of the database server was successfully changed to the requested mode, or the mode was successfully queried. |
1 | The mode of the database server was not successfully changed. The server is currently in a mode that is incompatible with the change. |
2 | The study server could not be contacted or there was an error in the command-line arguments. |
Examples
Example 3.1. Enable read-only access to study #123, do lengthy operation, and then reinstate read-write access
# /opt/dfdiscover/bin/DFaccess.rpc -s 123 -ro...some lengthy operation...
# /opt/dfdiscover/bin/DFaccess.rpc -s 123 -rwExample 3.2. Restrict study #123 in read-only access to DFdiscover and study administrators only, while they analyze and run reports on a static database, and then reinstate normal access to all users
#/opt/dfdiscover/bin/DFaccess.rpc -s 123 -restrict analysis#/opt/dfdiscover/bin/DFaccess.rpc -s 123 -ro
...administrators perform their analyses
#/opt/dfdiscover/bin/DFaccess.rpc -s 123 -rw#/opt/dfdiscover/bin/DFaccess.rpc -s 123 -enable
DFattach
DFattach — Attach one or more external documents to keys in a DFdiscover study
Synopsis
DFattach
[-S server]
[-U username]
[-C password]
[
[-doc docname]
| [-subject # -visit # -plate # -doc docname]
| [-idrf input_drf]
| [-dir directory]
]
[-odrf output_drf]
[-log logfile]
{study#}
Description
DFattach is a command-line utlity that mimics, and extends, the > facility in DFexplore. It's primary function is to permit one or more documents to be attached to one or more record keys from a command-line interface.
In DFexplore, it is possible to attach a document to the current data record; using DFattach it is possible to attach documents to many records with simple commands.
Permitted document types are the same as those allowed by DFexplore.
For each document successfully attached to a key:
an entry is added to the system
work/fax_log,a DRF entry is appended to
output_drf-odrfis given as an option. The DRF entry contains 5 fields: the key of the record in the first 3 fields, the image ID assigned to the document, and the original document name.output_drf
Attaching Documents
There are 4 different methods for attaching documents.
In it simplest form, DFattach attaches a single document to a single key. Specify the document with
-doc. The key is determined from the filename of the document. The document filename must have the formatdocnamesubject_visit_plate[_other] [.extension]subjectvisitplateAttach a single document to the key given as arguments. In this method, each of
-subjectmust be explicitly specified. This has the advantage that the filename of the document to be attached does not have to change to follow a format.#-visit#-plate#-docdocnameRead the input DRF. For each record in the DRF, the key is in the first three fields and the document name is in the fourth field. Attach the named document to the key. Repeat for each record.
Process each file and subdirectory in
-dir. For each file, if the filename has the formatdirectorysubject_visit_plate[_other] [.extension]
Permissions
Permissions are enforced for the user identified by the supplied credentials. Minimally, the user must have a study role permission that permits Server - Attach document and DFexplore - Data - Attach subject document. Additional permissions may be required dependent upon the action
Database Actions
For each document and key,
[id, visit, plate],
to be attached, the steps are:
Confirm that the combination of visit and plate are defined in the visit map. If it is not, output an error message and skip this document.
Lock the key. If the key cannot be locked, output an error message and skip this document.
If the key does not exist in the database, a record with pending status is created. The document becomes the primary image. Create Data permission is required.
If the key matches an existing missed record, the missed record is deleted and a record with pending status is created. The document becomes the primary image. Delete Missed record and Create Data permission are required.
If the key exists, and there is already a primary image, the document is attached as a secondary image; otherwise, the document is attached as the primary image. Modify Data permission is required.
Options
-S server | DFdiscover server name |
-U username | DFdiscover login username |
-C password | login password. Refer to Section 3.2, “User Credentials” for recommended/better solutions for safe password handling. |
-doc docname |
determine the key encoded in |
-subject |
attach |
-idrf input_drf |
read |
-dir directory |
read |
-odrf output_drf |
for each document that is successfully attached, append a DRF record
to |
-log logfile |
write any log messages to |
study# | the study number where the documents are to be attached; required |
Exit Status
DFattach exits with one of the following statuses:
0 | The command is successful. |
1 | One or more errors occurred, and the command has failed. Error messages are written to standard error on the command-line. |
Examples
In each of the following examples, the options
-S ,
server-U and
username-C are not shown
but are required.
password
Example 3.4. Attach 1234_1_12.pdf to subject
1234, visit 1, plate 12 in the database for study 100
% DFattach -doc 1234_1_12.pdf 100Example 3.5. Attach radiograph.pdf to subject
30001, visit 10, plate 200 in the database for study 22
% DFattach -subject 30001 -visit 10 -plate 200 -doc radiograph.pdf 22Example 3.6. Attach all of the documents in directory
/tmp/newdocs to the matching keys in study 200
and record the successes in /tmp/results.drf
% ls /tmp/newdocs
250001_0_1.pdf
250002_0_1.pdf
350001_0_1.pdf
350001_0_2.pdf
350001_1_10.pdf
% DFattach -dir /tmp/newdocs -odrf /tmp/results.drf 200
DFaudittrace
DFaudittrace — Used by the DF_ATmods report to read study journal files. DF_ATmods produces an audit trail report showing database modifications for the specified study.
Synopsis
DFaudittrace
{-s #}
[-d date1[-date2]]
[-q]
[-r]
[-N]
[-A]
[-I subjectID]
[-P #]
[-V #]
[-f fieldlist]
[-v vfence]
[-x output.xlsx]
Description
DFaudittrace reads a record from the study journal files, calculates any changes from the previous record for those keys and then outputs the differences to DF_ATmods.
The output from DFaudittrace consists of one or more ASCII records, each having 20 fields. Each field is separated by a pipe-delimiter (|). Field contents depend on:
whether DFaudittrace is describing a new record (type N), a changed field (type C), or a deleted record (type D). This information is found in the first field of each record.
whether DFaudittrace is describing a data record, query record or a reason record. This information is found in the 8th field of each record.
The tables describe each of the 20 fields for each record type (data, query, reason) for each type of change (new record, changed field, deleted record). Fields 1 to 7 are consistent across all records output by DFaudittrace and have been described in the first table. Fields 8 to 20 depend on the record type and the type of change, and are described in tables 2 to 4.
Table 3.3. DFaudittrace Output: Fields 1 to 7
| Field | Description |
|---|---|
| 1 | Record type (N=new, C=changed field, D=deleted record) |
| 2 | Date (yyyymmdd) |
| 3 | Time (hhmmss) |
| 4 | User |
| 5 | Subject ID |
| 6 | Visit |
| 7 | Plate |
Table 3.4. New Records
| Field | Data Records | Query Records | Reason Records |
|---|---|---|---|
| 8 | 0 | >0: unique field ID of field on which query is located | <0: unique field ID of field on which reason is located |
| 9 | 0 (summary), or unique field ID | field number of Query record | field number of Reason record |
| 10 | status 1-6, 0=new missed record | status 1-6 | status 1-6 |
| 11 | validation level | validation level | validation level |
| 12 | maximum validation level reached | maximum validation level reached | maximum validation level reached |
| 13 | missed record reason code or blank | Query category code 1-6, 21-23 + DFqcproblem_map codes | reason code |
| 14 | missed record reason text or blank | Query usage code 1=internal, 2=external | reason text |
| 15 | blank | blank | blank |
| 16 | blank | blank | blank |
| 17 | blank (summary), ordinal field position | ordinal field position of data field | ordinal field position of data field |
| 18 | blank (summary), field name | field name of data field | field name of data field |
| 19 | blank (summary), old decoded label for choice/check | blank | blank |
| 20 | blank (summary), new decoded label for choice/check | blank | blank |
Table 3.5. Changed Field
| Field | Data Records | Query Records | Reason Records |
|---|---|---|---|
| 8 | 0 | >0: unique field ID of field on which query is located | <0: unique field ID of field on which reason is located |
| 9 | 0 (summary), or unique field ID | field number of Query record | field number of Reason record |
| 10 | status 1-6 | status 1-6 | status 1-6 |
| 11 | validation level | validation level | validation level |
| 12 | maximum validation level reached | maximum validation level reached | maximum validation level reached |
| 13 | blank | Query Category code 1-6, 21-23 + DFqcproblem_map codes | reason code |
| 14 | blank | Query usage code 1=internal, 2=external | reason text |
| 15 | old value | old value | old value |
| 16 | new value | new value | new value |
| 17 | ordinal field position | ordinal field position of data field | ordinal field position of data field |
| 18 | field name | field name of data field | field name of data field |
| 19 | blank, old decoded label for choice/check | blank | blank |
| 20 | blank, new decoded label for choice/check | blank | blank |
Table 3.6. Deleted Record
| Field | Data Records | Query Records | Reason Records |
|---|---|---|---|
| 8 | 0 | >0: unique field ID of field on which query is located | <0: unique field ID of field on which reason is located |
| 9 | 0 (summary), or unique field ID | field number of Query record | field number of Reason record |
| 10 | status 7 | status 7 | status 7 |
| 11 | validation level | validation level | validation level |
| 12 | maximum validation level reached | maximum validation level reached | maximum validation level reached |
| 13 | 1=missed record, 0=data record | Query category code 1-6, 21-23 + DFqcproblem_map codes | reason code |
| 14 | blank | Query usage code 1=internal, 2=external | reason text |
| 15 | blank | blank | blank |
| 16 | blank | blank | blank |
| 17 | blank (summary), ordinal field position | ordinal field position of data field | ordinal field position of data field |
| 18 | blank (summary), field name | field name of data field | field name of data field |
| 19 | blank | blank | blank |
| 20 | blank | blank | blank |
It is also important to note the following about DFaudittrace:
If a record or a query is deleted and then re-created, the re-created record or query is considered to be new record (N), not a change (C) to the previous record.
In queries, the
useris sometimes, but not always set when a query is created by the user. Theuseris never set when the query is modified or deleted, or when it is created by the report DF_QCupdate. Unknown user names appear in the output asunknownfor dates before June 1, 1995 and as??thereafter.In queries, the validation level is set when the record is created and reset when the record is modified. The validation level of a query does not change when only the record's validation level changes.
If the
-v vfenceoption is used when running DFaudittrace, the effect is different for data records and queries. Data changes are output for records journaled after the case reached or surpassed thevfencevalidation level. Query changes are output for queries journaled after the query was modified at or beyond thevfencevalidation level.
Options
-s | DFdiscover study number. |
-d date1[-date2] |
date of changes. This option restricts the output to changes made at
|
-q | include query details. |
-r | include reason for change details. |
-N | include all field details for type N (new) records. |
-A | output the subject alias, if defined, in place of the subject ID. If there is no subject alias, output the subject ID. |
-I | Subject ID. |
-P | DFdiscover plate number. |
-V | DFdiscover visit or sequence number. |
-f fieldlist | field number(s). This option restricts the output to the field numbers specified in the list. This may include a single field number, or a range or list of numbers. Range and list specifications may include a dash (-), tilde (~), or comma(,). |
-v vfence |
validation level. In order to be considered for output, the keys on this
record must have attained or surpassed the specified validation level at
least once. This is useful if the user wants to output all changes that were
made to records that have existed at or above the specified validation level.
Once the record keys have made it to the |
-x | Excel output file. Write the output, in Excel format, to the named file. The Excel file contains the same output, 20 columns per row, as the standard output. It includes one additional header row, with column names. |
Exit Status
DFaudittrace exits with one of the following statuses:
0 | The command was successful. |
1 | The command failed because the command-line arguments were not present or were incorrectly specified, the database server could not be contacted, or communication with the database server failed. |
Examples
Example 3.7. Execute DFaudittrace to output journal information for study 254 between the dates of January 1, 2001 and January 15, 2001.
% DFaudittrace -s 254 -d 20010101~20010115Example 3.8. Execute DFaudittrace to output journal information for study 254 between the dates of January 1, 1998 and today, for field numbers 10-13.
% DFaudittrace -s 254 -d 19980101-today -f 10-13Example 3.9. Execute DFaudittrace to output all journal information for study 254, for records that have existed at or above a validation level of 2 at some point during the study.
% DFaudittrace -s 254 -v 2Example 3.10. Execute DFaudittrace to generate an Excel file containing all changes for data related to subject 44002.
% DFaudittrace -s 254 -I 44002 -x 44002history.xlsxDFbatch
DFbatch — Process one or more batch edit check files
Synopsis
DFbatch
[-S server]
[-U username]
[-C password]
[-b batchnames]
[-p stylesheet]
[-exec]
[
[-o outhtml_file]
| [-O outhtml_dir]
]
[-x out_xlsx]
[-X out_dir_name]
[-e error_file]
{-i control_file}
{#}
Description
DFbatch is a framework for edit check execution in command-line or unattended mode. The framework specifies which data records are to be operated upon by edit checks and what is to happen when edit checks are invoked. It uses the same edit checks that are used in interactive edit checks through DFexplore and introduces no changes to the language.
Complete reference documentation for DFbatch can be found in Batch Edit checks.
Options
-S server | DFdiscover server name |
-U username | DFdiscover login username |
-C password | login password. Refer to Section 3.2, “User Credentials” for recommended/better solutions for safe password handling. |
-b batchnames | selected batches by name from the control file, and/or re-order selected batches for processing. |
-p stylesheet | style the output with the specified XSL stylesheet
before generating the HTML output.
By default, |
-exec | run dfexecute() and dfmail() when 'no apply' changes is specified in control file. |
-O outhtml_dir | will make a default output HTML file in your local outhtml_dir for each batch. The default output file name will be 'outhtml_dir' + 'batch_name' + '_out.html'. |
-o outhtml_file | '-o outhtml' output html file name is local and must include the full path. If '-o outhtml' is specified and there are more than one batches within a control file, only the last log will be saved to the given name. |
-x out_xlsx | '-x out_xlsx' output excel file name is local and must include the full path. Use -X for multiple batches. |
-X out_dir | '-X out_dir' make a default output XLSX in out_dir_name directory for each batch. |
-e error_log | will write any errors to the full patch name of error_log. By default, errors are written to stderr. |
-i control_file | The input file of instructions (required). These instructions control the behavior of the program including how records are selected, and what actions, if any, are applied. |
study# | The study database number (required). |
DFcompiler
DFcompiler — Compile study-level edit check programs and output any warnings and/or errors encountered in the syntax.
Synopsis
DFcompiler
[-o compiled_outputfilename]
{-s #}
{filename}
Description
DFcompiler is used for syntax checking of edit check files. It can be run in the study DFsetup tool or from the command-line.
In DFsetup, selecting from and selecting the , button in the edit checks window, runs DFcompiler. Results are output to the bottom Outputs section of the edit checks window. A user requires permission to use DFsetup in order to run DFcompiler in this way.
DFcompiler may also be run from the command-line using the options described below. The study number and edit checks file name (with a correct pathname) are both required arguments.
DFexplore has the ability to compile and run edit checks. Edit checks can be compiled (to DFedits.bin) by selecting Publish in DFsetup or from the command line using DFcompiler as follows:
% DFcompiler -s study# -o DFedits.bin DFeditsEdit checks are loaded automatically when DFexplore starts but can be reloaded following a new compile from the > option.
Options
-s | DFdiscover study number |
-o DFedits.bin | the output executable file used to run production edit checks in DFexplore and DFbatch. If no output file name is specified, syntax checking is performed but no output file is created. |
filename | the source file in which the edit check programs reside. Typically this will
be $STUDY_DIR/ecsrc/DFedits containing the
edit checks used by DFexplore and DFbatch
|
Exit Status
DFcompiler exits with one of the following statuses:
0 | The command was successful. |
1 | The command is not supported by the user's current DFdiscover release. |
2 | The command failed because the database server could not be contacted, the study is not defined, the input file could not be located, or the server is out of memory. |
DFdisable.rpc
DFdisable.rpc — Disable a study database server or incoming fax daemon to make them unavailable to clients and incoming faxes
Synopsis
DFdisable.rpc
{
[-s #]
| [-i #]
}
[-f]
[-w #]
[-r string]
{key}
Description
The study database server must be disabled when a user requires "off-line" access to the database and wishes to ensure that no client connections to the server are permitted.
Equivalent functionality can be obtained using the dialog in DFadmin.
A disable request will fail if there are other users with client tools connected to the study server at the time of the request.
When -i is used to disable an incoming daemon, the daemon is
allowed
to complete any fax processing that it might be engaged in, but as soon as this
is completed and the daemon exits, it will not be allowed to process another
incoming fax.
Following execution of DFdisable.rpc, a study server or incoming fax daemon can be re-enabled using DFenable.rpc. The command must be executed by the user who executed DFdisable.rpc, and the same key must be provided.
When a study server is disabled, the default requirement is that the server
shutdown as quickly as possible. In the interest of efficiency, it removes
only those index entries that are for obsolete records and sorts only those
index files that are unsorted.
This is sufficient for correct operation of the
server. However, the server does not remove those indices or records that are
marked for deletion nor does it perform garbage collection on data records that
are obsolete. The result is that it is subsequently possible to export a record
that is still scheduled for deletion. This may be undesirable for archival
purposes.
Use of -f will force the server to remove all records
marked for deletion and perform garbage collection of obsolete data records.
This option is primarily useful when shutting down a database in preparation
for archiving.
Options
-s | the study number or the incoming daemon number of the server to be disabled |
-f | force clean-up of database. This results in a complete garbage clean-up by the server of the database. Usage of this flag will slow down the execution time of DFdisable.rpc and is not required for proper server operation. |
-w | an optional number of seconds for the command to delay while waiting for the server to shutdown. The default is 60 and the legal range is 10 to 1000. Very large databases may not shutdown in 60 seconds and so should delay longer. |
-r string | an optional reason string indicating why the study server is being disabled. This reason will appear in the error log file whenever a user attempts to connect to the server while it is disabled. |
key | a required string, which must be subsequently provided by the same user from the same machine when executing to enable the server again. The key must be the last argument on the command line. |
Exit Status
DFdisable.rpc exits with one of the following statuses:
0 | The command was successful. |
1 | The command failed because the required command-line arguments were not present or were incorrectly specified. |
> 1 | The command failed because the database server could not be contacted, communication with the database server failed, or the database server has already been disabled. |
DFenable.rpc
DFenable.rpc — Enable a study database server or incoming fax daemon following a previous
Synopsis
DFenable.rpc
{
[-s #]
| [-i]
}
{key}
Description
When a study database server has been disabled, use DFenable.rpc to enable the server again and make it available for client connections. Equivalent functionality can be obtained using the dialog in DFadmin.
When an incoming daemon is re-enabled it once again becomes available for processing incoming faxes.
Study servers and incoming fax daemons can only be enabled by the user who disabled them, and then only if the correct key is provided.
Options
-s | the study number to be enabled |
-i | enable incoming daemon |
key | a required string, which must be subsequently provided by the same user from the same machine when executing to enable the server again. The key must be the last argument on the command line. |
Exit Status
exits with one of the following statuses:
0 | The command was successful. |
1 | The command failed because the required command-line arguments were not present or were incorrectly specified. |
> 1 | The command failed because the database server could not be contacted, communication with the database server failed, or the database server has already been enabled. |
DFencryptpdf
DFencryptpdf — Protect a PDF file by encrypting it with the specified password
Synopsis
DFencryptpdf
{
[-c password]
| [-C]
}
[-i string]
[-o string]
Description
PDF supports password protection beginning with version 5.0 of Acrobat Reader and version 1.4 of the PDF standard. A PDF document has at least two levels of password: the owner password (which permits the owner to perform actions that another user cannot) and the user password. Since PDF is typically a plain text format, a password protected PDF document is encrypted and stored in binary format. The owner/user password is used as a salt for the encryption.
For DFdiscover purposes, the password is needed to ensure that the document can only be opened and read by known users (those with the password). Since DFdiscover supports delivery of study data/reports by PDF and email, it makes sense that the PDF document be protected from viewing by an unintended recipient. The password is not intended to limit what a user with the password can do with the document, so the owner and user password are the same and no restrictions are applied to any one of the actions available on the document.
DFencryptpdf returns zero upon success,
otherwise returns one. DFencryptpdf may fail if the input PDF file
is invalid PDF, has multiple cross-reference tables, such as
linearized or updated PDF files, or is already encrypted. If neither
-c nor -C
is specified, it also returns an error.
Options
-c password, -C |
If
The password file |
-i string | The name of the input PDF file that will be encrypted. If no input file is specified, DFencryptpdf reads from standard input. |
-o string | The name of the encrypted output PDF file. If no output file is specified, DFencryptpdf writes to standard output. DFencryptpdf will exit with an error if the input filename and output filename are the same. |
Exit Status
DFencryptpdf exits with one of the following statuses:
0 | The command was successful. |
1 | The command failed because the required command-line arguments were not present or were incorrectly specified, the input file could not be read, or the output file could not be created/written. |
DFexport
DFexport — Client-side, command-line interface for exporting data by plate, field or module; exporting change history; or exporting components of study definition
Synopsis
DFexport
[-S server]
[-U username]
[-C password]
[
[-Mname moduleName]
| [-Mnum moduleID]
| [-Pnum
[
[#]
| [qc]
| [reason]
| [new]
| [missed]
]
]
]
[-status #, #-#]
[-level #, #-#]
[-visit #, #-#]
[
[-site #, #-#]
| [-subject #, #-#]
| [-alias string]
]
[-plate #, #-#]
[-create list]
[-modify list]
[-resolve list]
[
[-Pattern string]
| [-pattern string]
]
[-expr string]
[
[-ALL criteria]
| [-ANY criteria]
]
[
[-Fnum #, #-#]
| [-Fname fieldname_list]
| [-Falias fieldalias_list]
]
[
[-joinALL plt#[moduleFields]...]
| [-joinANY plt#[moduleFields]...]
]
[-usealias]
[-X]
[
[-c]
| [-j]
]
[-d]
[-p]
[-z]
[-h]
[-D]
[-H header_list]
[-L lostcode]
[
[-w]
| [-a]
]
[-o [
[outfile]
| [-]
]
]
[-e errlog]
{study#}
DFexport also has a descriptive mode for the output of schema information.
DFexport
[-S server]
[-U username]
[-C password]
[-listfields]
{
[
[-listmodules]
| [-listplates]
]
[
[plt#,plt#~plt#]
| [all]
]
}
{study#}
DFexport has a history mode for the output of change history related to a subject, visit, or plate.
DFexport
[-S server]
[-U username]
[-C password]
{-history}
{-subject #}
[-visit #]
[-plate #]
{study#}
Options and Description
DFexport exports data from an individual study database. Minimally, the user must specify the study database and also at least one of the plates or modules containing the data of interest. Data records are exported in ASCII plain text format to a specified file, or the command-line output.
Differences and Similarities compared to DFexport.rpc
DFexport and DFexport.rpc share many features yet they are also unique in several important ways.
DFexport is available as both a server-side and client-side application; DFexport.rpc is server-side only.
DFexport is able to export descriptive information from a study schema with the
-listfields,-listmodulesand-listplatesoptions.DFexport is able to export, with the
-historyoption, the history of changes for a subject, visit within subject, or plate within visit of a subject.DFexport includes support for joining data fields from the same module definition that are instanced over one or more plates.
DFexport is able to export all records marked as missed in one command execution using the
-Pnum missedoption. In DFexport.rpc this would require looping through each of the plates individually, selecting missed records at each step of the loop.User permissions for selecting by validation level are enforced in DFexport.
Selecting queries and reasons by creation and modification date is supported in DFexport; in DFexport.rpc only data records may be selected in this way.
Many options are specified using the same notation as DFexport.rpc, while others are specified using unique notation.
It is possible for DFexport and DFexport.rpc to produce different results for the same selection criteria. DFexport enforces user permissions for the user specified with the
-Uoption or theusernameDFUSERenvironment variable. DFexport.rpc uses the UNIX login name of the command-line.
General Approach
DFexport can export data in a plate-centric manner, like DFexport.rpc,
using -Pnum, or in a
module-centric manner that is unique to DFexport using -Mname or
-Mnum.
Many options are available to create data sets for a wide variety of needs.
To get the most out of DFexport it can be useful to approach it's use with the
following in mind:
Preparation. Access to exported data is available only to authenticated users with appropriate database permissions, Authentication and Database Permissions. Plate, module and field name information is available from DFexport itself, Schema Listings.
Where is the data? Specifying the source of the data, whether it is plate-based or module-based, is required, Data Source.
Do the data records need to be filtered? In many cases not all of the rows in a data set are of interest and need to be filtered further, Record Selection by Keys and Filters.
Data Fields. By default, all of the data fields in the specified data source will be exported. It is possible to specify a subset of the fields to export, Extracting/Combining/Concatenating Fields for Output. It is also possible to add field, module, plate, visit, image, site, and study metadata (including custom properties) to the export data, Including Metadata in Output.
Output Formatting. For export, the appearance of data fields can be modified without modification of the data source, Output Formatting.
Output Destination. Finally, the export data is written to a destination, Output Options.
Authentication and Database Permissions
Authentication. To authenticate, DFexport requires the username and password for connection to a specific database server. These may be supplied as:
command-line options, the user can specify
-S,servername-Uandusername-Cwhen the program is run, orpasswordenvironment variables, the user can set the variables
DFSERVER,servernameDFUSERandusernameDFPASSWDbefore the program is run.password
Specification of command-line options takes priority if both command-line options and environment variables are supplied. Refer to User Credentials for more information.
Database Permissions. Subsequent to authentication with a specific database server, use of DFexport is allowed (or disallowed) by the Server - Export Data permission, or the intersection of both DFexplore - List view and DFexplore - Print/Save Data permissions. These permissions are granted to a role (and then user) by an administrator on a study-by-study basis (see System Administrator Guide, Server). An authenticated user with one of these role permissions will then be able to export data records from the set of site and subject IDs granted by their user permissions, which may further be limited by visit, plate and level restrictions associated with the user's role. DFexport provides no warning that some records cannot be exported due to permission restrictions as this would itself provide information about the existence of restricted data records. For roles without 'Show Hidden Fields' permission and fields with the Hidden or Masked property enabled, DFexport will output an empty (NULL) value when exporting such data fields, and it will also skip over reasons and queries attached to such fields.
Schema Listings
This feature is unique to DFexport and is not available in DFexport.rpc. DFexport is able to output database schema information. The available information includes plate numbers and module names, and may optionally also include field number, name, alias and data type for data fields in the requested plates or modules. This descriptive information can be useful reference material when a user wishes to further refine an export.
To obtain a listing of all defined plate numbers, use
-listplates all.
[1]
To obtain a listing of all defined module names, use
-listmodules all.
In both cases:
the output is a space-delimited list of values (either plate numbers or module names) matching the requested criteria,
a subset can be specified by replacing
allwith individual, lists, or ranges of plate numbers in the format#, #-#.
Example 3.15. List all module names used in plates 100 through 200
%DFexport -listmodules 100-200 10Chemistry Eligibility Enrollment Header LabData PhysicalExam SocialImpact Urinalysis
The output is sorted by module name and each module is listed exactly once, even when instanced more than once. Modules that are not instanced on one of the selected plates are not included in the output.
Information about data fields in the specified plates or modules can be
requested by additionally including the
-listfields option.
This option may only be used in conjunction with the
-listmodules and -listplates options.
Example 3.16. List schema information for data fields of all plates
%DFexport -listfields -listplates all 253Plate 001: Blood Pressure Screening Visits Field Name Alias Type ----- ------------------------- ------------------------- ------- 1 DFSTATUS DFstatus1 Choice 2 DFVALID DFvalid1 Choice 3 DFRASTER DFraster1 String 4 DFSTUDY DFstudy1 Number 5 DFPLATE DFplate1 Number 6 DFSEQ DFseq1 Number 7 ID ID001 Number 8 PINIT PINIT001 String 9 AGE AGE Number 10 SEX SEX Choice 11 RACE RACE Choice 12 RACEOTH RACEOTH String 13 S1DATE S1DATE Date...
This is the beginning of the output - actual output would be much longer as the user has requested this information for all defined plates. Field information is included both for user-defined fields and the fixed DFdiscover fields.
Example 3.17. List schema information for data fields of all modules
%DFexport -listfields -listmodules all 253Module: BloodPressure (ID=5022): Blood Pressure Readings Field Name Alias Type Used in Plates ----- -------------------- -------------------- ------- ------------------ 1 DFSTATUS DFSTATUS Choice 2 DFVALID DFVALID Choice 3 DFRASTER DFRASTER String 4 DFSTUDY DFSTUDY Number 5 DFPLATE DFPLATE Number 6 DFSEQ DFSEQ Number 7 DFPID DFPID Number 8 DFMNAME DFMNAME String 9 DFMID DFMID Number 10 DFMREF DFMREF Number 11 SBP1 SystolicReading1 Number 1,5 12 SBP2 SystolicReading2 Number 1,5 13 SBP3 SystolicReading3 Number 1 14 DBP1 DiastolicReading1 Number 1,5 15 DBP2 DiastolicReading2 Number 1,5 16 DBP3 DiastolicReading3 Number 1 17 SDAT ReadingDate Date 1 18 BPARM BPwhichArm Choice 5...
This is the beginning of the output - actual output would be much longer as the user has requested this information for all defined modules.
The module listing provides the module name, BloodPressure
(useful in conjunction with -Mname),
the module number, 5022
(useful in conjunction with -Mnum) and the field numbers and
names defined in the module, DFSTATUS, ...
(useful in conjunction with -Fname or -Fnum).
History of all Changes
This feature is unique to DFexport and is not available in DFexport.rpc.
DFexport is able to output the history of all changes made to the data for a specific subject,
visit or plate.
The available information includes when the change was made, who made the change, what was changed,
any reason associated with the change and any queries related to the data.
The output is always to a file, in Excel format, and hence option
-o outfile.xlsx is required.
To obtain a history listing use -history.
The history of changes is specific to a single subject, and includes all data,
query and reason changes for all data elements in records idenitfied by the subject ID.
The output can be further filtered by visit, -visit ,
and plate, #-plate .
#
DFexport is designed to export history of changes for exactly one subject. To export history for multiple subjects, DFaudittrace is available.
Data Source
Specifying the data source for the records to export is required.
Data can be exported by plate number, using the -Pnum
option, or by module, using either the -Mname or
-Mnum option.
Within any of these data sources, the default behavior is to export all of the
defined fields. It is possible to further select the exported fields using
one of the -Fname, -Falias or
-Fnum options.
Field name, alias and number information can be obtained from a previous
invocation that includes the -listfields option.
-Pnum | Plate number. This is equivalent to the required plate number in DFexport.rpc. Exactly one plate number value may be specified. The value is the actual plate number or from this list of keywords:
If a plate selector is not given, the data source must be specified by module name or module number. |
-Mname or -Mnum | Module name or module number.
Export data from the specified module.
Exactly one module name or module number may be specified.
Schema listing options If a module selector is not given, the data source must be specified by plate number. |
Record Selection by Keys and Filters
There are many options available for selecting subsets of data records for export. Several of these options are similar or identical to their counterparts in DFexport.rpc. [2] In all cases, record selection and filtering is from the set of records allowed by the user's database permissions.
The available selection mechanisms and filters are:
-level | validation level. By default, records at all validation levels permitted by the user permissions are exported. This option further selects a subset of those records, namely those having a validation level that falls within the specified range. | ||||||||||||||||||||||||||||||||
-site | site number. This option selects records by site number, site numbers, site number range or any combination thereof. The site number of any data record is derived by dereferencing the subject ID in the study's sites database.
This option may not be combined with
| ||||||||||||||||||||||||||||||||
-subject | subject ID. This option selects records by subject ID, subject IDs, subject ID range or any combination thereof.
This option may not be combined with
| ||||||||||||||||||||||||||||||||
-X | This option excludes data from sites marked
| ||||||||||||||||||||||||||||||||
-alias | subject alias. This option selects records for a single subject alias.
This option may not be combined with
| ||||||||||||||||||||||||||||||||
-visit | visit/sequence number. This option selects records by visit number, visit numbers, visit number range or any combination thereof. | ||||||||||||||||||||||||||||||||
-status status | record status. Select records by status keyword or status
numeric value.
The recognized status keywords are
If plate 511 is exported, the available status keywords are the same but their meaning (as related to query status) is translated by the table: Table 3.7. Numeric value, record status keyword, query status and reason status equivalence
| ||||||||||||||||||||||||||||||||
-plate | plate number. Select from module instances, queries, new, missed or reason records by plate number. It is important to note that this is not the same as the required plate number selector in DFexport.rpc. In that environment, the plate number selects the data file source for the export. In DFexport, this option filters the data source which may be modules, complete data records, queries, reason, new or missed records. Example 3.18. Export all missed records in plates 1 through 10
Example 3.19. Export all ESIG modules in plates 100 through 110 and 200
The output, from study 123,
is written to the file | ||||||||||||||||||||||||||||||||
-create | creation date.
Select data, query or reason records by their creation date.
The keyword | ||||||||||||||||||||||||||||||||
-modify | modification date.
Select data, query or reason records by their last modification date.
The keyword | ||||||||||||||||||||||||||||||||
-resolve | resolution date.
Select query records by their resolution date.
Queries that are not yet resolved will not have a resolution date and
hence will always be excluded if this selection filter is used.
The keyword | ||||||||||||||||||||||||||||||||
-Pattern|pattern string |
Filter records to export only those that
match the specified pattern string.
For inclusion in the export, a fragment of the record must exactly match
the entire pattern string.
The | ||||||||||||||||||||||||||||||||
-expr | Include only records that match the expression. The expression has the same format and meaning as the expression builder in DFexplore. For a complete description of the available expression syntax refer to DFexplore User Guide, Searching Data Records. | ||||||||||||||||||||||||||||||||
-ALL, -ANY |
Specify one or more, simplified filter criteria.
Each filter references fields from one plate and multiple filters may
be combined to include fields from other plates.
The result of these selection criteria is a set of subject IDs
matching all of the criteria ( Each criterion must be specified using the notation: where:
To specify multiple criteria use Example 3.20. Export eSignature records for eligible, african-american males
The The fields used in the criteria are, by default, not part of the output, nor are they required to be. In fact, unless the criteria are all from the same source, this is not possible with this option. | ||||||||||||||||||||||||||||||||
Extracting/Combining/Concatenating Fields for Output
Frequently, only a subset of the fields in the data source are of interest.
These can be selected using one of the -Fnum,
-Fname or -Falias options.
Special handling of data fields that are defined in a module which is then
instanced across more than one plate is required.
-Fnum .
Select by field number. From each exported record, select for output
only those fields requested by their number. Output fields can be
re-ordered by specifying the field numbers in the desired order.
Field numbers can be repeated.
It is possible to request field numbers using #, #-#NF notation
which selects by field number relative to the last field of the record.
Some examples of NF usage are:
-
2-NF. field numbers 2 to the last field inclusive
-
NF-1. the second last field
-
5-NF-1. fields 5 to the second last field, inclusive
-
NF-5-NF-1. fields fifth from the last to the second last field, inclusive
This option may not be combined with
-Fname or -Falias - doing so will cause
DFexport to exit with an error message.
-Falias ,
fieldname_list-Fname .
Select by field name or field alias.
From each exported record, select for output
only those fields requested by their name or alias. Output fields can be
re-ordered by specifying the field names or aliases in the desired order.
Field names/aliases can be repeated.
This option may not be combined with
fieldname_list-Fnum - doing so will cause DFexport to exit
with an error message.
Similarly, only one of -Falias or
-Fname may be specified - any other specification or
combination will cause DFexport to exit with an error message.
-joinANY, -joinALL.
The default behavior of DFexport is to export data from one
source, a plate or a module. However special handling is needed in the cases where a module
instance is distributed across multiple plates.
With the -joinALL and -joinANY options it
is possible to combine and export data from a data source that is defined across plates in one
invocation and into one output file.
The join keys (the "join key triple") are always the subject ID, the sequence number
and the module reference instance number and must match across data sources. These keys are
always exported as the first three fields in each output record when joining occurs.
Multiple data sources are specified using | as a delimiter.
The specification for a single data source uses the notation:
plate#[fieldlist]where:
plate#is a plate number from the set of plate numbers defined for the study,fieldlistis a list of one or more comma-separated field numbers or names, enclosed with[and].
The -joinANY and -joinALL options specify the
resulting output behavior: with the -joinALL option, the
database must contain a data record for every data source; otherwise, no data
is output for that join key triple.
Conversely, specifying -joinANY will export data so long as
the join key triple appears in at least one data source.
Example 3.21. Re-construct the demographics module for output
The DEMOGRAPHICS module is instanced with fields on plates 1
and 2. Export the data, with a specific field ordering and some output formatting.
-Mname DEMOGRAPHICS -joinANY '1[PINIT, SEX] | 2[RACE, RACE:d, RACEOTH] | 1[AGE, DOB:c]'
Concatenation with +.
By default, each selected field is output with optional formatting (see the section called “Output Formatting” and is separated
from adjacent selected fields by the delimiter. Alternatively, selected fields can be concatenated, output with no delimiter at all.
To specify concatenation, use the special concatenation symbol, +, between fields to concatenate. For example,
to concatenate the site identifier and the subject identifier, use
DFSITE_ID+SUBJIDor to concatenate fields 9 and 12, use
9+12It is also possible to concatenate a range of fields. In this case, concatenation has precedence over field range so,
8+9-12or
8-11+12or
8+9+10+11+12are all equivalent. Note that there is no notation to concatenate a range of fields by specifying only the minimum and maximum field numbers; at least one of the numbers must be inidividually specified so that the concatenation operator can be used.
Including Metadata in Output
Study metadata is available for export as columns in each output record. Metadata is specified for inclusion in the output by inserting metadata keywords in the list of fields for export. In all cases, the exported value has the string data type.
The available metadata keywords are grouped by 6 categories: field, page, visit, image, site and study.
field. These metadata keywords reference field definition properties of a data field. For these keywords only, the keyword is appended to a field name to request a specific property of that specific data field. For example,
MHENDAT.DFVAR_PROMPTrequests theDFVAR_PROMPTproperty (the field prompt from the study definition) of theMHENDATdata field.The field properties that are available are:
DFVAR_DESC: field descriptionDFVAR_TYPE: field typeDFVAR_PROMPT: field promptDFVAR_UNITS: field unitsDFVAR_COMMENT: field commentDFVAR_MODNUM: module instance number containing field (Module Instance in setup definition)DFVAR_MODNAME: module name containing field (Module Name in setup definition)DFVAR_MODDESC: module description containing field (Module Description in setup definition)DFVAR_USER#: field custom property value, where # is 1-20. Custom property tags may be used in place of the default name
module. These metadata keywords reference properties of the module instance.
DFMODULE_NAME: module name (Module Name in setup definition)DFMODULE_DESC: module description (Module Description in setup definition)DFMODULE_USER#: module custom property value, where # is 1-20. Custom property tags may be used in place of the default name
plate. Metadata keywords for a plate include
DFPLATE_DESC(plate description) andDFPLATE_USER#(plate custom property value, where # is 1-20. Custom property tags may be used in place of the default name).page. These metadata keywords reference page properties of the plate associated with the current data record. There is currently one page property available:
DFPAGE_LABEL. The value is the descriptive label of the page. This label is taken fromDFpage_mapif there is a matching entry for the combination of visit and plate (field number substitution is also performed if requested with the#or#:dnotation); otherwise, it is the plate description taken from the study database definition.visit. These metadata keywords reference visit properties of the visit associated with the current visit. The current visit is determined by the visit number of the data record, even if the visit number is not included in the export. The visit properties that are available are:
DFVISIT_DATE,DFVISIT_TYPE,DFVISIT_ACRONYM,DFVISIT_LABEL,DFVISIT_DUE,DFVISIT_OVERDUE,DFVISIT_REQUIREDPLATES,DFVISIT_OPTIONALPLATES,DFVISIT_ORDERPLATESandDFVISIT_MISSEDPLATE. The value of each property is detailed in Study Setup User Guide, Visit Map.image. Each data record has an image attribute, which will have a value if there is an image associated with the data record. For those records, the image properties that are available are:
DFIMAGE_ARRIVAL: arrival date/time of the imageDFIMAGE_FIRSTARRIVAL: arrival date/time of the image; if there were multiple images over time, the chronologically first imageDFIMAGE_LASTARRIVAL: arrival date/time of the image; if there were multiple images over time, the chronologically last (most recent) imageDFIMAGE_FORMAT: image formatDFIMAGE_SENDER: sender ID for the document that included this imageDFIMAGE_PAGES: number of pages in the document that included this image
site. The site metadata associated with each data record can be determined by connecting the subject ID of the data record with the site record that includes the subject ID in the list of subjects. The site properies that are available are:
DFSITE_ID,DFSITE_NAME,DFSITE_CONTACT,DFSITE_ADDRESS,DFSITE_FAX,DFSITE_PHONE,DFSITE_INVESTIGATOR,DFSITE_SUBJECTS,DFSITE_TEST,DFSITE_COUNTRY,DFSITE_BEGINDATE,DFSITE_ENDDATE,DFSITE_ENROLL,DFSITE_PROTOCOL1,DFSITE_PROTOCOLDATE1,DFSITE_PROTOCOL2,DFSITE_PROTOCOLDATE2,DFSITE_PROTOCOL3,DFSITE_PROTOCOLDATE3,DFSITE_PROTOCOL4,DFSITE_PROTOCOLDATE4,DFSITE_PROTOCOL5,DFSITE_PROTOCOLDATE5andDFSITE_REPLYTO. The value of each property is detailed in Programmer Guide, DFcenters - sites database.study. The study metadata is static for the entire study, it is defined at the study database level and does not change for different data record keys. The study properies that are available are:
DFSTUDY_NUMBER(study number),DFSTUDY_NAME(study name) andDFSTUDY_YEAR(4-digit year of study start, defined by study admin as a global setting). In addition,DFSTUDY_USER#provides the study custom property value, where # is 1-20. Custom property tags may be used in place of the default name.
Output Formatting
Date Modifiers.
By default, date fields are output "as is" in their defined format.
The options -c and -j may be used to
cause imputation and to
alter/normalize that defined format for all date fields that are exported.
The -c (calendar format) option requests that any 2-digit year
be replaced with a 4-digit year and imputation be applied.
The -j (julian format) option requests that imputation
be applied and dates be exported as their equivalent julian value - this
is primarily useful for mathematical calculations and comparisons with
other date values.
On an individual field basis, it is also possible to override the
defined format with field level date modifiers.
By following the field number, name or alias specification with a
:c or :j modifier, it is possible
to export the same calendar or julian format result for a single field.
The :o modifier requests the "original" date value,
and can be useful where -c or -j
has been previously specified.
DateField and DateField:o
produce the same result.
Similarly, DateField:c also produces the same result if
the field's format already specifies 4-digit years and no imputation is needed.
Example 3.22. Calendar and Julian Date Modifiers
For the field named VisitDate, export the value in
default, original, calendar and julian formats.
-Fname "VisitDate, VisitDate:o VisitDate:c, VisitDate:j"
If VisitDate is defined with "imputation to the beginning"
and an instance of that field in a data record has the data value
16/01/00, this specification will produce
16/01/00|16/01/00|2016/01/01|2456963.
A field level date modifier cannot be applied to a non-date
field nor can it be applied to a range of field numbers, names or aliases;
it may only be applied to a single field number, name or alias at a time.
Label Decoding.
For any field that is defined with coding,
it is possible to output the decoded label for a field's value by
appending the :d modifier to the field number, name or
alias.
Any coded value that cannot be decoded is output as is.
The modifier cannot be applied to a field that has no coding nor can
it be applied to a range of field numbers, names or aliases;
it must be applied to a single field number, name or alias at a time.
Header Record.
Specifying -h forces the inclusion of a descriptive
record, the header, as the first row of output.
If -h is specified with -D,
the header contains each field's description.
Otherwise, if -h is specified with -Fname,
the header contains each field alias.
If -h is combined with -Fnum, or no
field selection criteria are needed:
the header contains each field alias if the data source is a plate, as specified with
-Pnumthe header contains each field name if the data source is a module, as specified with
-Mnameor-Mnum.
During export it is possible to create one or more new data fields by
including options to string split
(see String Splitting),
extract substrings
(see Extracting Sub-Strings) or
include fixed, literal values
(see Literal, constant values).
If -h is specified then these new fields also need names
to appear in the header record. This is done with the
-H option.
This option specifies the variable names to
appear in the header record for any new fields.
If header_listheader_list contains fewer names than there
are new fields, the
remaining fields are assigned names identical to their original field
names.
String Splitting.
It is possible to split a string field into multiple, shorter string fields by
appending a :numxcharscw
modifier to a field number, name or alias selection.
The modifier includes a specification of the number of fields to
split the input string into (num), the
literal x as a separator,
the maximum width in characters of each output field
(chars),
and whether or not splitting should be done on character
(c) boundaries or word (w) boundaries.
If word boundaries are used, a word is
delimited by any combination of space or tab characters. Word splitting will
always split at the word boundary closest to but less than the maximum width.
If there is no word boundary in the substring, the string will be split at the
character boundary.
Example 3.24. Split a string field into 5 fields
This example splits the comments field into 5
200-character fields at character boundaries:
-Fname "comments:5x200c"
If a field to be split contains a
missing value code, the first output field will contain the same missing
value code and the remaining fields will be blank.
If a field is split to create additional fields and a header record is
requested with -h, field names for the new
fields are identical to the original field name unless
-H is also specified.
If -H is given,
the field names for the new fields
are assigned in order from the header_listheader_list.
Extracting Sub-Strings.
New fields can be created from substrings while exporting fields.
The modifier notation :xS.L indicates that a substring is
being extracted (x), starting at character position
S (the first position is 1)
and having length L characters.
The modifier can be applied to any field number, name or alias selection.
Substrings can be extracted from any field type: string, date, time
or numeric.
Substrings are extracted from the string value equivalent of the field.
Numeric field values are leading
zero-padded to their store width before substring extraction is performed.
[5]
Example 3.25. Digit extraction from subject ID
In some settings, the subject ID is a concatenation of site ID and a
numeric subject identifier.
In this example, the leading three digits are the site ID and the trailing
four digits. Given PID values of 50001,
60401 and 1232003, the extraction
would yield these results.
-Fname "PID:x1.3,PID:x4.4"005|0001 006|0401 123|2003
Literal, constant values.
A constant value may be inserted into the data export by including it in
one of the -Fnum, -Fname or
-Falias specifications.
The value must always be enclosed with single-quotes,
as in 'AB', to prevent any confusion with a matching
field name or alias.
To insert a blank field into the export, it must be
represented by 2 adjacent single quotes, specifically
''.
Example 3.26. Insert AD into the data export
-Falias "EnrollDate,'AD',SubjInit"2014/12/12|AD|STN 2013/06/15|AD|PRP 2015/03/12|AD|KKW
The constant value AD is inserted between the
EnrollDate and SubjInit fields
in every exported record.
Enclosed by single-quotes,
DFexport ignores the special meaning of any characters that
would otherwise be delimiters.
For example, 'a,b' is the constant value
a,b, not two separate constants.
If -h is present, the name used in the header record
is the value itself.
If -H is also present,
the name used in the header record for each constant value
will be the next value from header_listheader_list,
if one is available; otherwise, the value itself will again be used.
Example 3.27. Specify a field name for the header record
-h -H "When" -Falias "EnrollDate,'AD',SubjInit"EnrollDate|When|SubjInit 2014/12/12|AD|STN 2013/06/15|AD|PRP 2015/03/12|AD|KKW
Output Subject Alias.
If -usealias is present, output the subject alias, if
defined, in place of the subject ID. If there is no subject alias,
output the subject ID.
Exclude Test Site Data.
If -X is present, any data for sites that have been
marked as Test Only sites in the sites dialog in
DFsetup
Trailing Field Delimiter.
For backwards compatibility, exported data records can be terminated
by a trailing | if one is not already present.
This is specified with the -p option.
[6]
With the trailing delimiter, exported data records maintain the
original DFdiscover record format so that they can be, for example, easily
re-imported into DFdiscover in a subsequent step.
Missed Record Handling.
Missed records are include in the export if either
-status all or -status missed are
specified.
To export missed records, there are two output options:
Internal to DFdiscover, missed records are handled in a different structure than other data records (see
plt###.dat- missed records and Table 2.7, “Missed record field descriptions” for further information). Exporting them in this structure, when intermingled with plate- or module-based data records, does not result in normalized records - most records have the data structure, while some have the missed record structure. The result is that these records can be difficult to work with post-export.By specifying the
-Loption, DFexport will export missed records by matching the structure of the corresponding plate and insertinglostcodelostcodeinto all of the user-defined data fields. This results in exported records that are normalized and all share the same structure. Post-export, missed records can be identified by themissedstatus in the status field, or thelostcodein all of the user-defined data fields.
When missed records are exported along with one of the field selection options
-Fnum, -Fname, or -Falias,
the second output option is always used.
If the option -L has
not been specified, the standard DFdiscover missing
value code (lostcode*) is automatically inserted in
each user-defined field of the exported record.
The lostcode specified with
-L must be comprised of one or more alphanumeric characters.
It is not permissible to use control characters.
Also, the DFdiscover delimiter (|) may not be used, unless
data is also being exported in CSV format with the -z option.
Note that specifying the -L
option will not, by itself, cause missed records to be exported.
That is controlled entirely by the lostcode-status option.
The -L option only indicates that
the second, "normalized" output format is desired and is to be used with
the specified substitution code.
Output Options
Output File.
By default, output from DFexport is written to standard output (the command-line output).
To write the output to a specific file, specify the filename with
-o .
The user must have filesystem permission to create or modify the file.
If outfileoutfile is specified as a relative pathname, the file is
created relative to the DFexport command invocation directory.[7]
It is also possible to be explicit that standard output is the output destination
by specifying -o - although this is not necessary.
Output Mode.
Options -w and -a control the output mode.
The output is written (-w) or appended (-a) to the output file.
This option is ignored if exported records are written to standard output rather than a file.
If the output file does not exist, it is first created.
If the output file already exists, it is either overwritten or appended to, depending upon the
output mode.
Error Output.
Re-direct any error messages to a specific file with the
-e option.
By default, error messages are written to standard error and hence would get
intermixed with data if the data is being exported to standard output.
errorfile
Comma-Separated Values (CSV) Format.
CSV is a popular format used for sharing data
records between different software programs.
By including the -z option, DFexport will generate output
that is compliant with this format.
The unique requirements of the format are:
Each field within a record is separated by a comma.
Leading and trailing spaces adjacent to comma separators are ignored.
Fields containing commas as part of their value are enclosed in double quotes.
Fields containing double quotes are enclosed within double quotes, and the embedded double quotes themselves are each represented by a pair of consecutive double quotes.
Fields with leading or trailing spaces are enclosed in double quotes.
The record delimiter is a newline character (this is also true of records exported in the default, non-CSV format).
Exported records, in CSV or traditional (non-CSV), format are always delimited by a newline character.
If the -h option is also specified, the CSV requirements are
applied to the header record and all of the values in the header.
Exit Status
DFexport exits with status 0 if the command was successful.
Exit status 1 indicates that an error occurred - errors are written to standard error
or the errlog file if -e was specified.
![[Important]](../../imagedata/important.png) | Important |
|---|---|
|
Successful command execution can generate no output. This can happen if the selection criteria do not match any available data or match available data which the user does not have permission to view. If output to file is requested, such a command will create a file with no contents and size 0. |
Examples
In the following examples, only the options unique to the example are specified. For clarity, required options such as authentication credentials, output destination and study number are omitted.
Example 3.28. Select and filter using data from two different plates
Export complete data records from plate 6.
Filter those records to include only instances where records with matching
keys on plate 1 have a date variable, S1DATE with
a value of 01/01/06.
-Pnum 6 -ANY "1:$(S1DATE) == 01/01/06"
Example 3.29. Module-based export
The structure of data exported from a module varies dependent upon whether all of the fields are instanced on a single plate, or on multiple plates.
Consider a study containing a module, BASE,
that collects baseline data in fields
HEIGHT, WEIGHT,
the data across two records as in:
-Mname BASE73|180|| ||120|70 65|145|| ||110|65
To generate the previous single record output requires a little more work, specifically:
-Mname BASE -joinALL "1[HEIGHT,WEIGHT] | 2[SYSTOLIC,DIASTOLIC]"73|180|120|70 65|145|110|65
Example 3.30. Export eSignature records with a specific name
The eSignature name is stored in the eSignature module.
Export records signed by 'Jack'.
Several specifications are possible as illustrated here.
-Mname eSignature -expr '$(SigName) == "Jack"'This is the most specific filter - the signature name field must contain exactly "Jack" and nothing else.
-Mname eSignature -expr 'tolower($(SigName)) ~ "jack"'This is a less specific filter - the signature name field can contain a case insensitive variation of "Jack" somewhere in the value. Note that this also selects values like "Jackson", "Alex Jack" and "Wojack".
-Mname eSignature -pattern "jack"This is the least specific filter and selects each eSignature module record that contains a case insensitive match for "jack" anywhere in the record.
[1] This output format matches the output from DFlistplates.rpc.
[2] DFexport typically uses a word to specify an option while DFexport.rpc uses an option letter.
[3]
For backwards compatibility, the legacy status keywords
(clean, dirty, error, CLEAN, DIRTY, ERROR, missed, primary, secondary, all) are currently supported but will be removed in
a future release.
Do not rely upon the availability of the legacy status keywords.
[4] Matching occurs before any output formatting (such as variable decoding or string splitting) is applied.
[5] Choice and check field values are NOT zero-padded and hence substring extraction for those data types may yield unexpected or unreliable results.
[6] This option has no effect when applied to exported query or reason records.
[7] If DFexport is invoked from a cron facility, absolute pathnames are highly recommended.
DFexport.rpc
DFexport.rpc — Export data records from one or multiple plates from a study data file
Synopsis
DFexport.rpc
[-A]
[-X]
[
[-w]
| [-a]
]
[
[-c]
| [-j]
]
[-d]
[-e]
[-J]
[-m]
[-p]
[-q]
[-h]
[-k]
[-z]
[-s status_list]
[-v #, #-#]
[-n #, #-#]
[-I #, #-#]
[-V #, #-#]
[-C yy/mm/dd-yy/mm/dd]
[-M yy/mm/dd-yy/mm/dd]
[-L lostcode]
[
[-U fieldname_list]
| [-G fieldname_list]
]
[-f fieldnum_list]
[-H header_list]
{study}
{plate(s)}
{outfile}
Description
DFexport.rpc can be used to export whole data records or selected fields, from specified plates of a specified study database. Data records are exported in ASCII text format. DFexport.rpc does not provide support for joining fields from different plates or studies. To use DFexport.rpc users must have 'Export Data' permission, which is granted by an administrator on a study-by-study basis (see System Administrator Guide, Server). Users with export permission will only receive records for which they have get permission, which may be restricted by level, site, subject, assessment and plate. DFexport.rpc provides no warning that some records cannot be exported as this would itself provide information about the existence of restricted data records.
DFexport.rpc may appear in a shell script used to create reports stored in
the study reports directory, to be run in DFexplore from the Reports View,
or in a shell script run using dfexecute in an edit check. In these cases
the permissions of the DFexplore user running the report or edit check
will be applied. Thus the behavior and output may differ depending on the
permissions of the user who runs the script.
If the same script is run from the UNIX shell, the permissions associated with the UNIX login name apply. Thus, if a user has different UNIX and DFexplore login accounts with different permissions, the user may get different results depending on whether they run the script in the UNIX shell or DFexplore environments.
Options
-A | output the subject alias, if defined, in place of the subject ID. If there is no subject alias, output the subject ID. | |||
-X |
Exclude output of data from sites marked | |||
-w, -a | output mode.
The output is written ( | |||
-c, -j | default date format.
Without this option, date values are output in the format
specified by their variable definition, and for partial date values,
without any date imputation.
With this option, date values are
output in calendar ( | |||
-d | decode coded variables.
With this option, all requested variables that are coded
are output with their decoded labels.
The default behavior, without this option, is to output the code itself.
This option can be invoked at the individual variable level by appending the
| |||
-e | outfile extension. With this option, the output filename specified will have a text file extension (.txt) added to the end of the user defined outfile name. Outfile extension is ignored if the output file is standard output indicated by '-'. The outfile extension is also ignored if only a single plate is specified. In the case of a single plate, the outfile name will be exactly as specified.
If this option is used along with the csv ( | |||
-J | Outer join with requested fields that may not exist for current plate. With this option, if the user specifies one or more fields that do not exist for a plate that is requested, data for that plate will still be exported but non-existent fields will have a data field containing the missed subsitution code and a header containing "NOT_DEFINED". If this option is omitted, plates that do not contain one or more of the fields requested will not be exported. | |||
-m | match data record validation level. This option is only relevant when exporting metadata records: reasons (plate 510) and queries (plate 511); and is ignored when exporting data records. Meta-data records may have different validation levels from the underlying data records to which they are attached. When metadata records are exported using the -m option, the validation level of each exported metadata record is changed to match the validation level of the data record to which it is attached. | |||
-p | trailing pipe. For backwards compatibility, exported data
records can be terminated by a trailing
| |||
-q | quiet mode. This option instructs the program to execute in quiet mode, silencing all warning messages. The default, without this option, is to write warning messages to standard error. Warning messages are generated upon a request to export a field that does not exist in the record. | |||
-h | header. Include as the first record in the output file, a
delimited record of variable names for the columns in the data records. The
variable names are, by default, the alias variable names defined in the study
data dictionary combined with This option cannot be used with an export of the new record queue, plate 0, as the variable names are not fixed. It can however, be used with the export of query records (plate 511) and reason for data change records (plate 510). The headers for query and reason for data change records are defined in the study schema.
The trailing character is different in data records and queries.
Data records are terminated by a final
If multiple plates are requested and the | |||
-k | keys only. Output only the key fields for each data record. This
includes, in order: id, plate, visit, status, and validation level, as
| |||
-z | Comma Separated Variables (CSV) format. This option exports all records so that they are compliant with this popular format. If this option is used in conjunction with the file extension option, the extension added to the end of the outfile name is the csv extension (.csv). |
Required Options
The following three options are required and must appear in order at the end of the option list:
study | the DFdiscover study number, from which data records are to be exported. |
plate(s) | plate numbers of the data files to export. A single plate can be specified or a list of plates can be specified to run in one invocation. If the same plate is listed more than once, the plate data is only exported once. The keyword 'all' can be used to export all existing plates within the specified study including the special reserved plates. Special reserved plate numbers include: 0 for new records (received but not yet reviewed), 501 for returned Query reports, 510 for reason for data change records, and 511 for queries. If plate 511 is exported, the validation level of all exported records is updated to reflect the current validation level of the record that the notes are attached to. |
outfile | output file that the exported records are written to. The user
executing DFexport.rpc must have permission to create or modify
this file.
In the case of multiple plates being exported, the outfile name is used as
the base filename from which a unique filename is constructed by appending
each three digit, zero-padded plate number.
If the output file is given as |
Record Selection Options
The following options allow specific records to be selected from the output. With no options specified, all records are output. With options specified, only records matching the selection criteria are output. If multiple options are specified, only those records that match all criteria are output.
-s status | record status. The recognized status keywords consist of the
legacy terminology:
If plate 511 is exported, the available status keywords are the same but their meaning (as related to query status) is translated by the table: Table 3.8. Record and query status equivalence
| ||||||||||||||||||||||||
-v | validation level. By default, records at all validation levels are exported, independent of the maximum validation level defined for the user. Specifying this argument causes only those records that match a validation level or are within a validation level to be exported. | ||||||||||||||||||||||||
-I | subject ID.
If this option is specified, only those
records which have a subject ID matching the selection criteria are
output. It is not valid to select records using | ||||||||||||||||||||||||
-n | site ID. This option allows selection by site ID, site
range or any combination thereof.
However, it is not valid to specify | ||||||||||||||||||||||||
-V | visit/sequence number. Specifying this option selects records to output by the visit number. Only those records matching the visit selection criteria are output. | ||||||||||||||||||||||||
-C | creation date. If this option is specified, only those records which have a creation date matching the selection criteria are output. Note that the selection criteria apply only to the creation date of data records and not queries. | ||||||||||||||||||||||||
-M | modification date. If this option is specified, only those records which have a modification date matching the selection criteria are output. Note that the selection criteria apply only to the modification date of data records and not queries.
For both | ||||||||||||||||||||||||
-L lostcode | missing value code for missed records.
Missed records are exported if the keywords 'missed',
'lost', or 'all' are specified
with the status option,
The only exception to this is when missed records are requested along with
one of the field selection options
(
The
Note that specifying the | ||||||||||||||||||||||||
| Argument parsing |
|---|---|
|
Argument parsing in DFexport.rpc ignores extra, repeated delimiters. Any combination of space and comma is collapsed to one delimiter. For example: DFRASTER,,,DFVALID = DFRASTER,DFVALID DFRASTER DFVALID = DFRASTER,DFVALID DFRASTER ,, ,,DFVALID = DFRASTER,DFVALID ,,DFRASTER ,, ,,DFVALID = DFRASTER,DFVALID are equivalent. |
Field (variable) Selection Criteria
The following options allow fields (variables) to be selected from the output.
With no options specified, all fields are output, unless -k
has already been specified. With options specified, only the
requested fields are output. If multiple options are specified, all of the
requested fields are output, in the order requested.
-f | field number. Specifying this option selects for output from each record only those fields requested by their number. Output fields can be re-ordered by specifying the field numbers in the desired order. Fields can be repeated within the option. This option cannot be repeated in the command-line.
Command-line referencing of field numbers using
|
-U fieldname_list, -G fieldname_list | field name. Specifying this option selects for output from each
record only those fields requested by their field name.
If |
-H header_list | field name headers. This option specifies the variable names to
appear in the header ( |
Wherever a field number or field name is expected in field selection
criteria, a constant value may also be referenced by inserting it
in single quotes, as in 'AB'.
The purpose of this is to insert the constant value in the specified
field location into the output records.
The 'value' notation
allows constant values to be exported in much the same way that a variable
value can be.
Since it is possible for a constant value and variable name to be
the same, a constant value must always use the 'value' notation.
For example, the specification:
-G "date,'AD',DFRASTER"
requests the variable with the name date,
followed by the constant value AD
and the raster image ID number. The output might appear as:
99/06/17|AD|9924/00001001
If a blank field is being exported, it must be represented by 2 single quotes with nothing inside.
DFexport.rpc will ignore the special meaning of any characters that
would otherwise be delimiters.
For example, 'a,b' is the constant value
a,b, not two separate constants.
If -h is present, the column name for each constant
value will be the value itself, as in the following specification and
output:
% DFexport.rpc -h -G "date,'AD',DFRASTER" 254 1 - | head -2
If -H is also present, the column name for each constant
value will be replaced with the next -H value,
if one is available. For example:
% DFexport.rpc -h -G "date,'AD',DFRASTER" -H "when" 254 1 - | head -2
Date Modifiers
By default, date fields are output in the format defined for the field in the
study data dictionary.
If -c or -j is specified, the default
output format is changed to 4-digit year format with imputation
(-c) or julian format (-j).
It is possible to override the default format for selected fields
by following the field number or field name specification with a
:c, :j or
:o modifier.
For example, the specification:
-G "VisitDate, VisitDate:c, VisitDate:j"
requests the variable with name
VisitDate to be output in its default
format, in calendar date format, and finally in julian format.
The :c modifier applied to a field that already
uses a 4 digit year format applies
date imputation only.
When using -c or -j
to change the default output format for dates,
note that there is no field level modifier that
restores the original date format defined in the study data dictionary.
The :o
modifier can be used in an analogous fashion to
:c and :j. The effect of the
:o
modifier will be to cause the original date value to be output without any
imputation.
A modifier cannot be applied to a non-date variable nor can it be applied to a range of field numbers or field names; it must be applied to a single field number or field name at a time.
Variable Decoding
It is possible to output the decoded label for a variable's value by
appending the :d modifier to any variable that is defined
with coding.
Any coded value that cannot be decoded is output as is.
The modifier cannot be applied to a non-coded variable nor can it be applied to a range of field numbers or field names; it must be applied to a single field number or field name at a time.
String Splitting
It is possible to split a string field into multiple, shorter string fields by
appending a :numxcharscw
modifier to the field number or field name
specification. The modifier includes a specification of the number of fields to
split the input string into (num),
the maximum width in characters of each output field
(chars),
and whether or not splitting should be done on character
(c) boundaries or (w) boundaries.
If word boundaries are used, a word is
delimited by any combination of space or tab characters. Word splitting will
always split at the word boundary closest to but less than the maximum width.
If there is no word boundary in the substring, the string will be split at the
character boundary.
Example 3.32. Split a string field into 5 fields
This example splits the comments field into 5
200-character segments at character boundaries:
-G "comments:5x200c"
If a field to be split contains a missing value code, the first output field will contain the complete missing value code and the remaining fields will be blank.
If a field is split to create additional fields and a header record is
requested with -h, field names for the new
fields are identical to the original field name unless
-H is specified. If -H is
given, the field names for the new fields are assigned in order from the option
list. If the option list contains fewer names than there are new fields, the
remaining fields are assigned names identical to their original field
names.
Extracting Sub-Strings
New fields can be created consisting of substrings of database fields. The following example creates a data field from the 4th and 5th characters of field 22.
-f 22:x4.2
Substrings can be extracted from any field type: strings, dates, or numbers. Substrings are extracted from the string value of the field. Numeric fields will be zero-padded to their store width before the substring extraction is done. In the following example, the first three digits of the subject ID field are extracted.
-f 7:x1.3
Comma Separated Variables (CSV) Format
CSV is a popular format used for sharing data
records between different software programs.
By selecting the -z option, DFexport.rpc will generate output
records that are compliant with this format.
The requirements of the format are:
The record delimiter is a newline character (this is also true of records exported in the default, non-CSV format).
Each field within a record is separated by a comma.
Leading and trailing spaces adjacent to comma separators are ignored.
Fields containing commas as part of their value are enclosed in double quotes.
Fields containing double quotes are enclosed within double quotes, and the embedded double quotes themselves are each represented by a pair of consecutive double quotes.
Fields containing embedded line breaks are enclosed within double quotes.
Fields with leading or trailing spaces are enclosed in double quotes.
The first record in the CSV output file may consist of a header record containing field names. Each field in the header will also be comma-delimited and follow the requirements above.
Exit Status
DFexport.rpc exits with one of the following statuses:
0 | The command was successful. |
24 | The user does not have the necessary permission to execute the command. |
31 | The requested plate does not exist in the database. |
36 | The required command-line arguments were not present or were incorrectly specified. |
> 0 | The command failed because the database server could not be contacted, or communication with the database server failed. |
Examples
Example 3.33. Export all records from plate 1 of study 255 to standard output
% DFexport.rpc -s all -h 255 1 -Example 3.34. Export, with header, all primary records at validation levels 1-2 from plate 1 of study 255 to standard output
% DFexport.rpc -h -s primary -v "1-2" 255 1 -Example 3.35. Export the first 3 and the 7th fields from plate 1 to standard output
% DFexport.rpc -f "1-3,7" 255 1 -Example 3.36. Export the VDATE date field in
4-digit year format and export
the subject initials in 3 single-character fields. Include the header record
and define names for the newly created fields
% DFexport.rpc -c -G "VDATE,INIT:3x1c" -H "middle,last" 255 1 -Example 3.37. Export the primary records for subject IDs 99001 and 99002
selecting the fields from DFSTUDY to
VDATE inclusive
% DFexport.rpc -s primary -I "99001,99002" -G "DFSTUDY-VDATE" 255 1 -Example 3.38. Show all forms of manipulation for a partial date value in the
variable DateCompleted1 for study 251
% DFexport.rpc -j -G "DateCompleted1,DateCompleted1:c,DateCompleted1:o" 251 1 -Example 3.39. Create a DFdiscover Retrieval File (ID99001_plate10.drf) for study 254, all primary records for plate 10, for subject ID 99001
% DFexport.rpc -f "7,6,5" -I 99001 254 10 ID9901_plate10.drfThe following is the contents of the file ID9901_plate10.drf.
99001|1|10
99001|2|10
99001|3|10
99001|6|10
99001|9|10
99001|12|10
Example 3.40. Export all primary records for plates 1-3, 7 and 8 to standard output
% DFexport.rpc -f "7,6,5,3" 254 "1-3,7,8" -When exporting multiple plates in one invocation, the outputs are always sorted in ascending order of the plate numbers, for example if the plate argument is changed to "7,8,3-1", the same output will be seen.
Example 3.41. Export all primary records for all plates in a study and create separate text files for each set of plate data.
% DFexport.rpc -e -f "7,6,5,3" 254 all Study254_The following are the output files created by the above command
Study254_000.txt
Study254_001.txt
Study254_002.txt
Study254_003.txt
Study254_004.txt
Study254_005.txt
Study254_006.txt
Study254_007.txt
Study254_008.txt
Study254_009.txt
Study254_010.txt
Study254_011.txt
Study254_020.txt
Study254_501.txt
Study254_510.txt
Study254_511.txt
As seen above, all plates are exported in one invocation of the command. Special reserved plates are also included when the keyword 'all' is specified for the plates argument. A three digit, zero padded, plate number is also appended to the end of the outfile name, and is optionally followed by a file extension.
Example 3.42. Export, in CSV format, a subset of fields for plate 3 of study 254 and write the results to standard output
%DFexport.rpc -s all -z -f 1-7,59,63-66 254 3 -2,1,9807/0047003,254,3,1,99001,,0,0,"knee surgery, hip replacement",2 1,1,0347R0012001,254,3,1,99101,"""other"" surgery",1,1," carotid endarterectomy ",2
Note that field values containing commas (knee surgery, hip
replacement) are enclosed within double quotes.
Fields containing double quotes (such as "other" surgery)
are enclosed within double quotes and the
embedded double quotes themselves are represented by a pair of consecutive
double quotes.
Example 3.43. Export only missed records for plate 1, inserting the missing value code "NA" into the fields of each missed record exported. Export the results to standard output.
%DFexport.rpc -s missed -L "NA" 254 1 -0|7|0000/0000000|254|1|0|20100|NA|NA|NA|NA|NA|NA|NA|NA|NA|NA|NA|NA|NA|NA|NA|NA|NA|NA|NA|NA|NA|NA|NA|NA|NA|0|2018/01/15 12:35:23|2018/01/15 12:35:23 0|7|0000/0000000|254|1|0|20101|NA|NA|NA|NA|NA|NA|NA|NA|NA|NA|NA|NA|NA|NA|NA|NA|NA|NA|NA|NA|NA|NA|NA|NA|NA|0|2018/01/15 12:35:23|2018/01/15 12:35:23
Note that missing value code insertion is only performed for user-defined fields after field 7 (subject ID).
Limitations
DFexport.rpc and DFexport are the recommended ways to export data records from the study database for subsequent examination or analysis. Never read the data files directly as they may contain old copies of records scheduled for removal.
Since DFexportrpc; may only be run server-side by an authenticated user, it does not enforce user permissions as strictly as DFexport does. For example, DFexportrpc; ignores the Hidden/Masked field property while exporting field values.
[8]
Data written to standard output will also include "inline" header
metadata if either of the -h or
-x options are specified.
DFfaxq
DFfaxq — Display the members of the outgoing fax queue
Synopsis
DFfaxq
[#, #-#]
[username...]
Description
DFfaxq reports on the status of requested faxes, either by their fax IDs, or by all faxes owned by the user(s) specified. When invoked with no arguments, DFfaxq reports on all faxes in the queue. For each outgoing fax, DFfaxq reports the unique fax ID number (by which it is referred to when using DFfaxrm), the user name of the fax owner, the scheduled time of sending, the file to be sent, the current status of the entry in the queue, the number of attempts at sending, and the phone number (or email address) to be sent to.
In the case of a fax that is being sent to multiple recipients, the fax ID, owner, scheduled time, and file to be sent, are all displayed on the first line together with the status, attempt, and phone number/email address of the first recipient. For the second and subsequent recipients, only the status, attempt and phone number/email address are displayed. The possible status values are:
New: in queue and waiting for scheduled time to arriveSending: in process of being sent to recipientRetry: in queue as previous tries have failed and waiting for retry delay to expireSent: successfully sent to recipientFailed: failed and maximum number of retries was exceeded
If the recipient is an email address, the only possible status values are
Sending or Sent.
It is not possible to reliably track the delivery status of an email message
and so the other statuses cannot be reported.
DFfaxq displays the queue information sorted by increasing fax ID#.
Options
| report on the status of faxes with the requested fax id numbers. |
username | report on the status of faxes owned by
|
Exit Status
DFfaxq exits with one of the following statuses:
0 | The command was successful. |
> 0 | The required command-line arguments were not present or were incorrectly specified. |
Examples
Example 3.44. Scheduled but not yet sent fax
% DFfaxqExample 3.45. In-progress fax to multiple recipients
Here is a queue entry for an in-progress fax to multiple recipients:
% DFfaxq
DFfaxrm
DFfaxrm — Remove faxes from the outgoing fax queue
Synopsis
DFfaxrm
{
[-]
| [FaxId#...]
| [-a]
}
Description
DFfaxrm removes faxes from the outgoing fax queue, that is, those faxes that have been scheduled for sending but have not yet been sent.
A specific fax can be removed
by supplying its faxid#,
which can be obtained using DFfaxq.
Example 3.46. Removing a fax by its faxid
FaxId Owner Scheduled Time File Status Try To 307 usr1 Nov 30 16:18:23 /etc/fstab New 0 1234567 308 usr1 Nov 30 16:18:23 /etc/fstab New 0 555-1212%DFfaxq%DFfaxrm 307
DFfaxrm reports the names of any faxes it removes, and is silent if there are no applicable faxes to remove.
When DFfaxrm removes a queue entry, faxes that are scheduled to be sent (status
New) or retried (status
Retry) in the future will not be sent or retried.
However, any entries that have a status Sending
are currently being transmitted
and cannot be aborted. These faxes may be transmitted successfully, but any
success command arguments specified to DFsendfax will not be executed. If a
Sending status transmission fails,
it will not be retried if it has been removed.
Options
Exactly one of the options is required. It is an error to mix these options. It is also an error to not supply any option.
- | remove all faxes owned by the user executing the command. Fax ownership is determined by the user's login name on the machine where the fax was originally queued for sending. |
faxid# |
remove the fax specified by |
-a |
remove all faxes from the outgoing fax queue. This option can only be
invoked by users |
Exit Status
DFfaxrm exits with one of the following statuses:
0 | The command was successful. |
> 0 | The required command-line arguments were not present or were incorrectly specified. |
DFget
DFget — Get specified data fields from each record in an input file and write them to an output file
Synopsis
DFget
[-w]
[-i delim]
[-o delim]
[-f #]
{#, #-#}
Description
DFget reads records from the standard input and writes records to the standard output. Each input record is assumed to contain one or more fields delimited by the input delimiter. For each input record DFget applies the field specification string to create a new output record that is written to the standard output.
The field specification is constructed from one or more field specifiers. Each field specifier can be a single field number, a range of field numbers or a string.
One or more constant string fields can be inserted in output records. String fields can contain numbers and characters, and can also contain blank spaces. If the constant string field is a number (or begins with a number) it must be enclosed in a pair of single-double quotes (e.g. '"55"') or double-single quotes (e.g. "'55'"). This prevents DFget from interpreting those numeric strings as field specifiers.
Only those fields included in the field specification will be written to the new output record. Fields in the output record are delimited by the output delimiter and are written in the order given in the field specification.
The field number NF can be used to reference
the last field in a record, and NF-n can
be used to reference the
nth from last field
in a record.
DFget is a convenient way to extract fields from exported database records. Remember to first export the desired data files using DFexport.rpc.
Combining the tools DFexport.rpc, DFget, and DFimport.rpc is a powerful way to manipulate data.
Options
-w | warn about records that are too short to contain one or more of the requested fields. By default, no warnings are written and the requested fields that are not available are filled with blanks. |
-i delim | the specified character is the field delimiter
in the input records. The default is |
-o delim | use the specified character as the field delimiter
in the output records. The default is |
-f | skip any records that do not contain the specified number of fields. |
| the fields to retrieve from each record, and any constant values that are to be inserted (required). |
Exit Status
DFget exits with one of the following statuses:
0 | The command was successful. |
36 | The required command-line arguments were not present or were incorrectly specified. |
Examples
Example 3.48. Retrieving specified fields from input records
Consider the following two line input file:
102|2|2|0101|gh|2|mellaril|t|100|1|90/03/01|0|
102|2|9|0101|bc|2|noctec|c|500|1|90/07/12|0|
To retrieve fields 1, 4 through 7, a constant string and the last 2 fields from each record, with a colon as the output delimiter, DFget could be used as follows:
% DFget -i '|' -o ':' 1 4~7 "'12 gm'" NF-1 NF < infile
DFgetparam.rpc
DFgetparam.rpc — Retrieve and evaluate the value of the requested configuration parameter
Synopsis
DFgetparam.rpc
[-n]
[-s #]
{param}
Description
DFgetparam.rpc is the recommended way of determining
the value of the master daemon's or a study server's configuration parameter.
The current value of the parameter is printed on the standard output without
a trailing new line character, unless -n is given.
This is a format suitable for
command line substitution by the shell.
When DFgetparam.rpc is running as user datafax, if the environment variable DFUSER
is set, DFgetparam.rpc runs as that user. Thus for example requesting USER_PERMISSION
will get the permissions associated with DFUSER,
not the permissions for user datafax.
This is important in DFexplore for shell scripts run by dfexecute in edit checks,
and in study reports run under the Reports View.
The following configuration parameters can be retrieved from the master configuration:
AUTO_SLAVES | hostnames on which slaves are started when DFdiscover is started |
MAILEE | email address for delivery of important system messages |
PRINTER | default printer for DFadmin application |
PASSWORD_RULES |
a tuple of values in the following format:
|
ROUTER_USERS | list of users that have permission to use the router |
The following parameters can be retrieved from a study configuration:
AUTO_LOGOUT | a compound value containing two numbers that represent, in minutes, the minimum and maximum settable automatic logout intervals |
SITES |
database of participating clinical
sites ( |
DATABASE_DIR | study database directory |
FILE_MAP | lists all plates defined for the study |
PAGE_DIR | CRF page images root directory |
PRINTER | default printer for the study and all study applications |
REPORTS_DIR | study reports directory |
SCHEMA | study database schema |
SETUP | study setup defintion (JSON format) |
STUDY_DIR | study home directory |
STUDY_HINTS | information for ICR to locate data fields |
STUDY_NAME | descriptive study title, or acronym |
STUDY_NUMBER | DFdiscover study number |
USER_PERMISSION | the restrictions, if any, on which records the current user can access. The output is:
|
VISIT_MAP | subject assessment schedule |
WORKING_DIR | study work directory |
Options
-n | append a newline character to the end of the output. The default is to not emit a trailing newline. |
-s | the DFdiscover study number. If this argument is missing, the parameter request is made of the master daemon's configuration. |
param | the name of the configuration parameter to be retrieved and evaluated (required). |
Exit Status
DFgetparam.rpc exits with one of the following statuses:
0 | The command was successful. |
36 | The required command-line arguments were not present or were incorrectly specified. |
> 0 | The command failed because the master/server could not be contacted, or communication with the master/server failed. |
Examples
Example 3.49. Determine the working directory for study 123
In this case, the value is assigned to a new shell variable,
work.
% work=`DFgetparam.rpc -s 123 WORKING_DIR`
Example 3.50. Echo the value of the default printer for the master daemon
% echo `DFgetparam.rpc PRINTER`Example 3.51. Determine the access permissions for study 253 for the current user
%DFgetparam.rpc -s 253 USER_PERMISSION1-10|||||||0,1||||||1-44,46-90||
In this example, 3 access permission rules apply to the user:
1-10|||||: all records for sites 1 through 10, inclusive||0,1|||: all records for visits 0 or 1||2|1-44,46-90||: all records for plates 1 through 44 and 46 through 90, inclusive, at visit 2
The user will be granted access to data records that meet at least one of these permission rules.
DFhostid
DFhostid — Display the unique DFdiscover host identifier of the system
Synopsis
DFhostid
Description
DFhostid prints the unique DFdiscover host identifier of the system on the standard output. The output is a 20-character/digit identifier displayed in 5 blocks of 4. Note that the identifier will never contain any of 0 (zero), 1 (one), I (capital i), or O (capital o).
The host identifier of the DFdiscover master machine is required for licensing purposes.
DFimageio
DFimageio — Request a study CRF image from the database
Synopsis
DFimageio
[-hd]
[-f string]
{-s #}
{imageID}
Description
DFimageio fetches a specific, single CRF image from the requested study database and writes it in its native format to a file, or standard output.
The study number and the unique CRF image identifier are required arguments. The CRF image identifier must be one of:
Study CRF images are stored in the study file system and hence can also be accessed using standard shell commands. However, shell commands will fail to access the CRF image if:
the CRF image resides on a file system which is not visible to the current computer
filesystem permissions prevent the file from being read
the CRF image was previously deleted when the database record which it references was deleted
DFimageio is the correct, accepted method for accessing CRF image contents from the study database. Future releases of DFdiscover will further tighten the permissions on the CRF image files so that DFimageio will be the only method for retrieving them reliably.
Options
-hd | Request the HD version of the database image. If available, the HD version is returned; if not available, or if HD is not requested, the standard definition image is returned. This is applicable to database images only - the DFsetup and DFexplore backgrounds are available in only one definition. [10] |
-f string | write the retrieved CRF image to the named file. Without this option, the retrieved CRF image is written to standard output where it should be re-directed using shell syntax. |
-s | the study number (required). |
imageID | the unique identifier for the CRF image (required). |
Exit Status
DFimageio exits with one of the following statuses:
0 | The command was successful. |
36 | The required command-line arguments were not present or were incorrectly specified. |
1 | The requested CRF image could not be located using the supplied image identifier. |
Examples
Example 3.53. Get and write a requested CRF image to a file
% DFimageio -f image1 -s 254 1525/0008001
The CRF image with the unique identifier 1525/0008001 is
written to the file named image1 in the current
directory.
Example 3.54. Get and re-direct a requested CRF image to a file
% DFimageio -s 254 1525/0008001 > image1
The CRF image with the unique identifier 1525/0008001 is
written to the file named image1 in the current
directory.
The result is identical to that in the previous example but uses
shell re-direction to achieve it.
Example 3.55. Get and write a DFsetup background image to a file
% DFimageio -f image1 -s 254 \$plt001.png
The DFsetup background image with the unique identifier plt001 is
written to the file named image1 in the current
directory.
DFimport.rpc
DFimport.rpc — Import database records to a study database from an ASCII text file
Synopsis
DFimport.rpc
[-v]
[-N]
[-R]
[
[-n]
| [-q]
| [-c]
]
{
[-a]
| [-m]
| [-r]
}
[-s]
{#}
{string}
Description
DFimport.rpc imports records from the input file into a DFdiscover study database.
To use DFimport.rpc users must have permission to import data, defined by
the study administrator in role permissions.
To import new records (using the -a or -m options) users
must have create permission
and to replace existing records (using the -r
or -m options) users must have modify permission.
Remember that create and modify permission may be specified by level, site, subject,
assessment and plate.
DFimport.rpc will reject any records it cannot import with an error message indicating
that the user does not have the necessary permissions.
When reading records from the input file, each record must be delimited by a newline ('\n') character. Additionally, each record can be at most 4095 characters in length. If 4095 characters are read without encountering a newline, the record is truncated at 4095 characters. It will subsequently fail record checking and be rejected.
DFimport.rpc may be used in a shell script stored in
the study reports directory and run in the DFexplore Reports View,
or in a shell script stored in the study ecbin directory and run
dfexecute in an edit check. In these cases
the permissions of the DFexplore user running the report or edit check
will be applied. Thus the behavior and output may differ depending on the
permissions of the user who runs the script.
If the same script is run from the UNIX shell the permissions associated with the UNIX login name apply. Thus, if a user has both UNIX and DFdiscover login accounts, and these accounts have different permissions, the user may get different results when they run the script in the UNIX and DFexplore environments.
DFexplore uses the environment variable
DFUSER to implement user permissions. It is possible to set and export this
variable in the shell script to fix the permissions to those of any specified user,
thus rendering the results constant for all users despite their specific DFexplore
permissions.
Input records can be new data records that need to be reviewed in Fax View, new or previously entered data records for direct entry to the study database, or metadata records (data queries or reasons). It is not possible to mix these different record types in a single import operation. The type of records being imported is specified using one of the following options:
-n: new records to be added to the new fax queue-q: queries for specified data fields-c: reasons for specified data fields
If none of these options is specified, the records must be new or replacement data records to be imported into the study database according to the plate number specified in the fifth field of each data record.
In addition to the record type options, there are 3 import mode
options (add, replace and merge) to specify whether records are new
and being added to the database (-a),
replacement records (-r), or a combination
requiring a merge operation during which
new records are added to the database and existing records
are replaced (-m).
To locate existing records in the database, DFimport.rpc searches for a record with matching keys (id, visit, plate) and image ID. This will always result in the identification of a record uniquely, if it exists, independent of whether the record has primary or secondary status. Dependent upon the record's presence in the database, the requested import mode will result in either an 'Add' or 'Replace' operation as shown in Table 3.9, “Deriving operations from import mode”.
Table 3.9. Deriving operations from import mode
| Import mode | Exists | Does not exist |
|---|---|---|
-a
| **error | Add |
-r
| Replace | **error |
-m
| Replace | Add |
If the operation is not in error, then the primary or secondary status of the import record is considered subject to the following rules:
Table 3.10. Add operation
| Import record status | Existing record status | Ending State |
|---|---|---|
| primary | none | imported record becomes primary |
| secondary | none | **error |
| primary | primary | existing primary becomes secondary; imported record becomes primary |
| secondary | primary | imported record is added as secondary |
| primary | missing | **error |
Table 3.11. Replace operation
| Import record status | Existing record status | Ending State |
|---|---|---|
| primary | secondary | **error |
| secondary | secondary | imported record replaces existing |
| primary | primary | imported record replaces existing |
| secondary | primary | **error |
Imported records are verified against the study data dictionary if
-v is given.
Without this option, imported records are only verified for
the correct number of fields.
| Formatting Records for Import |
|---|---|
|
Records must be correctly formatted for the DFdiscover plate to which they will be imported.
The standard field delimiter,
The third field, image ID, must be unique for all data records in the
study database. This field contains the image identifier if the record
has an associated image file, or a raw record identifier if there is no image.
When importing new records that have no image (e.g. lab data from an external source)
this field should contain a placeholder image ID,
When importing metadata records (queries and reasons) the image ID field must also contain
A trailing delimiter is required at the end of
all data records but must not be present on metadata records,
i.e. queries (plate 511) and reasons (plate 510).
Thus, care should be taken not to use the |
If the validation level of an imported record is higher than the user's maximum write level, it is adjusted down to the maximum, a warning message is generated, and the record import proceeds.
If an input record has a # or a newline in the first column
position, DFimport.rpc treats
the entire record as a comment and skips over it.
If DFimport.rpc completes without error, it echoes the number of records imported and the number of warning messages and exits with status 0. If DFimport.rpc encounters errors, which are unrelated to the records being imported, it exits with a message to stderr and a positive exit status. If DFimport.rpc encounters errors with the records it is importing, it writes each offending record to stdout, a problem description to stderr, and increments a counter of failed records. Upon exit, DFimport.rpc sets its exit status to the failed record counter. If all records are successfully imported, the exit status is 0.
| Note |
|---|---|
|
Options
-v | Verify that the imported records match the
database record format as specified in the study data dictionary.
It is highly recommended that this argument be used under most circumstances.
Without this option, minimal record checking is performed on the number of
fields (must be at least 7), the record status, and the
record validation level. The verification performed by |
-N | Test that the data records verify correctly but do not import them. |
-R | Convert |
-n, -q, -c | Imported record type: if none of these options is specified the input file must contain data records to be imported into the study database according to the plate number field in each data record. Specifying:
|
-a, -m, -r | Import mode (required) specifies one of three possible actions:
|
-s | Skip plate arrival triggers.
This option can only be specified in conjunction with the Plate arrival triggers are only executed if the record import is successful. If a trigger fails, a warning message is written to the DFdiscover error log. |
| The study database number into which the records are to be imported (required). |
string | The input file containing the records
to be imported (required), or |
Exit Status
DFimport.rpc exits with one of the following statuses:
0 | The command was successful. |
24 | The user does not have the necessary permission to execute the command. |
36 | The required command-line arguments were not present or were incorrectly specified. |
> 0 | The command failed because the study schema or the input file could not be read, the database server could not be contacted, or communication with the database server failed. |
Limitations
DFimport.rpc attempts to enforce database integrity as best it can. As a result, the following constraints are enforced:
-
DFimport.rpc does not allow the import of type 21 (missing page), 22 (overdue visit) and 23 (edit check missing page) queries for which there is a primary record (missing, final, incomplete) in the database. Attempts to do this will result in a message that the record already exists.
-
DFimport.rpc will delete any corresponding type 21 (missing page), 22 (overdue visit) and 23 (edit check missing page) queries when a primary record (missing, final, incomplete) is imported into the database.
-
DFimport.rpc does not allow the import of new query records with category codes that are not defined in the Query Category Map in DFsetup. However, it does allow modification or deletion of records with undefined category codes.
-
DFimport.rpc can be used to import data records that contain fields from an e-signature module but each of the e-signature fields will be blanked during the import. It is not possible to programmatically add/replace data records that have pre-filled e-signature fields. Such records must be reviewed in DFexplore after the import so that they can be e-signed.
-
DFimport.rpc does not allow the import of queries for which the primary record is locked. Attempts to do this will result in a message that the record is currently in use.
-
DFimport.rpc does not allow the import of data values for choice and check fields that do not exactly match one of the codes defined for those fields in the study schema.
-
DFimport.rpc will not import secondary records with a raw or zeros image ID (e.g.
0922R00023001or0000/0000000). The only supported function for secondary records is to reference additional images attached to the primary data record. Thus secondary records must have an image ID that points to an image file.
However, there are situations where a knowledgeable user may want to import records out of order, for example, so that referential integrity is initially violated, and then subsequently restored. The following operations are permitted as they allow a knowledgeable user to fully utilize DFimport.rpc.
-
DFimport.rpc allows the import of queries for which there is no primary record in the database. This is to allow an out-of-sequence import of queries followed by their data records in a subsequent import. The correct sequence of steps is to first import the primary records followed by the queries.
DFimport.rpc allows the primary record to be imported with a
deletestatus, effectively deleting the primary record and all secondary records, queries and reasons associated with it. If the primary record is deleted, its secondary records and metadata will also be deleted to avoid having orphaned secondary, query and reason records in the database. During deletion, the record currently in the database is compared with the record being imported. All fields (other than status) must match for the operation to succeed. The number of fields can be different than the current definition for a given plate. This allows for the deletion of possibly corrupt records with field counts that differ from the current plate definition by exporting the record, changing its status todelete, and importing the record in question.DFimport.rpc allows query and reason records to be imported with a
deletestatus, effectively deleting the queries and reasons. All fields (other than status and validation level) must match for the operation to succeed. The deletion of queries and reasons does not delete the primary record to which they are attached.
DFlistplates.rpc
DFlistplates.rpc — List all plate numbers used in the study
Synopsis
DFlistplates.rpc
[-n]
[-p #, #-#]
{-s #}
Description
DFlistplates.rpc creates a list of the plate numbers defined for the study and
writes that list to the standard output. The list is sorted in increasing
numeric order.
Each plate number is output with
leading zero-padded to three digits
and is delimited from the next plate number by a single space character.
The
complete list of plate numbers is output in one line without a trailing
new line, unless -n argument is given.
Both the plate numbers for user-defined plates, and
501 (the plate number reserved for returned Query Reports), are output by
DFlistplates.rpc. However, the special plate numbers,
0, which is reserved for new records in DFin.dat,
510, which is reserved for reason for data change records,
and 511, which is reserved for records in the query database
DFqc.dat, are not included in the list.
With -p , the list of known plates for the
study is intersected with the argument list to create an output list.
If this option is not specified, the program lists all of the
defined plate numbers for the study.#, #-#
Options
-n | append a new line character to the end of the output. |
-p | include only the specified plates in the range of plates to output. |
-s | the DFdiscover study number (required). |
Exit Status
DFlistplates.rpc exits with one of the following statuses:
0 | The command was successful. |
> 0 | The command failed because the database server could not be contacted, or communication with the database server failed. |
Examples
Example 3.56. List the plates defined for study 123 to the standard output
001 002 003 004 005 006 007 008 009 010 020 501%DFlistplates.rpc -s 123%
Notice how the prompt has been affected by the lack of a trailing newline.
Example 3.57. List all plate numbers, one per line, for study 254 - Bourne shell method
%for p in `DFlistplates.rpc -s 254`?do?echo $p001 002 003 004 005 006 007 008 009 010 020 501?done
DFlogger
DFlogger
— Re-route error messages from non-DFdiscover applications to syslog, which in turn writes the messages to the system log files, as configured in /etc/syslog.conf.
Synopsis
DFlogger
[-t string]
[-f string]
{-s #}
Description
DFlogger reads the standard input, or the file specified with
-f ,
treating each input line as an error message
to be forwarded to stringsyslog.
DFlogger should be used, in a pipeline fashion, at the end of commands that
might generate error messages that you want to record in the
system error log.
DFlogger sends each input line to syslog and counts how many lines were
written. The number of lines is used as the exit status of DFlogger. This has
the benefit that, if DFlogger is used at the end of a pipeline, the exit status
of the pipelined command will always be the number of error messages
generated.
Options
-t string | the name of the program that DFlogger should prepend each
message with.
This is the program name that will appear in the header information for the
message when it is written to the error log.
The default is |
-f string | the name of a file that contains error messages to be sent to the error log. Each line of the file is assumed to be an individual error message. If this option is not provided input is assumed to come from the standard input. |
-s | the DFdiscover study number (required). |
DFpass
DFpass — Locally manage user credentials for client-side command-line programs.
Synopsis
DFpass
{[-add] | [-replace] | [-remove]}
{servername:username}
Description
Several command-line programs, namely DFattach, DFbatch, DFexport, DFpdfpkg,
DFreport and DFuserPerms,
connect to study databases and require valid database credentials for
the database connection to succeed.
Each of these programs already permits the use of command-line
options -S, -U and -C for
specifying the needed servername, username and password credentials.
Similarly, the DFSERVER, DFUSER and
DFPASSWD environment variables may be assigned values
and used.
DFpass is a convenience program that allows a user to locally store the password part of these credentials in a secure manner. Use of DFpass is not required but it is recommended for command-line users, and is strongly encouraged for users that write shell scripts and/or schedule program execution with facilities like UNIX cron.
DFpass manages credentials for the current user by keeping a local, user-specific database file of servername, username and password triples. Each record in the database is an encrypted representation of the credentials for one unique combination of servername, username and password. With DFpass one can add new records, update existing records with a new password and remove records.
Use of DFpass requires command-line specification of the action to be taken (one of: add, replace or remove) and the servername and username to which the action applies:
if the
-addaction is specified, the combination of servername and username must not match a previously added entry that is already being managed locally by DFpass. The user is prompted to enter their password. DFpass obscures the password as it is typed in and requires the user to confirm by entering the password again. If the passwords match exactly, the password is accepted and saved locally for the user.if the
-replaceaction is specified, the combination of servername and username must match a previously added entry that is already being managed locally by DFpass. The user is prompted to enter their new password. DFpass obscures the password as it is typed in and requires the user to confirm by entering the password again. If the passwords match exactly, the password is accepted and saved locally for the user.if the
-removeaction is specified, the combination of servername and username must match a previously added entry that is already being managed locally by DFpass.
In all cases, DFpass prints a message confirming that the requested action was action, or an error message if the action could not be completed.
| Important |
|---|---|
|
DFpass does not confirm that the supplied servername, username and password combination is valid. This is the responsibility of the user. |
Password management
DFpass is not a replacement for the existing DFdiscover tools for managing user credentials, nor does it offer the same functionality. User credentials must still be created and managed within DFdiscover using standard methods. DFpass simply allows you to write and read those credentials locally in a way that does not expose passwords as clear text.
Adding entries with DFpass does not add credentials for the user to DFdiscover.
It is vitally important that the entries made with DFpass match existing
DFdiscover credentials, otherwise those entries are of no value.
Users must also be aware that updating a password in DFdiscover does
not update the local information managed by DFpass; this must be done
separately with the -replace action.
Options
-add | -replace | -remove | action to take (required). |
servername:username | the specific credentials to add, replace or remove
(required).
For the |
Exit Status
DFpass exits with one of the following statuses:
0 | The command was successful. |
1 | The command was not successful. |
DFpdf
DFpdf — Generate bookmarked PDF documents of CRF images
Synopsis
DFpdf
[
[-c password]
| [-C]
]
[-d]
[-i string]
[-o string]
[-f string]
[-v string]
[-g string]
[-s string]
[-t string]
[-j string]
[-k string]
[-n]
[-b string
[-a string]
[-m #]
]
{#}
Description
DFpdf generates an optionally password-protected PDF document containing one or more pages, where each page is a study CRF, bookmarked within the complete PDF. The resulting PDF document follows the Adobe PDF specification, version 1.4.
If a password is provided, the entire file is encrypted and stored in binary format. Otherwise, the file is stored in plain text format.
DFpdf requires a study number argument and an input file. The input file, which
must be in either DFdiscover data export or DRF format, lists the images that are
to be included in the PDF output document. Sort order in the output
matches the order that records appear in the input file.
If the -s option is
specified, sort order
within subject will follow the rules specified by the contents of
sortmapsortmap.
Bookmarks are created at the document root, subject, visit, and plate levels.
The label for the document root bookmark is ID, Visit, Plate
but can be
over-ridden through the use of -t. A new bookmark
is created as each new ID is encountered in the input and the label is of the
form ID .
A visit bookmark is created for each new visit number
within the current ID. The label is created from
field 3 of the study visit map
if the visit is defined in the visit map; otherwise,
it has the form #####Visit .
Finally, a plate bookmark is created for each CRF in the input file.
The label is created from the matching page map entry, if it is defined;
from field 2 of the study #####DFfile_map if the plate is defined
(which it should always be); or, it has the form
Plate .
For secondary records, an asterisk
(#####*) is appended to the end of the page bookmark label. Hence it is easy to
scan the list of expanded bookmarks and identify those records that are
secondaries.
Using the -j and -k options, custom page
header and footer labels, respectively, can be created for each CRF page
in the output document.
If no labels are specified, the default header label is
ID %DFID : %DFPMLBL and there is no footer label.
The desired label is specified in a string
[11]
and may contain any combination
of fixed text and zero or more of the following keywords, which are
replaced at output creation time with the matching database value:
%DFSTATUS- record status (the status label is returned, rather than the status number)%DFVALID- record validation level%DFRASTER- image ID%DFSTUDY- DFdiscover study number%DFPLATE- plate number%DFSEQ- visit or sequence number%DFID- subject ID%DFCREATE- record creation time stamp%DFMODIFY- record modification time stamp%DFPMLBL- page map label for the current keys as defined inDFpage_map%DFVLBL- visit label for the current keys as defined inDFvisit_map%DFPLBL- plate label for the current keys as defined inDFschema
A warning message is written to stderr for each record in the input file that does not reference an image file. No output is written to the PDF file for such records.
For records exported from the new fax queue, bookmarking will only be as good as the accuracy of the ICR on the record keys.
It is possible to override the default labeling for study visits and plates
by providing alternative visit map, file map, and page map files with the
-v, -f, and -g
options respectively.
| PDF document size |
|---|---|
|
The output PDF document contains copies of the CRF images and hence each file can be quite large. The images are compressed so that the space requirements are not as onerous as for the source CRF images, but still, an input file listing 500 CRF images will create a PDF document that is approximately 5MB in size. |
DFpdf exits with a status 0 if a PDF output file was successfully created; otherwise, a non-zero exit status is returned.
Options
-c password, -C |
If
The password file |
-d | the input file is in DFdiscover Retrieval File (DRF) format |
-i string | the input file of data records that reference the CRF image
to be included. Data records are assumed to be in
data export format, unless |
-o string | the output file that will contain the resulting PDF document. If no output file argument is present, the resulting PDF document will be written to standard output. |
-f string | an alternative file location for the
study filemap. This file is read to determine plate labels for bookmarking. If
the argument is not present, the |
-v string | an alternative file location for the
study visit map. This file is read to determine visit labels for bookmarking.
If the argument is not present, the |
-g string | an alternative file location for the
study page map. This file is read to determine visit labels for bookmarking.
If the argument is not present, the |
-s string | allows the specification of sort order by an external file. The file is expected to be in query sort order format. Without this option, no sorting of the input file is performed and images appear in the PDF document in the order that records appear in the input file. With this option, consecutive records for the same ID are sorted to follow the rules stated by the sortmap file. Note that no sorting is performed across IDs, only within IDs, and only when the IDs appear consecutively in the input file. |
-t string | the title to appear at the top of the
bookmark list. If a title is supplied, in addition to setting the text of
the bookmark title object, the title is also set in the PDF document information.
If the title contains any characters that are meaningful to the
shell, including spaces, the title must be enclosed in double quotes.
If no title is supplied, the default title of
|
-j string | customize the page header label using a combination of fixed
text and references to key and meta information. The default header is
|
-k string | customize the page footer label using a combination of fixed text and references to key and meta information. The default footer is blank. |
-n | reverses the order of nesting of visits and plates. Without
this option, the preferred order is to nest plates within visits, unless the
visit cannot be found in the visit map, in which case the visit (sequence)
is nested within the plate. If |
-b string | allows the specification of fields to be blinded (blanked out)
in the output PDF file.
The plate:field,field,field;plate:field,field
where Field numbers that are not valid for the plate are skipped. Where multiple plates are required, plate specifications are separated by semi-colons.
To implement the blindlist, DFpdf must read the study setup file.
The study
setup file may be provided with
|
| the DFdiscover study number (required) |
Exit Status
DFpdf exits with one of the following statuses:
0 | The command was successful. |
1 | The command was successful, but the resulting PDF file contained 0 pages. |
2 | The user does not have the necessary permission to execute the command. |
2 | The input file cannot be read, the setup definition cannot be read, the database server could not be contacted, or communication with the database server failed. |
36 | The required command-line arguments were not present or were incorrectly specified. |
Examples
Example 3.61. Use DFpdf without the use of the DFexplore option
This example involves creating a DRF using from the menu in DFexplore, and then running DFpdf from the command line to generate a PDF file of the saved record set.
To start the process, DFexplore was used to retrieve a set of records
from the study database. The retrieved records were then saved to the DRF
dde.drf.
Example contents of dde.drf
are shown below.
#user1 16/02/22|Records ready for DDE
#Id|Visit|Plate
1002|0|1
1006|0|1
2035|1|2
2035|1|3
2035|1|4
2035|21|5
2035|23|5
2035|24|5
Next, DFpdf was run from the command line to create a PDF document from the DRF having a custom header label for each record in the PDF document. In this example, DFpdf was invoked by the following command:
% DFpdf -d -t "Subjects" -i /opt/studies/val254/drf/dde.drf \
-j "Subject %DFID, Image %DFRASTER" -o /opt/studies/val254/drf/dde.pdf 254
To generate the same file with password protection, the following command was invoked using the password "4aY3gh98B":
% DFpdf -c 4aY3gh98B -d -t "Subjects" -i /opt/studies/val254/drf/dde.drf \
-j "Subject %DFID, Image %DFRASTER" -o /opt/studies/val254/drf/dde.pdf 254
It is also possible to pipe the output from DFexport.rpc directly into DFpdf as illustrated in the following example:
% DFexport.rpc 254 1 - | DFpdf -t "Screening Data" \
-j "Subject %DFID, Image %DFRASTER" -o /opt/studies/val254/work/Screening.pdf 254
[11] If the string contains characters that are meaningful to the shell, such as space, quote, percent, etc., then the entire string must be enclosed in double quotes. The string can always be enclosed in double quotes, to ensure that no characters are interpreted by the shell.
DFpdfpkg
DFpdfpkg — Generate multiple bookmarked PDF files for specified subject IDs or sites
Synopsis
DFpdfpkg
[-S server]
[-U username]
[-C password]
[-A]
[-n]
[-color]
[-hd]
[-b blind_spec]
[-f filemap]
[-v visitmap]
[-g pagemap]
[-s sortmap]
[-t title]
[-j header]
[-k footer]
[
[-P pdfpasswd]
]
[-history
[-bookmark label]
[-excel | -legacy]
]
{
[-data data,missed]
[-image primary|all]
}
{-output out_dir_name
}
[-prefix file_prefix]
{
[-subject pid_list]
[-alias alias_list]
[-site site_list]
}
[-visit visnum_list]
[-plate pltnum_list]
[-e errlog]
{study#}
Description
DFpdfpkg generates a set of optionally password-protected PDF documents (one per subject) containing one or more pages representing data records (EDC, fax, email, DFsend), and images and audit trail information. The resulting PDF documents follow the Adobe PDF specification, version 1.4, and as a result can be read by Acrobat Reader versions 5.X and greater.
If a password is provided, files are encrypted and stored in binary format. Otherwise, the file is stored in plain text format.
DFpdfpkg requires a study number argument and an output folder name.
Records are output ascending numeric order
by visit and plate. If the -s
option is specified, sort order
will follow the rules specified by the DFsortmap file.
Bookmarks are created at the document root, ID, visit, and plate levels. The
label for the document root bookmark is ID, Visit, Plate
but can be
over-ridden through the use of -t.
A visit bookmark is created for each new visit number
within the current ID. The label is created from
field 3 of the study visit map
if the visit is defined in the visit map; otherwise,
it has the form Visit .
A plate bookmark is created for each CRF in the visit.
The label is created from the matching page map entry, if it is defined;
from field 2 of the study DFfilemap if the plate is defined
(which it should always be); or, it has the form
#####Plate .
For secondary records, an asterisk
(#####*) is appended to the end of the page bookmark label. Hence it is easy to
scan the list of expanded bookmarks and identify those records that are
secondaries.
Using the -j and -k options, custom page
header and footer labels, respectively, can be created for each CRF page
in the output document.
If no labels are specified, the default header label is
ID %DFID : %DFPMLBL and there is no footer label.
The desired label is specified in a string
[12]
and may contain any combination
of fixed text and zero or more of the following keywords, which are
replaced at output creation time with the matching database value:
%DFSTATUS- record status (the status label is returned, rather than the status number)%DFVALID- record validation level%DFRASTER- image ID%DFSTUDY- DFdiscover study number%DFPLATE- plate number%DFSEQ- visit or sequence number%DFID- subject ID%DFCREATE- record creation time stamp%DFMODIFY- record modification time stamp%DFPMLBL- page map label for the current keys as defined inDFpage_map%DFVLBL- visit label for the current keys as defined inDFvisit_map%DFPLBL- plate label for the current keys as defined inDFschema
It is possible to override the default labeling for study visits and plates
by providing alternative visit map, file map, and page map files with the
-v, -f, and -g
options respectively.
Options
-S server | DFdiscover server name |
-U username | DFdiscover login username |
-C password | login password. Refer to Section 3.2, “User Credentials” for recommended/better solutions for safe password handling. |
-A | output PDF in A4 size |
-n | nest visits within plates |
-color | apply field color to completed pages |
-hd | output the PDF file with images in higher definition (HD), which is 300dpi while the default standard definition (SD) is 100dpi. |
-b string | allows the specification of fields to be blinded (blanked out)
in the output PDF file.
The plate:field,field,field;plate:field,field
where Field numbers that are not valid for the plate are skipped. Where multiple plates are required, plate specifications are separated by semi-colons.
To implement the blindlist, DFpdf must read the study setup file.
The study
setup file may be provided with
|
-f filemap | alternate study filemap |
-v visitmap | alternate study visitmap |
-g pagemap | alternate study pagemap |
-s string | allows the specification of sort order by an external file. The file is expected to be in query sort order format. Without this option, no sorting of the input file is performed and images appear in the PDF document in the order that records appear in the input file. With this option, consecutive records for the same ID are sorted to follow the rules stated by the sortmap file. Note that no sorting is performed across IDs, only within IDs, and only when the IDs appear consecutively in the input file. |
-t string | the title to appear at the top of the
bookmark list. If a title is supplied, in addition to setting the text of
the bookmark title object, the title is also set in the document information
(which is accessed from the Reader's "Document Info-General-Title"
attribute. If the title contains any characters that are meaningful to the
shell, including spaces, the title must be enclosed in double quotes.
If no title is supplied, the default title of
|
-j string | customize the page header label using a combination of fixed
text and references to key and meta information. The default header is
|
-k string | customize the page footer label using a combination of fixed text and references to key and meta information. The default footer is blank. |
-P password |
If |
-history | include data and metadata audit trail. This outputs the default simplified change history for each record in each PDF. |
-bookmark label | bookmark label for history |
-excel | create detailed Excel history file for each subject. This outputs the audit trail for each subject in a separate file. |
-legacy | include DF_ATmods change history in each PDF. This outputs the audit trail in legacy format. |
-data data,missed | data record options. Data records are included for the record types listed - data for records that include EDC and image-based, or missed which includes any records marked as missed. |
-image primary|all | image options. Include only primary images or include all images attached to a record. |
-output dirname | output folder for PDFs (required). This must be the full path to an existing directory or folder that is writable by the user. |
-prefix file_prefix | PDF file prefix. Each file written to the output directory with a filename comprised of the prefix and the subject ID. |
-subject pid_list | subject ID list. Output packages for the subject IDs in this comma-delimited list. |
-alias alias_list | subject alias list. Output packages for the subject aliases in this comma-delimited list. |
-site site_list | site number list. Output packages for the subject IDs that belong to sites in this comma-delimited list. |
-visit visnum_list | visit number list. Include pages with the specified visit numbers. |
-plate pltnum_list | plate number list. Include pages with the specified plate numbers. |
-e errlog | error log file. Write any error or warning message to this filename. The default is to write any error or warning messages to stderr. |
| the DFdiscover study number (required) |
Exit Status
DFpdfpkg exits with one of the following statuses:
0 | The command was successful, one or more PDF output files were created. |
1 | The command was not successful. |
Examples
Example 3.62. Use DFpdfpkg without the use of the DFexplore option
The following example creates subject packages for subject ID 2035 and 2049 from Site 2.
% DFpdfpkg -S example.server.com -U example_user -C passwd \
-t "Site 2 Subject Packages" -color -data data -image primary \
-output /opt/studies/demo253/work -prefix "Site2_" \
-subject 2035,2049 253
[12] If the string contains characters that are meaningful to the shell, such as space, quote, percent, etc., then the entire string must be enclosed in double quotes. The string can always be enclosed in double quotes, to ensure that no characters are interpreted by the shell.
DFprint_filter
DFprint_filter — Format input file(s) for printing to a PostScript® capable printer, and print to a specified printer
Synopsis
DFprint_filter
[-p string]
[-c #]
[-o string]
[-f string]
Description
DFprint_filter is the main print interface. DFdiscover programs that send output to a printer may use DFprint_filter to format the output into PostScript® format, if necessary, and then spool the output to a printer.
DFprint_filter is capable of re-formatting PNG and Sun rasterfiles (the image formats used in DFdiscover), ASCII text files, and PostScript® files.
Options
-p string | direct the output to the specified printer.
If this argument is missing, and the environment
variable |
-c | the number of copies to print. The default is 1. |
-o string | pass the user-supplied options to
the print pre-processor. The
print pre-processor is DFpsprint (for image files) and DFtextps (for all
other files).
DFtextps accepts additional user options that can
be passed via this option.
For example, |
-f string | the name of the input file. If the
filename is not provided, or is given as |
DFprintdb
DFprintdb — Print case report forms merged with data records from the study database
Synopsis
DFprintdb
[-d]
[-A]
[-usealias]
[-p string]
[-i string]
[-o string]
[-t string]
[-e platelist|all]
{-s #}
Description
DFprintdb prints case report forms merged with data records from a study database. One page is printed for each data record in the input file, and is bookmarked by the record keys: subject ID, visit and then plate. Printed output is either sent directly to the printer or the named output file.
DFprintdb uses the high resolution backgrounds previously generated by DFsetup during a operation. A background, named DFbkgd###.png is created for each CRF plate, where ### is the plate number. If tagged backgrounds also exist, e.g. DFbkgd###_all_SPA.png for a Spanish background used at all visits for plate ###, they can be requested using the -t option.
If the high resolution PNG background does not exist for a plate, DFprintdb will print the field widgets and the data they contain on a blank background.
Options
-d | the input file is in DFdiscover Retrieval File (DRF) format where each input record contains only the record keys. Without this option, each record is assumed to be in data export format. |
-A | size the output pages for A4 paper rather than the default US-letter size. |
-usealias | output the subject alias, if defined, in place of the subject ID. If there is no subject alias, output the subject ID. |
-p string | the name of the printer that the output should be sent to. The default is the printer defined by the study configuration. |
-i string | the input file of data records that are
to be merged for printing. Records are assumed to be in the format output by a
previous DFexport.rpc, unless |
-o string | the name of the output file. Instead
of printing directly to the printer the output can be re-directed to a file
with this argument. If both |
-t string | the CRF background type. If the study setup includes backgrounds tagged with different type names, this option can be used to select the type to be used for printing. For example, -t SPA to use Spanish backgrounds, if a Spanish version of the CRFs was imported and tagged with 'SPA'. If this option is omitted, or used but the specified type does not exist for a particular plate, the default CRF background (i.e. untagged version) will be used if one exists. |
-e platelist|all | plates for which text fields may expand beyond their display size. Without this option printed text is truncated if it exceeds the field display size. For example, allows text field expansion, if necessary, on plates 10 to 15 and 22; while allows text expansion on all plates. NOTE: expanded text may cover other data fields on the plate and thus should be used only on plates with empty space into which text fields can expand. |
-s | the DFdiscover study number (required). |
Exit Status
DFprintdb exits with one of the following statuses:
0 | The command was successful. |
36 | The required command-line arguments were not present or were incorrectly specified. |
> 0 | The database server could not be contacted, communication with the database server failed, the study number is not defined, the database setup cannot be read, the input file cannot be read, or the output file cannot be written. |
DFpsprint
DFpsprint — Convert one or more input CRF images into PostScript®
Synopsis
DFpsprint
{infile...}
Description
DFpsprint is a utility program that converts input CRF image(s) to PostScript® suitable for printing. When multiple CRF images are given as options, the resulting PostScript® file contains one CRF image per page.
The resulting PostScript® document is always sent to standard output where it can be re-directed to a file.
| Note |
|---|---|
|
To convert CRF images files for immediate printing, DFprint_filter provides a simpler interface. |
Options
infile | one or more input CRF images.
If only one input file is being printed, the filename argument can be given
or the file can be re-directed in via standard input.
If there are multiple input files, each input file name must appear as an
option.
The file name |
Exit Status
DFpsprint exits with one of the following statuses:
0 | The command was successful. |
36 | The required command-line arguments were not present or were incorrectly specified. |
> 0 | The command was successful but one or more input files could not be read. The exit status is the number of input files that could not be read. |
Examples
Example 3.65. Simple use of DFpsprint for printing the file
/tmp/rasterfile
% DFpsprint /tmp/rasterfile | lp -dlpThis command line subsequently re-directs the output to the printer.
Example 3.66. Concatenating 3 image files where the second is read from standard input
% cat /tmp/ras2 | DFpsprint /tmp/ras1 - /tmp/ras3 > /tmp/ps.outDFqcps
DFqcps — Convert a Query Report, previously generated by DF_QCreports, into a PDF file with barcoding, prior to sending the report to a study site
Synopsis
DFqcps
[-A4]
[-new]
[-l string]
[-f string]
[-h string]
[-r string]
[-n #]
[-p #]
{-s #}
Description
DFqcps is used by DF_QCfax and DF_QCprint to format the Query Reports created by DF_QCreports, before they are sent or printed. It takes its input from the standard input, and translates it into a PDF document with the standard DFdiscover barcoding. Barcoding permits returned Query Reports to be routed to the correct study database, in the event that they contain queries in DFdiscover Q&A (question and answer) format, or in case an investigator decides to make a comment on the Query Report and fax it back.
Options
-A4 | format for A4 size paper. The default is US letter. |
-new | use the new format for Query Reports introduced in DataFax version 4.2.0. This option applies only to external Query Reports; internal reports will always use the pre-4.2 format with a single Query Report ID field. |
-l string | customize the label associated with the investigator signature
line at the top of each page. The string specified must be enclosed in
double quotes. The investigator signature line may be omitted entirely
by specifying the |
-f string | font to be used. If the specified font is not installed on the DFdiscover server the default fonts (Times, Helvetic, Courier, Century Gothic) will be used. |
-h string | the header name to appear in the top-left corner of each formatted page. Typically this is the study name. |
-r string | the report name that appears as the report identifier field on each formatted page. This value should be a 3 or 4-digit site ID, followed by a hyphen, followed by the 6-digit Query Report date. The default is no report name. |
-n | the total number of pages in the Query
Report. This number appears at the bottom of each formatted page in a
|
-p | the point size to print the report text in. The default is 10 point. |
-s | the DFdiscover study number (required). The study number is barcoded across the top of each page, together with the plate number (always 501) and the page number of the output. |
DFreport
DFreport — Client-side, command-line interface for executing reports
Synopsis
DFreport
[-S server]
[-U username]
[-C password]
[-JS js]
[-CSS css]
[-usealias]
[-logo]
[-e errfile]
[-o outfile]
{-CMD cmd}
{study#}
Options and Description
DFreport runs DFdiscover reports outside of DFexplore, making them available to run from a command-line or scheduled via the UNIX cron facility.
Authentication and Database Permissions
Authentication. To authenticate, DFreport requires the username and password for connection to a specific database server. These may be supplied as:
command-line options, the user can specify
-S,servername-Uandusername-Cwhen the program is run, orpasswordenvironment variables, the user can set the variables
DFSERVER,servernameDFUSERandusernameDFPASSWDbefore the program is run.password
Specification of command-line options takes priority if both command-line options and environment variables are supplied. Refer to User Credentials for more information.
Database Permissions. Subsequent to authentication with a specific database server, use of DFreport is allowed (or disallowed) by the DFexplore - Reports view or Server - Run reports permissions.
An authenticated user with one of these role permissions will then be able to run reports. The reported data is filtered by user permissions, which may further be limited by visit, plate and level restrictions associated with the user's role.
DFreport provides no warning that some records cannot be exported due to permission restrictions as this would itself provide information about the existence of restricted data records.
Report Options
-CMD command | resource request sent to server, specifying report to execute |
-JS command | matching javascript resource for report interactivity |
-CSS command | matching stylesheet resource for report styling and presentation |
-usealias | output the subject alias, if defined, in place of the subject ID. If there is no subject alias, output the subject ID. |
-logo | include the study logo in the top-left corner of the HTML output. If not defined, or not available, the study name is used |
Output Options
Output File.
By default, output from DFreport is written to standard output (the command-line output).
To write the output to a specific file, specify the filename with
-o .
The user must have filesystem permission to create or modify the file.
If outfileoutfile is specified as a relative pathname, the file is
created relative to the DFreport command invocation directory.[13]
Output from legacy reports is written as is (plain text) while output from standard DFdiscover reports is in HTML or JSON format, determined by the file extension of the argument file.
Error Output.
Re-direct any error messages to a specific file with the
-e option.
By default, error messages are written to standard error and hence would get
intermixed with data if the data is being exported to standard output.
errfile
Exit Status
DFreport exits with status 0 if the command was successful.
Exit status 1 indicates that an error occurred - errors are written to standard error
or the errfile file if -e was specified.
Examples
DFexplore includes a convenience feature, available from > , to display the command required to run a report. For example, run the Enrollment by Site report within DFexplore and select > to obtain this command (line breaks are for presentation only):
DFreport -S explore.dfdiscover.com -U demo_user1 -CMD "/DFedc?cmd=getreport&name=enrollment&title=Enrollment%20by%20Site&json&compress"
-JS "https://cdn.dfdiscover.com/v5.2/js/DF_Enrollment.min.js" -CSS "https://cdn.dfdiscover.com/v5.2/css/DF_ReportStyles.css"
252 -logo -o DF_Enrollment_20191028140508.html -C xxx
Substitute the username for demo_user1,
user password for xxx and provide an output
filename in place of
DF_Enrollment_20191028140508.html.
DFsas
DFsas — Prepare data set(s) and job file for processing by SAS®.
Synopsis
DFsas
{jobfile}
[-f]
[-dbx]
[
[
[-c]
| [-C]
]
study#
]
[-p platelist]
[-l [check] | [choice] ]
[-d csjo]
[-s #]
[-t #]
[-I pidlist]
[-n cidlist]
[-v visitlist]
[-w]
[-SAS #]
[-a]
[-A]
[-X]
[-r rundir]
[-z]
Description
DFsas is an intermediary between DFdiscover and SAS®. It can be used to extract summary data files from a study database and to create the corresponding SAS® job file for subsequent processing by SAS®.
Complete reference documentation for DFsas can be found in DFsas: DFdiscover to SAS®.
Options
jobfile | DFsas job file, specifies details of the translation between DFdiscover and SAS® (required). |
-f | force DFsas to include all specified plates, even those that have no data. |
-dbx | debug; do not remove the data export script
|
-c|C |
create mode; create a default DFsas jobfile for the argument study number.
Specifying |
-p platelist | in create mode, the list of plates to include. |
-l check,choice | export labels instead of codes for check and/or choice fields. |
-d csjo | output one or more date fields from each date variable using these specified formats:
|
-s | split string field data containing more than
|
-t | truncate string field data containing more than
|
-I sidlist | include only records for the specified subject IDs. |
-n cidlist | include only records for the specified site IDs. |
-v visitlist | include only records for the specified visit/sequence numbers. |
-w | suppress warning messages. |
-SAS |
apply SAS® version |
-a | use the DFdiscover field alias, instead of field name, for SAS® variable names. |
-A | output the subject alias, if defined, in place of the subject ID. If there is no subject alias, output the subject ID. |
-X | exclude data from sites marked |
-r rundir | set RUNDIR, e.g. -r 'C:\mydir\mysas' |
-z | use STUDYDIR/dfsas and do not overwrite existing DFsas job files |
DFsendfax
DFsendfax — Fax or email a plain text, PDF, or TIFF file to one or more recipients
Synopsis
DFsendfax
[-2]
[-A4]
[-F from]
[-w #]
[-r #]
[-d #]
[
[-p password]
| [-P]
]
[-c string]
[-sANY string]
[-sEACH string]
[-sALL string]
[-sFIRST string]
[-fANY string]
[-fEACH string]
[-fALL string]
[-fFIRST string]
{file}
{recipients...}
Description
DFsendfax transmits any plain text, PDF, or TIFF file to one or more recipients.
DFsendfax interacts with a DFdiscover outbound daemon. You must have at least one
outbound daemon configured before DFsendfax will work. DFsendfax makes a
temporary copy of the file to be sent.
By default, this is in /usr/tmp, although
it may be your home directory if there is no space available in
/usr/tmp.
The
temporary copy of the file becomes owned by user
datafax.
DFsendfax places its
options into a structure that it then sends to the outbound daemon. Which
outbound daemon is used is determined by the DFdiscover master using a round-robin
scheduling algorithm. The outbound daemon then makes a queue entry for the fax
request in its work directory. It also copies (or remote copies, if necessary)
the temporary file to a data file in its work directory. The outbound daemon
then manages the queue entry until the scheduled time for sending arrives. At
this point, the data file is passed to the system email service, DFprotusfax or HylaFAX,
which attempts delivery of the document. If the transmission is successful,
that status is forwarded to the outbound daemon which then executes zero or more of the success
commands. If the transmission has failed, the outbound
daemon either waits the number of minutes specified by the retry delay if one
or more retries are still possible, or executes one or more of the failure
commands. Finally, if the outbound daemon never receives a reply
regarding the disposition of a fax, the outbound daemon de-queues the fax and
executes the appropriate failure commands.
When specifying success or failure commands to execute at the completion of a fax session, you can reference the values of various arguments that you supplied in your original DFsendfax command. The values that you can reference are:
$FaxID | the faxid# of the outgoing fax |
$DataFile | the name of the file to be sent, <file> argument |
$Requestee | the username of the person executing DFsendfax |
$Callees | the <recipient list> argument |
$Comments | the <comments> argument |
$Number | the fax number (or email address) that the success or fail reply was generated from. This will be one of the fax numbers (or email addresses) from the original <recipients list> ($Callees). |
If your fax is successfully queued, DFsendfax echoes back the name of the file to be sent, the phone number of the recipients, the scheduled fax time, and the faxid of the queue entry. This faxid is unique within the system and can be used to monitor the status of the fax with DFfaxq, or to de-queue the fax with DFfaxrm. You should be aware that depending on how your outbound daemons are configured, it may take several seconds for a fax queued with DFsendfax to be detected so that it appears in the output of DFfaxq.
| DFsendfax and DF_QCfax |
|---|---|
|
The standard DFdiscover report program, DF_QCfax, uses DFsendfax to send
Query Reports to participating sites in a study. If a Query Report is
successfully transmitted, DFqcsent.rpc is executed (via
the |
Delayed Sending
DFsendfax can schedule a fax for transmission at a specified time, rather than
the default which is immediately. This is specified by the
-w option. The
possible arguments to this option can have the following syntax:
now | today | tomorrow | <time spec> [<offset>]
                         (1)                (2)
|
| |
|
and
|
If the time specified is in the past then this is the
same as specifying now.
Options
|
transmit the fax in fine mode. The default is standard mode. | |||
| transmit the fax using A4 sizing. The default is US letter size. | |||
| identify any files transmitted via email as originating
from sender | |||
| the time that the file should be sent or emailed. The default is now. The specification of the time is similar to that allowed by the UNIX at. | |||
| the number of attempts to refax the file if the first attempt fails. The default is 2. The total number of attempts is the number of retries plus 1. Multiple attempts do not apply to emails as DFdiscover has no way of determining whether or not an email was delivered. | |||
| time, in minutes, between refax attempts. The default is 10 minutes. If the number of retries is 0, this value is ignored. | |||
| encrypt the file to be emailed using the supplied
| |||
| any comment string that you want to attach to the fax command. You can reference this comment field later when executing success or failure commands. | |||
| the file to be sent (required). It can be any text, PostScript®, TIFF, or PDF file. For faxing, DFdiscover uses HylaFAX to convert any non-TIFF file into a TIFF file. For emailing, PostScript® files are converted to PDF first (other formats are sent unchanged), and then sent as a MIME attachment to the specified email address. You must have at least read permission on any file to be sent. | |||
| a white-space delimited list of fax
numbers or email addresses for recipients of the file (required).
For each fax number include all long
distance codes, etc. as required. Be careful not to include white-space
characters inside a fax number as it will be interpreted as multiple fax
numbers. Each email address must be in the format
|
DFsendfax provides commands that can be executed upon successful or unsuccessful completion of the transmission. Completion occurs after the specified number of retries have been attempted, if necessary. The command is executed in a Bourne shell as a background child process of the outbound daemon on the machine that the DFsendfax command was originally specified. There are four levels of commands that can be specified. They can be specified individually or in any combination. It is the user's responsibility to ensure that any concurrency issues that may arise as a result of more than one command executing simultaneously are planned for.
| execute the command specified in
|
| execute the command as soon as the file is successfully sent to all recipients in the recipients list. |
| execute the command each time the file is successfully sent to a recipient. |
| execute the command as soon as the file is successfully sent to the recipient specified first in the recipients list. |
| execute the command when the file cannot be successfully transmitted to a recipient. The command is executed only once, immediately after the first failure. |
| execute the command if the file cannot be sent to any of the recipients in the recipients list; that is, all send attempts to all recipients have failed. |
| execute the command for each recipient that the file cannot be successfully sent to. |
| execute the command if the file cannot be successfully sent to the recipient first specified in the fax list. |
Exit Status
DFsendfax exits with one of the following statuses:
| The command was successful. |
| The requested fax could not be scheduled for sending. |
Examples
Example 3.69. Send the file /etc/printcap
to one recipient at 5551212
% DFsendfax /etc/printcap 5551212Example 3.70. Schedule a fax for transmission at 11:00pm tonight and send it to two recipients, one via email (with a specific from email address)
% DFsendfax -w 23:00 -F repltyo@company.com /etc/fstab 9876543 mailto:luckyuser@hotmail.comExample 3.71. Schedule a fax for transmission 30 minutes from now and be informed via email that the fax was either successfully transmitted or failed
The line break is for presentation purposes only.
% DFsendfax -w 'now + 30 minutes' \
-sEACH 'echo $DataFile faxed to $Number | mail $Requestee' \
-fEACH 'echo $DataFile FAILED to $Number | mail $Requestee' \
/etc/magic 1-800-555-1212 9876543
DFsqlload
DFsqlload — Create table definitions and import all data into a relational database
Synopsis
DFsqlload
[-flavor oracle|postgresql|mysql|mssql]
[-d drfname]
[-q]
[-X]
[
[-ignore_mssql_priv]
| [-ignore_mysql_priv]
]
[-type typed|untyped|both]
[-coding code|label|both]
[-missing code|label]
[-date typed|untyped|both]
[-noimpute]
[-missed]
[-table all|DFcoding,DFnullvalue,DFsubjectalias]]
{param}
{study}
Options
-flavor oracle|postgresql|mysql|mssql | Type of target database. The default is
|
-d drfname | A DFdiscover retrieval file to use to record problems encountered during data import. |
-q | Quiet mode. Instructs the program to suppress all warning messages. The default, without this option, is to write warning messages to standard error. |
-X | Exclude data from sites marked |
-ignore_mssql_priv|ignore_mysql_priv | Ignore administrator privileges. For MS SQLServer or MySQL, allows tables to be loaded without requiring administrator privileges on the database. |
-type typed|untyped|both | Type of SQL tables to be created.
If set to |
-coding code|label|both |
Coded field specification. If set to |
-missing code|label |
Missing value specification only applies to untyped tables. If set to |
-date typed|untyped|both |
Date type specification for user date fields. If set to |
-noimpute | No imputation for partial dates replaces partial dates with NULL values for typed dates only. The default is to impute partial dates for
typed dates according to the imputation method specified in |
-missed | Include missed records from the database in the output. Typically missed records are not included as they contain no actual data. |
-table all|DFcoding,DFnullvalue,DFsubjectalias] |
List of optional tables to create.
If set to |
Required Options
The following two options are required and must appear in order at the end of the option list:
param | A set of parameters of the form
|
study | the DFdiscover study number, from which data records are to be exported. |
Table 3.12. Database Parameters
| Parameter | Description | Postgres | MySQL | Oracle | MS SQLServer | |||
|---|---|---|---|---|---|---|---|---|
| server | The server name to connect to | required | required | a place holder. Oracle will lookup
tnsnames.ora based on
database name | required | |||
| database | The database name | required | see Schema | required | required | |||
| schema | The DFdiscover study name | required | required | required | required (must be the same as the database name) | |||
| tablespace | The alternative storage tablespace for Oracle | ignored | ignored | see Schema | ignored | |||
| username:password | The database login user name and password | optional.
| optional.
| optional.
| optional.
|
Exit Status
DFsqlload exits with one of the following statuses:
0 | DFsqlload was able to (re-)create the schema, create all of the tables, and import all of the data without error. |
1 | The schema and tables were created and the data were imported, but one or more errors were encountered in the imported data. |
2 | A more serious error was encountered which prevented some or all data from being imported. |
Description
DFsqlload is a command-line solution that creates all of the table definitions and imports all of the data into a relational database. One SQL table is created for each DFdiscover plate. In addition, three tables are added to record logging information, qc and reason for change data plus four tables and a view are created to store study schema information. Optional tables are created to note any problem fields or store value and label pairs for coded fields.
When run repeatedly, existing SQL tables
are compared with the current DFschema file. Unchanged tables are truncated i.e., the data is removed but the table definitions remain. If any
changes were made, the existing DFdiscover-defined table is dropped and re-created.
DFsqlload calls DFexport.rpc to export all primary records to a temporary file,
and then loads the database tables plate by plate.
SQL Database Setup
The following operations are performed on the target database.
-
At least five and optionally three meta tables are created in the target database.
-
DFSQLLOAD: Each DFsqlload run creates an entry in this log table. This table is also the lock table that prevents more than one DFsqlload process from operating on the same schema. ANULLvalue for columnDFFINISHindicates that a DFsqlload process is running. If DFsqlload terminates abnormally, this record must be removed manually before starting a new DFsqlload process. The following SQL statements are used internally to create this table. The statements use syntax specific to PostgreSQL. Similar tables are created for MySQL, MS SQLServer and Oracle implementations of DFsqlload.CREATE TABLE <schema>.dfsqlload ( dfuser varchar(30) NOT NULL, -- the database user dfstart timestamp(0) NOT NULL, -- the start date and time dffinish timestamp(0), -- the finish date and time (NULL if process running) dfoption varchar(500), -- the options used with the DFsqlload command dfnull int4, -- the total number of problem fields converted to null dferror int4, -- the total number of records discarded or rejected dfstatus int2, -- the status: 0=process completed, 1=running CONSTRAINT dfsqlload_pk PRIMARY KEY (dfstart) ) WITH OIDS;
-
DFSTUDY, DFPLATE, DFMOULE, DFFIELD and DFSCHEMA_VIEW: Each DFsqlload run creates four tables and a view to store study schema information. Study, plate and field level user-defined tag-value pairs are written to the appropriate table. Since there are no module group identifiers inDFschema, module level user-defined tag-value pairs are ignored. Each DFsqlload run will clear and reload these tables.The following SQL statments are used to create these tables and view. The statements below use syntax specific to MS SQLServer. NOTE: MS-SQL loader: The default TDS_VERSION='7.0', used to support MS SQL Server 7.0 and 2000, now updated to TDS_VERSION='7.4'. User can overwrite default version and port by environment TDSVER=ver# and TDSPORT=port#.
CREATE TABLE <schema>.DFSTUDY ( DFNUM INTEGER NOT NULL, DFNAME VARCHAR(256), DFYEAR INTEGER, -- %B: study begin year DFSETUP_VER VARCHAR(10), -- %u: current setup version DFSCHEMA_DT VARCHAR(10), -- DFschema file timestamp: yyyy-mm-dd (ISO) DFSCHEMA_TM VARCHAR(8), -- DFschema file timestamp: hh:mi:ss DFHOST VARCHAR(256), -- short name from /opt/dfdiscover/lib/DFedcservice.cf DFSTUDY_TAGS VARCHAR(500), -- %z: tag=alias, tag=alias, ... (DFSTUDY_) DFPLT_TAGS VARCHAR(500), -- %z: tag=alias, tag=alias, ... (DFPLATE_) DFMOD_TAGS VARCHAR(500), -- %z: tag=alias, tag=alias, ... (DFMODULE_) DFVAR_TAGS VARCHAR(500), -- %z: tag=alias, tag-alias, ... (DFVAR_) DFSTUDY_TAG_VALUE VARCHAR(500), -- %y: tag=value, tag=value, ... CONSTRAINT DFSTUDY_PK PRIMARY KEY (DFNUM)) CREATE TABLE <schema>.DFPLATE ( DFPLT_NUM INTEGER NOT NULL, DFPLT_DESC VARCHAR(100), DFNUM_FILEDS INTEGER, -- %n: number of fields DFSEQ_CODE INTEGER, -- %E: seq in barcode vs first field DFARRIVAL_TRIG VARCHAR(200), -- %R: plate arrival trigger DFTERM_TRIG VARCHAR(6), -- %t: plate termination trigger DFPLT_TAG_VALUE VARCHAR(500), -- %y: tag=value, tag=value, ... CONSTRAINT DFPLATE_PK PRIMARY KEY (DFPLT_NUM)) CREATE TABLE <schema>.DFMODULE ( DFMOD_NAME VARCHAR(30) NOT NULL, DFMOD_DESC VARCHAR(100), CONSTRAINT DFMODULE_PK PRIMARY KEY (DFMOD_NAME)) CREATE TABLE <schema>.DFFIELD ( DFNUM INTEGER NOT NULL, DFPLT_NUM INTEGER NOT NULL, DFVAR_NUM INTEGER NOT NULL, DFVAR_UID INTEGER, -- %i: field unique id DFVAR_SPEC VARCHAR(9), -- %A: required, essential, optional DFVAR_NAME VARCHAR(80), DFVAR_ALIAS VARCHAR(80), DFVAR_DESC VARCHAR(40), DFVAR_TYPE VARCHAR(6), DFVAR_FORMAT VARCHAR(100), DFVAR_LEGAL VARCHAR(100), DFVAR_CODE_LABEL VARCHAR(2000), -- %c %C: code=label, code=label, ... DFVAR_TAG_VALUE VARCHAR(500), -- %y: tag=value, tag=value, ... DFVAR_STORE INTEGER, DFVAR_DISPLAY INTEGER, DFVAR_HELP VARCHAR(500), DFEC_FIELD_ENT VARCHAR(500), DFEC_FIELD_EXT VARCHAR(500), DFEC_PLATE_ENT VARCHAR(500), DFEC_PLATE_EXT VARCHAR(500), DFSTYLE VARCHAR(80), DFMOD_NAME VARCHAR(30), DFMOD_INSTANCE INTEGER, CONSTRAINT DFFIELD_PK PRIMARY KEY (DFNUM, DFPLT_NUM, DFVAR_NUM)) CREATE VIEW DFSCHEMA_VIEW AS SELECT DFSTUDY.DFHOST DFHOST, DFFIELD.DFNUM DFSTUDY_NUM, DFSTUDY.DFNAME DFSTUDY_NAME, DFSTUDY.DFSCHEMA_DT DFSCHEMA_DT, DFSTUDY.DFSCHEMA_TM DFSCHEMA_TM, DFFIELD.DFPLT_NUM DFPLT_NUM, DFPLATE.DFPLT_DESC DFPLT_DESC, DFFIELD.DFVAR_NUM DFVAR_NUM, DFFIELD.DFVAR_SPEC DFVAR_SPEC, DFFIELD.DFVAR_ALIAS DFVAR_ALIAS, DFFIELD.DFVAR_NAME DFVAR_NAME, DFFIELD.DFVAR_DESC DFVAR_DESC, DFFIELD.DFVAR_TYPE DFVAR_TYPE, DFFIELD.DFVAR_FORMAT DFVAR_FORMAT, DFFIELD.DFVAR_LEGAL DFVAR_LEGAL, DFFIELD.DFVAR_CODE_LABEL DFVAR_CODE_LABEL, DFFIELD.DFVAR_TAG_VALUE DFVAR_TAG_VALUE, DFFIELD.DFEC_FIELD_ENT DFEC_FIELD_ENT, DFFIELD.DFEC_FIELD_EXT DFEC_FIELD_EXT, DFFIELD.DFEC_PLATE_ENT DFEC_PLATE_ENT, DFFIELD.DFEC_PLATE_EXT DFEC_PLATE_EXT, DFFIELD.DFSTYLE DFSTYLE, DFFIELD.DFVAR_STORE DFVAR_STORE, DFFIELD.DFVAR_DISPLAY DFVAR_DISPLAY, DFFIELD.DFVAR_HELP DFVAR_HELP, DFFIELD.DFMOD_NAME DFMOD_NAME, DFMODULE.DFMOD_DESC DFMOD_DESC, DFFIELD.DFMOD_INSTANCE DFMOD_INSTANCE FROM DFSTUDY, DFPLATE, DFMODULE, DFFIELD WHERE DFFIELD.DFNUM = DFSTUDY.DFNUM AND DFFIELD.DFPLT_NUM = DFPLATE.DFPLT_NUM AND DFFIELD.DFMOD_NAME = DFMODULE.DFMOD_NAME -
DFNULLVALUE: This is an optional table where all problem fields that are converted toNULLare recorded. The following SQL statements are used internally to create this table.CREATE TABLE <schema>.dfnullvalue ( dfpid int4 NOT NULL, -- study subject id dfplate int2 NOT NULL, -- plate dfseq int4 NOT NULL, -- sequence/visit number dftable varchar(30) NOT NULL, -- name of sql table where substitution was made dffield varchar(30) NOT NULL, -- name of sql field where substitution was made dfvalue varchar(###), -- the original value exported from DFdiscover dfproblem varchar(###), -- the reason the value was converted to NULL dfraster varchar(12), -- the image id of the source CRF page CONSTRAINT dfnullvalue_pk PRIMARY KEY (dfpid, dfplate, dfseq, dftable, dffield) ) WITH OIDS;The
###above represents the maximum length encountered in the data source. -
DFCODING: This is an optional table where all value and label pairs for coded fields are stored. The following SQL statements are used internally to create this table.CREATE TABLE <schema>.dfcoding ( dfplate int2 NOT NULL, -- plate dffield varchar(30) NOT NULL, -- sql table column name dfcode varchar(###) NOT NULL, -- code value for this column dflabel varchar(###), -- code label for this column CONSTRAINT dfcoding_pk PRIMARY KEY (dfplate, dffield, dfcode) ) WITH OIDS;
The
###above represents the maximum length encountered in the data source.
-
-
Verify any existing SQL tables. The following tasks are performed in the verification of existing SQL tables.
-
All tables with the prefix
DFare treated as DFsqlload-defined tables. For any given run of DFsqlload, only the tables relevant to the current job are used. -
Existing SQL table definitions are compared to the
DFschemafile. DFsqlload will truncate any unchanged tables and re-create changed tables. Changes that may cause DFsqlload to drop a table are as follows:-
add, delete, reorder fields
-
rename field
-
change data type
-
any change to field size or format causing storage changes in the target database
-
missing code or label changes
-
code or label changes to coded fields
-
SQL tables that have been directly user-modified
-
-
All privileges (if any) for tables create by DFsqlload are backed up and restored.
-
If other tables reference any tables created by DFsqlload, the foreign keys will either be dropped (Postgresql, MS SQLServer) or disabled (MySQL, Oracle) and saved to the log file in the form of a database-specific SQL statement. The user can choose to execute these statements to restore the foreign keys manually, as DFsqlload does not do it automatically.
-
Other database objects - triggers, views, procedures, etc., which depend upon DFsqlload-defined tables are ignored.
-
Files used by DFsqlload
All DFsqlload created files are in the
study/working_dir/DFsqlload_logs
directory by default. If this directory does not exist,
DFsqlload will create it at the default location.
The file names use time stamp in the format yymmdd_hhmiss
as a prefix,
where mm is two-digit month and
mi is two-digit minute.
The time stamp, which is also the value of DFSQLLOAD.DFSTART, is the
unique identifier of this DFsqlload process.
Log file:
yymmdd_hhmiss.log. This file records the detailed loading progress including schema setup, SQL table definitions, record count, and rejected records with error messages in the following formats:Regular plates: Record (id, seq, plate, image): error message
QCs and REASONs: Record (id, seq, plate, image, field): error message
DFdiscover Retrieval File: If path is included, this file will be in the specified location. If the file already exists, the existing file will be removed. If the file cannot be created or written, DFsqlload will report an error and continue the loading process. The file is in standard DRF format. The first four fields are Id, Visit, Plate, and Image. The combination of id, visit, and plate is unique. The 5th field records the list of problems. The record level errors appear first, followed by the field level problems. The field level problems are derived from the
DFNULLVALUEtable, which is created by default if a.drffile is requested. Problem types are summarized below.Record level errors
error - incorrect number of fields: The number of fields of a record in
plt###.datdoes not match theDFschemadefinition.error - invalid DFdiscover field: The value of DFdiscover leading (1~7) or trailing (NF-2~NF) field is blank or invalid.
error - duplicate primary record: Two or more records have the same id, seq, plate combination.
error - rejected by database: Any field error that was not identified by DFsqlload, but rejected by the database.
Field level problems
missing value
too wide
bad format
invalid date
partial date
undefined code
data/type conversion
The format used in the
.drffile isTable1Name: FieldName (problem), FieldName (problem),..., Table2Name: F ieldName (problem),...QC or REASON specific error
error - primary record was rejected.
Data file: yymmdd_hhmiss_plt### (for regular plates)
yymmdd_hhmiss_DFreason (for plate 510)
yymmdd_hhmiss_DFqc (for plate 511)
This is the data source of current loading plate created by DFexport.rpc, and is removed automatically after the data is loaded into the SQL database.
Error files: yymmdd_hhmiss_plt###.err (for untyped table)
yymmdd_hhmiss_tbl###.err (for typed table)
yymmdd_hhmiss_DFreason.err (for plate 510)
yymmdd_hhmiss_DFqc.err (for plate 511)
These files record the records rejected by the SQL database along with database generated error messages.
Rejected keys: yymmdd_hhmiss.tmp. This file records the keys (plate, seq, id) of primary records discarded by DFsqlload or rejected by the SQL database. If a REASON or QC record matches one of the key combinations in this file, that REASON or QC record will not be loaded into the SQL database and a message will be written to the log file:
Record (id#,seq#,plate#,image,field#): discarded by DFsqlload.
DFRECORD (error - primary record was rejected).
This file is removed automatically.
Database login credentials files. The following database-specific files may be used to store login credentials.
Postgres: ~/.pgpass. This is a Postgres standard file located in the user's home directory and the file permission must be 600; otherwise, Postgres will ignore it. This file specifies the database login credentials in the format:
host:port:database:username:password
The username can be any valid database user, for example:
parkcity:5432:test_db_name:user_a_name:user_a_password
parkcity:5432:test_db_name:user_b_name:user_b_password
-
MySQL: ~/.my.cnf. This is MySQL standard file located in user's home directory and the file permission should be 600. This file specifies the program groups and options for each group. A typical group is [client]. In this group the database password for OS user can be specified:
[client]
password=my_pass
...
The global options can be specified in the global option file
/etc/my.cnforDATADIR/my.cnf. -
Oracle: tnsnames.ora, ~/.orapass.
tnsnames.orais the Oracle standard net services file located inORACLE_HOME/network/adminANY_DIR/network/adminORACLE_HOMEis set toANY_DIR.~/.orapassis NOT an Oracle standard file. It is provided for convenience for DFdiscover users to store their database password. This file should be in the user's home directory and file permission should be 600. The format is:db_name:password
for example,
test_db_name:test_db_password
production_db_name:production_db_password
-
MS SQLServer: ~/.mssqlpass. This is not an MS SQLServer standard file. It is provided as a convenience to DFdiscover users for storing their database password. This file needs to be kept in the user's home directory and the file permission needs to be 600. The format of this file is:
server_name:password
There are two types of entries that can be used. Both the server name and the password to use can be specified as follows:
my_server:my_server_password
or a password can be specified for any server this user connects to as in the following example:
*:any_server_password
Tables
The following details apply to tables and fields created by DFsqlload.
Table Names. Table names follow these rules.
DFSQLLOADis a log table and is used to store the details of a given DFsqlload for a particular schema. The table for plate 510 is namedDFREASON. The table for plate 511 is namedDFQC. All other plates are namedDFPLATE_nnn(untyped) orDFTABLE_nnn(typed), wherennnis the plate number. Optional tables created areDFNULLVALUEfor the storage of any problem field data conversions andDFCODINGfor the storage of value/value label pairs. All table names are in uppercase letters. Note that the table names are case sensitive for MySQL on UNIX platforms only.Table Types. Table types used for each of the supported database products are as follows: For PostgreSQL and Oracle, all tables are type
relational table. For MySQL, all tables are typeInnoDB table.Field Names for study tables. Field naming follows these rules. For fields 1 to 7 and the last three fields for a plate, generic variable names are used. For all fields in between, unique variable names are used. Any field names matching an SQL keyword get an _ (underscore) appended. This is target product dependent. Refer to the documentation for the product you are using for a complete list of the relevant keywords. Any non-alphanumeric characters are replaced with _ (underscore). If a field name starts with a digit,
DF_is prepended. Field names are truncated to 30 chars. A sequence number is appended to each non-unique field name.DFdiscover type to SQL type mapping: DFsqlload will map DFdiscover types to SQL types according to Data typing when creating SQL tables for typed columns. Untyped columns are mapped to VARCHAR (PostgreSQL, MySQL) and VARCHAR2 (Oracle).
Table 3.13. Data typing
DFdiscover type PostgreSQL Oracle MySQL MS SQL Server string VARCHAR(n) VARCHAR2(n) VARCHAR(n)[a] VARCHAR(n) check INT2 NUMBER(p) INT2 SMALLINT choice INT2 NUMBER(p) INT2 SMALLINT integer INT4 NUMBER(p) INT4 INT float NUMERIC(p,s) NUMBER(p,s) DECIMAL(p,s) DECIMAL(p,s) vas NUMERIC(p,s) NUMBER(p,s) DECIMAL(p,s) DECIMAL(p,s) number(nn:nn) TIME VARCHAR2(n) TIME VARCHAR(n) date DATE DATE DATE DATETIME timestamp TIMESTAMP DATE DATETIME DATETIME [a] MySQL converts VARCHAR(n) to CHAR(n) (n < 4) or TEXT (n > 255).
SQL column naming convention: DFsqlload will follow the rules defined in Fields for typed SQL tables and Fields for untyped SQL tables for DFdiscover field name to SQL column naming convention when creating SQL tables.
Table 3.14. Fields for typed SQL tables
Field Field Number Field Name Field Type Missing Code/Label Partial Date Impute Coded field: Code 1~7,NF-2~NF Generic True Type No Coded field: Label 1~7,NF-2~NF Generic VARCHAR No Coded field: Code [a] 1~7,NF-2~NF Generic True Type No Coded field: Label [b] 1~7,NF-2~NF U_Generic VARCHAR No Coded field: Code 8~NF-3 Unique True Type No Coded field: Label 8~NF-3 Unique VARCHAR Yes Coded field: Code[a] 8~NF-3 Unique True Type No Coded field: Label[b] 8~NF-3 U_Unique VARCHAR Yes Date field: Typed 8~NF-3 Unique True Type No No Yes Date field: Untyped 8~NF-3 Unique VARCHAR Yes Yes No Date field: Typed[a] 8~NF-3 Unique True Type No No Yes Date field: Untyped[b] 8~NF-3 U_Unique VARCHAR Yes Yes No Other fields 8~NF-3 Unique True Type No Other fields 1~7,NF-2~NF Generic True Type No No No [a] The first field, if
-coding bothor-date bothis specified.[b] The second field, if
-coding bothor-date bothis specified.
Table 3.15. Fields for untyped SQL tables
Field Field Number Field Name Field Type Missing Code/Label Partial Date Impute Coded field: Code 1~7,NF-2~NF Generic True Type No Coded field: Label 1~7,NF-2~NF Generic VARCHAR No Coded field: Code[a] 1~7,NF-2~NF Generic True Type No Coded field: Label[b] 1~7,NF-2~NF U_Generic VARCHAR No Coded field: Code 8~NF-3 U_Unique VARCHAR Yes Coded field: Label 8~NF-3 U_Unique VARCHAR Yes Coded field: Code[a] 8~NF-3 Unique VARCHAR Yes Coded field: Label[b] 8~NF-3 U_Unique VARCHAR Yes Date field: Typed 8~NF-3 U_Unique True Type No No Yes Date field: Untyped 8~NF-3 U_Unique VARCHAR Yes Yes No Date field: Typed[a] 8~NF-3 Unique True Type No No Yes Date field: Untyped[b] 8~NF-3 U_Unique VARCHAR Yes Yes No Other fields 8~NF-3 U_Unique VARCHAR Yes Other fields 1~7,NF-2~NF Generic True Type No No No
Locking: DFsqlload uses the table
DFSQLLOADto prevent two processes from working on the same database schema. A NULL entry inDFSQLLOAD.DFFINISHindicates that another process is running or terminated abnormally. IfDFSQLLOADdoes not exist, DFsqlload will create it. Upon completion, DFsqlload updatesDFSQLLOAD.DFFINISHto the finish time and theDFSQLLOAD.DFSTATUSto zero (normal exit process).DFdiscover Retrieval File: The first line in the DRF contains a two-field comment. The first field contains the username and creation timestamp. The second field identifies the creator of the DRF as DFsqlload and lists the parameters used to access the SQL database. The next line is a comment describing the format of the DRF records to follow. One DRF data record is created for each DFdiscover record with data import problems. Each DRF data record is identified by Id, Visit, Plate and Image. The 5th field records the SQL table name, followed by the field name and problem description for each problem encountered. Multiple field/problem descriptions are separated by commas.
Date fields: DFsqlload converts two-digit years to four-digits based on the cut off year specified for each date field in DFschema, or the year the study began (%B) if not specified. DFsqlload imputes partial dates according to the imputation method specified for each date field.
Number of fields: DFsqlload creates a minimum of 10 fields (1~7,NF-2~NF) for each SQL table. The maximum number of fields is limited by the database: PostgreSQL 1600, MySQL 1000, Oracle 1000, MS SQLServer 1024. DFsqlload will report errors for DFdiscover records that do not meet these field requirements and will continue the loading process.
Schema
Postgres. A schema is a namespace that contains DFdiscover study tables. Schema names are DFdiscover study names. If the schema name specified in the DFsqlload command line does not exist in the Postgres database, DFsqlload will create the schema as specified. DFsqlload will never drop existing schemas.
Oracle. A schema is a database user who is also the owner of DFdiscover tables that belong to one study. The schema specified in the command line must already exist in Oracle, unless the tablespace name (must exist in database) is also specified. If the schema does not exist, DFsqlload will create the schema and assign the specified tablespace as the schema's default tablespace. The DFdiscover study tables will be created, if specified, in the specified tablespace, otherwise in the schema's default tablespace. DFsqlload will check the schema's quota privilege on storage tablespace and grant unlimited quota privilege on that tablespace. DFsqlload will never drop existing schemas.
MySQL. There is no schema in MySQL. A MySQL database maps to a DFdiscover study database. In the command line, the schema name must be the same as the database name. Note that the database name is case sensitive whether MySQL is running on a UNIX or Windows platform. If the specified database does not exist in the MySQL database, DFsqlload will create the database as specified. DFsqlload will never drop existing MySQL databases.
MS SQLServer. There is no schema in MS SQLServer in version 2000 and older. A SQLServer database maps to a DFdiscover study database. In the command line, the schema name must be the same as the database name.
DFstatus
DFstatus — Display database status information in plain text format
Synopsis
DFstatus
[-l]
[-m]
[-h]
[-c]
[-n #, #-#]
[-i #, #-#]
[-v #, #-#]
[-p #, #-#]
[-s #]
Description
This command-line invocation of the DFexplore Status View generates a tabular representation of the database status in plain text format and writes the results to standard output.
Options
-c | execute DFstatus in command-line mode. This option is retained for backward compatibility but is no longer necessary as DFstatus now runs only in command line mode. |
-l | displays a list of current user logins with the hostname of the system running their DFdiscover applicataion. |
-h | removes the title header when executed with the -l option. |
-m | displays current seat usage statistics for the current DFdiscover server. |
-n | select only the requested site IDs for inclusion in the database status table. Default is all sites. |
-i | select only the requested subject IDs for inclusion in the database status table. Default is all subject IDs. |
-v | select only the requested visit numbers for inclusion in the database status table. Default is all visit numbers. |
-p | select only the requested plate numbers for inclusion in the database status table. Default is all plate numbers in the range 1 to 500, inclusive. |
-s | the study number (required unless -l or -m option is used). |
Exit Status
DFstatus exits with one of the following statuses:
0 | The command was successful. |
36 | The required command-line arguments were not present or were incorrectly specified. |
> 0 | The command failed because the database server could not be contacted, or communication with the database server failed. |
Examples
Example 3.73. Display record status and current user connections for study 253
% DFstatus -s 253Example 3.74. Display current seat usage on the server
% DFstatus -mDFtextps
DFtextps — Convert one or more input files into PDF
Synopsis
DFtextps
[-PDF]
[-A4]
[-h]
[-n #]
[-d]
[
[-1]
| [-2]
| [-4]
]
[-p #]
{file...}
Description
DFtextps is a utility program that converts plain text input files to PDF. If no input files are named, the input is taken from standard input.
The resulting PDF is sent to standard output where it can be re-directed to a file.
Options
create a PDF output file. This is the default behavior. The option is present for backwards compatibility only. | |
-A4 | format for A4 size paper. The default is US letter. |
-h | apply a standard header to each page. |
-n | start the page numbering at |
-d | double-space the output. |
-1, -2, -4 | format the output in 1-up, 2-up, or 4-up mode |
-p | use |
file | one or more input files. |
DFuserdb
DFuserdb — Perform maintenance operations on the user database
Synopsis
DFuserdb
[-help]
[-fsck]
[-reset]
[-reset2fa]
[-dump2fa]
[-stats]
[-unlock]
[-export filename]
[-import filename]
Description
DFuserdb is used to perform maintenance operations such as import/export on the user and role database.
Invoked without arguments DFuserdb works in interactive mode. Allowable commands match the options listed here, but without the leading dash.
Options
-help | print a list of the commands available. |
-fsck | perform a consistency check on the database.
If there are no consistency errors in the database structure
only the message |
-reset |
used to reset the |
-reset2fa | clear all of the devices that have been verified with two-factor authentication security codes. This will force all logins that require two-factor authentication to re-acquire and enter security codes during next login. |
-dump2fa | list all of the devices that have been recently verified with two-factor authentication security codes. |
-stats | display information about the database version and the number of records in the database for each of the indices. |
-unlock | reset the database synchronization locks in cases where they may be stuck after system failures. |
-export outfile | export (write) the user and role database information to the argument filename. |
-import infile |
import (read) user and role database information from the argument filename.
The file is expected to be in the |
DFversion
DFversion — Display version information for all DFdiscover executables (programs), reports, and utilities
Synopsis
DFversion
Description
DFversion invokes the DFwhich command for every DFdiscover executable, DFdiscover report and DFdiscover utility included in a standard installation.
Output is grouped by executables, reports and utilities. Within each group, output is sorted alphabetically by name.
DFversion is the most efficient and accurate way to determine the current state of an installation.
DFwhich
DFwhich — Display version information for one or more DFdiscover programs, reports and/or utilities
Synopsis
DFwhich
{name...}
Description
DFwhich examines and displays the RCS (revision control system) string of the specified filename(s), in a manner similar to the UNIX what command.
The output from the DFwhich command can be useful in determining exactly what version of the DFdiscover software is currently being used.
Examples
Example 3.76. Show the version information for DFedcservice
% DFwhich DFedcservice[1] This output format matches the output from DFlistplates.rpc.
[2] DFexport typically uses a word to specify an option while DFexport.rpc uses an option letter.
[3]
For backwards compatibility, the legacy status keywords
(clean, dirty, error, CLEAN, DIRTY, ERROR, missed, primary, secondary, all) are currently supported but will be removed in
a future release.
Do not rely upon the availability of the legacy status keywords.
[4] Matching occurs before any output formatting (such as variable decoding or string splitting) is applied.
[5] Choice and check field values are NOT zero-padded and hence substring extraction for those data types may yield unexpected or unreliable results.
[6] This option has no effect when applied to exported query or reason records.
[7] If DFexport is invoked from a cron facility, absolute pathnames are highly recommended.
[8]
Data written to standard output will also include "inline" header
metadata if either of the -h or
-x options are specified.
[9] The $ character may need to be escaped with a backslash to avoid interpretation as a shell variable.
[10] Combining -hd with
$plt or
###.png$DFbkgd will silently ignore the
###.png-hd argument.
[11] If the string contains characters that are meaningful to the shell, such as space, quote, percent, etc., then the entire string must be enclosed in double quotes. The string can always be enclosed in double quotes, to ensure that no characters are interpreted by the shell.
[12] If the string contains characters that are meaningful to the shell, such as space, quote, percent, etc., then the entire string must be enclosed in double quotes. The string can always be enclosed in double quotes, to ensure that no characters are interpreted by the shell.
[13] If DFreport is invoked from a cron facility, absolute pathnames are essential.
Table of Contents
- 4.1. Introduction
- 4.2. Alphabetical Listing
- DFaddHylaClient — Create the symbolic links necessary for accessing HylaFAX on a DFdiscover server
- DFauditdb — Add or reload journal files to DFaudit.db sqlite database.
- DFcertReq — Request an SSL certificate signing for DFedcservice.
- DFclearIncoming — Clean out the fax receiving directory, processing all newly arrived faxes
- DFcmpSchema — Apply the data dictionary rules against the study database
- DFcmpSeq — Determine the appropriate values for each
.seqYYWWfile - DFisRunning — Determine if the DFdiscover master program is currently running on the licensed DFdiscover machine
- DFmigrate — Upgrade study setup and configuration files from an old DFdiscover version to the current version.
- DFras2png — Convert Sun raster files in the study pages directory into PNG files
- DFshowIdx — Show the per plate index file(s) for a specific study
- DFstudyDiag — Report (diagnose) the current status of a study database server
- DFstudyPerms — Report, and correct, the permissions on all required DFdiscover sub-directories and files for a study
- DFtiff2ras — Convert a TIFF file into individual PNG files
- DFuserPerms — Import and update users and passwords, and optionally import roles, role permissions, and user roles
DFdiscover includes several utility programs that can be executed
from a command line. Most of these programs are useful in situations where
repairs or corrections within your DFdiscover environment are needed. They are
located in the DFdiscover utilities directory,
/opt/dfdiscover/utils.
DFaddHylaClient
DFaddHylaClient — Create the symbolic links necessary for accessing HylaFAX on a DFdiscover server
Synopsis
DFaddHylaClient
Description
DFdiscover uses HylaFAX to send and receive faxes. However, as installed by the DFdiscover INSTALL program, HylaFAX is not fully configured to run on a fax server workstation. DFaddHylaClient makes the links necessary to allow HylaFAX to operate.
Each workstation that will be used for receiving incoming faxes or sending faxes, must have this utility command run on it. The command must be run by someone with super-user privileges and needs to be run only once per workstation (unless the location of the DFdiscover software is subsequently changed).
As distributed, HylaFAX expects to find all of the fax resources it needs in
the /opt/hylafax directory.
However, those resources are actually in
/opt/dfdiscover/$MACHINE/hylafax.
DFaddHylaClient makes symbolic links to resolve
this inconsistency. Additionally, DFaddHylaClient creates a HylaFAX work
directory in /var/spool/fax.
If the directory already exists, the necessary
HylaFAX files are copied into the directory.
| Note |
|---|---|
|
This program is generally executed as part of the HylaFAX configuration in a new DFdiscover install, and subsequently never needs to be executed again. |
DFauditdb
DFauditdb — Add or reload journal files to DFaudit.db sqlite database.
Synopsis
DFauditdb
[-reload]
{-s #~#|all}
Description
A new audit trail sqlite database was introduced in release 5.5.0 that greatly improves the performance of retrieving and displaying page or field history in DFexplore or DF_SBhistory. Existing journal files for any ongoing studies created in a release previous to 5.5.0 must be loaded into the new audit database for each study. DFauditdb is provided for this purpose. Until study journal files are loaded, it is not possible to view page or field history, or run DF_SBhistory.
Studies that have been created in release 5.5.0, or newer, do not need to be reloaded.
The DFauditdb utility must be run by either user datafax or
root when reloading journal files using the -reload option. The
reload option empties existing entries and reloads journal files to the
DFaudit table in DFaudit.db.
If DFdiscover is running, the study to be loaded
must not be writing to the study database.
DFauditdb can be used to load all studies at once
using the -s all option provided the study servers can be started.
Running DFauditdb with just the -s studynum option counts entries in the
DFaudit table in DFaudit.db.
DFauditdb can be part of the server upgrade process like DFmigrate. DFauditdb is installed in the utils directory.
DFcertReq
DFcertReq — Request an SSL certificate signing for DFedcservice.
Synopsis
DFcertReq
Description
DFcertReq is used to generate an SSL key and a signing request for use with
DFedcservice. It must be run by root or datafax.
DFserveradmin also provides this functionality in a point-and-click visual interface.
Most administrators will find DFserveradmin to be the preferred interface for this task.
| Note |
|---|---|
|
There is no requirement to use DFcertReq and DF/Net Research, Inc. as the SSL certificate signing authority. There are many standard, commercial certificate signing authorities (known as CAs) that are internationally recognized. For a small annual fee paid to the CA, they will sign your certificate. Their signed certificate can be used in your DFdiscover installation. Some clients prefer this approach of using an independent CA. |
DFexplore, DFsetup, DFadmin and DFsend communicate with DFedcservice using TLS (Transport Layer Security) [14] in the same way that Internet banking sites do. TLS provides an encrypted path through the internet that prevents eavesdropping and modification of your data by third parties. The client applications check that they are communicating with the correct DFdiscover server by means of a certificate that encodes the DFdiscover server's name and ownership. This certificate is generated by choosing a very large random number (specifically a 4096-bit RSA key), adding organizational ownership information to it and then requesting that DF/Net Research, Inc. certify this key as authentic. Subsequently when an DFexplore, DFsetup DFadmin or DFsend client connects to DFedcservice, it asks for this certificate and can then determine whether it is communicating in an encrypted manner with the correct server.
The process of generating a certificate starts with the execution of the DFcertReq script. This script generates a large random number and then prompts for organizational information, including the country, state, organization name and server name.
| Important |
|---|---|
It is extremely important that the organizational information is up-to-date and accurate. Client applications may view this information to confirm the server's identity and certificate status. |
The organizational information is combined with the large random number
to create a unique certificate signing request text file.
An email is created for <certreq@dfnetresearch.com> containing a request to
certify that this is an authentic DFdiscover server. DF/Net Research, Inc. processes this request
and emails back a small file containing the certificate, which is then installed
in the DFdiscover system. At the end of these steps, communication between the DFexplore,
DFsetup, DFadmin and DFsend client applications is encypted and secure.
DFcertReq will fail to email the signing request if the computer from which it is run is unable to send email via the internet. In this case, it is possible to manually generate the request by:
Transferring the files
/tmp/cert.csr.textand/tmp/cert.csr, that are generated by DFcertReq, to an email enabled computer. Remember to perform the transfer in binary mode if using an application like ftp.Attach the two transferred files to a new email message and send it to
<certreq@dfnetresearch.com>.
Impact on Login Dialog Banner
At the time of executing DFcertReq, if there is no /opt/dfdiscover/lib/DFlogin.html
file present, DFcertReq will also create the file,
adding the organizational information
collected from the user's responses. Subsequently,
this information appears in the banner of each
DFdiscover login dialog.
To override this behaviour, before executing DFcertReq,
create your own login banner message in
/opt/dfdiscover/lib/DFlogin.html.
Examples
Example 4.1. Creating a DFedcservice SSL certificate and signing request
***************************************************************** * When asked for 'DFdiscover Server Name (fully qualified domain name)' * type the full name of the machine (e.g. dfdiscover.mycompany.com) * as it is called from the Internet. ***************************************************************** ----------------- Generating Server Key ---------------- Generating RSA private key, 4096 bit long modulus (2 primes) ...............................................++++++ ..................++++++ e is 65537 (0x10001) ----------------- Decrypting Server Key ---------------- writing RSA key ----------------- Generating Server Signing Request ---------------- You are about to be asked to enter information that will be incorporated into your certificate request. What you are about to enter is what is called a Distinguished Name or a DN. There are quite a few fields but you can leave some blank For some fields there will be a default value, If you enter '.', the field will be left blank. ----- Country Name (2 letter code) [US]: State or Province Name (full name) []:#DFcertReqCaliforniaLocality Name (eg, city) []:San DiegoOrganization Name (eg, company) []:Pharmadrug Biotech Inc.Organizational Unit Name (eg, section) [Research]: DFdiscover Server Name (fully qualified domain name) [dfdiscover.your-company.com]:dfdiscover.pharmadrug.comEmail Address [support@your-company.com]:support@pharmadrug.comEmailing certificate signing request to DF/Net Research, Inc... Once the certificate has been signed it will be emailed back to you.
DFclearIncoming
DFclearIncoming — Clean out the fax receiving directory, processing all newly arrived faxes
Synopsis
DFclearIncoming
Description
DFclearIncoming uses DFinnotify.rpc to submit all unprocessed faxes in the DFdiscover received fax (incoming) directory to the defined incoming DFdiscover daemons.
Under normal circumstances, this command is not needed as DFdiscover automatically processes each incoming fax as receipt completes.
This command is also automatically invoked by the DFdiscover bootstrap procedure when the software is restarted to process any faxes that were received while DFdiscover was not operational.
If one or more incoming daemons are processing when DFclearIncoming is started,
DFclearIncoming will wait until all of the daemons have exited. Then it will
empty out the /opt/dfdiscover/work/.dfincoming_work
file and submit for processing all of the faxes that appear in the
DFdiscover incoming directory.
DFcmpSchema
DFcmpSchema — Apply the data dictionary rules against the study database
Synopsis
DFcmpSchema
[-a]
[-v]
[-p #]
[-d DRF_filename]
{-s #}
Description
DFcmpSchema performs a consistency check of the database against the data dictionary for the study. It reports:
records that have an incorrect number of fields
records that have illegal status, validation levels, or time stamps
records that have an impossible CRF image reference
key fields that are illegal or inconsistent with the current study or plate
values that occupy more columns than the maximum defined for the field
values that have an incorrect format
fields that have impossible values
choice and check fields whose data value does not match the coding defined in the study schema
missing delimiter at the end of data records for user defined CRF plates
missing or empty required fields on clean primary or secondary data records
date values that contain digits, characters, or
??on clean primary and secondary records, and do not conform to the field imputation or partial rounding variable format
When the data dictionary for an existing study is changed via DFsetup, DFdiscover does not retroactively modify the database to match the new dictionary. DFcmpSchema is useful in this circumstance to identify and locate existing data that now violates the data dictionary.
DFcmpSchema applies two types of checking: basic and exhaustive checking.
Basic checking is the default and includes all but the last two bulleted
items described above. Exhaustive checking includes everything verified in
basic checking plus the last two items for missing/empty required fields and
inconsistent date values. Exhaustive checking can be performed by running
DFcmpSchema with the -v option.
By default, DFcmpSchema applies basic checks to all primary records in the database, excluding any records in the new record queue. New records are only checked if plate zero is explicitly specified. Because the data fields in new records have not yet been verified, DFcmpSchema only checks fields 1-7, i.e. checking stops at the subject ID field.
For each inconsistency, the report includes the record, plate number, the line number in the exported data file, a synopsis of the inconsistency, the key fields of the record (so it can be retrieved with DFexplore), the data dictionary definition, and the current data value.
Options
-a | Check all primary and secondary records. The default is to check only primary records. [15] |
-v | Apply exhaustive checking. Exhaustive checking includes all basic checking plus additional checks on clean records only for
|
-p | Check only the requested plate number. The plate number can be one of the user-specified plates, plate 0 (new record queue), plate 510 (reason for data change), or plate 511 (query). |
-d DRF_filename | Create a DFdiscover retrieval file for all problems identified. |
-s | Study number (required). |
Exit Status
DFcmpSchema exits with one of the following statuses:
0 | The command was successful. |
36 | The required command-line arguments were not present or were incorrectly specified. |
2 | The command failed because the study number was not defined, the study schema could not be read, the requested plate number was not defined, or communication with the database server failed. |
Examples
Example 4.3. Report on all inconsistencies for study 240
% DFcmpSchema -s 240Example 4.4. Perform exhaustive checking for inconsistencies on plate 2 for study 254
% DFcmpSchema -v -p 2 -s 254
DFcmpSeq
DFcmpSeq
— Determine the appropriate values for each
.seqYYWW file
Synopsis
DFcmpSeq
Description
This command must be run by user datafax or root.
DFcmpSeq verifies the contents of the sequence files maintained by DFdiscover
in the /opt/dfdiscover/work directory.
It verifies for each file that the number
stored in the file is:
greater than the highest sequence number assigned to a file in the TIFF archive directory (by any daemon)
greater than the highest sequence number referenced in the DFdiscover maintained
fax_logfile
In unusual circumstances it may be that a sequence file cannot be updated by DFdiscover when it should be. This can subsequently lead to problems processing incoming faxes because new sequence numbers assigned by DFmaster.rpcd overlap with previously used sequence numbers. Incoming fax processing will fail and messages will be logged while this condition persists. DFcmpSeq must be used in this case to determine what the correct values are for the sequence files.
Typically this command is required only in circumstances where a sequence file has been accidentally deleted and its contents need to be re-created.
Exit Status
DFcmpSeq exits with one of the following statuses:
0 | The command was successful. |
2 | The command failed because the configuration of the incoming daemon could not be read. |
Examples
Example 4.5. Report on the current status of the sequence files
In this example, DFcmpSeq finds two problems. The solutions are to insert
286 in
/opt/dfdiscover/work/.seq9245 to fix the first problem and
3 in
/opt/dfdiscover/work/.seq9401 to fix the second problem.
# DFcmpSeqDFisRunning
DFisRunning — Determine if the DFdiscover master program is currently running on the licensed DFdiscover machine
Synopsis
DFisRunning
[-q]
Description
DFisRunning is a utility program that determines whether or not DFmaster.rpcd is currently running on the licensed DFdiscover machine. It is most useful in shell scripts and cron jobs that need to determine if DFdiscover is operational before proceeding.
Options
-q | execute in quiet mode. Do not echo any messages to standard output. The result of the command can be determined from the command status, where 0 indicates that the master is not running, and 1 indicates that it is. |
DFmigrate
DFmigrate — Upgrade study setup and configuration files from an old DFdiscover version to the current version.
Synopsis
DFmigrate
[-f]
[-a]
[-s #, #-#]
[# study_directory]
Description
Several changes were introduced in release 2014.0.0 that are incompatible with earlier releases of DFdiscover. As a result any ongoing studies created in a release previous to 2014.0.0 must be migrated in order to make them compatible. DFmigrate is provided for this purpose. Until a study is migrated, it is not possible to use it in the current release of the software.
Studies that have been created in release 2014.0.0, or newer, do not need to be migrated. Similarly, studies that were previously migrated to be compatible with 2014.0.0, do not require (re-)migration.
| Important |
|---|---|
It is strongly recommended that you create a backup of your original study directories prior to migration. If you have not already backed up all studies prior to the new installation you should do it now. The migration process does not touch study data or faxed images, only study setup files including plate backgrounds are migrated. |
The DFmigrate utility must be run by either user datafax or
root. DFdiscover does not need to be running to run DFmigrate. If
DFdiscover is running at the time of migration, the study to be migrated
must not be in use.
DFmigrate can be used to migrate all studies at once or one study at a
time. The migration process follows the same steps regardless of the
number of studies being migrated.
The steps of the migration process are documented in the
DFmigrate output as follows:
Sanity Checks. Before migrating any studies DFmigrate checks to ensure that:
no study directory is nested within another study directory,
each study directory and configuration file belongs to exactly one study [16]
If a failure is detected in either of these requirements, DFmigrate terminates with an error message and no studies are migrated.
Updating DFserver.cf. This step updates the existing DFserver.cf file found in
STUDY_DIR/lib to include new Minimum Version parameters. A copy of the original DFserver.cf file is created as DFserver.cf_oldversion and stored inSTUDY_DIR/lib prior to the conversion. The study's minimum version restriction for DFexplore and DFsetup are set to the same version as DFmigrate (i.e. the current DFdiscover version).Converting DFsetup. This step converts the existing DFsetup, DFschema, DFschema.stl, DFtips and DFcterm_map files found in
STUDY_DIR/lib to the format expected by the current version. Copies of the original files (called DFsetup_oldversion, DFschema_oldversion, DFschema.stl_oldversion, DFtips_oldversion, DFcterm_map_oldversion) are created and stored inSTUDY_DIR/lib prior to the conversion. TheQC_Report_IDstyle is converted from type string to type number. If user-defined string styles also exist with the "Treat As Pre-printed Numerals" attribute, these too will be converted to type number during migration. If plate triggered procedures (Pre- and Post-processes) have been defined for any of the plates in DFsetup, a new plate arrival trigger file is created for each Pre- and Post-process. The plate arrival trigger files are namedDFPrePost###.sh, where ### represents the plate number on which the process is defined. These files are saved to the study directorySTUDY_DIR/ecbin. If a plate contains both a Pre- and Post-process, both processes will be merged into a single plate arrival trigger file.This step is also responsible for creating the following directories in the
STUDY_DIRparent directory:ecbin,dfsas,drfanddfschema, which did not exist in earlier releases.Where they are not already defined, custom level labels are set to the default label values
Level 0,Level 1,... ,Level 7.Moving Lookup Tables to
lutdirectory. All lookup tables must reside in either a study lookup table directory, specificallySTUDY_DIR/lut, or in a DFdiscover level lookup table directory, named /opt/dfdiscover/lut. DFdiscover looks for referenced lookup tables first at the study level and then if they cannot be found there at the DFdiscover level.STUDY_DIR/lut is created and lookup tables defined in the study lookup table map file,STUDY_DIR/lib/DFlut_map, which can be found inSTUDY_DIR/lib are moved toSTUDY_DIR/lut.DFlut_mapitself continues to reside inSTUDY_DIR/lib/DFlut_map.Note Lookup tables which do not reside in $STUDY_DUR/lib, and were instead defined in
STUDY_DIR/lib/DFlut_map with an absolute path location, will not be moved by DFmigrate and must be moved manually to eitherSTUDY_DIR/lut or /opt/dfdiscover/lut. AlsoSTUDY_DIR/lib/DFlut_map must be updated to remove any absolute pathnames to lookup tables.Moving Edit checks code to the
ecsrcdirectory. Edit checks are stored in theSTUDY_DIR/ecsrcdirectory. If necessary this directory is created and the pre-migration edit check fileDFeditsis moved to this directory. Published edit check fileDFedits.bin, which is used by DFexplore, is not moved and continues to reside inSTUDY_DIR/lib.Note Other edit check source files (i.e. any include files specified in
DFedits) are not moved by DFmigrate and must be moved manually to theecsrcdirectory in eitherSTUDY_DIRor /opt/dfdiscover. Like lookup tables, DFdiscover now looks for edit check include files first in the study directorySTUDY_DIR/ecsrcand if not found, then in the system location /opt/dfdiscover/ecsrc. All include files must be referenced by their file name alone, and an absolute path name is not allowed.Converting postscript and old TIFF files to PNG. A
DFbkgdXXX.pngfile is created for each plate background image found in the studySTUDY_DIR/bkgd directory. These PNG files are necessary if you use the DFdiscover DFprintdb program to print CRF backgrounds merged with data records from the study database. These high-resolution PNG files are also used by DFexplore to print CRF backgrounds. The PNG files are created by converting existing high-resolution tiff files. If tiff files do not exist then the PNG files are generated by amalgamating theDFbkgd-prologue.psfile and the individualDFbkgdXXX.psfiles for each plate and using Ghostscript (DFgs) to convert the merged PostScript files into high resolution PNG files.Note If the PostScript conversion performed in this step fails, the PNG files can be created by re-importing and saving the CRF backgrounds in the DFsetup tool.
If during execution of DFmigrate any of the above steps fail, DFmigrate can be re-run for the same study after the outstanding issues have been resolved.
DFmigrate appends a title (which includes: study number, study directory, date and time)
followed by any error or warning messages for each migrated study to a log file named
dfmigrate_errors which is created in the
directory from which DFmigrate is run if it does not already exist.
This file should be checked when DFmigrate ends.
It may contain messages describing manual steps that need to be taken to complete the
migration of one or more studies.
When migrating pre 4.1 studies, if the -a (migrate all studies) option is used an entry is added to DFstudyspaces.db for each unique study parent directory found in DFstudies.db; and if the -s option is used to migrate a single study an entry is added for that study alone, unless it's study space is already defined.
Once migration has been successfully completed for a study the DFdiscover utility program DFstudyPerms should be run to verify and, if necessary, correct any permission problems that may exist for the study directories and files.
Options
-f |
force the conversion of all plate backgrounds if there are no PNG
backgrounds already existing in |
-a | migrate all studies found in /opt/dfdiscover/lib/DFstudies.db |
-s #, #-# | migrate the specified study numbers (required). /opt/dfdiscover/lib/DFstudies.db is read to determine the study directory corresponding to each study number. |
# study_directory | migrate the specified study number (required) that is located in the specified study directory |
Exit Status
DFmigrate exits with one of the following statuses:
0 | DFmigrate ran successfully |
> 0 | DFmigrate failed, Any output error messages are written
to the dfmigrate_errors file
in the working directory. |
Examples
Example 4.7. Migrate study 100 to the current version
DFmigrate gets the correct path for study 100 from its entry in /opt/dfdiscover/lib/DFstudies.db.
% DFmigrate -s 100

**********************************************************
DFmigrate: Study 100 - /opt/studies/test100 - Thu Apr 15 12:58:40 2010
**********************************************************
Step 1: Updating DFserver.cf
------------------------------------------------------------
File Converted: /opt/studies/test100/lib/DFserver.cf
Step 2: Converting DFsetup
------------------------------------------------------------
OLD SETUP FILE <DFsetup v3.7.0>

File Created: /opt/studies/test100/ecbin/DFPrePost001.sh.
File Created: /opt/studies/test100/ecbin/DFPrePost002.sh.
File Created: /opt/studies/test100/ecbin/DFPrePost003.sh.

NOTE: Style type for the following styles has been been changed to
Number as it was previously set to treat data as pre-printed numerals:
        STYLE
        --------------
        QC_Report_ID

File Converted: /opt/studies/test100/lib/DFsetup
File Converted: /opt/studies/test100/lib/DFschema
File Converted: /opt/studies/test100/lib/DFschema.stl
File Converted: /opt/studies/test100/lib/DFtips
File Converted: /opt/studies/test100/lib/DFcterm_map

Step 3: Moving Lookup Tables to lut directory
------------------------------------------------------------
ERROR: Absolute file path found! lookup table file
/opt/studies/test100/lib/DF_QClut not moved.

Step 4: Moving Edit Checks code to ecsrc directory
------------------------------------------------------------
File Moved: from lib/DFedits to ecsrc/DFedits.
WARNING: DFedits contains #include files which must be moved to ecsrc
manually.

Step 5: Converting postscript to png and old tiffs to png
------------------------------------------------------------
All background files converted from DFbkgd###.ps to DFbkgd###.png

Study migration was successful.

~~~~~~~~~~~~~~~~~~~~~~~~~~~~~~~~~~~~~~~~~~~~~~~~
DONE:
Migration has been performed on the following study: 100
Please review dfmigrate_errors for any migration errors
or warnings and/or manual steps that may be required.
~~~~~~~~~~~~~~~~~~~~~~~~~~~~~~~~~~~~~~~~~~~~~~~~

%
Example 4.8. Migrate a non-active study to current version
Study 207 is not active. It does not appear in the DFadmin study list and is not defined in /opt/dfdiscover/lib/DFstudies.db. The study directory is located at /tmp/studies/study207. It might be an old study copied from a backup medium, or a copy of an active study (e.g. cp -pr /opt/studies/study107 /tmp/studies/study207)
% DFmigrate 207 /tmp/studies/study207Example 4.9. Migrate all studies found in /opt/dfdiscover/lib/DFstudies.db to current version
% DFmigrate -a[16] Study directory paths are evaluated without regard to case,
e.g. /opt/studies/study1 and
/opt/studies/Study1 are considered identical, and not
allowed as each study path must be unique.
DFras2png
DFras2png — Convert Sun raster files in the study pages directory into PNG files
Synopsis
DFras2png {-s study_dir}
Description
DFras2png is used to convert Sun raster files in the study pages directory into PNG files. File names remain the same.
All recent versions of DFdiscover store images in PNG format rather than the Sun raster image format used in older versions. Converting the images to PNG format brings several advantages: smaller file sizes, color capability and better interoperability with other software. Very few packages can deal with the Sun raster file format.
Only files in the pages directory are converted. Any Sun raster image files in any of the other study directories are not touched. Any PNG files that exist in the pages directory are reported but are not re-converted. Any other files that are not Sun raster files are ignored. Study directories that are incorrectly specified or don't exist are reported. All reporting is written to stderr.
DFshowIdx
DFshowIdx — Show the per plate index file(s) for a specific study
Synopsis
DFshowIdx
[-F]
[-q]
[-l #]
[-p #]
{-s #}
Description
DFshowIdx displays the per plate index files as described in plt###.ndx - per plate index files.
Options
-F | Update the count of total entries (if needed), sort the index (so that the sorted count now matches the total count), and reset the unsorted count to 0. |
-q | Display header only. |
-l | Maximum length of data record. |
-p | Display the index file for a specific plate. The plate number can be one of the user-specified plates, plate 0 (new record queue), plate 510 (reasons for data), or plate 511 (queries). If not specified, index files for all plates are checked. |
-s | Study number (required). |
DFstudyDiag
DFstudyDiag — Report (diagnose) the current status of a study database server
Synopsis
DFstudyDiag
{-s #}
Description
There are a variety of consistency checks that must be in place for a study server to operate correctly. If one or more of these consistency checks fails, it may be difficult for a user to determine the failure condition so that it can be remedied. DFstudyDiag is the utility to use in situations like this.
DFstudyDiag checks a variety of places while diagnosing a study server. It consults with the DFdiscover master, reviews the DFdiscover studies database, communicates with the operating system's portmapper, and also interacts with one or more DFdiscover slaves. DFstudyDiag displays its progress which each of these interactions as these proceed.
Exit Status
DFstudyDiag exits with one of the following statuses:
0 | The command was successful and the study server is operational and responding correctly, or the study server has been disabled. |
1 | The command was successful and the study server is not responding, or the command failed because there was an error in the command-line arguments. |
Examples
Example 4.11. What is the status of study 7's database server?
% DFstudyDiag -s 7Example 4.12. DFstudyDiag detects a problem with study 8
% DFstudyDiag -s 8DFstudyPerms
DFstudyPerms — Report, and correct, the permissions on all required DFdiscover sub-directories and files for a study
Synopsis
DFstudyPerms
[-v]
[-f]
[-g string]
{#}
Description
Incorrect permissions or file ownerships are the most common causes of problems in UNIX applications, and DFdiscover, being a UNIX application, is no exception.
DFstudyPerms is a useful utility for detecting permission and ownership problems on all required DFdiscover sub-directories and files for a study. It is not able to detect errors in files that are not required by DFdiscover.
DFstudyPerms exits with a status of 0 if no errors are detected and a non-zero status if errors are detected.
DFstudyPerms does not detect problems with ownership or permissions in the DFdiscover software files themselves. To reset ownerships and permissions with the DFdiscover software, use the SETPERMS script that can be found in /opt/dfdiscover.
Options
-v | verbose mode. Choosing this option causes DFstudyPerms to echo the name of each file and sub-directory it examines. The default behavior is to examine directories and files quietly unless an error is detected. |
-f | fix mode. Choosing this option causes
DFstudyPerms to attempt to fix each permission problem
that is detected. In most environments, the user executing DFstudyPerms will
need to be |
-g string | check group ownership and permissions for the named group
instead of the default |
| the DFdiscover study number (required). |
Exit Status
DFstudyPerms exits with one of the following statuses:
0 | The command was successful and no permission problems were detected. |
1 | The command was executed with the -u
(usage) option.
|
2 | The command was successful and permission problems
were detected, or the command failed because user datafax or group
studies was not defined.
|
Examples
Example 4.13. Check, in verbose mode, the permissions for study 251
checking study 251, group studies ...checking '/opt/studies/exemplar251' ...checking '/opt/studies/exemplar251/lib' ...checking '/opt/studies/exemplar251/bkgd' ...checking '/opt/studies/exemplar251/data' ...checking '/opt/studies/exemplar251/data/1602.jnl' ...checking '/opt/studies/exemplar251/data/1603.jnl' ...checking '/opt/studies/exemplar251/data/1604.jnl' ...checking '/opt/studies/exemplar251/pages' ...checking '/opt/studies/exemplar251/pages_hd' ...checking '/opt/studies/exemplar251/reports' ...checking '/opt/studies/exemplar251/work' ...checking '/opt/studies/exemplar251/lib/DFcenters' ...checking '/opt/studies/exemplar251/lib/DFfile_map' ...checking '/opt/studies/exemplar251/lib/DFschema' ...checking '/opt/studies/exemplar251/lib/DFsetup' ...checking '/opt/studies/exemplar251/lib/DFtips' ...checking '/opt/studies/exemplar251/lib/DFvisit_map' ...checking '/opt/studies/exemplar251/lib/DFlut_map' ...checking '/opt/studies/exemplar251/lib/DFmissing_map' ...checking '/opt/studies/exemplar251/lib/DFpage_map' ...checking '/opt/studies/exemplar251/lib/DFqcproblem_map'%DFstudyPerms -v 2510%echo $status
DFtiff2ras
DFtiff2ras — Convert a TIFF file into individual PNG files
Synopsis
{infile}
{outfile}
Description
is used to convert TIFF files into individual PNG files whose names are comprised of the output stem followed by a 3-digit page number. The raster files are converted to 100DPI images but are not image processed in any other way.
Exit Status
exits with one of the following statuses:
0 | The command was successful. |
2 | The command failed because there was an error in the command-line arguments, or the required input file could not be read. |
> 0 | The command was successful but one or more output files could not be created. The exit status is the number of output files that could not be created. |
DFuserPerms
DFuserPerms — Import and update users and passwords, and optionally import roles, role permissions, and user roles
Synopsis
DFuserPerms
[-S server]
[-U username]
[-C password]
[-a]
[-f]
[-e errorlog]
{-i inputfile}
Description
Normally, creating and modifying users, passwords, roles, role permissions, and user roles is done with DFadmin. However, there may be cases where it would be useful to perform these operations from the command line. DFuserPerms is a tool that grants the ability to import these records from the command line. The records must be stored in an input file which conforms to the format used in the DFuserdb.log file (see System Administrator Guide, DFuserdb.logDFuserdb.log), although with the following exceptions:
Record Time Stamp and Record Modifier must not be included for any record type.
Instead of a Password Hash field for PASS records, the actual password to be imported must be specified.
| Important |
|---|---|
|
The following behaviors of DFuserPerms should be noted:
|
Options
-S server | the DFdiscover server name. Must be specified unless the user has the DFSERVER shell variable set appropriately. |
-U username | login username. Must be specified unless the user has the DFUSER shell variable set appropriately. |
-C password | login password. Must be specified unless the user has the DFPASSWD shell variable set appropriately, or has previously set up authentication using DFpass. |
-a | allow ROLE, USRL, and RLPM records to be imported. |
-f | check data format only. Does not import records. This option only looks for record formatting errors. Problems in the records that would need to be caught by the study server, such as passwords that do not meet the requirements or importing passwords for non-existent users, are not recognized by this option. |
-e errorlog | output critical errors to specified file. Formatting errors are not written to the error log, only errors that prevent DFuserPerms from running. If this option is not specified, errors are written to stderr. |
-i inputfile | specify the input file for DFuserPerms to import (required). |
Exit Status
DFuserPerms exits with one of the following statuses:
0 | The command was executed, DFuserPerms has run and imported all valid records. If there are invalid records but DFuserPerms has still run, the exit status is still 0. |
1 | DFuserPerms encountered a critical error such as failed authentication or permission errors. Invalid records in the import file are not critical errors since DFuserPerms still runs, and do not cause an exit status of 1. |
Examples
Example 4.15. Importing USER and PASS records
In this example, a new user named Jason is imported and a password is assigned to them. The input file contains:
USER|Jason|2|Jason Johnson|A Company Incorporated|||||||||0|2|1|
PASS|Jason|apassword1234|1464208516
Importing the file:
% DFuserPerms -S servername -U username -C password -i inputfile
Example 4.16. Importing ROLE, RLPM, and USRL records
In this example a new role called Company Permissions is imported, role permissions for this role are specified, and user Jason is assigned to have this user role. The input file contains:
ROLE|20|254|2|Company Permissions||*|*|*||*|0|0
RLPM|20|2|2|*|*|1,2,3,4,5|1,2,3,4,5|1,2,3,4|*|*|*|0|0
USRL|Jason|20|1|2|*|*
Importing the file:
% DFuserPerms -S servername -U username -C password -a -i inputfile
Note that the ROLE, RLPM, and USRL records all used the same Role ID value (20). The DFuserdb.log file shows the the IDs have changed when they were imported, but DFuserPerms ensures that since they were imported with the same ID value, they are assigned to the same role ID (105):
20160610095127|ROLE|datafax|105|254|2|Company Permissions||*|*|*||*|0|0
20160610095127|RLPM|datafax|105|2|2|*|*|1,2,3,4,5|1,2,3,4,5|1,2,3,4|*|*|*|0|0
20160610095127|USRL|datafax|Jason|105|1|2|*|*
Table of Contents
- 5.1. Introduction
- 5.2. Language Features
- 5.3. Database Permissions
- 5.4. Language Structure
- 5.5. Variables
- 5.6. Missing/Blank Data
- 5.7. Arithmetic Operators
- 5.8. Conditional Execution
- 5.9. Built-in Functions and Statements
- 5.9.1. Edit check Function Compatibility Notes
- 5.9.2.
dfaccess - 5.9.3.
dfaccessinfo - 5.9.4.
dfalias2id - 5.9.5.
dfask - 5.9.6.
dfbatch - 5.9.7.
dfcapture - 5.9.8.
dfcenter - 5.9.9.
dfclosestudy - 5.9.10.
dfdate2str - 5.9.11.
dfday - 5.9.12.
dfdirection - 5.9.13.
dfentrypoint - 5.9.14.
dfexecute - 5.9.15.
dfgetfield - 5.9.16.
dfgetlevel/dflevel - 5.9.17.
dfgetseq - 5.9.18.
dfhelp - 5.9.19.
dfid2alias - 5.9.20.
dfillegal - 5.9.21.
dfimageinfo - 5.9.22.
dflegal - 5.9.23.
dflength - 5.9.24.
dflogout - 5.9.25.
dfmail - 5.9.26.
dfmatch - 5.9.27.
dfmessage/dfdisplay/dferror/dfwarning - 5.9.28.
dfmetastatus - 5.9.29.
dfmode - 5.9.30.
dfmoduleinfo - 5.9.31.
dfmonth - 5.9.32.
dfmoveto - 5.9.33.
dfneed - 5.9.34.
dfpageinfo - 5.9.35.
dfpassword - 5.9.36.
dfpasswdx - 5.9.37.
dfplateinfo - 5.9.38.
dfpref - 5.9.39.
dfprefinfo - 5.9.40.
dfprotocol - 5.9.41.
dfrole - 5.9.42.
dfsiteinfo - 5.9.43.
sqrt - 5.9.44.
dfstay - 5.9.45.
dfstr2date - 5.9.46.
dfstudyinfo - 5.9.47.
dfsubstr - 5.9.48.
dftask - 5.9.49.
dftime - 5.9.50.
dftoday - 5.9.51.
dftool - 5.9.52.
dftrigger - 5.9.53.
dfuserinfo - 5.9.54.
dfvarinfo - 5.9.55.
dfvarname - 5.9.56.
dfview - 5.9.57.
dfvisitinfo - 5.9.58.
dfwhoami - 5.9.59.
dfyear - 5.9.60.
int
- 5.10. Query operations
- 5.11. Reason operations
- 5.12. Lookup Tables
- 5.13. Looping
- 5.14. User-Defined Functions
- 5.15. Examples and Advice
- 5.16. Optimizing Edit checks
- 5.17. Creating generic edit checks
- 5.18. Debugging and Testing
- 5.19. Language Reference
The DFdiscover edit check language provides a general-purpose programming environment in which to create procedures that can be used to perform logic checks on data fields, generate quality control notes, and calculate and insert values into data fields. Edit checks may reference one or more data fields from any available record in the database, and may include arithmetic, logical and comparison operators. Looping and conditional execution constructs are also provided. The language structure is based on the C programming language and is a loose subset of C.
Edit checks are defined, named and stored in a study edit check file
(named DFedits and located in the study lib directory).
This file is accessed and edited by selecting
> in DFsetup.
Once defined, an edit check can be applied to
the desired data field(s) using the style or variable definition dialogs,
where the edit check can be set to execute on:
field entry, field exit, page entry, or page exit.
When choosing among the options of field entry, field exit, plate entry and plate exit, note the following:
most edit checks should execute on exit from the last field used in the edit check to ensure that the user has finished all relevant data entry and corrections.
if you do not trust users to tab through all data fields you may want to execute edit checks on both field and plate exit to ensure that a data record can not be saved without executing the edit checks.
do not attach edit checks to hidden fields if you want them to be executed by users who do not have access to hidden fields.
in Image view most edit checks should not be executed until after the duplicate resolution step has completed (which occurs on entry to the first non-key field), because the initial ICR values may be replaced by existing database values during duplicate resolution. In particular note that any edit checks triggered on exit from the key fields (visit and ID) will run to completion before duplicate resolution has a chance to occur, and thus might produce incorrect results.
any plate entry edit checks executed in Image view will be re-executed after the existing data record is brought forward by duplicate resolution.
Edit checks are most often executed interactively when entering and reviewing data records in DFexplore, DFcollect and DFweb but can also be executed in batch mode (see Batch Edit checks).
The process used to define edit checks in DFsetup is detailed in Study Setup User Guide, Edit checks.
In addition to user-defined field and plate entry and exit edit checks, there are 2 reserved edit check names:
DFopen_study- executed when the study is selected in the login dialog, andDFopen_patient_binder- executed when a subject binder is opened in DFweb, DFcollect or in DFexplore Data View, including when a user switches to Data View from any of the other views, and when a task record is selected for a different subject.
These two reserved edit checks are optional; if they are defined by an edit
check programmer they will execute in DFexplore, DFweb and DFcollect.
Additionally, DFopen_study executes for the first batch in a batchlist
when run in batch mode.
They are typically used to set user preferences (using function dfpref),
change visit and plate requirements from the default visit map specifications (using function dfneed),
and to display messages (using function dfwarning or dferror).
Since no data record has the focus when these edit checks run, the edit checks
cannot refer to data fields
unless the fields are fully qualified. For example, @[1001,0,1,15]
references field 15 and VDATE[1001,0,1] references variable
VDATE, both of plate 1 at visit 0 for subject 1001.
In DFopen_patient_binder, @PID can be used to refer to the
subject ID; thus VDATE[@PID,0,1] contains the value of the
VDATE field for the subject whose
binder is being opened.
In DFopen_study, @PID
equals 0 since no subject has yet been selected.
The edit check language provides the following features:
-
Support for all DFdiscover data types
-
Read/Write access to variables on the current plate
-
Read access to variables on other plates
-
Local variables
-
Arithmetic, logical, comparison operators
-
Query functions
-
Lookup table support
-
Legal range check functions
-
Message output functions
-
String matching and manipulation functions
-
Information functions
-
User-defined functions
In DFexplore the data fields available to edit checks are restricted by user's site, subject, visit, plate and read level access permissions, as specified in the roles the user plays within each study. This helps to ensure that users will not be shown database values in edit checks to which they would normally not have access, but it also means that data records unavailable to the DFexplore user can not be used in edit checks. This restriction does not apply to hidden fields. Thus data values that are needed in an edit check, but should not normally be seen by users with a certain role, can be made available by defining them as hidden fields on plates to which the user has read access permissions.
As each edit check is defined, it must be given a name.
This name can be any sequence of letters, but it is a good idea to use
names that are descriptive of what the edit check is to accomplish.
Names must start with a letter and may contain letters,
numbers and underscores, _.
There is no length limit on edit check names.
Edit check names are case sensitive, so myeditcheck()
and MyEditCheck() refer to different edit checks.
Comments can be placed anywhere an edit check by preceding it with an
octothorpe, #.
Edit checks begin with the line containing the
keyword edit, the name of the edit check,
a (, an optional parameter declaration list and a ).
The optional parameter declaration allows arguments to be passed into the
edit check. It is important to note that if parameters are declared, they
must be supplied when the edit check is invoked.
Following this is the body of the edit check, enclosed in a pair of braces,
{ and }.
The body of the edit check contains zero or more statements that perform
the desired operations.
Execution of the edit check begins with the first statement in the edit check
and proceeds to the next in sequence until the logic flow changes because
of an if or while
statement.
Execution is terminated via an exit or
return statement or when control reaches the end
of the edit check.
Braces, { and },
are used throughout the edit check language to group two or more
statements together to operate as one statement.
They become especially important when used with the
if and while statements that
require a single action statement.
Each statement in the edit check language is terminated by a semicolon,
;.
A simple edit check to convert pounds to kilograms could be written as
follows:
# This is a comment
edit lbs2kgs()
{
        kgs = lbs / 2.205;
}
Edit checks are placed one after the other in the DFedits
file, so the addition of a similar function to convert kilograms to
pounds would result in the following DFedits file:
edit lbs2kgs()
{
        kgs = lbs / 2.205;
}
edit kgs2lbs()
{
        lbs = kgs * 2.205;
}
An example of an edit check with parameters would look like this:
edit isbetween(number low, number high)
{
        if ((lbs < low) || (lbs > high)) {
                dferror("Weight is not between ", low, " and ", high, " pounds.");
        }
}
To verify that the weight is in the range of 100-250 pounds we would
attach the edit check isbetween(100, 250) on field exit
on the variable lbs.
Statements in the body of an edit check are executed in order.
The logic of an edit check typically terminates after the last statement is
executed, however, an edit check can be forced to terminate earlier
by use of the return or exit statements.
These two statements are very similar in purpose; they terminate the
logic of an edit check at the point where the statement is executed - no
following statements are executed.
The difference in the return and exit statements is in their
behavior with respect to a sequence of edit checks that are to be executed
at the same location on the current variable.
The exit statement terminates the current edit check and does not
execute any of the following edit checks on the variable, whereas return
terminates the current edit check but then resumes processing with the next
edit check defined on the variable, if any.
Example 5.1. Difference between exit and return
In this example, a variable has the following definition for the field enter edit checks:
ageCheck, demog, conmed
The three edit checks are to be executed in the listed order.
If an exit statement is executed in the body of ageCheck
then edit checks demog and conmed are
not executed.
However, if a return statement is executed in the body of
ageCheck, edit checks demog and
conmed would still be executed.
The same would be true for an exit or return statement inside the
body of edit check demog, conmed would
be skipped if exit executed, while it would not be skipped if return
was executed.
Now that you have some idea of what edit checks are about and have seen an example, we will turn to a description of the elements of the edit check language.
Variables are storage spaces that can hold values. Each variable has a data type associated with it, where the data type is from the list:
- number
- date
- string
- time
The data types have the following properties:
number. an optional leading plus/minus sign, a sequence of one or more digits (whole part of the number), an optional decimal point, and, optionally, one or more digits (fractional part). The range of numbers (10 digits at maximum, except for subject ID which allows 15 digits at maximum) that can be represented is
-2147483647to2147483647, inclusive.date. 2 or 4 digits for the year, 2 digits or 3 characters for the month, 2 digits for the day, and optional delimiters. The format of the date is taken from the field definition for database variables, or from the
format datedeclaration (see Section 5.5.7, “Date Variables”) for constant dates.string. a sequence of zero or more alphanumeric characters, plus a small set of two character sequences (see Section 5.19.2, “String Constants”), enclosed in double quotes. The maximum length of a string is taken from the field definition for database variables, or is 16383 bytes for constant strings (4095 UNICODE characters).
time. 2 digits for hours, a colon delimiter, two digits for minutes or 2 digits for hours, a colon delimiter, two digits for minutes, another colon delimiter and two digits for seconds. The minimum and maximum values are based on a 24 hour clock with a minimum value of 00:00:00 and a maximum value of 23:59:59.
Field types map to data types in the following way:
| Field type | Data type |
|---|---|
| Number | number |
| Date | date |
| String | string |
| Time | time |
| Choice | number |
| Check | number |
| VAS | number |
Different types can have different operations performed on them. For example, it makes sense to multiply two numbers together, but not two dates. The edit check language uses type information to decide what operations are permitted and what the results are. Subtracting two dates returns the number of days between them. Adding dates doesn't make sense, so this operation is not permitted and will result in an error message. Adding a number (of days) to a date is permitted and is used to calculate a date in the future.
Variables allow read/write access to data fields on the current plate, read-only access to data fields on another plate in the database, or read/write access to local temporary storage areas. A database field is referenced by its name as defined in the setup tool.
For example, if you have a database field called
DOB in your study setup, you would reference the
first instance of that field on the current page using:
DOB
References can be refined by specifying which module the variable is in. To
reference the DOB field in the current module that the
edit check is running in, use:
.DOB
To reference the DOB variable in the first instance of
the DEMOGRAPHICS module, use the construct:
DEMOGRAPHICS.DOB
To reference the DOB variable in the module
DEMOGRAPHICS with instance ID of 5, use the construct:
DEMOGRAPHICS[5].DOB
The above constructs operate on the current page. It is also possible to
reference variables in a read-only context on other pages by including
the keys to those pages by adding the id, visit and plate parameters to
the variable name using the form variable[id, visit, plate].
To reference the first instance of the DOB variable for
subject ID 12345 at visit 1 on plate 2, you would use:
DOB[12345, 1, 2]
The id, visit, and
plate fields can each be arithmetic expressions,
or may be left blank in which case they default to the current
id, visit, and plate. Thus:
DOB[,,]
means, the variable DOB for the current id,
on the current visit and plate which is the same as writing
DOB by itself.
Writing:
DOB[,1,2]
means the first instance of variable DOB for the current
subject ID, on visit 1, plate 2.
Similarly, module names can be added to more precisely specify which instance
of the DOB variable you wish to reference. To reference
the DOB field in the first instance of the
DEMOGRAPHICS module for subject ID 12345 at visit 1
and plate 2, use:
DEMOGRAPHICS.DOB[12345, 1, 2]
To reference
the DOB field in instance 5 of the
DEMOGRAPHICS module for subject ID 12345 at visit 1 and
plate 2 use:
DEMOGRAPHICS[5].DOB[12345, 1, 2]
Any string values written to database variables are sanitized (i.e., any '|' characters or control characters are converted to blank) before the data is written out to the database.
The first 6, and last 3, fields in all data records in a DFdiscover database are used for
database management by DFdiscover, and are referred to by the same variable names
in all DFdiscover studies. They are:
DFSTATUS (data record status: final, incomplete, etc.),
DFVALID (data record validation level: 1-7),
DFRASTER (the name of the
file holding the fax image of the CRF page corresponding to the data record),
DFSTUDY (the DFdiscover study number),
DFPLATE (the data record plate number),
DFSEQ (the data record sequence or visit number),
DFSCREEN (data record status
without consideration for primary/secondary),
DFCREATE (the record creation date and time) and
DFMODIFY (the record's last modification date and time).
Note that DFSEQ is assigned
only if the sequence/visit number is in the barcode; otherwise the name is
user-defined. A detailed description of these 6 fields can be found in
plt###.dat field descriptions.
In addition to named references to database variables, the edit check language allows access to data via positional notation. We may want to reference the variable we're presently on, without knowing its name. Similarly, we may want to reference the previous variable or the next variable in a record. This is accomplished with the @[expression], @[id,visit,plate,field], @T, @(T-expression), and @(T+expression) constructs.
Except for @[id,visit,plate,field] these positional variables may only reference data on the current record.
The @[expression] form refers to the field number represented by expression. For example, if expression evaluates to 7, then it would refer to the ID field (always the 7th field on a plate). To refer to the current field, the expression @[.] can be used. @[.+1] would indicate the next field on the plate.
A second, older construct also exists which does the same job. This is the @T construct (current field), @(T+1) which refers to the next field, and @(T-1) which refers to the previous field.
| Important |
|---|---|
|
Note that @(T-1) means the previous field, while (@T-1) means one less than the current field. Watch those brackets! |
The @[id,visit,plate,field] form can be used to refer to any field on any record in the study database, by it's numeric keys. Those keys which will always be the same as the plate on which the edit check is triggered can be omitted. For example, @[,,55,10] refers to field 10 on plate 55 of the same visit for the same subject, and @[,,,10] is equivalent to @[10], both referring to field 10 on the current plate. While this form can be used to read and test the value of any field in the study database it cannot be used to change the value of fields on other records in the database. The edit check language does not allow changes to be made to records other than the one on which the edit check is triggered.
The use of positional variables is both convenient and necessary when writing reusable generic edit checks. However they depend on field positions remaining constant. Problems can arise if a plate is modified by adding, deleting or renumbering fields. Thus edit checks must be reviewed as part of any such modifications.
Local variables are temporary storage locations that can be used to hold intermediate results of calculations. Local variables are only valid inside the edit check or function in which they are defined. They do not retain their values across invocations of that edit check or function.
Local variables are declared at the beginning of the edit check or function where they will be used. The declaration includes the data type of the variable and it's name. It must precede any other statements inside that function or edit check. Local variables are automatically initialized to a blank value.
Example 5.2. Local variable declaration
edit testdecl()
{
        number average;
        average = (bp1 + bp2) / 2;
}
In this simple edit check, the average of two variables is
calculated and stored in the local variable average.
Since this variable is local to this edit check, its value is no longer
available as soon as the edit check completes.
Global variables are storage locations just like local variables but differ in that they maintain their values across edit checks. Global variables are initialized when the edit checks file is first loaded and maintain their values until an edit check changes it. That new value is then used in any subsequent references until it is changed again.
| Important |
|---|---|
It is important to remember that edit checks can be executed in an arbitrary order as the user traverses fields. It is therefore important to consider where the values in global variables really came from when executing in interactive tools such as DFexplore. |
Global variables are declared in the same way that local variables are, except that they are declared outside of edit checks.
Example 5.3. Global variable declaration
number pages_traversed = 0;
edit another_page()
{
        pages_traversed = pages_traversed+1;
        dfmessage("Page ", pages_traversed, " PID=",
                PID, " Plate=", DFPLATE, " Visit=", DFSEQ);
}
If this edit check is attached as a plate exit check, it will count how many pages were traversed by a user in the course of a session and record the subject, plate and visit numbers in the edit checks log file.
There are often cases where it is useful to group variables that are
related to each other.
The group declaration can be used to build one-dimensional arrays of
variables.
The group declaration syntax is as follows:
Once a group has been defined it is referenced by
groupname[index].
Example 5.4. Compute the total dose from the individual dosages
edit compute_dose()
{
        number total=0, i=1, blank=0;
        group dgrp dosage1, dosage2, dosage3, dosage4, dosage5;
        while (i<=5) {
                if (dfblank(dgrp[i])) blank = blank+1;
                else total = total + dgrp[i];
                i = i+1;
        }
}
The individual dosages are in the database variables
dosage1 through dosage5.
The group variable dgrp allows the individual dosages
to be referenced through an index.
Group variables can be used anywhere other variables can be used but must be declared after any local variables in that edit check or function have been declared and before the first statement of the edit check's body.
| Missing group variables |
|---|---|
|
If a variable is missing from a group, the missing variable is treated as a missing value. If a variable defined in a group is on a plate that is missing from the database, the variable will also evaluate to a missing value. |
Each date variable in a DFdiscover study setup has a date format associated with it. This date format is used to determine which part of the date string contains the year, month and day portions of a date.
Internally, the edit check language uses julian dates and converts them
to printable representations as required.
Dates that are stored back into the database are stored using the date
format associated with that variable.
Dates displayed in messages are output using the default date format,
YY/MM/DD,
which can be overridden via the date format
instruction at the beginning of a DFedits file.
Example 5.5. Set the default date output format
to MM/DD/YY
date format "MM/DD/YY"
This statement must be added to the DFedits file.
| Date Format |
|---|---|
|
All date constants used throughout the |
Example 5.6. Incrementing a date value
date format "yy/mm/dd"
edit main()
{
        date d;
        d = "90/04/07";
        d = d + 14;
}
This example assigns the julian date for April 7th, 1990 to the local
variable d, and then add two weeks (14 days) to this date.
The two assignment lines cannot be combined into one line because the
conversion of the string to a julian date must be completed before
the subsequent addition of 14 to this value.
Combining them into one line would indicate that the string
"90/04/07" and the number 14 were to be added which is
clearly meaningless.
The DFdiscover edit check language allows the use of missing values in data fields.
Data may be unavailable for one of four reasons:
the data field has been left blank,
the data field contains a missing value code
the CRF page has not yet arrived and thus the data record does not exist in the database, or
the CRF page exists as a missed record.
The edit check language provides five functions for dealing with missing values:
dfblank,dfmissing,dfmissval,dfmisscode, anddfmissingrecord.
In addition, two functions exist that return information about missed data:
dflostcodedflosttext
Table 5.1. Return values for dfblank, dfmissing, dfmissval,
dfmisscode, and dfmissingrecord
dfblank | dfmissing | dfmissval | dfmisscode | dfmissingrecord | |
|---|---|---|---|---|---|
| Data Record does not exist | FALSE | TRUE | "" | "" | 2 |
| Data Record is a missed record | FALSE | TRUE | "" | "" | 1 |
| Field = missing value code | FALSE | TRUE | missing value label | missing value code | 0 |
| Field = blank | TRUE | TRUE | "" | "" | 0 |
| Field = value | FALSE | FALSE | "" | "" | 0 |
The dfblank function is used to determine if a data record exists
and the field is blank.
Table 5.2. dfblank usage
| Syntax: | dfblank(var) |
| Input Parameters: | var is any variable |
| Return Value: | TRUE if variable is blank.
A blank string/number/date is one containing no characters or digits,
not even a space.
Also TRUE for check and choice fields having a code for
"no choice".
FALSE in all other cases. |
| Example: |
if (dfblank(DOB)) dfmessage("DOB is missing");
|
| Notes: | The record containing var must exist for dfblank
to return TRUE.
Previous to 3.8, it was necessary to use, as a work-around, the construct if ( @T == 99 )... for check fields that coded "not checked" using a code other than 0, (e.g. 99 in this example). This work-around is no longer correct or supported. For check and choice fields any test for the code used for no choice, or unchecked, will always fail (i.e. evaluate to FALSE). The correct way to test for this condition is by using, if ( dfblank( @T ) )...
|
The dfmissing function is used to determine if a variable is missing,
either because the data record containing it does not exist, the data record
containing it is missed, the value is
blank, or the field contains a missing value code.
Table 5.3. dfmissing usage
| Syntax: | dfmissing(var) |
| Input Parameters: | var is any variable |
| Return Value: | TRUE if variable is missing. TRUE if variable references keys belonging to a missed record. TRUE if the variable type is date, and the value is a nonsensical date. FALSE in all other cases. |
| Example: |
if (dfmissing(DOB))
    dfmessage("DOB is missing");

# returns TRUE if keys match an entry identified as missed
if (dfmissing(DFSTUDY[,0,1]))
    dfmessage("Plate 1, visit 0 is a missed record");
|
| Notes: |
Testing for a missing record can also be performed with the
|
The dfmissval function returns the missing value label equivalent to the
variable's value.
Table 5.4. dfmissval usage
| Syntax: | dfmissval(var) |
| Input Parameters: | var is any variable |
| Return Value: |
The missing value label equivalent to the variable's value.
A Blank string in all other cases. |
| Example: |
label = dfmissval(DOB); |
The dfmisscode function returns the missing value code equivalent to the
variable's value.
Table 5.5. dfmisscode usage
| Syntax: | dfmisscode(var) |
| Input Parameters: | var is any variable |
| Return Value: |
The missing value code equivalent to the variable's value.
A blank string in all other cases. |
| Example: |
code = dfmisscode(DOB); |
The dfmissingrecord function returns information about a missing record.
Table 5.6. dfmissingrecord usage
| Syntax: | dfmissingrecord(id, visit, plate) |
| Input Parameters: | id is the subject ID of the missing record
visit is the visit number of the missing record plate is the plate number of the missing record |
| Return Value: |
Information about a missing record for the specified keys. Return values
are as follows:
|
| Example: |
if( dfmissingrecord(99001,0,1) == 1 )
    dfmessage( "Plate 1 at visit 0 is missed for this subject." );
|
dflostcode returns information about a missed record entered in DFexplore,
specifically the actual reason code assigned to the missed record.
Table 5.7. dflostcode usage
| Syntax: | dflostcode(id, visit, plate) |
| Input Parameters: | id is the subject ID belonging to the missed record
visit is the visit number belonging to the missed record plate is the plate number belonging to the missed record |
| Return Value: | The numeric reason code that has been assigned to the missed record having the specified keys. |
| Example: |
code = dflostcode(99001,0,1); |
dflosttext returns the actual text reason assigned to a missed record in
DFexplore.
Table 5.8. dflosttext usage
| Syntax: | dflosttext(id, visit, plate) |
| Input Parameters: | id is the subject ID belonging to the missed record
visit is the visit number belonging to the missed record plate is the plate number belonging to the missed record |
| Return Value: | The reason text (explanation) that has been assigned to the missed record having the specified keys. |
| Example: |
dfmessage( "The missed reason is ", dflosttext(99001,0,1) ); |
The edit check language supports two functions that can be used to identify
data records that do not exist in the database - dfmissing and
dfmissingrecord.
Using dfmissing requires testing for the existence of any one of the required fields on the data
record of interest.
For example, we could determine whether plate 1 at visit 0 is missing for the
current subject by testing to see if the DFdiscover study number is blank for
this record using dfmissing.
Example 5.7. Testing for a missing record with dfmissing
if( dfmissing( DFSTUDY[,0,1] )
    dferror("Plate 1 at Visit 0 is missing");
DFSTUDY is the name for the DFdiscover study number field
that is present on all plates in the database.
This field can never be left blank or contain a missing value code because
it is maintained by the system and users cannot edit it.
Thus the above test will only return true when the data record is missing or
if the specified keys match an entry marked as missed.
dfmissingrecord removes the need for the 'trick' of testing for a missing
record by
evaluating the value of a known, fixed variable. dfmissingrecord takes as
arguments the subject ID, visit and plate keys of the data record of interest
and returns the following:
0if the data record is in the database1if a missed record matching the keys is in the database2if there is no record in the database matching the keys
Example 5.8. Testing for a missing record with dfmissingrecord
if( dfmissingrecord(,0,1) == 2 )
    dfmessage( "Plate 1 visit 0 is not in the database" );
Example 5.9. Calculate the subject's age provided both birth date
(bdate) and the study entry date (edate)
are available.
if( !dfmissing( bdate ) && !dfmissing( edate ) )
    age = ( edate - bdate ) / 365.25;
Example 5.10. Complain if the subject was hospitalized (hospital has the value 2) but the hospitalization date has been left blank
if( hospital==2 && dfblank(hospdate) )
    dferror("Hospitalization date is required.");
Example 5.11. Check for a specific missing value label
if(dfmissval(hosp)=="not hospitalized" && !dfmissing(hospdate))
    dferror("Reason for hospitalization has missing value
    code = \"not hospitalized\", but a hospitalization date
    has been entered");
This example shows an edit check that might be placed on a field used
to record hospitalization date.
It checks the reason for hospitalization field (hosp) for
the existence of the missing value reason "not hospitalized" and if it
finds this reason pops up an error message.
Example 5.12. Check for a specific missing value code
If "N" was the missing value code for the above missing value reason,
the same edit check could be written using dfmisscode.
if(dfmisscode(hosp)=="N" && !dfmissing(hospdate))
    dferror("Reason for hospitalization has missing value " +
    "code = \"not hospitalized\", but a hospitalization " +
    "date has been entered");
This section summarizes the operators available and their results. In these tables a blank box indicates that the operation is not permitted and an error message will be produced.
The order of operations (highest to lowest precedence) is as follows:
unary minus
exponentiation
multiplication, division, modulus
addition, subtraction
You can override the default order of operations by using the
grouping operators, ( and ).
Expressions within parentheses are always evaluated first, and nested
parenthetical expressions are always evaluated from the lowest nesting point
to the highest.
For example,
2 + 3 * 5
evaluates to 17, because normal precedence evaluates the
* before the +, whereas
( 2 + 3 ) * 5
evaluates to 25, and
( ( 2 + 3 ) * 5 - 2 ) * 2
evaluates to 46.
In this latter case, ( 2 + 3 ) is evaluated first (5),
followed by ( 2 + 3 ) * 5 (25), and then
( ( 2 + 3 ) * 5 - 2 ) (23), and finally
( ( 2 + 3 ) * 5 - 2 ) * 2.
The addition operator, +, adds two operands and returns
the result as summarized by this table.
A missing variable may be a blank field, a missing value code or a
missing data record.
Returned missing values evaluate TRUE with dfblank and dfmissing
Table 5.9. Result table for Addition operator
| Missing | Number | Choice | Check | String | Date | Time | VAS | |
|---|---|---|---|---|---|---|---|---|
| Missing | Missing | Missing | Missing | Missing | String [a] | Missing | Missing | Missing |
| Number | Missing | Number | Number | Number | Date [b] | Time [c] | Number | |
| Choice | Missing | Number | Number | Number | Date | Time | Number | |
| Check | Missing | Number | Number | Number | Date | Time | Number | |
| String | String | String [d] | ||||||
| Date | Missing | Date | Date | Date | Date | |||
| Time | Missing | Time | Time | Time | Time | |||
| VAS | Missing | Number | Number | Number | Date | Time | Number | |
[a] Unlike other data types, string concatenation makes a distinction between blank fields which are concatenated as an empty string, and fields that contain missing value codes or where the data record is missing, which abort the concatenation and return a null string. [b]
Date/Number addition returns the date [c]
Time/Number addition returns the time [d] String/String addition returns the concatenated string, unless one of the strings is missing, in which case the result for Missing/String applies. | ||||||||
The subtraction operator, -,
subtracts two operands and returns the result as summarized by the
table.
A missing variable may be a blank field, a missing value code or a
missing data record.
Returned missing values evaluate TRUE with dfblank and dfmissing.
Table 5.10. Result table for Subtraction operator
| Missing | Number | Choice | Check | String | Date | Time | VAS | |
|---|---|---|---|---|---|---|---|---|
| Missing | Missing | Missing | Missing | Missing | Missing | Missing | Missing | |
| Number | Missing | Number | Number | Number | Date [a] | Time [b] | Number | |
| Choice | Missing | Number | Number | Number | Date | Time | Number | |
| Check | Missing | Number | Number | Number | Date | Time | Number | |
| String | String | |||||||
| Date | Missing | Date [a] | Date | Date | Number [c] | Date | ||
| Time | Missing | Time [d] | Time | Time | Number [e] | Time | ||
| VAS | Missing | Number | Number | Number | Date | Time | Number | |
[a] Subtracting a number from a date returns the date
[b] Subtracting a number from a time returns the time
[c] Date/Date subtraction returns the number of days between the dates. [d] Subtracting a number from a time returns the time
[e] Time/Time subtraction returns the number of seconds between the times. | ||||||||
The multiplication, *, division, /,
and modulus, %, operators return the results as
summarized by the table.
A missing variable may be a blank field, a missing value code or a
missing data record.
Returned missing values evaluate TRUE with dfblank and dfmissing.
Table 5.11. Result table for Multiplication/Division/Modulus operators
| Missing | Number | Choice | Check | String | Date | Time | VAS | |
|---|---|---|---|---|---|---|---|---|
| Missing | Missing | Missing | Missing | Missing | Missing | |||
| Number | Missing | Number[a] | Number | Number | Time | Number | ||
| Choice | Missing | Number | Number | Number | Time | Number | ||
| Check | Missing | Number | Number | Number | Time | Number | ||
| String | ||||||||
| Date | ||||||||
| Time | Time | Time | Time | Time | ||||
| VAS | Missing | Number | Number | Number | Time | Number | ||
[a] For division in which both operands are integers (no decimal or decimal places), the returned value will be truncated to an integer, e.g., 100/60 will return 1. To obtain a floating point result at least one of the operands must be a floating-point number, e.g., 100/60.0 returns 1.666667. Local and database fields may be cast to a floating-point number before the operation is performed by adding 0.0. For example, if A and B are 2 numeric fields which contain the integers 100 and 60 respectively, any of the following expressions: (A+0.0)/B, A/(B+0.0), (A+0.0)/(B+0.0) will return 1.666667. Division or modulus by zero results in an error message. | ||||||||
The exponentiation operator, ^, raises a number (the base)
to the power of an exponent, and is written as:
base^exponent
where both the base and the
exponent are numbers (integer, fixed point, or
floating point).
For example,
4 ^ 3 = 4 * 4 * 4 = 64
4 ^ 0.5 = sqrt( 4 ) = 2
The result of raising any number (including 0) to the exponent 0 (or 0.0) is 1. The result of raising 0 (or 0.0) to any positive exponent is 0. The result of raising 0 (or 0.0) to any negative exponent is illegal. The base can be negative only if the exponent is an integer value; that is, it is illegal to raise a negative number to a fractional exponent. In such a case, and in any case where the calculation is illegal, the returned result is a blank/empty string.
Results of exponentiation are summarized in the table.
A missing variable may be a blank field, a missing value code or a
missing data record.
Returned blank/empty values evaluate TRUE with dfblank and dfmissing.
Table 5.12. Result table for Exponentiation
| Missing[a] | Number | Choice | Check | String | Date | Time | VAS | |
|---|---|---|---|---|---|---|---|---|
| Missing | Missing | Missing | Missing | Missing | Missing | |||
| Number | Missing | Number | Number | Number | Number | |||
| Choice | Missing | Number | Number | Number | Number | |||
| Check | Missing | Number | Number | Number | Number | |||
| String | ||||||||
| Date | ||||||||
| Time | ||||||||
| VAS | Missing | Number | Number | Number | Number | |||
[a] The rows or the columns may be the base or the exponent - the table results are symmetric. | ||||||||
Example 5.13. Calculation of Body Surface Area
The calculation of an individual's body surface area in meters square, given their weight in kilograms and height in centimeters, is:
((kg)^0.425 x (cm)^0.725 x 71.84) / 10,000
An average adult has a body surface area of 1.73 meters square.
| Note |
|---|---|
With a sufficiently large base and exponent, the calculated values may be extremely large. Performing large number computations on systems that are capable of accurately handling only numbers of 32 or 64 bits, means that the math libraries internal to the computer's operating system must use algorithms and compromises to handle such large numbers. As a result, with sufficiently large base and exponents, the calculated values may not be reliable. It is unlikely however, that these types of numbers will be used in edit checks. The same also holds true for calculations performed using very small fractional numbers. |
The assignment operator, =, is used to store a
value in a database or local variable.
The assignment operator will cast (i.e. change) values from one type to another,
and follows these rules:
-
The assignment of a date to a string type causes the string to contain the date value formatted according to the edit check date format, which is
YY/MM/DDunless otherwise defined by thedate formatstatement in theDFeditsfile. -
The assignment of a string to a local date variable causes the string to be converted to a date using the default date format. If the resulting date is stored in the database it is stored according to the date format associated with the database field.
The assignment of a string to a local time variable causes the string to be converted to a time. If the resulting time is stored in the database it is stored according to the time format associated with the database field.
The assignment of a time to a string type causes the string to contain the time value formatted hh:mm:ss
When assigning numeric values to data fields the whole number part of the value is honored, but decimal places may be truncated to the number of decimal places provided by the format. For example, assigning the value
95.1234to a numeric field with a format of nn.n would store the value as95.1, and if the format was nn the stored value would be95.If the assigned value is too large to fit in the specified data field the result in DFexplore is a blank field, and a dialog appears describing the problem. The dialog identifies the field and the value that could not be assigned. In DFbatch the field is left unchanged and an error message is written to the log. For example, this would occur on attempting to assign the value
1000to a numeric field with a format of nn, nnn, nn.nn, etc., or to an unformatted field with a store length less than 4.Missing values are stored in database fields according to their missing value codes. Legal missing value codes are defined in
DFmissing_map. IfDFmissing_maphas not been defined the default DFdiscover missing value code is an*. It is legal to assign a missing value code to any field, regardless of type, e.g. bdate ="*".A database field of any type can be blanked by assigning it a blank string, e.g. bdate="".
Attempting to assign a value to DFdiscover protected fields (e.g. fields 1 to the end of the barcode and the last 3 record status fields), results in the edit check being aborted with an error message.
Attempting to store a
|character in a database field causes the character to be converted to a space.Attempting to store an illegal value in a database check or choice field (i.e. a value which does not correspond to any of the defined boxes on the CRF) results in assignment of the no choice code to the database field.
It is possible to store values into a data field on the current data record by assigning the value to the variable name of the desired field. For example, if the current record has three variables named
dispensed,returnedandcomplianceto track how compliant a subject is at taking their medication, the following example would calculate compliance and store it in thecompliancevariable of the current record:compliance = 100 * ( dispensed - returned ) / dispensed;
The edit check language provides the standard set of comparison operators:
less than,
<less than or equal,
<=equal,
==greater or equal,
>=greater than,
>, andnot equal,
!=
Be careful to differentiate between the assignment, =,
and the equality, ==, operators.
Example 5.14. Probable erroneous use of the = operator
number i=5,j=6;
if (i = j) {
        dferror("i equals j");
} else {
        dferror("i is not equal to j");
}
Erroneous use of =
results in i being assigned the value of
j and then being checked for a non-zero value,
which is probably not what was intended.
The correct syntax for checking the equality of i and
j is to use the equality,
==, operator.
String comparisons are done on a character-by-character basis using the ASCII sort order. This means that all uppercase letters come before all lowercase letters.
Date comparisons are done by julian date, regardless of the date format associated with the date.
Comparing two missing values returns TRUE for <=,
==, and >= and FALSE for all others.
Comparing a missing value with any other value returns FALSE except for the
!= operator.
When performing a simple comparison, (e.g.
if( @[15]==@[16] ) ), the edit check language does not
distinguish between different missing value codes or between blank fields
and fields containing missing value codes.
Thus a simple comparison of 2 fields will return TRUE when one field is
blank and the other contains a missing value code, or when the 2 fields
contain different missing value codes.
If such distinctions are important the dfblank and dfmisscode functions
should be used.
The edit check language represents FALSE as zero and TRUE as any non-zero number. Do not count on TRUE being any specific non-zero value (such as one).
The DFdiscover edit check language also provides the logical operators
&& (AND), || (OR), and
! (NOT).
Each of these operators will cast their operands to TRUE/FALSE values
as required based on the following rules:
Table 5.13. Casting rules for logical operators
| Input Type | TRUE | FALSE |
|---|---|---|
| Numeric/Date | non-zero | zero |
| String | non-zero length | zero-length |
| Missing/Blank | never | always |
The && (AND) operator returns TRUE only if
both operands are TRUE.
Otherwise it returns FALSE.
The || (OR) operator returns TRUE if at least one
of the two operands is TRUE.
If both operands are FALSE, it returns FALSE.
The ! (NOT) operator takes one operand and returns
TRUE if the operand is FALSE
and FALSE if the operand is TRUE.
| Note |
|---|---|
Prior to DFdiscover 2022 version 5.5, the |
The if statement provides a conditional execution
mechanism.
The two basic if constructs are:
if (condition) statement_1
if (condition) statement_1 else statement_2
statement in the above examples can be a single
statement or a group of statements enclosed in a pair of { and
}.
condition is an expression that evaluates to TRUE or FALSE.
If the condition evaluates to TRUE then statement_1
is executed, otherwise statement_2 is executed.
if statements can be nested and the most deeply
nested else clause always goes with the most deeply
nested if clause.
These two examples are identical:
if (age < 50)
    if (sex == 1)
        dferror("<50 year old male");
    else
        if (sex == 2)
            dferror("<50 year old female");
        else
            dferror("<50 year old, no sex info");
and
if (age < 50)
if (sex == 1)
    dferror("<50 year old male");
else
if (sex == 2)
    dferror("<50 year old female");
else
    dferror("<50 year old, no sex info");
The only differences are cosmetic.
The addition of braces makes the code even easier to read and understand without changing the meaning:
if (age < 50){
    if (sex == 1){
        dferror("<50 year old male");
    } else {
        if (sex == 2){
            dferror("<50 year old female");
        } else {
            dferror("<50 year old, no sex info");
        }
    }
}
Indentation, while useful for visually indicating logic flow to the programmer, does not influence program execution. When writing edit checks, use indentation to show the logic flow. It will make maintaining the checks much easier. The addition of braces around blocks of code also helps, and makes your intentions clear to the language compiler and any subsequent reader(s).
The edit checks language includes a robust set of built-in functions for use in any edit check.
Generally speaking, the built-in functions behave identically across DFexplore, DFcollect and DFweb. However there are some differences dictated by the purpose of, and features available in, each application. The following table details where those differences are.
Table 5.14. Edit check Function Implementation
| Function | Implemented in | Notes | ||
|---|---|---|---|---|
| DFexplore | DFcollect | DFweb | ||
DFopen_study and DFopen_patient_binder | ✓ | ✓ | ✓ | |
dfaccess | ✓ | ✓ | ✓ | |
dfaccessinfo | ✓ | ✓ | ✓ | |
dfaddqc | ✓ | ✓ | ✓ | |
dfaddmpqc | ✓ | |||
dfaddreason | ✓ | ✓ | ✓ | |
dfalias2id | ✓ | ✓ | ✓ | |
dfanympqc | ✓ | |||
dfanyqc | ✓ | ✓ | ✓ | |
dfanyqc2 | ✓ | ✓ | ✓ | |
dfanyreason | ✓ | ✓ | ✓ | |
dfask | ✓ | ✓ | ✓ | |
dfautoreason | ✓ | ✓ | ✓ | |
dfbatch | ✓ | ✓ | ✓ | |
dfcapture | ✓ | ✓ | ✓ | |
dfcenter | ✓ | ✓ | ✓ | |
dfclosestudy | ✓ | ✓ | ✓ | |
dfdate2str | ✓ | ✓ | ✓ | |
dfday | ✓ | ✓ | ✓ | |
dfdelmpqc | ✓ | |||
dfdirection | ✓ | ✓ | ✓ | In DFcollect, the return value is always 0. |
dfeditqc | ✓ | ✓ | ✓ | In DFweb, there is no confirmation dialog if the query status is changed to delete. |
dfentrypoint | ✓ | ✓ | ✓ | |
dfexecute | ✓ | ✓ | ✓ | In DFcollect, dfexecute does nothing if called while offline. |
dfgetfield | ✓ | ✓ | ✓ | |
dfgetlevel/dflevel | ✓ | ✓ | ✓ | In DFweb, the return value is always 1. |
dfgetseq | ✓ | ✓ | ✓ | |
dfhelp | ✓ | ✓ | ✓ | In DFweb, there is no visible effect of dfhelp until the user clicks the field help icon. |
dfid2alias | ✓ | ✓ | ✓ | |
dfillegal | ✓ | ✓ | ✓ | |
dfimageinfo | ✓ | ✓ | ✓ | |
dflegal | ✓ | ✓ | ✓ | There is no concept of missing plates in DFweb and DFcollect. Hence a dflegal test of fields on missing plates always returns FALSE. This is opposite from DFexplore which returns TRUE for dflegal test references to fields on missing plates. |
dflength | ✓ | ✓ | ✓ | |
dflogout | ✓ | ✓ | ✓ | After logout and re-login, DFcollect returns the user to the site list - it does not resume where the user was before logout. |
dflookup | ✓ | ✓ | ✓ | |
dflostcode | ✓ | |||
dflosttext | ✓ | |||
dfmail | ✓ | ✓ | ✓ | In DFcollect, dfmail does nothing if called while offline. |
dfmatch | ✓ | ✓ | ✓ | |
dfmessage/dfdisplay/dferror/dfwarning | ✓ | ✓ | ✓ | In DFweb and DFcollect, the message area is static and does not accept user input. |
dfmetastatus | ✓ | ✓ | ✓ | |
dfmissing | ✓ | ✓ | ✓ | There is no concept of missing plates in DFweb and DFcollect. |
dfmissingrecord | ✓ | ✓ | ✓ | There is no concept of missing plates in DFweb and DFcollect. In DFexplore, a missed record will return 1, and in DFweb and DFcollect, it will return 2. |
dfmode | ✓ | ✓ | ✓ | |
dfmonth | ✓ | ✓ | ✓ | |
dfmoveto | ✓ | ✓ | ✓ | DFweb stops infinite loops after 20 iterations. DFcollect only works on plate enter. When dfmoveto(DFSCREEN) is used on plate enter in DFcollect, the cursor moves to the last field. |
dfneed | ✓ | ✓ | ✓ | |
dfpageinfo | ✓ | ✓ | ✓ | |
dfpassword | ✓ | ✓ | ✓ | DFcollect does not remember the previously entered Username. In DFcollect the user must always enter both the Username and Password. |
dfpasswdx | ✓ | ✓ | ✓ | DFcollect does not remember the previously entered Username. In DFcollect the user must always enter both the Username and Password. |
dfplateinfo
| ✓ | ✓ | ✓ | |
dfpref | ✓ | ‐ | ‐ | In DFweb only UseSubjectAlias, SaveLevel, and WorkingMode are supported. In DFcollect only SaveLevel, WorkingMode, and AutoLogout are supported. In addition, WorkingMode doesn't support DDE in DFweb or DFcollect. |
dfprefinfo | ✓ | ‐ | ‐ | In DFweb only UseSubjectAlias, SaveLevel, and WorkingMode can be queried. In DFcollect, AutoLogout timer can be queried, returning a numeric value, as well as SaveLevel, and WorkingMode; otherwise an empty string is returned. |
dfprotocol | ✓ | ✓ | ✓ | |
dfqcinfo | ✓ | ✓ | ✓ | |
dfqcinfo2 | ✓ | ✓ | ✓ | |
dfreasoninfo | ✓ | ✓ | ✓ | |
dfreplyqc | ✓ | ✓ | ✓ | |
dfresqc/dfunresqc | ✓ | ✓ | ✓ | |
dfrole | ✓ | ✓ | ✓ | |
dfsiteinfo | ✓ | ✓ | ✓ | |
sqrt | ✓ | ✓ | ✓ | |
dfstay | ✓ | ✓ | ✓ | |
dfstr2date | ✓ | ✓ | ✓ | |
dfstudyinfo | ✓ | ✓ | ✓ | |
dfsubstr | ✓ | ✓ | ✓ | |
dftask | ✓ | ✓ | ✓ | |
dftime | ✓ | ✓ | ✓ | |
dftoday | ✓ | ✓ | ✓ | |
dftool | ✓ | ✓ | ✓ | Respective arguments to test for are: "DFexplore", "DFcollect" and "DFweb". |
dftrigger | ✓ | ✓ | ✓ | |
dfuserinfo | ✓ | ✓ | ✓ | |
dfvarinfo | ✓ | ✓ | ✓ | |
dfvarname | ✓ | ✓ | ✓ | |
dfview | ✓ | ✓ | ✓ | |
dfvisitinfo | ✓ | ✓ | ✓ | |
dfwhoami | ✓ | ✓ | ✓ | |
dfyear | ✓ | ✓ | ✓ | |
int | ✓ | ✓ | ✓ | |
Function dfaccess can be used
to change the user's access to data fields on the the current data entry screen
in Data View. This is its only purpose. Changes made by dfaccess do not persist after
leaving the current data screen and cannot be used to prevent users from seeing
or printing data values in List View. For this purpose define Hidden Fields in
DFsetup and specify whether users are allowed to see them when defining study roles
in DFadmin.
When dfaccess sets a field to 'VIEWONLY', 'MASKED' or 'IMMUTABLE' users can not
change the field manually, but an edit check can still change the field;
thus some automated change may still occur or users might be prompted using
dfask or dfcapture to consent or provide input for some change that
is controlled by an edit check.
When a field is set to 'VIEWONLY', users are not prevented from adding or modifying metadata on that field. This remains subject to the metadata permissions defined in the user's study role.
When a field is set to 'MASKED', users cannot view or change the metadata. But the user can tell whether the field has metadata attached by observing the color of the masked field.
Table 5.15. dfaccess usage
| Syntax: | dfaccess(variable, mode) |
| Input Parameters: | variable is a field on the current page.
mode is one of:
|
| Return Value: | None |
| Example: |
dfaccess(@T, DFACCESS_VIEWONLY); # Set current field to viewonly |
| Example: |
# Use: make all data fields view only for users with specified roles
# Run: on plate entry
# e.g. VIEWONLY("monitors,statisticians") - applies to only 2 roles
# e.g. VIEWONLY("ALL") - prevent all users from changing data fields
# note -assumes role names are single words
edit VIEWONLY(string roles)
{
   number fn=6;
   number max1=dfvarinfo(DFSCREEN,DFVAR_FLDNUM);
   number max=max1-1;
   string role=dfrole();
   if( roles=="ALL" || dfmatch(role,roles,"W") ) {
     while( fn <= max ) {
       dfaccess(@[fn],DFACCESS_VIEWONLY);
       fn=fn+1;
     }
   }
}
|
| Notes: |
dfaccess can be used to prevent users from changing fields manually but
it does not prevent fields from being changed by edit checks.
When a field is masked or hidden any queries or reasons are also hidden from view.
For two kinds of special fields, DFCREATE and DFMODIFY,
|
dfaccessinfo takes one argument, the name of a field on the current page and
returns the current access mode for the requested field.
The return mode also depends on 'Show Hidden Fields' role permission.
In DFbatch only, dfaccessinfo will always return 'Normal'.
Table 5.16. dfaccessinfo usage
| Syntax: | dfaccessinfo(variable) |
| Input Parameters: | variable is a field on the current page. |
| Return Value: | Returns one of the following modes:
|
| Example: |
dfmessage(dfaccessinfo(@T)); # Print the access mode of the current field |
| Notes: |
This is a brief summary of dfaccessinfo:
In DFexplore:
In DFbatch, |
As implemented, dfaccessinfo is a synonym for
dfvarinfo(var,DFVAR_ACCESS) |
This function returns the numeric ID of the argument string subject alias.
Table 5.17. dfalias2id usage
| Syntax: | dfalias2id(alias) |
| Input Parameters: | alias is a string subject alias |
| Return Value: |
dfalias2id returns a number that is the ID for the requested subject
alias.
If the alias is not known and cannot be found, 0 is returned.
|
| Example: |
string alias; number id; id = dfalias2id( alias ); dfmessage( "This is subject ID ", id ); |
The dfask function is used to pose to the user a question with two
possible answers and wait for the user to respond by choosing one of the
answers.
dfask returns 1 or 2 depending on which response is selected by the user.
Table 5.18. dfask usage
| Syntax: | dfask(query, default-option, option1, option2) |
| Input Parameters: | query is the question to be asked (string)
default-option is the default response (1 or 2) option1 is the label to appear on button 1 (string, typically
option2 is the label to appear on button 2 (string, typically
|
| Return Value: | 1 if button 1 is selected
2 if button 2 is selected |
| Example: |
if (dfask("Add Query?", 1, "Yes", "No") == 1)
|
| Notes: |
If dfask is executed in batch, there is no opportunity for the
question dialog to appear and so default-option
is always returned.
|
The dfbatch function returns TRUE/FALSE depending on whether
the edit check is executing in batch mode or not.
Table 5.19. dfbatch usage
| Syntax: | dfbatch() |
| Input Parameters: | None |
| Return Value: | TRUE if edit check is executing in batch, FALSE otherwise |
| Example: |
if (dfbatch())
    dfmessage("See this when in batch");
else
    dfmessage("See this when not in batch");
|
| Notes: |
Executing dfbatch in DFexplore always returns FALSE.
|
The dfcapture function is used to display a dialog for user input.
Table 5.20. dfcapture usage
| Syntax: | dfcapture(instructions,fieldlist,defaultvalues) |
| Input Parameters: | Your instructions will appear at the top of the dfcapture dialog.
They can be in plain text with '\n' used for line breaks, or in html.
The field list is a '|' delimited string comprised of field name and field length pairs. The default values are a '|' delimited string of initial field values or an empty string if there are no initial values. |
| Return Value: | The return value depends on whether the user presses
or in the dfcapture dialog.
If the user presses If the user presses |
| Example 1: |
Here's a very simple example.
string m="Please enter your name and address in the fields below."; string f="Name|50|Street|50|City|30|State|2|Zip|10"; string v=dfcapture(m,f,""); |
| Example 2: |
Here's a more complicated example.
string mycapture(string a)
{
  string msg= "<HTML><HEAD><STYLE>\n"
          + ".g {background-color: #999; color: #fff; padding: 2px; text-align: right;}\n"
          + ".h {background-color: #fff; padding: 2px; text-align: right;}\n"
          + "</STYLE></HEAD>\n"
          + "<BODY><DIV>\n"
          + "<P>CHECK FOR DUPLICATES</P>\n"
          + "<P>Enter the following values:</P>\n"
          + "<TABLE BORDER=0 MARGIN=0>"
          + "<TR><TD CLASS=g>First Name:</TD><TD CLASS=h>Participant's first name</TD></TR>"
          + "<TR><TD CLASS=g>Last Name:</TD><TD CLASS=h>omit titles: Sr., Jr, II, etc.</TD></TR>"
          + "<TR><TD CLASS=g>Birth Month:</TD><TD CLASS=h>1-12</TD></TR>"
          + "<TR><TD CLASS=g>Birth Year:</TD><TD CLASS=h>yyyy, e.g. 1950</TD></TR>"
          + "</TABLE>\n"
          + "<P>DFdiscover will check for a match in the database.\n"
          + "If one is found you will be asked for confirmation.\n\n"
          + "If name or birth date is missing select cancel to enter\n"
          + "this subject without checking for duplicates.</P>\n"
          + "</DIV></BODY></HTML>\n";
  string x="First Name|30|Last Name|30|Birth Month|2|Birth Year|4";
  string s;
  s=dfcapture(msg,x,a);
  return(s);
}
|
| Notes: | dfcapture has the following restrictions:
If the |
This function returns the study site number for a specified subject ID.
Table 5.21. dfcenter usage
| Syntax: | dfcenter(ID) |
| Input Parameters: | ID, subject ID key field identified by variable name or position |
| Return Value: | Site ID to which the subject ID belongs. |
| Example: |
number cid; cid = dfcenter(SUBJECT); # called using subject ID variable name 'SUBJECT' cid = dfcenter(@T); # works if edit check is on the subject ID field cid = dfcenter(@[7]); # always works since the subject ID is always field 7 |
| Notes: |
If the input subject ID is not associated with any of the defined sites,
returns the
For historical reasons and backwards compatibility, the function continues to be named dfcenter(), not dfsite(). |
This function can be used to close the current study and return the user to the DFexplore login dialog and list of studies.
Table 5.22. dfclosestudy usage
| Syntax: | dfclosestudy(message) |
| Input Parameters: | message - a string containing a message to be displayed in the close study dialog. |
| Return Value: | None |
| Example: |
{
if(dfpasswdx(msg,3) == 0)
    dfclosestudy("Incorrect password. The study will be closed!");
}
|
| Notes: |
When
|
This function is used to convert a date to a string using a specified date format.
Table 5.23. dfdate2str usage
| Syntax: | dfdate2str(date,"format") |
| Input Parameters: | date is a date variable
format is the date format to convert to |
| Return Value: |
dfdate2str converts the edit check language's
internal representation of a date to a string using the specified date format.
|
| Example: |
# Convert Visit date variable VDATE to a string in yy/mm/dd format string d; d = dfdate2str(VDATE, "yy/mm/dd"); |
This function returns the day component, as a number, from a date.
Table 5.24. dfday usage
| Syntax: | dfday( date ) |
| Input Parameters: | date is a date field, a local/global variable or a literal string containing a date |
| Return Value: | A number equal to the day component of the parameter date |
| Example: |
number day;
day = dfday( @T );
if ( day == 1 )
    dfmessage( "This is the first day of the month. Reset pill counter." );
|
| Notes: | The date parameter may be a data field defined as a date, or a local/global date variable. If the parameter cannot be interpreted as a date, the return value is -1. If the parameter contains a partial date in the data field, the day component of the parameter is "00", and partial date imputation is set to 'None', the return value is 0. Otherwise, the day component from the date is returned. |
The dfdirection function is used when an edit check program needs to know
the user's field traversal direction while working in DFexplore.
Table 5.25. dfdirection usage
| Syntax: | dfdirection() |
| Input Parameters: | None. |
| Return Value: | >0 if the keyboard traversal direction is forward |
| <0 if the keyboard traversal direction is backward | |
| 0 if mouse traversal was used | |
| Example: |
number whichway; whichway = dfdirection(); |
| Notes: |
In plate enter and plate exit edit checks dfdirection
returns a number greater than 0.
This ensures that these edit checks fire when
traversal direction is being used to abort an edit check during backward
traversal and/or mouse jumps.
In a field enter edit check
In DFbatch the traversal method is always forward and so |
The dfentrypoint function is used to determine from which entry point
a given edit check has been called.
Table 5.26. dfentrypoint usage
| Syntax: | dfentrypoint() |
| Input Parameters: | None. |
| Return Value: | OPEN_STUDY if the edit check is called in DFopen_study |
OPEN_BINDER if the edit check is called in
DFopen_patient_binder AND not in DFbatch (see Notes) | |
PLATE_ENTER if the edit check is called at plate entry | |
PLATE_EXIT if the edit check is called upon plate
exit | |
FIELD_ENTER if the edit check is called at field
entry | |
FIELD_EXIT if the edit check is called upon field
exit | |
| Example: |
string s; s = dfentrypoint(); |
| Notes: |
In DFbatch
|
The dfexecute function is used to execute shell scripts stored in
$STUDY_DIR/ecbin from
within an edit check and return its output.
It takes two arguments - the name of the script and the parameter list
to pass to it.
This function is available in DFexplore and DFbatch.
Table 5.27. dfexecute usage
| Syntax: | dfexecute("Program",Parameter List) |
| Input Parameters: |
Program is a string containing the name of the executable (program or script) to run.
Executables must be registered for each study by storing them in
$STUDYDIR/ecbin. For security
reasons, only registered executables can be run from dfexecute.
If the progam or script can not be found in this directory, or is not executable,
DFexplore displays an error dialog with the message
Error: invalid progam name.
Parameter List is one or more comma delimited strings containing any input parameters
required by the script. Certain characters which have special meaning to the
UNIX shell will not be allowed in the command line submitted,
including dollar, back quote, semicolon, pipe, and file
redirection. If any of these characters are encountered, the script
will not run and a zero-length string is returned. Additionally,
DFexplore displays the following error message: |
| Return Value: | A string equal to at most the first 16384 ASCII
characters (or 4096 UNICODE characters) of output from the command.
If, for any reason, the
script cannot be executed, a zero-length string is returned.
|
| Example: |
# both of the following examples pass 3 parameters to myscript.sh string s; s = dfexecute( "myscript.sh", "10156 2 1" ); s = dfexecute( "myscript.sh", "10156", "2", "1" ); |
| Notes: |
The working directory for a script defaults to the study work
directory.
The study must be in read-write mode for
Script names cannot reference files or directories outside of
Scripts and programs executed by
When run in a batch environment, |
The dfgetfield function returns a field of an input string.
Date variables in the input string are converted to printable strings using the
default date specification. Empty strings are converted to
"", and missing values are converted to
* except for dates which are converted to
??/??/??.
Table 5.28. dfgetfield usage
| Syntax: | dfgetfield(expn, fnum, delim) |
| Input Parameters: | expn is the input expression which will be converted to
the source string
fnum is the desired field number (1st field is numbered 1) delim is the character that is used to delimit fields in expn |
| Return Value: | Resulting field or empty string if the desired field number does not exist |
| Example: |
string S = "AB|CD|EF";
F = dfgetfield(S, 2, "|");
assigns |
| Notes: |
A start value of less than 1 is converted to a 1.
An empty delimiter is converted to |.
If fnum is greater than the number of fields in expn,
an empty string is returned.
Date fields are first converted to julian dates and then converted to strings using the default date format. |
These two functions are equivalent in purpose. The existence of two functions that do the same thing is for historical reasons and backwards compatibility.
The dflevel function returns the validation level
that the user is currently validating records to.
Table 5.29. dfgetlevel/dflevel usage
| Syntax: | dflevel() |
| Input Parameters: | None |
| Return Value: | Validation level that user is validating records to |
| Example: |
if (dflevel() == 5)
    dfmessage("Validating at level 5");
|
| Notes: |
In DFweb the return value is always 1.
|
This function is used to retrieve a comma-delimited list of visit/sequence numbers that exist for a given subject ID and plate combination.
Table 5.30. dfgetseq usage
| Syntax: | dfgetseq(id, plate) |
| Input Parameters: |
id, a subject ID (may be omitted if referring to the current subject).
plate, a plate number |
| Return Value: | A comma delimited string of the visit numbers present in the database for the input combination of subject and plate. |
| Example: |
s = dfgetseq(99001, 1); # returns a list of all visit
                        #numbers for subject 99001 on plate 1
|
| Notes: |
The returned list of visit/sequence numbers can be split using the dfgetfield() function.
All visits present in the database are returned regardless of record status. Record status can be tested using the 1st data field in each data record, named DFSTATUS with codes: 0=lost, 1=final, 2=incomplete, and 3=pending/error. Status 3 records at level 0 are true pending records, i.e. delayed new data entry, while status 3 records are higher levels are more commonly referred to as 'error' records. Level is the 2nd field in each data record, is named DFVALID, and has values 0-7. |
This function allows edit checks to change the help message displayed at the bottom of the DFexplore screen.
Table 5.31. dfhelp usage
| Syntax: | dfhelp(expn1, expn2, ...) |
| Input Parameters: | One or more expressions of any data type |
| Return Value: | None |
| Example: |
dfhelp( "Please enter the subject age" ); |
| Notes: |
The
The message displayed by If the message is too long to be displayed in the message window it will be truncated. Users can view the entire message by hovering over it, or by clicking the dfhelp icon which appears at the beginning of the message. Any HTML tags are removed in the message window, but clicking the help icon launches a dialog, with and buttons, which displays the message with HTML formatting. Date expressions are displayed using the default date format. Use dfvarinfo with the STRING_VALUE option to display date fields as they appear on screen.
Blank values are printed as empty strings,
other missing values are printed as |
This function returns the string alias of the argument numeric subject ID.
Table 5.32. dfid2alias usage
| Syntax: | dfid2alias(id) |
| Input Parameters: | id is a numeric subject ID |
| Return Value: |
dfid2alias returns a string that is the alias for the requested subject
ID.
If the subject ID is not known and cannot be found, empty string
("") is returned.
|
| Example: |
string a; a = dfid2alias( @[7] ); dfmessage( "The subject alias is ", a ); |
The dfillegal function is used to set the validity of the argument field to
illegal.
In DFexplore this has the side effect of changing the field color
of the field to the illegal value color.
Table 5.33. dfillegal usage
| Syntax: | dfillegal(var, optional_mode) |
| Input Parameters: | var, which must be a database variable on the current plate.
If var is a local variable, the function does nothing
optional_mode, an optional parameter which when 0 sets var status to illegal, and when non-zero undoes any illegal status previously set by dfillegal and re-evaluates var. |
| Return Value: | None |
| Example: |
dfillegal(DOB); dfillegal(DOB,1); |
| Notes: |
var can be a direct reference via the variable name, a positional
reference via @T or the @[var] construct, or a member of a
group variable.
This function can be used to set fields to the illegal color (even if the field contains a legal value); and unless the field is returned to legal or optional status, this will have the effect of forcing the user to sign the record off with status Incomplete, rather than Final. However, there are limitations.
|
This function returns context information for the primary or secondary image of the argument keys.
Table 5.34. dfimageinfo usage
| Syntax: | dfimageinfo(ID, visit, plate, image, attr) |
| Input Parameters: | ID, subject identifier
visit, visit number plate, plate number image, image ID attr is one of |
| Return Value: | The return value is dependent upon the
attr.
The return value of dfimageinfo is a string in all cases.
The return value is determined by locating, for the specified keys,
the matching system fax_log record. From the
fax_log record (described in
System Administrator Guide, Filesfax_log
fax_logfax_log), the value of the requested
attribute is returned for
DFIMAGE_ARRIVAL, DFIMAGE_FORMAT, DFIMAGE_SENDER
and DFIMAGE_PAGES.
For the attributes |
| Example: |
string sender = dfimageinfo( , , , "", DFIMAGE_SENDER ); dfmessage( "The sender is ", sender ); |
| Notes: |
Any of the ID, visit and plate
arguments can be omitted.
Omitted arguments are taken from the keys of the current record.
The image key, image, is required but may be
"", in which case
the image ID of the primary record is used.
The argument |
The dflegal function does legal range checking on a variable and
returns TRUE or FALSE depending on the outcome.
Legal range checks are based on the range specifications defined in
the setup tool for each variable.
Table 5.35. dflegal usage
| Syntax: | dflegal(var) |
| Input Parameters: | var, which must be a database variable defined on any study plate. If var is a local variable, the function always returns TRUE. |
| Return Value: |
FALSE if any of the following conditions apply:
TRUE if the data record exists and any of the following conditions apply:
|
| Example: |
if ( !dflegal(DOB) )
    dfmessage( "The value of DOB is not legal." );
|
| Notes: | var can be a direct reference via the variable name, a positional reference via @T or the @[var] construct, a fully qualified reference using the @[id,visit,plate,field] construct, or a member of a group variable. |
The dflength function returns the length of the string conversion
of an expression.
String conversion of dates uses the default date specification which
is YY/MM/DD unless a different format is specified in the
DFedits file.
A date field which is blank, contains a missing value code, is only
partially complete, e.g. 90/12, or contains an invalid date,
e.g. 99/15/22, is converted to ??/??/?? regardless of what
the date format is.
Thus dflength will always return 8 on blank, missing, incomplete and
invalid dates.
For string conversion on all other field types (i.e. other than date) all
missing codes are converted to *, and thus dflength will
return 1 for any missing value code.
For numeric fields leading zeros are ignored during string conversion. Thus values 0025, 025 and 25 will all have a length of 2.
For all field types string conversion of a blank field results in a blank string with length zero. This is true for choice and check fields, which have a numeric value when the field is blank, as well as for the other data types which store a true null string in the database when the field is blank.
Table 5.36. dflength usage
| Syntax: | dflength(expn) |
| Input Parameters: | expn, an expression of any data type |
| Return Value: | Length of resulting string conversion |
| Example: |
if ( dflength( "ABC" ) == 3 )
    dfmessage( "The length of ABC is 3." );
|
| Notes: | Date fields are first converted to julian dates and are then converted to strings using the default date format. The actual length of the date field and the date as represented by the default date format may vary. |
This function can be used to log a user out of their current DFexplore session and close the DFexplore login dialog.
Table 5.37. dflogout usage
| Syntax: | dflogout(message) |
| Input Parameters: | message - a string containing a message to be displayed in the study logout dialog. |
| Return Value: | None |
| Example: |
{
if(dfpasswdx(msg,3) == 0)
    dflogout("Incorrect password. You will be logged out!");
}
|
| Notes: |
When
|
The dfmail function can be used to send an email from within an edit
check. Email functionality may also be implemented as a shell script
using the dfexecute edit check function.
Table 5.38. dfmail usage
| Syntax: | dfmail("to-address","reply-to-address","subject","message") |
| Input Parameters: | to-address - one or more email addresses to which
the message will be sent. If there are multiple email addresses,
each is delimited by a space.
reply-to-address - the email address of the person who will receive any replies to the emailed message [a] subject - a short subject line for the email message message - a string containing the the body of the email message; the string may be plain text, or HTML formatted content Each of these input parameters is required and none are permitted to be the empty string ("").
|
| Return Value: | TRUE (1), successful; dfmail did not detect errors
FALSE (0), failed; |
| Example: |
edit SubjectRandomized()
{
    string id=dfvarinfo(ID[,1,2],DFVAR_STRING_VALUE,);
    if(ELIG[,1,2]==2)
       dfmail("jill@dfsite1.com john@dfsite1.com", "jack@centralsite.com",
         "Subject " + id + " Randomization",
         "This subject has now been randomized.");
}
|
| Notes: |
As a pre-requisite, dfmail relies on proper configuration
of the server's email infrastructure.
Consult with your system administrator to confirm that your
DFdiscover server is configured to send email.
Email systems vary according to the operating system.
Email systems are complex and beyond the scope of this
document.
It is possible for
When run in a batch environment,
If the body of the message begins with
|
[a] The sender ID in the email is always
as | |
The dfmatch function performs more sophisticated string matching than the
basic comparison operators.
dfmatch has the following capabilities:
match while ignoring spaces
match while ignoring punctuation
keyword/keystring matching
fuzzy string matching
Table 5.39. dfmatch usage
| Syntax: | dfmatch(key, str, mode) |
| Input Parameters: | key is the search string
str is the string to be searched mode is the string representation of the search mode(s) |
| Return Value: | A number equal to the last matched character position (1-based) of the first match found in str, or 0 if the match failed |
| Example: |
if ( dfmatch( "ASA", DRUG, "C" ) )
    dfmessage( "The value of DRUG is ASA or asa." );
|
| Notes: | Valid modes are:
Modes may be concatenated.
For example |
The dfmessage/dfdisplay/dferror/dfwarning statements are used to output messages.
In DFexplore dfwarning and dferror pop up their
messages in dialogs that the user must acknowledge before continuing.
The dfdisplay function displays its message in a dialog without any icon but includes a Print
button.
The dfmessage statement writes a message to the edit checks log.
In batch, each generates a message that appears in the batch log file.
Table 5.40. dfmessage/dferror/dfwarning usage
| Syntax: | dfmessage(expn1, expn2, ...)
dfdisplay(expn1, expn2, ...) dferror(expn1, expn2, ...) dfwarning(expn1, expn2, ...) |
| Input Parameters: | One or more expressions of any data type |
| Return Value: | None |
| Example: |
dfmessage( "This is a string, ", "2+2=", 2+2 ); |
| Notes: |
Date expressions are displayed using the default date format.
Blank values are printed as empty strings,
other missing values are printed as *,
except for dates which are displayed as
??/??/??.
In DFexplore the output of |
The dfmetastatus function is used to return counts of queries or reasons
present in
the study database.
Table 5.41. dfmetastatus usage
| Syntax: | dfmetastatus(ID,visit,plate,attr,arg1,arg2,arg3) | ||||||||||||||||||||||||||||||||||
| Input Parameters: | ID is a list of subject IDs or * (all)
visit is a list of visits or * (all) plate is a list of plates or * (all) attr is one of QC or REASON arg1 is a list of numeric QC or REASON status codes from the following tables, or * (all): Table 5.42. Query Status codes
arg2 is a list of numeric query category codes from the table, or * (all): Table 5.44. Query Category Codes
arg3 is a numeric query usage code from the table, or * (all):
| ||||||||||||||||||||||||||||||||||
| Return Value: | A count of QCs or REASONS. The return value is dependent upon the attr (QC or REASON) and the specifications for each of their applicable input parameters | ||||||||||||||||||||||||||||||||||
| Example: |
number n1=dfmetastatus("4001-4050","*","*","QC","0,1,2,6","*","1");
#returns the total number of external, unresolved and pending queries
#for subjects 4001-4050
number n2=dfmetastatus("*","1","1-2","REASON","2,3","*","*");
#returns the total number of rejected and pending reasons on plates
#1-2, at visit 1 for all subjects
| ||||||||||||||||||||||||||||||||||
| Notes: |
dfmetastatus can be executed in DFopen_study,
DFopen_patient_binder and in batch.
|
Function dfmode can be used to determine the user's current working mode.
Table 5.46. dfmode usage
| Syntax: | dfmode() |
| Input Parameters: | None |
| Return Value: |
In DFexplore dfmode returns the user's current working mode:
'view', 'edit', 'modify', 'validate', 'DDE', or
'locked' if the current record is locked by another user.
In DFbatch |
| Example: |
if (dfmode()=="DDE") return; |
| Notes: |
dfmode always returns 'validate' when working in DFexplore Fax View.
In DFbatch locked records are skipped thus |
The dfmoduleinfo function returns information about the module referenced by the argument, including up to 20 custom module properties.
Table 5.47. dfmoduleinfo usage
| Syntax: | dfmoduleinfo(var, attr) |
| Input Parameters: |
var, an existed database variable name or the number of an existing database variable when referenced by a record key. attr is one of |
| Return Value: | The return value is dependent upon the
attr.
The possible values for attr, and their meaning, are:
|
| Example: |
edit test_dfmoduleinfo()
{
# List the module name, module description, first, second and third user defined module property information of the selected field on current plate.
dfmessage("dfmoduleinfo(@T,DFMODULE_NAME)=" + dfmoduleinfo(@T,DFMODULE_NAME));
dfmessage("dfmoduleinfo(@T,DFMODULE_DESC)=" + dfmoduleinfo(@T,DFMODULE_DESC));
dfmessage("dfmoduleinfo(@T,DFMODULE_USER1)=" + dfmoduleinfo(@T,DFMODULE_USER1));
dfmessage("dfmoduleinfo(@T,MODULETAG2)=" + dfmoduleinfo(@T,MODULETAG2));
dfmessage("dfmoduleinfo(@T,DFMODULE_USER3)=" + dfmoduleinfo(@T,DFMODULE_USER3));

# List the module name of FirstName field on current plate.
dfmessage("dfmoduleinfo(FirstName,DFMODULE_NAME)=" + dfmoduleinfo(FirstName,DFMODULE_NAME));

# List the module name of Field 9 belongs to Plate 3, Visit 1 of Subject 1.
dfmessage("dfmoduleinfo(subject 1, visit 1, plate 3, field 9, DFMODULE_NAME)=" + dfmoduleinfo(@[1,1,3,9],DFMODULE_NAME));
}
|
| Notes: |
If the plate number referenced is not a valid plate number (less than 1,
greater than 511, or a plate number not defined in the
study setup),
the edit check runtime will issue an error message to
that effect.
If the attr parameter is not valid, a compile-time error message is issued.
The return value of Tags for custom properties can be used interchangeably with the default names. |
This function returns the month component, as a number, from a date.
Table 5.48. dfmonth usage
| Syntax: | dfmonth( date ) |
| Input Parameters: | date is a date field, a local/global variable or a literal string containing a date |
| Return Value: | A number equal to the month component of the parameter date, typically 1-12 |
| Example: |
number month;
month = dfmonth( @T );
day = dfday( @T );
if ( month == 4 && day == 1 )
    dfmessage( "It is April Fool's Day. Be skeptical." );
|
| Notes: | The date parameter may be a data field defined as a date, or a local/global date variable. If the parameter cannot be interpreted as a date, the return value is -1. If the parameter contains a partial date in the data field, the month component of the parameter is "00", and partial date imputation is set to 'None', the return value is 0. Otherwise, the month component from the date is returned, which is always in the range 1 to 12, inclusive. |
The dfmoveto statement can be used to change the normal (keyboard) order of
field traversal on a record.
Table 5.49. dfmoveto usage
| Syntax: | dfmoveto(var) |
| Input Parameters: | var, a database or positional variable on the current record |
| Return Value: | None |
| Example: |
dfmoveto(DOB); dfmoveto(@(T+3)); # 3 vars after current var |
| Notes: |
The first variable that can be moved to on the current record is the
sequence number, if it is not barcoded; otherwise, it is the subject ID.
Without edit checks, the focus moves to this first variable when
the current record is displayed.
Using
Attempting to move to a variable in advance of the first variable will
quietly move to the first variable.
The last variable that can be moved to is the
It is not possible to move to a variable on another record.
If multiple
It is possible to create a loop by repeated calls to |
This function can be used to alter the subject binder icons and
determine which visits and plates are shown when working in a subject binder.
It is typically used in special edit check DFopen_patient_binder,
which if present runs each time a new subject binder is opened.
Table 5.50. dfneed usage
| Syntax: | dfneed(action, visits, plates) |
| Input Parameters: | Action can have one of the following values:
Visits is a comma delimited list of visit numbers and ranges Plates is a comma delimited list of plate numbers and ranges |
| Return Value: | none |
| Example: |
edit DFopen_patient_binder() {
# Adverse Event report form comes in 2 versions (plates 4 and 5)
# For each recorded AE (seq 101-199) hide the empty version
number n=mymaxseq(4); # get last plate 4 AE report number
number x=mymaxseq(5); # get last plate 5 AE report number
if( x>n ) n=x;        # set n to last recorded AE report number
while(n>=101) {
if( !dfmissing(DFPLATE[,n,4]) )  dfneed(DFNEED_TRIM,n,5);
if( !dfmissing(DFPLATE[,n,5]) )  dfneed(DFNEED_TRIM,n,4);
n = n - 1;
}

# Hide follow-up visits (2-99) until eligibility criteria have been met
if( !myeligible() ) dfneed(DFNEED_TRIM,"2-99","");

# Hide endpoint adjudication form (visit 0 plate 9) from all roles
# except the endpoint adjudicators
if( dfrole()!="adjudicator" ) dfneed(DFNEED_HIDE,0,9);
}
|
| Notes: |
|
This function returns the label for the page referenced by the argument keys.
Table 5.51. dfpageinfo usage
| Syntax: | dfpageinfo(ID, visit, plate, attr) |
| Input Parameters: | ID, subject identifier
visit, visit number plate, plate number attr is |
| Return Value: | The return value is dependent upon the
attr. In the current implementation, the only defined
attr is DFPAGE_LABEL.
The return value of dfpageinfo is a string in all cases.
The return value is determined by locating, for the specified visit
and plate,
the matching record from
DFpage_map record (described in
DFpage_map - page map).
If there is no matching entry, the plate description property from
the setup is returned.
Substitution of field values, from the record selected by ID,
visit and plate, is possible using the standard %n or %n:d notations.
|
| Example: |
string label = dfpageinfo( , , , DFPAGE_LABEL ); dfmessage( "The page label is ", label ); |
| Notes: |
Any of the ID, visit and plate
arguments can be omitted.
Omitted arguments are taken from the keys of the current record.
The argument |
This function can be used to ask users to re-enter their DFdiscover password.
Table 5.52. dfpassword usage
| Syntax: | dfpassword(message,limit) |
| Input Parameters: | message - a string containing a message to be displayed on the password entry dialog.
limit - the maximum number of attempts allowed for the user to enter the correct password. See Notes for more detail. |
| Return Value: | True (1) if the user enters their login password.
False (0) if the user fails to enter the correct password within the specified
|
| Example: |
string msg = "Please enter your password to obtain a randomization code.";
if( dfbatch() ) return; # do not continue if this edit check is called in a batch job
if( dfpassword(msg,3) ) dfexecute("Randomization.shx");
else { dferror("Password was incorrect."); dfexecute("RandomizationFailure.shx"); }
|
| Notes: |
If the user enters an incorrect value in the password dialog the message Error: at least one of Username and Password is incorrect. is displayed and the user may be able to try again, or select , to exit the dialog.
The
Generally |
[a] The system specified limit on failed login attempts is defined in the Master tab of DFadmin. | |
This function is similar to dfpassword and can be used to ask users to
re-enter their DFdiscover password.
Table 5.53. dfpasswdx usage
| Syntax: | dfpasswdx(message,limit) |
| Input Parameters: | message - a string containing a message to be displayed on the password entry dialog.
limit - the maximum number of attempts allowed for the user to enter the correct password. See Notes for more detail. |
| Return Value: | 1 if the user enters their login password correctly.
0 if the user fails to enter the correct password within the specified
-1 if the user selects . |
| Example: |
string msg = "Please enter your password to obtain a randomization code.";
if(dfpasswdx(msg,3) == -1)
    dfwarning("You have canceled password entry.");
|
| Notes: |
The
Generally |
[a] The system specified limit on failed login attempts is defined in the Master tab of DFadmin. | |
The dfplateinfo function returns information about the
plate referenced by the argument, including up to 20 custom
plate properties.
Table 5.54. dfplateinfo usage
| Syntax: | dfplateinfo(plate, attr) |
| Input Parameters: | plate, the number of an existing plate.
attr is one of |
| Return Value: | The return value is dependent upon the
attr.
The possible values for attr, and their meaning, are:
|
| Example: |
edit listvars()
{
#   List the field names of all fields for a given plate
number count;
number nplates;
string scount;
string splate;
splate=DFPLATE;
dfmessage("Plate "+splate+": "+dfplateinfo(DFPLATE,DFPLATE_DESC));
scount = dfplateinfo(1,DFPLATE_FIELDS);
nplates=scount;
count=1;
while( count <= nplates ) {
    dfmessage("\t"+dfvarinfo( @[count], DFVAR_NAME) );
    count = count +1;
    }
}
|
| Notes: |
If the plate parameter is not a valid plate number (less than 1,
greater than 511, or a plate number not defined in the
study setup),
the edit check runtime will issue an error message to
that effect.
If the attr parameter is not valid, a compile-time error message is issued.
The return value of Tags for custom properties can be used interchangeably with the default names. |
Function dfpref is used to set DFexplore user preferences,
most commonly in edit checks DFopen_study and DFopen_patient_binder,
which if present run when the study is selected and when a subject binder is opened
respectively.
Table 5.55. dfpref usage
| Syntax: | dfpref(prefname, prefvalue, duration) |
| Input Parameters: | dfpref takes 3 parameters:
|
|
The preference names and values listed below are entered in the parameter list as quoted strings. They are given in the order in which they appear within the DFexplore preferences dialog. Refer to DFexplore User Guide, User Settings for a description of each preference. Case is not significant when specifying preference name and value. PreferenceName PreferenceValue ----------------- --------------- UseSubjectAlias Yes, No DefaultView Dashboard, Schedule, Image, Data, Queries, Reasons, Reports, Status, List, Batch Edits AutoLogout minutes Data Window: ExpandVisits Yes, No OpenFirstPage Yes, No AdvanceField Yes, No OpenTaskPage Yes, No WarnTraverse Yes, No RetainPosition Yes, No ShowDatePicker Yes, No AutoAlignText Yes, No ShowMetaPanel Yes, No ShowDocumentPanel Yes, No eCRFColor #D4E6F1 (hex RRGGBB code) Image Window: AutoOpenImage Yes, No ScreenSplit Toggle, StickyToggle, DataLeft, DataRight, DataTop, DataBottom Record List: ShowVisit NumberLabel, Number, Label ShowPlate NumberLabel, Number, Label ShowSite NumberLabel, Number, Label RecordListNavigation Yes, No Query Defaults: QueryUsage External, Internal QueryType Clarification, Correction List View: ShowFieldName Generic, Unique, NumberGeneric, NumberUnique ShowCodedField Code, Label ShowDateField Default, Calendar, Julian, CalendarImpute, JulianImpute ShowFieldColor Yes, No ExpandText Yes, No Image View: ReviewOnLoaded Yes, No ReviewOnSaved Yes, No Reports View: NewReportTab Yes, No Background Options: BackgroundColor Black, White, Color BackgroundType Default, (any values defined in DFCRFType_map) Schedule View: ShowSubjectSchedule Yes, No ShowVisitScheduleInfo Yes, No ShowMissingAndOverdue Yes, No ShowUnexpectedVisitsAndPlates Yes, No ShowCycles Yes, No ShowCycleVisits Yes, No ShowCorrectionQueries Yes, No ShowClarificationQueries Yes, No Mode and Level: WorkingMode View, Edit, Modify, Validate, DDE SaveLevel 1, 2, 3, 4, 5, 6, 7 PendingPlateExitEC On, Off
Schedule View preferences, as well as WorkingMode, SaveLevel and PendingPlateExitEC
do not appear in the DFexplore preferences dialog,
but can be set in edit checks by | |
|
ShowSubjectSchedule, ShowVisitScheduleInfo, ShowMissingAndOverdue, ShowUnexpectedVisitsAndPlates, ShowCycles, ShowCycleVisits, ShowCorrectionQueries, ShowClarificationQueries. Provide edit check control over which schedule sub-windows are visible in Schedule View. Each schedule sub-window is identified by a specific keyword from the list. The setting for each keyword is "yes" or "no" (case insensitive). The setting "yes" indicates that the sub-window is visible, "no" indicates that the sub-window is not visible. | |
|
WorkingMode.
| |
|
SaveLevel.
| |
|
PendingPlateExitEC.
| |
| Return Value: | none |
| Example #1: |
# Lock down user preferences for the clinical sites
edit DFopen_patient_binder() {
  if ( dfrole()=="Clinical Site" ) {
    dfpref("ExpandVisits","Yes",DFPREF_LOCK) ;
    dfpref("AutoOpenImage","Yes",DFPREF_LOCK) ;
    dfpref("AdvanceField","No",DFPREF_LOCK) ;
    dfpref("BackgroundType","SITE",DFPREF_LOCK) ;
    dfpref("PendingPlateExitEC","Off",DFPREF_LOCK) ;
  }
}
|
| Example #2: |
# During site monitoring using the 'Source Verification' task
# records are saved to the task level when incomplete, but when final
# are saved to level 5 where the sites can no longer change them.
edit SVfinal() {
  if ( dftask()!="Source Verification" ) return;
  if( DFSTATUS==1 ) dfpref("SaveLevel","5",DFPREF_CURRENT) ;
}
|
| Notes: | dfpref is ignored in DFbatch. In DFweb only UseSubjectAlias, SaveLevel, and WorkingMode are supported. In DFcollect only SaveLevel, WorkingMode, and AutoLogout are supported.
|
This function is used to return the current value of DFexplore user preferences.
Table 5.56. dfprefinfo usage
| Syntax: | dfprefinfo(prefname) |
| Input Parameters: | dfprefinfo takes 1 parameter, the name of an DFexplore user preference.
The preference name is entered as a quoted string.
Case is not significant.
Valid preference names and the values returned by PreferenceName ReturnValue ----------------- --------------- UseSubjectAlias Yes, No DefaultView Dashboard, Schedule, Image, Data, Queries, Reasons, Reports, Status, List, Batch Edits AutoLogout minutes Data Window: ExpandVisits Yes, No OpenFirstPage Yes, No AdvanceField Yes, No OpenTaskPage Yes, No WarnTraverse Yes, No RetainPosition Yes, No ShowDatePicker Yes, No AutoAlignText Yes, No ShowMetaPanel Yes, No ShowDocumentPanel Yes, No eCRFColor #D4E6F1 (hex RRGGBB code) Image Window: AutoOpenImage Yes, No ScreenSplit Toggle, StickyToggle, DataLeft, DataRight, DataTop, DataBottom Record List: ShowVisit NumberLabel, Number, Label ShowPlate NumberLabel, Number, Label ShowSite NumberLabel, Number, Label RecordListNavigation Yes, No Query Defaults: QueryUsage External, Internal QueryType Clarification, Correction List View: ShowFieldName Generic, Unique, NumberGeneric, NumberUnique ShowCodedField Code, Label ShowDateField Default, Calendar, Julian, CalendarImpute, JulianImpute ShowFieldColor Yes, No ExpandText Yes, No Image View: ReviewOnLoaded Yes, No ReviewOnSaved Yes, No Reports View: NewReportTab Yes, No Background Options: BackgroundColor Black, White, Color BackgroundType Default, (any values defined in DFCRFType_map) Mode and Level: WorkingMode View, Edit, Modify, Validate, DDE SaveLevel 1, 2, 3, 4, 5, 6, 7 PendingPlateExitEC On, Off
WorkingMode, SaveLevel and PendingPlateExitEC do not
appear in the DFexplore preferences dialog,
but can be tested in edit checks using |
| Return Value: | value is always a string; see table above |
| Example: |
# On study selection show Auto Logout setting to clinical site users
edit DFopen_study() {
  if ( dfrole()=="Clinical Site" ) {
    string msg = "NOTE!\n\n"
               + "Auto Logout is set to " + dfprefinfo("AutoLogout") + " min.\n"
               + "To change this and other user preferences select:\n"
               + "'Preferences...' from the 'File' menu in Data View." ;
    dfwarning(msg);
  }
}
|
| Notes: | dfprefinfo returns an empty string if the preference name is spelled incorrectly,
or if dfprefinfo is run in DFbatch. In DFweb, all preferences except WorkingMode,
SaveLevel, and UseSubjectAlias return an empty string. In DFcollect, all preferences
except WorkingMode, SaveLevel, and AutoLogout return an empty string.
|
This function returns the protocol version in effect for the argument subject ID on the argument date.
Table 5.57. dfprotocol usage
| Syntax: | dfprotocol(ID, date) |
| Input Parameters: | ID, subject identifier
date, date in the format "yyyy/mm/dd", "today" or "" (same as "today") |
| Return Value: |
The return value of dfprotocol is a string in all cases.
Return the protocol version in effect on the argument date.
The protocol version is identified by:
|
| Example: |
string protocol_vers = dfprotocol( , "2019/01/01" );
dfmessage( "The protocol version in effect on 2019/01/01 is ", protocol_vers );
Determine the protocol in effect for the current subject for their current visit. edit ProtocolAtVisit()
{
string vdate = dfvisitinfo( , , DFVISIT_DATE);
date dt = dfstr2date(vdate, "yy/MM/dd", 1990, 0);
# dates are in different formats - need to switch
string version = dfprotocol( , dfdate2str(dt, "yyyy/MM/dd"));
dfmessage("On visit date ", vdate, ", effective protocol version is ", version);
} |
| Notes: |
If ID is omitted, it is taken as the subject ID of the current record.
|
The dfrole function is used to determine the study role by which a user
has read access to specified data keys.
Table 5.58. dfrole usage
| Syntax: | dfrole(id, visit, plate) |
| Input Parameters: | The key fields (id, visit, and plate)
for the CRF to be tested.
One or more of id, visit and plate values may be omitted and will default to the id, visit or plate of the current record. When omitting keys remember to include all commas, e.g. dfrole(,,44) returns the role by which the user has access to plate 44 of the current visit for the current subject. |
| Return Value: | Returns the study role name by which the user has read access to the
specified keys. If the user does not have read access, dfrole will
return an empty string.
|
| Example: |
if ( dfrole() == "Full Permissions" )
       dfmessage ("You have permission to save data for these keys." );
|
| Notes: |
The dfrole function can be used to make edit check behavior
dependent upon a user's role in cases where
an edit check is only be relevant or needs to behave differently
for users with different roles.
In DFopen_study dfrole() returns a pipe delimited list of all roles the user has been assigned in the current study. |
The dfsiteinfo function returns attribute
information about the site overseeing the argument subject ID.
Table 5.59. dfsiteinfo usage
| Syntax: | dfsiteinfo(ID, attr) |
| Input Parameters: | ID, subject identifier
attr is one of |
| Return Value: | The return value is dependent upon the
attr.
The return value of dfsiteinfo is a string in all cases.
The possible values for attr, and their meaning, are:
|
| Example: |
string enroll_target = dfsiteinfo( , DFSITE_ENROLL ); dfmessage( "The site enrollment target is ", enroll_target ); |
| Notes: |
If the ID is omitted, the subject ID of the current
record is used.
If the attr parameter is not valid, a compile-time error message is issued.
|
The sqrt function calculates the square root of the argument number, and
returns it as an integer (if the result can be expressed as an integer with
no loss of precision), or as a fixed point number.
Table 5.60. sqrt usage
| Syntax: | sqrt(expn) |
| Input Parameters: | expn is any numeric expression |
| Return Value: | the square root of expn; as an integer if the result can be represented as an integer with no loss of precision, otherwise, as a fixed point |
| Example: |
sqrt(65) returns 8.062258 |
sqrt(16.0) returns 4 |
Function dfstay is used in edit checks triggered on record Save,
to abort the save operation and keep the user on the current page
with the focus on a specified data field.
Table 5.61. dfstay usage
| Syntax: | dfstay(var) |
| Input Parameters: | var, a database or positional variable on the current record, |
| Return Value: | None |
| Example: |
dfstay(DOB);# stay on field DOB dfstay(@T); # stay on the current field |
| Notes: |
Function
Function
When
A typical example would be an edit check that used dfask to describe the problem
and offer the user the option to 'fix it now' or 'fix it later'. If the user selects
'fix it later' a query could be added to the field, but if the user selects
'fix it now'
Since
|
This function is used to convert a specified string to a date using a specified date format, start year, and imputation method. It can be used to create a local date variable or assign a value to a date field (see examples).
Table 5.62. dfstr2date usage
| Syntax: | dfstr2date("date","format",start_year,imputation_method) |
| Input Parameters: | date is a string containing the date, e.g. "09/01/15"
for Jan 15, 2009 in yy/mm/dd format.
format is the date format, e.g. "yy/mm/dd" start_year is the first year of an imputed century for 2 digit years, e.g. 1950 imputation method is one of:
|
| Return Value: |
dfstr2date converts the specified date string to the edit check language's
internal representation of a date using the specified date format rather than
the standard global edit check date format.
As for all dates the edit check language converts an invalid date string to it's internal representation of a missing value. |
| Example: |
# Get the record creation date and store it in a user defined date field string c = dfgetfield(DFCREATE,1," "); @T = dfstr2date(c,"yy/mm/dd",2000,0); |
| Example: |
# Store the number of days between record creation and last modification # in a user defined numeric field date cd,md; string cs = dfgetfield(DFCREATE,1," "); string ms = dfgetfield(DFMODIFY,1," "); cd = dfstr2date(cs,"yy/mm/dd",2000,0); md = dfstr2date(ms,"yy/mm/dd",2000,0); @T = md - cd; |
This function returns attribute information about the study, including the study number, name, start year and up to 20 custom study properties.
Table 5.63. dfstudyinfo usage
| Syntax: | dfstudyinfo(attr) |
| Input Parameters: |
attr is one of |
| Return Value: | The return value is dependent upon the
attr.
Specifically, the descriptive name of the study, the study number
and the start year of the study (as defined by the value of
Study launched in the year in the study
global settings) are returned respectively for the
DFSTUDY_NAME, DFSTUDY_NUMBER,
and DFSTUDY_YEAR attributes. Corresponding user-defined description
is returned for its custom study property.
The return value of |
| Example: |
string studyname = dfstudyinfo( DFSTUDY_NAME ); dfmessage( "This is study ", studyname ); |
| Notes: |
Tags for custom properties can be used interchangeably with the default names. |
The dfsubstr function returns a substring of an input expression
converted to a string.
Table 5.64. dfsubstr usage
| Syntax: | dfsubstr(expn, start, len) |
| Input Parameters: | expn is the input expression which will be converted to the
source string.
start is the starting character position of the desired substring (1st character position is 1). len is the length in characters of the desired substring. |
| Return Value: | Desired substring.
If len is greater than the number of characters remaining to the end of the string, len is adjusted to include only the characters remaining in the string. |
| Example: |
string s="Hello world!";
A = dfsubstr( s, 3, 5 );
assigns "llo w" to A. |
| Notes: |
A start value of less than 1 is converted to 1.
A len of less than 1 is converted to 0.
If start is greater than the length of the string,
or len is 0, an empty string is returned.
Date fields are first converted to julian dates and are then converted to strings using the edit check date format. This may lead to unexpected results. Example 5.15. Date format conversion issues date format "mmm/dd/yy"
...
edit example()
{
string A;
# at this point EDATE, a database variable, contains 98/11/14
A = dfsubstr( EDATE, 1, 3 );
}
In this example, the date format of the
|
The dftask function is used to determine the current task name in DFexplore
and the current batch name in DFbatch.
Table 5.65. dftask usage
| Syntax: | dftask() |
| Input Parameters: | dftask may be used with no parameters or with a set of keys (id,visit,plate). |
| Return Value: |
dftask returns a task name or an empty string as follows: When called with no parameters:
When called with a set of record keys (id,visit,plate):
When 'Import Subject Documents' is used in DFexplore Data View to 'Import data entry worksheets/CRFs' a task set is created for all imported pages, and dftask() returns "Import Subject Documents' as the task name. In batch dftask() can only be called without parameters and returns the 'name' attribute of the current 'BATCH' element. If a DFbatch input file has multiple BATCH elements the current one will be returned. |
| Example: |
number answer;
string task = dftask();
if ( task == "SiteMonitoring" )
    ans = dfask("Does the recorded data match medical records?",1,"Yes","No");
if ( answer == 1 ) ...
|
| Notes: | Task and batch names are case sensitive and will be returned exactly as defined in DFexplore or DFbatch. |
The dftime function returns the current time on the machine
in HH:MM:SS format.
Table 5.66. dftime usage
| Syntax: | dftime() |
| Input Parameters: | None |
| Return Value: | A string value representing the current time on the client in HH:MM:SS format |
| Example: |
string now; now = dftime(); |
| Notes: | The time value returned is the time on the machine running the DFexplore or DFbatch software. In the case of DFexplore, this will be the time on the PC and will be in its local timezone. PCs that are not time synchronized to a time server may return incorrect times. |
The dftoday function returns a date value representing today's date.
Table 5.67. dftoday usage
| Syntax: | dftoday() |
| Input Parameters: | None |
| Return Value: | A date value representing today's date on the client. |
| Example: |
date today;
today = dftoday();
if ( VDATE > today )
    dferror( "Visit occurred in the future!" );
|
| Notes: | The date returned is the date on the machine running the DFexplore or DFbatch software. In the case of DFexplore, this will be the date on the PC and will be in its local timezone. PCs that are not time synchronized to a time server may return incorrect dates. |
The dftool function returns TRUE/FALSE depending on whether the edit check
is executing in the named tool or not.
Table 5.68. dftool usage
| Syntax: | dftool(toolname) | |||
| Input Parameters: | toolname is a literal
string equal to the name of the tool to test for.
Valid tool names are The argument must be a literal string - it cannot be a string from a variable.
| |||
| Return Value: | TRUE if the edit check is running in the specified environment, FALSE otherwise. | |||
| Example: |
if (dftool("DFexplore")) dfmessage("running in DFexplore");
if (dftool("iDataFax")) dfmessage("running in DFexplore");
|
This function is executed, if it is found in plate exit edit checks, when a record is saved in Fax View or Data View using DFexplore or processed in DFbatch. It is a no-op when encountered in plate enter edit checks or field enter/exit edit checks.
dftrigger can be used to add a new record to the current subject binder and/or to execute
all or specified plate entry edit checks on a specified data record in the current
subject binder.
This provides a mechanism for creating conditional plates and updating data fields
on other records that depend on values entered and saved on the current record.
In DFbatch, dftrigger can be used to add new records to the database or
to visit them to update their data fields programmatically.
dftrigger verifies user permissions and attempts to perform record locking.
If the subject ID in the argument keys is different than the current subject ID,
a record level lock for the single record identified by the keys is requested.
If the subject ID in the argument keys is the same as the current subject ID,
in Data View, the lock is already held (subject level locking) and no further record locking is required, or
in Fax View and Batch Edits View a record level lock is requested.
If permissions are insufficient or the locking request fails,
dftrigger does nothing and returns 0, otherwise it returns 1.
If the target data record already exists in the database and no plate entry edit checks are specified dftrigger then can be used to change the status and/or level of the target record, and/or to change to a different plate when the target record is saved.
New records added to the current subject binder by dftrigger in Data View will
immediately appear in the subject record list, and if the user is working on a
task set the new record will be added to the task set list.
Table 5.69. dftrigger usage
| Syntax: | dftrigger(id,visit,plate,status,level,"edit checks",action) |
| Input Parameters: | id, visit, and plate identify the keys
of the target record.
One or more of id, visit and plate values may be omitted and will default to the id, visit or plate of the current record. When omitting keys remember to include all commas, e.g. dftrigger(,,44,3,0,"GetInitials",0) will run the GetInitials plate entry edit check for plate 44 for the current subject and visit, but will not open the record. If plate 44 doesn't exist it will be created and added to the study database with status pending and level 0. Status must be one of: 1=final, 2=incomplete, 3=pending, or blank. When blank the status of an existing record will not be changed and the status of any newly created records will be set to 3=pending. The following restrictions apply:
Level is the workflow or validation level which must be: 0-7 or blank. When blank the level of an existing record will not be changed and the level of any newly created records will be set to 0. However, level cannot be reset from 1+ back to zero - any such requests will be ignored. When using dftrigger to set status or level on a target plate, neither status or level can be left blank. If either status or level is left blank, then it will have the same result as leaving both of them blank. The edit check parameter may be an empty string if no edit checks are to be run, "ALL" to run all plate entry edit checks, or a list of edit check names separated by commas or spaces, e.g. "GetInitials,CalcTargetDate". Only plate entry edit checks will run; any other edit check names will be silently ignored. For dialogs, most of dialogs will not appear and the default action will be taken for dialogs that prompt the user for input. Specifically, the dialogs that will not appear include dfask, dfmessage/dfdisplay/dfwarning/dferror, dfaddqc, dfeditqc, dfreplyqc, and dfaddreason. The dialogs that will still appear include dfcapture, dfclosestudy, dflogout, dfpassword, and dfpasswdx. The final action parameter determines whether the triggered record should be created, opened, and added to the current task set. Actions 0-4 create the specified data record with status pending and level 0 if it does not already exist in the study database. The action parameter is ignored in DFbatch and in Fax View. In Data View it functions as follows:
Unlike other edit check statements dftrigger requests are not executed immediately, instead they are added to a dftrigger queue and executed in order as a final step during plate exit edit check processing. In DFexplore actions 1-5 add the data record to the current list of open records and takes the user to that record instead of going to the next record in the list. Since dftrigger is ignored in all but plate exit edit checks the action request cannot be used to interrupt data entry on the current page. If all 3 keys are omitted action 1-4 can be used to return to the current data record after it is saved to the study database. Only those plate entry edit checks specified in the edit check parameter will be executed. In the following example the user will remain on the current page after selecting a Save button, and plate entry edit check INIT2 will be re-executed. edit EXIT2() { # run on exit from plate 2
if( NewRandomization() ) {
dfwarning("Please print this page and take it to the hospital pharmacy.") ;
dftrigger(,,,,,"INIT2",2) ;
}
}
If plate exit edit checks contain multiple dftrigger functions with non-zero actions, all of the relevant target data records will be added to the current record list and the focus will move to the first such record identified during plate exit edit check processing. |
| Return Value: | If DFexplore is able to add the dftrigger request to the end of the dftrigger queue it returns 1, otherwise it returns 0, which may occur because: (a) it can not get a lock on the target data record, (b) the user does not have permission to create or modify the target record, or (c) the target record has already been added to the dftrigger queue. |
| Example: |
# If subject was hospitalized and hospitalization record (plate 56) does
# not exist at this visit, create the hospitalization record, run the
# GetInitials plate entry edit check, and then open the record
if ( HOSPITALIZED == TRUE && dfmissingrecord(,,56)==2 ) {
  dfwarning("Please complete hospitalization details on the next page.") ;
  dftrigger(,,56,3,0,"GetInitials",1) ;
}
|
| Notes: | If the target record exists in the database with status "missed" the missed record will be deleted and a new record will be created. If this is not desired make sure you test for missed records before executing dftrigger. This can be done using dfmissingrecord which returns 1 for missed records. |
The dfuserinfo function returns information about the
user running the edit check, including
their login name, full name, and email as defined in DFadmin.
Table 5.70. dfuserinfo usage
| Syntax: | dfuserinfo(property) |
| Input Parameters: | dfuserinfo takes 1 parameter, the name of a property.
The property name is entered as a quoted string. Case is not significant. Valid property names are UserName, FullName, and Email, which returns the user's login name, full name, and email address respectively, as defined in DFadmin. Refer to System Administrator Guide, DFadmin - UsersDFadmin - Users for details. |
| Return Value: | The return value is always a string. |
| Example: |
edit AboutMe() {
    dfwarning("My username is: ", dfuserinfo("UserName"));
    dfwarning("My full name is: ", dfuserinfo("FullName"));
    dfwarning("My email is: ", dfuserinfo("Email"));
}
|
| Notes: |
dfuserinfo returns an empty string if the property name is spelled incorrectly.
If the full name property is blank in DFadmin, dfuserinfo("FullName") returns the username. If the email property is blank in DFadmin, dfuserinfo("Email") returns an empty string.
dfuserinfo("UserName") returns the same value as |
The dfvarinfo function returns information about the
variable referenced by the argument, including up to 20
custom variable properties.
Table 5.71. dfvarinfo usage
| Syntax: | dfvarinfo(var, attr, optional_arg) |
| Input Parameters: | var, which must be a database variable.
attr is one of optional_arg is required only when specifying the
|
| Return Value: | The return value is dependent upon the
attr.
The possible values for attr, and their meaning, are:
|
| Example: |
if ( dfvarinfo(@(T+2), DFVAR_TYPE) == "number" )
dfmessage( dfvarinfo( @(T+2), DFVAR_NAME ), " is a number." );
# get MYDATE value as a string from plate 1 for the current id
str=dfvarinfo(MYDATE[,0,1],DFVAR_STRING_VALUE);
dfmessage("MYDATE on plate 1 is " + str);
# get the label for the current choice code
dfmessage( "You marked ", dfvarinfo( @T, DFVAR_LABEL, @T ) );
# get the label for a specific choice code
dfmessage( "Code 1 has the label ", dfvarinfo( @T, DFVAR_LABEL, 1 ) );
#get the current field's prompt property
dfmessage( "field ", @T, " has the prompt property: ", dfvarinfo(@T, DFVAR_PROMPT));
#get the current field's comment property
dfmessage( "field ", @T, " has the comment property: ", dfvarinfo(@T, DFVAR_COMMENT));
#is this field in an AE module
if ( dfvarinfo( @T, DFVAR_MODNAME ) == "AE" )
...
|
| Notes: |
dfvarname is implemented as
dfvarinfo(var, DFVAR_NAME)
dfvarinfo(var,DFVAR_ACCESS)
Tags for custom properties can be used interchangeably with the default names. |
[a] This is the only attribute for which the third argument is required. | |
The dfvarname function returns the name of
the variable referenced by the argument.
Table 5.72. dfvarname usage
| Syntax: | dfvarname(var) |
| Input Parameters: | var, which must be a database variable |
| Return Value: | Name of variable |
| Example: |
if ( dfvarname(@(T+2)) == "PTID") |
| Notes: |
Although var can be any variable, it is only really useful
with positional variables and group references.
See also |
Function dfview can be used to determine the user's current working view.
Table 5.73. dfview usage
| Syntax: | dfview() |
| Input Parameters: | None |
| Return Value: |
In DFexplore,
dfview returns the user's current DFexplore view: 'data' or 'image',
which are the only 2 views in which edit checks can be run.
In DFbatch |
| Example: |
if (dfview()=="image") return; |
| Notes: | none |
The dfvisitinfo function returns information about the
visit, or visit map metadata,
referenced by the argument.
Table 5.74. dfvisitinfo usage
| Syntax: | dfvisitinfo(ID, visit, attr) |
| Input Parameters: | ID, subject identifier
visit, visit number attr is one of |
| Return Value: | The return value is dependent upon the
attr.
The return value of dfvisitinfo is a string in all cases.
If attr is DFVISIT_DATE, the visit date for the
requested subject ID and visit number is selected from the database and returned.
All other attributes have static values that are extracted from the visit map
definition of the requested visit number (the subject ID is ignored as it is
not relevant).
The return values for each attribute, and their meaning, are detailed in
Study Setup User Guide, Visit Map).
|
| Example: |
string vdate = dfvisitinfo( , , DFVISIT_DATE ); dfmessage( "The visit date is ", vdate ); |
| Notes: |
If the ID is omitted, the subject ID of the current
record is used.
If the visit is omitted, the visit number of the current
record is used.
If the attr parameter is not valid, a compile-time error message is issued. |
The dfwhoami function returns the login name of the user running
the edit check.
Table 5.75. dfwhoami usage
| Syntax: | dfwhoami() |
| Input Parameters: | None |
| Return Value: | A string representing the login name of the user executing the edit check, whether in DFexplore or in batch. |
| Example: |
string username;
username = dfwhoami();
if ( username == "bob" )
dfmessage( "hey bob, how are ya?" );
|
| Notes: |
If the user name cannot be determined, generally
due to a system mis-configuration,
the string unknown is returned.
|
This function returns the year component, as a number, from a date.
Table 5.76. dfyear usage
| Syntax: | dfyear( date ) |
| Input Parameters: | date is a date field, a local/global variable or a literal string containing a date |
| Return Value: | A number equal to the year component of the parameter date |
| Example: |
number year;
year = dfyear( @T );
if ( year < 2000 )
dfmessage( "The event occurred in the 2nd millenium." );
|
| Notes: | The date parameter may be a data field defined as a date, or a local/global date variable. If the parameter cannot be interpreted as a date, the return value is -1. Otherwise, the year component from the date is returned - year cutoff is applied to reported 2-digit years so that a 4-digit number is always returned. |
The edit check language provides several functions for dealing with queries:
dfaddqcdfaddmpqcdfanyqcdfanyqc2dfanympqcdfdelmpqcdfeditqcdfresqcdfunresqcdfqcinfodfqcinfo2
By way of example, the following generic edit check could be used to add a missing value query to a field which has been left blank.
edit addmissing()
{
if( dfblank(@T) ) dfaddqc(@T,1,"",1,2,"");
}
The dfaddqc function allows an edit check to add a query to
a field on the current record.
It is not possible to add queries to other records.
It is possible to add more than one query to a field, provided that the category code is different.
In DFexplore and DFbatch query creation permissions matter; depending on which of the 3 possible
query creation permissions the user has for fields on the current data record, behavior will vary
as follows.
The Query Add dialog (DFexplore) is only displayed
if the user has full query creation permission.
If the user has permission to create queries within edit checks only,
the Query Add dialog (DFexplore) is not displayed and the query
is added automatically.
And if the user has no query creation permission dfaddqc is a no-op; it does nothing.
Additionally, when using DFbatch to execute edit checks,
the actions of dfaddqc are further impacted by the attributes of the
APPLY element.
The behavior of dfaddqc is the same in DFexplore and DFbatch
with regard to which data records can have queries added.
In both cases a user will only be able to add queries to records for which they have
access (read) permission; any restrictions on sites, subjects, visits, and plates
will be applied.
Table 5.78. dfaddqc usage
| Syntax: | dfaddqc(var, code, query, usage, refax, note, optional_mode) | ||||||||||||||
| Input Parameters: | var is a database variable on the current plate and
is the variable to which the query is to be attached.
code is a category code from the table: Table 5.79. Category codes
query is the text that should appear as the query field, or "" if there is no text. [a] usage is a numeric usage code from the table:
refax is a numeric refax code from the table:
note is the text that should appear in the resolution note, or "" for no text.[a] optional_mode is a numeric value which can be used to suppress the default behavior of showing the Query Add dialog. If it is omitted or has the value 0 the dialog is displayed and the query may be accepted, modified, or canceled by the user. If the value is 1 the dialog is not displayed and the query is silently added, if possible (i.e. if the field does not already have a query with the same category code, and in DFexplore if the user has permission to create queries). | ||||||||||||||
| Return Value: | TRUE if the query dialog was displayed, FALSE otherwise. | ||||||||||||||
| Example: |
if ( dfaddqc( VDATE, 1, "Date missing", 1, 2, "" ) )
dfmessage( "Added a query to VDATE." );
| ||||||||||||||
| Note: |
It is possible to add queries to variables that already
have queries attached to them, provided the category codes differ for each query.
If a field already has a query with the same category code, | ||||||||||||||
[a] The text is "sanitized" by replacing each non-printable character with a space/blank and each '|' with a '?'. | |||||||||||||||
The dfaddmpqc function allows an edit check to add a
user-defined missing page query.
Table 5.82. dfaddmpqc usage
| Syntax: | dfaddmpqc(id, visit, plate, query, usage, refax, note) |
| Input Parameters: | id, visit, and plate provide the key
information for the data record that is missing.
query is the text that should appear as the note field,
or usage is a numeric usage code from the table: refax is a numeric refax code from the table: note is the text that should appear in the resolution note, or "" for no text. Any invalid (i.e., '|' or control characters) are converted to blank. |
| Return Value: | TRUE if the query was added, FALSE otherwise. |
| Example: |
if ( dfaddmpqc( 12345, 0, 1, "Excl. crit. required", 1, 2, "" ) )
dfmessage( "Added a missing page query." );
|
| Notes: |
Attempts to add a missing page query will fail if the data record exists,
regardless of it's status (final, incomplete, pending or lost), or if
a missing page query already exists.
In DFexplore the user must have permission to create queries for the specified
data record, otherwise Some, but not all, of the id, plate and visit parameters may be omitted in which case they will default to the current id, visit, and plate respectively. Although it is legal to use the default for all three key fields, thereby indicating the current record, this will never produce a missing page query, as one cannot add a missing page query to the current page, which clearly is not missing.
Setting the refax option has no effect on Missing plate queries are removed by the study server when the data record arrives regardless of the status of the data record (final, incomplete, pending or lost). These queries can also be removed using edit check function dfdelmpqc. We recommend using complimentary add and delete statements, and running these edit checks in batch. Designing edit checks like this: if ( condition is TRUE )
dfaddmpqc(...);
else
dfdelmpqc(...);allows the edit check to correct the Query database if the subject data changes in a way that makes the query no longer required. |
The dfanyqc function returns the query status of a variable.
Table 5.85. dfanyqc usage
| Syntax: | dfanyqc(var, optional_category_code) | ||||||||||||||
| Input Parameters: | var may be any variable in the study database.
It may be a direct, positional or group reference.
optional_category_code may be any category code in the study's query category map. It is an optional parameter. | ||||||||||||||
| Return Value: | If optional_category_code is omitted or has value 0, the status of the first query is returned.
If optional_category_code is greater than 0, the status of the query matching optional_category_code is returned. A numeric status from the table: Table 5.86. Query status codes
| ||||||||||||||
| Example: |
if ( dfanyqc( VDATE ) == 1 )
dfmessage( "VDATE has a new query." );
| ||||||||||||||
| Notes: |
If optional_category_code is greater than 0, and if optional_category_code is not found or there is an error, the return value is 0. If optional_category_code is illegal (negative), the status of the first query is returned.
If var is not a database variable, the return value is 0.
If in a study with single query permission, the optional_category_code is ignored, and the status of the first (only) query is returned.
When executed within |
The dfanyqc2 function returns the query statuses of a variable.
Table 5.87. dfanyqc2 usage
| Syntax: | dfanyqc2(var) | ||||||||||||||
| Input Parameters: | var may be any variable in the study database. It may be a direct, positional or group reference. | ||||||||||||||
| Return Value: | Returns a string of all query status codes for the referenced
variable, each status code delimited by pipe (|).
Each numeric status is from the table: Table 5.88. Query status codes
| ||||||||||||||
| Example: |
dfmessage( dfanyqc2(@T) ); | ||||||||||||||
| Notes: |
If var is not a database variable, the return value is an empty string.
dfanyqc2 will not report deleted as a query status,
but instead any such query will be skipped in the output.
If only one query exists for a field, When executed within |
The dfanympqc function determines if a missing page (code 21), EC missing
page (code 23) or overdue visit (code 22) query exists for the
specified arguments.
Table 5.89. dfanympqc usage
| Syntax: | dfanympqc(id, visit, plate) |
| Input Parameters: | id, visit, and plate provide the key information for the missing page (code 21), EC missing page (code 23) or overdue visit (code 22) query. |
| Return Value: | TRUE if a missing page, EC missing page or overdue visit query exists in the database for the specified keys, FALSE otherwise. |
| Example: |
if ( dfanympqc( 12345, 1, 12 ) )
dfmessage( "A missing page query already exists in the database." );
|
| Notes: |
If a missing page, EC missing page or overdue visit query
does not exist in the database for the specified keys,
dfanympqc returns FALSE.
Some, but not all, of the id, plate and visit arguments
may be omitted in which case they will default to the
current id, visit, and plate respectively.
Although it is legal to use the default for all three
key fields, thereby indicating the current record,
|
The dfdelmpqc function deletes a missing page (code 21), EC missing
page (code 23) and overdue visit (code 22) query.
The EC missing page query must have been previously created
by an invocation of dfaddmpqc, while the missing page or overdue visit
query must have been previously created by DF_QCupdate.
Table 5.90. dfdelmpqc usage
| Syntax: | dfdelmpqc(id, visit, plate) |
| Input Parameters: | id, visit, and plate provide the key information for the query to be deleted. |
| Return Value: | TRUE if the missing page (code 21), EC missing page (code 23) or overdue visit (code 22) query was deleted, FALSE otherwise |
| Example: |
if ( dfdelmpqc( 12345, 0, 1 ) )
dfmessage( "Deleted a missing page query." );
|
| Notes: |
If the referenced CRF exists or there is no
missing page, EC missing page, or overdue visit query for the keys,
dfdelmpqc returns FALSE.
Some, but not all, of the id, plate and visit parameters may be omitted in which case they will default to the current id, visit, and plate respectively. Although it is legal to use the default for all three key fields, thereby indicating the current record, this will always fail as one cannot delete a missing page, EC missing page or overdue visit query from the current page, which clearly cannot have one.
|
The dfeditqc function can be used to modify several properties of a query, namely:
status, current data field value, category, refax status, query, note, reply type, and usage type.
Table 5.91. dfeditqc usage
| Syntax: | dfeditqc(var, attr, value, attr, value, ..., optional_mode ) |
| Input Parameters: | var is any database variable (of the current record).
attr is the name of the attribute of interest, from the
list value is the new value to assign to the attribute. optional_mode is a numeric value which can be used to suppress the default behavior of showing the Query Edit dialog. If it is omitted or has the value 0, the dialog is displayed and the edit may be accepted, modified, or canceled by the user. If the value is 1 the dialog is not displayed and the edit is applied without confirmation. |
| Return Value: |
The return value is 0 if The return value does not indicate if the user actually accepted the edits by choosing OK interactively, or query actions are applied in DFbatch. |
| Example: |
# Resolve a missing value query if data present
edit ResolvQuery()
{
string curstatus;
# use: on exit from a required field
# resolve a missing value query if the field is no longer blank
if(dfqcinfo(@T,DFQCPROB) == "1" )
{
# if there is a query but it is already resolved, skip
curstatus = dfqcinfo(@T,DFSTATUS);
if (curstatus < 3 || curstatus > 5)
{
if( ! (dfblank(@T)) )
{
dfeditqc(@T,DFSTATUS,5,DFQCRFAX,1,DFQCNOTE,"Resolved by
ResolvQC edit check");
}
}
}
}
|
| Notes: |
If If
If an edit check using In the special case of changing the query status to delete (to delete the query) a confirmation dialog is immediately displayed to indicate that the query will be deleted and cannot be undone. Once the query edit dialog or query delete confirmation dialog appear on-screen, the return status of the function is set to 1. Choose or to confirm the dialog is reflected in the return statuses with 1 or 0, respectively.
If an edit check using
The behavior in response to changes to |
[a] Changes to the value of this attribute are limited to interactive edit checks only. Attempts to change the attribute value in DFbatch are silently ignored. | |
The dfreplyqc function can be used to add/modify the reply text of an
existing outstanding query.
Table 5.92. dfreplyqc usage
| Syntax: | dfreplyqc(var, category, reply_text, optional_mode) |
| Input Parameters: | var is any database variable (of the current record).
category is the unique query category. reply_text is the user-supplied reply text. If not supplied, the user will need to enter the reply text. optional_mode is a numeric value which can be used to suppress the default behavior of showing the Query Reply dialog. If it is omitted or has the value 0, the dialog is displayed and the reply may be accepted, modified, or canceled by the user. If the value is 1 the dialog is not displayed and the reply, if provided, is applied without confirmation. |
| Return Value: |
The function fails and the return value is 0 if dfreplyqc
determines that the requested
change is not allowed because there is no such query,
the user does have not permission, or
optional_mode is 1 and reply_text was not supplied.
The return value is 1 on success.
If the user accepted the edits by choosing , the return value is 1.
If the user chose , the return value is 0.
The return value does not indicate if query actions are
applied in DFbatch.
|
| Example: |
# Reply to a category 30, clinicalQC for example, query
if ( dfreplyqc( @T, 30, "Confirmed", 0 ) )
dfmessage ("A reply has been added to the query." );
|
| Notes: |
If the reply is successfully applied and the query status is Outstanding, the query status is updated to Pending. If the query status is already Resolved or Pending, the query status is not changed. |
The dfresqc/dfunresqc functions return TRUE/FALSE depending on whether
the variable contains a resolved/unresolved query.
Table 5.93. dfresqc usage
| Syntax: | dfresqc(var, optional_category_code)
dfunresqc(var, optional_category_code) |
| Input Parameters: | var may be any variable in the study database.
It may be a direct, positional or group reference.
optional_category_code may be any category code defined in the study's query category map. It is an optional parameter. |
| Return Value: | If optional_category_code is omitted or has value 0, TRUE/FALSE is returned for the first query.
If optional_category_code is greater than 0, TRUE/FALSE is returned for the query matching optional_category_code. For For |
| Example: |
if ( dfresqc( VDATE ) )
dfmessage( "VDATE has a resolved query." );
|
| Notes: | If var is not a database variable, the return value is FALSE. |
The dfqcinfo function returns information about the query on any
database variable.
The information returned can be selected from any of the fields defined for
a query.
Table 5.94. dfqcinfo usage
| Syntax: | dfqcinfo(var, attr, optional_category_code) |
| Input Parameters: | var is any database variable (of the current record).
attr is the name of the field of interest and
must be one of optional_category_code may be any category code defined in the study's query category map. It is an optional parameter. |
| Return Value: | If optional_category_code is omitted or has value 0, the attribute value of the first query is returned.
If optional_category_code is greater than 0, the attribute values of the query matching the optional_category_code is returned. The return value is the string equivalent of the value in the requested query field of the specified database variable. If the value is from a coded list, the return value is the code not the label of the code. If the referenced variable does not exist, or does not have a query note, the return value is "". |
| Example: |
if ( dfqcinfo(@(T+2), DFQCPROB) == "1" )
dfmessage( dfvarinfo( @(T+2), DFVAR_NAME ),
" has a query for a missing value." );
|
The dfqcinfo2 function returns information about the (multiple) queries on any
database variable.
The information returned can be selected from any of the fields defined for
a query.
Table 5.95. dfqcinfo2 usage
| Syntax: | dfqcinfo2(var, attr) |
| Input Parameters: | var is any database variable (of the current record).
attr is the name of the field of interest and
must be one of |
| Return Value: | A string is returned of all query attribute values delimited by pipe (|).
If the attribute values are from a coded list, the delimited values returned are the codes, not the labels of the codes. If the referenced variable does not exist, or does not have a query, the return value is "". |
| Example: |
dfmessage( dfqcinfo2(@(T+2), DFQCPROB) ); |
| Notes: | If only one query exists for a field, dfqcinfo and dfqcinfo2 return the same value.
|
The edit check language provides several functions for dealing with reasons:
dfaddreasondfanyreasondfautoreasondfreasoninfo
The dfaddreason function allows an edit check programmer to add a custom
reason to a data field. When a data field is changed by an edit check, the
system will immediately attach the static reason text
Set by edit check ecname, where ecname
is the edit check name, to the changed field, and will replace any
existing reason on that field. The dfaddreason function can then be used
by the edit check programmer to overwrite the static reason with a custom
reason.
Table 5.96. dfaddreason usage
| Syntax: | dfaddreason(var, text, optional_mode) |
| Input Parameters: | var must be a database variable.
text is the text string containing the reason. optional_mode is a numeric value which determines whether or not the reason dialog box is displayed. If it is omitted or has the value 0 the dialog is displayed and the reason may be accepted, modified, or canceled by the user. If the value is 1 the dialog is not displayed and the reason is silently added. |
| Return Value: | the actual reason added
"" if the action was canceled or it is not possible to add the reason. |
| Example: |
dfaddreason(@T, "clarification from site"); |
| Notes: |
If a DFexplore user does not have corresponding permission - Create Reason permission if there is no reason currently on the field or Modify Reason by Edit Check permission if there is a reason already on the field within edit checks,
If a DFexplore user has permission to both create and approve reasons any
reasons added using
If the user has permission to approve reasons only within edit checks,
(the shaded or dash setting) then reasons added using optional_mode 1 will be
automatically approved while reasons added via the reason dialog will always
have status pending whether added manually or through The reason text is "sanitized" by replacing each non-printable character with a space/blank and each '|' with a space. When the reason dialog is displayed in DFexplore both the current reason (if there is one) and the new reason are shown in the dialog. The new reason may be accepted, modified, or canceled by the user. The user cannot apply a new blank reason; a valid text string must be entered before a new reason can be saved; this can be as little as a single valid character.
The return value of
If
The system will automatically generate a
If the edit check changes the data value after a No record is kept of reasons that were not saved. |
The dfanyreason function is used to determine whether a data field has a
reason attached to it. If dfanyreason is used in batch mode, it will only
report on reasons that are already present on the field. In batch mode, it
will not detect auto-generated reasons added by the execution of edit checks.
Table 5.97. dfanyreason usage
| Syntax: | dfanyreason(var) |
| Input Parameters: | var may be any variable in the study database. It may be a direct, positional or group reference. |
| Return Value: | A numeric status from the table:
|
| Example: |
if ( dfanyreason( VDATE ) == 1 )
dfmessage( "VDATE has an approved reason." );
|
| Notes: | If var is not a database variable, the return value is 0. |
The dfautoreason function can be used to suppress the automatic addition
of reasons to data fields that are changed by edit checks.
Table 5.99. dfautoreason usage
| Syntax: | dfautoreason(mode) | |||
| Input Parameters: |
mode is one of 0 (do not add reasons for data change) or 1 (add reasons) | |||
| Return Value: | None | |||
| Example: |
dfautoreason(0); # do not add reason for subsequent data changes FLD1 = 44; # no reason will be added for this change dfautoreason(1); # turn autoreasons back on for subsequent data changes FLD2 = 22; # an autoreason will be added for this change | |||
| Notes: |
Whenever a data field is changed by an edit check a reason
is automatically added to the field, such as
Used with caution,
Automatic reasons can be added or suppressed for each change
made by an edit check.
The scope of any call to
|
The dfreasoninfo function is used to determine attribute information of
the reason, if any, attached to a data field.
Table 5.100. dfreasoninfo usage
| Syntax: | dfreasoninfo(var, attr) |
| Input Parameters: | var is any database variable (of the current record).
attr is the name of the field of interest and
must be one of |
| Return Value: | The return value is the string equivalent of the value
in the requested reason field for the specified database variable.
If the value is from a coded list, the return value is the code not the label of the code. If the referenced variable does not exist, or does not have a reason, the return value is "". |
| Example: |
string status, msg;
status = dfreasoninfo(@(T+2), DFSTATUS);
if ( status == "" )
msg = "does not have a reason";
else if ( status == "1" )
msg = "has an approved reason";
else if ( status == "2" )
msg = "has a rejected reason";
else if ( status == "3" )
msg = "has a pending reason";
dfmessage( dfvarinfo( @(T+2), DFVAR_NAME ), " ", msg, "." );
|
Lookup tables provide a mechanism for coding information based on a key field. This mechanism can be used for several applications, including:
Adverse event coding
Drug name lookup
Initial to name conversion for signature fields
Consistent queries
Spell checking
Lookup tables are defined in the DFlut_map file in the
study lib directory.
The DFlut_map file contains entries which link the table name used in edit checks with
the file name containing the lookup records.
Lookup table files must be stored in the study lut directory, or the DFdiscover lut directory.
The study level file has priority if both exist.
Lookup tables themselves are comprised of entries containing a key
followed by zero or more fields of return result.
Within a lookup table there is one entry per line, and fields within each
entry are delimited by |. A lookup table must be
a plain ASCII text file. If it is anything other than
this, an error message will appear in a blocking, warning dialog upon
starting DFexplore. If DFbatch is used, an error message will appear on the
command-line upon starting DFbatch.
Entries can have one of three possible formats.
single field. This field is both the search key and returned value
2 fields. The first field is the search key and the second field is the returned value, as in this example:
AIDS|autoimmune deficiency syndrome
3+ fields. The first field is the search key and all other fields are returned as a single
|delimited string that can be parsed using thedfgetfieldfunction.
A detailed description of both lookup table files and
DFlut_map can be found in
Lookup tables and
DFlut_map - lookup table map.
The dflookup function is the interface between the edit check language
and DFdiscover lookup tables.
The dflookup function can do silent lookups or, in DFexplore
it can display the lookup
table, optionally position the cursor and ask the user to make a selection.
Table 5.101. dflookup usage
| Syntax: | dflookup(table, var, default, alg) |
| Input Parameters: | table is the symbolic name of the table as defined
in DFlut_map
var is any variable default is the string return value if no match is found alg is the search algorithm to use from the following possible values:
|
| Return Value: | Matching string from the lookup table, or default if no match is made. Note that matching is performed case-insensitive. |
| Example: |
string s;
s = dflookup("drugs", @T, "unknown", -1);
|
| Notes: |
If a lookup table contains multiple fields for a key,
the return result is the string containing all of the fields
after the key.
The dfgetfield function can subsequently be used
to extract individual fields from the return result.
|
It is often desirable to execute certain parts of an edit check several times. An example would be a total dose calculation based on multiple fields on a form. The edit check language provides the while loop construct for this purpose.
The while statement executes its body
(either a single statement, or a group of statements surrounded by braces)
as long as the condition is true.
If the condition is FALSE when the
while statement is first started,
the body of the loop is not executed and execution continues at the first
statement following the end of the while statement.
Example 5.16. A simple edit check that prints all the numbers from 1 to 10
edit printnums()
{
number counter;
counter = 1;
while (counter <= 10) {
dfmessage("count is now ", counter);
counter = counter + 1;
}
}
In this example, the variable counter is initialized to 1
(remember that local variables are set to blank when they are declared).
The body of the while loop is executed as long as the value counter is less
than or equal to 10, causing the 'count is now' messages to be produced.
If you are using a variable as the condition in the while loop it is very important to make sure that the body of the while loop changes the value in such a way that the condition will eventually be false and the while loop is exited. Failure to do this results in an endless loop. The edit check language interpreter places an upper limit on the number of instructions that can be executed to gracefully recover from this programming error.
Example 5.17. Compare visit date fields of adjacent visits
edit vdatecheck()
{
number v;
v = DFSEQ;
while (v > 0) {
if( vdate[,v,] <= vdate[,v-1,] )
dferror("Visit ", v-1, "follows visit ", v);
v = v- 1;
}
}
In this edit check a local variable, v,
is first set to the value of the current visit number (this by default,
is the DFSEQ data variable) and then, using a while loop,
is successively set to the visit number of the preceding visit until the
value reaches zero.
A message is printed if the date for a given visit is earlier than the
date of the visit that precedes it.
This is written under the assumption that the plate on which the
vdate variable appears is to be collected at each visit.
If visit dates appeared on different plates for different visits, the
edit check would have to be modified.
| Note |
|---|---|
This example assumes that all visit/sequence number fields (field 6) in the
database have been assigned the DFdiscover name of |
Occasionally there is the need to break out of a loop prematurely. In the case of nested loops, the break applies to the innermost while loop.
Example 5.18. Example use of break
edit find_headache()
{
number seq;
seq = DFSEQ;
while (seq >= 0) {
if (AEevent[,seq,] == "headache")
break;
seq = seq - 1;
}
if (seq >= 0) {
dfmessage("headache on seq ", seq);
} else {
dfmessage("no headache found!");
}
In this example we have an adverse event form and would like to see if the subject had a headache event on a prior form. The edit check looks at all prior adverse event forms until it finds one with AEevent == "headache". When we find the headache event, we print out the sequence number for that form and break out of the loop;
| Note |
|---|---|
that the local variable |
The continue statement also modifies looping behavior, but unlike the
break statement, it causes execution to resume at the top of the loop.
In the case of nested while loops, the continue statement causes control
to be transferred to the top of the innermost active loop skipping the
remaining steps in the loop.
If a variable is being used in the while condition, it needs to be
adjusted before the continue statement, otherwise an endless loop may occur.
In addition to the built-in functions, the edit check language allows users to define their own functions. User-defined functions allow an edit checks programmer to create sections of code that can be reused by different edit checks, and in generic cases, by multiple studies.
Functions are similar to edit checks but some differences exist:
Unlike edit checks, user functions can return values,
Edit checks can be assigned to data fields in the setup tool, whereas user functions are executed when called by an edit check.
User functions have the same general form as edit checks,
but instead of beginning with the word edit they begin
with the keyword of the type of value which they return.
This is followed by the name of the function and the opening bracket,
(,
just like in an edit check.
The functions arguments, if any, are declared next and are followed by the
closing bracket, ).
This ends the function and argument declaration and is then
followed by the opening brace, {, and the body of the user function.
Example 5.19. User-defined function to add two numbers and report when the sum is greater than 10
number add(number n1, number n2)
{
number result;
result = n1 + n2;
if (result > 10) {
dferror(result, " is greater than 10");
}
return(result);
}
The result of calculations in the user function is returned via
the return statement.
Functions can be used for many purposes such as to implement sophisticated calculations that are used over and over again.
Example 5.20. User function that calculates a dose level based on the subject's weight and sex
number calcdose(number wt, number sex)
{
if (dfmissing(wt) || dfmissing(sex)) return(0);
if ((wt < 40) || (wt > 400)) {
dferror("Subject weight error");
return(0);
}
if (sex == 1) return(200 + .2*wt);
if (sex == 2) return(100 + .1*wt);
dferror("Unable to calculate dose. Sex not 1 or 2.");
return(0);
}
The last 2 lines may seem unnecessary given we have returned at
the top of the edit check if sex is missing, as long as
there are only 2 options for sex.
But, it never hurts to be cautious.
Several edit checks can now share the calcdose function
and if any dosage calculations need to be changed, only the
calcdose function needs to be altered.
Example 5.21. Calling a user defined function from an edit check
edit drugcheck()
{
number dose;
dose = calcdose(lbs, sex);
if ((dose != 0) && (DRUGDOSE > dose)) {
dferror("Drug overdose given!");
}
}
The #include
directive can be used to include other files into a DFedits file.
This can be useful in cases where a number of user functions or common
edit checks are to be shared across multiple studies.
To include another file in a DFedits file, use the following syntax:
#include other filename
where other filename is the file
to be included, represented as a string.
All include files must be located in the study ecsrc directory or in the DFdiscover ecsrc directory.
The study level file has priority if the same file exists in both places.
Example 5.22. Including DFedits.gen in the DFedits file
#include my generic edit checks
#include "DFedits.gen"
#the rest are my local edit checks
edit checkAge()
{
...
Included text is treated exactly the same way as text that appears
directly in the DFedits file.
A side effect of this is that care must be taken when naming edit checks.
It is not valid to define an edit check named checkAge
in a file to be included and define an edit check with the same name in
the local edit check file.
To reduce this possibility, consider naming generic edit checks with a common
prefix such as GEN_.
| Note |
|---|---|
|
It is not possible to start a line with the comment phrase #include as this is interpreted as an include directive. In such a case, use # include to start a comment with the word include (note the intervening space). |
Earlier we saw this simple edit check to convert pounds to kilograms.
Although syntactically correct the edit check does not take into account
the possibility that the lbs field might be missing
or contain an illegal value.
Steps for a more rigorous solution
A more rigorous solution might include the following steps.
Ignore the edit check if
lbsis blank or contains a missing value code.Only calculate
kgsiflbscontains a legal value.If
lbsdoes not contain a legal value add a query tolbs.
Example 5.24. Convert pounds to kilograms with error checking
edit lbs2kgs() {
# exit if lbs is blank or has a missing value code
if( dfmissing(lbs) ) return ;
else if( lbs>=40 && lbs <=400 ) kgs = lbs / 2.205;
else dfaddqc(lbs,2,"Please verify weight.",1,2,"");
}
The most difficult task in writing edit checks is to decide exactly what you want the edit check to do. The most appropriate action might be viewed differently by different users and might depend on various conditions involving legal and missing values for one or more other variables. Using the previous compliance check as an example, is it the intent to:
always insert the calculated value of compliance into the database?,
compliance = 100 * ( dispensed - returned ) / dispensed;
insert a calculated value of compliance into the database only when it is not already recorded?,
if ( dfblank( compliance ) ) compliance = 100 * ( dispensed - returned ) / dispensed;insert a calculated value of compliance into the database only when the record is at or below a certain validation level?,
if ( DFvalid <= 3 ) compliance = 100 * ( dispensed - returned ) / dispensed;or warn the user when the calculated value does not match the recorded value?
number calculated; calculated = 100 * ( dispensed - returned ) / dispensed; if ( !dfblank(compliance) && calculated != compliance ) dferror( "Reported compliance of ", compliance, "does not match calculated compliance of ", calculated );
| Note |
|---|---|
|
Remember that an edit check can be executed at different times i.e. on entry to the plate, on entry to a field, on exit from the plate or on exit from a field, or at multiple times , e.g. on exit from the field and again on exit from the plate. Also remember that a field entry or exit edit check will be executed every time that the field with the edit check is traversed, and skipped entirely if the user scrolls past the field, never entering it. |
Most edit checks are written as field exit edit checks and placed on the last field of those involved in the edit check so that all information has been validated before the edit check is executed. But only you can determine the best time to execute a particular edit check.
Be careful with illegal values, missing values, blank fields, existing queries, and calculated fields that have already been filled. Errors can easily arise from failure to account for unexpected data.
It is up to the programmer to design edit checks that take appropriate account of the variety of conditions which may arise. Although more time consuming to write, carefully crafted edit checks are more likely to do what you really want, and to be easily accepted by those performing data entry and validation for the study.
Finally, keep the following in mind with respect to assigning calculated values to database variables. The FDA's Guidance for Industry: Computerized Systems Used in Clinical Trials explicitly states
Features that automatically enter data into a field when that field is bypassed should not be used.
Hence, consider carefully edit checks that assign values to data fields. If the data value is a reported value on the CRF, a preferred alternative is to compute the expected value of a field and then compare it against the recorded value, signaling an error when the two do not match.
Like any langauge, the quality of edit check code benefits from repeated definition and use; the experience of the edit checks creator. Your first challenge is learning the language - what does the syntax allow me to do? Getting your first edit check to compile is a rewarding feeling.
As you learn the syntax, you then make decisions about the semantics of the edit checks code - is this the desired behavior or result of the edit check? Do I display a message, add a query, prompt the user to fix something? Syntactically, one can write several different edit checks to solve a problem - they each compile. But which one has the desired effect?
As you become even more proficient, it's worthwhile spending time and effort to optimize your edit checks. Can they execute quicker? Is the edit checks code clear to another reader? The suggestions in the following sections are intended to give you resources to increase the efficiency of your edit checks.
Each edit check takes time to execute. Most are extremely quick, hardly noticable. Some take more time and that time can become noticeable. Imagine the impact of that edit check if it is executed once on each CRF. Imagine the impact of that edit check if it is executed five times on each CRF. What is the impact if the user is geographically located several time zones away, or on a slow internet connection?
It is worthwhile improving the execution time of every edit check. If you can save 0.1 sec per edit check, over the duration of a study this can amount to hours or even days.
One of the most valuable, yet more expensive features in edit checks in terms of execution time, is the ability to request data for other CRFs, other visits, and even other subjects. It's an incredibly valuable feature - it does however require a request from the database and hence some execution time.
The edit checks language executes every clause in conditional statements. It does not implement shortcut evaluation, which you may have experienced in other programming languages.
In DFexplore, edit check logic is executed in the client and the edit
check definition file, DFedits.bin, is stored on the
server.
This means that the file must be transmitted to DFexplore from the
server each time that DFexplore starts.
Edit checks that are included, but never referenced, should be removed to
help reduce the size of the file that is transmitted.
In DFexplore, an edit check cache is maintained for each record request. If a record request matches the subject ID of the currently open subject binder (which it typically would), the result of the first request is added to the cache and the result for each subsequent request is pulled from the cache. Results for requests for other subject IDs continue to come directly from the database.
In this example, there are 5 requests for data records from the database. 3 are fulfilled by database responses and 2 (displayed in bold) are fulfilled from the local cache.
if (var1[,21,5] >= 100) dfmessage( msg1 ); if (var2[,22,5] < 150 && var1[,21,5] >= 150) dfmessage( msg2 ); if (var1[99001,11,1] == 1) dfmessage( msg3 ); if (var2[,22,5] < 150) dfmessage( msg4 );
Some conditional tests can be simplified with one or more
else clauses.
Some conditional tests may not be necessary.
Consider this example:
if ( Date[,0,1] < "01/01/16" )
value = 1;
if ( Date[,0,1] >= "01/01/16" && Date[,0,1] < "01/01/17" )
value = 2;
if ( Date[,0,1] >= "01/01/17" )
value = 3;
The Date[,0,1] >= "01/01/16" test is not necessary
if an else clause is used.
Similarly, Date[,0,1] >= "01/01/17" is not necessary.
The logic can be simplified:
date v1date = Date[,0,1];
if ( v1date < "01/01/16" )
value = 1;
else if ( v1date < "01/01/17" )
value = 2;
else
value = 3;
Function calls in edit checks have a cost. If the same function is called several times in the same context, it may be more efficient to store the function result in a local variable and use the local variable. For example:
if ( dflevel() == 1 || dflevel() == 2 || dflevel() == 3 || dflevel() == 4 || dflevel() == 5 ) # do something
can be more efficiently written as:
number mylevel = dflevel(); if ( mylevel == 1 || mylevel == 2 || mylevel == 3 || mylevel == 4 || mylevel == 5 ) # do something
or even more efficiently as:
number mylevel = dflevel(); if ( mylevel >= 1 && mylevel <= 5 ) # do something
There is no shortcut evaluation in DFdiscover edit checks. Hence it can be more efficient to simplify multiple conditions. In this example, all 5 conditions are evaluated even if the first one, or any one, fails.
if ( condition1 && condition2 && condition3 && condition4 && condition5 && condition6 )
something_happens;
return;Although it appears longer, this re-writing will execute quicker because any failed condition will prevent the other conditions from being tested.
if ( !condition1 ) return; if ( !condition2 ) return; if ( !condition3 ) return; if ( !condition4 ) return; if ( !condition5 ) return; if ( !condition6 ) return; something_happens; return;
Messages that are displayed for the user, or written to a new query, benefit from having as much detail in them as possible. This often involves inserting context into the message.
string msg1 = "The visit date " + dfvarinfo( @T, DFVAR_STRING_VALUE ) + " is in the future.";
string msg2 = "The subject reported " + @(T-1) + ". Was follow-up prescribed?";
if ( dfblank( @T ) )
return;
...In this example, the work to construct the two messages is immediately wasted if the simple exclusion test is true.
A more efficient solution delays construction of the messages until they are actually needed:
string msg1, msg2; if ( dfblank( @T ) ) return; msg1 = "The visit date " + dfvarinfo( @T, DFVAR_STRING_VALUE ) + " is in the future."; msg2 = "The subject reported " + @(T-1) + ". Was follow-up prescribed?"; ...
While some edit checks are unique, i.e. used only once in the entire study database, other edit checks may need to be repeated at several locations. In such cases there is considerable advantage in being able to create a generic edit check that can be written once and then applied to all of the data fields on which it needs to be executed. To do this we need a way of referring to data fields other than by explicit variable names, as the relevant variable names will likely change depending on the field to which the generic edit check is attached.
As an example consider a list of medical history items (diabetes, hypertension, etc.) with a Yes/No question followed by a Duration question for each history item. Duration is only required when the Yes/No question is answered Yes. The following is a generic edit check that could be applied to each duration field to check such medical history questions.
edit medhx() {
if( @T==0 || dfblank(@T) ) { # duration is zero or blank
if( @(T-1)==1 ) dferror("duration is missing"); }
else { # a duration has been specified or marked missing
if( @(T-1)==2 ) dferror("should history = Yes?"); }
}
Note the use of @T and @(T-1) to
refer to data fields in the above example.
@T refers to the data field to which the edit check
is attached.
Other fields can be referenced relative to this field by adding or
subtracting the desired number of fields.
Thus @(T-1) refers to the field immediately before
@T, @(T+1) refers to the field
immediately after @T, and
@(T+5) refers to the fifth field following
@T.
Don't forget the brackets: @T+1 adds 1 to the value of
the field to which the edit check is attached, whereas
@(T+1) refers to the value of the field following
the field to which the edit check is attached.
Writing an edit check this way allows you to attach the same edit check
to different fields in the CRF which share the same meaning and variable
block structure.
In the previous example, the edit check is attached to the
duration field and the Yes/No question is
thus @(T-1).
In this example we have assumed that 1=Yes and 2=No.
The edit check generates a message if duration is missing
when a history item is marked Yes, and also complains if a
duration has been specified or marked with a missing
value code when the history variable
has been answered No.
Why did we attach the edit check in this example to the
duration field and not to the Yes/No question?
In general it is best to write edit checks with the intention of attaching
them to the last field in the block of fields to be checked.
This allows data entry to be completed on all fields within the block
before the edit check is executed.
Data entry staff will quickly get frustrated with edit checks
if they pop-up messages just as they are about to make a correction
which would have fixed the problem.
Also, if the edit check is executed too soon, it may fail to detect an
error condition that only becomes apparent after the block of fields
has been completed.
Generic edit checks may also include references to data fields on other plates, but must do so explicitly, by using the variable name of each such field.
In the following examples, any variable names that are not locally declared are assumed to be the names of variables specified in the study schema.
Example 5.25. If "Other" Race check box has been checked, does the "Other, specify" field also contain a value?
This example deals with 2 scenarios. If "Race" = "Other", then the "Other, specify" field must contain a value. If "Race" does not equal "Other", then the "Other, specify" field should not contain a value With this type of edit check, it is also a good idea to first check for existing queries on either the "Race" or "Other, specify" field. If queries exist, the edit check should probably abort as the problem has already been dealt with.
edit checkrace(){
#this is a field exit edit check attached to RACEOTH
#abort if either RACE or RACEOTH has a query
if( dfanyqc(RACE) || dfanyqc(RACEOTH) ) return;
if( RACE==4 && dfblank(RACEOTH) )
dfaddqc(RACEOTH,1,"",1,2,"");
if( RACE!=4 && !dfblank(RACEOTH) )
dfwarning("Other race was specified when unexpected.");
}
Example 5.26. Does the reported date of surgery occur before the study enrollment date?
edit days2surg() {
number diff;
diff = surgDate - entryDate;
if ( diff < 0 )
dfwarning( "Surgery occurred ", -diff,
" days before enrollment?" );
}
Example 5.27. Does the subject meet all eligibility criteria?
This example also shows one way to use local variables that are symbolic names for choice values. This can be useful because the current version of the edit checks language does not interpret references to choice or check variable labels.
edit isElig() {
choice no, yes;
yes = 1; no = 2;
if ( crit1 == yes && crit2 == yes &&
crit3 == yes && crit4 == yes &&
crit5 == yes && crit6 == yes )
{
if ( elig != yes )
dfwarning( "Subject meets eligibility criteria",
"but is not reported as eligible." );
}
else
{
if ( elig == yes )
dfwarning( "Subject has not met all eligibility",
criteria but is reported as eligible." );
}
}
Example 5.28. Compute age from birth date and compare with Age field.
The local variable age is declared at the beginning of the
edit check.
Within the body of the edit check, age must be coerced to
an integer because it is possible that the calculation used to assign a
value to age will yield one or more decimal places.
If the age value contains decimals, age
and the database variable AGE will never match when
compared because AGE is defined in the database as an
integer.
edit checkage(){
number age;
string s, m;
if( dfmissing(AGE[,0,1]) || dfunresqc(AGE[,0,1]) ||
!dflegal(BDATE) || dfunresqc(BDATE) ||
!dflegal(EDATE) || dfunresqc(EDATE) ) return;
age = int( (EDATE - BDATE)/365.25 );
if(age!=AGE[,0,1]){
m = "Age (" + (s=age) + "yrs) computed from birth" +
" and entry dates\ndiffers from age (" +
(s=AGE[,0,1]) + "yrs) on Form 1.";
if(dfask(m + "\nAdd Query.",1,"Yes","No")==1 )
dfaddqc(BDATE,3,m+
"Explain below and refax corrected page.",
1,1,"");
}
}
Example 5.29. If an adverse event has been checked on a follow-up form has the adverse event report been received?
This is an example of a cross-plate consistency check. This particular test can be dependent on the order that CRFs are validated from the new queue and hence should be programmed carefully. If the adverse event report is the subsequent page to the follow-up form during new record entry, it will not be present in the database when the follow-up form's edit checks are executed. A possible solution, as shown here, it to only execute this edit check when the follow-up form has been validated to at least level 1.
edit haveAEreport() {
number AEplate = 10; # Using a variable as a symbolic name
if ( DFVALID < 1 ) return;
if ( hadAE == 1 ) # the hadAE choice box was checked "yes"
# The assumption in this example is that the AE
# form has the same visit number as the visit that
# it is reported on.
if ( dfmissingrecord( ,,AEplate )
dfwarning( "An adverse event was reported but" +
" the AE report has not been received." );
}
Example 5.30. Is the subject's weight within the normal range for their gender?
In some cases a single legal range will not apply to all subjects. Rather than settle for a single range in the study schema that is wide enough to accommodate all subjects, we can write an edit check to apply different legal ranges to different subjects.
edit weightLegal() {
if ( sex == 1 ) { # male
if ( weight < 120 || weight > 275 ) {
dfwarning( "Weight is outside normal range for males." );
dfillegal( weight );
}
}
else if ( sex == 2 ) { # female
if ( weight < 90 || weight > 210 ) {
dfwarning( "Weight is outside normal range for females." );
dfillegal( weight );
}
}
}
Example 5.31. Compute body mass index
This example computes a value for a database variable,
bmi, that is stored in the database but is not
on the original CRF.
Remember that all you need to do this is to leave placeholders for these
computed variables in your database schema when defining the CRF in
DFsetup.
This example also uses the dfmoveto function to move to the
bmi variable if it can be computed, or to skip
to a subsequent field if it cannot.
edit storeBmi() {
if ( !dfmissing( weight ) && !dfmissing( height ) ) {
# store the computed value and move to it
bmi = weight / ( height * height );
dfmoveto( bmi );
}
else
# skip over bmi and move to dbp
dfmoveto( dbp );
}
Example 5.32. Send an e-mail notification of elevated blood pressure
The first part of the example uses two pieces: the edit check and the shell script that it calls. Note that this could all be done within the edit check, as is shown the second part of the example, but it could be harder to read.
The following example will send mail to a user named 'brian' each time a subject with elevated blood pressure is encountered when validating new records.
edit bpsendmail()
{
# send only on initial entry (validation = 0)
if ((DFVALID == 0) && (dbp > 95 || sbp > 140))
dfexecute("bpalert", "brian ", ID,
" ", DFSEQ, " ", dbp, " ", sbp);
}
Note the use of extra spaces in the dfexecute call.
These spaces are needed to ensure that the parameters passed to
the script are not combined into one argument.
The bpalert script might be written as follows:
#!/bin/sh
# bpalert - alert user in $1 that subject $2, visit $3
# has elevated blood pressure dbp = $4, sbp = $5
mail -s "HYPERTENSION ALERT" $1 <<END
SUBJECT = $2, VISIT = $3
DBP/SBP = $4 / $5
END
Example 5.33. Use batch edit checks to verify consistency of subject initials
This example uses the dfbatch function to first determine if this edit
check is being executed in batch or interactive mode.
If dfbatch evaluates to TRUE, the edit check is being executed in
batch and consistency checking will occur.
If this edit check is triggered interactively, it will not execute.
As this edit check executes only in batch mode, it is important to
include a useful error message.
edit batchcheckinitials(){
#check consistency of subject initials in batch mode
string m = "Different initials: visit 0 plate 1 = " ;
if( !dfbatch() )
exit;
if( @T != PINIT[,0,1] ) {
m = m + PINIT[,0,1]
+ " visit ", @[6], " plate ", @[5], " = ", @T;
dferror(m) ;
}
}
Example 5.34. Check visit date order
Errors in visit dates can result in incorrect overdue visit and next visit
calculations.
This edit check verifies that visit dates are in the expected order.
This edit check makes use of the group statement to define an array
of visit date variables for visits 1 through 6.
It will abort if it comes to a visit date variable that is blank or
contains a missing value code.
It is important that the error message is descriptive enough to help
the user identify which visit date is likely in error.
edit checkvisitdates(){
#check order of visit dates across visits 1 to 6
#this is a field exit edit check attached to the variables
#used as VisitDates
number v=1, flag=0;
string s, m = "Visit Dates are not in order:";
group vd vdt[,1,5], vdt[,2,5], vdt[,3,5], vdt[,4,5], vdt[,5,5], vdt[,6,5];
if( dfmissing(@T) ) exit;
while( v<=6 ){
m = m + "\nVisit " + (s=v) + "" + (s=vd[v]);
if( v<@[6] && !dfmissing(vd[v]) && vd[v]>=@T ){
flag=1 ; m = m + "?";}
if( v>@[6] && !dfmissing(vd[v]) && vd[v]<=@T ){
flag=1 ; m = m + "?";}
v = v + 1
}
if( flag==1 )
dferror("Visit Date Problem(s)\n",m);
}
The following message would be displayed in a pop-up dialog box during data entry if the edit check detected a visit date discrepancy.
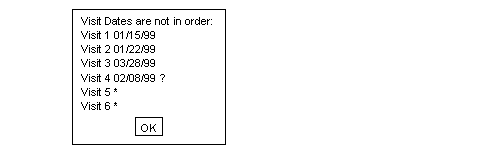
Example 5.35. Define a look-up table of study investigators
There are 2 steps involved in defining this edit check.
The first step is to create a file containing a list of investigator names
(e.g., $STUDY_DIR/lib/investigators.lut).
For example:
Dr. Joseph Smith Dr. Sally Brown Dr. Jane Doe Dr. Michael Green
The file investigators.lut must also be registered in
$STUDY_DIR/lib/DFlut_map.
For example, the following entry would be appended:
INVESTIGATORS|investigators.lut
The second step is the definition of the edit check.
edit investigatorpicklist(){
#this is a field exit edit check attached to the
#Investigator style
string s, m ;
#look for an exact match, if found abort
s = dflookup("INVESTIGATORS",@T,"",-1);
if( !dfblank(s) ) return;
#display pick list for user selection
s = dflookup("INVESTIGATORS",@T,"",4);
if( !dfblank(s) ){ @T=s; return;}
#if user does not pick a value from pick list and leaves
#the field blank, add a missing value query
if( dfblank(@T) )
dfaddqc(@T,1,"",1,2,"");
else{
#if user does not pick a value from pick list and enters
#some other value, add an illegal value query
m = @T + "is not a registered investigator.";
dfaddqc(@T,2,m,1,2,"");
}
}
Example 5.36. Define a generic function that will fill fields in the specified range of field numbers with the specified value
A generic function such as this can be referenced by name within any
other edit check in the study.
If you define generic functions in your DFedits file, be sure to
define them at the beginning of the file.
In this example, the generic function is called
GEN_Fill,
f and f2 define
by their numeric position
the range of fields that are to be filled, and
value represents the string value that is to fill
the specified fields.
#GEN_Fill(f,f2,value)
#enter the specified value into fields in the specified range
number GEN_Fill(number f, number f2, string value)
{
while(f<=f2){
@[f]=value;
f = f + 1;
}
}
Note that the function body does not actually return a number per its declaration. In such a case, the edit check environment returns a 0 value from the function, but this behavior should not be relied on. It is better to be explicit.
Here are some tips to help debug edit checks:
Use
dferror/dfmessage/dfwarningstatements at strategic places in your edit check.Remember that local variables are initialized to blank and any operation on blank data produces a blank result.
Variables are passed by value and not by reference - it is not possible to add a query to a function argument from within a function.
Be careful to use a double equals,
==, in if statements if you are trying to compare values. A single equal,=, is valid and performs an assignment and test for non-zero. The compiler will produce a warning message if you try to assign values in an 'if' statement.If the function in the setup tool reports problems, the actual error may be on the line just before the reported line number.
Do not use the same name for both edit checks and database variables. If you do, the compiler will issue an error message.
Do not use the same name for a local variable and a database variable. If you do, the local variable declaration hides the database variable until the end of the edit check or function.
The single quote, ', and the double quotes, ", are not interchangeable. Use double quotes whenever you are dealing with strings. Single quotes return the ASCII value of the single character they contain.
Use raw data entry to quickly test correct behavior.
Think about what happens if fields contain missing values.
Think about what happens when fields used in your calculations have queries attached to them.
Think about what happens if your edit check is executed again.
The shell level program DFcompiler can be used to compile the edit checks for DFexplore. Edit checks can be compiled from the command line as follows:
% DFcompiler -s # -o DFedits.bin DFedits
It is easiest to run DFcompiler from the study ecsrc directory and DFedits.bin
will be saved in the same ecsrc directory.
Edit checks can also be compiled by selecting in the Edits Checks dialog of DFsetup. Edit checks are loaded automatically when DFexplore, DFweb or DFcollect starts and can also be reloaded following a new compile, in DFexplore only, from the > menu.
The recommended procedure, when it is necessary to implement and test new edit checks
or modifications of existing edit checks, is to use DFsetup's Development and
Production studies feature.
Among other benefits, this allows study users to continue using the existing edit
checks without interference until the new version has been fully tested.
It is also recommended that previous production versions of DFedits be preserved
in case you ever need to rollback. A simple way to do this, for a study administrator,
is simply to rename DFedits
to DFedits_yyyymmdd, where yyyymmdd
is the date on which the DFedits file was replaced by a new version.
Allowable characters: A-Z, a-z, 0-9, _
No length limit
Case sensitive
First character must be a letter
Modifiers:
\n(new line),\r(carriage return),\t(tab),\f(form feed),\\(backslash)Maximum length: 1024 characters
The edit check language interpreter limits the number of instructions that can be executed per edit check to 1,000,000. This limit is imposed to provide endless-loop detection and prevention.
Reserved words cannot be used as edit check or variable names.
| @PID | DFSITE_CONTACT | DFVAR_UNITS | dfid2alias |
| @PLATE | DFSITE_FAX | DFVAR_USER1 | dfillegal |
| @T | DFSITE_ID | DFVAR_USER2 | dfimageinfo |
| @VISIT | DFSITE_NAME | DFVAR_USER3 | dflegal |
| DFACCESS_HIDDEN | DFSITE_PHONE | DFVAR_USER4 | dflength |
| DFACCESS_IMMUTABLE | DFSITE_BEGINDATE | DFVAR_USER5 | dflevel |
| DFACCESS_MASKED | DFSITE_COUNTRY | DFVAR_USER6 | dflogout |
| DFACCESS_NORMAL | DFSITE_ENDDATE | DFVAR_USER7 | dflookup |
| DFACCESS_VIEWONLY | DFSITE_ENROLL | DFVAR_USER8 | dflostcode |
| DFIMAGE_ARRIVAL | DFSITE_INVESTIGATOR | DFVAR_USER9 | dflosttext |
| DFIMAGE_FIRSTARRIVAL | DFSITE_PROTOCOL1 | DFVAR_USER10 | dfmail |
| DFIMAGE_FORMAT | DFSITE_PROTOCOLDATE1 | DFVAR_USER11 | dfmatch |
| DFIMAGE_LASTARRIVAL | DFSITE_PROTOCOL2 | DFVAR_USER12 | dfmessage |
| DFIMAGE_PAGES | DFSITE_PROTOCOLDATE2 | DFVAR_USER13 | dfmetastatus |
| DFIMAGE_SENDER | DFSITE_PROTOCOL3 | DFVAR_USER14 | dfmisscode |
| DFMODULE_USER1 | DFSITE_PROTOCOLDATE3 | DFVAR_USER15 | dfmissing |
| DFMODULE_USER2 | DFSITE_PROTOCOL4 | DFVAR_USER16 | dfmissingrecord |
| DFMODULE_USER3 | DFSITE_PROTOCOLDATE4 | DFVAR_USER17 | dfmissval |
| DFMODULE_USER4 | DFSITE_PROTOCOL5 | DFVAR_USER18 | dfmode |
| DFMODULE_USER5 | DFSITE_PROTOCOLDATE5 | DFVAR_USER19 | dfmonth |
| DFMODULE_USER6 | DFSITE_REPLYTO | DFVAR_USER20 | dfmoveto |
| DFMODULE_USER7 | DFSITE_SUBJECTS | DFVISIT_ACRONYM | dfneed |
| DFMODULE_USER8 | DFSITE_TEST | DFVISIT_DATE | dfpageinfo |
| DFMODULE_USER9 | DFSTUDY_NAME | DFVISIT_DUE | dfpasswdx |
| DFMODULE_USER10 | DFSTUDY_NUMBER | DFVISIT_LABEL | dfpassword |
| DFMODULE_USER11 | DFSTUDY_USER1 | DFVISIT_MISSEDPLATE | dfplateinfo |
| DFMODULE_USER12 | DFSTUDY_USER2 | DFVISIT_OPTIONALPLATES | dfpref |
| DFMODULE_USER13 | DFSTUDY_USER3 | DFVISIT_ORDERPLATES | dfprefinfo |
| DFMODULE_USER14 | DFSTUDY_USER4 | DFVISIT_OVERDUE | dfprotocol |
| DFMODULE_USER15 | DFSTUDY_USER5 | DFVISIT_REQUIREDPLATES | dfqcinfo |
| DFMODULE_USER16 | DFSTUDY_USER6 | DFVISIT_TYPE | dfqcinfo2 |
| DFMODULE_USER17 | DFSTUDY_USER7 | DFopen_patient_binder | dfreasoninfo |
| DFMODULE_USER18 | DFSTUDY_USER8 | DFopen_study | dfresqc |
| DFMODULE_USER19 | DFSTUDY_USER9 | break | dfrole |
| DFMODULE_USER20 | DFSTUDY_USER10 | check | dfsiteinfo |
| DFNEED_HIDE | DFSTUDY_USER11 | choice | dfstay |
| DFNEED_OPTIONAL | DFSTUDY_USER12 | continue | dfstr2date |
| DFNEED_REQUIRED | DFSTUDY_USER13 | date | dfstudyinfo |
| DFNEED_RESET | DFSTUDY_USER14 | dfaccess | dfsubstr |
| DFNEED_TRIM | DFSTUDY_USER15 | dfaccessinfo | dftask |
| DFNEED_UNEXPECTED | DFSTUDY_USER16 | dfaddmpqc | dftime |
| DFPAGE_LABEL | DFSTUDY_USER17 | dfaddqc | dftoday |
| DFPLATE_DESC | DFSTUDY_USER18 | dfaddreason | dftool |
| DFPLATE_FIELDS | DFSTUDY_USER19 | dfalias2id | dftrigger |
| DFPLATE_SEQCODING | DFSTUDY_USER20 | dfanympqc | dfunresqc |
| DFPLATE_USER1 | DFSTUDY_YEAR | dfanyqc | dfuserinfo |
| DFPLATE_USER2 | DFSUBJECT_ALIAS | dfanyqc2 | dfvarinfo |
| DFPLATE_USER3 | DFSUBJECT_ID | dfanyreason | dfvarname |
| DFPLATE_USER4 | DFVAR_ACCESS | dfask | dfview |
| DFPLATE_USER5 | DFVAR_COMMENT | dfautoreason | dfvisitinfo |
| DFPLATE_USER6 | DFVAR_DESC | dfbatch | dfwarning |
| DFPLATE_USER7 | DFVAR_ENTER_VALUE | dfblank | dfwhoami |
| DFPLATE_USER8 | DFVAR_ESSENTIAL | dfcapture | dfyear |
| DFPLATE_USER9 | DFVAR_FLDNUM | dfcenter | edit |
| DFPLATE_USER10 | DFVAR_FORMAT | dfclosestudy | else |
| DFPLATE_USER11 | DFVAR_GENERIC | dfdate2str | exit |
| DFPLATE_USER12 | DFVAR_HELP | dfday | format |
| DFPLATE_USER13 | DFVAR_INSTRUCTION | dfdebug | group |
| DFPLATE_USER14 | DFVAR_LABEL | dfdelmpqc | if |
| DFPLATE_USER15 | DFVAR_LEGAL | dfdirection | int |
| DFPLATE_USER16 | DFVAR_MODDESC | dfdisplay | number |
| DFPLATE_USER17 | DFVAR_MODNAME | dfeditqc | return |
| DFPLATE_USER18 | DFVAR_MODNUM | dfentrypoint | sqrt |
| DFPLATE_USER19 | DFVAR_NAME | dferror | string |
| DFPLATE_USER20 | DFVAR_PROMPT | dfexecute | time |
| DFPREF_CURRENT | DFVAR_REQUIRED | dfgetfield | vas |
| DFPREF_LOCK | DFVAR_STRING_VALUE | dfgetlevel | while |
| DFPREF_SESSION | DFVAR_TYPE | dfgetseq | |
| DFSITE_ADDRESS | DFVAR_UNIQUE | dfhelp |
Table of Contents
Batch is a framework for edit check execution in unattended (batch) mode. The framework specifies which data records are to be operated upon by edit checks and what is to happen when edit checks are invoked. It uses the same edit checks that are used in interactive edit checks through DFexplore and introduces no changes to the language.
From this point forward we'll refer to batch edit checks as DFbatch, the name of the program that oversees the batch edit checks process.
With DFbatch, it is possible to:
- add queries to data fields in the study database,
- add (and remove) missing page queries to the study database,
- generate and log messages that report inconsistencies, data values that need further review, etc,
- perform coding from lookup tables,
- change data values on records in the study database, and
- execute all of the same edit checks that DFexplore already does.
With DFbatch all of this is possible in an unattended mode.
This chapter contains overview descriptions as well as step-by-step instructions for most of the tasks you will perform with DFbatch.
| Read entire chapter before proceeding |
|---|---|
|
DFbatch is a very powerful, and potentially dangerous if misused, application. We recommend that you read each section before using DFbatch for the first time. If you do not have time to read everything before starting, read DFbatch Basics and Using DFbatch at a minimum. |
If you have previously used DFbatch, Using DFbatch, BATCHLIST Element Reference, and BATCHLOG Element Reference are good reference sections.
Limitations of DFbatch are outlined in Limitations.
A great deal of the value added by DFbatch is in the log information that it records. The syntax and semantics of the log information is described in Reference Pages. The XML nature of the log information lends itself to presentation in an HTML-enabled, web browser environment.
Sample control files and their purpose are listed in Example Control Files. Where file examples are given throughout the chapter, they may be fragments of a complete file, or a complete file themselves. If the example file begins with the XML declaration,
<?xml version="1.0"?>
it is the complete file, otherwise it is only a fragment from a file.
Common Pitfalls and System Messages describes common pitfalls and enumerates all of the possible error messages.
DFbatch can be thought of as an additional layer that sits on top of the edit checks language, in much the same way that DFexplore is another layer, albeit interactive, that sits on top of the same edit checks.
Figure 6.1. DFbatch interacts with the study database and the edit checks language in the same manner as DFexplore
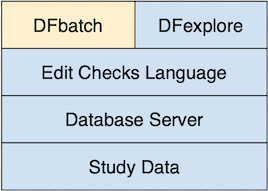
DFbatch reads the edit checks file as input, in the same way that DFexplore does. Where DFexplore provides interactive control over the records that are to be processed, DFbatch provides a language, stored in a control file, wherein the records to be processed can be specified non-interactively by the user. That specification can subsequently be applied to a study database on a regular (or irregular!) basis, in an efficient and unattended manner. This causes DFbatch to retrieve from the study database, one-by-one, the records selected by the control file, and apply the edit checks, field-by-field, to every field where they are referenced. Data field changes and queries are sent back to the study database, and all messages are logged. This is equivalent to retrieving sets of task records in DFexplore and traversing over each field of each record with the keyboard or mouse to invoke the edit checks.
While DFbatch is useful in most situations where edit checks are processed, it is not necessarily appropriate in all situations. Before proceeding to implement DFbatch, consider the following situations where it is inappropriate:
Application of edit checks to level 0 records . Batch edit checks cannot be applied to level 0 (new) records. If your workflow model is such that most edit checking must be performed during validation of new records, batch edit checks may not be appropriate.
Creation of queries that require user confirmation. In batch, calls to
dfaddqc()must always return with either a success status (equivalent to the user clicking ) or a fail status (equivalent to clicking ). It is not possible within a batch for some function calls to return success and some function calls to return false. If there is some uncertainty in the response (possibly because additional external information that is not available to the edit check must be reviewed), DFbatch is not appropriate.Display of lookup tables. DFbatch returns the default response for
dflookup()in all circumstances unless an exact match can be found. If matching must be performed by a visual search of the lookup table, DFbatch is inappropriate.Changes to record key fields. The record key fields cannot be modified in batch, this includes: the study number, plate number, visit number, and subject ID.
On the other hand, DFbatch is appropriate in many more situations where interactive edit checks are not workable or painfully inefficient.
Cross-plate edit checks. Records are generally processed in the order that they are received within a fax. In an interactive setting, it is very possible that the other plate involved in a cross-plate check is not yet in the database. Typically, the logic of the edit check will gracefully fail because the other plate is missing. However, in batch, the likelihood of this occurring is substantially reduced, and at those times when it does occur likely represents a plate that is truly missing.
Re-application of edit checks. When the logic of an edit check changes mid-study, it is too time consuming to re-apply study edit checks interactively via DFexplore, except for all but the smallest databases. With DFbatch, re-applying edit checks is trivial.
Application of new edit checks. Using DFbatch, it is easy to add new edit checks over the course of a study and apply them retrospectively to existing data.
Improved audit information. DFbatch logs a great deal of information about the environment in which edit checks execute. This can prove to be valuable debugging or audit information that is simply not available during interactive edit checks.
DFbatch is a command-line utility as well as a view in DFexplore. This section describes the command-line version of DFbatch which, apart from how it's invoked, is identical to the DFexplore DFbatch view. The commmand-line version of DFbatch is invoked from a command prompt or a scheduled cron or Windows Task Scheduler task.
DFbatch reads a control file of instructions as input, uses those instructions to select records from the study database, and executes all referenced or requested edit checks for those records, sending additions and changes back to the study database. At the same time, all actions taken by DFbatch are logged to an output file.
The output is a complete record of what happened during the execution of DFbatch. It is created so that incremental changes can be easily identified and is in a format that is amenable to post-processing. It is by default post-processed to an HTML document, which is only one possible view of the log results. The post-processing can be skipped, delayed, or subsequently re-applied to create a different view of the same results. DFbatch goes to great lengths to separate the creation of log information from its presentation.
It should be noted that DFbatch does not bypass the normal database activities that already define DFdiscover. Database records are requested from the study server in the same manner as existing applications, permissions and record locking are enforced, and changes are similarly sent back to the study server, where updates are performed and journal records are written. Record locks are observed so that DFbatch cannot modify a record that is currently locked by another DFdiscover application.
Certain aspects of edit checks are intrinsically interactive and do not
lend themselves naturally to a batch environment.
The dfask() edit check function, for example, is
an interactive function where the user selects one of the two
presented responses.
Lookup table functions, via dflookup(), are also
inherently interactive.
Fortunately, each of these functions also requires the programmer to
provide a default response as an argument.
DFbatch uses this default response as the function return value in
batch mode.
This allows an edit check that would otherwise require user interaction
to complete in a non-interactive environment.
Perhaps the easiest way to learn DFbatch is to look at an example.
DFbatch needs a batch control file as input. This must be created by the user in advance of invoking DFbatch. The purpose of the batch control file is to specify criteria that select records from the study, optionally name edit checks to be executed (by default all edit checks referenced by variables of selected records are executed), and state actions to be applied as the edit checks are executed.
Example 6.1. Example batch control file
<?xml version='1.0'?>
<BATCHLIST version='1.0'>
<BATCH name="simple">
<TITLE>This is a very simple batch</TITLE>
<DESC>This batch executes edit check aeCoding on all
records that are currently at level 2.</DESC>
<ACTION>
<APPLY which="none"/>
<LOG which="data msg qc" file="simple_out.xml"/>
</ACTION>
<CRITERIA>
<LEVEL include="2"/>
<EDIT>aeCoding</EDIT>
</CRITERIA>
</BATCH>
</BATCHLIST>
The first thing that you will notice is a new language. The batch control file is specified in eXtensible Markup Language, XML. In XML parlance, the input file is a document. It turns out that the log output from DFbatch is also written in XML. There are many public domain tools (written in Java, Perl, C, etc) that are to parse and transform XML. Some web browsers are even able to display XML directly.
XML is a markup language and the markup is in elements
and attributes.
The extent of an element is marked with tags, namely
a start tag and an end tag.
The start tag and end tag for an element have the same name but
different notation.
The start tag is denoted with <TAG>
and the matching end tag is denoted with </TAG>.
The terminology is important: for the element named
TAG, the start tag is
<TAG> and the end tag
is </TAG>.
The content of an element is the data between the start and end tags. The relationships in the content are achieved by nesting elements.
In the example,
BATCHLISTBATCHTITLEDESCACTIONAPPLYLOGCRITERIALEVELEDIT
are elements.
Each document must have exactly one element, called the root, within which
all other elements are nested.
In the example, BATCHLIST is the root element.
It is an error for any text to appear after the end tag of the root element.
Nested elements must be properly balanced or the document will be invalid, meaning that it cannot be parsed.
Example 6.3. Improperly balanced, nested elements
<A><B></A></B>
In this example the relationship between
A and B
is ambiguous and so is not valid.
Elements that have no content are called empty elements.
Empty elements are denoted with a single tag that represents both the
start tag and the end tag.
The notation for an empty tag is <TAG/>.
In the example,
APPLYLOGLEVEL
are empty elements. Empty elements are typically used to convey information via their attributes.
Data about elements can be kept in nested elements or, if the data is itself not structural, in attributes. In the example,
versionis an attribute ofBATCHLISTnameis an attribute ofBATCHwhichandfileare attributes ofLOGincludeis an attribute ofLEVEL
The example control file contains a single BATCH
named simple.
The batch has a brief TITLE and a more
verbose description in DESC.
These two elements are present for documentation purposes only and do not
influence the processing.
The records to be processed are selected by the CRITERIA
element.
In this example, only those records that have a current validation level
equal to 2 and reference the
aeCoding edit check are selected.
For each selected record (those records that have a validation level of 2),
the data fields are traversed in tab order
and the edit check aeCoding is executed at every data
field that references it by name through at least one of the variable's
plate enter, field enter, field exit, or plate exit attributes.
Other edit checks are not executed.
Any actions that cause messages to be generated, queries to be added, or
data field values to be changed are logged to the
file
simple_out.xml.
The changes are not however applied to the database as is indicated by the
which
attribute of the APPLY element.
Of equal importance to the behavior that is stated, is the behavior that is not stated. In particular,
There is nothing about the input control file that specifies which study it applies to. DFbatch control files are meant to be re-used across studies. Hence the input file itself does not state which study it belongs to. The association with a particular study is made when DFbatch is executed.
Many possible retrieval criteria are not stated. As is true in the task set building dialog of DFexplore, criteria that are not stated match everything on that criteria. So for example, since no selection has been done by subject ID or visit number, all subject IDs and visit numbers are included.
The example control file must be saved to a named file that is accessible to the DFbatch program. There are two possible locations:
Stored on the server. Server-side study-specific control files must be kept in the
STUDY_DIR/batchdirectory.Stored locally. Locally stored control files can be stored anywhere on the system that you have access to.
For file naming conventions, we recommend that the control file use the
name of the batch as the basename with a _in.xml
extension (meaning input XML file).
For example, a control file named simple
for study 254 which is
stored on the server where study 254 has a STUDY_DIR of
/opt/studies/val254
would be saved to
/opt/studies/val254/batch/simple_in.xml.
To process the control file, DFbatch needs to login to your DFdiscover server the same way DFexplore does when you login. If you need to use a proxy server to access the internet, DFbatch automatically uses the same proxy settings as DFexplore. If you need to change these settings, use the Proxy Setting window in DFexplore to do this. Next, you need to tell DFbatch the name of your DFdiscover server, your username and your password. You can do this using -S, -U and -C command line options, by setting DFSERVER, DFUSER and DFPASSWD environment variables or by using DFpass. DFbatch is invoked with the command:
%cd /opt/studies/val254/batch%DFbatch -S server.somedomain.com -U datafax -C passwd 254 -i simple_in.xml
The login, study number and control file arguments can appear in any order. For more invocation options, see Invoking DFbatch.
The result of the command is the execution of the batch and the creation
of the log file, /opt/studies/val254/batch/simple_out.xml
on the server (as requested by the file
attribute of the LOG element).
The log file records the details of the batch execution but is not
post-processed in any way.
A more common way of running DFbatch is to process the batch, applying any
actions and creating the log file as before, and then immediately
post-processing the log to create a viewable HTML page.
This is achieved with -p xsl as in:
%cd /opt/studies/val254/batch%DFbatch -S server.somedomain.com -U datafax -C passwd -p xsl 254 -i simple_in.xml -osomedir/simple.html
The option requests post-processing via a default
XSL transformation (supplied with DFbatch) and the result
is written to simple.html, typically in a directory that
can be viewed from a web browser.
The HTML output is explicitly re-directed to an output file
at execution time (rather than making that file an attribute of the input
control file) to allow for the various web-publishing infrastructures that
are present at DFdiscover installations.
Alternatively, an existing log file can be transformed at any time into an HTML file using DFstyle, a companion program to DFbatch. The invocation of DFstyle requires a log file created by a previous invocation of DFbatch (not an input control file).
%cd /opt/studies/val254/batch%DFstyle -p xsl simple_out.xml >somedir/simple.html
The exit status of DFbatch reflects the success of the command.
If the exit status is 0, DFbatch executed
successfully.
Any other exit status indicates that an error occurred.
The text of the error will appear in one of the last elements of the
log file.
Example 6.4. Testing DFbatch exit status in C-shell
%/opt/dfdiscover/bin/DFbatch -S server.somedomain.com -U datafax -C passwd 254 -i simple_in.xml0%echo $status
This section covers the DFbatch control file language in detail and also provides addition detail for how DFbatch can be used.
The control file is an XML document that must address two needs:
it must state selection criteria for records to retrieve and/or edit checks to execute, and
it must state actions to take as edit checks are applied.
The document root element of the control file is always
BATCHLIST.
A BATCHLIST contains one or more
BATCH elements.
A BATCHLIST that contains zero BATCH
elements is an empty input file.
Although this is syntactically valid, it has no semantic purpose,
and results in no processing.
Most users will define one BATCH per control file as this
is an easy organizational way to think about batches.
The basic processing element of the control file
is a BATCH.
BATCHes appear sequentially within the input and cannot be self-nested (that is,
a BATCH may not contain another
BATCH).
Example 6.5. The general format of an input file
<?xml version="1.0"?> (1) <BATCHLIST version="1.0"> (2) <BATCH name="batch1"> (3) <TITLE>title of the batch</TITLE> (4) <DESC>description of the batch</DESC> <ACTION> (5) action directives </ACTION> <CRITERIA> (6) record selection criteria edit checks to be included </CRITERIA> </BATCH> <BATCH name="batch2"> <!-- another batch definition appears here --> (7) </BATCH> </BATCHLIST>
|
This declaration must appear as the first line of the input file to indicate that the contents are an XML document. | |
|
The default | |
|
A | |
|
An optional description for the batch and its purpose can be placed in
| |
|
The processing rules of the | |
|
This is the required notation for a comment. Comments are for internal documentation of an XML file - they are read but otherwise not processed. |
The input file elements serve one of four purposes:
Descriptive. These elements,
TITLEandDESC, are present for identification and documentation purposes only.Processing Directive. These elements,
CONTROLandMOVETO, allow the user to modify the behavior and limits of DFbatch as it executes.Action. These elements,
ACTION,APPLY,LOGandODRF, are used to specify what actions are to be taken as edit checks are executed.Record and Edit check Selection. These elements,
CRITERIA,IDRF,ID,PLATE,VISIT,CREATE,MODIFY,LEVELandSTATUS, are used to select from the database the records that are to be processed, and optionally,EDIT, to select the specific edit checks that are to be applied to the fields of those records.
Certain characters have special meaning to an XML parser and hence cannot appear directly in an XML document. This includes the input control file. To use one of these five special characters in an XML document, the corresponding entity must instead be used.
Table 6.1. Special characters
| To display this character | Use this entity |
|---|---|
| & | & |
| < | < |
| > | > |
| " | " |
| ' | ' |
Example 6.6. Use of entity for special character
<?xml version='1.0'?>
<BATCHLIST version="1.0">
<BATCH name="special">
<TITLE>Run checkElig & checkDemo</TITLE>
<DESC>Among other things these edit checks test
that the subject's age is >= 20 and <= 50.
</DESC>
<!-- note that &, <, >, ', and " can appear inside
comments because comments are not parsed -->
...
</BATCH>
</BATCHLIST>
Record selection criteria are similar to those found in the
By Data Fields
retrieval option of DFexplore.
Retrieval criteria for records are by:
site ID, subject ID (not subject alias), visit, plate, level, status, creation date, modification date.
These map respectively to the elements:
SITE, ID, VISIT, PLATE, LEVEL, STATUS, CREATE, MODIFY.
These criteria are specified as nested elements of the
CRITERIA element.
If any element is omitted (or empty), the records to be selected
are not constrained by this element.
For example, if
PLATE is omitted (or empty), there is no restriction on
plate and hence all plates are retrieved, subject to the other criteria.
Retrieval by center and pattern are currently excluded.
Where multiple elements are given as criteria,
the selected records must satisfy the inclusion
criteria of each element, that is, the selected records are the intersection
set of the sets of selected records satisfying each element individually.
Each element is expected to appear at most once. If an element (accidentally) does appear more than once, the last element overrides any previous occurrences.
Each criterion allows a value, range, and/or lists of both.
These are expressed as the value of
the include
attribute as in:
include="val,min-max,val2"
Example 6.7. Selection criteria for all final records of visits 1 through 5, 10, and 20 through 29 inclusive
<CRITERIA>
<STATUS include="final"/>
<VISIT include="1-5,10,20-29"/>
</CRITERIA>
The CRITERIA element accepts one
optional attribute, sort.
The value of the attribute determines what sort order, if any, is applied
before processing to records that meet the selection criteria.
The value is constructed from one or more sort keys (precedence for
multiple leys is left to right) from the list:
id, visit, plate
where multiple keys are separated by ; and each key is preceded
by either + to indicate that the key is sorted in ascending
order, or - to indicate that the key is sorted in
descending order.
Example 6.8. Use of the sort
attribute to sort selected records on ascending id, then descending visit,
and then descending plate
<CRITERIA sort="+id;-visit;-plate"> .... </CRITERIA>
It is also possible to select records by an existing
DFdiscover Retrieval File (DRF).
This is specified with the IDRF empty element and the
file attribute as in:
Example 6.9. Select records specified by IDRF
<IDRF file="test.drf" />
The element instructs DFbatch that the records to be processed
in the batch can be found in a file named test.drf
located in the study /drf directory.
Example 6.10. Select records specified by IDRF
in a sub-folder using relative pathname
<IDRF file="sub_folder/test.drf" />
Example 6.11. Select records specified by IDRF
in a sub-folder using absolute pathname
<IDRF file="/STUDY_DIR/drf/test.drf" />
In the above two examples,
the element instructs DFbatch that the records to be processed
in the batch can be found in a file named test.drf
located in the study /drf directory.
The use of IDRF is mutually exclusive of the other
selection criteria and it is an error for the two to appear together in
one batch's CRITERIA.
Additionally, records selected by the IDRF element
are processed in the order that they appear in the file, ignoring any
value assigned to the file attribute of
the parent CRITERIA.
By default, all of the edit checks that are referenced by data fields on the records selected by the criteria, are executed.
For each selected record, DFbatch performs the following steps
The data fields of the record are traversed in the normal order (typically plate top to plate bottom), executing any plate enter edit checks that are defined at each field. A plate enter edit check may change the traversal order as the result of a
dfmoveto()call.Starting at the first data field, the data fields are traversed in order. At each field any field enter edit checks, and then any field exit edit checks are executed. A field exit edit check may change the traversal order as the result of a
dfmoveto()call.The data fields of the record are again traversed in the normal traversal order, executing any plate exit edit checks that are defined at each field. Note that a
dfmoveto()call always returns 0 in a plate exit edit check.
It is possible to include only certain edit checks to be executed by naming
them in EDIT elements within the
CRITERIA element.
Records and fields are still traversed in the same manner but only those
edit checks that match one of the included names are executed.
This can be useful, for example, when a new edit check is introduced
and requires testing.
Example 6.12. Execute only the aeCoding edit check on plate 5 records
<CRITERIA>
<PLATE include="5" />
<EDIT>aeCoding</EDIT>
</CRITERIA>
The EDIT element is the only element that is allowed to
repeat within CRITERIA.
A single EDIT element may also list multiple comma
or space separated edit checks by name in the element body.
Example 6.13. Equivalent specifications for multiple edit checks
<CRITERIA>
<EDIT>aeCoding</EDIT>
<EDIT>checkInit</EDIT>
<EDIT>sigLookup</EDIT>
</CRITERIA>is equivalent to
<CRITERIA>
<EDIT>aeCoding,checkInit,sigLookup</EDIT>
</CRITERIA>
When EDIT elements appear in the criteria,
DFbatch optimizes the retrieval by automatically excluding from
selection those plates that contain no variables which reference any of the
named edit checks.
For example, if the edit check named checkElig
is referenced only by variables on plate 2, only records from plate 2 are
selected even if PLATE does not
appear in the criteria.
However, if the PLATE element is present
and includes a plate other than 2, the resulting set of selected records
will be empty as there can be no records that reference both the
checkElig edit check and are from a plate other than 2.
Edit checks are capable of changing (or assigning) data field values, adding queries to fields, adding and deleting missing page queries for records other than the current record, and generating information, warning, and error messages. This leads to three important categories:
- data - changes that are made to data field values
- qc - addition/modification of queries to data
fields by
dfaddqc()anddfeditqcor missing page query operations bydfaddmpqc()anddfdelmpqc() - msg - messages that are generated by
dfmessage(),dfwarning(), anddferror()
In an interactive environment, the user has the ability to visually review
and confirm or cancel each of these actions.
In DFbatch this is not possible.
Instead the batch control file must carefully state which actions will be
allowed to proceed unattended and which ones will be canceled.
This is specified in the ACTION element and its
APPLY, LOG, and
ODRF child elements.
Figure 6.2. The descendants of ACTION and
their attributes
<ACTION> <APPLY when="changes|all" level="1|2|3|4|5|6|7" which="none msg data qc"/> <LOG when="changes|all" which="none msg data qc" file="logfile_out.xml" mode="create|write" share="yes|no" history="yes|no" /> <ODRF when="changes|all" which="none msg data qc" file="outfile.drf" mode="create|write" share="yes|no"/> </ACTION>
This element controls what categories of actions are applied back to the database.
| Use with care |
|---|---|
|
This is the only element that controls whether or not DFbatch can request
irreversible database changes to be made and hence it must be used with care.
If you are uncertain about the behavior of a batch control file or
the edit checks that it may execute, use
|
The attributes of APPLY have the
following semantics:
when. This attribute must have a value ofallorchanges. If the value isall, every selected record is sent back to the database as an update, even if the record contains no differences from its previous state. If the value ischanges, only those records that contain changes are sent back to the database for update.level. This attribute must be a single integer in the range of legal validation levels, 1 through 7 inclusive. It indicates the validation level to assign to records when they are sent back to the database for update. This causes DFbatch to behave in a manner equivalent to Validate mode in DFexplore. If this attribute is not specified, the validation level of any record sent back for update is not changed. This is equivalent to Edit mode in DFexplore.which. This attribute has a value that is one or more space delimited categorical keywords from the list:none,data,msg,qc.dataindicates that all records with changed data fields should be updated back to the database.qcindicates that all queries added viadfaddqc()ordfaddmpqc(), modified bydfeditqc()or deleted viadfdelmpqc(), should update the database.msgis intended for logging purposes only and is present here for symmetry only.noneindicates that no changes to data or queries should be updated back to the database. This is the recommended attribute value for this attribute in the context ofAPPLY.
This element controls what categories of actions are logged to file.
The attributes of LOG have the
following semantics:
when. This attribute must have a value ofallorchanges. If the value isall, every selected record, and every selected edit check, is logged to file, even if the edit check or record created no changes or messages. If the value ischanges, only those records and edit checks that created a change or message are logged to file.which. This attribute has a value that is one or more space delimited categorical keywords from the list:none,data,msg,qc.dataindicates that all records and edit checks which would change data fields should be logged to file.qcindicates that all queries that would be added viadfaddqc()ordfaddmpqc(), modified viadfeditqc()or deleted viadfdelmpqc(), should be logged.msgrequests that all messages generated viadferror(),dfwarning(), anddfmessage()be logged.noneindicates that no actions should be logged. The recommended value for this attribute in the context ofLOGisdata msg qc, as inwhich="data msg qc".file. This attribute specifies the pathname of the file that will store the log information. The location of the batch control file (server-side or local) determines where the log file will be stored. The attribute is not required if no logging has been specified withwhich="none".If the log file location is local and the pathname is given as a relative pathname, it is assumed to be relative to the directory that contains the input file. If a pathname is given, and the log file will be stored on the server, the pathname portion is discarded and only the filename portion will be used. If the attribute is missing but logging has been specified, DFbatch will construct a filename for the log as follows:
The directory name of the input file is the base.
Append the value of the batch's
nameattribute.Append the fixed suffix,
_out.xml.
It is also possible to include a sub-folder as part of filename specification. The location can start from either a relative or absolute path. The filename can be given as
sub_folder/xx_out.xmlSTUDY_DIR/batch/sub_folder/xx_out.xml, which is an absolute path. In both cases, the output file will be created inSTUDY_DIR/batch/sub-folder/xx_out.xml. It is not possible to include../as a sub-folder: including../in any pathname will lead to an error.mode. This attribute specifies whether the log file should be created,create, or (over)written,write.share. This attribute specifies whether the log file is readable and writable by other members of the same group,yes, or by the creator only,no. This attribute is applicable only to locally stored log files.history. This attribute specifies whether DFbatch should distinguish between log entries that are new to this execution of the batch and entries that were present in previous executions,yes, or not,no.If history is requested, it is required that the file be created with
mode="write"and that the name of the log file and the batch criteria not change between executions. That is, DFbatch must be able to read an existing log file to create a previous execution history and then overwrite that log file with the history and new entries.The purpose of this history mechanism is not to build a complete historical view containing all log entries ever generated. Instead it creates the log file containing only the entries from the current execution, flagging each of the entries to indicate whether this is the first time that it has appeared or whether it first appeared in a previous execution. Only those entries which are generated by the current execution are included when history is enabled.
The entries in the batch output are the same whether history is checked or not. If history is yes, the entries are divided by date to show in which run the entry first appeared. If history is no, all entries are shown together.
This element controls which records are written to a DFdiscover Retrieval File.
The attributes of ODRF have the
following semantics:
when. This attribute may have a value ofallorchanges. If the value isall, every selected record is written to the DRF, even if the record had no changes or messages. If the value ischanges, only those records that had a change or message are written to the DRF.which. This attribute has a value that is one or more space-delimited categorical keywords from the list:data: all records and edit checks which would change data fields should create a DRF recordqc: all queries that would be added viadfaddqcordfaddmpqc, modified viadfeditqcor deleted viadfdelmpqc, should create a DRF recordmsg: all records for which messages are generated viadferrordfwarning; and dfmessage; shall be written to the DRF.none: no DRF should be created (this is equivalent to not specifying theODRFelement).
The presence of a result DRF allows for the subsequent review of records that were (if changes were applied) or would have been (if changes were logged) processed by the batch.
file. This attribute specifies the file that will receive the output DRF records. The attribute is not required ifODRFhas been specified withwhich="none".Output DRF files are written to the study
/drfdirectory, and must have the.drfsuffix, e.g.test.drf. If the attribute is missing but output DRF has been specified, DFbatch will construct a filename for the DRF.It is also possible to include a sub-folder as part of filename specification. The location can start from either relative or absolute path. The filename can be given as
sub_folder/xx_out.xml, which is a relative path, or/STUDY_DIR/batch/sub_folder/xx_out.xml, which is an absolute path. In both ways, the output file should be found in/STUDY_DIR/batch/sub-folder/xx_out.xml. The filename cannot contain ../ or /.. to alter the file path. Doing this will lead to error.mode. This attribute specifies whether the DRF should be created,create, or (over)written,write.share. This attribute specifies whether the DRF is readable and writable by other members of the same group,yes, or by the creator only,no. This attribute is applicable only to locally stored DRF files.
For the current implementation of DFbatch, the input file must contain only the elements and attributes that have been described and are valid for the document type definition. The presence of unknown elements or attributes will cause reading of the batch to fail, resulting in the batch not being processed. This will likely change in a future release.
For additional descriptions of each element and the attributes (and their purpose) that are valid for each element, consult BATCHLIST Element Reference.
The simplest way to invoke DFbatch is from the command-line with the command
% DFbatch -S server -U username -C password -i control_file study#
where the -S, -U and -C options,
-i control_file and
study# arguments are all required,
The command line options -S, -U and
-C may be used to supply user credentials for
authentication, although a much better approach is to use DFpass
as described in
Section 3.2, “User Credentials” and
DFpass.
The control_file can be located locally if the infile contains a
path, or it can exist on your server, in the 'STUDY_DIR/batch'
directory.
This DFbatch command processes, in document order and in the context of the
selected study,
all of the BATCH elements that appear in
control_file.
Example 6.14. Executing DFbatch on study 254 with the control
file /opt/studies/val254/batch/test_in.xml
% DFbatch -S idemo44.datafax.com -U datafax -C passwd 254 -i test_in.xml
DFbatch accepts several other command-line options:
| permits batches to be selected by name from the control file, or re-ordered within the control file. |
| will make a default output HTML file in your local outhtml_dir for each batch. The default output file name will be 'outhtml_dir' + 'batch_name' + '_out.html'. |
|
output html file name is
local and must include the full path. If '-o outhtml_file' is specified and
there is more than one batch within a control file, only the last
log will be saved to the given name. Consider using
|
| use the specified directory for the log file of each batch |
|
XLSX file name is
local and must include the full path. If '-x xlsx_file' is specified and
there is more than one batch within a control file, only the last
Excel output will be saved to the given name. Consider using
|
| use the specified directory for the Excel output of each batch |
| will write any errors to the full pathname of error_log. By default, errors are written to stderr. |
DFbatch is ideally a batch process, run during off-hours.
In the UNIX environment this is easily accomplished with the cron program.
To use cron, simple include the needed DFbatch command-line equivalents in
the crontab file.
For additional information on using cron, refer to the UNIX man pages.
Example 6.15. Using cron to run DFbatch at scheduled times
0 23 * * * /opt/dfdiscover/bin/DFbatch -S idemo44.datafax.com -U datafax -C passwd 254 -i test_in.xml
Remember that the environment and path variables defined by your login are not available to cron, and hence /opt/dfdiscover must be set explicitly.
| DFbatch exit status |
|---|---|
|
When executing DFbatch several times with a sequence of control files (as might be done in a shell script), it is recommended to check the exit status of each execution before continuing with the next. Refer to DFbatch exit status. |
Recall that the root document element,
BATCHLIST, can contain one or more
nested BATCH elements.
The option -b
can be used to select for processing specific batches by their name.
For example, the command:
batchname(s)
% DFbatch -S idemo44.datafax.com -U datafax -C passwd -b simple 254 -i test_in.xml
processes only the batch named simple from the control file,
independent of how many other batches are defined.
If the control file defines only the batch named simple
then execution of DFbatch with and without -b simple
are equivalent.
However, if the control file defines three batches named
simple, hard, and, difficult,
it would be possible to process only a subset of the defined batches with
a command like
% DFbatch -S idemo44.datafax.com -U datafax -C passwd -b "simple difficult" 254 -i another_in.xml
which would process the two batches simple and
difficult while skipping the batch named hard.
When multiple batches appear in the control file, and multiple batches are
processed, default ordering specifies that the batches be processed
in the order that they appear in the file.
Using -b it is possible to alter the processing order at
invocation time without altering the control file.
Consider the following skeleton of a control file.
<?xml version="1.0"?>
<BATCHLIST>
<BATCH name="b1">
...
</BATCH>
<BATCH name="b2">
...
</BATCH>
<BATCH name="b3">
...
</BATCH>
</BATCHLIST>Invoked in the default fashion,
% DFbatch -S idemo44.datafax.com -U datafax -C passwd 254 -i simple_in.xml
DFbatch will process batches b1, then
b2, and finally
b3.
Order of processing can be altered on an ad-hoc basis through use of
-b, as in the following example that processes batch
b3 first, and then
b1, skipping
b2:
Example 6.16. Process batches named b3 and b1
% DFbatch -S idemo44.datafax.com -U datafax -C passwd -b "b3 b1" 254 -i simple_in.xml
| Note |
|---|---|
If non-default ordering is commonly achieved with this method, it is recommended that the control file be edited to permanently re-order the batches. |
The log information recorded by a batch execution is also in XML format.
This makes it amenable to further processing, filtering, or
transformation (also called styling).
Of course, post-processing is only meaningful if the control file uses
a LOG element and the value of the
which attribute is not
none; otherwise, there is no log
information available to post-process.
For this release, the only post-processing that is supported by DFbatch is transformation of the log output via XSL. This is accomplished with one or more XSL style sheets that are able to transform the log information into HTML without affecting the log file itself. HTML is the most common output format but is certainly not the only one. An XSL transformation could just as easily create another XML file, plain text output, or even PDF. The simplest method for specifying post-processing is at DFbatch execution time with the command:
% DFbatch -p xsl study control_file > htmlfile
This command processes, in the same manner as already described,
the batch in control_file in
the context of study study.
When the processing completes the log information is immediately post-processed
with the default
XSL transformation to create an HTML view of the log information that
is stored to htmlfile.
Note that the log file is not changed which allows
post-processing to re-occur at a future time with the same XSL
transformation, or a different XSL transformation to achieve different views
of the same log.
This post-processing of XML via XSL (or other) transformation is the key
ingredient that allows DFbatch to separate content creation from
presentation.
DFbatch comes with a default file for XSL transformation that is stored in
/opt/dfdiscover/lib/xsl/batchlog.xsl and is referenced by the
file /opt/dfdiscover/lib/stylesheets.xml.
It is possible to create other XSL transformations
(and future versions of DFbatch will
be available
with more) and incorporate them into
/opt/dfdiscover/lib/stylesheets.xml.
In such a case, it is possible to post-process the log information with
an alternate, non-default, XSL transformation using the command:
% DFbatch -p XSL=name study control_file > htmlfile
which applies the XSL transformation named name
to the log file, instead of the default transformation.
Note that the case of the option is important:
-p xsl requests the default transformation,
-p XSL= requests a specific
transformation.
name
So far, we have only seen how to post-process a log file at the time of DFbatch execution. This unfortunately does not de-couple log creation from presentation as DFbatch must be run again to re-do the post-processing. De-coupling log creation from presentation requires an additional program, DFstyle.
The DFstyle program can be invoked at any time to apply a transformation to an XML file (not just a batch log file). DFstyle is invoked with either:
% DFstyle -p xsl XML file > htmlfilewhich applies the default transformation, or
% DFstyle -p XSL=name XML file > htmlfile
which applies the transformation named by name.
Notice that XML file can be any XML file,
although in the context of DFbatch, it is an existing log file (not control
file) from a previous execution.
Also notice that the study number is not supplied to DFstyle - it does need the
context of the study number to transform the log file.
Using DFstyle in conjunction with DFbatch, it is now possible to independently execute a batch to create a log, and then transform that log information into another format for viewing, thus achieving the de-coupling of content creation from presentation.
Example 6.17. Complimentary uses of DFbatch and DFstyle
Remember that DFstyle can transform a log file independent of when the log file was created. As a result the following two scenarios produce the identical HTML file.
The first scenario performs the post-processing at DFbatch execution time,
% DFbatch -S idemo44.datafax.com -U datafax -C passwd -p xsl 254 -i /opt/studies/val254/batch/example_in.xml \
-o /opt/studies/val254/batch/htmlfilewhile the second uses DFstyle to perform the post-processing at some, potentially much, later point in time:
%DFbatch -S idemo44.datafax.com -U username -C passwd 254 -i /opt/studies/val254/batch/example_in.xml%DFstyle -p xsl example_out.xml > htmlfile
If multiple XSL transformations are defined, it also possible to create multiple presentations of the same log file.
Example 6.18. Creating multiple presentations
(1)%DFbatch -S idemo44.datafax.com -U datafax -C passwd -p xsl 254 -i /opt/studies/val254/batch/example_in.xml \ -o /opt/studies/val254/batch/htmlfile1(2)%DFstyle -p XSL=secondtransform example_out.xml > htmlfile2(3)%DFstyle -p XSL=thirdtransform example_out.xml > htmlfile3
|
The first presentation is an HTML file created with the default transformation. | |
|
The second presentation is a second HTML file created with the named
transformation | |
|
The third presentation is a third HTML file created with the named
transformation |
The challenge in using DFstyle to transform a log file is to know the name of the log file that was created by a batch control file. Consistent naming between batches and input/log files simplifies this challenge.
Keep the following issues in mind as you learn about and begin to use batch edit checks.
Decide on file naming conventions and stick to them. There are potentially many input control files and output log and drf files that can be created and naming conventions will help you to keep them straight. Minimally, try using suffixes to distinguish between file types, something like this:
_in.xml- input control file_out.xml- output log file.drf- output DRF
If possible, define only one
BATCHper input control file. Use the name of the batch as the base name of the input file.Use the
APPLYelement sparingly. Instead, useLOGandODRFas often as possible. Remember that theAPPLYelement will cause actual, irreversible changes to be made to the database. There is no rollback feature in DFbatch.Further remember that the owner of created queries and the last modifier of changed data becomes the person that executed DFbatch. This implies that different batches should be run by different people, likely at different validation levels, just as if the edit checks were being tripped by individuals during interactive validation. Certain batches will lend themselves to being run by first level data entry, at validation level 1, while others will lend themselves, such as adverse event and medication coding, to being run by subsequent reviewers at higher validation levels. Alternatively, you may decide to make one person responsible for running all batch edit checks. DFbatch does not require or restrict either implementation method.
Perform extensive testing of edit check logic in DFexplore. Test all edit checks extensively in DFexplore before using them in DFbatch. In the 10-20 seconds required to validate a record interactively, DFbatch will process hundreds of records. It is much easier to deal with a single edit check error than potentially hundreds of the same error.
Re-usability of batches versus specificity. Do certain types of batch control files lend themselves to being generic while others are study specific? Where multiple batches need to be defined, is it better to define them in one
BATCHLISTwith multipleBATCHes, or in multipleBATCHLISTs with one (or a few)BATCHes per.One reason to place multiple
BATCHes in oneBATCHLISTis that the order of execution of the eachBATCHis executed in the order that is in encountered in the file, reading the file from top to bottom.Executing DFbatch from cron. What timing issues need to be considered before running DFbatch from the UNIX cron?
Try to limit how much a batch does. Avoid input control files that execute all edit checks on all records. This can lead to very large log files that are difficult to post-process and subsequently apply history to. Experience to date has shown that log files larger than 5MB in size cannot really be post-processed efficiently.
Primary records only. Remember that only primary records are processed in batch.
Consider dedicating a validation level to DFbatch. If DFbatch is being used to make changes to database records and add/delete queries, consider using one of the validation levels only for the purpose of marking records that have been through batch processing. For example, assume that all data records go through two levels of review by data clerks (first review moves record from level 0 to 1, and second review moves record from level 1 to 2) resulting in database records (hopefully final) at level 2. If the next step in the data review process required application of all edit checks to all level 2 records, level 3 could be used as an indication of records that had been through batch processing. The input control file would look something like:
<?xml version="1.0"?> <BATCHLIST version="1.0"> <BATCH name="level2"> <TITLE>Process all level 2, primary records</TITLE> <DESC>This batch processes all level 2, primary data records, moving them to level 3 after they are processed.</DESC> <ACTION> <APPLY when="all" which="data msg qc" level="3"/> (1) <LOG when="changes" which="data msg qc" (2) history="no"/> </ACTION> <CRITERIA sort="+id;+visit;+plate"> <STATUS include="primary"/> <LEVEL include="2"/> (3) </CRITERIA> </BATCH> </BATCHLIST>Apply all actions (data, msg, and qc) and assign all records (not just changed records) a validation level of 3. Specifying
when="changes"would only change the validation level of those records that were updated by the batch processing, leaving the unchanged records at their current validation level. In some scenarios, this may be desired, but not in this one.Log only the changes (this is not required, but does reduce the amount of log information recorded when edit checks do nothing and records are not changed).
Also, turn off history. Because of the way that this control file is designed, this attribute setting really makes no difference. Since level 2 records are always promoted to level 3, it will never occur that the same log entries repeat, because the selected set of records will always be different.
Select only the records that are at level 2.
This section describes the behavior of interactive edit check functions in the non-interactive environment of DFbatch, and lists items that cannot and should not be done with DFbatch.
Certain features of the edit checks language
are intrinsically interactive, for example, the dfask()
function.
When these features are encountered in DFbatch, they must be handled
intelligently and consistently.
The following describes the behavior of edit check functions when executed in
DFbatch.
Functions that are not listed behave identically in both environments.
dfask( query, dflt, accept, cancel )always returnsdflt.dflookup( table, var, dflt, method )always returnsdfltwhenmethodhas any value other than-1. Ifmethod=-1,dflookupbehaves the same in both environments, returning the result element fromtableif an exact match can be made,dfltotherwise.![[Warning]](../../imagedata/warning.png)
Warning Improper coding of
dflookupwithout consideration to this behavior in DFbatch can lead to unexpected results. In particular, previously coded fields can be replaced with the default.Example 6.19. Improper usage
The following use of
dflookupwould always replace the value in the current variable with the default parameter,""in this case.string s; s = dflookup( "TABLE", @(T-1), "", -1 ); if ( s != "" ) @T = s; else @T = dflookup( "TABLE", @(T-1), "", 0 );The intention of the edit check appears to be a good one: store an exact match if it can be found, otherwise display the table and store the selected result. In DFexplore, this works fine. However, in DFbatch, the second invocation of
dflookup()will never display the table and will always return"", which after the assignment, effectively erases any previous value in@T.
An example of a general implementation strategy for
dflookupthat considers the behavior in DFbatch is given below.Example 6.20. Implementation strategy for
dflookup# Look-up the value in @(T-1) and store the result in @T if ( dfbatch() ) { # Use the result only if an exact match is available and then # only if the field is not already coded result = dflookup( "TABLE", @(T-1), "", -1 ); if ( result == "" ) return; if ( dfblank( @T ) ) @T = result; else if ( result != @T ) dferror( "Previously coded value of ", @T, " and new result ", result, " do not match." ); } else { # insert existing dflookup code here }
dfillegal()always returns0. Setting the field color to the illegal value color is only meaningful in DFexplore.dfbatch()always returns1in DFbatch and0in DFexplore.The behavior of
dfaddqc(),dfeditqc(),dfaddmpqc(), anddfdelmpqc()is controlled by thewhichattribute of theAPPLYelement. IfAPPLYcontains the attributewhich="qc", the behavior of these functions is equivalent to the user interactively always choosing , that is, the queries are always added/deleted. If the value forwhichdoes not containqc, the behavior of these functions is equivalent to the interactive user who always chooses , that is, the query operations are always canceled.The behavior of
dfmessage(),dfwarning(), anddferror()is controlled by thewhichattribute of theAPPLYorLOGelements.All other errors that would cause a dialog to appear in interactive edit checks cause a log message to be written to the batch log file, if there is one, or standard error, otherwise. For example, if the referenced lookup table is not a plain ASCII file, an error message will appear on the command line when the batch is initialized.
The following actions are not possible with DFbatch.
It is not possible to change the status of a record. This means that a final record must remain final - it is not possible to assign an illegal or missing required value to a data field on a final record.
There are exceptions to this rule. DFbatch will change the status of a final record to incomplete if one or more queries are added to data fields of the record. DFbatch will change the status of a final record to incomplete if an illegal value is assigned to a field on a final record.
It is not possible to change the status of any primary record to secondary in batch.
It is not possible to change the value of any key field of a record. This means that the plate, visit, and ID numbers may not be changed, regardless of whether or not those fields are barcoded. This limits the usefulness, in batch, of edit checks that calculate and assign the visit number of a CRF.
It is not possible to apply batch edit checks to new (validation level 0) records, or records with status
missed.It is not possible to to assign a validation level that is greater than the maximum permitted to the user by their DFdiscover permissions.
It is not possible to query or interact with the user when something unexpected happens. Most unexpected events in DFbatch result in the writing of a message to the log file followed by immediate termination of the batch execution.
The FDA's Guidance for Industry: Computerized Systems Used in Clinical Trials explicitly states
Features that automatically enter data into a field when that field is bypassed should not be used.
Although not stated, the spirit of the guidance relates to reported values. Calculated or derived values that are not part of the source record should be exempt from this guidance.
To be safe, however, we do not encourage creating or processing edit checks that blindly assign values to data fields. A preferred alternative is to compute what the expected value of a field is and then compare it against the recorded value, signaling an error when the two do not match.
Example 6.21. Comparing calculated and reported values
Rather than simply replacing reported values, edit checks should be written to compare calculated and reported values, issuing an error message when the two do not match.
# s contains the calculated value for what should be in @T
s = "some calculated value";
if ( s != @T )
dferror( "The expected value, ", s,
", and the reported value, ", @T,
", do not match." );
Should it be necessary to add or change data values using edit checks, DFdiscover will by default, automatically create a reason indicating that the change was made by an edit check rather than manually. These reasons have this standard format:
Set by edit check ECname
Going with the old saying that “a picture is worth a thousand words”, this section is a collection of example control files.
Example 6.22. Execute all edit checks on all records, logging their actions without actually applying them
<BATCHLIST>
<BATCH name="batch1">
<TITLE>All edit checks on all records</TITLE>
<ACTION>
<!-- this APPLY statement isn't actually needed as the
default is to apply none, but being explicit about it
never hurts -->
<APPLY which="none" />
<LOG which="data msg qc" file="batch1_out.xml" mode="write"/>
</ACTION>
<CRITERIA>
</CRITERIA>
</BATCH>
</BATCHLIST>
Example 6.23. Execute all edit checks on all incomplete, level 1 records for plates 1 through 5, applying no changes, and logging only the messages generated
<BATCHLIST>
<BATCH name="batch2">
<ACTION>
<APPLY which="none" />
<LOG which="msg" file="batch2_out.xml" mode="write"/>
</ACTION>
<CRITERIA>
<STATUS include="incomplete" />
<LEVEL include="1" />
<PLATE include="1-5" />
</CRITERIA>
</BATCH>
</BATCHLIST>
Example 6.24. Perform AE coding on all level 4 records, assigning the records to level 5 when coding is complete
<BATCHLIST>
<BATCH name="batch3">
<ACTION>
<APPLY which="data" level="5" />
<LOG which="data" file="batch3_out.xml" mode="write"/>
</ACTION>
<CRITERIA>
<LEVEL include="4" />
<PLATE include="12" />
<EDIT>aeCoding</EDIT>
</CRITERIA>
</BATCH>
</BATCHLIST>
Notice the statement:
<APPLY which="data" level="5" />
requests DFbatch to make changes to the processed records and change
their validation level to 5.
Before including this statement in the batch control file, you should
thoroughly
test that the aeCoding() is performing as expected.
Example 6.25. Execute the echoWho edit check on
all level 1 and 2 records, processing records in the specified order
<BATCHLIST>
<BATCH name="batch4">
<ACTION>
<APPLY which="none" />
<LOG which="data msg qc" file="batch4_out.xml" mode="write"/>
</ACTION>
<CRITERIA sort="-id;+visit;+plate;-img">
<LEVEL include="1-2" />
<EDIT>echoWho</EDIT>
</CRITERIA>
</BATCH>
</BATCHLIST>
Example 6.26. Execute the missingAEreport() edit check on
all plate 15 records, adding and logging only queries
<BATCHLIST>
<BATCH name="batch5">
<ACTION>
<APPLY which="qc" />
<LOG which="qc" file="batch5_out.xml" mode="write"/>
</ACTION>
<CRITERIA>
<PLATE include="15" />
<EDIT>missingAEreport</EDIT>
</CRITERIA>
</BATCH>
</BATCHLIST>
This would be a beneficial edit check in a scenario where plate 15 contains
a question like: “Did the subject experience an adverse event? If yes,
please submit adverse event report.”.
The assumption is that the missingAEreport() edit check
tests the condition and adds a missing page query if the condition is
true.
Interactively, we don't know if the missing adverse event report is possibly
the next page in the fax, so this makes more sense to do in batch.
Experience has demonstrated that the following areas of DFbatch are known to be problematic and may result in confusion at the end-user level:
The control file lists both plate and edit checks selection criteria. The plate list that results from the intersection of these two criteria is the empty set. The result is that DFbatch executes without error but no records are processed.
Edit checks that assign the sequence number based upon fields after the sequence number and then dfmoveto() back to the sequence number. This can lead to a loop condition because the attempt to assign the sequence number will always fail.
At runtime, the interpreter may detect errors that generate messages.
Error messages from DFbatch appear either on the command-line (or the shell
from which DFbatch was started via cron) or
in the
BATCHLOG file as a M
element with a type of
s (short for system).
Even though these system messages appear as
M elements, it is not possible
to filter them by excluding msg
from the which attribute of either
the APPLY or
LOG elements.
They will always appear in the output log file.
While it is possible to subsequently filter out these messages with an
alternate style sheet, this practice is not recommended.
Messages that appear on the command-line have the following format:
ERROR[batchname,type]:message(1) (2) (3)
|
The name of the batch in which the error was detected.
A batch name of | |
|
The severity of the error detected from the list:
| |
|
The text of the reported message. |
This section describes every element in the BATCHLIST document type definition. The description is offered in two complimentary views. The first view is a tree diagram illustrating the relationships between the elements. The second view is a reference where the meaning and use of every element is described.
A Document Type Definition (DTD) defines the set of elements and their attributes that are valid within a document, how many occurrences of each are allowed, and in what order they are allowed. The batch edit checks input control file has its own DTD that is listed here.
The root element of the input control file is
BATCHLIST.
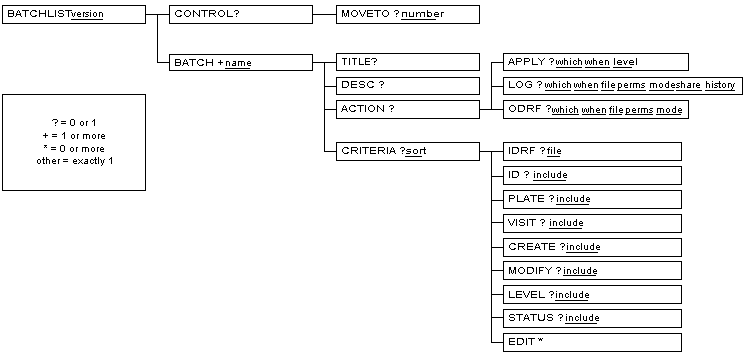
The description of each element in this reference is divided into sections.
Provides a quick synopsis of the element. The content of the synopsis varies according to the nature of the element, but may include any or all of the following sections:
Content model. This is a concise description of the elements that it can contain. This description is in DTD "content model" syntax which describes the name, number, and order of elements that may be used inside an element. The syntax contains: element names, keywords, repetitions, sequences, alternatives, and groups.
Element names. An element name in a content model indicates that an element of that type may (or must) occur at that position.
Keywords. A content model that consists of the single keyword
EMPTYidentifies an element as the empty element. Empty elements are not allowed to have any content. The#PCDATAkeyword indicates that text may occur at that position. The text may consist of any characters that are legal in the document character set.Repetitions. Repetition of an element is accomplished by following the element name with one of the following characters:
*for zero or more times,+for one or more times, or?for exactly zero or one time. If no character follows the element name, then it must appear exactly once at that position.Sequences. If element names in a content model are separated by commas, then they must appear in sequence.
Alternatives. If element names in a content model are separated by vertical bars, then they are alternatives, requiring the selection of one or another element.
Groups. Parenthesis may be used around part of a content model to form a group. A group formed this way can have repetition characters and may occur as part of a sequence.
Note that at this time, there is no element that allows a mixed content model, that is, an element that accepts both text and sub-elements.
Attributes. Provides a synopsis of the attributes on the element.
Describes the semantics of the element in detail. Typically contains the following sub-sections:
Processing Expectations. Summarizes specific processing expectations of the element. Many processing expectations are influenced by attribute values. Be sure to consult the description of element attributes as well.
Parents. Lists the elements that are valid parent elements.
Children. Lists the elements that are valid child elements.
APPLY
APPLY — which actions are applied to database, when, and at what validation level
Synopsis
Attributes
| Name | Type | Default | Description | ||||
|---|---|---|---|---|---|---|---|
| which | Enumeration:
| none | The value for this attribute is one or more (space-delimited) words from the enumerated list. Inclusion of a word in the attribute value indicates that the batch is interested in the action of this operation. Edit checks operate in three distinct areas:
which="none msg" is equal to which="msg"
| ||||
| when | Enumeration:
| None | If the value is all,
every record, or edit check (in the case of
LOG), every action is taken.
If the value is changes,
only those records which are changed,
or edit checks (in the case of
LOG) that cause a change, are actioned.
| ||||
| level | Enumeration: 1, 2, 3, 4, 5, 6, 7 | None | Level specifies the validation level that should be assigned to processed records when they are written back to the database [a]. The level may never be greater than the maximum validation level permitted to the user. If the level is not specified, the validation level of the record is not changed. This is equivalent to working in Edit mode in DFexplore. | ||||
[a] A processed record (a data record) will be written back to the database when:
| |||||||
Examples
Example 6.28. Apply no changes to the database - this is the recommended usage for this element
<APPLY which="none"/>
Example 6.29. Apply all records to the database that have had data fields modified, qc notes added or deleted, or messages generated and assign those records a validation level of 2
<APPLY
when="all"
which="data msg qc"
level="2"
/>
BATCH
BATCH — a named set of processing actions and record retrieval set
Synopsis
Examples
Example 6.30. A simple BATCH that logs all messages generated by the msgIllegalBP edit check when applied to level 1, plate 2 records
<BATCH name="checkBP">
<TITLE>Check systolic and diastolic blood pressure readings</TITLE>
<ACTION><LOG which="msg" /></APPLY>
<CRITERIA>
<EDIT>msgIllegalBP</EDIT>
<LEVEL include="1" />
<PLATE include="2" />
</CRITERIA>
</BATCH>
BATCHLIST
BATCHLIST — root element of input control file
Synopsis
Attributes
| Name | Type | Default | Description |
|---|---|---|---|
| version | NUMBER | 1.0 | The version of the Note that this version number is in no way related to the version number of the XML language that appears at the head of each input file in the processing instruction <?xml version="1.0"?>
|
Description
A BATCHLIST is simply
a container element for one or more
BATCH elements.
The BATCHLIST is the root element of the input control
file.
Processing Expectations
When multiple BATCH elements
appear in a BATCHLIST,
they are, by default, processed in the order that they are defined in
the BATCHLIST.
The processing order can however be altered at runtime through the
-b option.
The BATCHLIST root element must be present even if only
one BATCH is defined.
It must appear exactly once in the file.
It is an error for any characters to appear after the
</BATCHLIST> end tag.
Examples
Example 6.31. A BATCHLIST containing two BATCHes, named first and example
<?xml version="1.0"?>
<BATCHLIST version="1.0">
<BATCH name="first">
<CRITERIA>
<PLATE include="1-10" />
<EDIT>codeAE</EDIT>
</CRITERIA>
</BATCH>
<BATCH name="example">
<ACTION>
<APPLY which="data msg qc" level="2" when="changes" />
</ACTION>
<CRITERIA>
<LEVEL include="1" />
</CRITERIA>
</BATCH>
</BATCHLIST>
CONTROL
CONTROL — grouping element for batch edit checks processing options
Description
Certain elements of the control input file language may themselves be present
to provide end-user control over
the actions and behavior of the batch edit checks program itself.
These elements are defined within a CONTROL or
REASON element.
The CONTROL and REASON
elements apply to all
BATCH elements within the input control file and hence is
defined once before any BATCH definition.
CREATE
CREATE — select records for inclusion by the record creation date
Synopsis
Description
Records are selected by creation date with this element.
If the creation date of a record is in the range of included creation
dates
(specified by the value of the include
attribute), the record becomes part of the set of records to be processed.
If no inclusion criteria are specified,
records are selected for inclusion independent of the creation date.
This is equivalent to not specifying a
CREATE element.
The date notation for expressing constant date values is the standard
DFdiscover notation, yy/mm/dd, which means two-digit year of
century, two-digit month of year, and two-digit day of month.
The word today may appear in the selection criteria,
and has the effect of selecting records created with todays date.
CRITERIA
CRITERIA — record selection criteria for the batch
Synopsis
Content model
CRITERIA ::= ((IDRF| (ID | PLATE | VISIT | CREATE | MODIFY | LEVEL | STATUS)*), EDIT*)
Attributes
| Name | Type | Default | Description |
|---|---|---|---|
| sort | CDATA | None | The sort method to be applied to the selected records before processing the edit checks. The value for the attribute contains one or more (semi-colon
delimited) words from the list:
If a sort key is omitted, the sort order on that key in the selection set of records is arbitrary. Example 6.34. Use of the sort attribute Sort by ascending subject ID, and then descending visit identifier within subject. sort="+id;-visit" |
Description
The CRITERIA specifies the record selection criteria for
the current batch.
Records can be selected by:
a previously created DRF file using the
IDRFchild element,key fields using the
ID,VISIT,PLATE,CREATE,MODIFY,LEVEL, andSTATUSchild elements,edit checks that they reference using the
EDITchild element,a combination of DRF and edit check names, or
a combination of key fields and edit check names.
Examples
Example 6.35. Select records from plate 5, modified on or after January 1, 2000, at validation level 3, for subjects 1000 to 4999 inclusive, and for visits 1 through 10, inclusive, and 14
<CRITERIA>
<PLATE include="5" />
<MODIFY include="00/01/01-today" />
<LEVEL include="3" />
<ID include="1000-4999" />
<VISIT include="1-10,14" />
</CRITERIA>
DESC
DESC — verbose description for the batch purpose
EDIT
EDIT — select records for inclusion by the edit checks that reference them
ID
ID — select records for inclusion by the subject ID
Synopsis
Description
Records are selected by subject ID with this element.
If the subject ID of a record is in the range of included subject IDs
(specified by the value of the include
attribute), the record becomes part of the set of records to be processed.
If no inclusion criteria are specified,
records are selected for inclusion independent of the subject ID.
This is equivalent to not specifying an ID
element.
IDRF
IDRF — DFdiscover Retrieval File of keys for records to be selected
Synopsis
Attributes
| Name | Type | Default | Description |
|---|---|---|---|
| file | CDATA | None | A relative or absolute pathname.
For relative pathnames, the base directory is the $STUDY_DIR/drf
directory of the study.
The pathname must be specified using UNIX file and directory naming semantics.
If the pathname is not given, the processing system
will create a pathname from:
/STUDY_DIR/drf/sub-folder/xx_out.drf,
which starts from absolute path, or
sub-folder/xx_out.drf,
which is a relative path.
In both ways, the output file should be found in
/STUDY_DIR/drf/sub-folder/xx_out.drf.
The filename cannot contain ../ or /.. to alter the file path.
Doing this will lead to error.
|
LEVEL
LEVEL — select records for inclusion by the validation level
Synopsis
Description
Records are selected by validation level with this element.
If the current validation level of a record (not of the user performing
the batch) is in the range of included validation levels
(specified by the value of the include
attribute), the record becomes part of the set of records to be processed.
If no inclusion criteria are specified, records are selected for inclusion from the minimum validation level, 1, up to and including either:
the level specified by the
levelattribute of theAPPLYelement, if it is specified explicitly, orthe maximum validation level permitted to the user executing the batch
This is equivalent to not specifying a LEVEL
element.
Permissible validation levels are in the range 1 through 7 inclusive.
LOG
LOG — which actions are logged to an external file and when
Synopsis
Attributes
| Name | Type | Default | Description | |||||
|---|---|---|---|---|---|---|---|---|
| which | Enumeration:
| none | The value for this attribute is one or more (space-delimited) words from the enumerated list. Inclusion of a word in the attribute value indicates that the batch is interested in the action of this operation. Edit checks operate in three distinct areas:
which="none msg" is equal to which="msg"
| |||||
| when | Enumeration:
| None | If the value is all,
every record, or edit check (in the case of
LOG), every action is taken.
If the value is changes,
only those records which are changed,
or edit checks (in the case of
LOG) that cause a change, are actioned.
| |||||
| file | CDATA | None | A relative or absolute pathname.
For relative pathnames, the base directory is the same as the base directory
of the input file.
The pathname must be specified using UNIX file and directory naming semantics.
If the pathname is not given, the processing system
with create a pathname from:
/STUDY_DIR/batch/sub-folder/xx_out.xml,
which starts from absolute path, or
sub-folder/xx_out.xml,
which is a relative path.
In both ways, the output file should be found in
/STUDY_DIR/batch/sub-folder/xx_out.xml.
The filename cannot contain ../ or /.. to alter the file path.
Doing this will lead to error.
| |||||
| share | Enumeration:
| None | Is this file sharable (meaning readable and writable) with other
members of the same group?
If the attribute value is no,
the file can be read and written by the creator only.
If the attribute value is yes,
the file can be read and written by the creator and others in the same
group as the creator.
If the attribute is not specified, the sharing is inherited from the user's
environment.
In UNIX, this is defined by the umask command.
| |||||
| mode | Enumeration:
| write | should the file be created, (create), or
(over)written, (write)?
Generally, files will be created with write so that they
can be subsequently overwritten when the batch is re-run.
However, if a batch is only intended to be run once or you would like to
ensure that the log file does not accidentally overwrite a log file from
another batch that might have the same name, use
create.
| |||||
| history | Enumeration:
| None | Should the log file mark those entries that were generated
by a previous execution, yes,
or should all entries be marked equally, no,
as though they were all created by the current execution.
|
Examples
Example 6.41. Log all records that have had data values changed, messages generated, or queries added or deleted
<LOG
when="all"
which="data msg qc"
/>
Example 6.42. Log records which have had data values changed or messages generated to an output file in a subfolder
<LOG
when="all"
which="data msg"
file="test/example_out.xml"
/>or
<LOG
when="all"
which="data msg"
file="/STUDY_DIR/batch/test/example_out.xml"
/>
The output file should be found in
/STUDY_DIR/batch/test/example_out.xml
MODIFY
MODIFY — select records for inclusion by the record modification date
Synopsis
Description
Records are selected by last modification date with this element.
If the plate identifier of a record is in the range of included modification
dates
(specified by the value of the include
attribute), the record becomes part of the set of records to be processed.
If no inclusion criteria are specified,
records are selected for inclusion independent of the modification date.
This is equivalent to not specifying an
MODIFY element.
The date notation for expressing constant date values is the standard
DFdiscover notation, yy/mm/dd, which means two-digit year of
century, two-digit month of year, and two-digit day of month.
The word today may appear in the selection criteria,
and has the effect of selecting records last modified on todays date.
MOVETO
MOVETO
— define limit on number of consecutive
dfmoveto() calls
Synopsis
Description
During processing of an edit check, it is possible for one edit check or a combination of edit checks to create a loop. Specifically, a loop can occur when:
- two edit checks, on two different fields,
each execute the
dfmoveto()statement, resulting in a move to the other field - or execution of the
dfmoveto()statement in a single edit check can move the focus back to a previous field allowing subsequent traversal to move the focus back to the current field and triggering the same edit check
A loop is detected after a number of consecutive dfmoveto()
invocations.
By default this number is 20.
When a loop is detected, edit checks processing halts.
In an interactive environment, a warning dialog is displayed and the user has
the option of aborting the current edit check or allowing it to continue,
presumably resulting in another loop shortly thereafter.
In batch edit checks, the current edit check is always aborted.
It is possible, although highly unlikely,
for a particularly complex combination of edit checks to invoke
dfmoveto() more than the default number of times, 20,
without a loop existing.
In this case, the limit on the loop can be raised by setting the
number attribute of the
MOVETO element to a higher value.
This element applies to all of the BATCH elements in the
current BATCHLIST.
ODRF
ODRF — which records are logged to an external DFdiscover Retrieval File (DRF) and when
Synopsis
Attributes
| Name | Type | Default | Description | |||||
|---|---|---|---|---|---|---|---|---|
| which | Enumeration:
| none | The value for this attribute is one or more (space-delimited) words from the enumerated list. Inclusion of a word in the attribute value indicates that the batch is interested in the action of this operation. Edit checks operate in three distinct areas:
which="none msg" is equal to which="msg"
| |||||
| when | Enumeration:
| None | If the value is all,
every record, or edit check (in the case of
LOG), every action is taken.
If the value is changes,
only those records which are changed,
or edit checks (in the case of
LOG) that cause a change, are actioned.
| |||||
| file | CDATA | None | A relative or absolute pathname.
For relative pathnames, the base directory is the $STUDY_DIR/drf
directory of the study.
The pathname must be specified using UNIX file and directory naming semantics.
If the pathname is not given, the processing system
will create a pathname from:
/STUDY_DIR/drf/sub-folder/xx_out.drf,
which starts from absolute path, or
sub-folder/xx_out.drf,
which is a relative path.
In both ways, the output file should be found in
/STUDY_DIR/drf/sub-folder/xx_out.drf.
The filename cannot contain ../ or /.. to alter the file path.
Doing this will lead to error.
| |||||
| share | Enumeration:
| None | Is this file sharable (meaning readable and writable) with other
members of the same group?
If the attribute value is no,
the file can be read and written by the creator only.
If the attribute value is yes,
the file can be read and written by the creator and others in the same
group as the creator.
If the attribute is not specified, the sharing is inherited from the user's
environment.
In UNIX, this is defined by the umask command.
| |||||
| mode | Enumeration:
| write | should the file be created, (create), or
(over)written, (write)?
Generally, files will be created with write so that they
can be subsequently overwritten when the batch is re-run.
However, if a batch is only intended to be run once or you would like to
ensure that the log file does not accidentally overwrite a log file from
another batch that might have the same name, use
create.
|
Examples
Example 6.45. Write all records that have had messages generated to the
DRF named /opt/studies/254/batch/outputs/sample1.drf
and enable file sharing
<ODRF
when="all"
which="msg"
file="/opt/studies/254/batch/outputs/sample1.drf"
share="yes"
mode="write"
/>
Example 6.46. Write records which have had data value changed or messages generated to the DRF in a sub-folder
<ODRF
when="all"
which="data msg"
file="test/sample1.drf"
/>or
<ODRF
when="all"
which="data msg"
file="/STUDY_DIR/drf/test/sample1.drf"
/>
The output file should be found in
/STUDY_DIR/drf/test/sample1.drf
PLATE
PLATE — select records for inclusion by the plate identifier
Synopsis
Description
Records are selected by plate identifier with this element.
If the plate identifier of a record is in the range of included plate
identifiers
(specified by the value of the include
attribute), the record becomes part of the set of records to be processed.
If no inclusion criteria are specified,
records are selected for inclusion independent of the plate identifier.
This is equivalent to not specifying a PLATE
element.
REASON
REASON — define the text that will be inserted into reason for data change records for each data value that is changed and applied to the database
Description
During processing of an edit check, a data value may be changed. Further, that data value may have been defined in the study setup so that it has a minimum reason level after which all data value changes require reasons. If the changed data value is applied to the database, and the record's validation level is at or above the minimum reason level, then a reason is required. The text of this element is used as the reason.
If, in the batch definition, this element is not present or is invalid
(i.e. contains '|' or control characters, or consists entirely of an empty string)
and a reason is required for a data value change that is to be applied to the database,
then the system creates a reason text that is the concatenation of the
fixed string DFbatch and the current batch's name.
This element applies to all of the BATCH elements in the
current BATCHLIST.
STATUS
STATUS — select records for inclusion by the record status
Synopsis
Description
Records are selected by status with this element.
If the status of a record is in the range of included statuses
(specified by the value of the include
attribute), the record becomes part of the set of records to be processed.
If no inclusion criteria are specified,
records are selected for inclusion independent of the status.
This is equivalent to not specifying a STATUS
element.
Permissible status values must be chosen from the list:
final, incomplete, pending, missed, all.
TITLE
TITLE — brief title for the batch
VISIT
VISIT — select records for inclusion by the visit identifier
Synopsis
Description
Records are selected by visit identifier with this element.
If the visit identifier of a record is in the range of included visit
identifiers
(specified by the value of the include
attribute), the record becomes part of the set of records to be processed.
If no inclusion criteria are specified,
records are selected for inclusion independent of the visit identifier.
This is equivalent to not specifying a VISIT
element.
This section describes every element in the BATCHLOG document type definition. The description is offered in two complimentary views. The first view is a tree diagram of the document type definition. The second view is a reference where the meaning and use of every element is described.
A Document Type Definition (DTD) defines the set of elements and their attributes that are valid within a document, how many occurrences of each are allowed, and in what order they are allowed. The batch edit checks input control file has its own DTD that is outlined in Figure 6.3, “The BATCHLOG DTD”.
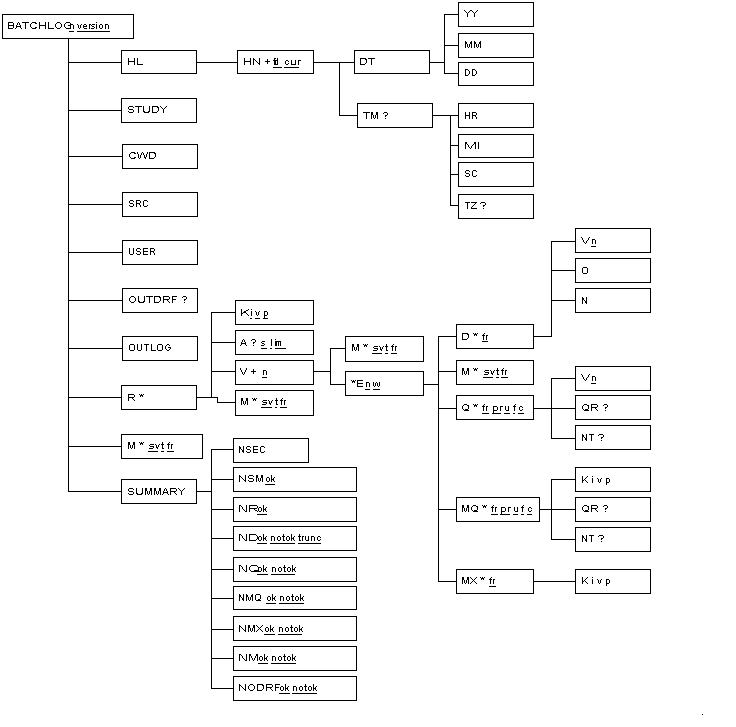
This reference describes every element in the BATCHLOG document type declaration. The organization of the reference is identical to that for the BATCHLIST document type and can be reviewed at Organization of Reference Pages.
A
A — meta information, including record status, validation level, and CRF image name, for the context record
Synopsis
Attributes
| Name | Type | Default | Description |
|---|---|---|---|
| s | Enumeration:
1=final, 2=incomplete, 3=pending, 4=FINAL, 5=INCOMPLETE, 6=PENDING, 0=missed.
| None | A numeric code, from the enumerated list, equivalent to the record status. |
| l | Enumeration: 1, 2, 3, 4, 5, 6, 7. | None | The validation level of the context record. |
| im | CDATA | None | The unique CRF image name of the context record. The name may be used to locate a physical file containing the image, or it may simply be a sequencing number in the case of records that have no CRF image. |
Description
A A contains meta information for the context record.
The meta information includes the record status, validation level, and the
CRF image name.
BATCHLOG
BATCHLOG — container element of batch output log file
Attributes
| Name | Type | Default | Description |
|---|---|---|---|
| n | CDATA | The name of the
The value of this attribute must match the value of the
| |
| version | NUMBER | 1.0 | The version of the Note that this version number is in no way related to the version number of the XML language that appears at the head of each input file in the processing instruction <?xml version="1.0"?>
|
CWD
CWD — the current working directory in which DFbatch executed to create this log file
D
D — information about a change in a data value for a single variable
Synopsis
Attributes
| Name | Type | Default | Description | |||
|---|---|---|---|---|---|---|
| fr | CDATA | None | The id of the unique history element ( | |||
| c | Enumeration:
| None | The completion status of the action, or function during which this item was recorded. The only time that a status of "failure" (code 0) is produced is when the database server is found to be unavailable. Otherwise, a status of success (codes 1 or 2) is produced. |
Description
A D contains the information of a change in a data
value that occurred when the edit check named in the parent element was
executed.
It identifies which variable (V) was changed,
what the original value of the variable was (O), and
what the new value is (N).
Processing Expectations
The V element identifies the variable for which the
data value was changed.
In this context, it is not expected to have any child elements.
The O element will always be present, even if the
variable had no original value (was blank), and similarly the
N element will always be present, even if the variable
has no new value (becomes blank).
DD
DD — day of month information for a date stamp
DT
DT — timestamp information for a single execution of DFbatch
Description
A DT contains date information, specifically the year
(YY), month (MM), and day
(DD).
This element appears as a child of an HN element and
records the current date that the batch was run, or the historical date
of a previous execution of the batch.
E
E — container element for an edit check including its name and what actions occurred when the edit check was executed
Synopsis
Description
The execution of an edit check can cause no changes to occur, or changes to one or more data values, messages, queries, missing page queries, or deletions of missing page queries, to occur. This element identifies the edit check by name and when it was executed, and is the parent element for the changes, if any. The parent of this element is the variable that was current when the edit check was executed.
Processing Expectations
If the detail level
(identified by the when
attribute of the LOG or APPLY
element in the input batch file) has a value of
changes, then this element will never
appear in the output as an empty element.
It may only appear as an empty element when the attribute value is
all in which the element identifies
that the edit check was executed but no changes occurred.
Examples
Example 6.58. An edit check element and its children
<E w='pn' n='no_diabetes'><M fr='1' t='w'>Section 5.c questions should be blank subject is not diabetic. </M> </E>
This fragment identifies that the edit check named
no_diabetes was triggered at plate
enter (pn) of the context variable
and its execution caused the shown warning message.
EQ
EQ
— a query edited by the execution of
dfeditqc
Synopsis
Attributes
| Name | Type | Default | Description | |||
|---|---|---|---|---|---|---|
| fr | CDATA | None | The id of the unique history element ( | |||
| pr | Enumeration:
1=missing, 2=illegal, 3=inconsistent, 4=illegible, 5=fax noise, 6=other, 30-99=user-defined category
| None | The category code identified by the query. | |||
| u | Enumeration:
| None | The usage type identified by the query. | |||
| f | Enumeration:
| None | The response type identified by the query. | |||
| c | Enumeration:
| None | The completion status of the action, or function during which this item was recorded. The only time that a status of "failure" (code 0) is produced is when the database server is found to be unavailable. Otherwise, a status of success (codes 1 or 2) is produced. | |||
| prlbl | CDATA | None | The label of the query when a user-defined category type is used. When a default DFdiscover category type is used, this attribute is not included. |
Description
Any queries edited by the
dfeditqc function during the execution of an
edit check are recorded in an EQ element.
The V element identifies the variable by name to
which the query was edited, even if it is the current variable.
The query and note child elements appear only if their respective values have been set by the function. Note that the element values do not identify whether it has been changed from its previous value, simply that the value was specified as an argument in the function call.
An EQ element does not imply that changes to a query
were added to the database, simply that they would have been added
if the APPLY element had allowed queries to be added or changed.
Examples
Example 6.59. A query on the age
variable was edited
<EQ fr='8' pr='3' u='1' f'=1' c='1'><V n='age'/> <QR>The reported age is inconsistent with the exam date and the subject's birth date</QR></Q>
Example 6.60. A user defined query added to the visitDate
variable
<Q fr='9' pr='30' u='1' f'=1' c='1' prlbl="Requires Follow-Up"><V n='visitDate'/> <QR>The reported visit date does not match up with the trial schedule and needs to be verified by the trial coordinator.</QR></Q>
HL
HL — container element for history elements
Description
A HL is simply
a container element for one or more HN elements.
A BATCHLOG always records at least the date and time of
the current batch execution, and if history is enabled, additionally
records the date and time of every previous execution.
Processing Expectations
The HN child elements can be ordered in reverse
chronological order by descending sequence of
fd.
While the oldest HN element generally has a
value of 1 for this attribute, this
is not required.
Similarly, it is not required that there are no gaps in the ascending
sequence of fd attributes, but this
is usually the case.
HN
HN — timestamp information for a single execution of DFbatch
Synopsis
Description
A HN contains date and time information regarding
a single execution of DFbatch.
Processing Expectations
If the element has a cur
attribute with a value of 1, the
element records the date and time of the current execution.
Otherwise, it records the date and time of a previous execution.
Where multiple HN elements are present, they can
be ordered chronologically by sorting their
fr attributes in ascending order.
The HN elements also appear within the
parent HL element in chronological order, but this
is not required.
Examples
Example 6.62. A history entry
<HN fd='1'> <DT><YY>2000</YY><MM>10</MM><DD>19</DD></DT> <TM><HR>09</HR><MI>01</MI><SC>40</SC></TM> </HN>
This is the entry for the oldest execution of the batch which took
place on October 19, 2000 at 09:01:40.
Because the element does not have a cur
attribute, it is not the history element for the current (and only)
execution.
HR
HR — hour information for a time stamp
K
K — container element for key identification of the parent element
Synopsis
M
M
— the message generated by the execution of
dfmessage,
dferror, or
dfwarning
Synopsis
Attributes
| Name | Type | Default | Description | ||||
|---|---|---|---|---|---|---|---|
| fr | CDATA | None | The id of the unique history element ( | ||||
| t | Enumeration:
| None | The type of message logged.
This type maps directly to one of the edit check functions,
|
Description
Any messages generated by the functions
dfmessage,
dferror, or
dfwarning during the execution of
an edit check are recorded in a M element.
Messages can also be generated by the DFbatch system during the execution.
As a result, a M element can occur at almost any
point in the BATCHLOG output.
MI
MI — minute information for a time stamp
MM
MM — month information for a date stamp
MQ
MQ
— a missing page query generated by the execution of
dfaddmpqc
Synopsis
Attributes
| Name | Type | Default | Description | |||
|---|---|---|---|---|---|---|
| fr | CDATA | None | The id of the unique history element ( | |||
| u | Enumeration:
| None | The usage type identified by the query. | |||
| f | Enumeration:
| None | The response type identified by the query. | |||
| c | Enumeration:
| None | The completion status of the action, or function during which this item was recorded. The only time that a status of "failure" (code 0) is produced is when the database server is found to be unavailable. Otherwise, a status of success (codes 1 or 2) is produced. |
Description
Any missing page queries generated by the
dfaddmpqc function during the execution of an
edit check are recorded in a MQ element.
Since missing page queries are never added to the current record,
a K child element is needed to identify the keys that
will get the missing page query.
If query or note arguments were specified to dfaddmpqc,
QR or NT child elements, respectively,
will be present.
A MQ element does not imply that a missing page query
was added to the database, simply that one would have been added
if the APPLY element had allowed queries to be added.
MX
MX
— deletion of a missing page query generated by the
execution of dfdelmpqc
Synopsis
Description
Any missing page queries deleted by the
dfdelmpqc function during the execution of an
edit check are recorded in a MX.
Since missing page queries are never deleted from the current record,
a K child element is needed to identify the keys from
which the missing page query is deleted.
A MX element does not imply that a missing page query
was deleted from the database, simply that one would have been deleted
if the APPLY element had allowed query actions.
N
N — the original value before a data change
Description
A N element records the new data value
of a variable after it was changed by assignment.
If a field has a value assigned by an edit check, and the new value is identical to the original value, this is considered to be no change, and as a result is not recorded in the output log.
ND
ND — the number of data changes recorded
Synopsis
Attributes
| Name | Type | Default | Description |
|---|---|---|---|
| ok | CDATA | None | The number of items of this type that were successfully
applied, or would have been successfully applied if
|
| notok | CDATA | None | The number of items of this type that were not successfully
applied, or would not have been successfully applied if
|
| trunc | CDATA | None | The number of truncated data values that were
successfully applied,
applied, or would have been successfully applied if
|
| apply | CDATA | None | Set to "1" if |
Description
The ND contains summary information including the
number of data changes that were successful, the number that failed, and
the number that were successful but required truncation of the data value.
attributes.
NEQ
NEQ — the number of times queries were edited
Synopsis
Attributes
| Name | Type | Default | Description |
|---|---|---|---|
| ok | CDATA | None | The number of items of this type that were successfully
applied, or would have been successfully applied if
|
| notok | CDATA | None | The number of items of this type that were not successfully
applied, or would not have been successfully applied if
|
| apply | CDATA | None | Set to "1" if |
Description
The NEQ element contains summary information including the
number of times dfeditqc was called.
NM
NM — the number of messages recorded
Synopsis
Description
The NM contains summary information including the
number of messages that were successful - it is not possible for message
creation to fail.
| Note |
|---|---|
If <NR ok='0'/> (number of selected records is 0). Be aware that edit check execution will not have been applied to the selected records in this case. |
NMQ
NMQ — the number of missing page queries added
Synopsis
Attributes
| Name | Type | Default | Description |
|---|---|---|---|
| ok | CDATA | None | The number of items of this type that were successfully
applied, or would have been successfully applied if
|
| notok | CDATA | None | The number of items of this type that were not successfully
applied, or would not have been successfully applied if
|
| apply | CDATA | None | Set to "1" if |
Description
The NMQ element contains summary information including the
number of missing page queries added successfully, and the number
that failed.
NMX
NMX — the number of missing page queries deleted
Synopsis
Attributes
| Name | Type | Default | Description |
|---|---|---|---|
| ok | CDATA | None | The number of items of this type that were successfully
applied, or would have been successfully applied if
|
| notok | CDATA | None | The number of items of this type that were not successfully
applied, or would not have been successfully applied if
|
| apply | CDATA | None | Set to "1" if |
Description
The NMX element contains summary information including the
number of missing page queries deleted successfully, and the number
that failed.
NODRF
NODRF — the number of DRF records written
Synopsis
Attributes
| Name | Type | Default | Description |
|---|---|---|---|
| ok | CDATA | None | The number of items of this type that were successfully
applied, or would have been successfully applied if
|
| notok | CDATA | None | The number of items of this type that were not successfully
applied, or would not have been successfully applied if
|
NQ
NQ — the number of queries added
Synopsis
Attributes
| Name | Type | Default | Description |
|---|---|---|---|
| ok | CDATA | None | The number of items of this type that were successfully
applied, or would have been successfully applied if
|
| notok | CDATA | None | The number of items of this type that were not successfully
applied, or would not have been successfully applied if
|
| apply | CDATA | None | Set to "1" if |
Description
The NQ element contains summary information including the
number of queries added successfully, and the number that failed.
NR
NR — the number of records selected by the criteria
Synopsis
NT
NT — an additional note added to a query or missing page query
NSEC
NSEC — the total number of seconds elapsed for the execution of the batch
Description
The NSEC element contains a numeric value that is
the number of seconds elapsed in the execution of the batch.
The value is reported without any fractional seconds and so it is possible
for the number of seconds elapsed to be 0.
attributes.
The number of seconds elapsed does not include the time spent, if any, styling the resulting output file for presentation.
NSM
NSM — the number of system messages recorded
Synopsis
Description
The NSM element records the number of system
messages recorded during the execution of the batch.
System messages are generated by the edit checks interpreter or
database server and do not include any messages generated by the
dfmessage, dferror, or
dfwarning functions.
O
O — the original value before a data change
Description
A O element records the original data value
of a variable before it was changed by assignment of a new value.
If a field has a value assigned by an edit check, and the new value is identical to the original value, this is considered to be no change, and as a result is not recorded in the output log.
OUTDRF
OUTDRF — the filename of the output DRF
Description
The value of the OUTDRF element is the filename
to which output DRF records were written.
If output DRF records were not selected, this element will not be
present.
OUTLOG
OUTLOG — the filename of the output log, namely this file
Description
The value of the OUTLOG element is the filename
to which output log information was written.
The value is self-referential naming the file that contains the element.
Q
Q
— a query generated by the execution of
dfaddqc
Synopsis
Attributes
| Name | Type | Default | Description | |||
|---|---|---|---|---|---|---|
| fr | CDATA | None | The id of the unique history element ( | |||
| pr | Enumeration:
1=missing, 2=illegal, 3=inconsistent, 4=illegible, 5=fax noise, 6=other, 30-99=user-defined category
| None | The category code identified by the query. | |||
| u | Enumeration:
| None | The usage type identified by the query. | |||
| f | Enumeration:
| None | The response type identified by the query. | |||
| c | Enumeration:
| None | The completion status of the action, or function during which this item was recorded. The only time that a status of "failure" (code 0) is produced is when the database server is found to be unavailable. Otherwise, a status of success (codes 1 or 2) is produced. | |||
| prlbl | CDATA | None | The label of the query when a user-defined category type is used. When a default DFdiscover category type is used, this attribute is not included. |
Description
Any queries generated by the
dfaddqc function during the execution of an
edit check are recorded in a Q element.
The V element identifies the variable by name to
which the query was added, even if it is the current variable.
A Q element does not imply that a query
was added to the database, simply that one would have been added
if the APPLY element had allowed queries to be added.
Examples
Example 6.85. A query added to the age
variable
<Q fr='8' pr='3' u='1' f'=1' c='1'><V n='age'/> <QR>The reported age is inconsistent with the exam date and the subject's birth date</QR></Q>
Example 6.86. A user defined query added to the visitDate
variable
<Q fr='9' pr='30' u='1' f'=1' c='1' prlbl="Requires Follow-Up"><V n='visitDate'/> <QR>The reported visit date does not match up with the trial schedule and needs to be verified by the trial coordinator.</QR></Q>
QR
QR — an additional question asked in a query or a missing page query
QRPLY
QRPLY — the reply field of a query
R
R — a container element for all of the processing associated with a single record
Description
Each record that is processed by DFbatch is identified in the log by a
R element.
The children of this element record the actions that occurred during the
processing of the record.
The record that is being processed is identified by the key fields which
are recorded in the K element.
Processing Expectations
If the detail level of logging is all,
R elements may appear in the output with no child
elements other than the required K element, indicating
that the identified record met the record selection criteria but
then executed no edit checks, or no edit checks that recorded changes.
It is possible for a system message to be reported at the record level.
S
S
— a reason for data change generated by the execution of
dfaddreason
Synopsis
Attributes
| Name | Type | Default | Description | |||
|---|---|---|---|---|---|---|
| fr | CDATA | None | The id of the unique history element ( | |||
| c | Enumeration:
| None | The completion status of the action, or function during which this item was recorded. The only time that a status of "failure" (code 0) is produced is when the database server is found to be unavailable. Otherwise, a status of success (codes 1 or 2) is produced. |
Description
Any reasons for data change generated by the
dfaddreason function during the execution of an
edit check are recorded in a S element.
The V element identifies the variable by name to
which the reason for data change was added, even if it is the current variable.
The T element contains the text of the reason for data
change.
This text matches the input reason text supplied by the programmer in the
dfaddreason function call.
A S element does not imply that a reason for data change
was added to the database, simply that one would have been added
if the APPLY element had allowed data changes.
SC
SC — second information for a time stamp
SRC
SRC — the name of the input file whose execution created this batch log
Description
A SRC identifies the filename that contains the
input BATCH whose execution created this batch log.
STUDY
STUDY — the DFdiscover study number
SUMMARY
SUMMARY — container element for summary information elements
Synopsis
Description
A SUMMARY is simply
a container element for other elements containing specific summary
information about the most recent execution of the batch.
Examples
Example 6.94. The summary element and its children
<SUMMARY> <NSEC>12</NSEC> <NSM ok='0'/> <NR ok='2365'/> <ND apply='0' ok='1' notok='0' trunc='0'/> <NQ apply='0' ok='0' notok='0'/> <NEQ apply='0' ok='0' notok='0'/> <NMQ apply='0' ok='0' notok='0'/> <NMX apply='0' ok='0' notok='0'/> <NM apply='0' ok='210'/> <NODRF ok='210'/> </SUMMARY>
T
T — the text reason accompanying a data change
Description
A T element records the reason for change text
supplied as an argument during the execution of the
dfaddreason function. If the execution of dfaddreason returns an empty
string, then DFbatch records any empty string for the T
element. When DFbatch has finished processing the record and required reasons
are still missing, the system inserts a default reason constructed from the
batch name.
TM
TM — timestamp information for a single execution of DFbatch
USER
USER — the login name of the user that executed the batch
V
V — variable identification
XML is really a meta language - a language for creating new
languages.
The syntactic rules for each language are the same, but the vocabulary
and semantics of each language can be quite different.
In the case of DFbatch, we used XML to create two new languages:
the input control file language, rooted at BATCHLIST, and
the output log file language, rooted at BATCHLOG.
XML was chosen as the input and output language format for a variety of reasons, a few of which are listed below:
- It is supported by community standards. It is an entirely vendor neutral way of describing data and the structure of data.
- It is self-describing. You can read an XML document and understand what it is saying without being aware of specialized formats or processing instructions.
- It is extensible (hence the X in XML). If you need another element or attribute, you can add it.
- XML is easy to format for a variety of different uses and audiences.
- There are many publicly available tools for manipulating XML with many more to come. This will allow you to do numerous things with XML data that are independent of DFdiscover.
It is not coincidental that XML is so easy to use - it was designed this way. There are very few rules to live by when using XML. This makes it easy to implement lightweight programs (typically parsers) that enforce those rules. The programs never have to worry about exceptions to the rules - if there is an exception, it is no longer XML - it's as simple as that.
The following rules define what is and what is not an XML document:
- An XML document is constructed from elements and attributes. Elements are delimited by tags, a start-tag and a matching end-tag. The content for the element, which may be character data, other elements, or a combination, is between the tags.
- The value of an attribute must be enclosed in matching quotes, either single quotes, '', or double quotes, "".
- An XML document must have exactly one root element.
An XML document must be well-formed. Each starting tag must be balanced by a closing tag, and pairs of tags must be nested properly.
Example 6.100. Improperly nested tags
<bold>This text is bold and <italic>this is bold-italic </bold>, but what is this?</italic>
- The following reserved characters may not appear directly in an XML document: &, <, >, ", and '.
Comments are denoted in the SGML notation.
- XML documents may optionally also be valid. A valid XML document, in addition to being well-formed, also adheres to the structure of a Document Type Definition (DTD).
XML has many companion technologies, some that apply business rules, and others that define schemas. By far though, most of the additional technologies are focused on transformation (converting one XML document into another XML document, or filtering parts of an XML document) and formatting (converting an XML document to HTML or PDF, for example). The following illustration is a simple view of how XML fits in with these other technologies.
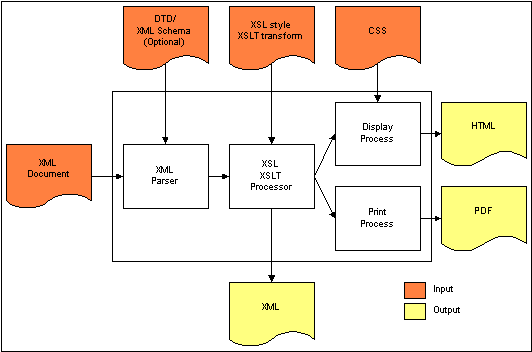
If you would like to learn more about XML, we recommend the following starting points for additional reading:
Table of Contents
DFdiscover comes with approximately 40 standard reports that are useful for most clinical trials. There will always be the need for custom reports for almost every trial. You can create reports using any of the programming tools that you are familiar with (e.g SAS®, a database report tool, UNIX shell scripts, etc.) and then install them in DFdiscover so that your DFdiscover users can execute them via Reports View in DFexplore. Also, don't hesitate to take a look at the standard DFdiscover reports included in your DFdiscover installation reports directory. Most are UNIX shell scripts, which can serve as models for creating your own study specific reports.
After a report has been created the easiest way to make it available to study staff is through DFexplore's Reports View. It can then be executed by permitted users by simply clicking the report name.
If reports are to be executed from DFexplore they must be installed in the study reports directory and have execute permissions for at least owner and group.
When you install a new report in the study reports directory, be sure to update the
.infofile kept in that same directory with a complete description of how the report works, including what options it accepts and what output it generates. Take a look at the existing.infofile in your DFdiscover reports directory for examples of how on-line documentation should be formatted. However, make sure you don't include your own documentation in this file, as it will be replaced with each new DFdiscover release, as new standard reports are added.Reports executed from DFexplore are always provided with the study number as an argument, plus the options that the user has provided in DFexplore's
Optionsfield. Within a Bourne shell script, for example, the study number is always $1, so you can do things like:study=$1
Use the shell level program DFgetparam.rpc to obtain the values of configuration parameters from the study server rather than trying to parse the configuration file yourself, or even worse, hard coding in the values of study directories, etc. The following Bourne shell example shows how to use DFgetparam.rpc to get the study database directory, where the study number has already been set to $study:
db=`/opt/dfdiscover/bin/DFgetparam.rpc -s $study DATABASE_DIR`
Temporary files created by your report should be written to the study work directory. Using DFgetparam.rpc you can evaluate the value of the work directory as follows:
work=`/opt/dfdiscover/bin/DFgetparam.rpc -s $study WORKING_DIR`
and then use the temporary file in one of these ways:
$work/tmp $work/$$tmp
-
HTML markup can be used to format report output directed to the reports view in DFexplore. HTML reports must start with one of the following tags: <HTML>,<!DOC>,<!doc>,<TABLE>,<table>,<P>,<p>. Note: If DFexplore is run using the web-based DFnavigator, links are disabled. Page breaks are output when printing or saving report output to PDF.
Many study reports are re-executed at regular intervals throughout the trial. Such routine reports can be created by putting all of the computational steps (data retrieval, analysis and report creation) into a UNIX shell script. This script can then be documented and installed in the study reports directory. Once this is done, and tested, it can then be executed by anyone with access to the reports tool, the study, and privileges for the particular report. Of course some analyses must be performed by a skilled statistician each time they are done, but most of the summary reports created for trial and database management purposes are routine tables and graphs. In such cases setting up a shell script, which includes all of the steps needed to create the report, can relieve programmers and data analysts from those tasks which are simple, repetitive and time consuming and allow them to concentrate on those analyses which require more attention and skill.
DFdiscover Study Files describes the location and format of all study files including: the data files created from the study CRFs, the quality control data base, the journal files used to record every transaction written to the study database, and all study configuration files. Any of these files might be needed as input to a study report program.
DFdiscover includes several shell level programs which are described in Shell Level Programs. These programs can be used to export and reformat data, and read study configuration parameters. Any number of other programming tools might also be incorporated into shell scripts to create study specific report programs. These might include other DFdiscover programs (e.g. DFsas), UNIX commands (e.g. awk, grep, sed, sort), third party packages (e.g. SAS), report generators (e.g. perl) or even low-level programming languages.
With these tools, programmers can extract the data they need from the study database, and then analyze and summarize it using whatever programming tools they are familiar with or think most suitable to the task at hand.
The following shows a simple example of a UNIX shell script that reports subject entry by site for the past 9 months, as well as the total to date, for an example study.
The basic outline of this program is documented with comments (which begin with
the # symbol). This hopefully is enough to give you an idea of the level of
effort required to produce simple study specific reports. For those
unfamiliar with UNIX shell programming, this may whet
your appetite for an exploration of the many useful tools built into the UNIX
operating system. You can accomplish a great deal without invoking big systems
like SAS, and it's really not that hard, honest!
#!/bin/sh
# RANDOMIZATIONS BY SITE FOR PAST 9 MONTHS AND TOTAL TO DATE
# $1 is study number.
# yy = current year
# mm = current month
# hx = number of months to be printed
yy=`date +"%y"`
mm=`date +"%m"`
hx=9
# Export all primary randomization records (plate 1) received to date
# and use field 13 as the visit date. Site number is assumed to be pid/1000
/opt/dfdiscover/bin/DFexport.rpc -s primary $1 1 - | nawk -F\| '
BEGIN { YY="'$yy'"+0; m=MM="'$mm'"+0; HX="'$hx'"+0
# determine which months are to be printed
if(m >= HX) {
for(i=HX;i>=1;i--) {k[i]=YY*100+m;--m}
} else {
jn = HX - MM
jm = 13 - jn
jy = YY - 1
for(i=1 ;i<=jn;i++) {k[i]=jy*100+jm; ++jm}
for(jm=1;i<=HX;i++) {k[i]=YY*100+jm; ++jm}
}
}
{ # Read each exported record and count cases by month and center
mon=substr($13,4,2); yr=substr($13,7,2)
center=int($7/1000); yymm= yr*100 + mon
n[yymm,center] +=1
mtot[yymm] +=1
ctot[center] +=1
}
END{ # Print Report
printf"RECENT AND TOTAL RANDOMIZATIONS BY SITE\n"
printf"SITE "
for(i=1;i<=HX;i++) printf"%6d",k[i]
printf" TOTAL\n\n"
for(i=1;i<=200;i++) { # center number range is 1~200
if( ctot[i]>0 ) {
printf"%5d: ",i
for(j=1;j<=HX;j++)
if (n[k[j],i] > 0) printf"%6d",n[k[j],i];
else printf " ";
printf" :%6d\n", ctot[i]
SUM += ctot[i]
}
}
printf"\nTOTAL: "
for(j=1;j<=HX;j++)
if (mtot[k[j]] > 0) printf "%6d",mtot[k[j]];
else printf " ";
printf" : %5d\n", SUM
}'
When this UNIX shell script is installed in the study reports directory, and given execute permissions for the permitted members of the study group, it can be executed.
The documentation for study specific reports must be kept in a separate file
from the documentation for all standard DFdiscover reports.
Specifically, it must be kept in the .info file in the
study reports directory.
Report titles appear in the scrolling list of reports in the order in which they are defined in the file. Any reports not defined in this file will appear in alphabetical order at the end of the list of reports that have been defined.
The general layout of the file is repeating blocks, of the following structure, where each block contains the documentation for one report:
.BEGIN report_name (1) .TITLE report_title (2) .OPTION first_option (3) .OPTION next_option (4) documentation text (5) .END (6)
|
The keyword | |
|
A descriptive title for the report. | |
|
The | |
|
This text appears in the reports output window when is clicked. | |
|
This marker indicates where the end of the documentation for the report is. |
Table of Contents
DFsas is an intermediary between DFdiscover and SAS®. It can be used to extract summary data files from the study database and to create the corresponding SAS® job file for subsequent processing by SAS®.
| SAS® version 7 assumed |
|---|---|
|
Unless otherwise stated, the SAS® functionality described herein is based upon version 7. |
DFsas reads specifications from a DFsas job file. As an introduction to DFsas consider the following example DFsas job file.
Example 8.1. Typical DFsas job file
# GLOBAL SPECIFICATIONS DFNUM 248 SASDIR /studies/df248/sas SASJOB test SASVERSION 7 CHECK labels CHOICE codes VLABEL yes BLANK all asis RETAIN QUOTES no MISSING all asis MISSING missed .L NOVISIT . RECSTATUS final incomplete missed RECLEVEL all MERGE yes # DATA RETRIEVALS # variables from plate 001, seq 001 RECORD 1 9 race labels 10~31 # variables from plate 002, seq 000 to 005 RECORD 2 0~5 9 vdate 11 SBP 12 DBP # SAS PROCS SAS proc print;
Executing DFsas with the example job file results in the creation
of 3 files: test.sas (the SAS® job file), and
test.d01 and test.d02
(two data files, one for each of the 2 record types specified in the DFsas
job file).
The SAS® job and data files created by DFsas are plain ASCII files, which
can be moved to any platform capable of running SAS®.
From the above example, one can see that a DFsas job file has three parts:
- global specifications
- data retrievals
- SAS® procedures
The global specifications identify the study database, SAS® job name, and those specifications that are to be applied to all data fields. The global statements in Example 8.1, “Typical DFsas job file” include the following:
-
The
DFNUMstatement identifies the DFdiscover study number (248 in this example) for which the SAS® job is to be created. -
The
SASDIRstatement identifies the full path name of the directory where the DFsas job file can be found and where the output SAS® job and data files are to be written. -
The
SASJOBstatement identifies the name of the DFsas job file. This file includes all of the specifications needed to create the SAS® job and data files. This name also serves as the root name of the SAS® files to be created. In the example,test.saswill become the name of the SAS® job file, andtest.d01andtest.d02will become the names of the SAS® input data files. -
The
SASVERSIONstatement specifies the version of SAS® to be used with the SAS® job file created by DFsas. This statement is created by specifying the-SAS #option when generating the DFsas job file. If this option is not specified, the default of SAS® version 7 is used. -
The
CHECKstatement is used to specify the desired output for check fields (i.e. those data fields defined by a single box which is either checked or not). In our example we are requesting that the labels specified in the study schema be written to the data files for all check fields (instead of the numeric codes,0and1). All check fields must have labels defined in the study schema [17]. Note that local specification ofcodesat the variable level overrides specification oflabelsat the global level.If labels are to be written, DFsas encloses the label in double quotes and removes any double quotes present in the label's text. Single quotes present in the label text are preserved.
-
The
CHOICEstatement is used to specify the desired output for choice fields (i.e. those fields like race, for which there are 2 or more response options). As withCHECK, the options arecodesorlabels. In the example, codes have been requested. If labels are requested DFsas will read them from the study schema. DFsas will enclose the label in double quotes and remove any double quotes present in the label's text. Single quotes present in the label text are preserved. If no labels are found, DFsas will default to the numeric codes. Note that local specification ofcodesat the variable level overrides specification oflabelsat the global level. -
The
VLABELstatement, followed byyesindicates that SAS® variable labels are to be written to the SAS® job file. These labels are read from the description of each field found in the study schema.When writing variable labels, DFsas encloses the label in double quotes and removes any double quotes present in the variable description text. Single quotes present in the variable label are preserved.
-
The
BLANKstatement is used to identify how blank fields are to be written to the data files. In the example, all blank fields will be written as they are (i.e. they will remain blank). -
The
RETAIN QUOTES nostatement instructs SAS to discard any quotation marks when reading string fields from the input data files. If no is changed to yes, quotation marks are preserved. -
The
MISSINGstatement is used to identify how fields that contain a DFdiscover missing code, are to be written to the data files. In the exampleMISSING all asisspecifies that all missing codes are to be output as they are, (i.e. without any re-coding). TheMISSING missed .Lstatement specifies that the missing value code.Lis to be output in fields exported from missed data records. -
The
NOVISITstatement is used to specify a value to be used for all variables for visits that do not exist in the database for a subject, when constructing data records containing variables that are repeated across visits. The SAS®.(dot) missing value code has been used in the example. -
The
RECSTATUScommand is used to select data records by record status. The default is to export all final, incomplete and missed data records. -
The
RECLEVELcommand is used to select tdata records by workflow level. The default is to export records at all levels. Levels can be specified using a list of values and ranges, as in: RECLEVEL 3-5,7. -
The
MERGEstatement followed by 'yes' specifies that the merge command needed to combine all of the data files into a single SAS® data set, should be included at the end of the SAS® job file. In cases where a more detailed merge command is needed, useMERGE no, and include a new merge specification at the top of the SAS® procedures section.
This section identifies the data fields to be extracted from the study
database. The RECORD
statement identifies the plate from which data fields are to be
extracted. The plate number may be followed by a visit or sequence number or
range, to identify the repetitions of the plate which are to be included. If
there is only one possible sequence number for a particular plate, the sequence
number need not be specified.
In the example, for each primary data record in the database with plate number
1, a summary data record will be written to
test.d01.
Each summary data
record automatically includes the subject ID as the first data field. In
the example, the subject ID is followed by data fields 9 through 31. The field numbers
correspond to the numbering used in the study schema. The SAS® job file will
automatically include the variable name ID for the subject ID. The
variable name race
will be used in the SAS® job file for field 9. Since variable
names are not specified for fields 10 through 31, variable names for these
fields will be taken from the study schema. If a variable's field name has been
specified it will be used; otherwise the appropriate number of leading
characters of the variable's alias will be used.
The variable race (a choice field) is also followed by the
keyword labels.
The result will be to output value labels (e.g.
Caucasian, Asian, etc.) instead of codes for this particular choice field, thus
overriding the global CHOICE codes specification. DFsas
will enclose the labels in double quotes and remove any double quotes present
in the text of the label. Single quotes present in the label's text will be
preserved.
The retrieval specified for plate 2 will be written to file
test.d02.
It is
similar, except that a range of visit numbers has been specified. One summary
data record will be created for each subject who has at least one record in the
specified set (i.e. plate 2, visit numbers 0 through 5 inclusive). In each
summary data record, separate data fields are created for each of the specified
sequence numbers. In retrievals of this type the sequence number is appended to
each variable name when the SAS® job file is created. Thus the variable names
written to the SAS® job file in the example will be:
ID, vdate0, SBP0, DBP0, vdate1, SBP1, DBP1, etc.
When variable names are not specified they will be taken
from the study schema, and if a sequence number range is specified, the
sequence number will be appended to each variable name. It is therefore
important when specifying the variable field names to allow for the sequence
number that will be appended when this type of retrieval is specified.
It is also possible to create a separate data record for each visit (or sequence) number that appears in the database. To do this, specify the plate number alone, without any qualifying visit or sequence numbers.
DFsas also includes the ability to create normalized records for adverse events, medications, medical history items, etc. This is not shown in the preceding example but is illustrated later in this chapter.
DFsas will automatically write the commands required to merge the summary data
files on subject ID to the SAS® job file (unless MERGE no
is specified in
the global specifications section). In addition, all lines at the end of a
DFsas job file, following the SAS® statement, are written to the end of the SAS®
job file.
In the example, after the data is merged into a SAS® data set it
will be printed using the SAS® print procedure.
After
% DFsas test
is executed to create the SAS® job file, test.sas,
and the data files, test.d01
and test.d02,
the job can be submitted to SAS®.
If SAS® is installed on the same machine being
used to run DFsas, SAS® can be run directly with the command:
% sas test.sas
SAS® will put the output from the print command in file
test.lst,
and will write job control and messages to file test.log.
A DFsas job file can be created manually by using a text editor (e.g. vi) and following the syntax described in detail later in this chapter. But a quicker method is to first use the DFsas job creation option to build an initial DFsas job file for all variables in the database or all variables on specified plates, and then use an editor to make any desired modifications. Modifications might include:
changing global statement options
removing specifications for variables that are not required
changing variable names or labels
specifying the desired sequence number range for specified plates, or
indicating how a normalized data set is to be created
SAS® imposes various limits, those limits vary with SAS® version and those limits have an impact upon the behavior of DFsas. Specifically, there are character limits on variable name, variable description and maximum length of text/string value. DFsas enforces the following maximums:
for SAS® version 6, and older:
variable name length = 8 characters
variable description length = 40 characters
text/string length = 200 characters
for SAS® version 7, and newer:
variable name length = 32 characters
variable description length = 256 characters
text/string length = 32767 characters
An initial DFsas job file is created by using the -c
(or -C) option.
Option -C includes all variables while
-c includes all variables except for the following meta
variables:
DFRASTER(the DFdiscover CRF page identifier)DFSTUDY(the DFdiscover study number)DFPLATE(the DFdiscover plate number)DFCREATE(the record creation date/time field)DFMODIFY(the last date/time the record was modified)DFSCREEN(screen value of the record status)
These fields are infrequently
used in a SAS® analysis and can thus generally be omitted by using
-c instead of -C
when creating a DFsas job file.
Example 8.2.
Build a DFsas job file named
job1 for all variables on all plates for study number 7.
% DFsas job1 -C 7 -p allThe DFsas job file created by this command contains the field number, name and description of all data fields described in the study schema for all user defined study plates in the range 1-500, plus DFdiscover plates 510 (reasons) and 511 (queries). Users can then scan the list of variables and remove any that are not required.
To create a DFsas job file for specified plates, replace the keyword
all
with a list of the desired plate numbers, as in:
% DFsas job1 -c 7 -p 1~3 6 10~12 33
To split long string fields into a number of smaller fields use
-s like this:
% DFsas job1 -C 7 -p all -s 200
This example splits all string fields that are defined with a maximum length
greater than 200 characters into multiple fields of 200 characters each.
For example a 500 character comment field named COMMENT
would be split on word boundaries into 3 fields named
COMMENT1,
COMMENT2 and
COMMENT3, each with a maximum of 200 characters.
If -s is specified, DFsas uses the SAS® version number to
decide how long it can make the new variable names that it needs to create.
DFsas creates a new variable for each substring by using the variable name
as a base and adding a number (1, 2, 3, etc.). If SAS® version 6 or earlier is being
used and the variable name is
already 8 characters long, DFsas will reduce it as needed to keep the
resulting variable names within the 8-character limit.
For example,
splitting a field named LONGNAME produces fields named
LONGNAM1, LONGNAM2, etc.
If SAS® version 7 is
specified, a limit of 32 characters will be imposed when creating new variable
names for each substring.
| Warning for shortened names |
|---|---|
|
A warning message is printed whenever DFsas has to shorten an existing variable name. |
String splitting may be needed for versions of SAS® 6 and older, as they
will not read string fields that are
longer than 200 characters. As described later, a DFsas job file may include
instructions to split specified string fields into 1 or more shorter fields.
When creating a default DFsas job file, using
-c or -C, one can
instruct DFsas to automatically include the specifications needed to split all
string fields that are longer than a specified maximum length by also
specifying -s.
| Warning for long fields |
|---|---|
|
A warning message is printed if the DFsas job file specifies string fields longer than the SAS® maximum and that have not been split into smaller strings. This is merely a warning as DFsas can be used to assemble data sets for purposes other than SAS®. |
To truncate long string fields, use -t as in:
% DFsas job1 -C 7 -p all -t 200which truncates all string fields to a maximum of 200 characters.
Use -t
to truncate string fields to a specified maximum character
length.
Truncation occurs at exactly the specified number of characters,
even if this truncates the string in the middle of a word.
Strings that are shorter are not affected.
To export dates in calendar, string, original or julian formats use the
-d option.
As described in
Section 8.4.2, “Qualified Dates”,
DFsas can export each date field in one or more of 4
different formats. When creating a default DFsas job file,
using -c or -C, you
can automatically generate the specifications needed to have all dates
formatted in one or more of these formats by using
-d followed by
one or more of the single letters (date qualifiers) csoj
to specify the desired date formats.
For example, the following command will generate the DFsas specifications needed to convert all dates on plates 1-3 to both c (calendar) and s (string) formats.
% DFsas job1 -C 7 -p 1~3 -d cs
This results in creation of 2 output fields for each date field. These fields
are named by appending 1,2,3 etc. to the original field name.
DFsas uses the SAS® version number to determine the maximum length allowed
for these variable names
(see Impact of SAS® limits).
If the base name
is too long to generate a legal SAS® name by appending
a number (1-4 in the case of qualified dates),
then the base name is shortened
and a warning message is printed similar to the following:
WARNING: date datename -> datenam1 to datenam4 (SAS 8 char names)
To select subjects use -I as in:
% DFsas job1 -C 7 -p all -I 1001~1999,3001~3999,5066
Use -I
to specify a list of subject IDs to be included in the
SAS® data sets. In the above example, 2 subject ID ranges and one single value
have been specified. If this option is not used all subjects with primary
records for the specified plates will be included. Note that the specified ID
string must not contain spaces.
To select data records having a specified list of visit numbers, use
-v as in:
% DFsas job3 -C 254 -p all -v 0~99
In the above example, a range of visit numbers (0-99) has been specified. If this option is not used, DFsas will create DFsas job files for all visits.
To suppress warning messages, use -w as in:
% DFsas job2 -C 254 -p all -w
After you have setup a DFsas job file, you can execute DFsas again,
this time with no options,
to create the SAS® job file and assemble the required summary data files.
Variable name and label lengths created in the data files will be
determined by the SAS® version number specified in the global
SASVERSION statement in the DFsas job file
(see Impact of SAS® limits).
Example 8.3. Create SAS® job file and data files for DFsas job file
job1
% DFsas job1
DFsas creates the SAS® job file (job1.sas) and the
required data files (job1.d01,
job1.d02,
job1.d03, etc.).
These are plain ASCII files that can be
copied to the computer used to run SAS® and submitted for execution.
DFsas displays the number of subjects and number of records written to each data file, as it proceeds to build the data files.
1. RECORD 1 Subjects = 172 Records = 172 2. RECORD 2 Subjects = 154 Records = 154 3. RECORD 3 Subjects = 152 Records = 152
If a DFsas job file requests data from a plate that contains no data, DFsas
will not create an output data file or SAS® input statements for that plate,
unless the force option is used. The force option is invoked by including
-f on
the command line after the DFsas job file name.
% DFsas job1 -f
By default, the data export script created when building a DFsas job file is
removed after it is executed. Including -dbx
as a command line option preserves the data export script.
% DFsas job1 -f -dbx -c 7 -p allThis script may be useful for debugging purposes but is not required for proper operation of DFsas or SAS®.
The default behavior of using field names will not create a valid SAS
job file when used on a study that has more than one instance of a
module, whether on the same or on different plates. Including
-a in the command line creates
job files using the
field alias and will work as expected
provided all field aliases are unique for all
fields.
% DFsas job1 -a
DFsas performs limited checks on the integrity of the DFsas job file before proceeding to create the SAS® job file and data files. In general it is up to the user to make sure that SAS® rules for variable names, labels, missing value codes, etc. are followed. DFsas checks the following:
-
DFNUM. Has a legal DFdiscover study number been specified? SASDIR. Does the SAS® directory exist?SASJOB. Has a SAS® job name been specified?Reserved character,
|. Has the field delimiter been used inappropriately? DFsas checks for illegal use of|in the specification of fixed fields, default labels for check fields and recoded values for blanks and missing value codes.Plate and variable numbers. Have legal values been specified? DFsas checks the specified plates to verify that they have been defined for the study, and also verifies that the specified field numbers have been defined for each plate.
Field numbers do not contain extraneous characters (e.g.
12-,12.,12a,a12, etc).Field number ranges are legal (e.g.
12~55, and not:55~12,12~15~55, etc.)If a string split is specified, is the field a string?
No more than one field qualifier is used on any field.
If a date qualifier is specified, is the field a date?
Variable name and label length. DFsas checks the length of all variable names and labels in the DFsas job file and prints error messages and stops if there are any which exceed the limits of the specified SAS® version.
If the DFsas job contains a request to split a specified data field, DFsas uses the
SASVERSIONstatement to determine the maximum length allowed for the variable names that it creates (see Impact of SAS® limits).
Dates are governed by the global statements IMPUTE,
INFORMAT
and OPTIONS and by the date field qualifiers,
jocs.
The IMPUTE statement controls how date values for SAS®
are imputed from DFdiscover partial dates.
IMPUTE no. Date fields are exported exactly as they appear in the database, regardless of what imputation method has been defined.IMPUTE yes. All 2-digit years are converted to 4 digit years using the pivot year defined for each date. In addition the imputation method defined in the study schema for each date field is used to convert missing days and/or months to legal values. If the imputation method is set to none only 2 digit to 4 digit year conversions are performed. When imputing dates, any nonsensical dates, i.e. dates with impossible values for day, month or year, are converted to the default DFdiscover missing code,*. If other missing value codes have been defined for the study, any dates that use them will retain their original missing value code.
The INFORMAT statement controls the type of SAS®
informat statements DFsas generates.
INFORMAT dates. Create SAS®informatstatements for date fields that SAS® recognizes. DFdiscover allows some date formats that SAS® does not recognize as dates, (e.g. Jan 25, 2001). When this global statement is used, date fields with formats that SAS® does not allow are converted to string fields and a corresponding characterinformatstatement is created.INFORMAT all. Convert all fields to type character, including dates.INFORMAT all dates. Use date formats for all date fields and convert all other fields to type character.
Finally, 4-digit year imputation from 2-digit years can be achieved through
the SAS® OPTIONS YEARCUTOFF statement.
The DFsas global statement:
OPTIONS YEARCUTOFF=yyyy
instructs DFsas to add a SAS® YEARCUTOFF
statement to the job file, such that
yyyy defines the beginning of a
100 year period for imputing the century in 2 digit dates.
Example 8.4. Using OPTIONS YEARCUTOFF
With the following DFsas global statement,
OPTIONS YEARCUTOFF=1940
years 40 to 99 will be interpreted as 1940 to 1999, and years 00 to 39 will be interpreted as 2000 to 2039.
| One YEARCUTOFF statement per SAS® job
file |
|---|---|
|
SAS® only allows one |
The global statements already described set the desired format for all dates.
This can be overridden at the individual field level by using one of the date
qualifiers, jocs,
after the date's field number, as in:
12:c
which will output field 12 as a calendar date.
Qualified dates will be written with an INFORMAT
statement appropriate to the qualified date format, and will
override the global statement INFORMAT all, if present.
The date qualifiers are:
:j- julian value. This option converts the date to a number representing the number of days since a date in 4712 BC. No informat statement is written to the SAS® job file as this is treated by SAS® as a number.:o- original value. This option turns off imputation to yield the value exactly as it appears in the database, overriding any global specificationIMPUTE yes.With this date qualifier a date informat statement is written to the SAS® job file using the original date format specified in the study schema. This option should only be used for fields that cannot contain a partial date. Otherwise SAS® will complain.
:c- calendar value. This option converts 2 digit years to 4 digit years and performs imputation as specified in the study schema. If imputation leads to a nonsensical date it is converted to*, the DFdiscover default missing value code. When:cis specified the appropriate date informat statement is written to the SAS® job file overriding any globalINFORMATstatement.:s- string value. Like the:ooption,:salso turns off imputation to yield the value exactly as it appears in the database, but the field is considered to be a string and thus a character (not date) informat statement is written to the SAS® job file. This option allows one to output partial dates exactly as they appear in the database with a character informat that SAS® will accept.
In addition, to date qualifiers, DFsas includes time qualifiers that
cause DFsas to generate appropriate SAS® time types.
Time variables in DFdiscover are handled correctly automatically,
however this qualifier must
be applied manually to numeric or string fields that have the format
nn:nn or nn:nn:nn.
:t5- SAS time typeTIME5. This option indicates that the field is to be identified as the SAS® time type,TIME5, represented asHH:MMThe appropriate SAS® informat statement is written to the SAS® job file for any fields so qualified.:t8- SAS time typeTIME8. This option indicates that such fields are to be identified as SAS time typeTIME8, represented byHH:MM:SS. The appropriate SAS® informat statement is written to the SAS® job file for any fields so qualified.
When creating a default DFsas job file, with
-c or -C, the following rules are applied:
The global statement
INFORMAT datesis written to the DFsas job file.If all dates in the study schema use the same pivot year, DFsas creates the following global statements:
OPTIONS YEARCUTOFF=yyyy (1) IMPUTE no
where
yyyyis set to the common pivot yearIf all dates do not use the same pivot year a
YEARCUTOFFstatement cannot be generated because SAS® only allows one such statement. Instead, DFsas converts all dates to 4 digit years using the global statementIMPUTE yes.If more than one output format is requested for date fields using the
-doption, DFsas creates a unique variable name for each of the output date variables by appending 1, 2, 3, 4 to the variable name. DFsas uses the SAS® version number to determine the maximum length allowed for these variable names.csoj
This section includes a description of how global statements can be manipulated for string fields.
SAS® cannot input a string field that is longer than 200 characters. DFdiscover allows much longer string fields. Thus when preparing string fields for SAS® it is necessary to either truncate strings that are longer than 200 characters or split them into multiple shorter fields. This can be done within a DFsas job file using the same string splitting syntax used by DFexport.rpc.
Example 8.5. String splitting
Field 44, a 500-character field named comment,
is split into 5 fields of up to 100 characters each.
The w qualifier specifies
that splitting is to occur on word boundaries. The field names are created by
appending 1,2,3, etc. to the root name provided in the DFsas job file.
The resulting 5 fields are named comment1,
comment2, comment3,
comment4 and comment5.
DFsas uses the SASVERSION statement in the DFsas job
file to determine the maximum lengths allowed for the variable names it
creates.
44:5x100w comment "Physician comment field"
It is also possible to split string fields on exact character boundaries, by
using the c qualifier.
44:5x100c comment "Physician comment field"
String fields may be truncated by specifying a split that does not add up to the original field length, as in:
44:2x200w
This creates 2 fields of not more than 200 characters each, with the division occurring on word boundaries. If it is necessary to truncate the second field, truncation will occur on a word boundary.
Similarly,
44:1x200c
truncates field 44 to not more than 200 characters. In this case truncation will occur on a character boundary and thus may occur in the middle of a word.
When creating a normalized data set, field names are specified after the
NORMALIZE key word.
A separate name must be specified for each of the string
fields that result from any string field splitting that is specified in the
data record creation section that appears after the
RECORDS keyword, as in
this example:
NORMALIZE if(length(drug) > 0) drug "Drug name" why1 "Drug indication - part 1" why2 "Drug indication - part 2" RECORDS 200 20,25:2x200w 30,35:2x200w 40,45:2x200w
New fields can be created consisting of substrings of database fields. The specification is: field number : start_character x number_of_characters. Substrings can be extracted from any field type: strings, dates, or numbers. But substrings are extracted from the string value of the field. So be careful with numeric fields; unless they are zero padded you may not get the results you want. In the following example variable sitenum is created from the 1st 3 digits of the subject ID field. This will give the desired results provided all IDs are zero padded, e.g. 001001 not 1001, for subject 1 at site 1.
7:1x3 sitenum "site number - 1st 3 digits of subject ID"
When SAS reads string fields from an input data file it normally removes any
quotation marks it finds. This can be prevented by tagging string field names
with ~$ instead of $ in SAS input
statements. (Aside: per communication from SAS support, his trick only works
when the DSD option is used in the INFILE statement; but this has been
standard practice for reading the pipe delimited output files created by
DFsas from the beginning.)
By default DFsas tags string fields with $ and thus
quotes are removed.
You can instruct DFsas to tag string fields with ~$ and
thus retain input quotes, in 2 ways: by including the global statement
RETAIN QUOTES yes
which is applied to all string fields, or by using the :q
field level qualifier on those fields for which quotes are to be retained,
as illustrated in the following example.
RECORD 1 8 PINIT Subject Initials 9 AGE Age 10 SEX Sex 10:q PCOMP Subject complaint
There is one limitation.
It is not possible to use more than one field level qualifier at a time.
Thus you cannot instruct DFsas to both split a string field and retain quotes
using field level qualifiers. The only way this can be accomplished is by using
the global statement RETAIN QUOTES yes in combination with
field level string splitting specifications. However, note that there is no
guarantee that matching quotes will appear in each of the split string fields.
This section includes a detailed description of all DFsas commands. Each DFsas job file has three parts. Global specifications come first, followed by instructions for each of the summary data files to be created, and ending with any SAS® command lines you want to include in the SAS job file.
DFsas job files are constructed from records, where each record
is composed of a keyword followed by value specifications for the keyword.
Keywords and options must be typed exactly as illustrated in the examples. All
keywords are in uppercase. Blank lines and extra spaces may be inserted
anywhere to aid readability. Comments can be added on lines by starting them
with a single
octothorpe, #, followed by at least one space and then your
comment.
The global specifications, located at the top of each DFsas job file, apply to all of the subsequent data retrieval specifications in the job file. They include the following:
DFNUM. This keyword is followed by the DFdiscover study number of the database from which you plan to export a SAS® data set. For example:
DFNUM 248
SASJOB. The file name specified after this keyword is the name of the DFsas job file and is also the root name for the SAS® job and summary data files created by DFsas.
The following sets the DFsas job name to
job1:SASJOB job1
The SAS® job file name is constructed by appending
.sasto the specified job name, constructing a filename similar tojob1.sas. A separate data file is created for each set of retrieval specifications introduced by the keywordRECORDorNORMALIZE. These summary data files are named by appending.d##(where ## is in the range 01 to 99, inclusive) to the job name (e.g.job1.d01,job1.d02). Summary data files are numbered in the order in which they appear in the DFsas job file.-
SASVERSION. When using the
-Cor-coption to create a default DFsas job file, the target SAS® version can be specified on the command line using the-SAS #option. SAS® version 7 is the default if the-SAS #is not specified. Each DFsas job file contains aSASVERSIONstatement regardless of whether or not the-SAS #is explicitly specified on the command line.SASVERSION 7
SASDIR. The SAS® job file and summary data files created by DFsas are written to the directory specified by the value of this keyword. A full path name must be given.
SASDIR /studies/mystudy/sas/baseline
RUNDIR. If you plan to move the SAS® job and data files created by DFsas to another platform, such that the files will be processed by SAS® from a different file location than they were created by DFsas, use this keyword and specify the location where you intend to install the files. If a RUNDIR statement is present, DFsas will use this directory when creating filename statements in the SAS® job file. Without the RUNDIR statement DFsas uses SASDIR when creating filename statements. A full path name must be given.
RUNDIR C:\studies\mystudy\sas\baseline
LIBNAME. DFsas includes support for SAS® libraries, and also allows users to create their own data set names for both the individual data files corresponding to DFdiscover plates, and for the merged data set that currently has the default name
final. SAS® libraries are used to save a SAS® data set created during a SAS® run, and to use a previously saved SAS® data set. When libraries are not used, the SAS® data sets created during a SAS® run are temporary, and are removed when the run is completed.SAS® libraries may be used by specifying the
LIBNAMEstatement in the global specifications section of a DFsas job file as per the following example.Example 8.6. SAS® data sets
mylib1andmylib2are created by specifying the previously saved SAS® data sets ofbaselibandaelib, respectively, in aLIBNAMEstatement in the global section of a DFsas job file.LIBNAME mylib1 `C:\studies\study254\sas\baselib' LIBNAME mylib2 `C:\studies\study254\sas\aelib'
Note DFsas will not create the
LIBNAMEif it does not exist. The user must do this.Data set names may be specified for each input data file by including a
DATAstatement immediately following theRECORDstatement used to introduce data set specifications for a plate in a DFsas job file, or immediately below a normalized data set.Example 8.7. The data set name
mylib1.vitalsis specified using aDATAstatement following theRECORDstatement for plate 5.RECORD 5 DATA mylib1.vitals
Example 8.8. The data set name
mylib2.medsis specified using aDATAstatement following theNORMALIZEstatement for normalized data set specifications.NORMALIZE if( length(medname)>0 ) DATA mylib2.meds
To change the name of the final merged data set, from the current default value of
final, add the desired name of the merged data set to the globalMERGEstatement.Example 8.9. The name
mylib1.baselinereplaces the default name offinalusing theMERGEstatement in the global specifications section of a DFsas job file.MERGE yes mylib1.baseline
OPTIONS. A DFsas job file may include one or more OPTIONS statement to define SAS® options. For example,
OPTIONS YEARCUTOFF=1940 OPTIONS PAGESIZE=60 LINESIZE=72 NOCENTER
IDNAME. When DFsas is used to create a DFsas job file it determines the field variable name assigned to the subject ID field from the first plate in the schema and writes this out as the global IDNAME statement. The variable name can be changed to any desired value, keeping in mind the SAS® restrictions on variable names. If the IDNAME statement does not appear in a DFsas job file, DFsas uses the name ID.
SUBJECTS. This statement can be used to specify a list of subject IDs and ID ranges to be included in the SAS® data sets. The default setting is
SUBJECTS all
which includes all subjects who have a primary data record in at least one of the plates being extracted from the study database.
Example 8.10. Select a subset of subjects
The following statement selects subject IDs in the range 1001 to 1999, 3001 to 3999, and values 5501 and 6002. The order in which the values are specified is not important.
SUBJECTS 1001~1999,3001~3999,5501,6002
-
VISITS. This option can be specified on the command line during SAS® job creation by using the option
-vor added to the global specifications section by editing the DFsas job file. If this option is not specified, DFsas will create DFsas job files containing the global statementvisit#_listVISITS all. For backwards compatibility, DFsas will assumeVISITS allif theVISITSglobal statement is missing from a DFsas job file.This option is similar to the existing
SUBJECTSoption in that both are applied during data export. Since data export occurs before data record processing, this option takes precedence over the visit specification on theRECORDstatement. Thus, for example, specifyingRECORDS 12 20, which indicates the creation of a data file for plate 12, visit 20, would produce no output at all if the globalVISITSstatement was not set toallor did not include20. Also, if the globalVISITSstatement has already been used to select visit20, theRECORDSstatement would not need to include the visit specification. For example,RECORDS 12would be adequate to produce the desired data file.The specified visit number list is applied to all of the specified plates. It is not necessary that all visits be relevant for all plates.
Note The
VISITSoption does not allow the specification of different visit numbers for different plates. SUBJECTALIAS. Specifying
SUBJECTALIAS yes
instructs DFsas to export the subject alias as the identifier in place of the traditional subject ID. It is possible to include both subject ID and subject alias by specifiying
SUBJECTALIAS yes
and also requesting field 7 in the list of fields to be exported.
CHECK. Check fields are data fields that are entered using a single box which is either checked or left blank. An example might be a question that asks the investigator “Check all of the symptoms that apply to this subject from the following list”. Each of the symptoms will have a check box with only 2 possible values, for example, 1 if the box was checked and 0 if it was left blank.
This keyword is used to control the output for all data fields of this type. You may either print the codes (e.g. 0,1) or replace them with the labels specified in the study schema.
The 2 possibilities are specified as follows:
CHECK codes
which outputs the codes (e.g. 0, 1) for all check fields and creates a proc format statement for the value labels, and
CHECK labels
which outputs the schema labels (e.g. no for 0, yes for 1).
When using the labels option, missing value codes are preserved. If you request labels for all check fields, but have not specified any labels for a particular check field in the study schema, DFsas will use the codes.
The default for this global specification is
CHECK codes, meaning that the numeric codes found in the database will be output to the SAS® data file if this statement does not appear in your DFsas job file.You can override the global specification of labels or codes at the individual field level as described in Data Retrieval Specifications.
CHOICE. Choice fields consist of a question followed by 2 or more mutually exclusive response options. Examples include: race, yes/no questions, severity mild/moderate/severe, etc. As for check fields, choice fields can be output as either codes or labels,
CHOICE codes CHOICE labels
When codes are output to the data file, DFsas creates a proc format statement for value labels and writes it to the SAS job file.
Because the choice data type will apply to fields having many different response options it doesn't make sense to have default labels. Thus if you request labels and DFsas cannot find them in the study schema it will simply output the codes. As for check fields, DFsas will first check for missing value codes before substituting value labels for the codes stored in the database.
The default for this global specification is
CHOICE codes, meaning that the numeric codes found in the database will be output to the SAS® data file if this statement does not appear in your DFsas job file.You can over-ride the global specification of labels or codes at the individual field level as described in Data Retrieval Specifications.
IMPUTE. Dates which use 2 digit years can be converted to 4 digit years and missing day and/or month values can be imputed with this statement, such that
IMPUTE no
disables imputation and outputs dates as they appear in the database and
IMPUTE yes
enables imputation and imputes the day and month in partial dates and convert 2 digit years to 4 digits.
Imputation of day and month, and conversion of 2 digit years to 4 digit years is performed using the imputation method and pivot year set in the study schema.
If a date variables has its imputation method set to
never, imputation by DFsas will only result in conversion of 2 digit years to 4 digit years.If a date is nonsensical, (i.e. does not yield a true date even after application of the imputation method, if any) imputation will output the DFdiscover default missing value code,
*.If a date field is blank or contains a missing value code, as defined in the study missing values map, imputation has no effect, i.e. the field will be output as is, with a blank or missing value code.
IMPUTE and RECODE The use of imputation in a DFsas job file (via any of the ways that it can be done) has the potential of creating missing value codes and thus the
RECODEstatement should be used to change the DFdiscover*to either the SAS®.or some other user-defined missing value code that SAS® will accept. If the user has defined a missing map which only contains legal SAS® missing value codes, then theRECODEstatement could still be used for dates. For example,RECODE date *
NUMBER. Numeric fields may be defined with labels, just like choice and check fields. In such cases you have the option of outputting the numeric values, as in
NUMBER codes
or, the labels defined for the values, as in
NUMBER labels
STRING. It is rare to put value labels on string fields but DFdiscover does allow it. For example single letter entries in a string field may be used as codes for longer descriptions that are defined in value labels. In such cases you have the option of outputting the string values,
STRING codes
or the labels, as in:
STRING labels
If string splitting is used in conjunction with a request for labels and the resulting split string values are coded with labels, the labels will be output.
Example 8.11. STRING coding and string splitting
Suppose you have a string field where you enter codes for problems that have occurred
A = "lost to follow-up" B = "temporary withdrawal from treatment" ... Z = "zero interest in this study" Further, the user enters any combination of the letters A-Z into the string field in the database. To export the labels, one could then include
22:12x1c prob labels
in a record specification, such that the string field is field 22 and has a maximum length of 12 characters. The record specification would produce 12 fields named prob1 to prob12, each containing the label corresponding to the letter, or the letter itself if no label is defined.
RETAIN QUOTES. This statement determines how SAS input statements are written for string fields. If
RETAIN QUOTES no
is specified (which is also the default setting), string field names are followed by a
$sign, and SAS will remove any quotation marks found in these fields when the input data files are read. IfRETAIN QUOTES yes
is specified, string field names are followed by
~$, which instructs SAS to retain quotation marks.VLABEL. Specifying
VLABEL yes
instructs DFsas to include variable labels in the SAS® job file. Variable labels are copied from the field descriptions included in the study schema file, with the exception that any double-quote characters appearing in the field description are removed from the variable label.
VALFMT. If
VALFMT yesis specified, equivalentproc formatvalue label statements will be written to the SAS® job file for each variable that has code labels defined in it's style or variable definition in the study schema. With value formats defined in the SAS® job file, users can elect to use the data values as in the SAS® statementproc print, or use the value labels as in the SAS® statementproc print label.DFsas creates value formats for all variables that have code labels, whether they are defined in the style or at the variable level. If code labels are defined in the style, the style name is used as the value format name in the SAS® job file, unless the style name would be an illegal SAS® name, in which case DFsas makes up a legal SAS® name. The style name must meet the SAS® restriction that it be no longer than 8 characters, start with a letter or underscore, thereafter contain characters that are letters, digits, or an underscore, and not end with a digit. If the code labels are defined at the variable level (instead of in a style), DFsas makes up a new SAS® value format name.
When DFsas creates a value format name, it does not check to see if the variable codes and labels exactly match another value format already in use. Thus if coding and labels are not defined in the style, it is possible that DFsas may create and use more value formats than are really required. If the same code labels are used by more than one variable, it is recommended that the codes and labels be defined in a style which the variables then use.
When creating new value format names, DFsas uses
F####vwhere####starts at 0001 and is incremented for each new value format name that DFsas creates as it reads through the list of study styles stored in the fileDFschema.stl.vis the visit number which is appended to the variable's field name. There is one exception. For DFSTATUS and DFSCREEN variables, which are DFdiscover protected fields appearing on every plate, DFsas uses value format namesDFSTATvandDFSCRNvrespectively. Thus these 2 names should not be used for user-defined styles with code and label definitions of their own.For normalized records DFsas creates SAS® value formats based on the code labels defined in the study schema for the first data record defined in the block of normalized records. Typically all records in the normalized block have the same variables with the same codes (which is why they are being normalized) but DFsas does not check to make sure that this is the case.
Value format and variable names SAS® requires that value format names be different from variable names. DFdiscover does not impose this restriction and currently DFsas does not check for this possible SAS® error.
BLANK. Data fields which are blank (i.e. empty) in the database can be output as they are or can be recoded to some other value (e.g. the SAS®
.missing code). Since check and choice fields contain a numeric code when no box has been selected, check and choice fields are never blank. Consequently theBLANKglobal specification only applies to string, date and numeric fields.The
BLANKkeyword is followed by either the keywordallor by the data type from the liststring,date, orint, which is to be recoded. This is then followed by either the keywordasisor by the value to be inserted for blank fields. For example,BLANK all asis
outputs all blank fields without any recoding.
BLANK all .
recodes all blank fields to a period.
BLANK all blank
recodes all blank fields to the word
blank.BLANK string .
recodes blank string fields to a period.
BLANK int 0
recodes blank int fields to 0.
It is legal to include more than one
BLANKspecification, to specify different recoding instructions for string, date and int data types. Any such field type specifications will take precedence over aBLANK allspecification.RECODE. A
RECODEstatement can be used to recode all data fields of a given type. Since SAS® provides extensive recode capabilities, only minimal recoding has been implemented in DFsas. DFsas only allows oneRECODEstatement per data type and only allows for the replacement of one data value by another.The
RECODEkeyword is followed by the data type, from the listcheckchoicestringdateint, which is to be recoded. This is followed by the value to be recoded and then the new value to be written to the SAS® data input files. For example:RECODE choice 0 .
recodes 0 to a period in all choice fields, and
RECODE check 0 9
recodes 0 to 9 in all check fields
Note If you request output labels instead of codes for check and/or choice fields, and a label has been specified for zero for some or all check and/or choice fields, then the label will appear in the data field, and the above recode specification will have no effect. The desired recode can however be obtained when outputting labels, by specifying the label that is to be recoded instead of the numeric value (see Recode Processing Order).
MISSING. Data fields that contain a missing value code in the database can be output as they are or can be recoded to some other value. For example, while several different missing value codes may be used in a DFdiscover study, you might want to change all missing value codes to the SAS®
.missing code for a particular SAS® analysis.The
MISSINGkeyword is followed by either the keywordallor by the data type, from the listcheck,choice,string,date, orint, which is to be recoded. This is followed by either the keywordasisor by the value to be used in place of all missing codes. For example:MISSING all asis
outputs all missing codes without any recoding,
MISSING all .
recodes all missing codes for all fields to a dot,
MISSING all NA
recodes all missing codes for all fields to "NA", and
MISSING string .
recodes all missing codes in string fields to a dot.
It is legal to include more than one
MISSINGspecification, to specify different recoding instructions for choice, check, string, date and int data types. However, if theallspecification appears it takes precedence over all other specifications.When creating new SAS® job files, a second
MISSINGstatement is included by default. This statementMISSING missedallows you to specify the missing value code to be used in data fields for missed records. The keywordmissedcan be followed by a user-defined missing value code that will be inserted into each data field after field 7 (Subject ID) in each missed data record. If the global statementMISSING missedexists with no missing value code specification, all data fields following field 7 are left blank for missed records.It is important to note that the
MISSING allglobal statement described above will not insert missing value codes into fields of missed records. A separateMISSING missedstatement must be specified in order to do this. However, if theMISSING missedstatement specifies the DFdiscover missing value code (*) and aMISSING all codestatement is used to recode DFdiscover missing value codes, then theMISSING all codetakes precedence and this statement will apply to missed records as well.Note The
MISSING missedglobal statement will have no effect on the output unless missed records are requested by theRECSTATUSglobal statement (See RECSTATUS). By default, theRECSTATUSstatement includes final, incomplete and missed records. If missed records are requested but aMISSING missedstatement has not been included, or has been included but with no missing value code specification (i.e. literally asMISSING missed), all data fields following field 7 will be left blank for missed records.The
MISSINGstatement can also be used to specify that a SAS®MISSINGstatement is to be included in the SAS® job file created by DFsas. A SAS®MISSINGvalue statement is generated if the DFsas job file contains the following:MISSING SAS
missing_value_list_from_study_missing_value_mapFor example the global statement:
MISSING SAS A B C
will generate the SAS®
MISSINGstatement:MISSING A B C;
to indicate that the values A, B and C represent missing values.
Note A
MISSING SASstatement is generated automatically when DFsas is executed with-cor-C, regardless of whether or notDFmissing_mapcontains legal SAS® missing value codes. If only legal SAS® codes have been used theMISSING SASstatement should be removed, as SAS® expects this statement only for non-standard codes. The SAS® missing value statement is written at the top of each data step rather than just once at the top of the entire SAS® job file.Example 8.12. Generate a SAS® job file called
testjobfor plate 5 of study #254, view the globalMISSINGstatements, and recode all illegal SAS® missing value codes.%DFsas testjob -c 254 -P 5After executing the above command, we see that the SAS® job file
testjobcontains the followingMISSINGstatements.MISSING all asis MISSING SAS * _A _U _N
We see that
*is used as a missing value code in DFdiscover. This is not legal in SAS® and thus needs to be changed. An appropriate change might be to modify theMISSINGstatements in the job file to appear as follows:MISSING recode * _D MISSING SAS _D _A _U _N
F. In addition to extracting data from the DFdiscover database you might also want to include fixed fields, i.e. data fields that contain the same value for all cases. An example might be a study protocol number or a study name that you want to be able to include in data listings. Another possibility is that you might plan to merge data sets from different studies at some point and want to have the protocol number included in the data set for subjects from each study.
Fixed fields can be defined globally (in which case they are added to all data records from all plates) or they may be included in the variable list following the
RECORDstatement used to begin data retrieval from a specified plate (as described in Data Retrieval Specifications). Fixed fields can be defined for both normalized or non-normalized data sets.A fixed field is defined using a statement in the following format:
F fixed_value variable_name variable_label (1) (2)
If the
fixed_valueincludes spaces it must be enclosed in double or single quotes. If the fixed field contains non-numeric characters (i.e. characters other than 0-9 or.), or if the fixed field is enclosed in quotes it is treated as a string field, otherwise it is considered to be of type int. A fixed field can not contain quotes within the string and the:qqualifier can not be used.Quotes may also be used around the
variable_labelbut are not required.Example 8.13. Common uses of fixed fields
F 18345 SNUM "Study Number" F 44.171 PNUMBER "Protocol Number" F "Study 44-171" PNAME "Protocol Name" F 09/15/97 STARTDT "Study Start Date" F "150mg" STDOSE "Study Treatment Dose"
The first example is interpreted as an int field and the last 4 examples are all string (character) fields.
Exactly the same format is used to specify fixed fields, whether defining them in the global statements section of the DFsas job, or locally in the variable list following a
RECORDstatement for a particular plate. The only difference is that globally defined fixed fields are inserted at the beginning of each data record immediately after the subject ID, while locally defined fixed fields are inserted in the position in which they are defined within the variable list. A DFsas job may include both globally and locally defined fixed fields.There are 3 restrictions on fixed fields:
they can not contain single or double quotes
they can not contain the
|or-characters,and they can not begin with a minus/dash (
-).
NOVISIT. By specifying visit numbers after the RECORD statement, it is possible to construct data records in which the data for repeating visits are laid out on a single summary data record for each subject (e.g. ID dbp0 dbp1 dbp2 dbp3 etc.). The NOVISIT keyword is used to specify a value to be inserted for variables that don't exist in the database for a subject, because that visit has not been completed, or received. Whatever follows the NOVISIT keyword will be used, exactly as typed. Do not include quotes or the quotes will also be inserted. The only exception is the word blank, which is interpreted as requesting that the fields be left blank. A few examples follow.
NOVISIT .
Inserts the SAS® missing value code, i.e. the dot.
NOVISIT NA
Inserts the 2 letters NA.
NOVISIT blank
Leaves the fields blank.
RECSTATUS. If the
RECSTATUSstatement is not used, DFsas retrieves final, incomplete and missed data records from the database. It does not retrieve pending records because this status is normally used to indicate that the data is not ready for statistical analysis, and in some cases might even indicate that one or more of the keys (subject ID, visit or plate) are uncertain. Missed records are included by default so that the data set includes all cases as is typically desired for an intention to treat analysis. TheMISSING missedstatement is also be included by default in new SAS® job files. This outputs blank fields for missed records. Alternatively a missing value code can be specified (See MISSING).The
RECSTATUSstatement can include any combination of the following record status keywords: final, incomplete, pending and missed.Note While it is also possible to export 'secondary' records this is not generally useful, as the only meaningful data field on secondary records is the image ID.
The
RECSTATUSstatement applies only to data plates and not to queries. If you want to export data by query status, you must specify plate 511 when building an initial DFsas job file, as in%DFsas job 1 -c 7 -p 511In the data retrieval specifications for job1, specify
RECORD 511 unresolved
or
RECORD 511 resolved
to export unresolved or resolved queries respectively.
SETNAME. DFsas names the input data files which it creates by appending d01, d02, d03, etc. to your SAS® job file name (specified using the SASJOB command). It is possible instead to have DFsas append the plate number as the extender following the SAS® job name. This is done using the SETNAME statement, as follows:
SETNAME byplate
which results in the naming of data sets by plate number (not d01, d02, etc.). The ASCII data files will be named jobname.
#and the SAS® data sets will be named data#where#is the plate number.This might be helpful if you want to have a common data set name across different SAS® jobs or different studies, in situations where the same variables are always pulled from each plate, or the same plate numbers are used in different studies.
Obviously, this option can not be used if you build more than one data set from a single plate. In the case of normalized data sets, which involve the creation of normalized records from more than 1 plate, DFsas will use the plate number from the first
RECORDSstatement to name the data set whenSETNAME byplateis specified.INFORMAT. This statement controls the creation of SAS® informat statements. When a DFsas job file is created the following INFORMAT statement is automatically included:
INFORMAT dates
which instructs DFsas to create SAS® informat statements for date fields that SAS® recognizes. DFdiscover allows some date formats that the current version of SAS® does not recognize as dates, (e.g. Jan 25, 2016). Any date fields that SAS® does not allow are converted to string fields.
DFsas identifies string fields which are up to 8 characters long using the SAS®
$identifier in the data variable list, and generates informat statements for any string fields that have more than 8 characters.DFsas converts fields which contain formatting characters to type string. Also if labels are requested for check or choice fields they too will be converted to SAS® string fields by DFsas, and if any of these labels is more than 8 characters long DFsas will automatically generate a SAS® informat statement for that field.
A global INFORMAT statement can be used to get DFsas to convert all variables to type string and generate the appropriate SAS® INFORMAT statements as follows:
INFORMAT all
This converts all fields to type string including dates. To use date formats for dates and convert all other fields to type string use the following:
INFORMAT dates all
FORMAT. This statement is used to create SAS® output format statements for dates. The following example sets the output format for all dates to the SAS® date format
DDMMYY10:FORMAT dates DDMMYY10
If this option is used without specifying a SAS® date format, DFsas creates SAS® format statements which correspond to the format defined for each date in the study schema.
FIELDCODE. By default, for choice and check fields, code labels are taken from the variable style and written as SAS® format statements. Generally speaking, this is the desired behavior for such fields. There may however be situations where the unique code labels for the field may be preferred. The default behavior can then be overridden with this statement as a global specification.
FIELDCODE yes
With this specification, the code labels specified at the individual field level are written as SAS® format statements.
MERGE. In order to read all of the data files created by DFsas into a single SAS® data set it is necessary to include the appropriate SAS® commands after the data statements in the SAS® job file. Most of the time the commands that will be needed are something like the following:
data final; merge test.d01 test.d02; by ID;
In this example, a data set named
finalwill be created by merging filestest.d01andtest.d02on the subject ID. The above is what is written to your SAS® job file by default, or when you explicitly ask for it by including:MERGE yes
The summary data files are sorted on ID when they are created by DFsas and thus
proc sortis not needed in SAS®.Sometimes, for example when building normalized data sets, you may want to specify a different SAS® merge command. In such cases specify:
MERGE no
and then put the desired SAS® merge commands at the top of the SAS® procedures section of your DFsas job file.
DFsas includes several commands (labels, MISSING, BLANK, RECODE and NOVISIT) that can be used to recode data fields before they are written to the SAS® input data files. These commands are applied in the following order:
labels. converts numeric values to labels in choice and check fields
MISSING. converts different missing value codes to a single code
BLANK. converts blank fields to a specified value
RECODE. converts a single specified value to another specified value
NOVISIT. the missing visit code is applied to all fields of visits not in the database
| Side effects of ordering |
|---|---|
|
Watch out for possible unintended order effects. For example, if for check fields you use coding: 0="box not checked", 1="box checked", and your global statements include both: CHECK labels RECODE check 0 .
the |
After the global statements come the data retrieval statements, which identify
the data fields to be included in your SAS® job.
DFsas will create 1 or more
data input files depending on the number of different plates from which data
are to be retrieved. These data files are merged within SAS®, using the SAS®
merge command, to create the final SAS® data set. The summary data files created
by DFsas are named using the DFsas job name plus .d01, .d02, .d03, etc. as
suffixes (e.g. test.d01,
test.d02, etc.)
The definition of each data set begins with the keyword
RECORD or NORMALIZE.
The
RECORD
keyword is used when you want to pull specified data fields from a
single plate, to create a single record for each subject (or for each
subject/visit combination). It is followed by the plate number and optionally
by record status criteria and/or either a single visit/sequence number or a
list of visit/sequence numbers and ranges. This identifies the records in the
study database from which variables are to be exported.
If more than one visit or sequence number list is specified, the individual
sequence numbers or ranges must be separated by a space, and the 2 numbers
making up a range must be separated by the range delimiter (-
or ~), without any intervening spaces.
Example 8.14. Sample data retrieval
This example specifies that the
variables listed below the RECORD
keyword (i.e. status and vdate) are to be
pulled from plate 101. Further it specifies that these variables are to be
pulled from several visit numbers 0 to 5, 9, 12, 21 to 25 and 99. All of these
variables will be assembled in a single record for each subject. The variables
for visit 0 will be written first, then the variables for visit 1, and so on.
Be careful, you can end up with very long records this way.
RECORD 101 0~5 9 12 21~25 99 1 status 9 vdate
If visit or sequence numbers are not specified, DFsas will create a summary data record for each data record that appears in the database for the specified plate. Thus instead of all variables being laid out on a single record for each subject, each subject will have as many summary data records as they have visits for that particular plate in the study database. In some situations this may be what you want to happen. Or you might know that the plate only occurs at one visit. It's up to you to decide how you want the data organized when you import it into SAS®.
If the global RECSTATUS and RECLEVEL
statements are used, only data records meeting the specified status and level
criteria will be retrieved from the study database.
It is also possible to specify status and level criteria on the
RECORD statement line itself, in which case they
override the global specifications.
In the following example final and incomplete records at levels 3,4,5 and 7
and at visits 0,1,2,3,4, and 9 will be exported from plate 101.
RECORD 101 final incomplete level:3-5,7 0~5 9
| Note |
|---|---|
Status and level specifications must follow the plate number and come before the visit criteria (if any). Status and level specifications can appear in any order. The level specification must not contain spaces. |
When exporting queries (plate 511) the record status keywords
resolved and unresolved
may be used to retrieve only those queries which have the desired
resolution status:
RECORD 511 resolved ... only export resolved queries |
RECORD 511 unresolved ... only export unresolved queries |
The variables to be retrieved from the specified plate are listed following the
RECORD statement. Variables are identified by field number, as specified in the
study schema. Each line, following the RECORD
statement, can define either a
single variable or a single contiguous range of variables. It is not legal to
include a list of variables and ranges on a single line.
The variables to be retrieved may also be specified using the notation
NF or NF-.
#NF refers to the last field on the current plate,
while NF- refers to the
field which is ## fields before the last field.
| Note |
|---|---|
Use of the |
The following example shows legal syntax. Note that variables may be defined in any order.
RECORD 22 12~17 10 34~45 NF-1 NF
DFdiscover maintains a separate data file for each CRF plate. A listing of the study data dictionary for all plates, with data field numbers and variable names, can be displayed and printed by running DF_SSvars.
Do not specify the subject ID (always field number 7) as one of the variables to be retrieved. Since subject ID is needed to merge the summary data files into a SAS® data set this field is retrieved automatically and written as the first field of each summary data record. The variable name is set to the name specified in the study schema but may be changed by editing the global IDNAME statement. If the IDNAME statement is missing from a DFsas job file the subject ID is assigned variable name ID.
Normally variable names will be extracted from the study schema and written to the SAS® job file. This is what happens when you specify a field number without a variable name in a DFsas job file. However, you can override the schema names, and specify new ones in the DFsas job file, as we have done in the preceding example.
If a variable name is not specified in the DFsas job file, a name is constructed from the study schema as follows. If a field name exists it will be used, and if not, the required variable alias will be used. If SAS® version 6 is used and either of these names is longer than 8 characters, it will be truncated to 8 characters when it is written to the SAS® job file. If a sequence number range is specified, the sequence number will be appended to the variable names in that retrieval set. When DFsas is run with the existing DFsas job file to create SAS® job and data files, DFsas checks the length of all variable names in the DFsas job file and prints a warning if there are any which exceed the limit of the SAS® version specified.
All of these variables will be created for each subject record. If a subject
does not have one or more of the specified visits in the database, the fields
for missing visits will be written with the SAS® missing value code, i.e.
., a dot.
If a visit or sequence number is not specified, variable names will be used as they appear in the study schema, or as specified in the DFsas job file, without any appended visit or sequence numbers. If a particular plate is only completed at one visit there is really no need to specify a sequence number, but if one is specified, it will be appended to the variable names.
The first 6, and last 3, fields in all data records in a DFdiscover database are used for
database management by DFdiscover, and are referred to by the same variable names
in all DFdiscover studies. They are: DFSTATUS
(data record status: final, incomplete, pending),
DFVALID (data record validation/workflow level: 0~7),
DFRASTER (the name of the
file holding the fax image of the CRF page corresponding to the data record),
DFSTUDY (the DFdiscover study number),
DFPLATE (the data record plate number),
DFSEQ (the data record sequence or visit number),
DFSCREEN (data record status
without consideration for primary/secondary),
DFCREATE (the record creation date and time) and
DFMODIFY (the record's last modification date and time).
DFSEQ is assigned only if the sequence number
is defined as being in the barcode; otherwise the variable name is
user-defined.
If you want to retrieve these
variables from more than one data file you will have to give them unique
variable names in your DFsas job file.
Date variables are specified as character string fields in the SAS® job file.
You can override the global specification to output codes or value labels for
any field by including the keyword codes or
labels after the
variable name. For example:
10 sex1 codes 10 sex2 labels
will output the variable sex (field 10) twice, sex1 will be numeric (e.g. 1,2) and sex2 will be text (e.g. male, female). Note that if you wish to specify codes or labels at the variable level, a variable name must be specified as illustrated above, i.e. 10 codes, would assign the variable name codes to field 10, probably not what you intended.
When DFsas is executed with the -c or
-C options to create a DFsas job file,
the data retrieval specifications for each plate includes one line for each
variable with the database field number, variable name and variable label found
in the study schema file. Both the variable name and variable label can be
modified in the DFsas job file.
Variable labels can be
increased to the SAS® version's character maximum in the DFsas job file.
When DFsas is
executed to create the SAS® job and data files, it is the variable names and
labels found in the DFsas job file that are used. DFsas reverts to the variable
names and labels found in the schema if they are not specified in the
DFsas job file. If the DFsas job file contains a variable label that is
longer
than the character maximum allowed by the SAS® version, the label is truncated
to the maximum limit
in the SAS® job file. Note that a variable label cannot be either
"codes" or "labels", as these are key words used to determine whether
the output data file is to be written with the numeric codes or text labels for
specified variables.
It is not uncommon to see case report forms designed so that several medications, medical history items, adverse events, etc. can be recorded on the same page. Associated with each entry there are typically several data fields. For example, medications might include: drug name, indication, dose, start date, stop date, etc. These questions might be repeated several times on the same page so that several medications can be recorded in the same place in each subject's case record book. The same question blocks may also appear on optional continuation pages, or be used at both baseline and follow-up, and thus may appear on several different plates and at several different visits in the study database.
A normalized data set for such repeating question blocks, puts all of the data fields related to a single item (e.g. a medication, medical problem, or adverse event) on a single data record. Each subject might thus contribute none, one or more such records to the normalized data set, depending on the number of items (medications, medical problems, or adverse events) that were recorded for each subject.
When building a normalized data set, you usually only want to output records for those items that have data recorded. That is, you want to skip over empty question blocks. Also, you might want to specify additional retrieval criteria (e.g. build a data set consisting of only serious adverse events).
It is also possible that you might want to have a data field appear in the normalized records that does not actually appear in the study database. For example, if medical history items are described on the case report forms (e.g. hypertension, diabetes, etc.) but only appear as a yes/no choice field followed by other details on the case report forms, you would probably want to include a field in the normalized data records which specified the type of medical problem (e.g. "hbp" for hypertension, "dbm" for diabetes, etc.) being described by each data record.
Finally, in the SAS® data set you may want to merge a normalized data set with other subject data. For example you might want to combine adverse event data with demographic data (e.g. age, sex), initial diagnosis, etc.
DFsas includes the ability to create normalized data sets with all of these features. The syntax is illustrated in Section 8.7, “ Creating a Normalized Data Set”.
The third and final section of a DFsas job file begins with the keyword
SAS on
a line by itself. All lines following this keyword are written directly to the
SAS® job file. This can be used to include SAS® commands following the data
definition statements in the SAS® job file. This section is optional. Without it
the SAS® job will end with the SAS® commands needed to merge the summary data
files on subject ID.
Sometimes you will want to be able to create more than one record for each subject, because certain data can naturally be divided into repeating record blocks. Examples include CRFs in which several medications, adverse events, or medical problems are listed on a single CRF page. In such cases you may want to be able to create a separate data record for each medication, adverse event or medical problem.
The example that we will use shows how to create a normalized data set for medical problems reported at baseline. Our objective will be to create a record for each problem that exists (i.e. for each problem checked Yes). Also we will show how to merge the problem records with the subject’s age and sex, and then print them out, one problem on each line. The case report forms used to record this data might appear as illustrated in Figure 8.1, “Sample Case Report Form”.
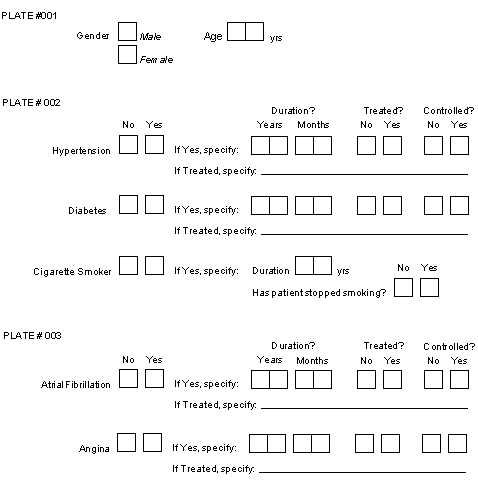
Example 8.15. Normalization code for Sample Case Report Form
MERGE no NORMALIZE if(item==2) SORT 1:n 2 medprob "Medical Problem" item tempvar yrs "Medical Problem - duration (yrs)" mon "Medical Problem - duration (mon)" treat labels "Medical Problem - on treatment" ok "Medical Problem - controlled or stopped" rx "Medical Problem - treatment specify" RECORDS 2 "hbp" 10~15 "dbm" 16~21 "smoker" 55 56 "." "." 57 "." RECORDS 3 "afib" 41~46 "angina" 47~52 RECORD 1 12 sex labels 13 age SAS data final; merge medhx.d01 (in=medprob) medhx.d02; by ID; if medprob; proc print;
Although most specifications will probably be simpler than the example shown above, this example illustrates most of the DFsas normalization features. A detailed description follows below. In this example we will assume that the yes/no questions are coded 1=no, 2=yes, and that plates 1, 2 and 3 only occur at baseline.
In our example the only global specification shown is MERGE no. This will
suppress the standard merge command so that it can be replaced by the command
shown at the bottom under the SAS keyword.
With the specified merge command
only subjects who have one or more medical problems will be included in the
normalized data set. If the usual merge command were used subjects with no
medical problems who appeared in the baseline (age/sex) file, would appear as a
single record in the merged data set, with SAS® missing value codes (i.e. the
dot) for the medical problem variables.
In our example, each medical problem is defined by 7 data fields, named:
medprob, item, yrs, mon, treat, ok, rx.
Each of these 7 data fields is defined on a separate line following the
NORMALIZE command. The normalized records to be created consist of only 6 of
these fields.
The variable named item
is classified as a tempvar. Tempvars are variables that are needed for case
selection but which are not be included in the normalized data records.
Variable item
is needed to select the problems to be printed but is of no use by itself. It
is a choice field with 2 boxes coded 1 for no (the problem does not exist) and
2 for yes (problem exists). Since this field will equal 2 for all records that
are written to the normalized data set, it would be an uninformative constant
and can therefore be eliminated. It is legal to specify more than one tempvar
within a set.
The type (choice, check, etc.) of each variable is determined from the
definition in DFschema
of those variables that make up the first normalized
record.
For this reason it is important to choose the first record carefully and to
avoid using a record in which some of the fields are missing and therefor
specified with a fixed value. The record that begins with "smoker" in
the preceding example is like this and thus would be a poor choice for the first record.
If you can not avoid fixed fields in the first record, (e.g. medprob
in the example) the variable type is determined by inspection of the fixed value.
If this value is entirely numeric (i.e. composed of 1 or more digits and optionally
including a decimal) it is defined as a number to SAS®,
otherwise it is defined as a text field. When specifying fixed numeric fields
remember to enclose them in double or single quotes, otherwise they will be
interpreted as database field numbers.
When DFsas creates a normalized data set, it determines the field type
(i.e., string, number, date) of each variable by examining the definition of
each variable on the first normalization record specified. If a fixed string
is specified, DFsas examines it to determine whether it is a string or a
number. In some cases it may determine the type incorrectly. For example,
if the first record contains a field that is defined with a SAS missing value
code, e.g. ".M", there is no way for DFsas to know whether the field is a
number or a character string.
To eliminate
ambiguity, users may specify the string qualifiers of c
(string) or
n (number) for fixed strings in the DFsas job file.
String qualifiers should only be specified on the first normalization record,
because this is the only one examined to determine the field type of each
variable in the normalized data set. This is all that is needed because
each field can only be of one type.
For example
RECORDS 3 "bp" 9~13 "mmHg":c "wght" 14~18 "kg" "hght" 19~23 "cm" "pulse" 24~28 "beats per min" "other" 29~33 ""
String qualifiers are defined in the DFsas job file and consist of:
:c- character string. This option specifies that a fixed string is to be interpreted as a character field.:n- number. This option specifies that a fixed string is to be interpreted as a numeric field.
There are several important points to bear in mind when using string qualifiers:
The qualification is only used from the first normalized record and is ignored if present on any other normalized records.
Qualified strings may have embedded spaces, as for
pulsein the example above.Single or double quotes may be used to specify qualified strings, but quotes of any type are not allowed within a string, and the
:qqualifier is not allowed. Qualified strings must have matching quotes.Empty strings are allowed, and may be specified with either single or double quotes, as for
otherin the above example.
The if statement after the NORMALIZE command is optional. It instructs DFsas to
print a data record if variable item
equals 2 (i.e. the problem exists).
The if statement uses awk syntax. Other
examples of legal selection criteria for the above example would include:
-
medical problems among older men
if(item==2 && sex==1 && age>65)
-
untreated problems which are not resolved
if(item==2 && treat==1 && ok==1)
-
problems among women of any age or men over 65
if(item==2 && (sex==2 || age>65))
Another common use of the case selection specification is to restrict record selection to a desired set of visits (e.g. baseline only, follow-up only, etc.). This can be accomplished by including the visit number in the variable list (perhaps as a tempvar) and then using it in the case selection specification. For example:
medical problems at visit 0 (baseline)
if(item==2 && vnum==0)
medical problems from visits 1 through 5 inclusive
if(item==2 && vnum>=1 && vnum<=5)
Another common example will arise when normalizing medication records or
adverse events. In such cases each question block typically begins with a
string variable (e.g. a drug name or adverse event name). To select blocks in
which something was specified use the
awk length function as follows:
if(length(drugname)>0) # include if a drug name is specified
DFsas will also accept
SELECT if(condition statement) on one or more separate
lines following the NORMALIZE statement. If more than one
SELECT statement is
used, an OR is implied among them, i.e. a record only has to match one
SELECT statement to be created. For example, the statement:
NORMALIZE if ( x==1 || y==2 || (z==3 && length(comment)>0) )
can also be written as:
NORMALIZE SELECT if(x==1) SELECT if(y==2) SELECT if(z==3 && length(comment)>0)
NORMALIZE and SELECT
must both appear in uppercase, if
must be in lowercase, and the names must use case exactly as defined in the
NORMALIZATION variable definitions. SELECT if
must be considered a single phrase.
if must follow SELECT and it is not
legal to have anything except space(s) between SELECT and
if.
For example,
SELECT {if(...)}is not legal.
Remember that the variables used for case selection must appear in the list of
normalized variables. However, if they are not wanted in the normalized data
records they can be removed by defining them as tempvar,
as was done for
variable item
in the example.
Variable names may be followed by the keyword labels or
codes to
override global specifications. This is illustrated in variable
treated,
for which labels are requested.
For example, this variable might have labels
no and yes, which will be written to the normalized data set in
place of the codes 1 and 2.
Value labels are taken from the study schema. Since all records are assumed to
follow the same format, it does not matter which of the records specified
under the
RECORDS keyword(s) is used to locate variable labels. DFsas uses the
very first record specified.
The variable name statements all end with a variable description or label. This is needed because these variables do not exist in a single place in the database, and thus a unique variable description can not be read from the study schema.
The
RECORDS statement identifies the plate from which the variables will be
extracted. In our example, there are 2
RECORDS statements, one for records to
be created from plate 2 and one for records to be created from plate 3.
As previously described for RECORD
statements, it is possible to specify record
status retrieval criteria following the plate number on a
RECORDS statement.
For example:
RECORDS 1 final #only export final data records from plate 1
Each line following a
RECORDS statement identifies the variables to be
extracted from the specified plate to form a single normalized data record.
Variables are specified as a space delimited list of single field numbers,
field number ranges and/or quoted fixed string fields. The field numbers
corresponding to the variables you want to select can be determined from
DFsetup, or by running DF_SSvars or DF_SSschema from DFexplore in
Reports View.
There must be a one-to-one correspondence between the variable names specified
under the NORMALIZE statement, and the data fields identified under the
RECORDS
statement. Note that the first data field, which maps to variable
medprob, is a fixed string field,
and is a constant which identifies the question on
the study case report forms from which the problem record was created. This
technique is also used to insert missing codes for 3 variables
(mon, treat and
specify)
for history of smoking, which in our example inquires about duration in years
(variable yrs
) and whether the subject has stopped (variable ok
), but not about duration in months, and treatment. Remember to enclose all
fixed string fields within single or double quotes.
DFsas automatically sorts each normalized data set on subject ID, however sometimes this may not be enough. You may wish to sort the normalized set on some other variable(s) within subject ID, or even sort on some other variable ahead of subject ID.
You can specify your own sort order by including a SORT
statement after the NORMALIZE statement as in:
SORT 1:n 2
This example statement will sort the normalized data set on the 1st
field (ID) in numerical order, and then within
ID will sort on the 2nd field
(medprob) in ascending ASCII or character order.
Note that field numbers
correspond to the order in which the variables are defined in the normalized
set.
Remember that although subject ID is not included in the list it is always
present as the first field.
Legal field sort qualifiers include:
:n. Sort the field in ascending numeric order, as in:2:n
which sorts on field 2 in ascending numeric order.
:r. Sort the field in descending alphanumeric order, as in:2:r
which sorts on field 2 in descending alphanumeric order.
:nr. Sort the field in descending numeric order, as in:2:nr
which sorts on field 2 in descending numeric order.
If a sort field is specified with no qualifier, sorting is done in ascending alphanumeric order (a.k.a. ASCII collating sequence).
Table of Contents
DFsqlload provides a convenient method for migrating data from the proprietary DFdiscover storage to storage in a relational database. Although this link is not maintained in real time, the relational side can be synchronized with the proprietary side whenever required. Data integrity is maintained in that only changes made to the data on the validated DFdiscover side are kept. These changes are reflected in the relational copy only after synchronizing with DFsqlload. DFsqlload can be scheduled using cron or run interactively as required. In this way, snapshots of the database at a known time can be generated and used for whatever purpose the user deems important, much in the same way as DFsas provides snapshots of the database in SAS format.
DFsqlload is only useful in situations where one of the following four database products are being used or are planned on being used in a particular computing environment.
-
MySQL - a common, multi-platform, open source relational database product.
-
PostgreSQL - another multi-platform, open source relational database product that has more sophisticated features than MySQL, which may make it better suited for server environments.
-
Oracle - commercial relational database product.
-
Microsoft SQLServer - commercial relational database product.
All four products are network-aware, and provide native as well as JDBC and ODBC-based connectivity from client applications running on any platform.
DFsqlload is one of three data export utilities available in DFdiscover. DFsqlload provides an easy to use export facility for relational databases. DFexport.rpc is a flat-file data export utility, and DFsas provides DFdiscover export capability for the SAS environment.
All methods can be used at any time and produce a true equivalent to the data stored in DFdiscover at the time the export is performed. This chapter will focus on how this is accomplished with relational databases.
There are many applications written for relational databases for many purposes. The two main applications benefiting from DFsqlload are reporting and analysis. Writing custom reports for DFdiscover is possible, but can take effort compared to the many report-writing and spreadsheet applications with relational database connectivity on the market today. For Windows users, there is Microsoft Office, Crystal Reports, Visual Basic, to name just a few of the applications available. UNIX users have OpenOffice, many java-based report writers, and Perl at their disposal. Mac users in most cases can pick the best from both worlds. There are hundreds of applications out there, some of which you may already be using.
DFdiscover is a validated system. The ways to get data into DFdiscover have been rigorously tested and proven accurate. Providing for one-way movement of data out of DFdiscover allows DFdiscover to maintain the integrity of the DFdiscover database by limiting the ability of outside processes to compromise the validity of the system.
Plates: DFdiscover keeps all data from a given form type together as one record type or plate. There may be, for example, blocks of information on a particular plate that repeat and would be better modeled with separate tables. DFsqlload makes no attempt to do this. When DFsqlload is run, each plate becomes its own relational table.
Fields: DFdiscover plates are made up of fields, each field storing data according to the layout of the plate on the paper CRF form. When a DFdiscover study is setup, you will recall that each plate is imported into the setup tool as a PS or PDF representation of the printed page that will ultimately be used to collect data for the study you are designing. The same fields defined during DFdiscover setup are used to define column names for the relational tables DFsqlload will create. There are some differences in the rules for naming columns in relational tables, but these differences are handled by DFsqlload as it has its own set of rules for doing so. DFsqlload provides two options for the creation of tables. One is to export all data as if it were character string data. The other option is to create columns of the same data type as the source fields.
Coding: DFdiscover has the ability to use multiple missing value codes for different purposes. Data values with corresponding labels may be used to represent different discreet conditions. Dates may be incomplete and as such, have rules for imputation. None of these concepts are an integral part of relational databases and require different ways to handle these situations as they arise. DFsqlload provides options for passing both coded values and labels to the relational side.
Schemas and Tablespaces: DFdiscover keeps the information for any given study together under one study number. There is no sharing of data between studies, so in cases, for example, where two studies share the same sites, the sites database is duplicated for the two studies. Each study database is independent of the others. Some relational database products allow for multiple groups of potentially similar data in the same database through use of the concept of the database schema. DFsqlload is aware of these possibilities and supports multiple schemas if the relational database product supports them. Tablespaces provide for another layer of hierarchy in data modeling and are supported as well.
It is very simple to create a relational database equivalent to a DFdiscover study once a working relational database environment is established on your network. On the relational database side, you will need to know the following:
-
What relational database product am I using - MySQL, PostgreSQL, MS SQLServer or Oracle
-
What is the name of the server hosting the relational database
-
In the case of Oracle, what tablespace has been assigned to me for this purpose by my DBA.
-
In the case of Oracle and Postgres and MS SQLServer, what database will be used to store my DFdiscover schemas
-
What are my login credentials for the relational database server I am using.
With the answers to these questions, simply run DFsqlload as shown and a relational database equivalent to your DFdiscover study will be ready to use. Using Oracle (the default) as an example, the command would be:
% DFsqlload bluto:mystudies:foo.bar:olive:popeye 254
which will create a snapshot of study 254 in the mystudies database,
in the foo schema with the tablespace name bar
on the server bluto with user credentials username
olive and password popeye.
By default, all columns are typed as closely as possible to the data types used by DFdiscover during setup. All dates are imputed. No coded values are translated. No missing codes are translated. No optional tables are created. If these defaults are acceptable, then this is all you need to know.
The default settings for DFsqlload should be adequate for most users. However, if the purpose of using DFsqlload is to provide a relational database view of a study to a set of specialized users with different requirements, then you might want to get as much information as possible from the DFdiscover side to the relational database side. For this scenario, you will need to use some of the options DFsqlload offers.
Answers to the following questions will affect how DFsqlload is used. See also the reference page for DFsqlload elsewhere in this guide.
- Q: What is the target database type?
- Q: Is it important to have the data type of each column in my relational tables match as closely as possible the data types for each field in my DFdiscover plates?
- Q: My DFdiscover setup makes extensive use of codes and value labels for these codes. How can I make this information accessible from relational tables?
- Q: My DFdiscover setup includes subject aliases. How can I access this information from relational tables?
- Q: In my DFdiscover setup, I have defined a number of missing value codes that are important for correct interpretation of the data. How do I make those codes available in relational tables?
- Q: How are dates handled by DFsqlload?
- Q: How do I find out if something went wrong?
- Q: Can I add tables to my SQL database outside DFdiscover?
- Q: What if the DFdiscover study schema is changed?
- Q: What happens if I modify the definition of one of the SQL tables used by DFdiscover?
- Q: How does DFsqlload update my SQL tables?
Q: | What is the target database type? |
A: |
DFsqlload supports four popular SQL server platforms - Oracle,
PostgreSQL, MS SQLServer and MySQL. Your target
database will need to be one of these four types. Once this is known,
DFsqlload is directed to create
a set of relational tables for a given database type using the
|
Q: | Is it important to have the data type of each column in my relational tables match as closely as possible the data types for each field in my DFdiscover plates? |
A: |
The default behavior of DFsqlload is to preserve data typing. The older
version of DFsqlload that was shipped with DFdiscover 3.7 and 3.7.001 did not
preserve data typing and all user fields were converted to type
To preserve Data Typing - omit this option or use |
Q: | My DFdiscover setup makes extensive use of codes and value labels for these codes. How can I make this information accessible from relational tables? |
A: |
Relational tables rely on other relational tables when a code has a
corresponding label and it is the label that you want to report. Rather than
create a separate table for every coded variable, DFsqlload offers two options
which may be used together or separately depending on the specific requirements.
The |
Q: | My DFdiscover setup includes subject aliases. How can I access this information from relational tables? |
A: |
Use the
The |
Q: | In my DFdiscover setup, I have defined a number of missing value codes that are important for correct interpretation of the data. How do I make those codes available in relational tables? |
A: |
How missing codes are handled depends upon the |
Q: | How are dates handled by DFsqlload? |
A: |
By default, DFsqlload creates date columns using the correct data type for the
target system. A string representation of a date can be output in a separate
column using the option |
Q: | How do I find out if something went wrong? |
A: |
DFsqlload writes extensive logging information. When DFsqlload encounters a
problem, the problem is written to
If you use the Complete records will be rejected if the following conditions are encountered.
These cases will also appear in the .drf file if the |
Q: | Can I add tables to my SQL database outside DFdiscover? |
A: | Yes. DFsqlload will ignore them. |
Q: | What if the DFdiscover study schema is changed? |
A: | DFsqlload recreates the tables it needs each time it is run. Be careful when changing DFsqlload program options from run to run. SQL tables created from a previous run are not recreated if they are not required by the current run. |
Q: | What happens if I modify the definition of one of the SQL tables used by DFdiscover? |
A: |
DFsqlload will drop the table (and all of your changes) and recreate it from
the current |
Q: | How does DFsqlload update my SQL tables? |
A: | If there have been no changes to the data definitions, the data is dropped from the SQL table and reloaded from DFdiscover. This occurs even if there have been no data changes for that DFdiscover plate since the last time DFsqlload was run. |
Table of Contents
- A.1. External Software Copyrights
- A.1.1. DCMTK software package
- A.1.2. Jansson License
- A.1.3. Mimencode
- A.1.4. RSA Data Security, Inc., MD5 message-digest algorithm
- A.1.5. mpack/munpack
- A.1.6. TIFF
- A.1.7. PostgreSQL
- A.1.8. OpenSSL License
- A.1.9. Original SSLeay License
- A.1.10. gawk
- A.1.11. Ghostscript
- A.1.12. MariaDB and FreeTDS
- A.1.13. QtAV
- A.1.14. FFmpeg
- A.1.15. c3.js
- A.1.16. d3.js
DFdiscover software uses several third-party software components as part of its server side and/or client tools.
The copyright information for each is provided below. If you would like to receive source codes of these third-party components, please send us your request at <help@dfnetresearch.com>.
Copyright © 1994-2011, OFFIS e.V. All rights reserved.
This software and supporting documentation were developed by
OFFIS e.V.
R&D Division Health
Eschereg 2
26121 Oldenburg, Germany
Redistribution and use in source and binary forms, with or without modification, are permitted provided that the following conditions are met:
Redistributions of source code must retain the above copyright notice, this list of conditions and the following disclaimer.
Redistributions in binary form must reproduce the above copyright notice, this list of conditions and the following disclaimer in the documentation and/or other materials provided with the distribution.
Neither the name of OFFIS nor the names of its contributors may be used to endorse or promote products derived from this software without specific prior written permission.
THIS SOFTWARE IS PROVIDED BY THE COPYRIGHT HOLDERS AND CONTRIBUTORS “AS IS” AND ANY EXPRESS OR IMPLIED WARRANTIES, INCLUDING, BUT NOT LIMITED TO, THE IMPLIED WARRANTIES OF MERCHANTABILITY AND FITNESS FOR A PARTICULAR PURPOSE ARE DISCLAIMED. IN NO EVENT SHALL THE COPYRIGHT HOLDER OR CONTRIBUTORS BE LIABLE FOR ANY DIRECT, INDIRECT, INCIDENTAL, SPECIAL, EXEMPLARY, OR CONSEQUENTIAL DAMAGES (INCLUDING, BUT NOT LIMITED TO, PROCUREMENT OF SUBSTITUTE GOODS OR SERVICES; LOSS OF USE, DATA, OR PROFITS; OR BUSINESS INTERRUPTION) HOWEVER CAUSED AND ON ANY THEORY OF LIABILITY, WHETHER IN CONTRACT, STRICT LIABILITY, OR TORT (INCLUDING NEGLIGENCE OR OTHERWISE) ARISING IN ANY WAY OUT OF THE USE OF THIS SOFTWARE, EVEN IF ADVISED OF THE POSSIBILITY OF SUCH DAMAGE.
Copyright © 2009-2014 Petri Lehtinen <petri&digip.org>
Permission is hereby granted, free of charge, to any person obtaining a copy of this software and associated documentation files (the “Software”), to deal in the Software without restriction, including without limitation the rights to use, copy, modify, merge, publish, distribute, sublicense, and/or sell copies of the Software, and to permit persons to whom the Software is furnished to do so, subject to the following conditions:
The above copyright notice and this permission notice shall be included in all copies or substantial portions of the Software.
THE SOFTWARE IS PROVIDED “AS IS”, WITHOUT WARRANTY OF ANY KIND, EXPRESS OR IMPLIED, INCLUDING BUT NOT LIMITED TO THE WARRANTIES OF MERCHANTABILITY, FITNESS FOR A PARTICULAR PURPOSE AND NONINFRINGEMENT. IN NO EVENT SHALL THE AUTHORS OR COPYRIGHT HOLDERS BE LIABLE FOR ANY CLAIM, DAMAGES OR OTHER LIABILITY, WHETHER IN AN ACTION OF CONTRACT, TORT OR OTHERWISE, ARISING FROM, OUT OF OR IN CONNECTION WITH THE SOFTWARE OR THE USE OR OTHER DEALINGS IN THE SOFTWARE.
Copyright © 1991 Bell Communications Research, Inc. (Bellcore)
Permission to use, copy, modify, and distribute this material for any purpose and without fee is hereby granted, provided that the above copyright notice and this permission notice appear in all copies, and that the name of Bellcore not be used in advertising or publicity pertaining to this material without the specific, prior written permission of an authorized representative of Bellcore. BELLCORE MAKES NO REPRESENTATIONS ABOUT THE ACCURACY OR SUITABILITY OF THIS MATERIAL FOR ANY PURPOSE. IT IS PROVIDED “AS IS”, WITHOUT ANY EXPRESS OR IMPLIED WARRANTIES.
Copyright © 1991-2, RSA Data Security, Inc. Created 1991. All rights reserved. License to copy and use this software is granted provided that it is identified as the “RSA Data Security, Inc. MD5 Message-Digest Algorithm” in all material mentioning or referencing this software or this function. License is also granted to make and use derivative works provided that such works are identified as “derived from the RSA Data Security, Inc. MD5 Message-Digest Algorithm” in all material mentioning or referencing the derived work. RSA Data Security, Inc. makes no representations concerning either the merchantability of this software or the suitability of this software for any particular purpose. It is provided “as is” without express or implied warranty of any kind. These notices must be retained in any copies of any part of this documentation and/or software.
Copyright © 1993,1994 by Carnegie Mellon University All Rights Reserved.
Permission to use, copy, modify, distribute, and sell this software and its documentation for any purpose is hereby granted without fee, provided that the above copyright notice appear in all copies and that both that copyright notice and this permission notice appear in supporting documentation, and that the name of Carnegie Mellon University not be used in advertising or publicity pertaining to distribution of the software without specific, written prior permission. Carnegie Mellon University makes no representations about the suitability of this software for any purpose. It is provided “as is” without express or implied warranty.
CARNEGIE MELLON UNIVERSITY DISCLAIMS ALL WARRANTIES WITH REGARD TO THIS SOFTWARE, INCLUDING ALL IMPLIED WARRANTIES OF MERCHANTABILITY AND FITNESS, IN NO EVENT SHALL CARNEGIE MELLON UNIVERSITY BE LIABLE FOR ANY SPECIAL, INDIRECT OR CONSEQUENTIAL DAMAGES OR ANY DAMAGES WHATSOEVER RESULTING FROM LOSS OF USE, DATA OR PROFITS, WHETHER IN AN ACTION OF CONTRACT, NEGLIGENCE OR OTHER TORTIOUS ACTION, ARISING OUT OF OR IN CONNECTION WITH THE USE OR PERFORMANCE OF THIS SOFTWARE.
Copyright © 1988-1997 Sam Leffler Copyright © 1991-1997 Silicon Graphics, Inc.
Permission to use, copy, modify, distribute, and sell this software and its documentation for any purpose is hereby granted without fee, provided that (i) the above copyright notices and this permission notice appear in all copies of the software and related documentation, and (ii) the names of Sam Leffler and Silicon Graphics may not be used in any advertising or publicity relating to the software without the specific, prior written permission of Sam Leffler and Silicon Graphics.
THE SOFTWARE IS PROVIDED “AS-IS” AND WITHOUT WARRANTY OF ANY KIND, EXPRESS, IMPLIED OR OTHERWISE, INCLUDING WITHOUT LIMITATION, ANY WARRANTY OF MERCHANTABILITY OR FITNESS FOR A PARTICULAR PURPOSE. IN NO EVENT SHALL SAM LEFFLER OR SILICON GRAPHICS BE LIABLE FOR ANY SPECIAL, INCIDENTAL, INDIRECT OR CONSEQUENTIAL DAMAGES OF ANY KIND, OR ANY DAMAGES WHATSOEVER RESULTING FROM LOSS OF USE, DATA OR PROFITS, WHETHER OR NOT ADVISED OF THE POSSIBILITY OF DAMAGE, AND ON ANY THEORY OF LIABILITY, ARISING OUT OF OR IN CONNECTION WITH THE USE OR PERFORMANCE OF THIS SOFTWARE.
Portions © 1996-2019, PostgreSQL Global Development Group Portions © 1994, The Regents of the University of California
Permission to use, copy, modify, and distribute this software and its documentation for any purpose, without fee, and without a written agreement is hereby granted, provided that the above copyright notice and this paragraph and the following two paragraphs appear in all copies.
IN NO EVENT SHALL THE UNIVERSITY OF CALIFORNIA BE LIABLE TO ANY PARTY FOR DIRECT, INDIRECT, SPECIAL, INCIDENTAL, OR CONSEQUENTIAL DAMAGES, INCLUDING LOST PROFITS, ARISING OUT OF THE USE OF THIS SOFTWARE AND ITS DOCUMENTATION, EVEN IF THE UNIVERSITY OF CALIFORNIA HAS BEEN ADVISED OF THE POSSIBILITY OF SUCH DAMAGE.
THE UNIVERSITY OF CALIFORNIA SPECIFICALLY DISCLAIMS ANY WARRANTIES, INCLUDING, BUT NOT LIMITED TO, THE IMPLIED WARRANTIES OF MERCHANTABILITY AND FITNESS FOR A PARTICULAR PURPOSE. THE SOFTWARE PROVIDED HEREUNDER IS ON AN "AS IS" BASIS, AND THE UNIVERSITY OF CALIFORNIA HAS NO OBLIGATIONS TO PROVIDE MAINTENANCE, SUPPORT, UPDATES, ENHANCEMENTS, OR MODIFICATIONS.
Copyright © 1998-2019 The OpenSSL Project. All rights reserved.
Redistribution and use in source and binary forms, with or without modification, are permitted provided that the following conditions are met:
Redistributions of source code must retain the above copyright notice, this list of conditions and the following disclaimer.
Redistributions in binary form must reproduce the above copyright notice, this list of conditions and the following disclaimer in the documentation and/or other materials provided with the distribution.
All advertising materials mentioning features or use of this software must display the following acknowledgment: “This product includes software developed by the OpenSSL Project for use in .the OpenSSL Toolkit.” (http://www.openssl.org/)
The names “OpenSSL Toolkit” and "OpenSSL Project" must not be used to endorse or promote products derived from this software without prior written permission. For written permission, please contact openssl-core@openssl.org.
Products derived from this software may not be called “OpenSSL” nor may “OpenSSL” appear in their names without prior written permission of the OpenSSL Project.
Redistributions of any form whatsoever must retain the following acknowledgment: “This product includes software developed by the OpenSSL Project for use in the OpenSSL Toolkit. (http://www.openssl.org)”
THIS SOFTWARE IS PROVIDED BY THE OpenSSL PROJECT “AS IS” AND ANY EXPRESSED OR IMPLIED WARRANTIES, INCLUDING, BUT NOT LIMITED TO, THE IMPLIED WARRANTIES OF MERCHANTABILITY AND FITNESS FOR A PARTICULAR PURPOSE ARE DISCLAIMED. IN NO EVENT SHALL THE OpenSSL PROJECT OR ITS CONTRIBUTORS BE LIABLE FOR ANY DIRECT, INDIRECT, INCIDENTAL, SPECIAL, EXEMPLARY, OR CONSEQUENTIAL DAMAGES (INCLUDING, BUT NOT LIMITED TO, PROCUREMENT OF SUBSTITUTE GOODS OR SERVICES; LOSS OF USE, DATA, OR PROFITS; OR BUSINESS INTERRUPTION) HOWEVER CAUSED AND ON ANY THEORY OF LIABILITY, WHETHER IN CONTRACT, STRICT LIABILITY, OR TORT (INCLUDING NEGLIGENCE OR OTHERWISE) ARISING IN ANY WAY OUT OF THE USE OF THIS SOFTWARE, EVEN IF ADVISED OF THE POSSIBILITY OF SUCH DAMAGE.
This product includes cryptographic software written by Eric Young (<eay@cryptsoft.com>). This product includes software written by Tim Hudson (<tjh@cryptsoft.com>).
Copyright © 1995-1998 Eric Young (<eay@cryptsoft.com>)
All rights reserved.
This package is an SSL implementation written
by Eric Young (<eay@cryptsoft.com>).
The implementation was written so as to conform with Netscapes SSL.
This library is free for commercial and non-commercial use as long as
the following conditions are aheared to. The following conditions
apply to all code found in this distribution, be it the RC4, RSA,
lhash, DES, etc., code; not just the SSL code. The SSL documentation
included with this distribution is covered by the same copyright terms
except that the holder is Tim Hudson (<tjh@cryptsoft.com>).
Copyright remains Eric Young's, and as such any Copyright notices in the code are not to be removed. If this package is used in a product, Eric Young should be given attribution as the author of the parts of the library used. This can be in the form of a textual message at program startup or in documentation (online or textual) provided with the package.
Redistribution and use in source and binary forms, with or without modification, are permitted provided that the following conditions are met:
-
Redistributions of source code must retain the copyright notice, this list of conditions and the following disclaimer.
Redistributions in binary form must reproduce the above copyright notice, this list of conditions and the following disclaimer in the documentation and/or other materials provided with the distribution.
All advertising materials mentioning features or use of this software must display the following acknowledgement: “This product includes cryptographic software written by Eric Young (
<eay@cryptsoft.com>)” The word “cryptographic” can be left out if the rouines from the library being used are not cryptographic related :-).If you include any Windows specific code (or a derivative thereof) from the apps directory (application code) you must include an acknowledgement: “This product includes software written by Tim Hudson (
<tjh@cryptsoft.com>)”
THIS SOFTWARE IS PROVIDED BY ERIC YOUNG “AS IS” AND ANY EXPRESS OR IMPLIED WARRANTIES, INCLUDING, BUT NOT LIMITED TO, THE IMPLIED WARRANTIES OF MERCHANTABILITY AND FITNESS FOR A PARTICULAR PURPOSE ARE DISCLAIMED. IN NO EVENT SHALL THE AUTHOR OR CONTRIBUTORS BE LIABLE FOR ANY DIRECT, INDIRECT, INCIDENTAL, SPECIAL, EXEMPLARY, OR CONSEQUENTIAL DAMAGES (INCLUDING, BUT NOT LIMITED TO, PROCUREMENT OF SUBSTITUTE GOODS OR SERVICES; LOSS OF USE, DATA, OR PROFITS; OR BUSINESS INTERRUPTION) HOWEVER CAUSED AND ON ANY THEORY OF LIABILITY, WHETHER IN CONTRACT, STRICT LIABILITY, OR TORT (INCLUDING NEGLIGENCE OR OTHERWISE) ARISING IN ANY WAY OUT OF THE USE OF THIS SOFTWARE, EVEN IF ADVISED OF THE POSSIBILITY OF SUCH DAMAGE.
The licence and distribution terms for any publically available version or derivative of this code cannot be changed. i.e. this code cannot simply be copied and put under another distribution licence [including the GNU Public Licence.]
GNU GENERAL PUBLIC LICENSE Version 2, June 1991
http://www.gnu.org/licenses/gpl-2.0.html
Copyright © 1989, 1991 Free Software Foundation, Inc.
51 Franklin Street, Fifth Floor,
Boston, MA 02110-1301, USA
Everyone is permitted to copy and distribute verbatim copies of this license document, but changing it is not allowed.
The licenses for most software are designed to take away your freedom to share and change it. By contrast, the GNU General Public License is intended to guarantee your freedom to share and change free software--to make sure the software is free for all its users. This General Public License applies to most of the Free Software Foundation's software and to any other program whose authors commit to using it. (Some other Free Software Foundation software is covered by the GNU Lesser General Public License instead.) You can apply it to your programs, too.
When we speak of free software, we are referring to freedom, not price. Our General Public Licenses are designed to make sure that you have the freedom to distribute copies of free software (and charge for this service if you wish), that you receive source code or can get it if you want it, that you can change the software or use pieces of it in new free programs; and that you know you can do these things.
To protect your rights, we need to make restrictions that forbid anyone to deny you these rights or to ask you to surrender the rights. These restrictions translate to certain responsibilities for you if you distribute copies of the software, or if you modify it.
For example, if you distribute copies of such a program, whether gratis or for a fee, you must give the recipients all the rights that you have. You must make sure that they, too, receive or can get the source code. And you must show them these terms so they know their rights.
We protect your rights with two steps: (1) copyright the software, and (2) offer you this license which gives you legal permission to copy, distribute and/or modify the software.
Also, for each author's protection and ours, we want to make certain that everyone understands that there is no warranty for this free software. If the software is modified by someone else and passed on, we want its recipients to know that what they have is not the original, so that any problems introduced by others will not reflect on the original authors' reputations.
Finally, any free program is threatened constantly by software patents. We wish to avoid the danger that redistributors of a free program will individually obtain patent licenses, in effect making the program proprietary. To prevent this, we have made it clear that any patent must be licensed for everyone's free use or not licensed at all.
The precise terms and conditions for copying, distribution and modification follow.
TERMS AND CONDITIONS FOR COPYING, DISTRIBUTION AND MODIFICATION
This License applies to any program or other work which contains a notice placed by the copyright holder saying it may be distributed under the terms of this General Public License. The “Program”, below, refers to any such program or work, and a “work based on the Program” means either the Program or any derivative work under copyright law: that is to say, a work containing the Program or a portion of it, either verbatim or with modifications and/or translated into another language. (Hereinafter, translation is included without limitation in the term “modification”.) Each licensee is addressed as “you”.
Activities other than copying, distribution and modification are not covered by this License; they are outside its scope. The act of running the Program is not restricted, and the output from the Program is covered only if its contents constitute a work based on the Program (independent of having been made by running the Program). Whether that is true depends on what the Program does.
You may copy and distribute verbatim copies of the Program's source code as you receive it, in any medium, provided that you conspicuously and appropriately publish on each copy an appropriate copyright notice and disclaimer of warranty; keep intact all the notices that refer to this License and to the absence of any warranty; and give any other recipients of the Program a copy of this License along with the Program.
You may charge a fee for the physical act of transferring a copy, and you may at your option offer warranty protection in exchange for a fee.
You may modify your copy or copies of the Program or any portion of it, thus forming a work based on the Program, and copy and distribute such modifications or work under the terms of Section 1 above, provided that you also meet all of these conditions:
You must cause the modified files to carry prominent notices stating that you changed the files and the date of any change.
-
You must cause any work that you distribute or publish, that in whole or in part contains or is derived from the Program or any part thereof, to be licensed as a whole at no charge to all third parties under the terms of this License.
If the modified program normally reads commands interactively when run, you must cause it, when started running for such interactive use in the most ordinary way, to print or display an announcement including an appropriate copyright notice and a notice that there is no warranty (or else, saying that you provide a warranty) and that users may redistribute the program under these conditions, and telling the user how to view a copy of this License. (Exception: if the Program itself is interactive but does not normally print such an announcement, your work based on the Program is not required to print an announcement.) These requirements apply to the modified work as a whole. If identifiable sections of that work are not derived from the Program, and can be reasonably considered independent and separate works in themselves, then this License, and its terms, do not apply to those sections when you distribute them as separate works. But when you distribute the same sections as part of a whole which is a work based on the Program, the distribution of the whole must be on the terms of this License, whose permissions for other licensees extend to the entire whole, and thus to each and every part regardless of who wrote it.
Thus, it is not the intent of this section to claim rights or contest your rights to work written entirely by you; rather, the intent is to exercise the right to control the distribution of derivative or collective works based on the Program.
In addition, mere aggregation of another work not based on the Program with the Program (or with a work based on the Program) on a volume of a storage or distribution medium does not bring the other work under the scope of this License.
You may copy and distribute the Program (or a work based on it, under Section 2) in object code or executable form under the terms of Sections 1 and 2 above provided that you also do one of the following:
Accompany it with the complete corresponding machine-readable source code, which must be distributed under the terms of Sections 1 and 2 above on a medium customarily used for software interchange; or,
-
Accompany it with a written offer, valid for at least three years, to give any third party, for a charge no more than your cost of physically performing source distribution, a complete machine-readable copy of the corresponding source code, to be distributed under the terms of Sections 1 and 2 above on a medium customarily used for software interchange; or,
-
Accompany it with the information you received as to the offer to distribute corresponding source code. (This alternative is allowed only for noncommercial distribution and only if you received the program in object code or executable form with such an offer, in accord with Subsection b above.) The source code for a work means the preferred form of the work for making modifications to it. For an executable work, complete source code means all the source code for all modules it contains, plus any associated interface definition files, plus the scripts used to control compilation and installation of the executable. However, as a special exception, the source code distributed need not include anything that is normally distributed (in either source or binary form) with the major components (compiler, kernel, and so on) of the operating system on which the executable runs, unless that component itself accompanies the executable.
If distribution of executable or object code is made by offering access to copy from a designated place, then offering equivalent access to copy the source code from the same place counts as distribution of the source code, even though third parties are not compelled to copy the source along with the object code.
You may not copy, modify, sublicense, or distribute the Program except as expressly provided under this License. Any attempt otherwise to copy, modify, sublicense or distribute the Program is void, and will automatically terminate your rights under this License. However, parties who have received copies, or rights, from you under this License will not have their licenses terminated so long as such parties remain in full compliance.
You are not required to accept this License, since you have not signed it. However, nothing else grants you permission to modify or distribute the Program or its derivative works. These actions are prohibited by law if you do not accept this License. Therefore, by modifying or distributing the Program (or any work based on the Program), you indicate your acceptance of this License to do so, and all its terms and conditions for copying, distributing or modifying the Program or works based on it.
Each time you redistribute the Program (or any work based on the Program), the recipient automatically receives a license from the original licensor to copy, distribute or modify the Program subject to these terms and conditions. You may not impose any further restrictions on the recipients' exercise of the rights granted herein. You are not responsible for enforcing compliance by third parties to this License.
-
If, as a consequence of a court judgment or allegation of patent infringement or for any other reason (not limited to patent issues), conditions are imposed on you (whether by court order, agreement or otherwise) that contradict the conditions of this License, they do not excuse you from the conditions of this License. If you cannot distribute so as to satisfy simultaneously your obligations under this License and any other pertinent obligations, then as a consequence you may not distribute the Program at all. For example, if a patent license would not permit royalty-free redistribution of the Program by all those who receive copies directly or indirectly through you, then the only way you could satisfy both it and this License would be to refrain entirely from distribution of the Program.
If any portion of this section is held invalid or unenforceable under any particular circumstance, the balance of the section is intended to apply and the section as a whole is intended to apply in other circumstances.
It is not the purpose of this section to induce you to infringe any patents or other property right claims or to contest validity of any such claims; this section has the sole purpose of protecting the integrity of the free software distribution system, which is implemented by public license practices. Many people have made generous contributions to the wide range of software distributed through that system in reliance on consistent application of that system; it is up to the author/donor to decide if he or she is willing to distribute software through any other system and a licensee cannot impose that choice.
This section is intended to make thoroughly clear what is believed to be a consequence of the rest of this License.
If the distribution and/or use of the Program is restricted in certain countries either by patents or by copyrighted interfaces, the original copyright holder who places the Program under this License may add an explicit geographical distribution limitation excluding those countries, so that distribution is permitted only in or among countries not thus excluded. In such case, this License incorporates the limitation as if written in the body of this License.
The Free Software Foundation may publish revised and/or new versions of the General Public License from time to time. Such new versions will be similar in spirit to the present version, but may differ in detail to address new problems or concerns.
Each version is given a distinguishing version number. If the Program specifies a version number of this License which applies to it and "any later version", you have the option of following the terms and conditions either of that version or of any later version published by the Free Software Foundation. If the Program does not specify a version number of this License, you may choose any version ever published by the Free Software Foundation.
If you wish to incorporate parts of the Program into other free programs whose distribution conditions are different, write to the author to ask for permission. For software which is copyrighted by the Free Software Foundation, write to the Free Software Foundation; we sometimes make exceptions for this. Our decision will be guided by the two goals of preserving the free status of all derivatives of our free software and of promoting the sharing and reuse of software generally. NO WARRANTY
BECAUSE THE PROGRAM IS LICENSED FREE OF CHARGE, THERE IS NO WARRANTY FOR THE PROGRAM, TO THE EXTENT PERMITTED BY APPLICABLE LAW. EXCEPT WHEN OTHERWISE STATED IN WRITING THE COPYRIGHT HOLDERS AND/OR OTHER PARTIES PROVIDE THE PROGRAM “AS IS” WITHOUT WARRANTY OF ANY KIND, EITHER EXPRESSED OR IMPLIED, INCLUDING, BUT NOT LIMITED TO, THE IMPLIED WARRANTIES OF MERCHANTABILITY AND FITNESS FOR A PARTICULAR PURPOSE. THE ENTIRE RISK AS TO THE QUALITY AND PERFORMANCE OF THE PROGRAM IS WITH YOU. SHOULD THE PROGRAM PROVE DEFECTIVE, YOU ASSUME THE COST OF ALL NECESSARY SERVICING, REPAIR OR CORRECTION.
-
IN NO EVENT UNLESS REQUIRED BY APPLICABLE LAW OR AGREED TO IN WRITING WILL ANY COPYRIGHT HOLDER, OR ANY OTHER PARTY WHO MAY MODIFY AND/OR REDISTRIBUTE THE PROGRAM AS PERMITTED ABOVE, BE LIABLE TO YOU FOR DAMAGES, INCLUDING ANY GENERAL, SPECIAL, INCIDENTAL OR CONSEQUENTIAL DAMAGES ARISING OUT OF THE USE OR INABILITY TO USE THE PROGRAM (INCLUDING BUT NOT LIMITED TO LOSS OF DATA OR DATA BEING RENDERED INACCURATE OR LOSSES SUSTAINED BY YOU OR THIRD PARTIES OR A FAILURE OF THE PROGRAM TO OPERATE WITH ANY OTHER PROGRAMS), EVEN IF SUCH HOLDER OR OTHER PARTY HAS BEEN ADVISED OF THE POSSIBILITY OF SUCH DAMAGES.
The files in the base, psi, lib, toolbin, examples, doc and man directories (folders) and any subdirectories (sub-folders) thereof are part of GPL Ghostscript.
The files in the Resource directory and any subdirectories thereof are also part of GPL Ghostscript, with the explicit exception of the files in the CMap subdirectory (except “Identity-UTF16-H”, which is part of GPL Ghostscript). The CMap files are copyright Adobe Systems Incorporated and covered by a separate, GPL compatible license.
The files under the jpegxr directory and any subdirectories thereof are distributed under a no cost, open source license granted by the ITU/ISO/IEC but it is not GPL compatible - see jpegxr/COPYRIGHT.txt for details.
GPL Ghostscript is free software; you can redistribute it and/or modify it under the terms the GNU General Public License as published by the Free Software Foundation, either version 3 of the License, or (at your option) any later version.
GPL Ghostscript is distributed in the hope that it will be useful, but WITHOUT ANY WARRANTY; without even the implied warranty of MERCHANTABILITY or FITNESS FOR A PARTICULAR PURPOSE. See the GNU General Public License for more details.
You should have received a copy of the GNU General Public License along with this program so you can know your rights and responsibilities. It should be in a file named doc/COPYING. If not, write to the
Free Software Foundation, Inc., 59 Temple Place Suite 330, Boston, MA
02111-1307, USA.
GPL Ghostscript contains an implementation of techniques covered by US Patents 5,055,942 and 5,917,614, and corresponding international patents. These patents are licensed for use with GPL Ghostscript under the following grant:
Whereas, Raph Levien (hereinafter “Inventor”) has obtained patent protection for related technology (hereinafter “Patented Technology”), Inventor wishes to aid the the GNU free software project in achieving its goals, and Inventor also wishes to increase public awareness of Patented Technology, Inventor hereby grants a fully paid up, nonexclusive, royalty free license to practice the patents listed below (“the Patents”) if and only if practiced in conjunction with software distributed under the terms of any version of the GNU General Public License as published by the
Free Software Foundation, 59 Temple Place, Suite
330, Boston, MA 02111.
Inventor reserves all other rights, including without limitation, licensing for software not distributed under the GNU General Public License.
5055942 Photographic image reproduction device using digital halftoning to para images allowing adjustable coarseness 5917614 Method and apparatus for error diffusion paraing of images with improved smoothness in highlight and shadow regions
GNU LESSER GENERAL PUBLIC LICENSE Version 2.1, February 1999 http://www.gnu.org/licenses/lgpl-2.1.html
Copyright © 1991, 1999
Free Software Foundation, Inc.
51 Franklin Street, Fifth Floor, Boston, MA 02110-1301 USA
Everyone is permitted to copy and distribute verbatim copies of this license document, but changing it is not allowed.
[This is the first released version of the Lesser GPL. It also counts as the successor of the GNU Library Public License, version 2, hence the version number 2.1.]
Preamble The licenses for most software are designed to take away your freedom to share and change it. By contrast, the GNU General Public Licenses are intended to guarantee your freedom to share and change free software--to make sure the software is free for all its users.
This license, the Lesser General Public License, applies to some specially designated software packages--typically libraries--of the Free Software Foundation and other authors who decide to use it. You can use it too, but we suggest you first think carefully about whether this license or the ordinary General Public License is the better strategy to use in any particular case, based on the explanations below.
When we speak of free software, we are referring to freedom of use, not price. Our General Public Licenses are designed to make sure that you have the freedom to distribute copies of free software (and charge for this service if you wish); that you receive source code or can get it if you want it; that you can change the software and use pieces of it in new free programs; and that you are informed that you can do these things.
To protect your rights, we need to make restrictions that forbid distributors to deny you these rights or to ask you to surrender these rights. These restrictions translate to certain responsibilities for you if you distribute copies of the library or if you modify it.
For example, if you distribute copies of the library, whether gratis or for a fee, you must give the recipients all the rights that we gave you. You must make sure that they, too, receive or can get the source code. If you link other code with the library, you must provide complete object files to the recipients, so that they can relink them with the library after making changes to the library and recompiling it. And you must show them these terms so they know their rights.
We protect your rights with a two-step method:
we copyright the library, and
-
we offer you this license, which gives you legal permission to copy, distribute and/or modify the library.
To protect each distributor, we want to make it very clear that there is no warranty for the free library. Also, if the library is modified by someone else and passed on, the recipients should know that what they have is not the original version, so that the original author's reputation will not be affected by problems that might be introduced by others.
Finally, software patents pose a constant threat to the existence of any free program. We wish to make sure that a company cannot effectively restrict the users of a free program by obtaining a restrictive license from a patent holder. Therefore, we insist that any patent license obtained for a version of the library must be consistent with the full freedom of use specified in this license.
Most GNU software, including some libraries, is covered by the ordinary GNU General Public License. This license, the GNU Lesser General Public License, applies to certain designated libraries, and is quite different from the ordinary General Public License. We use this license for certain libraries in order to permit linking those libraries into non-free programs.
When a program is linked with a library, whether statically or using a shared library, the combination of the two is legally speaking a combined work, a derivative of the original library. The ordinary General Public License therefore permits such linking only if the entire combination fits its criteria of freedom. The Lesser General Public License permits more lax criteria for linking other code with the library.
We call this license the "Lesser" General Public License because it does Less to protect the user's freedom than the ordinary General Public License. It also provides other free software developers Less of an advantage over competing non-free programs. These disadvantages are the reason we use the ordinary General Public License for many libraries. However, the Lesser license provides advantages in certain special circumstances.
For example, on rare occasions, there may be a special need to encourage the widest possible use of a certain library, so that it becomes a de-facto standard. To achieve this, non-free programs must be allowed to use the library. A more frequent case is that a free library does the same job as widely used non-free libraries. In this case, there is little to gain by limiting the free library to free software only, so we use the Lesser General Public License.
In other cases, permission to use a particular library in non-free programs enables a greater number of people to use a large body of free software. For example, permission to use the GNU C Library in non-free programs enables many more people to use the whole GNU operating system, as well as its variant, the GNU/Linux operating system.
Although the Lesser General Public License is Less protective of the users' freedom, it does ensure that the user of a program that is linked with the Library has the freedom and the wherewithal to run that program using a modified version of the Library.
The precise terms and conditions for copying, distribution and modification follow. Pay close attention to the difference between a “work based on the library” and a “work that uses the library”. The former contains code derived from the library, whereas the latter must be combined with the library in order to run.
TERMS AND CONDITIONS FOR COPYING, DISTRIBUTION AND MODIFICATION
-
This License Agreement applies to any software library or other program which contains a notice placed by the copyright holder or other authorized party saying it may be distributed under the terms of this Lesser General Public License (also called “this License”). Each licensee is addressed as “you”.
A “library” means a collection of software functions and/or data prepared so as to be conveniently linked with application programs (which use some of those functions and data) to form executables.
The “Library”, below, refers to any such software library or work which has been distributed under these terms. A “work based on the Library” means either the Library or any derivative work under copyright law: that is to say, a work containing the Library or a portion of it, either verbatim or with modifications and/or translated straightforwardly into another language. (Hereinafter, translation is included without limitation in the term “modification”.)
“Source code” for a work means the preferred form of the work for making modifications to it. For a library, complete source code means all the source code for all modules it contains, plus any associated interface definition files, plus the scripts used to control compilation and installation of the library.
Activities other than copying, distribution and modification are not covered by this License; they are outside its scope. The act of running a program using the Library is not restricted, and output from such a program is covered only if its contents constitute a work based on the Library (independent of the use of the Library in a tool for writing it). Whether that is true depends on what the Library does and what the program that uses the Library does.
You may copy and distribute verbatim copies of the Library's complete source code as you receive it, in any medium, provided that you conspicuously and appropriately publish on each copy an appropriate copyright notice and disclaimer of warranty; keep intact all the notices that refer to this License and to the absence of any warranty; and distribute a copy of this License along with the Library.
You may charge a fee for the physical act of transferring a copy, and you may at your option offer warranty protection in exchange for a fee.
You may modify your copy or copies of the Library or any portion of it, thus forming a work based on the Library, and copy and distribute such modifications or work under the terms of Section 1 above, provided that you also meet all of these conditions:
The modified work must itself be a software library.
You must cause the files modified to carry prominent notices stating that you changed the files and the date of any change.
You must cause the whole of the work to be licensed at no charge to all third parties under the terms of this License.
If a facility in the modified Library refers to a function or a table of data to be supplied by an application program that uses the facility, other than as an argument passed when the facility is invoked, then you must make a good faith effort to ensure that, in the event an application does not supply such function or table, the facility still operates, and performs whatever part of its purpose remains meaningful. (For example, a function in a library to compute square roots has a purpose that is entirely well-defined independent of the application. Therefore, Subsection 2d requires that any application-supplied function or table used by this function must be optional: if the application does not supply it, the square root function must still compute square roots.)
These requirements apply to the modified work as a whole. If identifiable sections of that work are not derived from the Library, and can be reasonably considered independent and separate works in themselves, then this License, and its terms, do not apply to those sections when you distribute them as separate works. But when you distribute the same sections as part of a whole which is a work based on the Library, the distribution of the whole must be on the terms of this License, whose permissions for other licensees extend to the entire whole, and thus to each and every part regardless of who wrote it.
Thus, it is not the intent of this section to claim rights or contest your rights to work written entirely by you; rather, the intent is to exercise the right to control the distribution of derivative or collective works based on the Library.
In addition, mere aggregation of another work not based on the Library with the Library (or with a work based on the Library) on a volume of a storage or distribution medium does not bring the other work under the scope of this License.
You may opt to apply the terms of the ordinary GNU General Public License instead of this License to a given copy of the Library. To do this, you must alter all the notices that refer to this License, so that they refer to the ordinary GNU General Public License, version 2, instead of to this License. (If a newer version than version 2 of the ordinary GNU General Public License has appeared, then you can specify that version instead if you wish.) Do not make any other change in these notices.
Once this change is made in a given copy, it is irreversible for that copy, so the ordinary GNU General Public License applies to all subsequent copies and derivative works made from that copy.
This option is useful when you wish to copy part of the code of the Library into a program that is not a library.
You may copy and distribute the Library (or a portion or derivative of it, under Section 2) in object code or executable form under the terms of Sections 1 and 2 above provided that you accompany it with the complete corresponding machine-readable source code, which must be distributed under the terms of Sections 1 and 2 above on a medium customarily used for software interchange.
If distribution of object code is made by offering access to copy from a designated place, then offering equivalent access to copy the source code from the same place satisfies the requirement to distribute the source code, even though third parties are not compelled to copy the source along with the object code.
A program that contains no derivative of any portion of the Library, but is designed to work with the Library by being compiled or linked with it, is called a "work that uses the Library". Such a work, in isolation, is not a derivative work of the Library, and therefore falls outside the scope of this License.
However, linking a "work that uses the Library" with the Library creates an executable that is a derivative of the Library (because it contains portions of the Library), rather than a “work that uses the library”. The executable is therefore covered by this License. Section 6 states terms for distribution of such executables.
When a “work that uses the Library” uses material from a header file that is part of the Library, the object code for the work may be a derivative work of the Library even though the source code is not. Whether this is true is especially significant if the work can be linked without the Library, or if the work is itself a library. The threshold for this to be true is not precisely defined by law.
If such an object file uses only numerical parameters, data structure layouts and accessors, and small macros and small inline functions (ten lines or less in length), then the use of the object file is unrestricted, regardless of whether it is legally a derivative work. (Executables containing this object code plus portions of the Library will still fall under Section 6.)
Otherwise, if the work is a derivative of the Library, you may distribute the object code for the work under the terms of Section 6. Any executables containing that work also fall under Section 6, whether or not they are linked directly with the Library itself.
As an exception to the Sections above, you may also combine or link a "work that uses the Library" with the Library to produce a work containing portions of the Library, and distribute that work under terms of your choice, provided that the terms permit modification of the work for the customer's own use and reverse engineering for debugging such modifications.
You must give prominent notice with each copy of the work that the Library is used in it and that the Library and its use are covered by this License. You must supply a copy of this License. If the work during execution displays copyright notices, you must include the copyright notice for the Library among them, as well as a reference directing the user to the copy of this License.
Also, you must do one of these things:
Accompany the work with the complete corresponding machine-readable source code for the Library including whatever changes were used in the work (which must be distributed under Sections 1 and 2 above); and, if the work is an executable linked with the Library, with the complete machine-readable "work that uses the Library", as object code and/or source code, so that the user can modify the Library and then relink to produce a modified executable containing the modified Library. (It is understood that the user who changes the contents of definitions files in the Library will not necessarily be able to recompile the application to use the modified definitions.)
Use a suitable shared library mechanism for linking with the Library. A suitable mechanism is one that
uses at run time a copy of the library already present on the user's computer system, rather than copying library functions into the executable, and
will operate properly with a modified version of the library, if the user installs one, as long as the modified version is interface-compatible with the version that the work was made with.
Accompany the work with a written offer, valid for at least three years, to give the same user the materials specified in Subsection 6a, above, for a charge no more than the cost of performing this distribution.
If distribution of the work is made by offering access to copy from a designated place, offer equivalent access to copy the above specified materials from the same place.
-
Verify that the user has already received a copy of these materials or that you have already sent this user a copy. For an executable, the required form of the “work that uses the Library” must include any data and utility programs needed for reproducing the executable from it. However, as a special exception, the materials to be distributed need not include anything that is normally distributed (in either source or binary form) with the major components (compiler, kernel, and so on) of the operating system on which the executable runs, unless that component itself accompanies the executable.
It may happen that this requirement contradicts the license restrictions of other proprietary libraries that do not normally accompany the operating system. Such a contradiction means you cannot use both them and the Library together in an executable that you distribute.
You may place library facilities that are a work based on the Library side-by-side in a single library together with other library facilities not covered by this License, and distribute such a combined library, provided that the separate distribution of the work based on the Library and of the other library facilities is otherwise permitted, and provided that you do these two things:
Accompany the combined library with a copy of the same work based on the Library, uncombined with any other library facilities. This must be distributed under the terms of the Sections above.
Give prominent notice with the combined library of the fact that part of it is a work based on the Library, and explaining where to find the accompanying uncombined form of the same work.
You may not copy, modify, sublicense, link with, or distribute the Library except as expressly provided under this License. Any attempt otherwise to copy, modify, sublicense, link with, or distribute the Library is void, and will automatically terminate your rights under this License. However, parties who have received copies, or rights, from you under this License will not have their licenses terminated so long as such parties remain in full compliance.
You are not required to accept this License, since you have not signed it. However, nothing else grants you permission to modify or distribute the Library or its derivative works. These actions are prohibited by law if you do not accept this License. Therefore, by modifying or distributing the Library (or any work based on the Library), you indicate your acceptance of this License to do so, and all its terms and conditions for copying, distributing or modifying the Library or works based on it.
Each time you redistribute the Library (or any work based on the Library), the recipient automatically receives a license from the original licensor to copy, distribute, link with or modify the Library subject to these terms and conditions. You may not impose any further restrictions on the recipients' exercise of the rights granted herein. You are not responsible for enforcing compliance by third parties with this License.
If, as a consequence of a court judgment or allegation of patent infringement or for any other reason (not limited to patent issues), conditions are imposed on you (whether by court order, agreement or otherwise) that contradict the conditions of this License, they do not excuse you from the conditions of this License. If you cannot distribute so as to satisfy simultaneously your obligations under this License and any other pertinent obligations, then as a consequence you may not distribute the Library at all. For example, if a patent license would not permit royalty-free redistribution of the Library by all those who receive copies directly or indirectly through you, then the only way you could satisfy both it and this License would be to refrain entirely from distribution of the Library.
If any portion of this section is held invalid or unenforceable under any particular circumstance, the balance of the section is intended to apply, and the section as a whole is intended to apply in other circumstances.
It is not the purpose of this section to induce you to infringe any patents or other property right claims or to contest validity of any such claims; this section has the sole purpose of protecting the integrity of the free software distribution system which is implemented by public license practices. Many people have made generous contributions to the wide range of software distributed through that system in reliance on consistent application of that system; it is up to the author/donor to decide if he or she is willing to distribute software through any other system and a licensee cannot impose that choice.
This section is intended to make thoroughly clear what is believed to be a consequence of the rest of this License.
-
If the distribution and/or use of the Library is restricted in certain countries either by patents or by copyrighted interfaces, the original copyright holder who places the Library under this License may add an explicit geographical distribution limitation excluding those countries, so that distribution is permitted only in or among countries not thus excluded. In such case, this License incorporates the limitation as if written in the body of this License.
-
The Free Software Foundation may publish revised and/or new versions of the Lesser General Public License from time to time. Such new versions will be similar in spirit to the present version, but may differ in detail to address new problems or concerns.
Each version is given a distinguishing version number. If the Library specifies a version number of this License which applies to it and "any later version", you have the option of following the terms and conditions either of that version or of any later version published by the Free Software Foundation. If the Library does not specify a license version number, you may choose any version ever published by the Free Software Foundation.
If you wish to incorporate parts of the Library into other free programs whose distribution conditions are incompatible with these, write to the author to ask for permission. For software which is copyrighted by the Free Software Foundation, write to the Free Software Foundation; we sometimes make exceptions for this. Our decision will be guided by the two goals of preserving the free status of all derivatives of our free software and of promoting the sharing and reuse of software generally.
NO WARRANTY
BECAUSE THE LIBRARY IS LICENSED FREE OF CHARGE, THERE IS NO WARRANTY FOR THE LIBRARY, TO THE EXTENT PERMITTED BY APPLICABLE LAW. EXCEPT WHEN OTHERWISE STATED IN WRITING THE COPYRIGHT HOLDERS AND/OR OTHER PARTIES PROVIDE THE LIBRARY "AS IS" WITHOUT WARRANTY OF ANY KIND, EITHER EXPRESSED OR IMPLIED, INCLUDING, BUT NOT LIMITED TO, THE IMPLIED WARRANTIES OF MERCHANTABILITY AND FITNESS FOR A PARTICULAR PURPOSE. THE ENTIRE RISK AS TO THE QUALITY AND PERFORMANCE OF THE LIBRARY IS WITH YOU. SHOULD THE LIBRARY PROVE DEFECTIVE, YOU ASSUME THE COST OF ALL NECESSARY SERVICING, REPAIR OR CORRECTION.
IN NO EVENT UNLESS REQUIRED BY APPLICABLE LAW OR AGREED TO IN WRITING WILL ANY COPYRIGHT HOLDER, OR ANY OTHER PARTY WHO MAY MODIFY AND/OR REDISTRIBUTE THE LIBRARY AS PERMITTED ABOVE, BE LIABLE TO YOU FOR DAMAGES, INCLUDING ANY GENERAL, SPECIAL, INCIDENTAL OR CONSEQUENTIAL DAMAGES ARISING OUT OF THE USE OR INABILITY TO USE THE LIBRARY (INCLUDING BUT NOT LIMITED TO LOSS OF DATA OR DATA BEING RENDERED INACCURATE OR LOSSES SUSTAINED BY YOU OR THIRD PARTIES OR A FAILURE OF THE LIBRARY TO OPERATE WITH ANY OTHER SOFTWARE), EVEN IF SUCH HOLDER OR OTHER PARTY HAS BEEN ADVISED OF THE POSSIBILITY OF SUCH DAMAGES.
© Wang Bin <wbsecg1@gmail.com>
Shanghai University->S3 Graphics->Deepin, Shanghai, China
2013-01-21
**QtAV is free software licensed under the term of LGPL v2.1. The player example is licensed under GPL v3. If you use QtAV or its constituent libraries, you must adhere to the terms of the license in question.**
Rather than repeating the text of the LGPL v2.1, the original text can be found in GNU LESSER GENERAL PUBLIC LICENSE, Version 2.1.
Most files in FFmpeg are under the GNU Lesser General Public License version 2.1 or later (LGPL v2.1+). Read the file `COPYING.LGPLv2.1` for details. Some other files have MIT/X11/BSD-style licenses. In combination the LGPL v2.1+ applies to FFmpeg.
Rather than repeating the text of the LGPL v2.1, the original text can be found in GNU LESSER GENERAL PUBLIC LICENSE, Version 2.1.
The MIT License (MIT) © 2013 Masayuki Tanaka
Permission is hereby granted, free of charge, to any person obtaining a copy of this software and associated documentation files (the "Software"), to deal in the Software without restriction, including without limitation the rights to use, copy, modify, merge, publish, distribute, sublicense, and/or sell copies of the Software, and to permit persons to whom the Software is furnished to do so, subject to the following conditions:
The above copyright notice and this permission notice shall be included in all copies or substantial portions of the Software.
THE SOFTWARE IS PROVIDED “AS IS”, WITHOUT WARRANTY OF ANY KIND, EXPRESS OR IMPLIED, INCLUDING BUT NOT LIMITED TO THE WARRANTIES OF MERCHANTABILITY, FITNESS FOR A PARTICULAR PURPOSE AND NONINFRINGEMENT. IN NO EVENT SHALL THE AUTHORS OR COPYRIGHT HOLDERS BE LIABLE FOR ANY CLAIM, DAMAGES OR OTHER LIABILITY, WHETHER IN AN ACTION OF CONTRACT, TORT OR OTHERWISE, ARISING FROM, OUT OF OR IN CONNECTION WITH THE SOFTWARE OR THE USE OR OTHER DEALINGS IN THE SOFTWARE.
Copyright 2010-2017 Mike Bostock All rights reserved.
Redistribution and use in source and binary forms, with or without modification, are permitted provided that the following conditions are met: * Redistributions of source code must retain the above copyright notice, this list of conditions and the following disclaimer. * Redistributions in binary form must reproduce the above copyright notice, this list of conditions and the following disclaimer in the documentation and/or other materials provided with the distribution. * Neither the name of the author nor the names of contributors may be used to endorse or promote products derived from this software without specific prior written permission.
THIS SOFTWARE IS PROVIDED BY THE COPYRIGHT HOLDERS AND CONTRIBUTORS “AS IS” AND ANY EXPRESS OR IMPLIED WARRANTIES, INCLUDING, BUT NOT LIMITED TO, THE IMPLIED WARRANTIES OF MERCHANTABILITY AND FITNESS FOR A PARTICULAR PURPOSE ARE DISCLAIMED. IN NO EVENT SHALL THE COPYRIGHT OWNER OR CONTRIBUTORS BE LIABLE FOR ANY DIRECT, INDIRECT, INCIDENTAL, SPECIAL, EXEMPLARY, OR CONSEQUENTIAL DAMAGES (INCLUDING, BUT NOT LIMITED TO, PROCUREMENT OF SUBSTITUTE GOODS OR SERVICES; LOSS OF USE, DATA, OR PROFITS; OR BUSINESS INTERRUPTION) HOWEVER CAUSED AND ON ANY THEORY OF LIABILITY, WHETHER IN CONTRACT, STRICT LIABILITY, OR TORT (INCLUDING NEGLIGENCE OR OTHERWISE) ARISING IN ANY WAY OUT OF THE USE OF THIS SOFTWARE, EVEN IF ADVISED OF THE POSSIBILITY OF SUCH DAMAGE.