Table of Contents
This chapter ensures that the individuals responsible for DFdiscover have been identified, the materials necessary for the install are available, configures the UNIX environment of the server, and then steps through the installation of the major version.
A successful DFdiscover installation and subsequent properly maintained DFdiscover environment requires the commitment of personnel with different skills. It is essential that these personnel be identified in advance and be trained in the relevant aspects of DFdiscover. The following is a minimal set of job functions for which personnel must be identified. On the worksheet, record the names of one or more staff that will fill each job function. It is entirely acceptable for a single individual to perform more than one of the job functions.
UNIX administrator [SI50] . This job function includes maintenance of the hardware and operating system, supervision of and planning for resources such as disk storage and printers, administration of HylaFAX and modems, supervision of cron jobs, installation of application software and any updates, backup and recovery of data, and the creation of UNIX user accounts. The primary contact is the DFdiscover administrator. Typically this job requires 0.1 FTE.
DFdiscover administrator [SI51] . This job function includes registration of new studies to DFdiscover, administration of user privileges within DFdiscover, starting and stopping of study databases, and monitoring of study database consistency. Typically this job requires 0.1 FTE.
Study setup [SI52] . This job function is responsible for the definition of the study database to DFdiscover which minimally includes importing of the CRFs for setup, definition of variable styles and variables, specification of visit scheduling, and entry of participating centers information. This job function may also be involved in the initial creation of CRFs.
Programmer [SI53] . The programmer is responsible for creating any custom logic checks (referred to as edit checks within DFdiscover) and possibly executing them in batch, creating any study-specific reports, and defining lookup or coding tables.
SAS specialist [SI54] . This job function is responsible for creating DFsas specification files, executing them in DFdiscover, and subsequently processing the results in SAS®. This job function may also get involved in the definition of variable names, data types, and coding, and hence may liaise with the study setup job function.
Data entry [SI55] . This job function performs initial (and possibly second, or double data entry) review of received CRFs, verifying the data that was read by ICR, entering data that was not read, adding Queries where necessary, and identifying and resolving duplicates when they occur.
Higher-level data review [SI56] . This job function performs additional data reviews after entry. The focus is on data quality, completeness, and consistency.
Before beginning installation, the following steps must be completed as they gather information necessary for the install.
-
Record the full company name on the worksheet [SI00].
-
Record the DFdiscover software release on the worksheet [SI01].
Release numbers are of the form
X.Y.Z.![[Important]](../../imagedata/important.png)
Software Release These installation instructions are for a specific DFdiscover software release only. Confirm that the software release number on the download matches the software release number at the head of this document.
Record today's date on the worksheet [SI02].
Determine the name of the contact person [SI03], the server hostname [SI04], and the version of operating system on the server [SI05]. The contact person, in accordance with the DFdiscover License Agreement, should be the DFdiscover administrator or the DFdiscover software user consultant, and will be the primary liaison between end users and DF/Net Research, Inc..
Confirm the name of a printer that can be accessed from the DFdiscover environment [SI08].
Confirm that www.dfnetresearch.com can be accessed for obtaining the software release, patches and other downloads [SI09].
Confirm that the computer that will be running the DFdiscover software is able to send email externally, for example to DF/Net Research, Inc. (
<support@datafax.com>) [SI57].Record the telephone number of an existing, paper fax machine in the vicinity of the DFdiscover installation [SI12]. This will simplify fax send and receive testing.
If you will be using HylaFAX for fax handling, confirm that at least one of the telephone lines for incoming and outgoing DFdiscover faxes has been installed [SI10]. Record this DFdiscover telephone number [SI11] and also whether this is a direct, outward dialing line, or whether it passes through an internal PBX (what digit(s), if any, must be dialed to pass through the PBX? [SI58]).
The following materials are required for installation:
these installation notes [SI13]
the super-user password for the server machine [SI14]
the current DFdiscover software release [SI15]
a copy of the current DFdiscover Release Notes [SI16]
a copy of the Installation and Initialization chapter of the DFdiscover Acceptance Test Kit documentation [SI18]
a DFdiscover License Renewal form (or email) [SI21] with a valid license and expiration date for the server host identifier.
Transcribe the values from the form/email to the worksheet: hostid [SI37] , hostname [SI38] , # of users [SI39] , expiry date [SI40] , features [SI42] , password [SI41]
a support username [SI22] and support password [SI23] that will grant access to the support section of www.dfnetresearch.com
If the first study setup is being supplied by DF/Net Research, Inc., the study setup [SI24] is also required.
The steps in this section require the DFdiscover software media from download and super-user privileges.
This section is skipped for a new installation or when upgrading from release 3.8 or later.
| Important |
|---|---|
The steps in this section are required for an upgrade installation from releases prior to 3.7-004 and must be completed before re-starting DFdiscover for the first time. |
The steps in this section require super-user privileges.
The permissions structures have been extended significantly beginning with the 3.8 release and existing user and permission definitions must be migrated to these new structures. To assist with this migration, DFuserdb, has been included with the release.
To migrate existing user permissions to the new structures [SI60], execute:
# /opt/dfdiscover/bin/DFuserdb -migrate
The program creates /opt/dfdiscover/lib/DFuserdb.log,
the new permissions structure, and archives the old files which are no longer
needed, for example /opt/dfdiscover/lib/DFperm.
After the program has run, an administrator should review the migrated
user and role definitions via DFadmin.
In particular, they may choose to assign more meaningful role names to those
generated by DFuserdb.
More information about DFuserdb can be found in
Programmer Guide, DFuserdb.
DFdiscover 2018 is supported on Novell openSUSE version 13.2 and newer, Leap 42.1 and newer, SUSE Tumbleweed and Redhat Enterprise Linux up to version 7.2 or newer. DFdiscover is a 64-bit server application - it installs on the 64-bit versions of any of these Linux distributions. It will not run on 32-bit systems. Other Linux distributions may work, but are unsupported. Debian distributions such as Ubuntu will not work at this time. CentOS and Oracle Linux are clones of RHEL and will work as expected.
If this is a new installation, DO NOT CREATE a
datafaxuser account or/opt/dfdiscoverdirectory. These tasks are completed automatically by the installer. The installer also adds the DFdiscover executables to the system-wide path and installs DFdiscover as a systemd service.-
If this is an upgrade of a DataFax server, there are several important changes that will be performed on your system. It is HIGHLY recommended that you have a complete backup or snapshot of your server prior to upgrading. Ensure that the
datafaxaccount is not in use as the installer moves/opt/datafaxto/opt/dfdiscoverand resets thedatafaxaccount home directory to the new file structure. The systemwide path to the software is automatically adjusted. Existing configuration files are automatically adjusted to match the new file structure.
Download and save the software rpm, from www.dfnetresearch.com to a local hard drive. Log into your server as
root.If this is an upgrade, stop DataFax, and erase the current version.
A complete installation will require approximately 1.7 Gb of free disk space for the software and documentation. The software will be installed into
/opt/dfdiscover. Record the installation directory [SI32].Execute the installation command appropriate for the operating system.
On openSUSE, use zypper, which will automatically download and install any dependencies required:
#zypper --no-gpg-checks install dfdiscover-5.1-0.x86_64.rpmOn RHEL, first install the epel-release repo (if you haven't already) as follows:
#yum install epel-releaseThen install DFdiscover using yum:
#yum --nogpgcheck install dfdiscover-5.1-0.x86_64.rpm
Record that the Linux installation completed successfully on the worksheet [LX00].
![[Note]](../../imagedata/note.png) | Note |
|---|---|
|
If you are upgrading from 3.8 or later and already have a valid certificate, you can skip this step. If you have acquired a certificate from a commercial CA, you can skip this step. |
The steps in this section require super-user privileges.
DFexplore and other DFdiscover client applications communicate with the DFdiscover server using TLS (Transport Layer Security, specifically TLS v1.2, in the same way that Internet banking sites do. TLS provides an encrypted path through the internet that prevents eavesdropping and modification of your data by third parties. Each DFdiscover client checks that it is communicating with the correct DFdiscover server by means of a certificate which encodes the DFdiscover server's name and ownership. This certificate is generated by choosing a very large random number (a key), adding organizational ownership information to it and then requesting that DF/Net Research, Inc. certify this key as authentic. When an DFexplore client connects to the DFdiscover server, it asks for this certificate and can then determine whether it is communicating with the correct server.
The process of generating a certificate starts with the execution of
DFserveradmin which generates the random number and then prompts
for required organizational information, including the country, state, organization
name and server name. Once this information has been provided, an email is
generated to <certreq@datafax.com>.
containing a request to certify that this is
an authentic DFdiscover server.
DF/Net Research, Inc. processes this request and emails back a small file
containing the certificate, which is then installed into the DFdiscover system.
Once this step has been completed, DFdiscover and DFexplore can be used.
Log in as super-user.
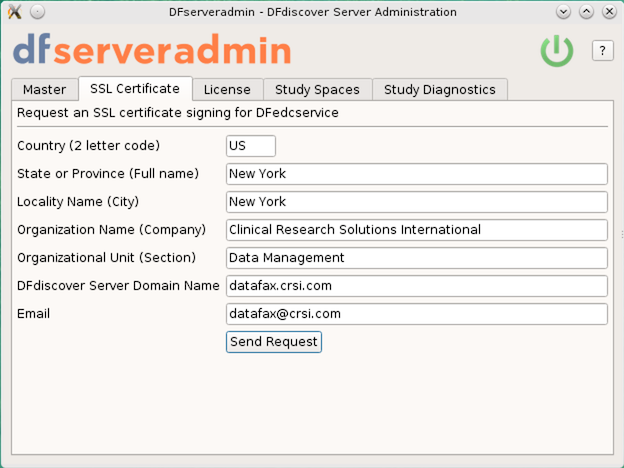
Use DFserveradmin to create the certificate request [CI01]
The certificate request is created with the DFserveradmin program. Click Request an SSL certificate signing for DFedcservice and enter the appropriate values for each of the fields.
Once you have entered the required data, click to submit the certificate signing request to DF/Net Research, Inc..Outgoing email The certificate signing request is emailed to DF/Net Research, Inc. from the machine where the DFserveradmin program was executed. This machine must be able to send email to the internet (in other words, outside of any corporate intranet). If that is not possible, the files
/tmp/cert.csr.txtand/tmp/cert.csrcan be transferred (use binary mode if doing this via ftp) to another machine and sent as attachments in an email to<certreq@datafax.com>.Wait for the certificate
This is the end of the procedure for generating a certificate request. You can expect an email with a signed certificate within 24 hours on business days.
In the interim, it is still possible to proceed as DFserveradmin also generates a self-signed certificate that is valid for 10 days.
Install Server Certificate
Determine install location
The server certificate must be installed in the location referenced by the
certificatekeyword in the/opt/dfdiscover/lib/DFedcservice.cffile. For example, thisDFedcservice.cffile:master localhost key /opt/discover/lib/edckey.pem certificate /opt/discover/lib/edccert.pem documentroot /opt/discover/edcdocs
identifies
/opt/discover/lib/edccert.pemas the location of the server certificate.Save the signed certificate [CI02]
The signed certificate will be emailed back to the email address that was specified as the
Email Addressin the certificate request procedure. Typically it will appear as a small (~1KB) attachment namededccert.pem.Save the attachment to the filename identified in the first step. If DFcertReq also generated a self-signed certificate, that certificate will be overwritten by this permanent, signed certificate.
This is the end of the steps necessary to request and install a server certificate.
The process of requesting and installing a DFdiscover license is described in this section.
DFdiscover is licensed on an annual basis for a specified maximum number of simultaneous users working on a uniquely identified DFdiscover server. Each license is unique to the combination of server identifier, features, expiry date, and number of licensed users. If any of these values changes, the existing license becomes invalid and a new license is required. Please note that if you are upgrading an existing DataFax server you will need to request a replacement license as the old license will no longer work once DFdiscover is installed. [1]
Request DFdiscover License
Determine server identifier
The unique server identifier [LI01] can be determined with the DFhostid command, as in:
#/opt/dfdiscover/bin/DFhostidThe output is a 20 character/digit identifier displayed in 5 blocks of 4. Note that the identifier will never contain any of 0 (zero), 1 (one), I (capital i), or O (capital o).
Forward server identifier to DF/Net Research, Inc.
Contact DF/Net Research, Inc. via telephone or email and provide them with this unique server identifier. Using the server identifier, and other license information including the expiry date, the number of licenses purchased, and any additional licensed features (such as web services or large study numbers), DF/Net Research, Inc. will generate a unique license. The license information will be emailed to the DFdiscover administrator.
-
The license will arrive in the body of an email message and have the following appearance:
hostid  SG8D-QM2L-V8TK-PFB5-DDEG
hostname        <replace_with_your_hostname>
nclients        12
expiration      20181231
password        2SQG-PGVG-BVXY-87BU-YYBL
features DFWS,LS
Save the license [LI03] to the file
/opt/dfdiscover/work/license(note the license will always be stored in this location, it is not customizable). Update hostname in DFdiscover License [LI04]
In the installed license, the value for the
hostnamekeyword must be updated. Edit the saved license and replace<replace_with_your_hostname>with the actual hostname of the server (this can be the fully qualified name or the nickname). Be careful to use the correct name and spell it correctly - if the hostname is inaccurate, DFdiscover will not start. Save the changes to the license file.
This step is applicable only if you have studies that were created in pre-2014 versions of DataFax. It must be performed by super-user.
DFdiscover
requires that studies from pre-2014.0.0 DataFax installations be migrated
using the DFmigrate program to take advantage of new features.
DFmigrate will determine
which steps need to be taken based on the version of DFdiscover that the
study is from. These changes may include moving edit checks to an
ecsrc directory and moving the lookup tables into a
lut directory.
-
To upgrade all studies on your system, as super-user run:
#/opt/dfdiscover/utils/DFmigrate -aThe following shows example output from this command:
**********************************************************
DFmigrate: Study 254 - /opt/studies/val254 - Thu Apr 19 15:04:33 2018
**********************************************************
Step 1: Updating DFserver.cf
------------------------------------------------------------
File Converted: /opt/studies/val254/lib/DFserver.cf
Step 2: Converting DFsetup
------------------------------------------------------------
File Converted: /opt/studies/val254/lib/DFsetup
File Converted: /opt/studies/val254/lib/DFschema
File Converted: /opt/studies/val254/lib/DFschema.stl
File Converted: /opt/studies/val254/lib/DFtips

Step 3: Moving Lookup Tables to lut directory
------------------------------------------------------------
Following lookup table files moved from study's lib to lut dir:
aecodes.lut
drugs.lut
investigators.lut

Step 4: Moving Edit Checks code to ecsrc directory
------------------------------------------------------------
DFedits already exist in ecsrc directory.

Step 5: Converting postscript to png and old tiffs to png
------------------------------------------------------------
WARNING: PNG files already exist for plates: 1-11, 20.

Study migration was successful.

~~~~~~~~~~~~~~~~~~~~~~~~~~~~~~~~~~~~~~~~~~~~~~~~
DONE:
Migration has been performed on the following study: 254
Please review dfmigrate_errors for any migration errors
or warnings and/or manual steps that may be required.
~~~~~~~~~~~~~~~~~~~~~~~~~~~~~~~~~~~~~~~~~~~~~~~~
#
In some cases (as in the example above), the background images used by DFprintdb will not be automatically converted. If you use DFprintdb and get a conversion error, you will need to re-import the backgrounds from the original PostScript® or PDF file using DFsetup.
Record that the pre-2014 studies migration completed successfully on the worksheet [MG00].
Congratulations! You have installed DFdiscover on your system. There are additional steps to be followed to ensure that your DFdiscover system is up-to-date and also to configure the various components. These are outlined in the following chapters.
[1] DFdiscover employs a floating license mechanism based on a unique host identifier, which requires one machine on the network to act as the central DFdiscover server. Choose a machine that is reliable (infrequently down) and is accessible by all potential DFdiscover client machines. If another server replaces the selected server in the future, a new license must be requested from DF/Net Research, Inc..