Table of Contents
- 13.1. Tests & Requirements
- 13.2. Begin Module 13. Replying to EDC Queries, eSignatures.
- 13.3. Determine a count of outstanding/outstanding queries in Status View.
- 13.4. Review outstanding queries in Queries View.
- 13.5. Using EDC, locate and reply to outstanding clarification queries.
- 13.6. Add an Electronic Signature (eSign) to a set of completed subject records.
- 13.7. End Module 13. Replying to EDC Queries, eSignatures.
Determine a count of outstanding/outstanding queries in Status View.
Review outstanding queries in Queries View.
Using EDC, locate and reply to outstanding clarification queries.
Add an Electronic Signature (eSign) to a set of completed subject records.
Estimate of Time Required: 30 Minutes
-
Start DFATK as described in Module 1 (Installation & Initialization).
-
Click followed by to begin this module.
-
Start DFexplore, login as
site_monitorand choose 254 Acceptance Test Study as described in Section 1.7, “How to start DFexplore”. -
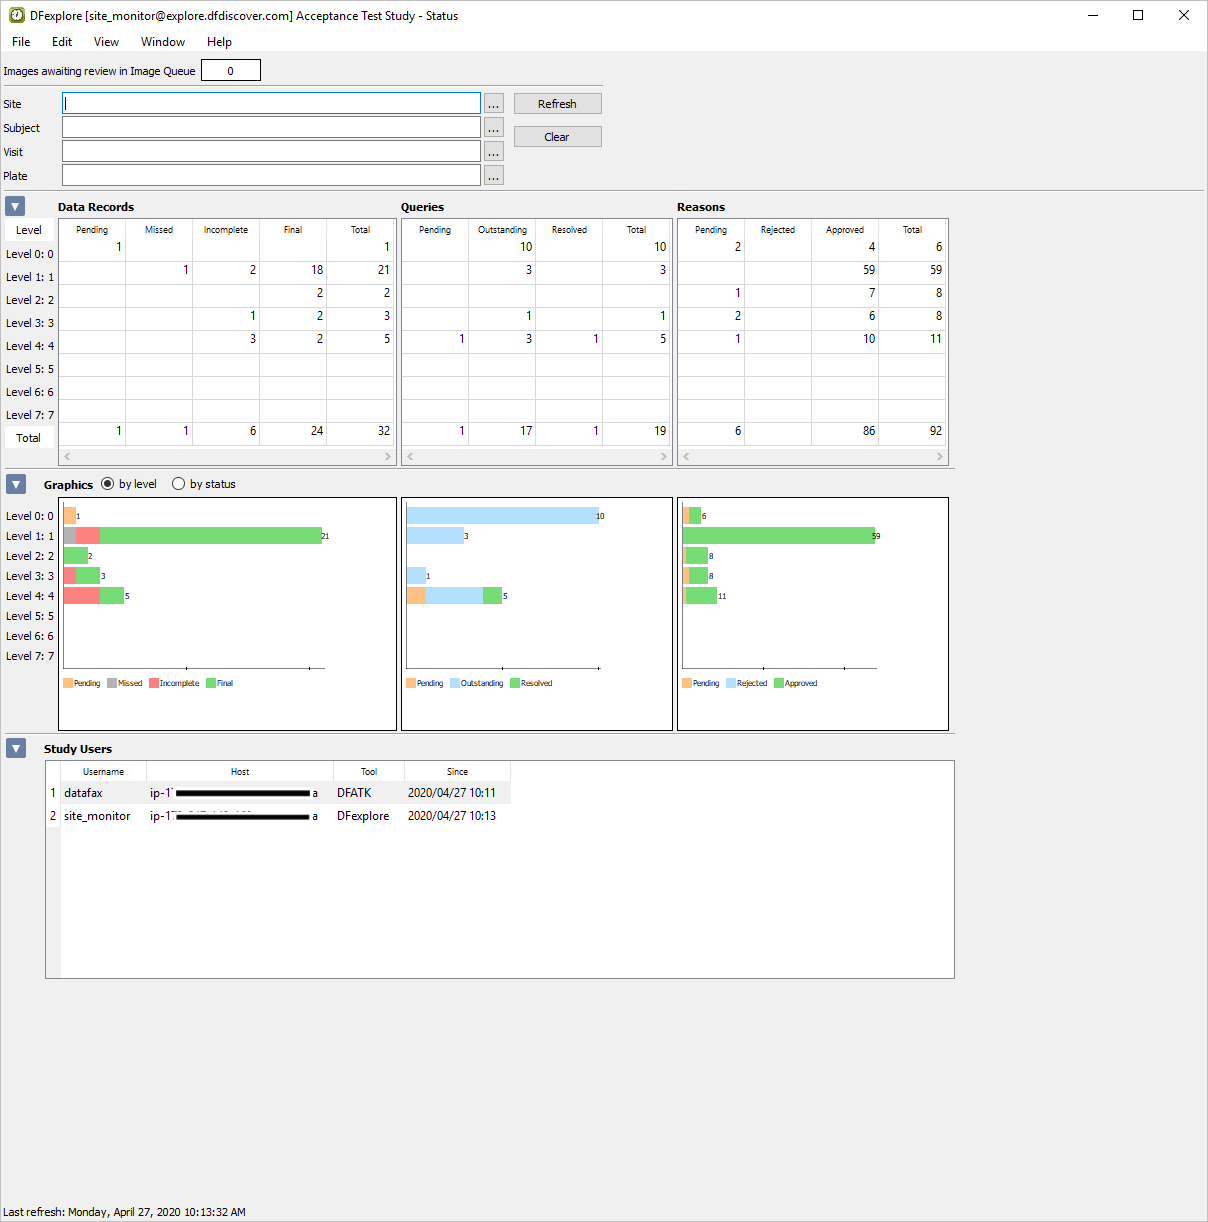
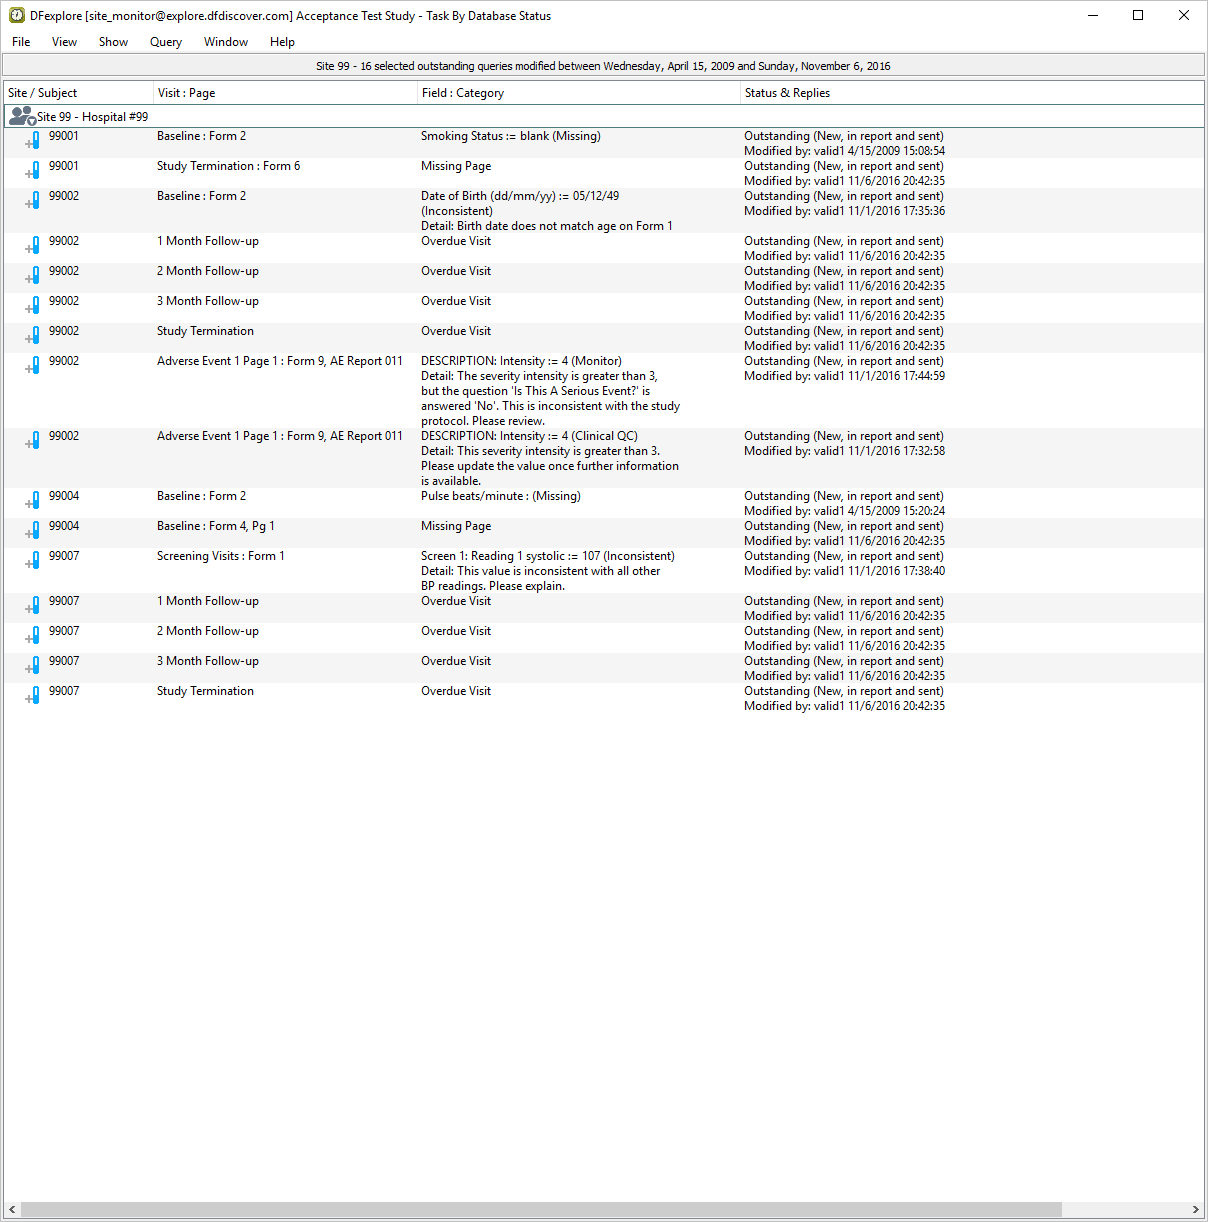
Select > . Examine the Queries table to view the status and count of all queries.
-
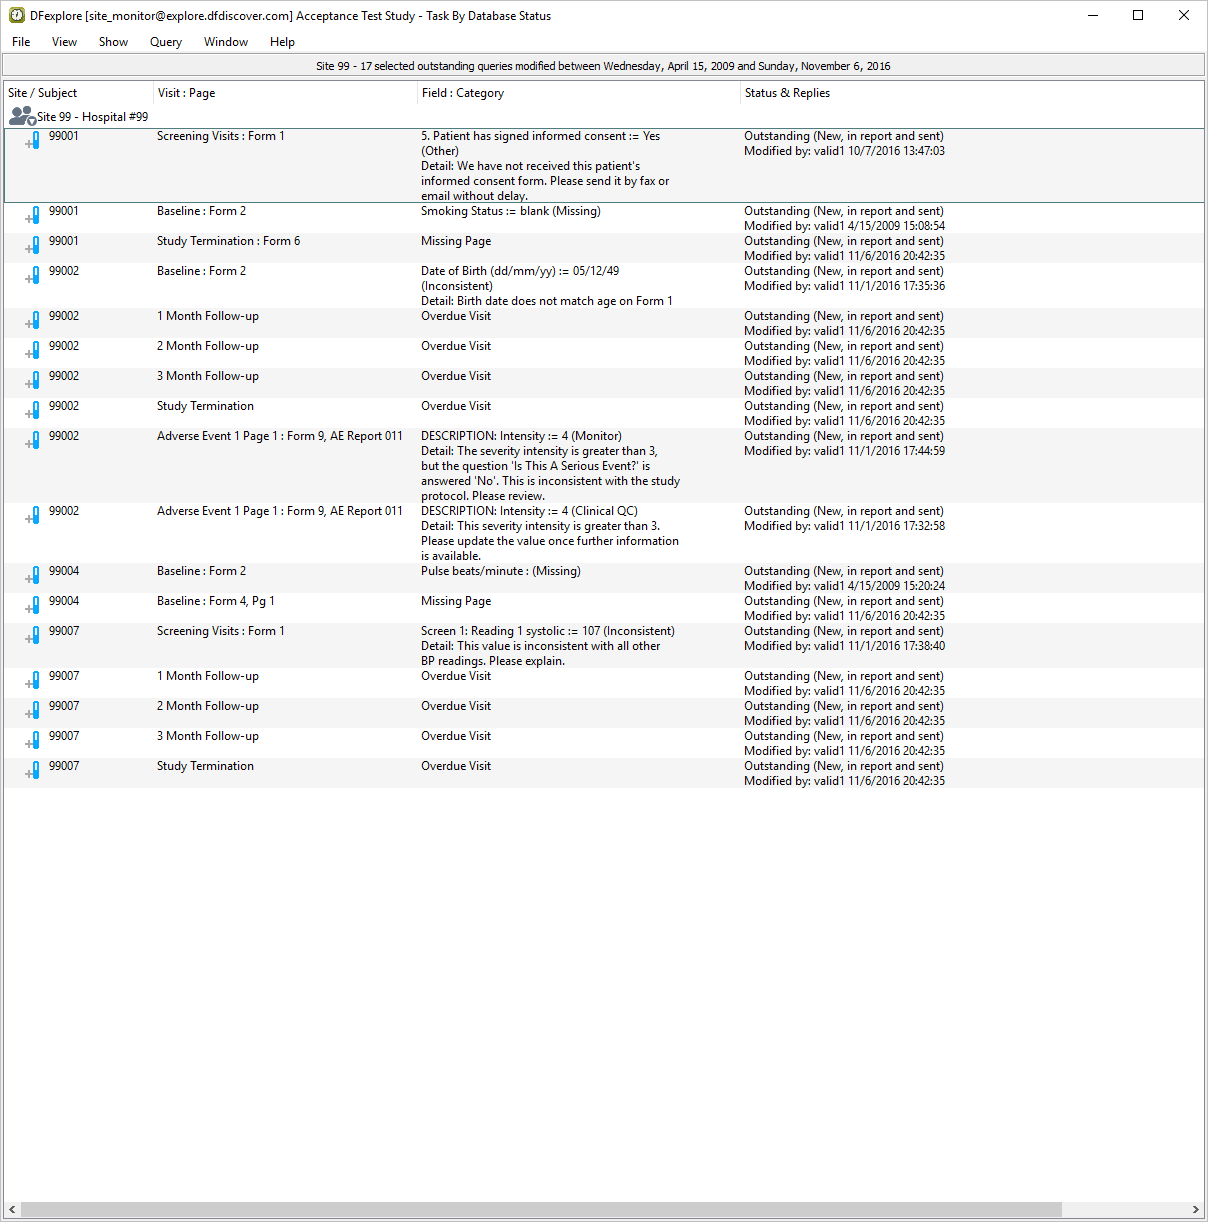
Locate the Outstanding column that displays a count of 17 in the Total row. Double-click 17 to retrieve the records containing the 17 outstanding queries.
-
In the Database Status task Specification dialog set:
Mode = Validate
Save level = 1 - Level 1
Check (enable) Enable Edit checks
Search queries and open check (enable) Queries View?
Click to display a dialog confirming the retrieval. In the confirmation dialog, click to open Queries View.
-
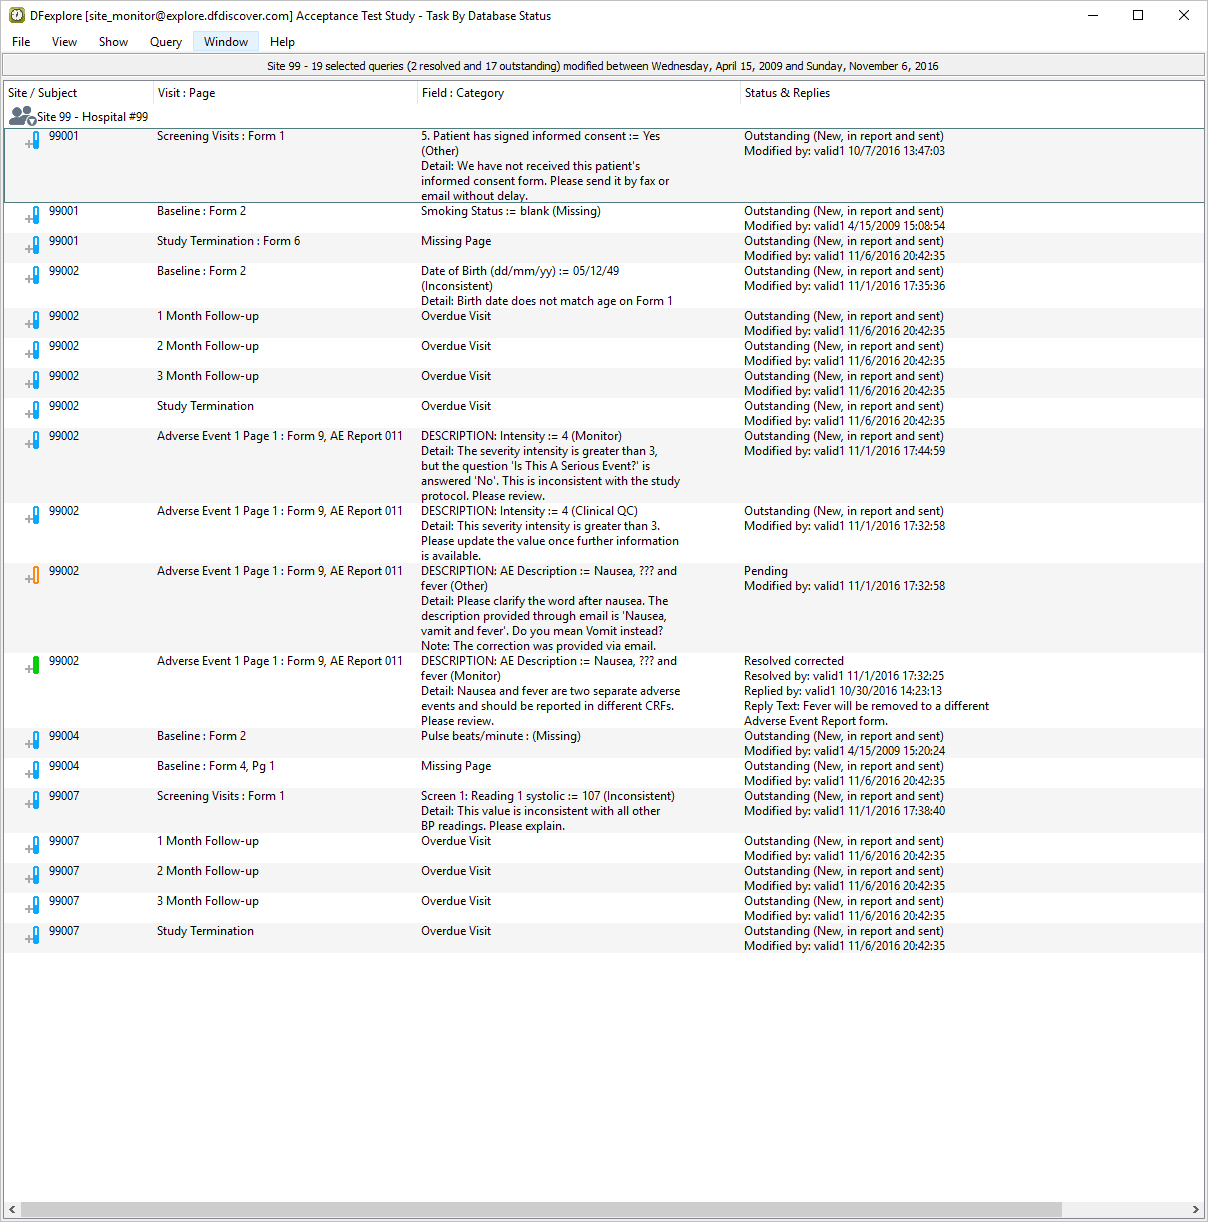
Select > to verify that you are seeing only outstanding queries for subjects in Site 99 - Hospital #99.
-
Examine Queries View to confirm:
-
The Status & Replies column displays Outstanding (New, in report and sent) for all queries.
An entry exists for Subject 99001, Screening Visits Form 1, 5. Patient has signed informed consent.
An entry exists for Subject 99007, Screening Visits Form 1, Screen 1 Reading 1 systolic.
-
-
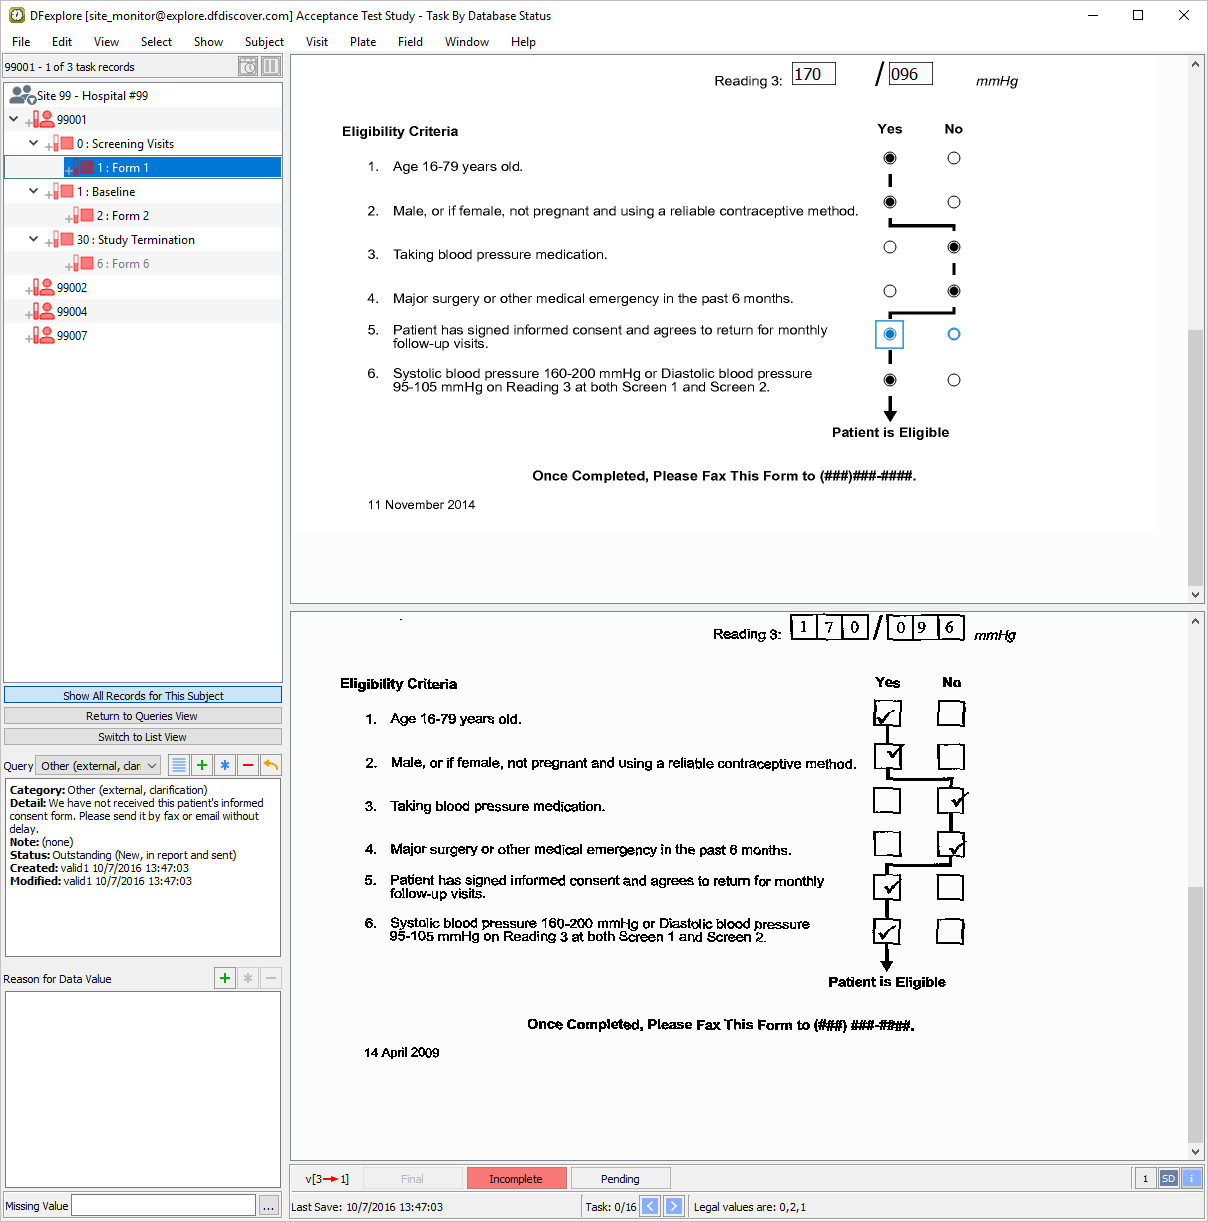
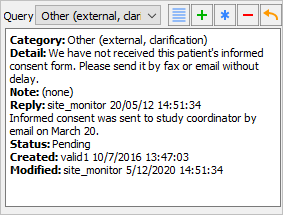
Locate the entry for Subject 99001, Screening Visits Form 1, 5. Patient has signed informed consent. Double-click the query to switch to Data View and make the queried page and field active. Examine the information present in the Query window.
-
Select > or click
 . In the dialog, enter
 Informed consent was sent to study coordinator by email on March 20.in the New Reply field.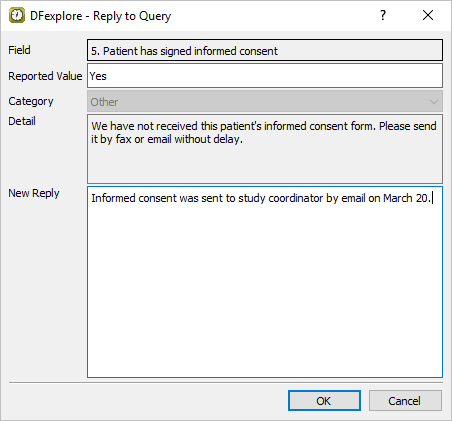
-
Click to apply the reply to the queried field. Examine the information present in the Query window.
-
Do not enter or change data in any of the remaining fields on the current page. Click to save the current page and the query reply to the database.
-
From the record list window, click . Examine the list of queries.
-
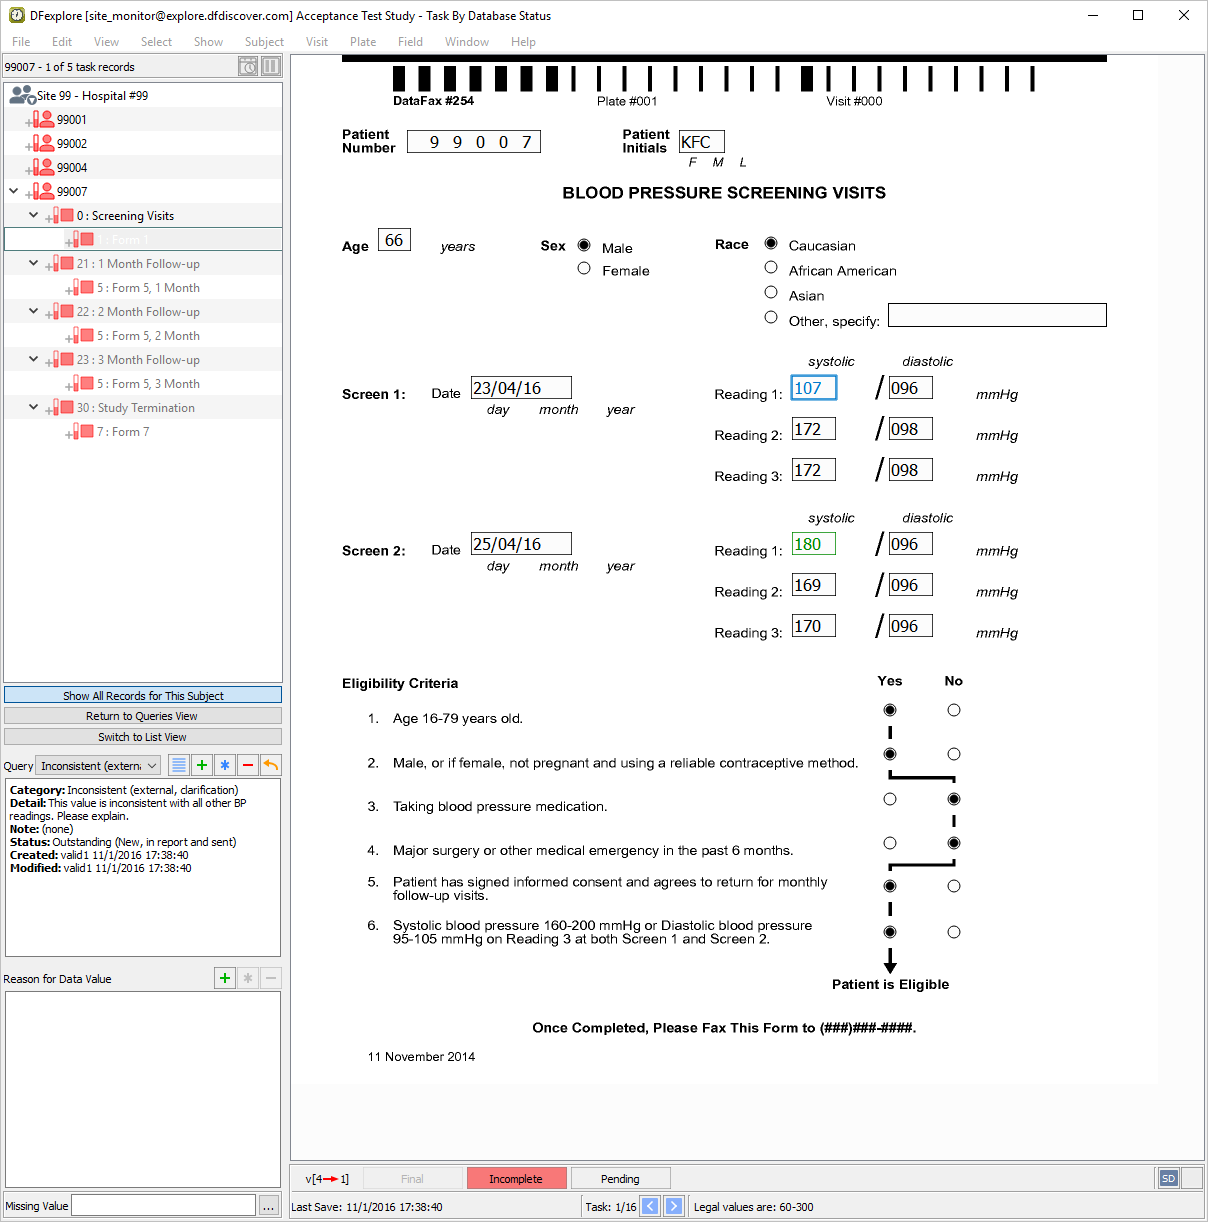
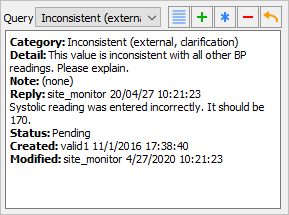
Locate the entry for Subject 99007, Screening Visits: Form 1, Screen 1: Reading 1 systolic. Double-click the systolic blood pressure query to switch to Data View and make the queried page and field active. Examine the information present in the Query window.
-
Select > or click
in the dialog, enter Systolic reading was entered incorrectly. It should be 170.in the New Reply field.
-
Click in the Reply to Query dialog to apply the reply to the queried field. Examine the information present in the Query window.
-
Click to save the current page and the query reply to the database.
-
Select > to close and exit DFexplore.
![[Note]](../../imagedata/note.png) | Note |
|---|---|
eSignatures require password permission to be set in the user role at the DFadmin level. The Password permission must be granted for the specific eSignature plate. |
-
Start DFexplore, login as user
site_investand open the 254 Acceptance Test Study as described in (Section 1.7, “How to start DFexplore”). -
As user
site_investhas 2FA enabled, enter security code recieved by email as previously defined.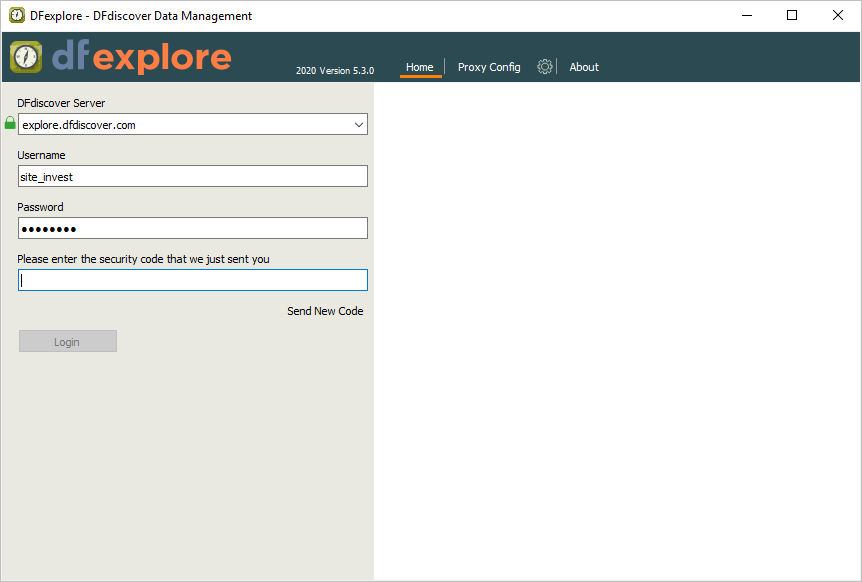
Note Refer to Section 1.8, “Creating user accounts and assigning study permissions.” as a valid email address is required for
site_investto receive 2FA codes. -
Select > , click Background Options to expand the preferences. Click Color > to apply the changes.
-
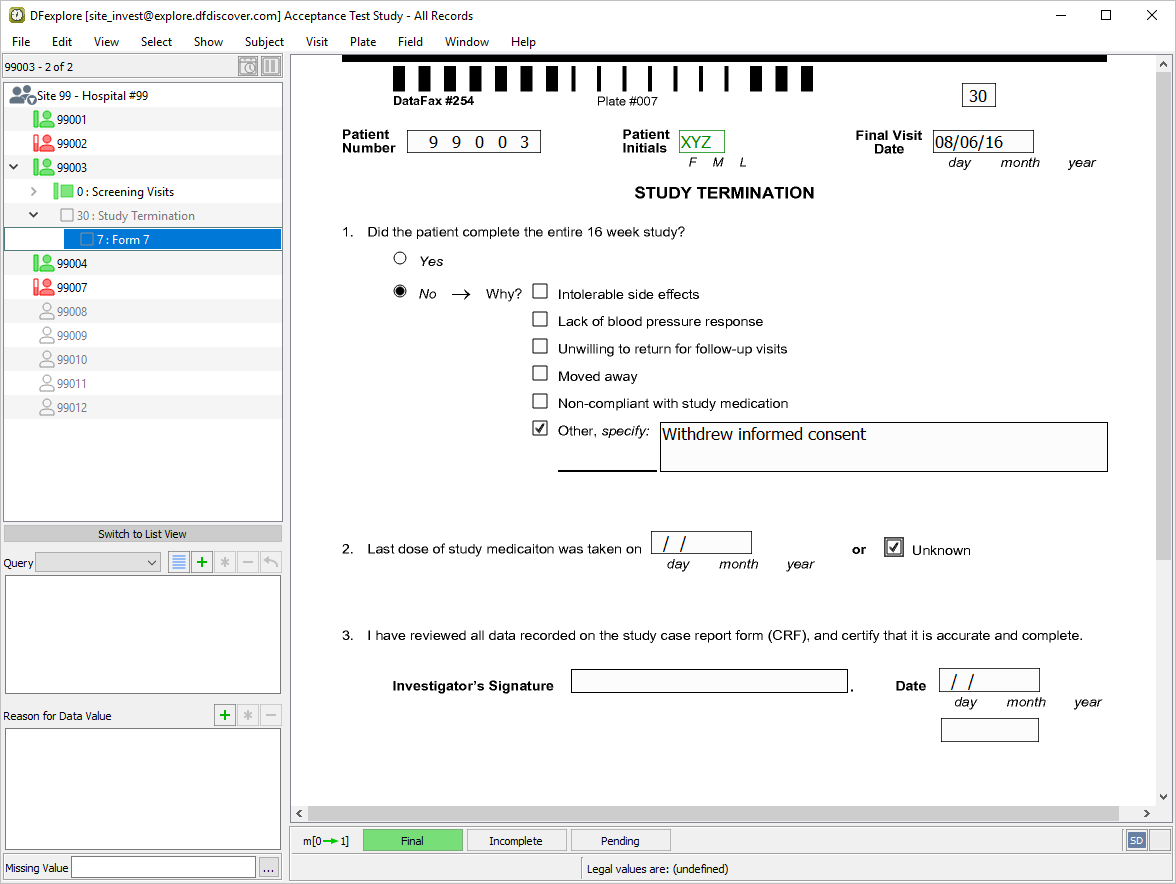
Locate subject 99003, double-click its entry to expand a list of visits for Subject 99003.
-
Double-click 30 : Study Termination. Select 7: Form 7 to open a new STUDY TERMINATION form.
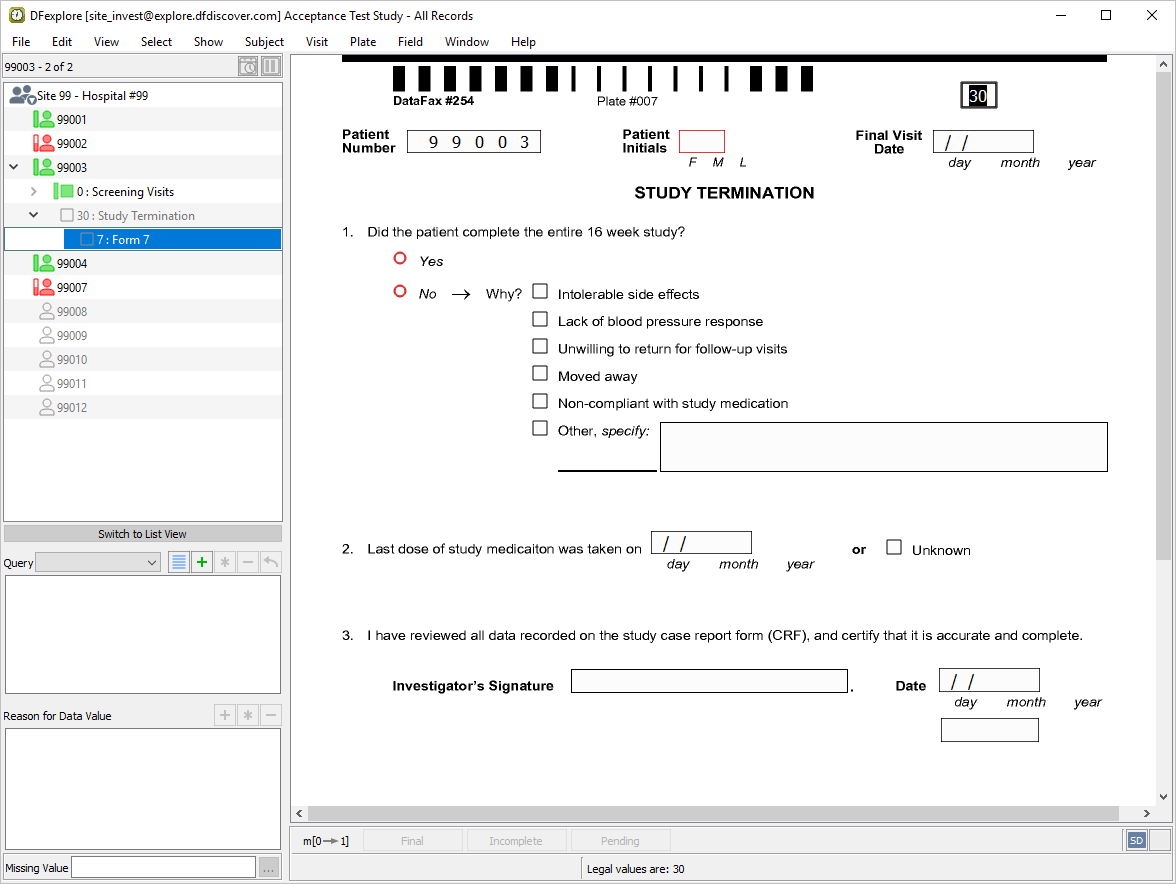
-
Click anywhere in the screen background to begin data entry. Enter the form data as shown below:
-
Press Tab to advance to the Investigator's Signature field. This field and the remaining fields on the page are used to capture eSignature name, date and time, respectively. Attempt to enter any name in the Investigator's Signature field.
-
Press Tab to advance to the remaining 2 eSignature fields. Again attempt to manually enter data into each of these fields. Press Tab to exit the last field on the page (eSignature time) to make the save buttons active.
-
Click to save and eSign the STUDY TERMINATION form.
-
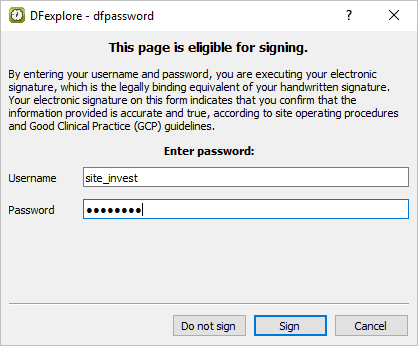
In the dfpassword confirmation dialog enter the user name
site_investand the corresponding password used for login in Section 13.6, “Add an Electronic Signature (eSign) to a set of completed subject records.”. Click to apply the electronic signature to the current STUDY TERMINATION page.
-
Examine the 3 eSignature fields at the bottom of the page.
-
Select > to close and exit DFexplore.