Table of Contents
- 2.1. Main Application Pages
- 2.2. Entering Data / Completing a Record
- 2.3. Responsive Elements
- 2.4. Menus
- 2.5. Dialogs
- 2.5.1. Alert Dialogs
- 2.5.2. Confirmation Dialogs
- 2.5.3. Study Help Dialog
- 2.5.4. CRF Help Dialog
- 2.5.5. Modified Values Dialog
- 2.5.6. Attach Documents Dialog
- 2.5.7. Change Password Dialog
- 2.5.8. Add Subject Dialog
- 2.5.9. Query Dialogs
- 2.5.10. Reason Dialogs
- 2.5.11. Missing Value Code Dialog
- 2.5.12. Error Dialogs
DFweb includes several key pages which are explained here. More detailed explanations of certain pages and functionality, as well as the menus and dialogs that appear on these pages are given in the following sections.
After logging in, you will be taken to the Studies Page. The Studies Page and other pages in DFweb share a similar layout.

The following features appear in the application layout:
Browser Controls. Browser controls are specific to each browser and are not part of DFweb. In general, this area contains the URL for the content that is being viewed, buttons to move to the previous page (if one exists), the next page (if one exists) and refresh the current page, and controls for tabbed windows (if supported).
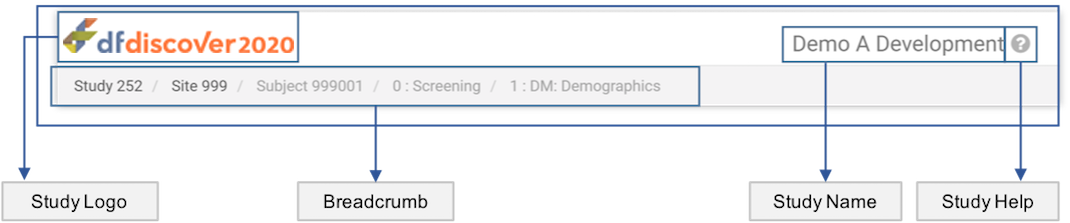
Header Panel. The header panel is available on all pages of DFweb except the login page. It contains options and navigation that are relevant for all pages, including:
Breadcrumb. The breadcrumb is a navigation aid displaying information about the current context as well as simplifying access to other pages in the study via clickable links.
Study Logo. If the study defines a study logo, it appears in the header panel. Otherwise, the DFdiscover logo is displayed.
Study Name. This is the name of the selected study. On the studies page, before you have selected a study, this is empty.
Study Help. If study help has been defined,
 appears
in the header panel.
Click it to display the Study Help Dialog.
appears
in the header panel.
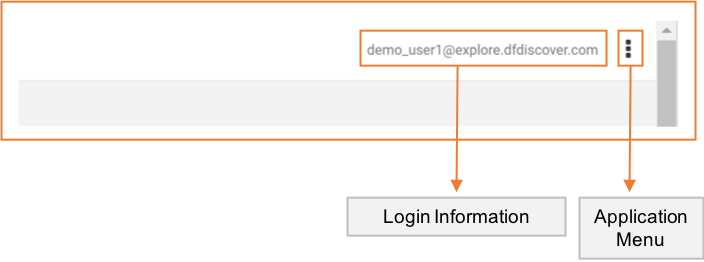
Click it to display the Study Help Dialog.Login Information. Your username and DFdiscover server appear in the header panel with the format [username]@[server]. On small displays, this information is visible from the application menu,
 .
.Application Menu. The application menu contains several generic functions that are not study specific, including . See Application Menu for more information.
Main Panel. The main panel contains the primary information and interaction for the current page. Pages that may appear here are the Studies Page, Sites Page, Subjects Page, and Subject Binder.
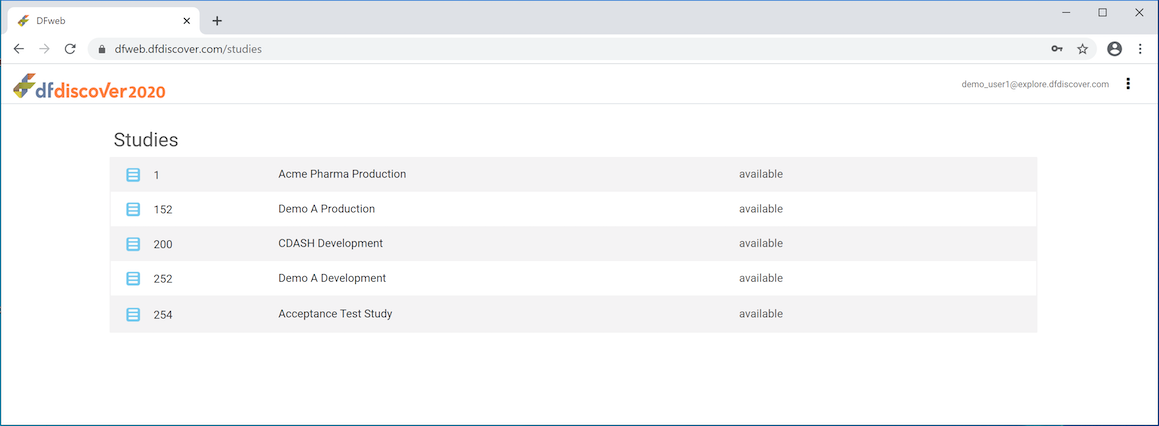
The Studies Page is displayed after successful login. It lists the studies you have permissions for. Click one of the available studies to choose that study as the current study. This takes you to the Sites Page for that study.
If you have permissions for exactly one study, this page is bypassed, going to the Sites Page.
The study's number, name, and status are displayed on each line. If the study is not available, the reason is displayed in red in the status column. Not all issues can be discovered before entering the study. If such a problem exists, after selecting the study you are notified of the issue with an alert dialog and returned to the studies page, where the issue is also presented in the status column.
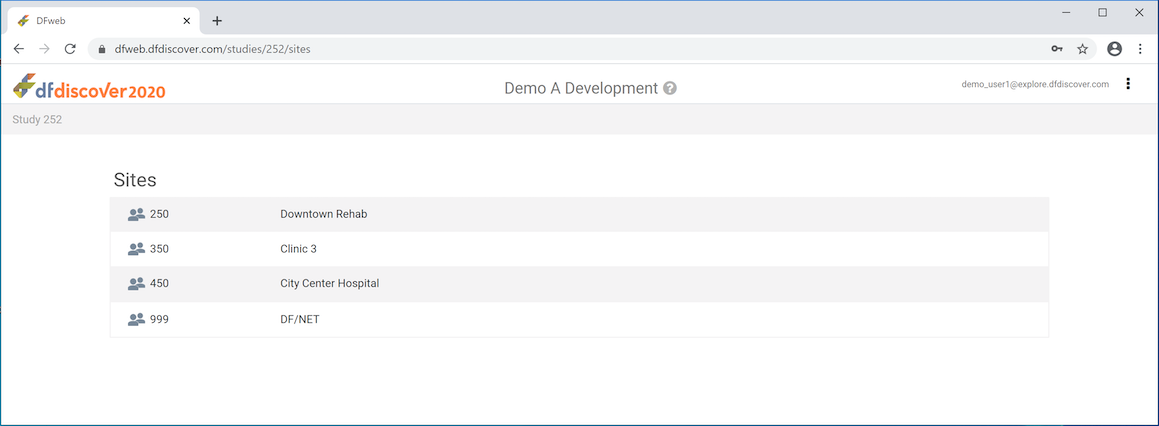
The Sites Page contains a list of the sites you have permission for. The site number and label are shown on each line. Click one of the sites to make it the active site. This takes you to the Subjects Page for that site.
If you have permissions for exactly one site, this page is bypassed, going to the Subjects Page.
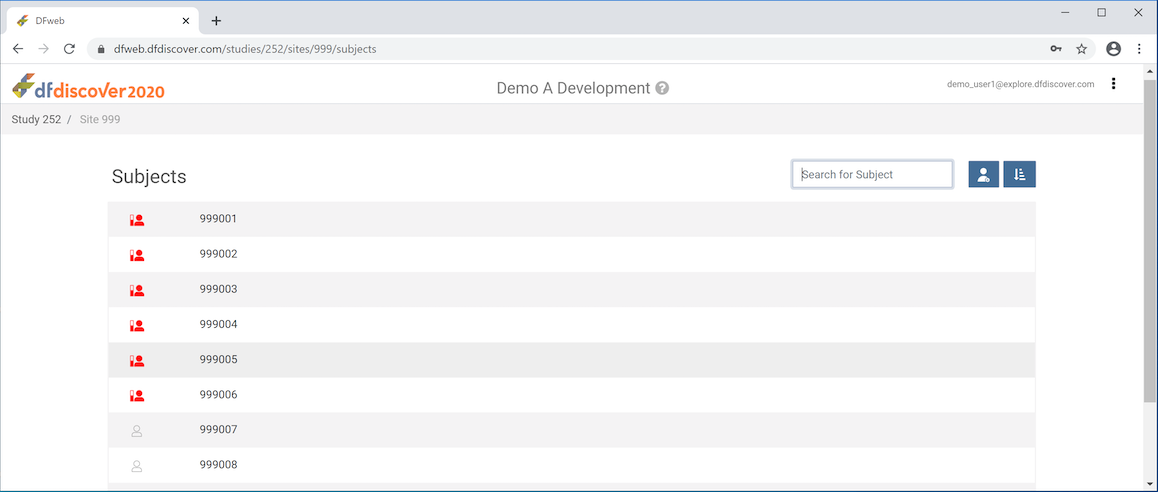
The Subjects Page contains a list of permitted subjects. Click a subject to open the subject binder. The icon to the left of the subject ID shows the current status of the subject binder. The status may change over the duration of the study as more visits become required and further data review takes place.
-
 The subject binder is final, all data required at this time
has been
submitted, and there are no outstanding responses or missing,
required values.
The subject binder is final, all data required at this time
has been
submitted, and there are no outstanding responses or missing,
required values.
-
 The subject binder is incomplete.
There may be missing, required values, illegal values
or unresolved questions about the data.
The subject binder is incomplete.
There may be missing, required values, illegal values
or unresolved questions about the data.
-
 The subject binder is pending.
There is at least one document attached to the subject ID, but
otherwise there is no data yet.
The subject binder is pending.
There is at least one document attached to the subject ID, but
otherwise there is no data yet.
-
 There is no data for this subject,
or the subject has not yet been saved.
There is no data for this subject,
or the subject has not yet been saved.
50 subjects are displayed by default. Click to show all subjects. Click to return to the first 50.
The Subjects Page also provides the following functionality:
Search Bar. The search bar allows you to quickly navigate to a subject with a given subject ID. As you type, the list of subjects automatically filters to show only those subjects containing what you have entered. Click Enter to open the Subject Binder for the first filtered subject.
Add Subject. Click
 to open the Add Subject Dialog.
Sorting. Click
 or
or
 to change the sort order. This toggles between increasing and decreasing subject ID ordering.
indicates that currently the subject IDs are sorted numerically in ascending order.
indicates that the
current sort order is descending.
to change the sort order. This toggles between increasing and decreasing subject ID ordering.
indicates that currently the subject IDs are sorted numerically in ascending order.
indicates that the
current sort order is descending.
To return to the Subjects list from a subject binder, click the site number in the breadcrumb.
The Subjects list displays up to 50 subjects at a time. Click to display additional subjects. To search for a specific subject ID, use the Search Bar.
On the Subjects page, click a subject ID from the list to open the subject binder.
If the subject ID you need is not in the list, click
to add a new subject. This opens a dialog with two text input fields. Enter the subject ID to add to the current site. Confirm the subject ID by entering it again. Click to confirm the subject creation, or to close the dialog without creating a subject.
The Subject Binder contains all the information of the visits and plates related to a subject. The initial page you are taken to is the first visit and CRF for the subject.
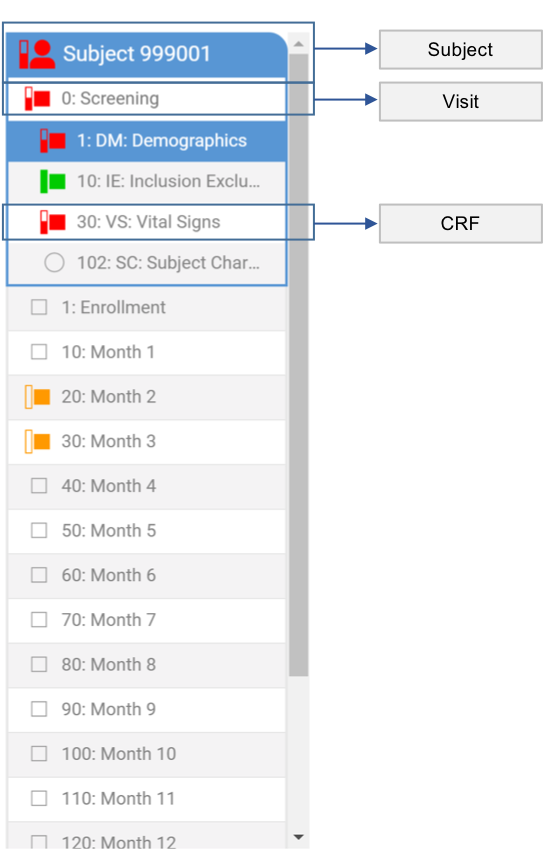
The sidebar displays the current subject, visit, and CRF, as well as providing navigation between CRFs and visits. The current subject is displayed at the top of the sidebar. The rest of the sidebar displays all the visits for this subject that you have permission to view. The current visit is expanded to show all the CRFs in that visit that you have permission to view. CRFs are indented slightly from the visits to help visually differentiate them. CRF and visit labels follow the format [Number]: [Label].
Each visit and CRF has an icon that displays its current status. The meanings of the icons are:
 - This CRF or visit is final, and it is a required CRF or visit.
 - This CRF or visit is incomplete, and it is a required CRF or visit.
 - This CRF or visit is pending, and it is a required CRF or visit.
 - This CRF or visit has not been saved, and it is a required CRF or visit.
 - This CRF or visit is final, and it is an optional CRF or visit.
 - This CRF or visit is incomplete, and it is an optional CRF or visit.
 - This CRF or visit is pending, and it is an optional CRF or visit.
 - This CRF or visit has not been saved, and it is an optional CRF or visit.
 - This CRF or visit is final, and it is an unexpected CRF or visit.
 - This CRF or visit is incomplete, and it is an unexpected CRF or visit.
 - This CRF or visit is pending, and it is an unexpected CRF or visit.
Click a CRF in the current visit to make it the current and displayed CRF. Click another visit to make that visit current and to display the first CRF in that visit.
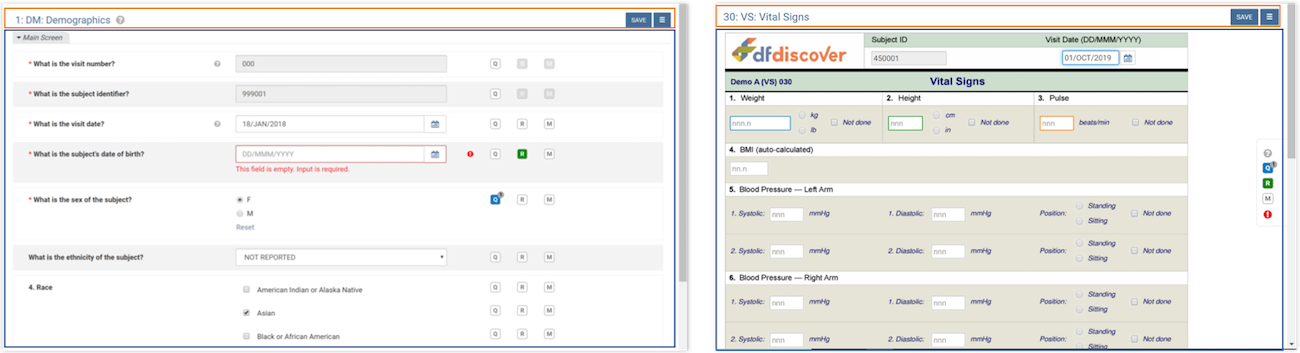
The main part of the page contains the data entry form. This form allows you to view, add and modify data, queries, reasons, and missing value codes, and view and add documents to the form.
Data entry forms on DFweb can be presented as either eCRFs or paper CRFs, depending on the study setup for the plate. Both types of forms contain a header section and a data entry section.
At the top of the form is a header area for CRF-wide actions. The header remains visible as you scroll through the CRF contents.

The header contains:
CRF Label. The CRF label is composed of the CRF number and label. These follow the format [Number]: [Label].
CRF Help. If CRF help has been provided for this CRF in the study setup,
appears in the header area. Click to open the CRF Help Dialog.Locked CRF Icon. If the CRF is in use by another user,
 appears to the left of . This indicates that no editing can be done on this CRF.
CRF Menu Button. Click
 or
or  to open the CRF Menu, which contains CRF level options such as managing
documents and resetting the data entry form.
to open the CRF Menu, which contains CRF level options such as managing
documents and resetting the data entry form.Save Button. Click to save the changes you have made to the current CRF and submit them to the server. is disabled if no changes have been made to the form. Hover your mouse over to display a tooltip with the last saved time and the CRF status.
On an eCRF, the remainder of the form is filled by screens, which appear as vertically stacked tabs. Click the corresponding tab to close any screen. The tab with the input focus cannot be closed.
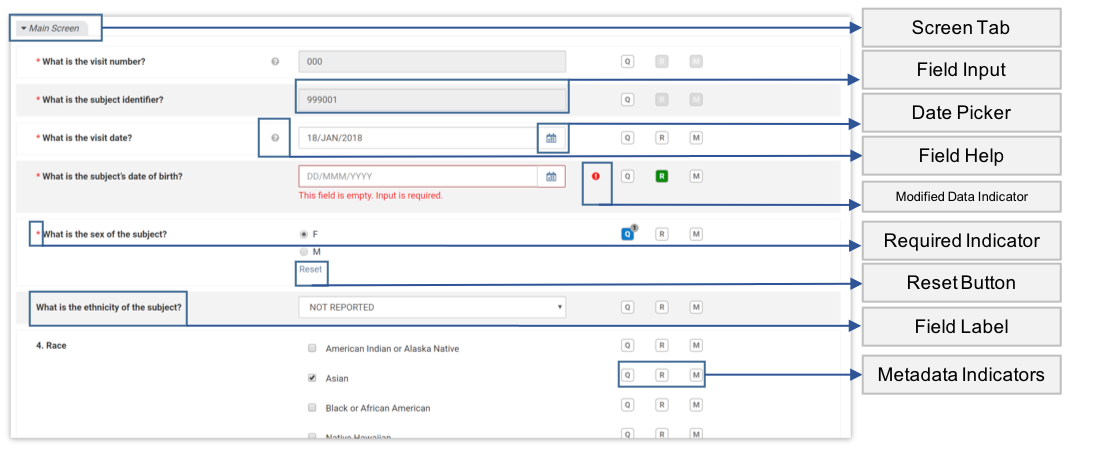

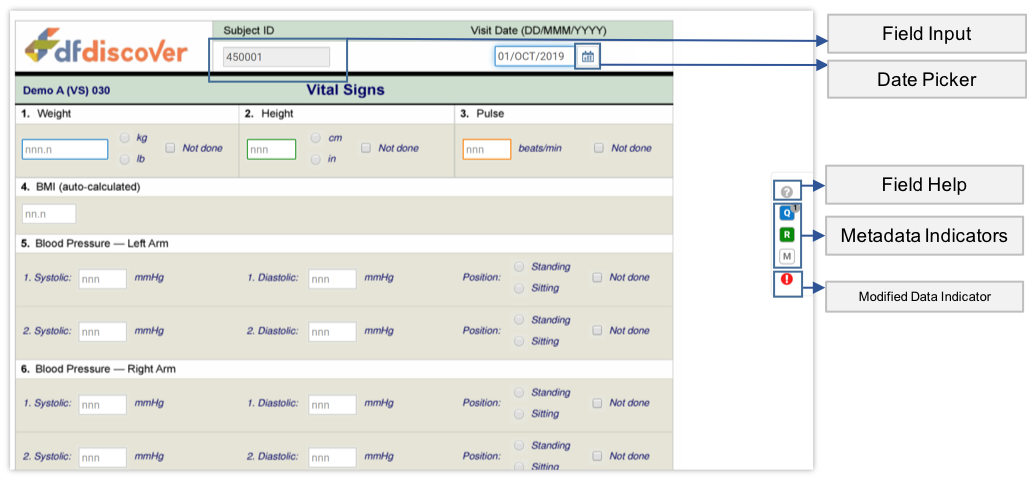
Each screen is composed of rows of fields. Each field can contain:
Field Input. Each field has an input area. The type of input determines exactly what appears in this area. For more information on input types, see Data Types.
Date Picker. Date fields have a date picker (
 ). Click to reveal a calendar. Picking a date in the calendar is equal to typing it in the Field Input.
Field Help. If the study setup has defined help for the field,
is visible. Click to display a help tooltip, which can be dismissed by clicking any other area of the page.Modified Data Indicator. If a value in the field is unable to be displayed in the input area, it is modified when you open the CRF.
 shows which fields have been modified. Click the indicator to display more information about the change.
Required Indicator. If the field is required or essential,
 appears on the line. Fields with this indicator display a warning message if left blank.
Reset Button. Choice (Radio Button) and VAS input areas have . This can be used to set the field back to the blank value.
Field Label. The field label shows the field prompt, if it is available. Otherwise the field description is used for the label.
Metadata Indicators. , , and are displayed on each line. They allow the user to add, modify and view queries, reasons and missing value codes for that field. For more information on queries, reasons, and missing value codes, see Chapter 3, Metadata.
Focus Indicator. A colored bar indicates that the field is in focus, and the color indicates the status of the field. To learn more, see Focus Indicators.
Units. If units are defined for the field, they are shown in or near the input area. Where they are displayed depends on the type of input.
Warning Message. Warning messages appear when issues like illegal field values, missing values, or incorrectly formatted information are present in the field. Correct the issue to remove the message.
On a paper CRF, each plate is displayed as fields laid out on a background image, and a metadata icon panel floats to the right of the window. The metadata icon panel represents metadata for the currently focused field.
A paper CRF can contain:
Field Input. Each field has an input area. The type of input determines exactly what appears in this area. For more information on input types, see Data Types. Field inputs on paper CRFs can have colored borders. For more information on the borders, see Locating Metadata.
Date Picker. Date fields have a date picker (
) that becomes visible when the field is focused. Click to reveal a calendar. Picking a date in the calendar is equal to typing it in the Field Input.Field Help. For the field that is currently focused, if the study setup has defined help for the field,
is visible in the metadata icon panel. Click to display a help tooltip, which can be dismissed by clicking any other area of the page.Metadata Indicators. , , and are displayed in the metadata icon panel. They allow the user to add, modify and view queries, reasons and missing value codes for the field that is currently focused. For more information on queries, reasons, and missing value codes, see Chapter 3, Metadata.
Modified Data Indicator. If a value in the field is unable to be displayed in the input area, it is modified when you open the CRF. For the field that is currently focused,
in the metadata icon panel shows that the field has been modified. Click the indicator to display more information about the change.Focus Indicator. When a field is in focus, the outline color indicates the status of the field. To learn more, see Focus Indicators.
When you enter a subject binder and the CRF becomes visible, DFweb attempts to establish a lock on the CRF. If it succeeds, you gain the lock on the CRF and other DFdiscover apps won't be able to edit the CRF until it is unlocked. If someone else already has the lock, your attempt fails and you are shown the locked CRF in read-only mode.
A locked CRF is indicated by a beside the save button. When a CRF is locked, all data fields are in read-only mode, meaning no data can be entered, and no queries, reasons, or missing codes can be added to the field.
Existing queries, reasons, and missing codes can still be viewed by clicking the appropriate button, however all input fields and actions other than cancel are disabled.
The Manage Documents dialog is accessible for document review, however no new documents can be uploaded to a locked CRF.
Finally, and are disabled on a locked CRF.
Exiting a CRF, whether by navigating to another CRF, exiting the subject, or logging out, unlocks the CRF.
Navigating from field to field is possible using the Tab key. The button, if enabled, is tabbed to after the last field. Within choice fields (shown as either radio buttons or dropdowns), the up and down arrow keys can be used to switch between options, and the option can then be selected using the Space key. Within visual analog scale (VAS) fields, the left and right arrow keys can be used to select a point on the scale.
The last in-focused field displays a vertical bar on the left edge of the field (for eCRFs) or a field highlight/outline (for paper CRFs). It may have color information, including red (required and missing or illegal values), blue (outstanding query), green (resolved), orange (pending), and black (otherwise). The current active field is outlined; on eCRFs, the highlight color matches the vertical bar, except in the case of a black vertical bar, in which case the highlight color is the default one for the browser.
Some fields only accept specific data formats. Field formatting is shown in the blank field to help guide data entry. For example, a date field may have the format YYYY/MM/DD or a lab result field may have the format nn.nn.
Some fields may have legal ranges defined. If you enter an illegal value, you are shown a warning similar to: "The input value is not a legal value. The legal values are 01-JAN-2018~today." Correcting the value removes the warning and avoids queries.
In addition to the description for each field on the CRF, Help information may be available for each field. This is indicated with a
icon. eCRFs display this next to the field label. Paper CRFs display it in the metadata icon panel. Click
to view the Help message.
When navigating fields on a CRF using the Tab key, some fields may be skipped. This indicates that the field skipped is not required and can remain blank.
Some eCRFs may be divided into multiple screens. A screen has a main body for data as well as a clickable tab to control visibility. In the tab, click the arrow to collapse the fields within that screen, and click again to expand. By default, all screens are expanded when you open a CRF. The tab with the input focus cannot be closed.
In fields where you can type a value, deleting the value is sufficient to clear the data. In check fields, removing the check removes the value. In choice and VAS fields however, other methods are provided to clear the data.
In an eCRF plate, click on choice and VAS fields to clear the data.
On paper CRF plates, is not available. Instead, the field is reset using the missing value dialog. Enter the missing value dialog, and select from the Code dropdown. Click to close the dialog and remove the current field value.
Numeric digits (0-9), decimal (.), and a sign symbol (+ or -) can be entered in number fields. If a decimal or other character is required, it can be typed directly. Otherwise, it is entered automatically to match the required format for the field.
Any text may be entered in a string field. A maximum field length may be defined which limits the number of characters that can be entered.
If the maximum length for the string is longer than the input area can display, the string field will show as a resizeable field.
![[Note]](../../imagedata/note.png) | Note |
|---|---|
Resizing input areas is impossible on Microsoft Edge. However, the entire text can still be edited, and hovering over the input will display a tooltip with the entire text for easier reading. |
Enter dates using the keyboard, or use the date picker to select a date. The date picker is always visible on date fields in eCRF plates. On paper CRF plates, the date picker becomes visible when the date field is focused. The date picker can be scrolled using the scroll wheel on the mouse, and clicking the month name will enter a condensed view to speed up scrolling. Click a month to exit the condensed view. If a date is entered using the keyboard, it must follow the defined format, e.g. DD-MMM-YYYY, YYYY/MM/DD, DDMMYY. Partial dates may only be entered via the keyboard.
Only one response option can be selected for each choice field. The field displays as radio buttons or a drop-down menu according to the study setup. If connecting to servers with a dfdiscover version earlier than 5.2, the field is displayed as radio buttons if there are three or fewer response options, and a drop-down menu otherwise. To remove a response, click Reset below the field (eCRFs only), or select from the missing Value dialog.
A check field can be checked or unchecked. Multiple check fields may be included in one item; check all that apply.
Select a point along the scale using the cursor or the left and right arrow keys on the keyboard. On eCRFs, the selected value is shown under the scale in the middle, with the first and last options in the scale shown on the left and right respectively. Paper CRFs display the selected value directly under the scale indicator. To remove a response, click Reset below the field (eCRFs only), or select from the Missing Value dialog.
It can occur during data entry that the response to a question is not available. The question may not be relevant, the response is unknown or not applicable, or the response may only be available in the future. With the exception of data fields that are identified as essential, the response for any data field can be recorded as missing. While performing data entry it is important to mark the response for such a data field as missing, rather than leaving it blank. If left blank, a query will be raised during review - was the data field simply skipped or ignored, or was it considered and there is a reason why there is no response? To prevent this uncertainty, missing data must be appropriately identified. Conversely, if data was previously marked as missing and has since become available, the missing designation must be removed and the available data entered. For both situations, the steps are described in Mark a Data Value as Missing.
Edit checks are defined during study setup. They are fragments of logic that enforce study expectations for the data collected. They run interactively during data entry and data review. Edit checks may be run when you enter a CRF or a field, or when you leave a CRF or a field. Edit checks perform various actions, such as displaying messages, adding a query, masking a field, calculating data, or changing data to view only.
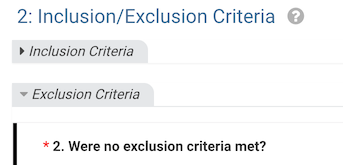
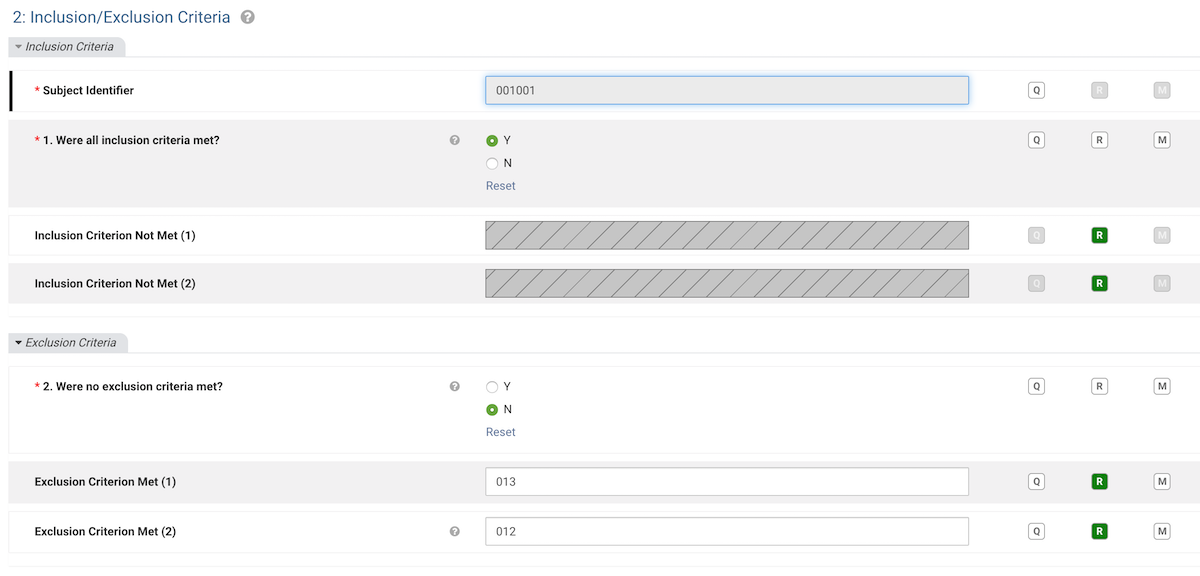
The following is an example edit check. Your own study will likely have similar edit check that also masks other fields based on the answer of current field. In the edit check example shown below, the edit check has detected the answer of "Were all inclusion criteria met?" is Yes after field exit. The edit check thus masks the following two fields as there is no need to continue to answer them.
When you have completed data entry on a CRF, you must save your changes before leaving the CRF. To do so, click , located near the right side of the header area.
If you leave the CRF before saving, the following dialog is presented:
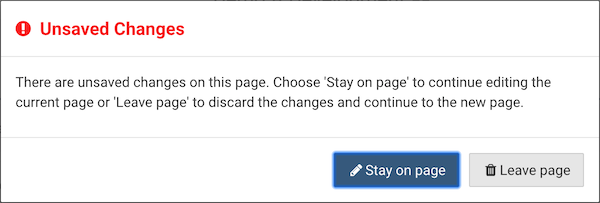
Select to remain on the CRF and save your changes. Select to discard the data on the CRF. Your changes are not saved and cannot be retrieved.
Select from the CRF menu to undo all unsaved changes and reset the CRF to the last saved database values. This can be useful if you are interrupted during data entry and lose track of where changes have been made. After confirmation, unsaved changes to data, queries and reasons are discarded.
DFweb adapts the content to fit displays of different sizes. Largely this is done by adjusting the spacing on the page, however greater changes are made when the display becomes too small. Some of the more significant changes are detailed here.
To allow more room for data entry, the sidebar is hidden on small displays. When it is hidden, a new button with the subject's status icon is added beside the CRF label. Clicking this button hides the data entry panel and shows the sidebar. Clicking the same button again hides the sidebar and shows the data entry panel.
On small displays, the organization of the fields on eCRFs also changes. The input area, date picker, units, reset button, and warning message are moved below the rest of the elements of the field, allowing enough room for all elements to be visible and usable. Paper CRF field layouts remain the same on small screens.
The application menu provides functionality that is applicable for the entire study or user session. The following functions are available:
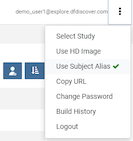
Select Study. Select to navigate you back to the study list page. This option is only avaiable when you have selected a study and have permission for more than one study.
Use HD Image. Select to alternate between viewing the HD and normal definition backgrounds for paper CRFs. A check mark indicates that you will see HD images on paper CRFs.
Use Subject Alias. Select to alternate between viewing the numeric Subject ID and the Subject Alias. A check mark indicates that you will see the Subject Alias. If the study definition does not include subject aliases then the displayed ID and Alias are the same.
Copy URL. Select to copy the URL of the current page to your device's clipboard. This allows you to easily share the URL with other users, and if they have permission to view the page, they are taken directly there after logging in.
Change Password. Select to open the Change Password dialog. This allows you to update your password.
Build History. Select to open a new tab with the build history for DFweb. This allows you to review recent and past changes to DFweb and learn about any new features.
Logout. Select to exit out of DFweb and return to the login page. Remember to always Logout after completing your work.
The CRF Menu is only visible on the Subject Binder page. It provides actions for the entire CRF. A file icon on the menu indicates that this CRF has documents attached. A loading spinner on the menu button indicates that the CRF documents are still loading. The following actions are available:
Manage Documents. Select to open the Manage Documents dialog. This allows you to add or view documents for the current CRF. A number to the right shows the number of documents on this CRF.
Reset Page. Select to reload the current CRF, resetting all fields and other elements to the last saved value. If you have made changes since your last save, you are warned that continuing with the reset removes unsaved changes.
Alert dialogs provide warnings of different events or states in DFweb. Information in alert dialogs is important, and you should read them carefully before closing them. Example alert dialogs include:
Session Timeout Dialog. If you have been away from DFweb for too long, DFweb logs you out. When this happens, a session timeout dialog is displayed.
Missing Permission Dialog. Some actions, such as trying to directly navigate to a CRF using a URL, can result in a missing permission dialog if you do not have permission to view the study, site, subject, etc. Close this dialog to return to the closest level in the navigation that you have permission to access.
Data Was Modified Dialog. Some illegal values cannot be accepted by the study server. If you save a CRF with such values, they are altered by the server, and you are notified by this dialog.
DFweb displays confirmation dialogs to warn you of the (potentially unintended) consequences of an action you are about to perform and to give you a chance to cancel the action. Some confirmation dialogs are:
Unsaved Changes Dialog. Resetting or navigating away from a CRF that has unsaved changes on it triggers an unsaved changes dialog. This dialog gives you a chance to stop the action and save those changes before continuing.
Save Plate Confirmation Dialog. If you have entered values that cannot be saved as is by the DFdiscover server, when you save, DFweb warns you that these values may be modified, and give you a chance to go back to correct the values before saving.
Auto Logout Warning Dialog. If you have been inactive in DFweb for an extended period of time, this dialog is shown with a countdown to the logout, allowing you to choose to continue your session before the countdown reaches zero.
Click beside the study name to open a dialog showing the study help. The content is displayed in the main body of the help dialog.
Click  to close the dialog.
The CRF help dialog is displayed when the user clicks beside the CRF label. Similar to the study help dialog, the CRF help dialog displays help content in the main section of the dialog, in this case, specific to the current CRF. The dialog is closed by clicking .
On occasion, a change in the study setup can cause a value to be saved to the study database that cannot be displayed in the field. In these cases, DFweb modifies the values as best as possible to make them fit in the field. You are notified of these modifications with this dialog when you open the CRF.
The dialog shows you a list of all fields modified in this way. For each field, the dialog shows you the field label, a message explaining why the value was modified, the value in the database, and what the value is after the modification.
Leaving the CRF without saving causes the modifications to be discarded and the database values to be preserved.
The Attach Documents dialog provides a way to view and add documents to the CRF, and to download attached documents to your device. Documents are displayed in a list, and at the bottom of the list is an area for attaching a new document.
Each document in the list is displayed as a row with the document name, the size of the document, an expand document button ( ), and a download button (
 ). Click to display the document in the dialog.
Some document types cannot be displayed by the browser, so a message is shown in place of the document. Click to download the document to your device. This is especially useful for documents that can't be viewed in the browser
as it allows you to open the document with a program designed to open files of that type.
). Click to display the document in the dialog.
Some document types cannot be displayed by the browser, so a message is shown in place of the document. Click to download the document to your device. This is especially useful for documents that can't be viewed in the browser
as it allows you to open the document with a program designed to open files of that type.
To attach a new document to the CRF, click . This opens a file chooser dialog. Select the file you wish to upload, and confirm the selection to close the dialog. Click to attach the document.
| Note |
|---|---|
The label of may differ in the browser you are using. |
If the CRF has not been saved, attaching a document saves an empty version of the CRF with the status Pending and the document attached. Saving with the CRF save button is still required to save any changes you have made to field values.
At the top right of the Attach Documents dialog is the Download All button (). This button downloads a zip file containing all the documents attached to the CRF. Click to close the dialog.
The Change Password dialog is displayed when you select from the Application Menu, or when you login for the first time after being given a new password by the study administrator. The text of the dialog indicates minimum password requirements.
To change your password, enter a new password that matches the requirements in New Password. Then enter the same password again in Confirm Password. If the password does not meet the requirements, an error message is displayed in red below Confirm Password. When you have entered a password and no error messages show, click to submit the new password to the server. If the password change is not successful you are notified by an error message. Click to close the dialog without changing your password.
The Add Subject dialog is displayed when you click from the subjects list page. It permits you to create a new subject within the range of allowable IDs for the site.
To create a new subject, enter the desired subject ID in Enter Subject ID. Enter the same ID in Confirm Subject ID. When you have entered an ID in both input areas and no errors are displayed, click to create the subject. The subject binder page for the new subject is displayed. Click to close the dialog without creating a new subject.
The Query Dialogs allow you to create ( ),
edit (
),
edit ( ),
reply to (
),
reply to ( ) and
delete (
) and
delete ( ) queries for a field. Separate dialogs are used for each function. For a study in which multiple
queries are permitted, there is an additional Multiple Queries dialog to view and initiate actions once a query has been created for the field.
Click to open the query dialogs for the field.
For more details on query dialogs and their use, see Queries.
) queries for a field. Separate dialogs are used for each function. For a study in which multiple
queries are permitted, there is an additional Multiple Queries dialog to view and initiate actions once a query has been created for the field.
Click to open the query dialogs for the field.
For more details on query dialogs and their use, see Queries.
The Reason Dialogs allow you to create, edit, and delete reasons for a field. Separate dialogs are used for each function. Click to open the reason dialog. For more details on the reason dialog and its use, see Add a Data Reason.
The Missing Value Code dialog allows you to set (or unset) a missing value code for the field. Click to open the Missing Value Code dialog. For more details on missing value codes and their use, see Mark a Data Value as Missing.
On occasion DFweb may experience a problem resulting in an error dialog. This can be caused by a problem in network connectivity, the server, or DFweb itself. The dialog content gives details as to the cause of the error. Further detail regarding some errors can be found below. Depending on the error, you may be taken to a different page, or logged out, on closing the dialog.
Server Internal Error. This error is caused by an issue connecting to the DFweb server. This may happen if an internet connection is unavailable, or if the DFweb server is otherwise unavailable. Closing this dialog will log you out. Check your network connection and try again. If the error persists, contact your study administrator.
API Error. This error is caused by an issue connecting to the API server. This may happen if the API server is unavailable, or due to a problem in the study setup. The contents of this dialog provide more information on the nature of the issue. You may be returned to a previous page when closing this dialog.
Website Problem. DFweb has crashed due to unexpected actions, input or changes in the browser. Expanding the details section reveals information useful for the DF/Net team in resolving the crash. Closing the dialog will return you to the current screen so you can copy any unsaved data. Refresh DFweb using your browser's refresh button to recover from the crash. If the crash persists, contact your study administrator, including the content of the details section.