Table of Contents
- 5.1. Subject Binders
- 5.2. Metadata: Queries, Reasons and Missing Values
- 5.3. Data Field Colors
- 5.4. Entering Data and Metadata
- 5.5. Saving Data and Metadata
- 5.6. Correcting Key Fields
- 5.7. Images of CRFs and other documents
- 5.8. Image Option Buttons
- 5.9. High Definition (HD) Images Setting
- 5.10. Working with Tasks
- 5.11. Ad hoc Record Selection
- 5.12. Using Lookup Tables
- 5.13. Query Management
- 5.14. Review/Approve Queries and Reasons
- 5.15. Transmitting Scanned CRFs
- 5.16. Importing Subject CRFs
- 5.17. Creating Subject Packages
- 5.18. Data View Menus
The Data View is the most commonly used DFexplore window. It provides access to all subject binders for data entry and review. Several of the other views provide quick access links to Data View.

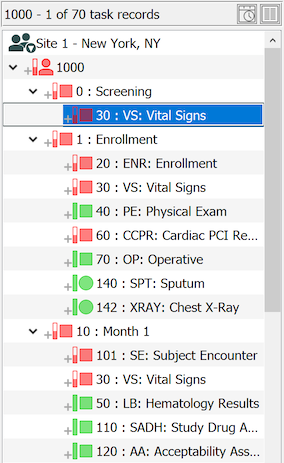
The Data View is organized as a list of subject binders. Subject binders are nested under clinical sites, and displayed in a list on the left side of the window. Only sites and subject binders for which you have been granted permissions are visible.
Double-clicking a site opens it, revealing the subject binders; double-clicking a binder opens it, revealing the subject visits. Visits are opened by clicking the arrow or double-clicking the visit label. This reveals the pages belonging to each visit. Only one subject binder can be open at a time, but multiple visits within the binder can be open simultaneously. Double-clicking the label for an open visit, subject or site closes it. Opening a new binder, or a new site, automatically closes the current one.
Clicking the square button
(  )
at the top of the record list panel toggles
between subject binder and list navigation.
In list navigation, the binders are replaced by columns showing:
status icon, site, subject, visit, plate and workflow level
for all records in the current subject binder, without needing to open each visit.
It can also be used when working on a task set, in which case only task records are shown.
)
at the top of the record list panel toggles
between subject binder and list navigation.
In list navigation, the binders are replaced by columns showing:
status icon, site, subject, visit, plate and workflow level
for all records in the current subject binder, without needing to open each visit.
It can also be used when working on a task set, in which case only task records are shown.
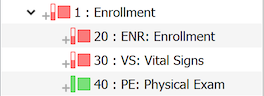
Visits and the pages within each visit are shown in visit map order, regardless of which navigation method is used.
Different icons and colors indicate the status of subjects, visits and pages. Subject icons have two visual indicators, a vertical scale (rectangle) and a subject outline. The possible combinations are:
-
 Subject outline, no scale - a new subject binder, not yet started
 -
 Green, filled scale - no problems, all pages entered so far
have status final
Green, filled scale - no problems, all pages entered so far
have status final
-
 Red, half filled scale - one or more pages entered so far has
status incomplete
Red, half filled scale - one or more pages entered so far has
status incomplete
-
 Orange, outline scale - one or more pages entered so far has
status pending and no pages are incomplete
Orange, outline scale - one or more pages entered so far has
status pending and no pages are incomplete
-
 Grey, dashed outline scale - all pages completed so far have
been marked missed (i.e. unavailable)
Grey, dashed outline scale - all pages completed so far have
been marked missed (i.e. unavailable)
Visit and page icons use the same colors and additional scale, with the same meaning, but they come in different shapes to indicate if they are required.
-
 Square - a required visit or page
-
 Circle - an optional visit or page which may not be
relevant for all subjects
Circle - an optional visit or page which may not be
relevant for all subjects
-
 Diamond - an unexpected visit or page
In addition to a data value, each field may have other information; data about the data, often referred to as metadata.
Metadata is displayed in one of two styles: bottom-left (positioned below the subject binder list) or in the metadata editor panel (right of the data window). The style used is determined by the setting for the Display metadata editor panel preference.
If the current field in the data window has metadata, the metadata is displayed in 3 sub-panels:
-
Query - queries are requests for corrections or additional information from the study coordinating site. A query can be up to 500 characters long and has a status of:
outstanding - the query still needs to be addressed
pending - the query has been addressed but the solution has not yet been reviewed by the study coordinating site
resolved - the query has been addressed and the solution has been accepted by the study coordinating site
You can reply to a query by clicking the button (
 ),
entering a reply in the Reply field,
or selecting
> .
After a reply is entered, the Query status
changes to Pending.
),
entering a reply in the Reply field,
or selecting
> .
After a reply is entered, the Query status
changes to Pending.There may be multiple queries on a field; if so, this will be evident from the query count on the upper-left corner of the field widget when the queried field has the focus. Use the arrow keys in the Query panel to navigate between queries and, if required, reply to each one individually.
Some queries do not require a reply and can be resolved simply by correcting the data field. A blank field with query category 'missing', or an illegal field with query category 'illegal', is resolved by entering a legal value.
If a query requests a data correction which cannot be made because the current value is correct, you can respond either by replying to the query or adding a reason to explain the current value.
-
Reason - reasons are entered to explain unusual data values by clicking the add button (
 ),
in the Reason panel.
A dialog appears where you can type a reason (500 characters maximum)
or select one of the standard reasons defined for the study.
For example, if a field turns red because the value you have entered
is considered illegal, you could add a reason to explain the value -
this might be sufficient to avoid receiving a query from the study
coordinating site.
),
in the Reason panel.
A dialog appears where you can type a reason (500 characters maximum)
or select one of the standard reasons defined for the study.
For example, if a field turns red because the value you have entered
is considered illegal, you could add a reason to explain the value -
this might be sufficient to avoid receiving a query from the study
coordinating site.When you add a new reason, or change an existing one, the field turns orange with status pending to signal that it should be reviewed by the study coordinating site.
If you change a field that already has a reason you are required to provide a new reason explaining why the value has been changed. This ensures that the reason displayed is always related to the current value.
-
Missing Value - if the study has been configured to use one or more predefined reasons explaining why a field has no value, you can select one of these reasons using on the Missing Value window, and keyboard shortcut Control+M (Command+M on macOS) can be used to apply the most recently used missing value code to a new field. However, a missing value cannot be assigned to fields defined in the database as essential.
Colors indicate the status of data fields and whether they have associated metadata (queries, reasons and/or missing values).
The colors used for fields without metadata are:
-
White - legal values
-
Red - illegal values or blank, required fields
The colors used for fields with metadata are:
-
Blue - fields with outstanding metadata: an unresolved query or a rejected reason
-
Orange - fields with pending metadata (and no outstanding metadata): a reason or query reply that has not yet been reviewed by the coordinating site
-
Green - fields with approved metadata (and no outstanding or pending metadata): a resolved query, an accepted reason, or a predefined missing value code
If more than one color might apply, descending priority order is: blue, orange, and then green.
Entering data is very similar to completing paper forms, with a computer mouse and keyboard replacing pen and ink. You can go to any field by selecting it with the mouse, move to the next field using Tab or Return, or move back to the previous field using Shift+Tab or Shift+Return.
The current field is highlighted in the data window. If legal values or other help text has been defined for the current field it appears in the bottom-right corner of the DFexplore window.
All entry of data values and metadata (query replies, reasons and missing values) apply to the current field. Be certain that the correct field is highlighted in the Data window before entering data and metadata. If multiple queries are present on a field, be certain that the correct query is selected by using the arrow buttons in the upper-left corner of the Query window before replying to the query.
Choice fields, which allow you to select one choice from the listed response options, are displayed with a small circle beside each option; a 'filled-in' circle denotes the currently selected option. You can select a response option by clicking the circle with the mouse, or by using the number keys - 1 for the first option, 2 for the next, etc. The current option can be removed, returning the field to blank, by pressing Delete (or Backspace).
String fields support UNICODE characters from the en_US.UTF-8 locale.
During data entry, DFexplore blocks use of the |
character - this character is reserved internally and used as the
field delimiter in data and metadata records.
Changes made to each page need to be saved before moving to another page. If you click a different page before saving changes, a dialog asks for confirmation to save or discard any changes before proceeding.
You can save changes to data and metadata and move the record to the save level by selecting one of the available Save buttons at the bottom of the data window.
-
- data entry is complete; there are no outstanding problems (no red or blue fields)
-
- additional work is needed to complete this page
-
- use this option during new data entry to indicate that you have not finished your first pass through the page and want to complete it before it is reviewed by the study coordinating site
-
- this button is only available on records that have been marked 'Missed'. Use it to indicate that you have completed a task, to move the record to the save level, or to save a query that may have been added to the subject ID field.
is the only button available if the page has been marked 'Missed'.
is unavailable if the page has any problem fields.
is available even if the page has no obvious problem fields. This allows you to flag a record as needing subsequent review, regardless of the reason.
is unavailable if the page has advanced beyond new data entry to Incomplete or Final status. Note that pending is available if your permissions include 'Data View - with select'. This permission is typically restricted to study coordinating personnel who may demote problem records to Pending status to exclude them from statistical analyses until the problem is resolved.
Each data record has 4 numeric key fields: Study, Page, Visit and Subject. Together they uniquely identify each data record in the study database. It is critical that these keys are correct. In most instances they are automatically set to the correct values.
If you discover an error in one or more keys, it can be corrected by selecting > and correcting the values in the dialog.
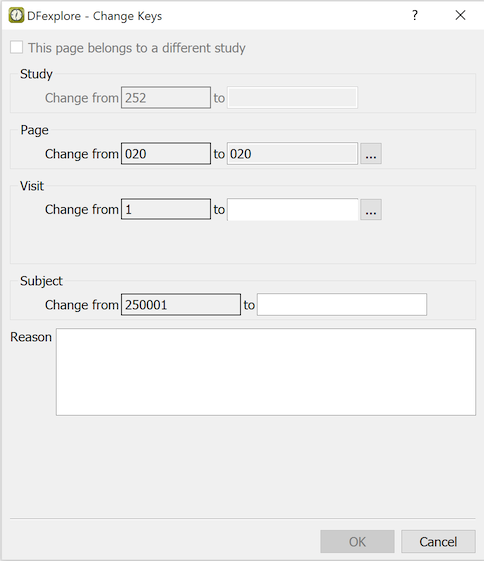
The study number can only be changed if the data record has an image. When the study number is changed all images are sent to the router and the data record is deleted from the current study. It is not possible to move a data record directly to another study even if you have the necessary permissions.
Changing any or all of the other 3 keys (page, visit and subject) moves the data record to another location in the current subject binder, or to another subject binder. All queries, reasons and images move with the data record.
A reason may be specified to explain the change. This is recommended, but is optional.
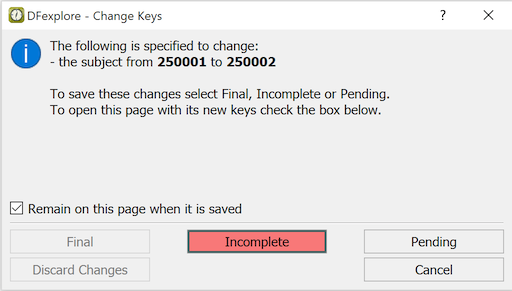
Click to confirm the change. Checks are conducted to confirm that the new plate is compatible with the old one. An additional check is performed to determine if a data record with the new keys already exists in the database. Depending on the result of these two checks, one of the following confirmation dialogs is presented:
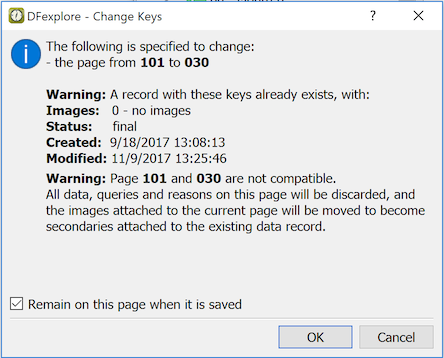
No existing record but pages are not compatible.
If the new page has different data fields from the old one, the existing data, queries and reasons can not be transferred and must be discarded. In this case a warning message is displayed. Click if you do not wish to continue, or choose a save option to proceed with the key change. If you check , the page opens in it's new binder location. This is recommended.
No existing record and pages are compatible.
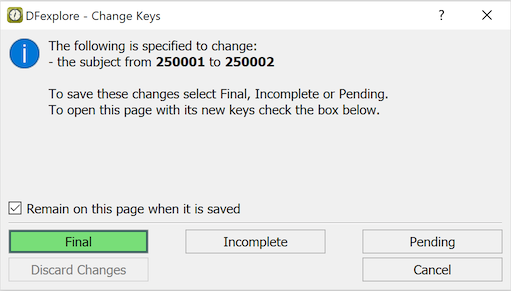
In this example, only the subject ID is being changed. Since the pages are the same they have the same data fields and thus it is possible to transfer the data record to the new keys. Click if you do not wish to continue, or one of the Save options: , or to proceed with the key change.
New keys already exist and pages are compatible.
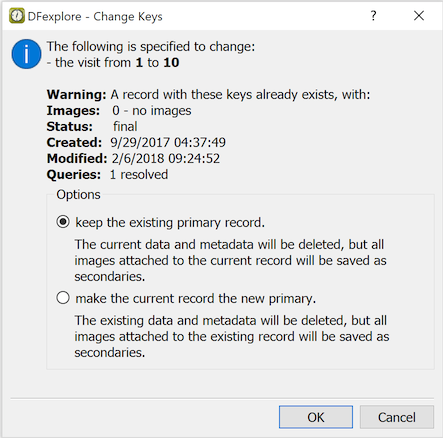
If a data record already exists with the new keys you can either cancel the key change or continue by selecting one of the two conflict resolution options. If you chose to keep the existing primary record it is not changed in any way, and the current data record with all of it's queries and reasons is deleted. The only thing that moves to the new keys is any images from the current page. If you chose to make the current record primary, it is moved with all of it's queries, reasons and images to the new keys, and the existing data record with all of it's queries and reasons is deleted. Images only are preserved from the existing record and they become secondary.
New keys already exist but pages are not compatible.
If a data record already exists with the new keys, and the data fields on the current page differ from those on the existing page, you can either cancel the key change or continue. If you chose to continue, the existing data record is not changed in any way. The data on the current page cannot be moved because the data fields are different on the new page, thus all data, queries and reasons on the current page are discarded. The only thing that moves to the new keys is any images from the current page; and if the existing page already has images, all moved images become secondary.
DFdiscover can receive scanned, faxed or otherwise generated images and link them to data records. An image can be a faxed copy of the original paper case report form, a supporting source document from medical records (i.e. DICOM), or other audio-visual files generated by medical imaging devices. The image or supporting document can be in landscape or portrait orientation.
Each image or supporting document must be linked to one and only one data record. Images such as video files or multi-page documents are displayed with controls that permit playing the file or navigating the document.
Multiple images or documents may be linked to the same data record
(e.g. all faxed copies of the original CRF page as corrected over time).
One image must be designated as the 'primary' copy.
This is the image or document that appears along with the data
record when the screen is split in data and list views. All other
images are designated as 'secondary'.
They are reviewed by selecting
> or
clicking the image counter
( )in Data View.
If one or more images have been linked to the current data record,
two additional buttons appear with the image counter,
 .
Clicking the image button (
.
Clicking the image button (  )
toggles visibility of the primary image.
The behavior varies depending upon the setting for
Image Window : Display method in the
> dialog.
)
toggles visibility of the primary image.
The behavior varies depending upon the setting for
Image Window : Display method in the
> dialog.
The first (left-most) button reports the number of images linked to the current data record. Click this button, or select > , to access the Review Images dialog.

This dialog shows all images linked to the current data record. It shows each Image ID, image Type, Arrival (when the image was received), Status (whether it is the primary or a secondary image), and the Sender (identification of the sender). This dialog is used to:
Review Images. Select any image from the image list to display that image.
Split. The drop-down has 3 choices: No, Top-Bottom and Left-Right. When the window is split, click any 2 images in the image list to display them together. Double-clicking one of the images in the image list switches them between the two display windows.
Specify the Primary Image. When the dialog opens the primary image is tagged with an asterisk ( * ) in the image list. Selecting a secondary image and clicking changes that image to primary and demotes the original primary image to secondary. The asterisk however remains on the original primary image as a reminder of which image was primary when the dialog was opened. Changes in image status do not take effect until is clicked.
Delete Images. Select an image and then click to change Status to 'deleted' (this does not take effect until is clicked). Status can be changed from 'deleted' back to 'primary' or 'secondary' by clicking . Once is clicked this is no longer possible. If there is more than one image, the primary cannot be deleted until all secondary images have been deleted.
Fix Keys. If an image has been linked to the wrong data record you can re-link it to the correct record by clicking and entering the correct subject ID, visit and/or plate numbers. The image is unlinked from the current data record and linked as a secondary image to the data record of the new keys. If necessary, the new record can subsequently be opened to change the image status from secondary to primary.
For documents that are transmitted and received with quality settings higher than black-and-white fax quality (grayscale and color PDFs for example), it is possible to also locally view such documents using HD mode in DFexplore.
The default is to view images at standard definition (SD), which is equivalent to historical black-and-white, 100 dpi fax quality. The central data management office can enable HD images (300 dpi) to be received for a study via DFadmin. Individual users can determine if they wish to view the HD images in DFexplore, if it is available.
To enable the HD setting in DFexplore, toggle the
SD button
 at the the lower-right corner of the the screen in Data View,
which changes to:
at the the lower-right corner of the the screen in Data View,
which changes to:
 .
If there is an HD version of the image available, the screen refreshes with
the HD image. If HD is not enabled at the study level or an HD image was not
transmitted, the SD/HD toggle changes to
.
If there is an HD version of the image available, the screen refreshes with
the HD image. If HD is not enabled at the study level or an HD image was not
transmitted, the SD/HD toggle changes to
 to indicate that
there is no HD version of the image available:
the HD setting is enabled but the SD image is displayed.
to indicate that
there is no HD version of the image available:
the HD setting is enabled but the SD image is displayed.
Like other screen settings, the HD setting is stored locally in your device-specific settings. For example, this allows you to easily work over a slower laptop connection with HD mode disabled. HD mode can be enabled on another device (an office computer perhaps) which has a fast internet connection.
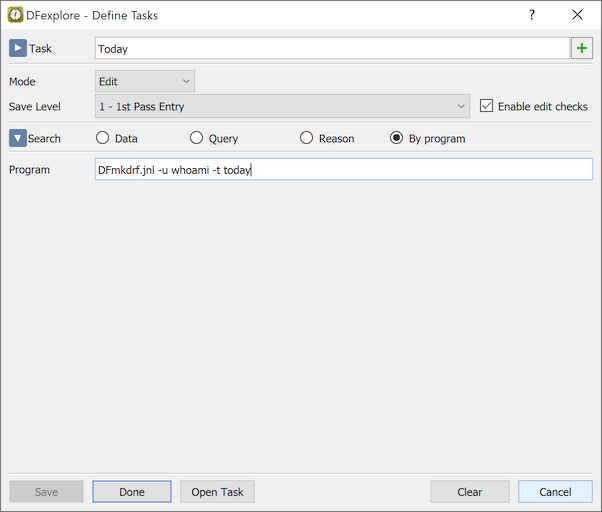
Tasks, which are user instructions and record retrieval specifications, can be defined and assigned to individual users or study roles. Any user with access to Data View can perform tasks. However, 'Data with Select' permission is required to define tasks.
It is also possible to export and import tasks, even from other studies. The export dialog is a standard dialog that simply prompts for a file name using either .dat or .txt file name extensions. The import dialog is an extension of the task definition dialog that allows selection and import of a previously exported task definition as a starting point for the new task definition.
To perform a task, select > . Alternatively, use the Data View Tasks pull-right from Dashboard View.

Only tasks assigned to your login or study role are listed in this dialog.
If available, task instructions can be viewed before starting the task by clicking .
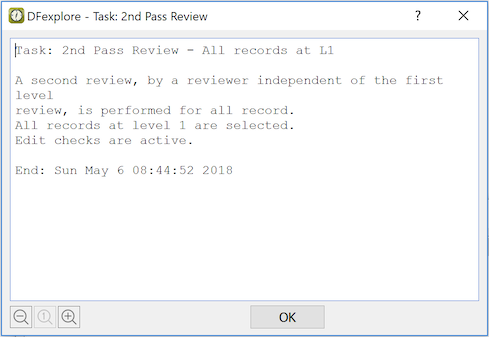
Instructions are specified when the task is created, and can subsequently be modified.
To perform a task, double-click it in the list, or highlight it and click .
After selecting a task, a confirmation dialog with the task instructions (if available) and the number of records matching the task criteria is displayed.
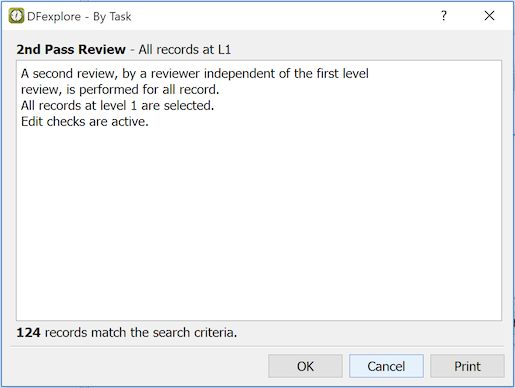
Confirm the retrieval by clicking .
The subsequent task record list includes those records (sites, subjects and visits) with matching task criteria. If your user preference Open first task record when task set is built is enabled, the first task record opens automatically; otherwise a subject binder must be selected to display the task records.
The title shows the current subject ID, the current task record and the number of task records for this subject.
Task records are flagged with a plus symbol
(  )
which changes to a checkmark (
)
which changes to a checkmark (  )
when the record is saved, indicating that the task for that record
has been completed.
The current record counts are displayed at the bottom
of the DFexplore window (
)
when the record is saved, indicating that the task for that record
has been completed.
The current record counts are displayed at the bottom
of the DFexplore window ( 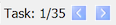 ).
).
Click to open the subject binder and review other records for the current subject. Click the button again to return to Task Records only.
More than one user can work on the same task at the same time. Each user gets a list of pointers to the records currently available for the task, but a subject binder is locked only when it is opened, and only one user can have the binder locked at a time. Other users are able to open the binder in view only mode until the lock is released.
Saving a task record changes the task icon from
to
, but only for
the user who saved the record.
Thus if more than one user is working on the same task at the same time,
it is possible that the task has been completed by one user
before another user opens the subject binder, and that the second user
may wonder why the record has been included in the task set.
A clue that this may have occurred is provided by the value for
Last Save at the bottom of the screen - it
may indicate that the record has
been modified since the user began working on the task.
When you are finished performing a task, select > to dismiss the task set. This removes the icons from task records, and resumes access to all subject binders and data records.
Users with permission can define tasks for themselves and other users using the task definition dialog. This dialog is available by choosing > . Only one user can define tasks at a time, but other users can open this dialog in view only mode.
Task definitions have the following properties:
Task name, Description and Instructions document the meaning and purpose of the task.
User Role and Username identify who is allowed to perform the task.
Owner Role and Username identify who is allowed to modify the task definition. In addition, study administrators have permission to modify all tasks.
Specify a Mode and Save Level to indicate how each record level should be updated. Mark Enable edit checks to indicate that edit checks fire (or not) when the task records are retrieved and traversed.
Save Level is a number (1-7) that is stored as a special field (
DFLEVEL) in each data and metadata record for workflow management. New data entry is typically saved at level 1. Higher levels are used to indicate that some review task has been completed - analogous to moving paper CRFs from one person's inbox to another.The final section is for record selection by record metadata and record properties. It includes data, query or reason criteria, or any standard DFdiscover or custom program that outputs a data retrieval file.
Multiple user and owner roles, and usernames, may be entered using a comma delimited list.
Task ownership specifications are ignored for study users with DFdiscover or study administrator privileges. These special users can view, edit and delete any task including those created by other users.
The task set returned to each user depends on their role permissions, and equals the intersection set created by the task retrieval criteria and the user's permissions. Thus it is not possible to grant extra permissions to a user within a task definition. For example, one task can be defined and used by all of the clinical sites because each site receives only the data records they are allowed to see.
This section includes several example task definitions. These examples illustrate how data, query, reason and program criteria are used to define the records to be selected for different tasks.
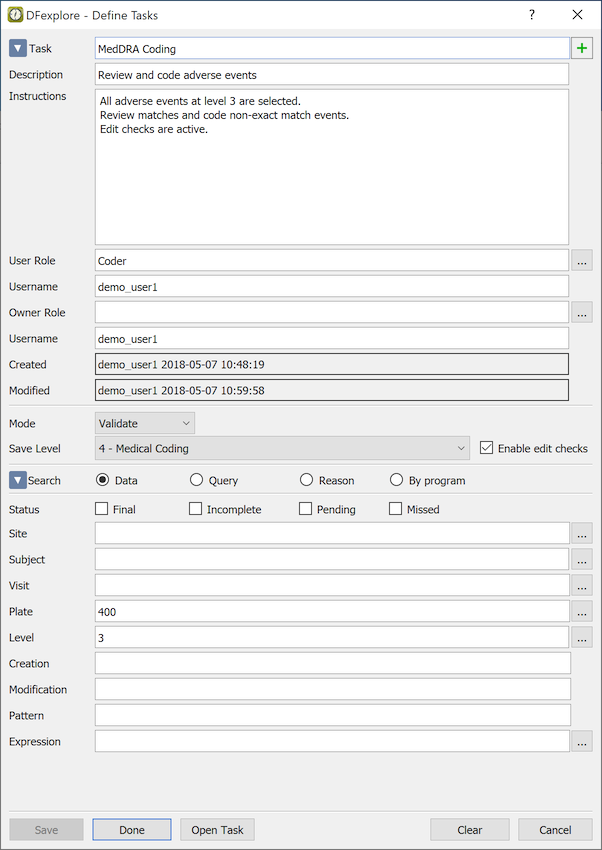
Example 5.1. Review Task for drug coding
This example illustrates a review task for drugs recorded on plate 400 which have reached workflow level 3. The expression builder (not shown here has been used to select records where the 'check if none' data field (MEDNONE) is empty (code 0) because we only need to review pages on which drugs have been recorded.
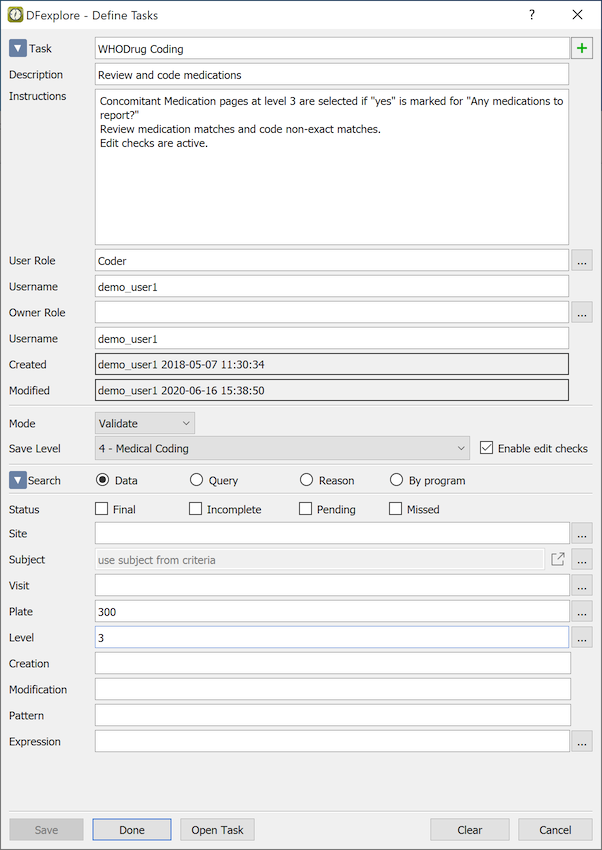
To be selected, records must meet all of the specified criteria. The task is performed in Validate mode with edit checks turned on. Each saved record has its save level raised from 3 to 4.
The expression builder is accessed via next to the Subject field, Selecting Subjects based on Criteria, and implements subject selection based on multiple criteria across multiple plates.
This example illustrates a task for someone who reviews new queries created by data entry staff during new data entry at level 1, to make sure they are clear and appropriate before being sent to the clinical sites in a Query Report.
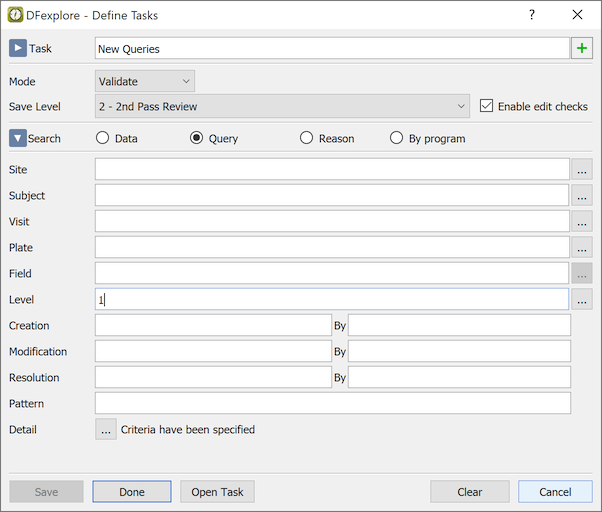
This task should be performed using the > dialog so that queries can be saved on their own, raising them to level 2 without changing the workflow level of the data records.
The additional Query Detail dialog is used to specify the unique query criteria.

Example 5.3. New Reasons Review
New reasons entered to explain data values are set to status Pending with the expectation that they are reviewed and either approved or rejected, along with a query explaining why and requesting a correction or additional information.
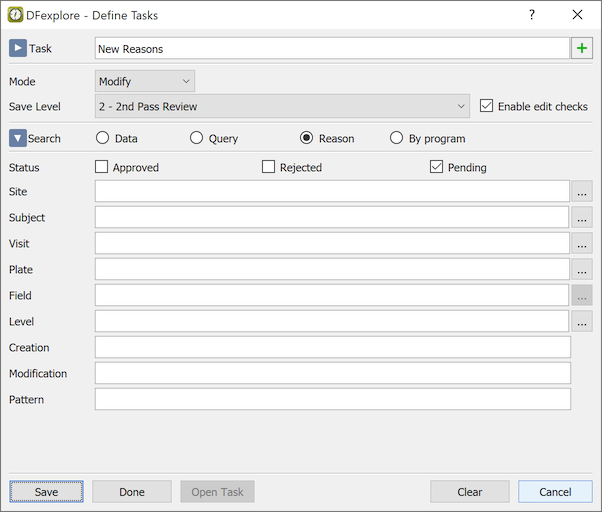
Task records = all data records with reasons that have status Pending. Mode is set to Modify and the sign off level is set to 2. We could also have used Edit mode which would leave the reasons at their current workflow level.
This task could also be performed using the > dialog.
The following examples illustrate how tasks can be defined by running a program that generates a data retrieval file as output.
DFdiscover includes 2 standard programs which are designed for this purpose: which selects records from the study journal files and which selects records identified by edit checks. A few examples are shown here.
A full description of these programs can be found in the Section A.4, “Programs”. If you need to write a custom program, an explanation of data retrieval files can be found in Programmer Guide, Data Retrieval Files (DRF).
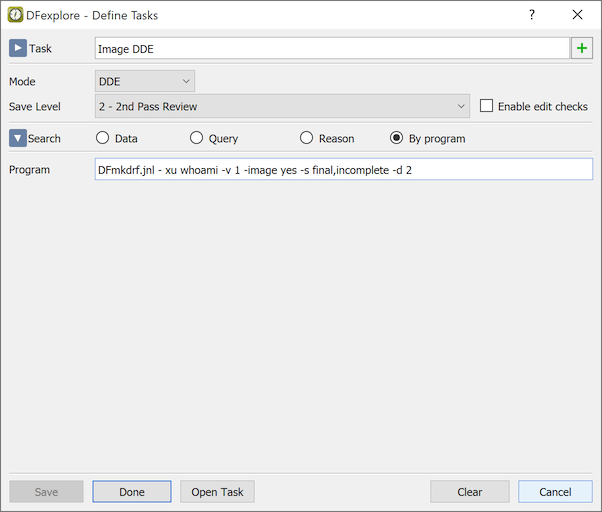
Example 5.4. Image Review with Double Data Entry
In this example, double data entry (i.e. Mode=DDE) is performed on data records
saved by other users (-xu whoami)
with associated images (-image yes),
which were at level 1 (-v 1)
with status final or incomplete (-s final, incomplete) at any time during
the study, and still meet these criteria today (-d 2).
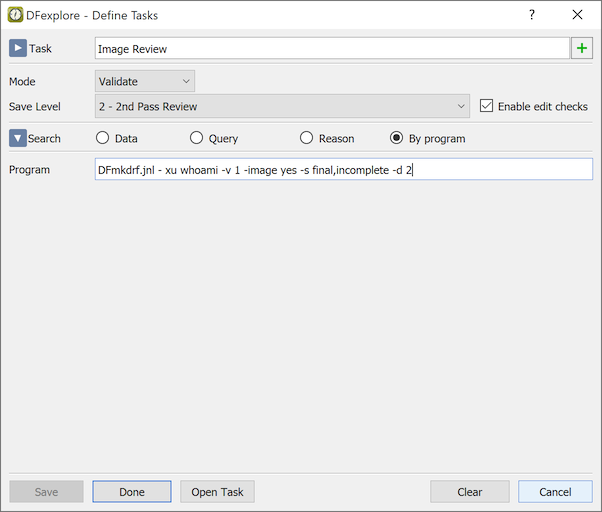
Example 5.5. Image Review without Double Data Entry
Instead of performing double data entry, it may be considered adequate to review level 1 data entry records and move them to level 2. If so, the same retrieval criteria can be used with Validate instead of DDE mode.
Example 5.6. Search for Today's Records
Users sometimes forget exactly what case they were working on earlier in the
day but want to retrieve it so they can check something or make a change.
With no deselection (-d) option specified, records are retrieved even if
subsequently saved today by someone else.
The edit check programming language gives the programmer access to all data fields
for all plates, visits and subjects, and includes functions that can be used to test for
the existence and status of queries and reasons.
Thus it is ideally suited for the definition of tasks that involve complicated
record retrieval criteria. All the programmer needs to do is raise a message
using dfwarning or create a query using dfaddqc
on records that are to be selected, and use function dfbatch if the edit check
is to be executed only when the task is being performed.
Example 5.7. Search by All Edit check Results
This task runs all edit checks (-E ALL) on plate 1 (-P 1) data
records that are currently at level 1 (-v 1). No edit check actions
are applied. Instead records are retrieved if one or more
edit checks would have added a new query, modified an existing query,
displayed a message, or changed a data field.

Example 5.8. Search by Specific Edit check Result
In this example the edit check (-E CheckInit)
is programmed to check subject initials and display a warning message
if they differ from some reference value.
In this task, the edit check is run on all pages used in the study (-P 1-102) and
thus retrieves all records on which this message would be displayed.

Example 5.9. Search by Custom Edit check
The following example shows how an edit check could be used to find unusually large changes in diastolic or systolic blood pressure between visits. It could be programmed to add a query if a suspicious change is found, and to do nothing if a query for this category has already been added to the blood pressure field in question.

In this example
edit check (-E CheckBP) is triggered on page 5 (-P 5) at all
follow-up visits (-S 21-24) which are currently at level 2 (-v 2).
By running this edit check in a task, you can review the blood pressure readings recorded on the submitted CRF pages and verify that any unexpected changes are not the result of data entry errors.
In addition to using predefined tasks to select data records and set workflow modes and levels, users who have Data with Select permission can perform ad hoc retrievals using the same dialogs that are used to define tasks. Working in this way requires an understanding of the study workflow plan and is thus most appropriate for central data management staff. This permission typically is not enabled for clinical sites and thus the features described here may not be available to all users.
DFexplore allows you to work in 5 different modes and to keep track of data reviews and other tasks by moving records from one workflow level to another when a task has been completed.
The default mode, defined when DFexplore starts, is Modify and the default save level is set to your lowest write level (defined in your study roles). Mode, save level, and whether edit checks are enabled, are also set whenever you perform a task or build an ad hoc task set. They can also be changed at any time by selecting > .

The choices for Mode include:
-
View. No changes can be made to data or metadata, and no changes are made to the workflow level.
-
Edit. Changes can be made to data and metadata (as permitted by user permissions). New and modified metadata are saved at the current level of the data record, and the level of the data record itself remains unchanged.
-
Modify. The workflow level is changed to the specified Save Level, only for those data and metadata records that are modified. It is possible for data and metadata records to end up at different levels.
-
Validate. The workflow level of data and all metadata records is changed to the Save Level when a Save button (Final, Incomplete or Pending) is selected, regardless of whether or not any changes were made to data or metadata.
-
DDE. The current data values and metadata are hidden until you exit each data field, at which time the value entered is compared with the current value in the database. If they differ a dialog appears asking you to select the correct value. You must tab through all data fields before the record can be saved. During save, the data record and all metadata records move to the Save Level. > can be used to check the changes made so far and the data fields that remain to be entered on the current data record.
The dialog can be used to change mode, save level, and to enable or disable edit checks. It is available to users who have Data with Select permission.
The current mode and save level are shown to the left of the Save buttons at the bottom of the screen. For example, Save m[1->2] indicates that we are in Modify mode with a sign off level of 2, and that the data record is currently at level 1. Modes are identified by the letter m for Modify, e for Edit, v for Validate, and d for DDE.
When in View mode only the current workflow level is shown, e.g. Save [3], and the message view mode is displayed to the right of the save buttons.
Ad hoc task sets can be created using the same record selection dialogs already described in the section on defining tasks. As with predefined task sets, the records in an ad hoc task set are also flagged with the 'T' and 't' icons. To get started, select > .
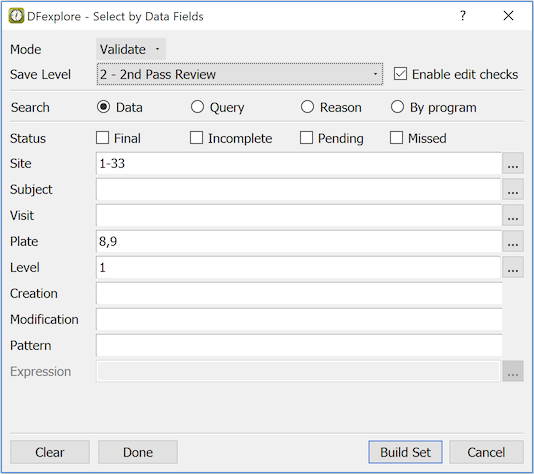
To be selected a record must meet all of the specified criteria. Criteria that are left blank are irrelevant. The search criteria restrict the search to data records, query records or reason records. For example, when searching for records at level 1 you will obtain different results depending on whether you are searching for level 1 in data, query or reason records.
In this example, Plates 8 and 9 that are at workflow Level 1 with status Final are selected for all subjects at Sites 1 to 33. The selected records are to be reviewed in Validate mode with a save level of 2. Thus, whether or not a record is modified, it is raised to level 2 if it is saved using one of the Save buttons.
If you click , the dialog remains open and you are able to add more records to the ad hoc task set by specifying a new set of criteria and again clicking .
Click when you are finished building your task set and you are ready to review the records.
In addition to the record selection criteria, the dialog requires specification of the Mode and Save Level. These settings apply to both data and metadata records.
It is important to remember that modes do not grant any permission that you do not already have. Permission to view and modify data and metadata are controlled by study roles defined and assigned to users by the study management team. Thus, you are only able to select records you are allowed to see, and regardless of the mode you select, you are only able to modify data and metadata for which you have modify permission.
When you click a confirmation dialog indicates the number of records in the database that match the selection criteria. Click to proceed or to abort the selection.
If you proceed, the record list is reduced to show only those sites, subjects and visits that contain records in the ad hoc task set, and each of these records is flagged with the task icon. Just as with predefined tasks, the not completed task icon (plus symbol) changes to the completed task icon (checkmark) when a task record is saved. This shows that the record has been reviewed but does not necessarily mean that the task has been completed as intended. If the record still meets the selection criteria for the task it will come up again the next time the task is performed. All other sites, subjects, visits and records are hidden.
To toggle the current subject between task records and all records, click at the bottom of the task records list. The entire record list containing all sites and subjects can also be toggled using the menu items > and > .
This option can be used to retrieve data records listed in a Data Retrieval File (DRF).
These files all have a .drf extension. They can be loaded from either
the study drf folder or your local computer.
DRFs can be created by standard DFdiscover reports,
by saving a current task set using > ,
by using or
(described in Section A.4, “Programs”) or with a custom program (described in
Task Definition by Program).
To retrieve records listed in a DRF, select > .

The DRF in this example is named VDillegal.drf.
This is a standard DFdiscover DRF which lists illegal visit dates detected
by DFdiscover report DF_XXkeys.
Validate mode is specified which means that the workflow level of existing data and metadata records are changed to 2. The file is selected from the study server, as this is a standard DRF. If the DRF contains a descriptive header it is displayed in this dialog when the file is selected. If each record in the DRF includes a description (e.g. explaining why it was included) it is displayed in DFexplore's message window when a record is selected in the record list. The message is optional and may not be present in all cases.
The Batch Validate feature is used to move all matching data records to a specified workflow level in one step. You require permission for Data with Select to use this feature. Data records may only be batch validated if they meet all of the following criteria:
You are able to retrieve the records. Records that you do not have permission to get, or which are currently locked by another user, cannot be batch validated.
Record status is final, incomplete, pending or missed. New records cannot be batch validated.
The records are currently at levels for which you have modify permission.
You can only move records to levels for which you have write permission.
There are 3 batch validate selection options: move the current page only, move all open pages for the current subject, and move all records in the current task set.
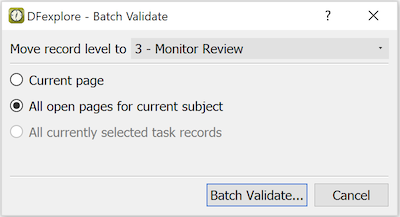
In this example all open pages for the current subject are moved to workflow level 3 when is clicked. The open pages could include visits opened by selecting them in the record list (using > ) or as the result of a predefined or ad hoc task.
After clicking , a confirmation dialog requesting your username and password is presented. This batch action requires your username and password for the first use, and for subsequent uses your password only. The specified records are moved immediately. No edit checks are triggered.
Some tasks require selecting an item from a predefined lookup table. This functionality is implemented in DFexplore using an edit check to achieve the desired behavior. For example, the edit check might be programmed to provide the lookup table to only specified users, users with specified roles, or users performing a specified task; and the lookup table might always appear on entry to some data field or only when an exact match can not be found automatically.
Regardless of how the edit check is programmed, if a lookup table appears while performing data entry, you are able to search the lookup table and select one of its entries (rows), or click to select none of them.
This example shows a lookup table which has been created for MedDRA coding. The division of each row into fields, the field labels, the order in which they appear, which fields are shown in the dialog, and which fields are returned to the edit check when a row is selected, are all customizable by the edit check programmer.

The top section of the dialog shows the field labels and the field values in the currently selected row. The bottom section is a scrolling list of all rows in the lookup table, typically with abbreviated field labels (acronyms) at the top of each column. If all fields can not be seen, click to reduce the display size of each column to fit them all within the current dialog. The size of each column can be adjusted by right-clicking the vertical line separating the field labels and dragging it left or right.
To search for one or more terms enter them in Search Terms,
check the option to find entries that contain ANY, ALL,
or ONLY the terms,
check the fields to be searched, and click or
. displays the
next matching row, while reduces the table to display all matching rows.
After reducing the rows to a filtered set you can enter new search terms and search or filter again within the current rows. Click to display all rows in the lookup table.
When you have found the correct row either double-click it, or highlight it and click . This returns your selection to the edit check and dismisses the lookup table. What happens next depends on what the edit check is programmed to do. Typically all or some of the fields from the row you selected are entered into specified data fields on the current page, but the edit check may be programmed to do something else.
Queries can be created, modified and deleted by edit checks with no user intervention, or manually by selecting , or from the menu. You can also directly add or modify a query in the Metadata editor panel or from the specific Query panel.

The query dialog has the following components:
-
Title. The title at the top of the dialog shows the context needed to identify which site, subject, visit and page the query is about.
-
Field. The field description, as entered in the study setup, identifies the data field in question.
-
Reported Value. When a new query is created, this field shows the value currently recorded in the data window, but you can change this. For example, if a date is unclear you might enter a best guess in the data window but change the query to indicate that the year was unclear (e.g. Jan ??,2017).
-
Category. The category type can be one of the following default categories: missing, illegal, inconsistent, illegible, fax noise, and other. It may also be any user-defined category. The category cannot be edited after the query is created. Although multiple queries are allowed on a single field, at most one query of each category is permitted per field.
-
Use. Use can be
external, meaning the query is directed to the clinical site; orinternal, indicating it is for the data management site only. -
Status. The status of each query is updated as appropriate to one of the following:
-
New. The query addresses a new question which has not yet been transmitted to the clinical site.
-
Revised. The query addresses a revised question which has not yet been transmitted to the clinical site.
-
Outstanding. The query has been transmitted to the clinical site but has not yet been resolved.
-
Pending. The site has responded to the query but the reply has not yet been reviewed by the data management site.
-
Resolved NA. The query has been resolved - the requested data or correction is Not Available.
-
Resolved irrelevant. The query has been resolved - the query was deemed to have been unnecessary.
-
Resolved corrected. The query has been resolved - the requested correction or information has been received.
-
-
Type. Type is
Correctionif the query asks for some data correction, orClarificationif the query requests additional information. -
Detail. A description of the issue and the requested resolution can be entered manually or, if standard queries have been predefined, they can be selected by typing a short acronym or using to select the query from a lookup table.
-
Note. An internal note, used only by data management staff, can be entered for any internal purpose, such as recording special circumstances explaining why or how a query was resolved.
-
Timestamps. The creation timestamp is updated when a query is saved with status
New. The modification timestamp is generated when a query is saved after modification of any of the fields described above. The resolution time stamp is updated when Status is changed to one of the 3 resolution types.
Clicking saves the query locally. It is applied to the study database when the data record is saved.
Some data queries resolve automatically when the data field is corrected while others do not. For auto resolution to occur all of the following conditions must be met.
Query Use = 'External'
Query Type = 'Correction'
Query Category = 'Missing' or 'Illegal'
The data field does not have a Reason with status 'Rejected'
If all of the above criteria are met then:
if the study setup includes a legal value specification for the data field, then entry of one of the specified legal values resolves the query
-
if legal values have not been specified for the data field, then entry of any value resolves a query with category 'Missing' but not a query with category 'Illegal'.
In addition to the above auto resolution rules, edit check programmers can
resolve queries when certain conditions are met using the edit check function
dfeditqc. In this case there are no restrictions on the type of queries
that can be resolved, other than those imposed by the edit check programmer.
Central office review and approval of reasons and query replies can be performed using > or > .
The dialog looks the same for these two options, but they differ in behavior. The Review dialog lists all queries and reasons on the current page, while the Approve dialog lists only those queries and reasons with status 'Pending'. When a query or reason is changed from status pending to approved or rejected, it is removed from the Approve dialog but remains visible in the Review dialog.
To use this feature, begin by retrieving the records to be reviewed, and if necessary set the working mode and level per study workflow SOPs. Using these dialogs in 'Validate' mode is generally the best choice as it allows you to save the data records and also move them to the same level. Select the Review or Approve dialog and position it beside the data window. As you traverse the data records, all relevant queries and reasons on the current record appear in the dialog. As you select each query and reason in the dialog the relevant data field is highlighted in the data window making it easy to see the relevant item.
The Review/Approve dialogs are generally used to review and approve
new reasons and query replies, but as needed you can also modify or even delete queries
and reasons if your permissions allow. Note: There is one limitation.
Changes cannot be made to queries and reasons on Pending, level 0 data records
as this status indicates that the most recent user was interrupted during the entry of a new record
and intends to complete it before it is reviewed by study managers.
The two buttons below Query Status and Reason Status (each has this appearance
 )
can be used to save your
changes to the current query or reason before moving on to the next one,
or you can delay saving changes until all queries and reasons on the current
data record have been reviewed, in which case an asterisk appears beside
each query and reason with unsaved changes. Click
to save both the reason and query on the current
field.
Click
to dismiss the dialog without saving any changes.
)
can be used to save your
changes to the current query or reason before moving on to the next one,
or you can delay saving changes until all queries and reasons on the current
data record have been reviewed, in which case an asterisk appears beside
each query and reason with unsaved changes. Click
to save both the reason and query on the current
field.
Click
to dismiss the dialog without saving any changes.
If you change the status of a query in these dialogs to 'New' or 'Revised', or you 'Reject' a pending reason, the data field turns blue, and when the query and reason changes are saved the status of the data record changes to 'Incomplete' (if needed) to signify that it contains one or more outstanding problems. On the other hand, approving all of the query and reason replies on a data record does not automatically make it 'Final' but does enable the 'Final' save button, which can be selected if you want to change the data record to status 'Final'.
The Review/Approve dialog allows you to perform workflow management on the metadata independently of the data records. When you have completed your review of the metadata on one page, you can proceed to the next page in the task set. You do not need to save the data record itself, unless you have made changes to data fields that you want to keep or you want to change the data record status and/or level. The workflow level is changed on data and metadata records that you save.
As an alternative to faxing, CRFs can be scanned to a PDF file, and then transmitted to a DFdiscover server. This capability is available via the standalone DFsend application and also within DFexplore using > .
When the server receives the PDF it is processed just like an incoming fax; the pages are reviewed and entered by a user with permission to use Image View, and the pages are inserted into the database and appear in the subject binder.
CRFs can be scanned in black & white, grayscale, or color and saved as a PDF file. There is a limit of 999 pages that can be included in one PDF document.
Start DFexplore and login to the destination DFdiscover server. Since a PDF is processed just like an incoming fax, it doesn't matter which study you are using when you transmit a PDF. The PDF can even contain CRF pages for multiple studies, as long as all pages in the PDF file are for studies that reside on that same DFdiscover server.
If you use different DFdiscover servers for different studies, make sure you select, and login to, the correct server. Transmitting a PDF to the wrong DFdiscover server would be the same as sending a fax to the wrong fax number.
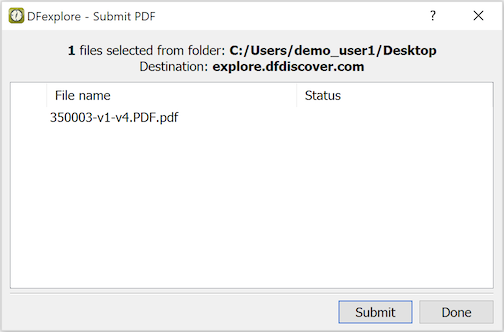
Select > in Data View.
This displays the operating system file selection dialog. Use it to select the PDF file(s) to transmit.
The confirmation dialog identifies the DFdiscover server and each PDF file you selected for transmission. After confirming that these are correct, click to start the transmission.
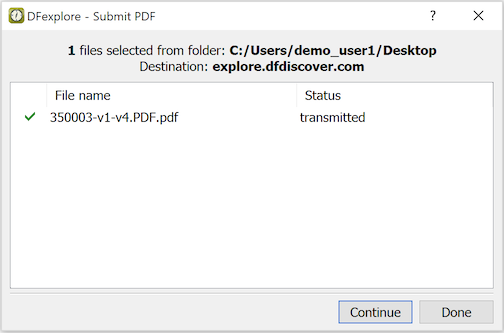
A progress bar is updated while each PDF transmission is underway. Pressing cancels transmission of any remaining PDFs but does not stop the current transmission.
When the transmissions are complete, the dialog shows the status of each PDF: 'transmitted', 'failed' or 'canceled'. Click to select additional PDFs for transmission. dismisses the dialog.
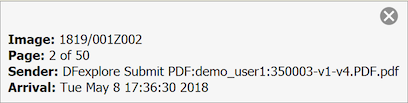
PDFs transmitted to the server from DFexplore are registered in the DFdiscover document log. Each transmitted file is also added to the DFdiscover document archive.
Select > to view the date and time the page was centrally received along with the submission method and user.
To use this feature your study role must include permission for 'DFexplore: Data-Submit PDF'.
This feature is blocked if a study has been 'disabled' or put into 'read-only' mode by a study administrator. If a study is in 'restricted' mode, PDFs can be submitted by study and DFdiscover administrators only.
Transmitting Scanned CRFs sends one or more PDFs to the DFdiscover server for processing in Image View. It is yet another method for adding new CRFs to a study for data entry.
In some cases however, CRFs are not meant for separate data entry. Instead these CRFs may belong to already existing data records. This functionality is available via > for users that have permission to 'Import Subject CRFs'. With this feature, a PDF file is imported and each page can be immediately attached to an appropriate data record.
The imported pages may be supporting documentation e.g. letters, reports, test certificates, etc. or copies of paper CRFs or worksheets containing subject data.
Select > in Data View. From the file selection dialog, select a PDF for import.
The import dialog contains two main sections: a window for reviewing the PDF pages on the right, and a spreadsheet for identifying the data records they belong to on the left.

This feature has 3 modes of operation, chosen from the Select task drop-down:
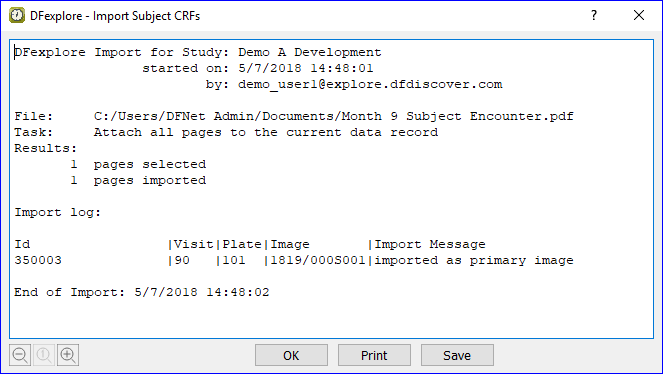
Attach all pages to the current data record. To use this option, the destination data record must be opened before is selected. When the import dialog opens the keys identifying the current data record are displayed in the spreadsheet and cannot be changed. Simply select the check box beside each page you want to import, or click to select all pages. Click . A dialog appears asking you to re-enter your password (you can still at this point). If you proceed and enter your password, the selected pages are imported. A results dialog appears, displaying a summary of the transaction including a list of the pages that were imported. If the current data record had one or more images before import, all imported pages become secondary images, otherwise the first imported page becomes the primary image and the rest become secondary. The imported images can be reviewed and the primary/secondary classification can be changed using the Review Images dialog, which is selected by clicking the image count button at the bottom of the screen or by selecting > .
Attach each page to the data record identified below. Use this option if the PDF contains pages that belong to a number of different data records. To use this option you must be able to identify the data record that is to receive each page by entering its keys (Subject, Plate/Page and Visit) in the spreadsheet. If any of the imported pages are barcoded to identify where they belong in the subject binders, values for Plate/Page and Visit are read from the barcodes; otherwise enter the appropriate numeric value in the spreadsheet, or right-click a cell to use the selection dialog. Enter the Plate/Page number first. The Visit selection list then shows only those values that are consistent with that plate, per the study visit map. To prevent errors DFexplore does not allow pages to be imported if they are barcoded with a different study number. Also, users can only import pages for data records that their study permissions allow them to modify. If a key field contains a value that is illegal or not permitted, the cell appears purple and the page selection check box is not available until the problem keys are corrected. If a page contains a barcode for a different study or the identified record is at a workflow level you cannot modify, a red X replaces the page selection check box indicating that the page cannot be imported. After entering valid keys a check box appears which when checked indicates that the subject binder can be locked and that the page has been selected for import. If the page cannot be imported because the subject binder is locked by another user a lock icon replaces the check box and the message This record is currently locked by another user is displayed. When the pages you want to import have been identified and checked click and enter your password. Each page is attached to the specified data record as a primary or secondary image, as described for the previous option. The assignment is displayed in the results dialog.
If a page is imported for a data record that does not currently exist in the study database, a pending data record is created and added to the subject binder.
-
Import data entry worksheets/CRFs identified below. Use this option if you want to import worksheets or CRFs on which data has been recorded and then use DFdiscover's split-screen data/image feature to enter the data into the corresponding data records. This option begins like the previous one: the pages to be imported are identified and selected, the import button is clicked and you are prompted to enter your password, after which the selected pages are imported and the results dialog appears. It differs from the previous option as follows:
Only one page can be imported for each data record. If the same keys are entered in the spreadsheet for a second page, the selection check box becomes unavailable for that page.
Each imported page becomes the primary image for its data record. The previous primary image (if any) becomes secondary.
DFexplore builds a task set of all imported pages, and displays the first task record when you close the results dialog. If any of the imported pages did not have a matching data record before import, a data record with pending status is created and added to the task set.
The user performs data entry by comparing the data fields with the values recorded on the imported CRF or worksheet, and entering or correcting the data fields as needed.
All imported pages should be processed before releasing the task set, but if this is not possible they can be saved using > . They can then be retrieved and completed another time using > .
The following keyboard shortcuts may be useful in the import process:
Tab or Right arrow moves forward across the cells in each row.
Shift-Tab or Left arrow moves backward across the cells in each row.
Pressing Enter on a Subject cell, or completed Plate or Visit cell, moves down to the next cell in the column, as does Down arrow.
Shift-Enter on a Subject cell, or completed Plate or Visit cell, moves up to the next cell in the column, as does Up arrow.
If you know the numeric value it can be typed into an empty cell or you can over-type to change a completed cell. Plate and visit labels are displayed after the numeric value is entered in these cells.
If you don't know the numeric value for plate or visit a selection dialog showing the legal values and corresponding labels can be launched using right-click, Control-S or by hitting Enter when the cell is empty.
Within the selection dialogs use the Up and Down arrow keys to find the desired value and then hit Enter to select it and close the dialog.
Plate must be entered before Visit; only visit numbers that are legal for the specified plate are displayed in the visit selection dialog.
To enter the same value in a range of cells in any column, first select the cells (click the first cell then shift-click the last cell) and then enter the value by typing or using the selection dialog.
To copy and paste the values from one range of cells to another, first select the cells as described above, then use Control-C (or right-click-Copy) to copy the values, then click the first cell in the destination range; finally, use Control-V (or right-click-Paste) to paste the values.
While working within a selected range of cells, the Delete (Backspace) key removes the current value from all of the selected cells.
When all keys have been completed with valid values, the space bar can be used to toggle the import selection check box on and off.
A subject package is a user-specified selection of data records, CRF images, metadata and change history assembled into a PDF. The PDF is viewable with a PDF viewer application, such as Acrobat Reader.
DFexplore includes a feature to create one or more subject packages, for a specific subject ID, set of IDs, or entire sites.
To start the creation of subject packages, select > . The Create Subject Packages dialog is displayed. [6]

The dialog has several configuration sections:
Subject Selection. Which subjects, or sites, are included? For each included subject, a unique PDF is created.
Selection Criteria. Are only certain visits or plates to be included? By default, all visits and plates appearing in the database for the selected subjects are included. This can be useful for example to create packages containing only the enrollment visit or adverse event CRFs.
Resources. The appearance of the contents in each package is impacted by the settings in several resource files. In most cases, the already defined study resources yield the desired results. A custom title, page header and page footer, and details for fields to be blinded in the output are also specified here. Details for the syntax of the Blind fields setting can be found in Programmer Guide, DFpdf.
PDF Options. In combination with the subject selection criteria, these options determine which data from each subject binder to include in the output. Typical settings include Data records and Images. Metadata (including change history) and secondary images can also be included. Note that including change history and secondary images can result in PDF documents that are very large.
PDF Output. One PDF document is created for each included subject. In this section specify the folder location where each of the PDFs should be created and what prefix should be used for each generated document. The subject ID is appended to the file prefix. The complete document name for each PDF is the concatenation of the values for Output folder and File prefix, which is then followed by the current subject ID. A fixed extension of
.pdfis added to complete the document name.
Complete all of the relevant settings in the dialog. Depending upon the number of subjects or sites selected, and the volume of data, the package creation step can be quite lengthy. Review that all of the settings are correct and as intended. Click . Review the settings summary in the confirmation dialog. Click .
While the package creation process is running, a progress bar is displayed. At completion, a summary dialog is displayed. Review the referenced log file (if more detail is needed) by clicking . Click to dismiss the dialog.
The resulting PDFs are available in the folder previously specified for Output folder. Each PDF is viewable with a PDF viewer application, such as Acrobat Reader. If a Password is specified, resulting PDFs are encrypted and stored in binary format. The recipient needs the password to open each PDF. The summary log file is also in the same folder. It if is not needed, it can be deleted.
This section describes the options available from the application menubar. The specific menus displayed, and the availability of options under each menu, varies depending on user permissions and whether an action is allowed at any given time.
The menu is similar for all views (data, list, queries and reasons) and contains the following items:
-
- users with DFexplore Developer permission can use this option to:
reload lookup tables,
reload edit checks, and
trace edit check execution
These functions make it possible to modify edit check code, republish it and then reload the edit checks to test the modifications and trace edit check execution as you enter and exit records and fields. In order to avoid disrupting production edit checks in use by other users, we recommend using Link Development-Production studies for testing the changes to edit checks before publishing them.
-
- functions the same as DFsend. A CRF with a legible barcode is sent to the image queue of its study. CRFs with illegible barcodes are sent to the Image Router.
-
- create a DRF listing the keys of all records in the current task set. This allows reloading of this same set some time later using > .
-
- create a PDF file containing data and/or images from the current subject binder or task set. Use this option to: print blank CRFs, print documents and data records side by side, or include data records with the same field color coding used in DFexplore.
If a watermark exists for your login role, it appears in the PDF file created by this menu item. Blank CRFs are not watermarked.
-
- create a PDF file containing data and/or images from the current subject binder or task set. This option includes many of the same options as the command line program DFpdf and includes a navigation sidebar indexed by subject ID, visit and plate. Use this option to produce a PDF containing any combination of CRF images and data records with the same color coding used in DFexplore, to blind specified data fields (e.g. for endpoint adjudication committees), and to password protect the PDF file.
Enter field blinding specifications as follows:
plate#s:field#s;plate#s:field#s, and use '*' for all plates and/or all fields. For example:*:8(blind field 8 on all plates),1-5:8;9:22-25,33(blind field 8 on plates 1-5 and fields 22-25 and 33 on plate 9.If a watermark exists for your login role, it appears in the PDF file created by this action.
-
- create a PDF file containing the data record keys, set creation method, set instructions, user name and date for the current task set.
-
- print blank CRF books with subject ID and visit numbers pre-printed, or pages (containing data and/or images) from the current subject binder or task set.
If a watermark exists for your login role, it appears in the printed CRFs created by this action.
-
- print the data record keys, set creation method, set instructions, user name and date for the current task set.
-
- create bookmarked PDF documents containing EDC data records, fax or other image records and audit records for study subjects; one file per subject.
-
- create ODM compliant XML files containing study data.
-
- set user preferences. Changes are applied immediately and persist across login sessions.
-
- change your contact information and/or login password.
-
- display the login/study selection dialog so that an additional login session can be started. The current study login session is not impacted.
This can be useful if you want to compare data in 2 different studies, compare information presented in different views (e.g. list and data views) within the same study, or compare behavior for 2 login sessions with different study roles during study setup.
-
- close the connection to the current study and return to the study selection window, where a different study or different server may be selected.
When a field in the data entry window has the focus the following menu items are available:
-
- undo the last edit operation performed.
-
- redo the last edit operation performed.
-
- copy the contents of the current field to the system clipboard, then clear the field.
-
- copy the contents of the current field to the system clipboard.
-
- copy data from the system clipboard to the current field at the current cursor location.
-
- remove all data from the current field.
-
- select all data in the current field.
The menu is used to select subjects and data records for review. Selected subjects and records are tagged in the record list panel with the letter t (for task).
-
- cancel the current selection criteria and return to the default display showing all subject binders and records.
-
- select data records using a predefined task.
-
- select data records by: site, subject, visit, plate, level, status, etc. as well as by metadata (queries and reasons). This option requires permission for Data - with Select.
-
- select data records using a previously defined data retrieval file.
-
- define individual tasks or tasks for other users.
-
- export previously defined data tasks to a local file.
-
- import data tasks from a local file.
-
- DFexplore supports 4 working modes and allows records to be moved to specified workflow levels. The supported modes include:
-
- users review subject data but can not make any changes.
-
- changes can be made (as permitted by user permissions) but the workflow level of all data and metadata remains unchanged.
-
- the workflow level is changed to the specified sign off level, but only for those data and metadata records that are modified.
-
- the workflow level of data and metadata records is changed to the specified save level when you select one of the Save buttons, regardless of whether or not any changes were made to data or metadata.
-
-
- change the workflow level of a set of records.
-
- e-sign all records for the current subject or a set of selected records eligible for signing and move to a specified workflow level.
The menu determines which subjects and data records are listed in the study binder window. The menu items act as filters. The following choices are available:
-
- show all data records, independent of whether they are included in the current task set.
-
- show only data records that have been assembled in a predefined or ad hoc task using the Select menu options.
-
- show all subject binders.
-
- show only empty subject binders (for which no data has been entered).
-
- show only subject binders that contain data.
-
- show only subject binders with complete data for all visits completed to date.
-
- show only subject binders containing pages marked Incomplete or Pending.
The menu includes the following options:
-
- add a new subject binder to the current site for a specified subject ID. Only subject IDs which have been predefined as belonging to the current site, are accepted.
-
- open all visits in the current subject binder.
-
- close all visits in the current subject binder.
-
- import PDF documents containing CRF pages directly from the local computer.
When a visit is selected in a subject binder, the following options are available:
-
- add visits which do not already appear in the subject binder.
-
- if an entire subject visit is unavailable (e.g. because the subject missed the visit) this option can be used to mark it missed.
If a missed visit report page has not been created for the study a default dialog appears. In this dialog, choose a reason from the choice list. Additional text can be entered to explain why the visit has not been completed. All required pages in the visit are then marked 'Missed', data entry is blocked on all of these pages, and the reason is displayed in the reason window whenever one of these pages is selected.
If an overdue visit query exists it is removed when the visit is marked missed.
-
- undo the previous option if the default dialog was used. If a special missed visit report page has been completed it remains in the study database, just like any other study record, unless it is deleted.
The menu provides the following options for the current page:
-
- offer the same 3 options provided by the save buttons at the bottom of the window: Final, Incomplete and Pending.
-
- undo all unsaved changes that have been made to the current page.
-
- display all images (primary plus all secondaries) and allow user to: select which image to call primary, delete secondary images, and correct keys on secondary images.
-
- correct any errors in the key fields that might have occurred when a page was saved, including corrections to the study number, subject ID, visit number and plate number.
-
- delete a data record. All of the data, queries, reasons and images associated with the record are deleted from the database. Deleting a record is a drastic, and unusual measure. Confirmation is required, and a reason must be entered to explain why the record is being deleted. Once a reason for deletion is applied, you are required to enter your password to confirm and complete the delete process. The delete action, the reason and your user name appear in the audit trail report created by DF_ATmods. Permission to use this option is typically tightly controlled.
-
- if a page is unavailable, and may never be available, this option can be used to mark it missed. Choose one of the standard reasons, or 'other'; additional details explaining why the page was missed can be entered in this dialog.
A page that is marked missed cannot contain data. Thus pages that have already been saved cannot be marked missed unless the data record is first deleted. Also if data has been entered into data fields on a new record before it is marked missed, the data fields are cleared when marking it 'Missed' is confirmed. After a page is marked missed all data fields become inactive to prevent data entry.
If a missing page query exists it is removed when the page is marked missed.
Study managers may add a query to the subject ID of missed records to request additional information from the clinical site.
-
- this undoes the previous option, removes any data query that might have been added to the subject ID field, and enables data entry.
-
- display the date and time the page arrived (if one exists), and the source of the page.
-
- display key properties of all fields defined on the current page, including: name, description, style, need, type, format and legal values.
-
- lists each field with a problem on the current page including: required fields that are blank, illegal values, outstanding queries and rejected reasons.
-
report all changes made to data fields on the current page. For moderate to large databases, this action can take a considerable amount of time to run.
The output is a tabular listing. The listing can be filtered to include/exclude rows showing changes made to data, queries or reasons. The columns included in the listing can be adjusted by clicking and including/excluding columns. The output can be saved to Excel.
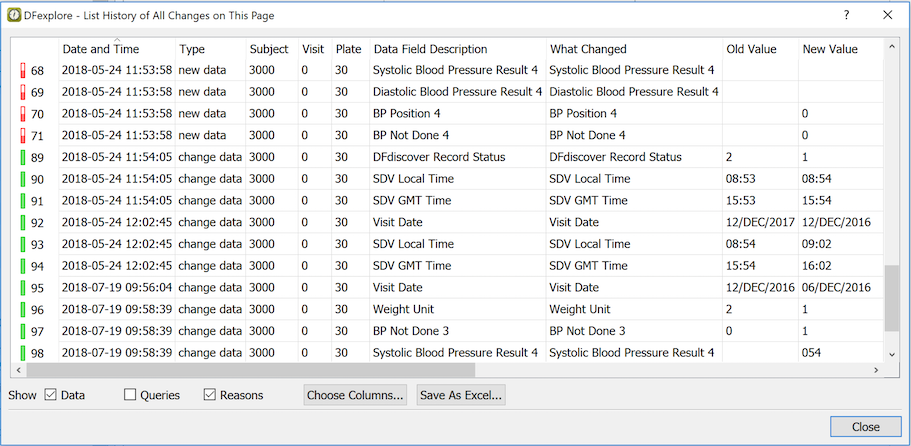
Further options for viewing the history of changes are available via the DF_ATmods report and the
-historyoption of the DFexport command. -
- during Double Data Entry, lists the fields that have not yet been entered, and the fields that have been changed from their previous value.
-
- displays a file selection dialog to select PDF, DICOM (dcm, dic, dicom), image (png, jpg, jpeg, bmp), and AV (mp3,wav,avi,mp4) file types, and attach the selected file to the current record as a supporting document. Documents can be reviewed later with the review images dialog. Attached files can each be up to 25MB in size.
The menu provides field-level functions. Access to these functions depends upon the state of the current field and the permissions you have been granted by the study sponsor. The functions include:
-
- assign a predefined missing value code to the current field, or remove the missing value code previously assigned. Missing values may also be accessed using the metadata panel. After applying a missing value code, the keyboard shortcut Control+M can be used to apply the same missing value code to other data fields.
-
- return the current data field to the state it was in when the page was opened; this includes the data value itself as well as the presence/values of any field metadata.
-
- explain the current data value with a new reason. The reason dialog can also be accessed through the metadata panel. If there are outstanding (not yet resolved) queries on the data value, which were previously defined with the auto-resolve attribute enabled, adding a reason to the data value also resolves each such query.
-
- update the reason of the current data value. The reason dialog can also be accessed through the metadata panel.
-
- delete the reason on the current data field (note: permission to use this option is typically tightly controlled).
-
- reply to an unresolved query on the current field. The reply dialog can also be accessed through the metadata panel. Some queries can be resolved by correcting the data field and do not require a direct reply. If the study coordinating site wants a direct reply to the query, the phrase (reply required) appears at the top of the Query metadata window. Can also be performed by clicking
.
-
- add a new query to the current data field. This function is also available via the metadata panel. Can also be performed by clicking
.
-
- modify a query on the current data field. If more than one query is present on the field, use the arrows in the Query window to select the correct query for editing. Can also be performed by clicking
 .
. -
- delete a query from the current data field. If more than one query is present on the field, use the arrows in the Query window to select the correct query for deletion. Can also be performed by clicking
 .
. -
- approve or reject pending reasons and query replies, on the current page.
-
- review all reasons and queries (resolved and unresolved) on the current page.
-
- list all data definition properties of the current data field, including: name, description, style, need, type, format, legal values, edit checks, etc.
-
- report all changes made to the current data field. For moderate to large databases, this action can take a considerable amount of time to run.
The output is a tabular listing. The listing can be filtered to include/exclude rows showing changes made to data, queries or reasons. The columns included in the listing can be adjusted by clicking and including/excluding columns. The output can be saved to Excel.
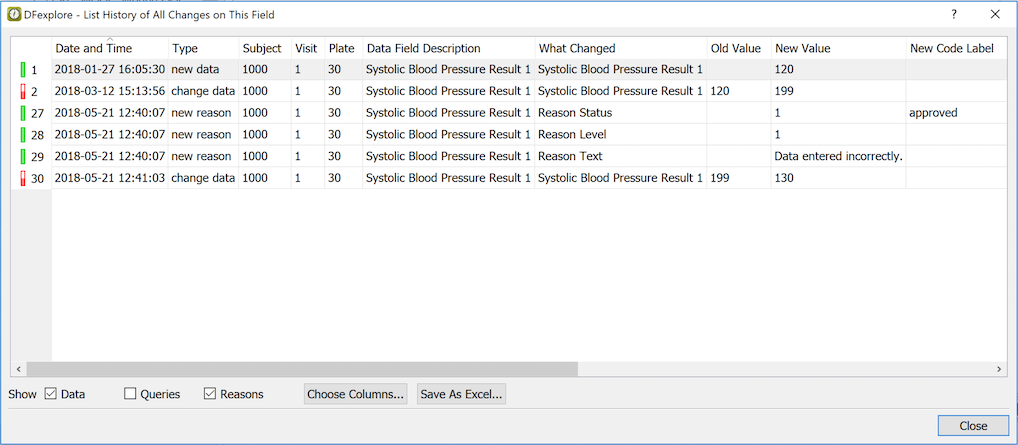
Further options for viewing the history of changes are available via the DF_ATmods report and the
-historyoption of the DFexport command.
Through the Reports View, it is possible to create new, undocked windows. Those windows remain visible until closed, even if you change to another view. To dock or close all of these windows, use these menu items:
-
- any open and undocked report windows are returned to a docked state.
-
- any open and undocked report windows are closed.
The menu launches the help viewer application and displays information about DFexplore. It also includes additional study information:
-
- display the DFexplore user guide.
-
- display the status of the SSL certificate provided by the server. Use this to confirm the encryption status of communication between DFexplore and the DFdiscover server.
-
- display a summary of the colors used and their meaning.
-
- display the instructions for the current task (if any).
-
- list the role(s) you have been assigned in the current study.
-
- display the study level help.
-
- display the plate level help for the current plate.
-
- display the field level help message for the current field. This may be overridden by the last
dfhelp()message generated during execution of field enter edit checks. -
- display version and copyright information. Confirm that you are running the up-to-date version required by the server. Confirm the security settings of your server connection. On macOS, this menu item appears under > .

[6] There are several other methods for creating PDF documents, including > and > . These are historical options that are being offered for backwards compatibility. Their features have been superseded and they will be removed in a future release.