Table of Contents
- 3.1. How do I select the correct subject binder for a new subject?
- 3.2. Can I print a copy of a subject binder?
- 3.3. How do I confirm that I am the only person making changes?
- 3.4. How can I make sure that I am completing the data forms correctly?
- 3.5. Can I enter a reason to explain an unusual value or a value that I have changed?
- 3.6. Can I use standard missing value codes?
- 3.7. What are queries and where do they come from?
- 3.8. How do I find all outstanding queries?
- 3.9. How do I respond to queries?
- 3.10. Can I respond to a query by adding a reason for the data value?
- 3.11. How should I respond to a query if the data field is correct as is?
- 3.12. Can I indicate that a subject visit is unavailable?
- 3.13. Can I indicate that a page is unavailable?
- 3.14. Do I need to save the changes I have made?
- 3.15. Can I undo all changes I just made to a page?
- 3.16. What is the best way to find all outstanding problems?
- 3.17. Why did my DFexplore session Auto Logout?
- 3.18. How do I exit from DFexplore?
- 3.19. What should I do if I have questions?
This chapter explains how to perform a number of common data management tasks. It describes what is possible in DFexplore, but how these features are applied may differ from one study to another. You may receive more specific instructions from the coordinating site for your particular study.
In many studies subjects are numbered sequentially as they enter the trial, but in some studies subject IDs are random and assigned on study enrollment or randomization. In either case, subject IDs must be registered in the DFdiscover study setup at the coordinating site before they are available in DFexplore.
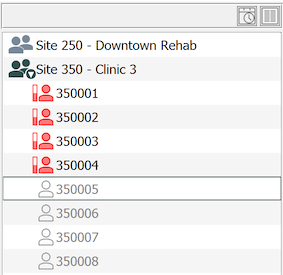
To see the subject binders available for a site, select > . If you work at more than one study site you must double-click a site to open it. Within an open site, a list of subject binders, identified by icons and subject IDs, and sorted in ascending numeric order, is presented on the left side of the screen.
Binders that are in use are represented by an active icon. Unused binders appear muted with an empty icon. In most cases, the first unused binder in the list is the correct binder for the next subject. Double-clicking the binder opens it.
If the subject ID you need is not in the subject binder list, select > , and enter the subject ID number.
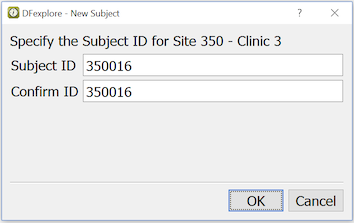
Enter the subject ID, and re-enter the same ID to confirm. Click to create the new subject binder. The new subject binder is added to the binder list, and this binder opens automatically.
If instead of a new subject ID, you enter one that already exists in the subject binder list, that binder opens after clicking .
Yes. You may need blank copies of the data forms to use as worksheets before entering the data in DFexplore, or you might complete and submit certain pages so that staff at the study coordinating site can enter the data for you. Or, you might want to print a completed visit so it can be added to the subject's medical records.
You have 2 options, with very similar dialogs, > and > .
To print subject CRFs:
-
Select > to open Data View.
-
Open a site and then a subject binder.
-
To print only selected pages, open the corresponding visits.
-
Select > .
-
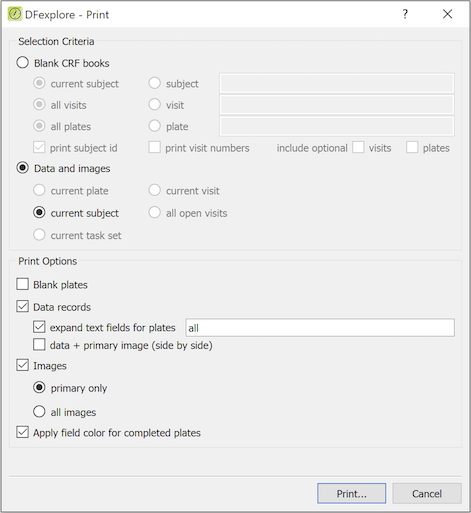
Complete the Selection Criteria to include:
Blank CRF books - CRF pages which do not yet contain data, or
Data and images - completed CRF pages and their corresponding images
-
Select one or more Print Options:
-
Blank plates - CRF pages which do not yet contain data, and may optionally contain the pre-printed subject ID
-
Data records - CRF pages containing data values
-
expand text fields - to avoid truncating long text entries
-
data + primary image - to see both the data and the supporting CRF
-
Images - document images that exist for primary records only, or all records
Mark Apply field color for completed plates to color the data fields as shown in DFexplore
-
-
Click and complete the system print dialog.
-
In this example, the current subject is selected. Data records and Images are checked. This creates one copy of each entered page for the current subject, with data values included on pages where data has been entered. If a fax or scanned image exists for any of the entered pages, the primary image is also included. The subject ID and visit number are printed on every page, even on blank plates. Confirm that the correct subject binder(s) is selected before printing.
DFexplore uses subject binder locking, which ensures that only one user can work in a subject binder at a time. The binder is locked when you open it and released when you close it. It is also be released if your DFexplore session times out.
Do not lock a subject binder unless you are working on subject data or metadata. Even if you are the only person with permission to enter data into subject binders at your site, remember that someone at the study coordinating site will have permission to review, and approve or reject, new reasons for data values and replies to queries that you have entered. This too locks a subject binder until the review is completed.
If you try to open a subject binder which is locked by another user, a dialog appears asking if you want to open it in view only mode.
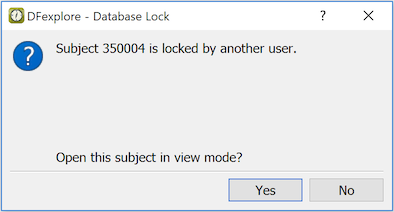
While in view only mode, the Save buttons are inactive and a message indicating that the subject is locked by another user is displayed at the bottom of the data window.

These are the recommended steps:
-
Double-click a subject binder to open it.
-
Double-click all of the visits that require entry/review.
-
Click the page to start on. It appears in the data window.
You can go to any page at any time by selecting it in the subject binder list. The up and down arrow keys can be used to move through the pages of the all the visits that are open.
-
Press Tab or click anywhere in the background of the data window. This places the focus on the first data field and the field is highlighted.
-
Complete the first data field using the keyboard, entering text and numbers, or the mouse to select a choice option or move a visual analog slider. Choice options can also be selected using the number keys: 1=1st option, 2=2nd option, etc., and visual analog fields can also be completed by using the right and left arrow keys to move the slider along the scale.
-
As you enter values notice the field color. Required but blank fields, or fields containing illegal values, appear red and change to white when a legal value has been entered. The help message may display the legal values expected for each field.
-
After completing the field value, press Return or Tab to move to the next field. Continue in this way to complete all fields on the page. This ensures that all fields are traversed in the order planned by the form's designer. Some fields may have edit checks that are triggered as the field is entered or exited. Moving through all fields ensures that all of the edit checks are triggered, and thus that notifications of any problems are displayed.
-
Carefully review all warning and error messages displayed by edit checks. Take any necessary action to correct or explain unexpected values.
-
If necessary, move backward through fields using Shift+Tab or Shift+Return.
-
When all of the fields on the page have been completed, save your work by clicking one of the three Save buttons at the bottom of the screen:
- all fields have been completed and there are no red or blue problem fields,
- a field is incomplete, or there are unresolved queries or illegal values,
- a field is incomplete and you want to complete the page later, before it is reviewed by the study coordinating site.
Pending cannot be used after a page has reached Final or Incomplete status, and Final can not be used if the page still has problem fields.
-
Some edit checks may also be triggered when clicking , or to save changes.
-
If there are problems fields that you are not able to locate, select > . A listing of all the problems that are preventing you from saving the page with status Final is displayed.
Resolve the problems and click . If some problems cannot be resolved, click .
-
After a page is saved, the next page that is open in the subject binder list (if any) is opened in the data window, again with the focus on the first field at the top of the page.
-
Continue in this way to complete all pages in the opened visits. Those visits and pages with a square icon are required, while those with a circle icon are optional (i.e. not required for all subjects). However, an optional page may become required if some specified condition is met, thus you may find a missing page query on what would normally be an optional page.
-
Examine the icons for each completed page to confirm that each record has been saved with the correct status. Icon shape and color confirms each record status: green indicates Final status, red indicates Incomplete status, orange indicates Pending status, while any page with an outline icon has been marked Pending.
-
Double-click the subject icon to close the open subject binder. The open subject binder also automatically closes when a new subject binder is selected / opened. Remember that only one subject binder can be open at a time, and while you have it open, no one else is able to use it (except in view only mode).
-
When you are finished entering study data, or if you need to pause for more than a few minutes, exit DFexplore.
Do not leave your computer unattended while you are logged in to the study database.
Yes. This is a good way to avoid queries from the study coordinating site. Add a new reason, or modify an existing reason, for any problem field (red or blue), to create a pending reason (orange) that resolves the problem, pending review by the study coordinating site. Dealing with all problem fields this way allows you to indicate that you are finished with the page by selecting when you save your modifications.
If there are outstanding queries on the data value, the addition of a new reason to that data value may automatically resolve one or more queries. This behavior is controlled by the "auto-resolve" attribute of each query and is defined by the coordinating site.
When a data field has the focus, all metadata (queries, reasons and missing values) for that field are shown in the metadata panels below the subject binder list.
If a field already has a reason, it is displayed in the Reason for Data Value metadata panel;, otherwise this window is empty.
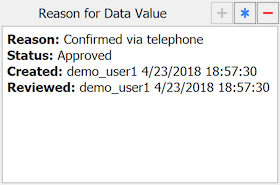
The following properties are displayed:
Reason. the user-specified reason for the current value in the data field
Status. when a reason is created or revised its status is set to Pending. On review by central staff, status may be changed to Approved or Rejected.
Created. who created or most recently revised the reason and when
Reviewed. who most recently set the reason status to Approved or Rejected and when
To add a new reason,
click  or select
> .
or select
> .
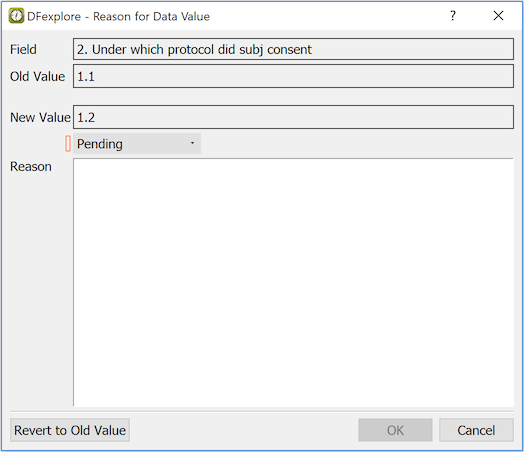
The Reason for Data Value dialog displays:
Field. The description of the current field
Old Value. The value the field had when the page was opened
New Value. The current value in the data field
Status. The status of the reason - new reasons are created with status Pending, unless you have permission to approve reasons
Reason. Enter a reason for the new value
Some fields may require a reason when they are changed. In such cases the dialog appears automatically when the field is exited. You can enter a reason or click to undo the change. Once a reason has been entered, is used to apply it. The new reason appears in the Reason for Data Value metadata panel.
When a reason is created by a user who has permission to approve reasons, the status is automatically set to Approved, and is active so that the status can be changed if needed.
Remember that no reason changes are saved until the entire record is saved. This applies to all reason, query, missing value and data changes on the current record.
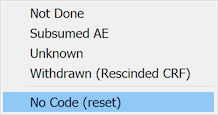
Yes. DFdiscover supports missing value codes. They may be predefined for each study to provide standard accepted reasons for missing data. If missing value codes have been predefined for your study, you can assign one of them to the current data field by selecting it from the list displayed when you click the button on the Missing Value metadata panel, or using > .

When a missing value code is selected, the data field turns green (provided the field does not have some other problem) to indicate that the field has an approved metadata value. The missing value is not displayed in the data field; it appears in the Missing Value metadata panel when the field has the focus in the data window.
After applying a missing value code, the keyboard shortcut Control+M (Command+M on macOS) can be used to repeatedly apply the same missing value code to other data fields.
To remove a missing value code so that a data value can be entered, choose No Code (reset) from the drop-down list of missing values.
Queries are questions about data values. They are always attached to a data field, manually by someone at the study coordinating site, or automatically by edit checks and other programs that check for problems.
There are 4 types of queries:
Data Correction Queries. Request a correction to a data value or a blank field
Data Clarification Queries. Ask for a reply to a question
Overdue Visit Queries. Identify visits which should have been performed by now
Missing Page Queries. Identify required pages that have not been completed
Data Correction and Data Clarification queries have several attributes - the most important is a categorical type. There are several standard categories that are always available in DFdiscover. They are:
Missing. The field's value is blank but is required
Illegal. The value is outside of the field's legal range property
Inconsistent. The field's value is inconsistent with the value in another field
Illegible. The source document has handwriting which is unclear
Fax noise. The faxed page had transmission errors which make the page unreadable
Other. An uncategorized problem described in the query details
Additionally, each individual study may define further categories for specific queries.
In some cases, such as when the category is Missing or Illegal, no further information may be needed to communicate the problem. When necessary, the query can include further details describing the problem.
If a query is attached to a data field, it is displayed in the Query metadata panel when the focus moves to that field. If the query is not yet resolved, the field is blue and the query status is Outstanding. If the query has been resolved, the field is green (unless there is another problem, like a rejected reason, or an outstanding or pending query) and the query status is Resolved.
-
Select > to open Queries View.
-
Select > .
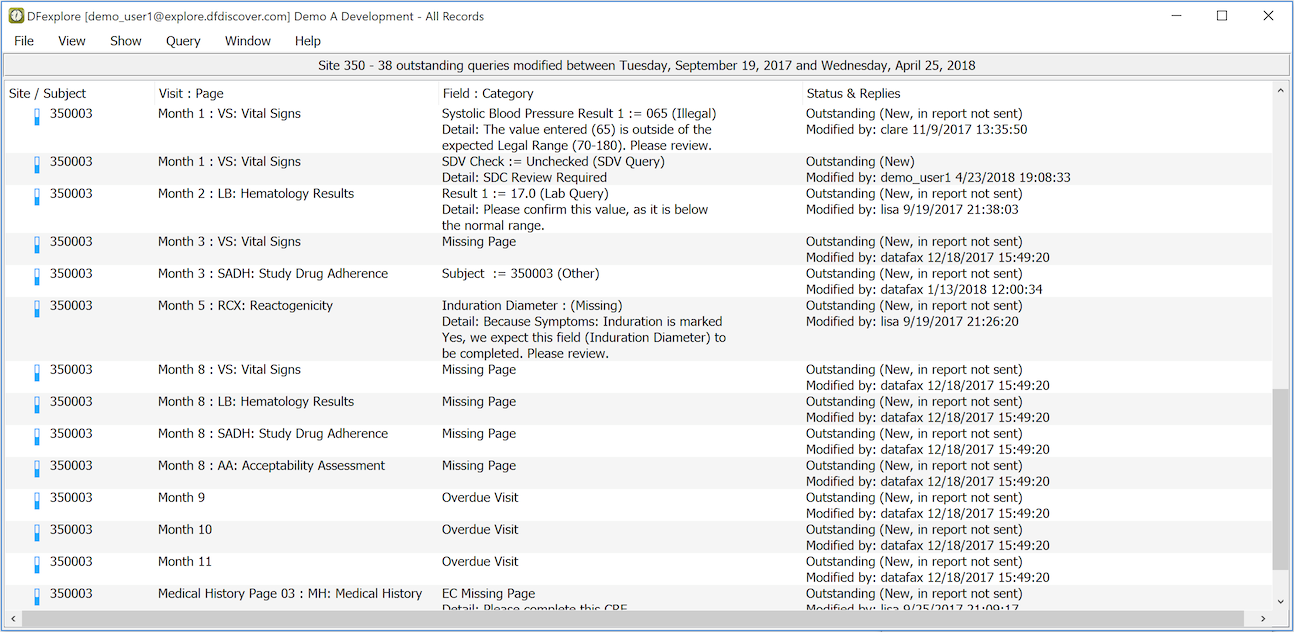
All outstanding queries are displayed. If none are displayed you have no outstanding queries - congratulations!
To review and respond to a query, double-click the query in the list. The main window switches to Data View, with the field focus on the data field with that query. Edit/resolve the query as required.
After you resolve a query, it is removed from the list when you return to Queries View.
When the focus moves to a data field that has a query, the query is displayed in the Query metadata panel.
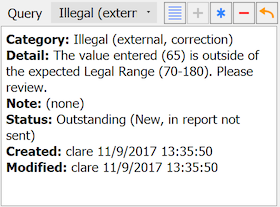
The Query metadata window contains:
Category. Categorical value for the query type
Detail. Text description of the problem (optional)
Note. Optional text description to accompany a resolved query
Status. Current status of the query
Created. User that created the query and when
Modified. User that modified the query and when
Resolved. If query is resolved, user that resolved the query and when
Some queries can be resolved by correcting the data field. For example, a missing or illegal value query can be resolved by entering a legal value. In such cases the field changes from blue to green and no further action is required.
Other queries ask a question to which a reply is expected. When a reply is entered, the field turns orange (provided there are no other outstanding queries on the field) and query status changes to Pending, to indicate that the reply is ready for central review.
You can reply to an outstanding query, or modify the reply to Pending status, but you cannot change the reply once a query has been resolved.
To reply to a query,
click  ,
or select > .
,
or select > .
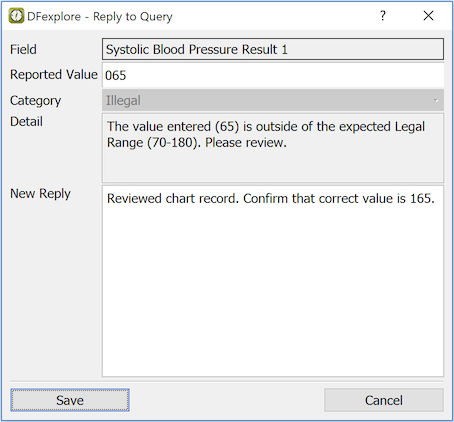
The Reply to Query dialog includes:
Field. Description of the current field
Category. From one of the system types: Missing, Illegal, Inconsistent, Illegible, Fax noise, Other, or a study-defined type
Detail. Optional description of the problem
Old Reply. Previous reply to this query (if any)
New Reply. Enter the (new) reply here
Yes, and often this will be the best response. Unless a query indicates that a reply is required, adding a reason to explain the data value is the better solution, because the reasons you enter are not changed by the study coordinating site and are thus always be visible in the Reason for Data Value metadata panel, whereas the current query, once resolved, may be replaced by a new query to address a new problem.
As a general rule, use reasons to explain why data fields have the values that they do, and only reply directly to queries when it is necessary to refer to other data fields, or explain something not contained in the reason.
If a query asks you to correct a data value that is already correct, respond using one or more of the 3 metadata options:
If the field is blank and an appropriate missing value code is available, choose one using the button on the Missing Value metadata panel. If the field is defined as 'essential', this is not possible.
To explain why the value is correct as is, add a reason in the Reason for Data Value metadata panel.
To reply to the query directly, click
in the Query metadata panel.
When all queries on the field have been responded to in one of these ways, the data field changes from blue to green if the response resolves the problem, or orange if the response needs to be reviewed by the study coordinating site.
Yes. A subject visit might be unavailable for a variety of reasons. The subject might have missed a clinic visit or refused a particular lab test. In such cases you can indicate that the visit is missed.
To mark a visit missed:
Select > to open Data View.
Double-click the subject binder to open it and display the visits.
Click the visit in the subject binder list.
Select > .
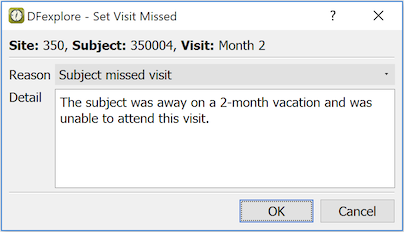
In the dialog, select a reason from the drop-down list. Optionally, enter additional explanation in the Detail field.
Click to save this change to the database and set the visit as missed. If an overdue visit query exists it is removed.
Once a visit has been marked missed, data entry is blocked for all pages in the visit.
Whenever a record in the missed visit is selected the reason specified when the visit was set missed appears in the Reason for Data Value metadata panel.
If you discover that it was a mistake to mark a visit missed, select the visit in the subject binder list and select > . In the confirmation dialog, a reason is required for the change. This removes the missed flag and enables data entry for all pages in the visit.
It is also possible to remove the missed attribute from individual pages by making the page current and selecting > . Again, in the confirmation, a reason is required for the change.
Yes. A single page within a visit might be unavailable while other pages can be completed. This might arise because the visit is made up of different exams and some are not relevant for some reason, or because the subject refused to complete the entire exam. Whatever the reason, individual pages can be marked missed.
To mark a page missed:
Select > to open the data view.
Double-click the subject binder to display the study visits. Double-click the visit to open it.
Select the page to set missed. It appears in the data window.
Select > . In the confirmation dialog, choose a reason category and enter details describing the circumstances.
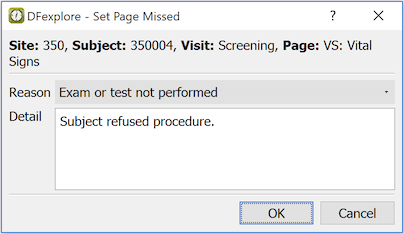
Click to save this change to the database and set the page as missed. If a missing page query exists it is removed.
Once a page has been marked missed, data entry is blocked for that page. Whenever the page is selected, the reason specified when the page was set missed appears in the Reason for Data Value metadata panel.
If you discover that it was a mistake to mark a page missed, select the page in the subject binder list and select > . In the confirmation dialog, a reason is required for the change. This removes the missed flag and enables data entry for the page.
Yes. None of the changes you make to data fields or metadata (queries, reasons and missing values) are saved until you select one of the save buttons at the bottom of the data window. The same green (Final), red (Incomplete) and orange (Pending) color coding is applied to the save buttons. Only those buttons which are valid for the current data are available.
The save buttons are:
Click if all fields have been completed or explained with reasons, all queries have been answered, and you know of no other changes that are needed to complete data entry.
Click if any field is still incomplete or any query is still outstanding.
Click if you are not finished with the page and would like to return to it later before it is reviewed by the study coordinating site.

There are two restrictions:
-
is not available once a page has reached Final or Incomplete status if your permissions only allow Pending to be used during new data entry. If this is the case, is inactive to prevent a mistake.
-
can not be used if there are any red or blue fields on the page, i.e. any problem fields which have not been corrected or addressed using a resolved query, a new reason or a missing value code). If this is the case, is inactive.
If you try to close the current page or open a different page without saving changes, a dialog appears asking if you want to save or discard your changes before opening the new page.
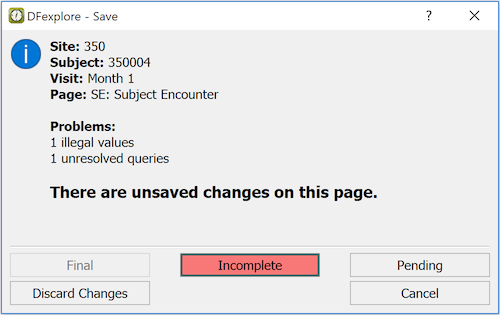
Click the appropriate button to continue and save your changes, discard your changes or return to the data record for further review.
Yes, but only if you have not yet selected one of the save buttons. Select > , and click in the confirmation dialog, to undo all changes to data fields and metadata (queries, reasons and missing values). The page is returned to the state it was in when you first opened it.
This is the only undo level available. Once you have selected one of the Save buttons (Final, Incomplete or Pending), you can not revert to a previous state.
Start by reducing the subject binder list to just those subjects that have Incomplete and/or Pending pages. Select > .
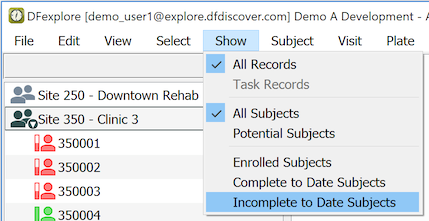
If no subject binders appear in the list, congratulations - there are no outstanding problems.
Otherwise, for each subject binder proceed as follows:
Open the subject binder and scan the list of visits for those which are Incomplete (red, for example
 ) or Pending (orange, for example
  )
)
When you open one of these visits, the Incomplete and Pending pages are identified with the same red and orange icons.
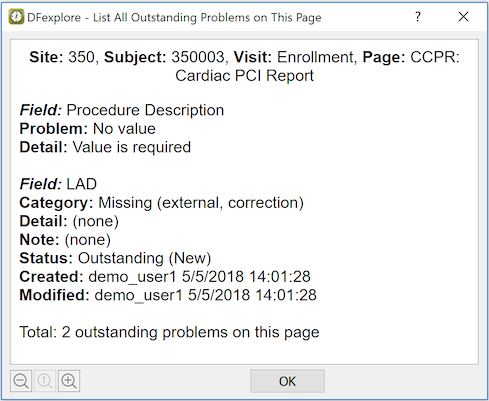
Select one of these pages and look for red and blue fields. The blue fields have metadata, either an unresolved query or a rejected reason. The red fields contain illegal values or are required but currently blank.
It is possible to save a page with Incomplete status even though it has no red or blue fields. This might be done when there are optional fields that still need to be completed. Users may have flagged these fields with reasons, thus it is also be a good idea to review any orange fields.
If you are able to resolve all problems on the page, save your changes using status Final, turning the icon color to green.
In addition to looking for red and blue fields, it is possible to get a list of all outstanding problems on the current page. To list all problems on the current page select > .
For regulatory reasons related to confidentiality of subject data and the requirement that data entry must be attributable to an authorized individual user, you must always exit DFexplore when your current work is done, or when you need to leave the computer unattended for any reason.
Should an unexpected event or emergency prevent you from logging out, a built-in timer will automatically log you out after a specified period of inactivity, determined by the study coordinating site.
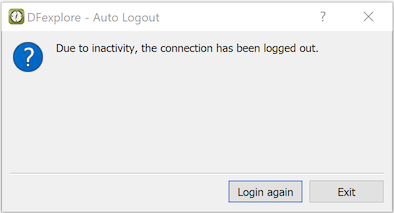
If this occurs, any unsaved changes to the last page you were working on are not saved, and the subject binder is released so that other authorized users can access it.
If you were auto logged out from your last DFexplore session, you will see the Resume Previous Session dialog the next time you login to the same study.
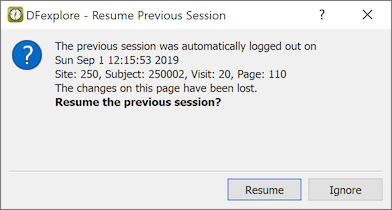
The default action, returns you to the same Data, Query or Reason view that was on-screen before the Auto Logout occurred. Click to return to your preferred view.
If there were unsaved changes to a page, the page is identified by subject ID, visit, and page number, and you are able to return to it by clicking .
If you return to a page after some time has passed, and other users are authorized to modify the page, some data fields may have been changed since you last saw it. You can tell if this has occurred by comparing the time shown in the Resume Previous Session dialog with the Last Save time displayed in the data window when you return to the page.
You can change the Auto Logout timer, within limits specified by the study coordinating site, by selecting > .
Confirm that you have saved any changes to the page you are currently working on. If you forget you are warned when you try to exit.
When you are finished working in a study, you can close the study or exit the entire DFexplore session.
-
To close the study connection but remain connected to the DFdiscover server, select > . This takes you back to the study selection dialog. This is a useful shortcut if you are working with DFexplore and multiple studies.
-
To end your current DFexplore session, select > (Windows), or > (macOS). This disconnects you from the DFdiscover server and exits the application.