DFbarcode creates barcodes in the same fashion as the DFdiscover plug-in for FrameMaker® (see Barcoding with the DFdiscover Plug-in for FrameMaker®). Rather than positioning the barcode on a CRF, DFbarcode saves the image of the barcode to a file or the system clipboard. The barcode can subsequently be pasted (or imported from the saved file) as a graphic image into a desktop publishing package and positioned by the user on a CRF.
Each barcode image is saved as a separate file. The use of meaningful names for the images is left to the user.
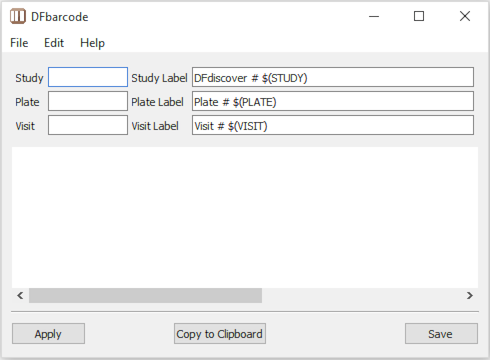
Start DFbarcode.
DFbarcode starts and displays the main window interface.
-
Specify the barcode components to be created.
The barcode graphic that is produced depends on the numeric values entered for Study, Plate, and Visit. If the value is blank, that portion of the barcode graphic will not be created. For example, in cases where the visit number is the first data field and hence is not part of the barcode, Visit value can be left blank.
The legal integer values that can be entered are:
Study. 1 to 255, inclusive
Plate. 1 to 500, inclusive
Visit. 0 to 511, inclusive
Modify the label (optional).
The numeric equivalent of each barcode component should always appear below the component. In addition to the number, it is recommended to combine the number with a descriptive label. The default labels are DFdiscover # $(STUDY), Plate # $(PLATE) and Visit # $(VISIT), where $(STUDY), $(PLATE) and $(VISIT) are placeholders for the respective number. The text of any label may be edited in the dialog - it is applied, including number replacement of the placeholder, in the preview and when the barcode is created.
For the barcode labels, the font family, style, and size can be changed by selecting > . The same font styling is applied to each of the barcode labels. Changes to font styling also apply to each of the labels.
If a label is left blank (not recommended), then no label appears below that barcode component. If the number is left blank, that component of the barcode is not created.
Click to create a preview of the barcode.
If it is necessary to edit the image, re-specify the component numbers and labels and click again before proceeding to the next step.
Click to save the barcode image.
In the file selection dialog, navigate to the desired directory and provide a meaningful name, with the desired extension (BMP, PNG or TIFF), for the file and then click .
Click to copy the barcode image to the system clipboard.
Once copied to the clipboard, the barcode image can be pasted in any application that supports images and clipboard operations.
Repeat this procedure as necessary to create barcodes for each CRF that requires barcoding.
![[Note]](../../imagedata/note.png) | Importing barcodes |
|---|---|
|
The imported barcodes will appear with the correct size so long as you adhere to the following criteria:
|
DFbarcode can also run from the command-line if the required arguments are supplied; otherwise the tool will start in display mode.
From the command-line, enter
%DFbarcodestudy_numberplate_numbervisit_numberoutfilefile_format (TIF|PNG|BMP)
DFbarcode creates a barcode from the provided arguments
and saves it in the desired format
by creating or overwriting outfile.
DFbarcode outputs any error messages to the command-line.
study_number | Study number between 1-255 (required). |
plate_number | Plate number between 1-500 (required). |
visit_number | Visit number between 0-511 (optional). |
outfile | File name where the barcode image will be saved (required). |
file format | Must be one of TIF, PNG or BMP (if provided). If not specified, then output file's extension is used to determine the expected output format. If the output file extension is not supplied, or is not one of TIF, PNG or BMP, the image is created in TIFF format. |
Example 3.1. Create a barcode for study 253 plate 50 and save it to plate50barcode.tif as a TIFF image
% DFbarcode 253 50 plate50barcode.tif
Example 3.2. Create a barcode for study 253 plate 10 visit 1 and save it to plate10barcode as a PNG image
% DFbarcode 253 10 1 plate10barcode PNGor
% DFbarcode 253 10 1 plate10barcode.png