Table of Contents
After installation of the plug-in for the local instance of FrameMaker®, you can create barcodes and insert them directly into the current document.
The plug-in is installed in the FrameMaker® menubar under the > menu item. The menu typically appears between the and menus. Confirm successful installation before proceeding.
Select > to start the plug-in. The user interface is displayed.
The plug-in can create a complete barcode or any individual component (study number, plate number, and visit number) of a barcode, and position it directly on the current CRF at its required location.
Each component of the barcode is labeled with default text or user-specified text. The text labels play an important role in CRF routing. It is highly recommended that you indicate with a label below the barcode what the actual values are. This will greatly assist the user responsible for routing any CRFs that could not be routed automatically.
The steps in creating a barcode with the plug-in are:
-
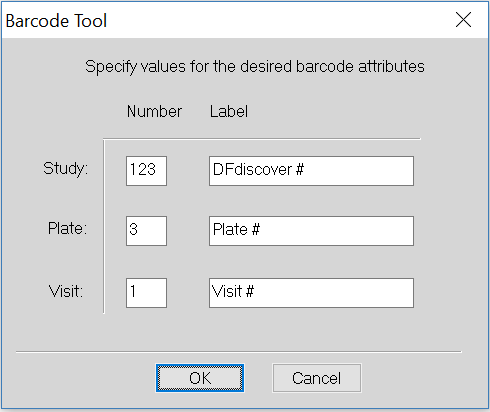
The value is entered under the Number column in the row appropriate to the component.
The barcode graphic that is produced depends on the values entered for Study, Plate and Visit. If the value is blank that portion of the barcode will not be created. For example, in CRFs where the visit number is the first data field and hence is not part of the barcode, the Visit value must be left blank.
The legal integer values that can be entered are:
Study. 1 to 255, inclusive
Plate. 1 to 500, inclusive
Visit. 0 to 511, inclusive
-
The number equivalent of each barcode component is always printed below the component. In addition to the number, it is recommended to combine the number with a descriptive label. The default labels are DFdiscover #, Plate # and Visit #. The text of any label may be edited in the dialog and applied when the barcode is created.
For the barcode labels, the font family, style, and size are taken from the current FrameMaker® character format, not the current paragraph format. These must be set appropriately before the barcode is created.
The text labels and/or font settings may also be subsequently edited directly with FrameMaker® tools.
The number for the component always appears after the label. If a label is left blank, only the number appears. If the number is left blank, that component of the barcode is not created.
-
The barcode is created and positioned at the correct location on the current CRF.
To cancel the operation without creating a barcode (or editing an existing barcode), click .
Once a barcode has been created for a CRF it can subsequently be moved, cut, or pasted just like any other object. It can also be edited.
Editing a barcode allows any/all of the study, plate or visit numbers to be changed.
To edit an existing barcode:
-
The CRF containing the barcode to be edited must be the current page.
-
The plug-in dialog is displayed with the current values pre-filled from the existing barcode on the CRF.
The settings for an existing barcode are stored as attributes of the anchored frame that contains the image. While it is possible to delete the anchored frame without deleting the image, this will cause any subsequent edits to not reflect the current settings.
-
The number or label for any component can be updated, added, or deleted (by leaving that value blank).
-
The existing anchored frame, image, and text labels are deleted, and new ones are created. The current character format will be applied whenever a new text label is created.
In FrameMaker® it is convenient to create a master page that includes text and graphics that will form a background common to all CRFs.
In the context of the barcode, the registration bar and the DFdiscover study number are common to all CRFs for the study. Hence it makes sense to create and position that barcode component on a master page. The plug-in can be used to generate this graphic by entering only the number and label for the study component and leaving everything else blank.
The unique barcodes for plate and visit number will subsequently be added to each CRF. These barcodes will be created by leaving the study number component blank and only specifying the plate and/or visit number. The plate and visit portion of the barcode are then imported directly onto the body page (rather than the master page). With default positioning, the registration bar from the master page and the body page will be automatically aligned to create one contiguous bar.