Table of Contents
- 19.1. Introduction
- 19.2. Tests & Requirements
- 19.3. Begin Module 19. DFengage ePRO Data Entry.
- 19.4. Create DFengage users role in DFadmin
- 19.5. Add bulk DFengage users accounts to DFadmin
- 19.6. Installation and initial DFengage login.
- 19.7. Complete a task in online mode.
- 19.8. Complete a task in offline mode.
- 19.9. Sync data collected offline to your DFdiscover server.
- 19.10. Confirm data sent to the server using DFexplore.
- 19.11. End Module 19. DFengage ePRO Data Entry.
![[Warning]](../../imagedata/warning.png) | Warning |
|---|---|
Optional Module. The DFengage ePRO Data Entry module requires the DFWS feature (web services API). If your DFdiscover server is not licensed for this feature, do not complete this module. DFengage is compatible with the following mobile device operating systems:
|
Create DFengage users role in DFadmin
Add bulk DFengage users accounts to DFadmin
Installation and initial DFengage login.
Complete a task in online mode.
Complete a task in offline mode.
Sync data collected offline to your DFdiscover server.
Confirm data sent to the server using DFexplore.
Estimate of Time Required: 15 Minutes
-
Start DFATK as described in Module 1 (Installation & Initialization).
- Click followed by to begin this module.
-
Start DFadmin. Login to your DFdiscover Server as
datafax. -
Specify a Username and
datafax, and the assigned user password in the Password field. Click . to complete login and continue. - Create a role for DFengage users. Begin this task by clicking the Roles tab.
-
Within the list of studies, locate and choose the entry for 254 Acceptance Test Study. Click to add a new user role. In the dialog, enter the role name
ePROData. -
Click to create the new role
ePROData. -
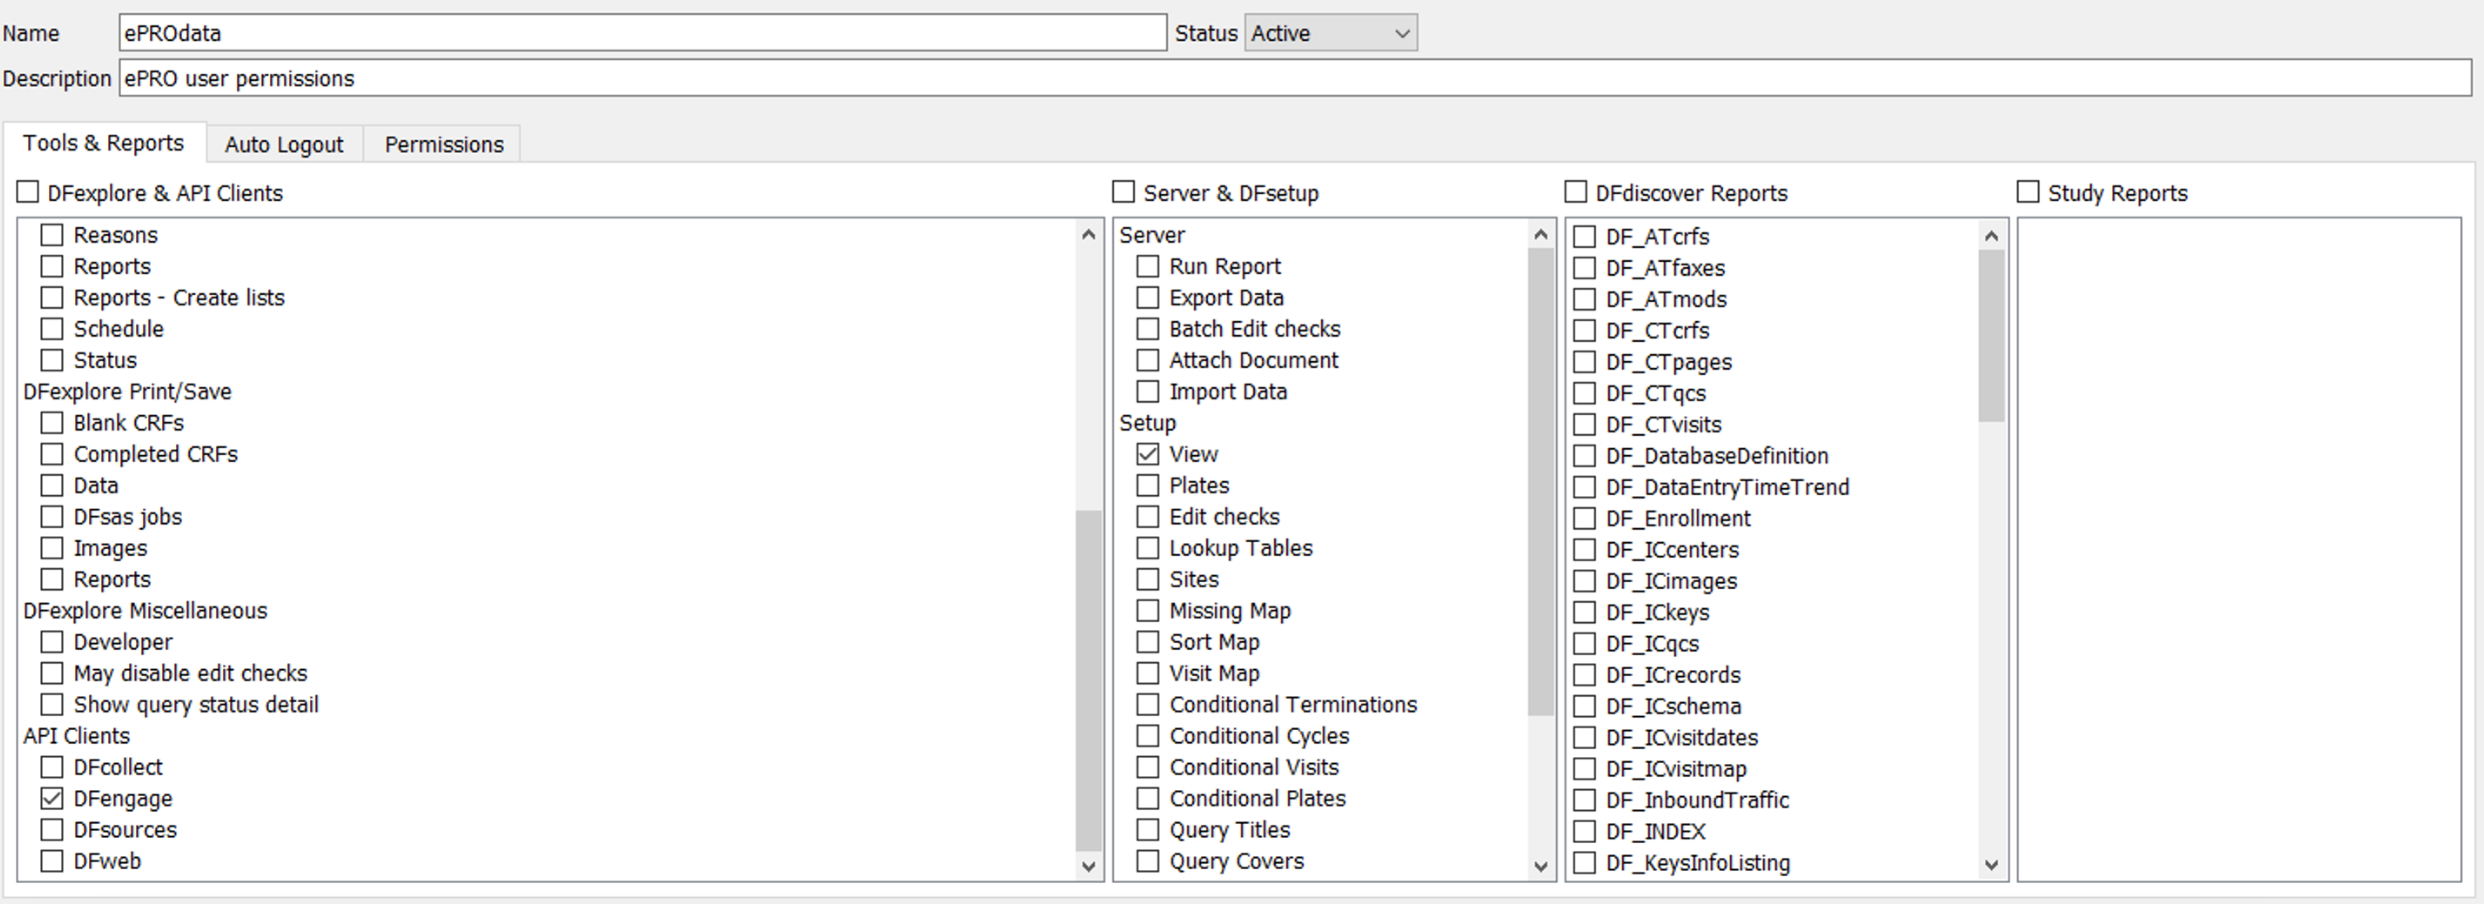
Define Tools & Reports permissions for the
ePRODatarole. HighlightePRODatain the Roles list to make it the active role. EnterePROData user permissionsin the Description field. -
Click Tools & Reports tab below the Description field. Set each of the following:
In the DFexplore & API Clients panel,
-
Check (Enable) Data within DFexplore Views
-
Check (Enable) DFengage within API Clients
In the Server & DFsetup panel,
-
Check (Enable) View within Setup
-
Click Permissions tab.
-
Set plates 31-33 data permissions as follows:
Visits =
301-303Plates =
31-33Levels =
ALLModify =
1-5Write Levels =
1Data = Check (enable) CM (Create, Modify)
Reasons = Check (enable) M (Modify)

-
Set plate 30 data permissions as follows:
Visits =
300Plates =
30Levels =
ALLModify =
1Write Levels =
1

-
Select > or click to save settings for role
ePROData.
Still as
datafaxand with the DFadmin application open, click Users tab to open the user definition window.Click .
In the resulting Add Bulk Users dialog, set:
Study = Select 254 Acceptance Test Study
Role = Select ePROData
Username Prefix =
atk_Subjects Range =
99001-99015Check (enable) Preview usernames
Set an Initial Password by entering a passowrd of your choice.
Click , in the resulting confirmation dialog click to add the defined user accounts.
Click .
![[Note]](../../imagedata/note.png)
Note Remember the password assigned in this step as it is needed in future tests.
-
Choose the atk_99015 entry from the list of users. Click Permissions tab to confirm the assigned permissions.
-
Click Permissions tab. Set:
Study = Select 254 Acceptance Test Study
Sites =
99Subjects =
99015Role Name = ePROData
-
Select > > > to close DFadmin.
-
Download and install DFengage from Google Play™ or Apple® App Store® to your mobile device or tablet.
Open DFengage.
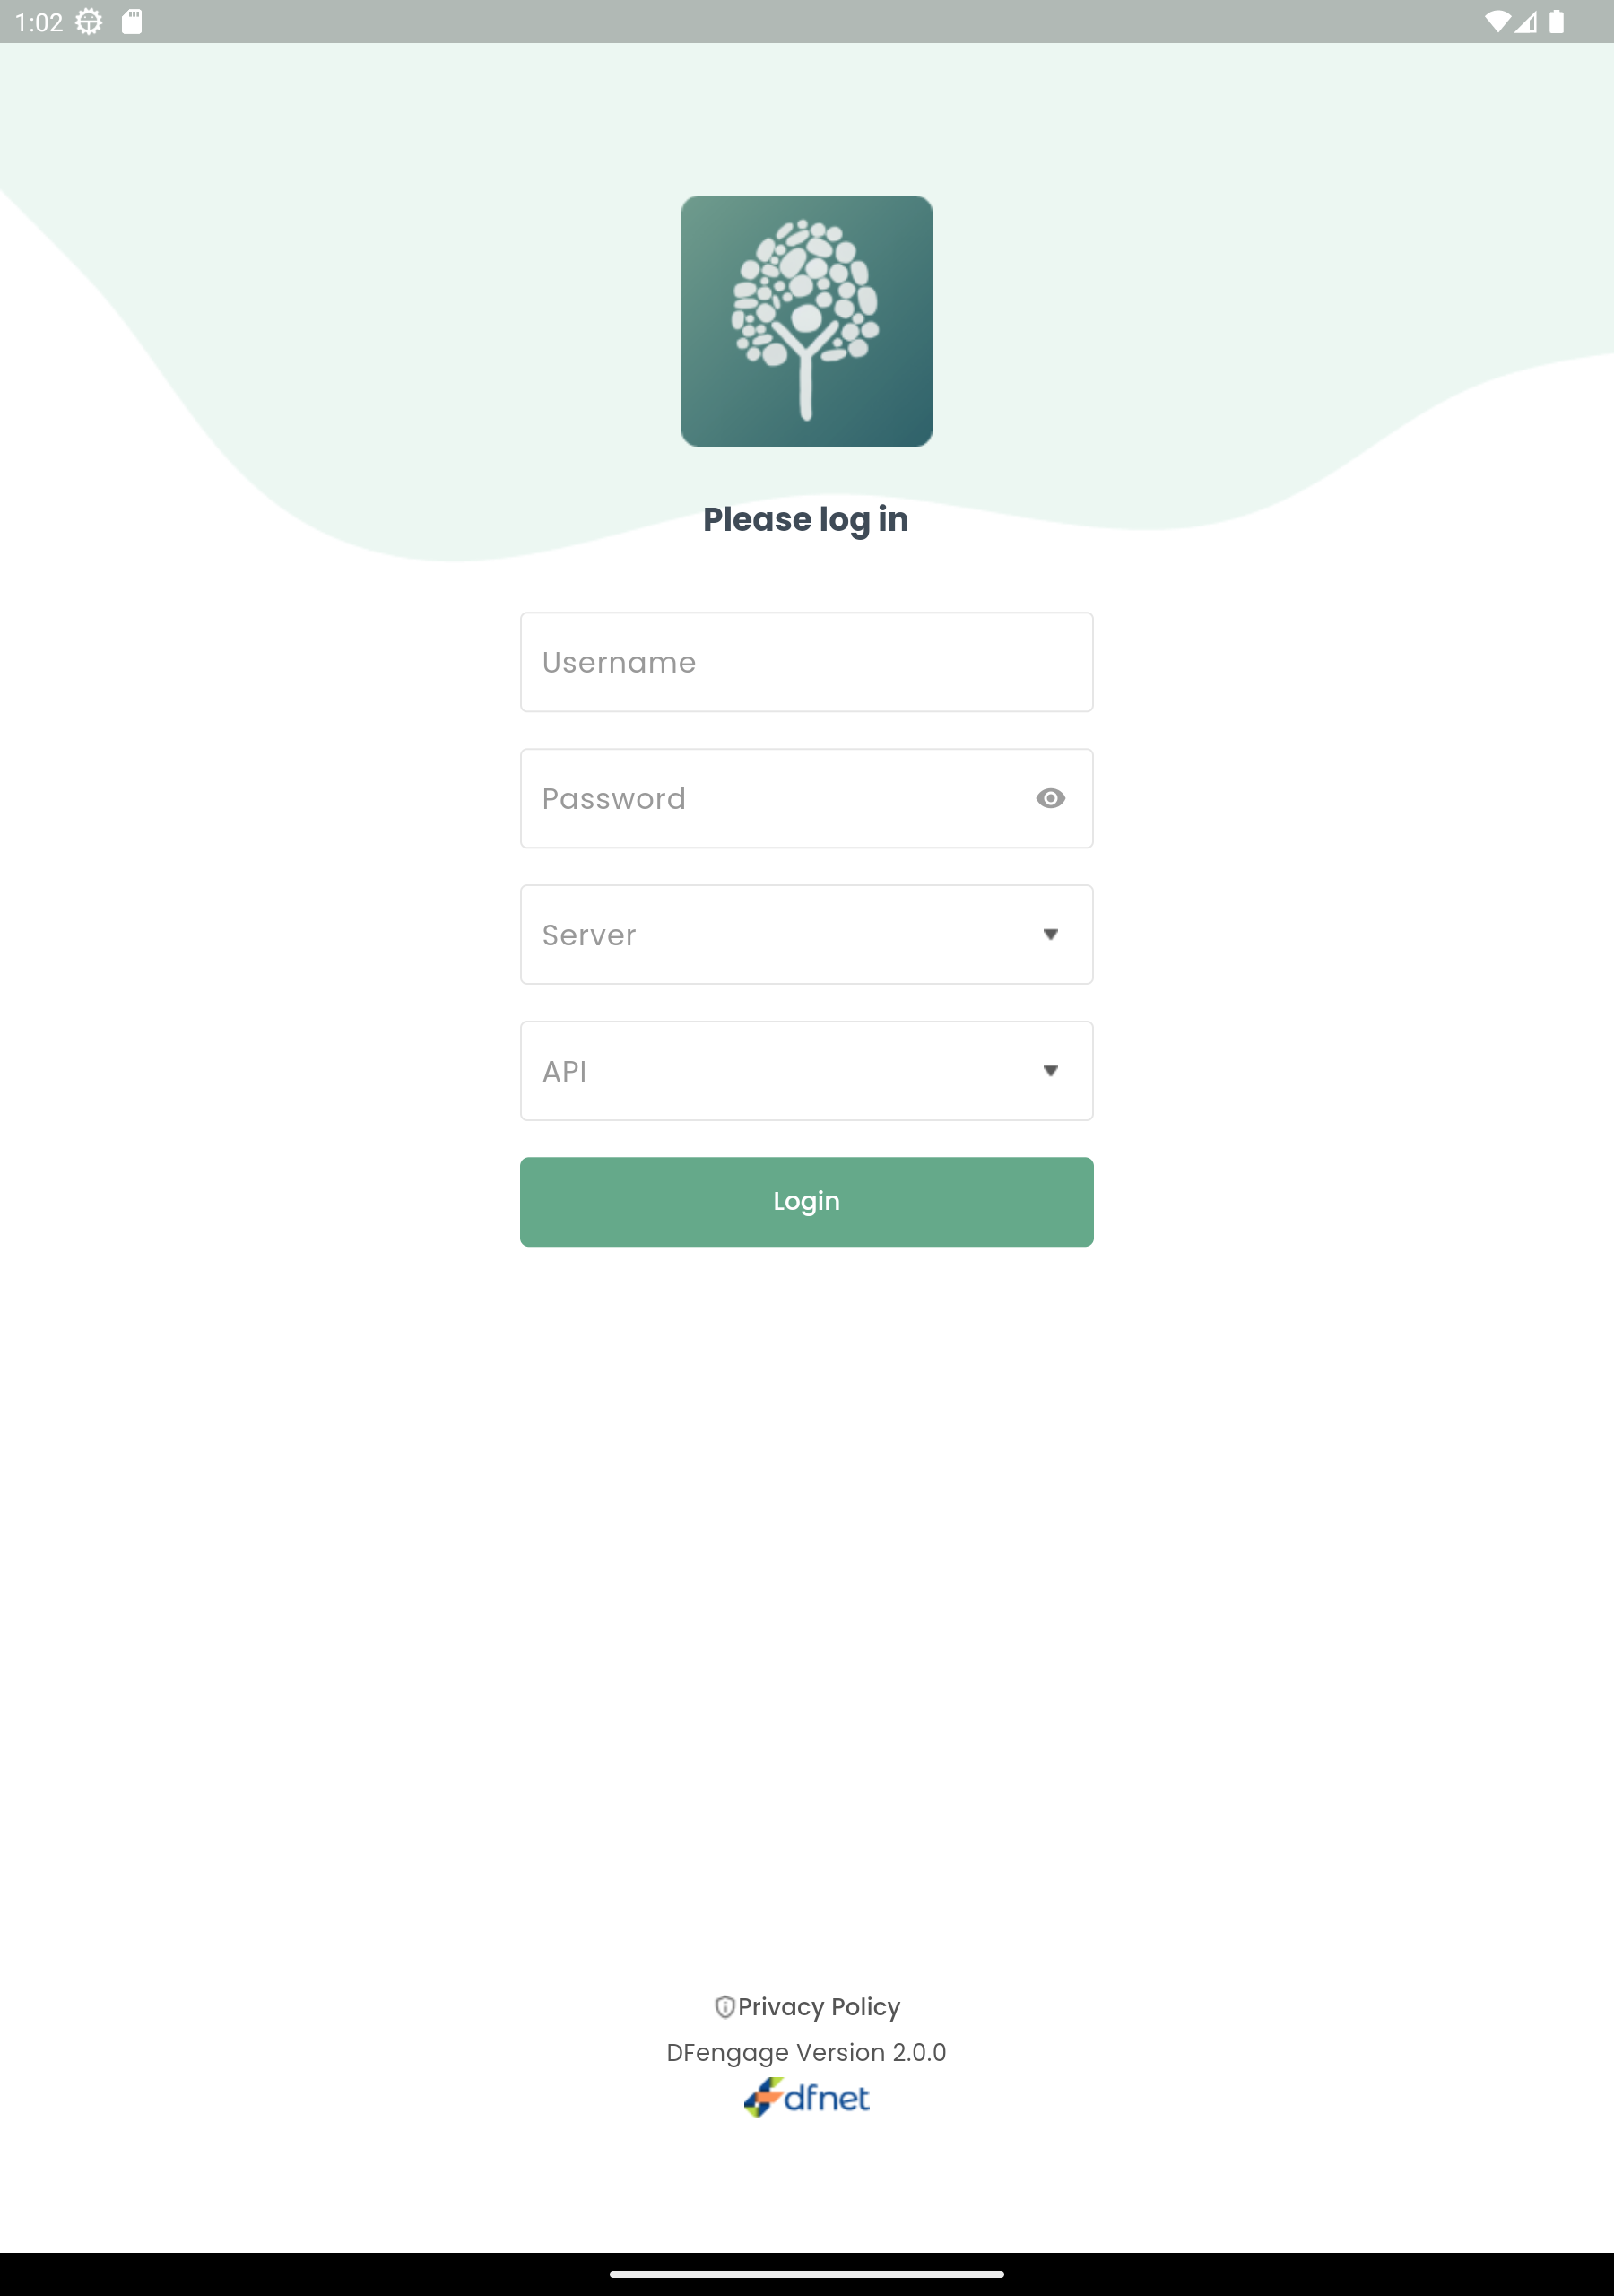
-
In the DFengage login dialog, enter
atk_99015in the Username field and the previously assigned password in the Password field. Enter the name for DFdiscover Server that has been provided by your administrator and the DFdiscover Server API servername. Click to login.
The change password dialog is presented. Enter a password of your choice, click .
-
The Pincode setup dialog is presented. Enter any 4-digit numeric pincode. Click .
-
Select the default language, click .
Click next to eDiary Day 1.
Click Today's date, Select a date of
01 Jun 2023. Click , then .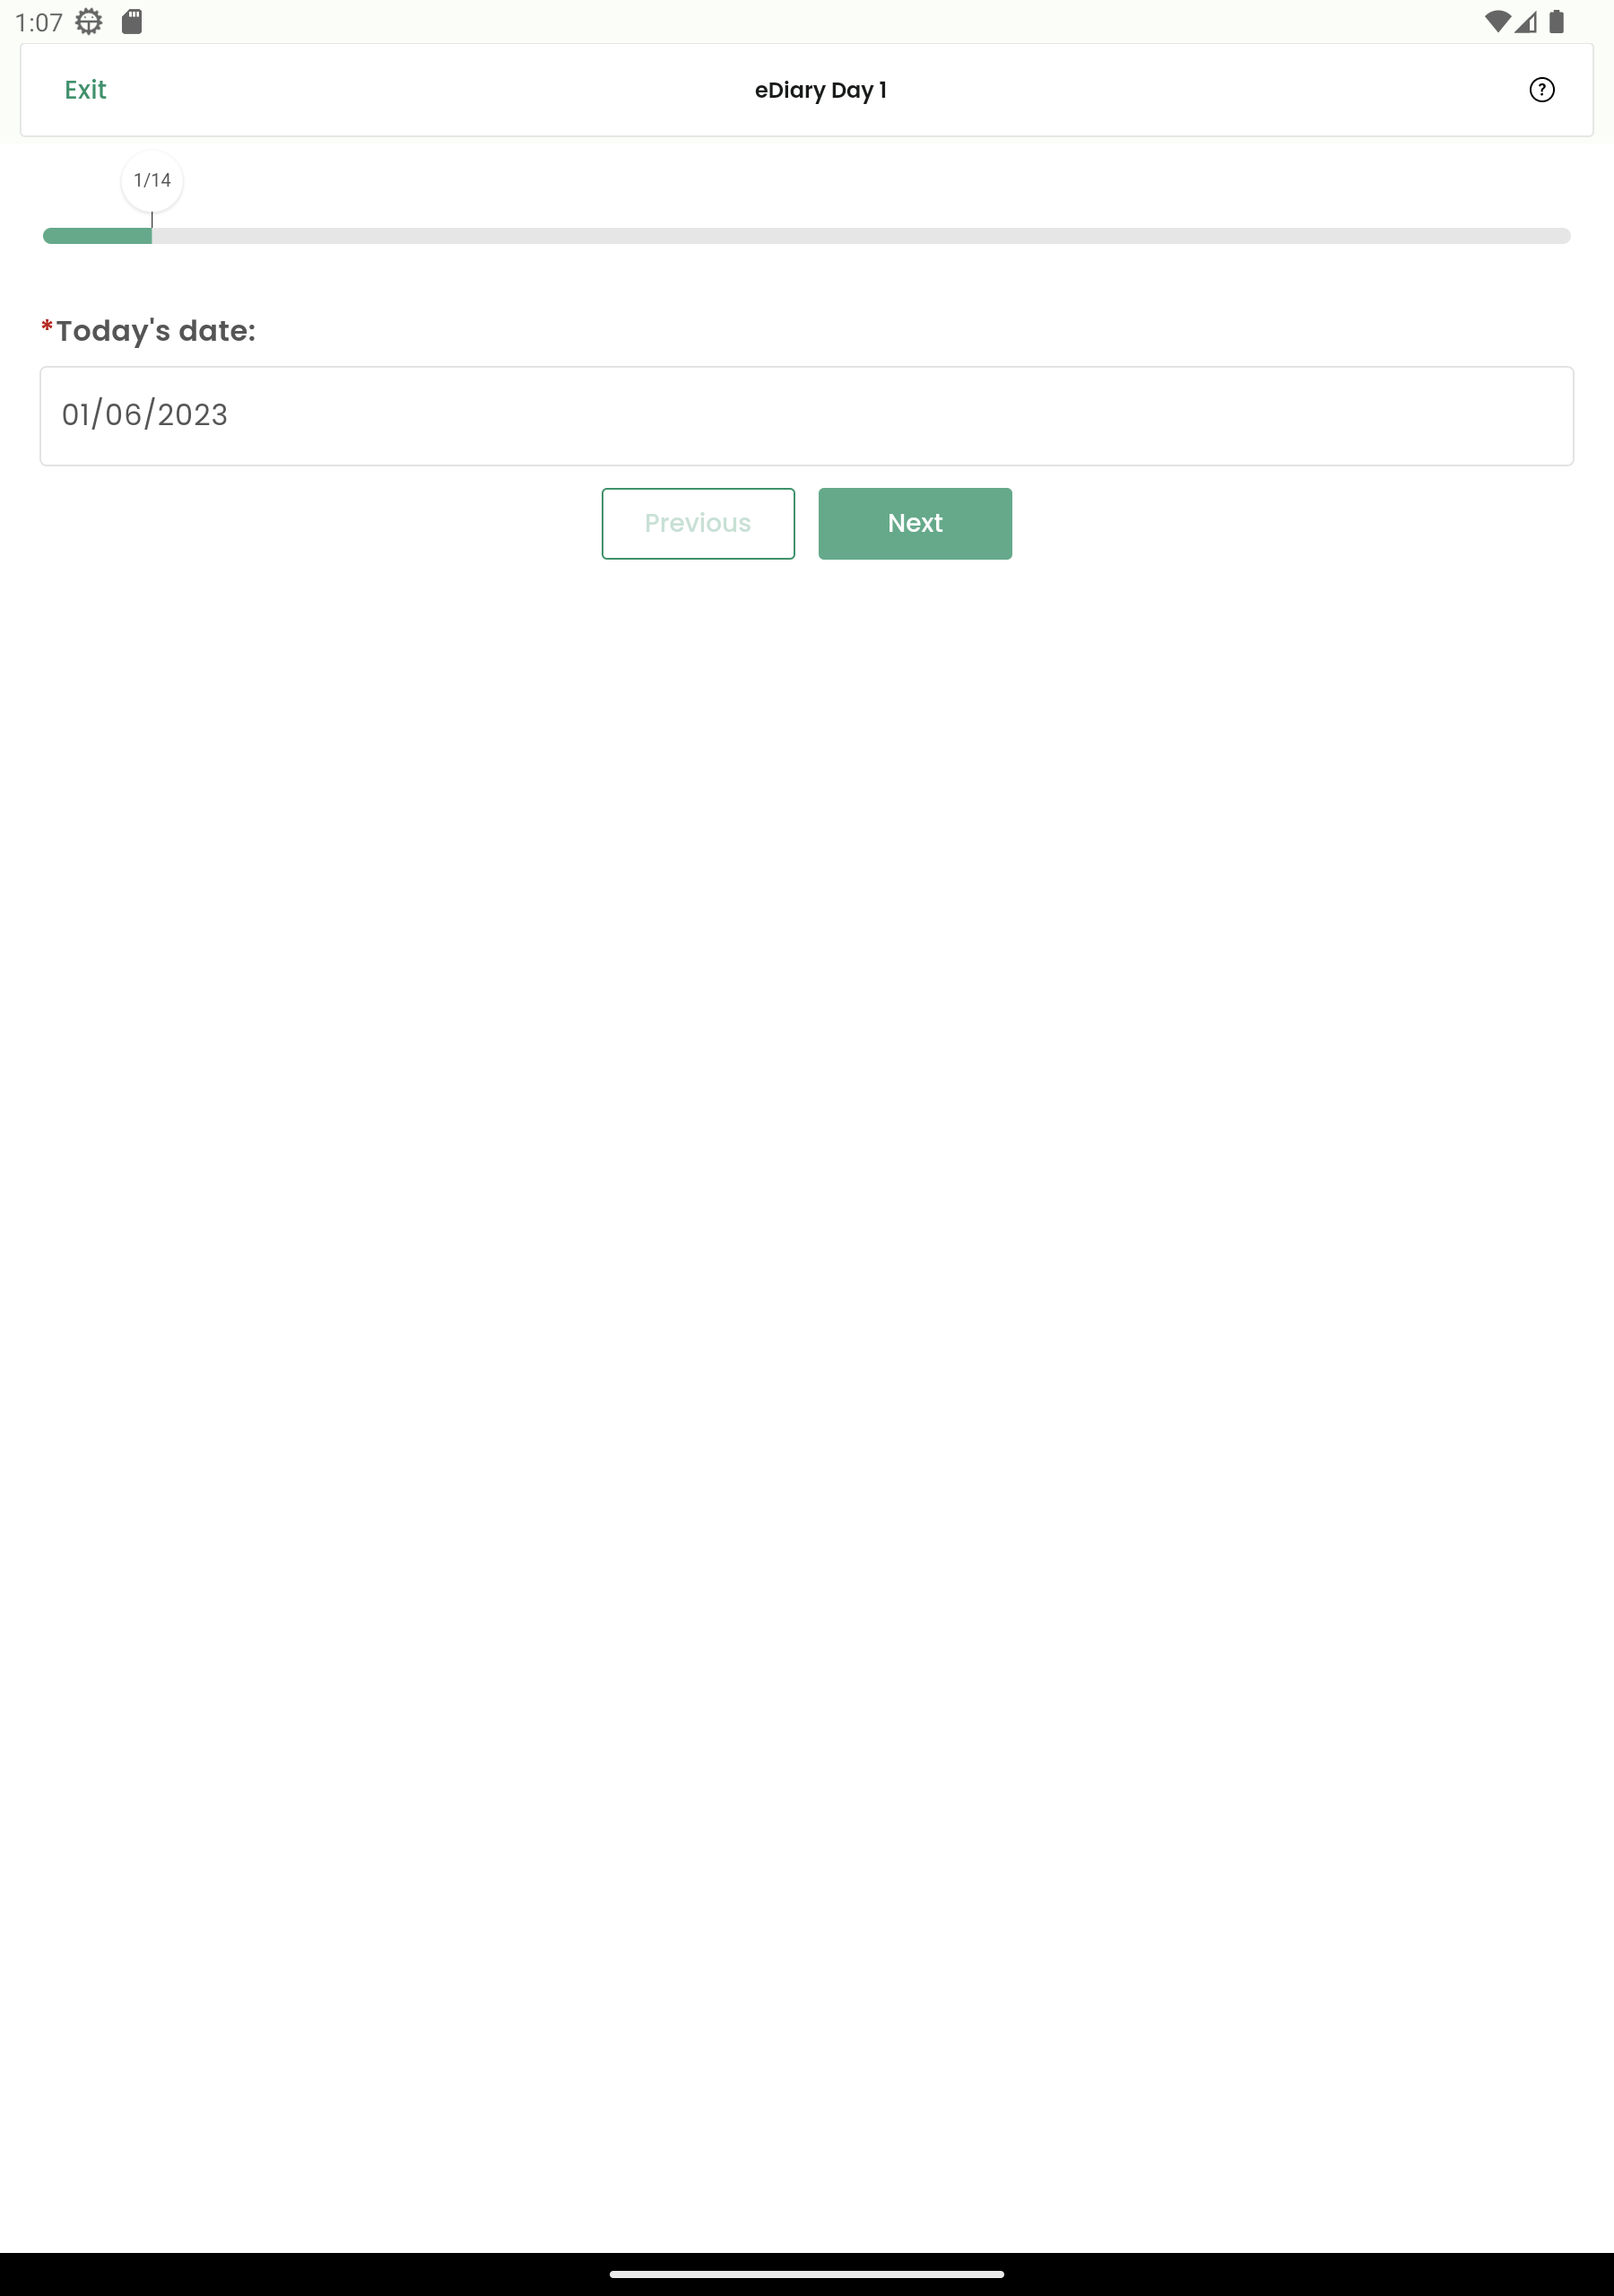
Complete the remaining eDiary Day 1 questions by entering the following and clicking on each screen:
14:45:00What time is it? =
2:45 PM, clickThe first set of questions relate to recations at or around the site of vaccination.
Is there redness? =
YMaximum severity of redness =
Does not interfere with activity.Medication taken for redness? =
N
Check the box next to each symptom you have experienced today
Nausea = Checked (enabled)
Headache = Unchecked (disabled)
Fatigue = Checked (enabled)
Joint Aches = Unchecked (disabled)
Muscle Aches = Unchecked (disabled)
No Symptoms = Unchecked (disabled)
On a scale of 1 to 10, with 1 being the lease and 10 being the worst pain imaginable , how severe were your symptoms today? =
7Please take your temperature using the provided thermometer. Record your temperature here (degrees F) =
98.4
Click .
Close the DFengage application
Switch your device to airplane mode or otherwise disconnect from the internet.
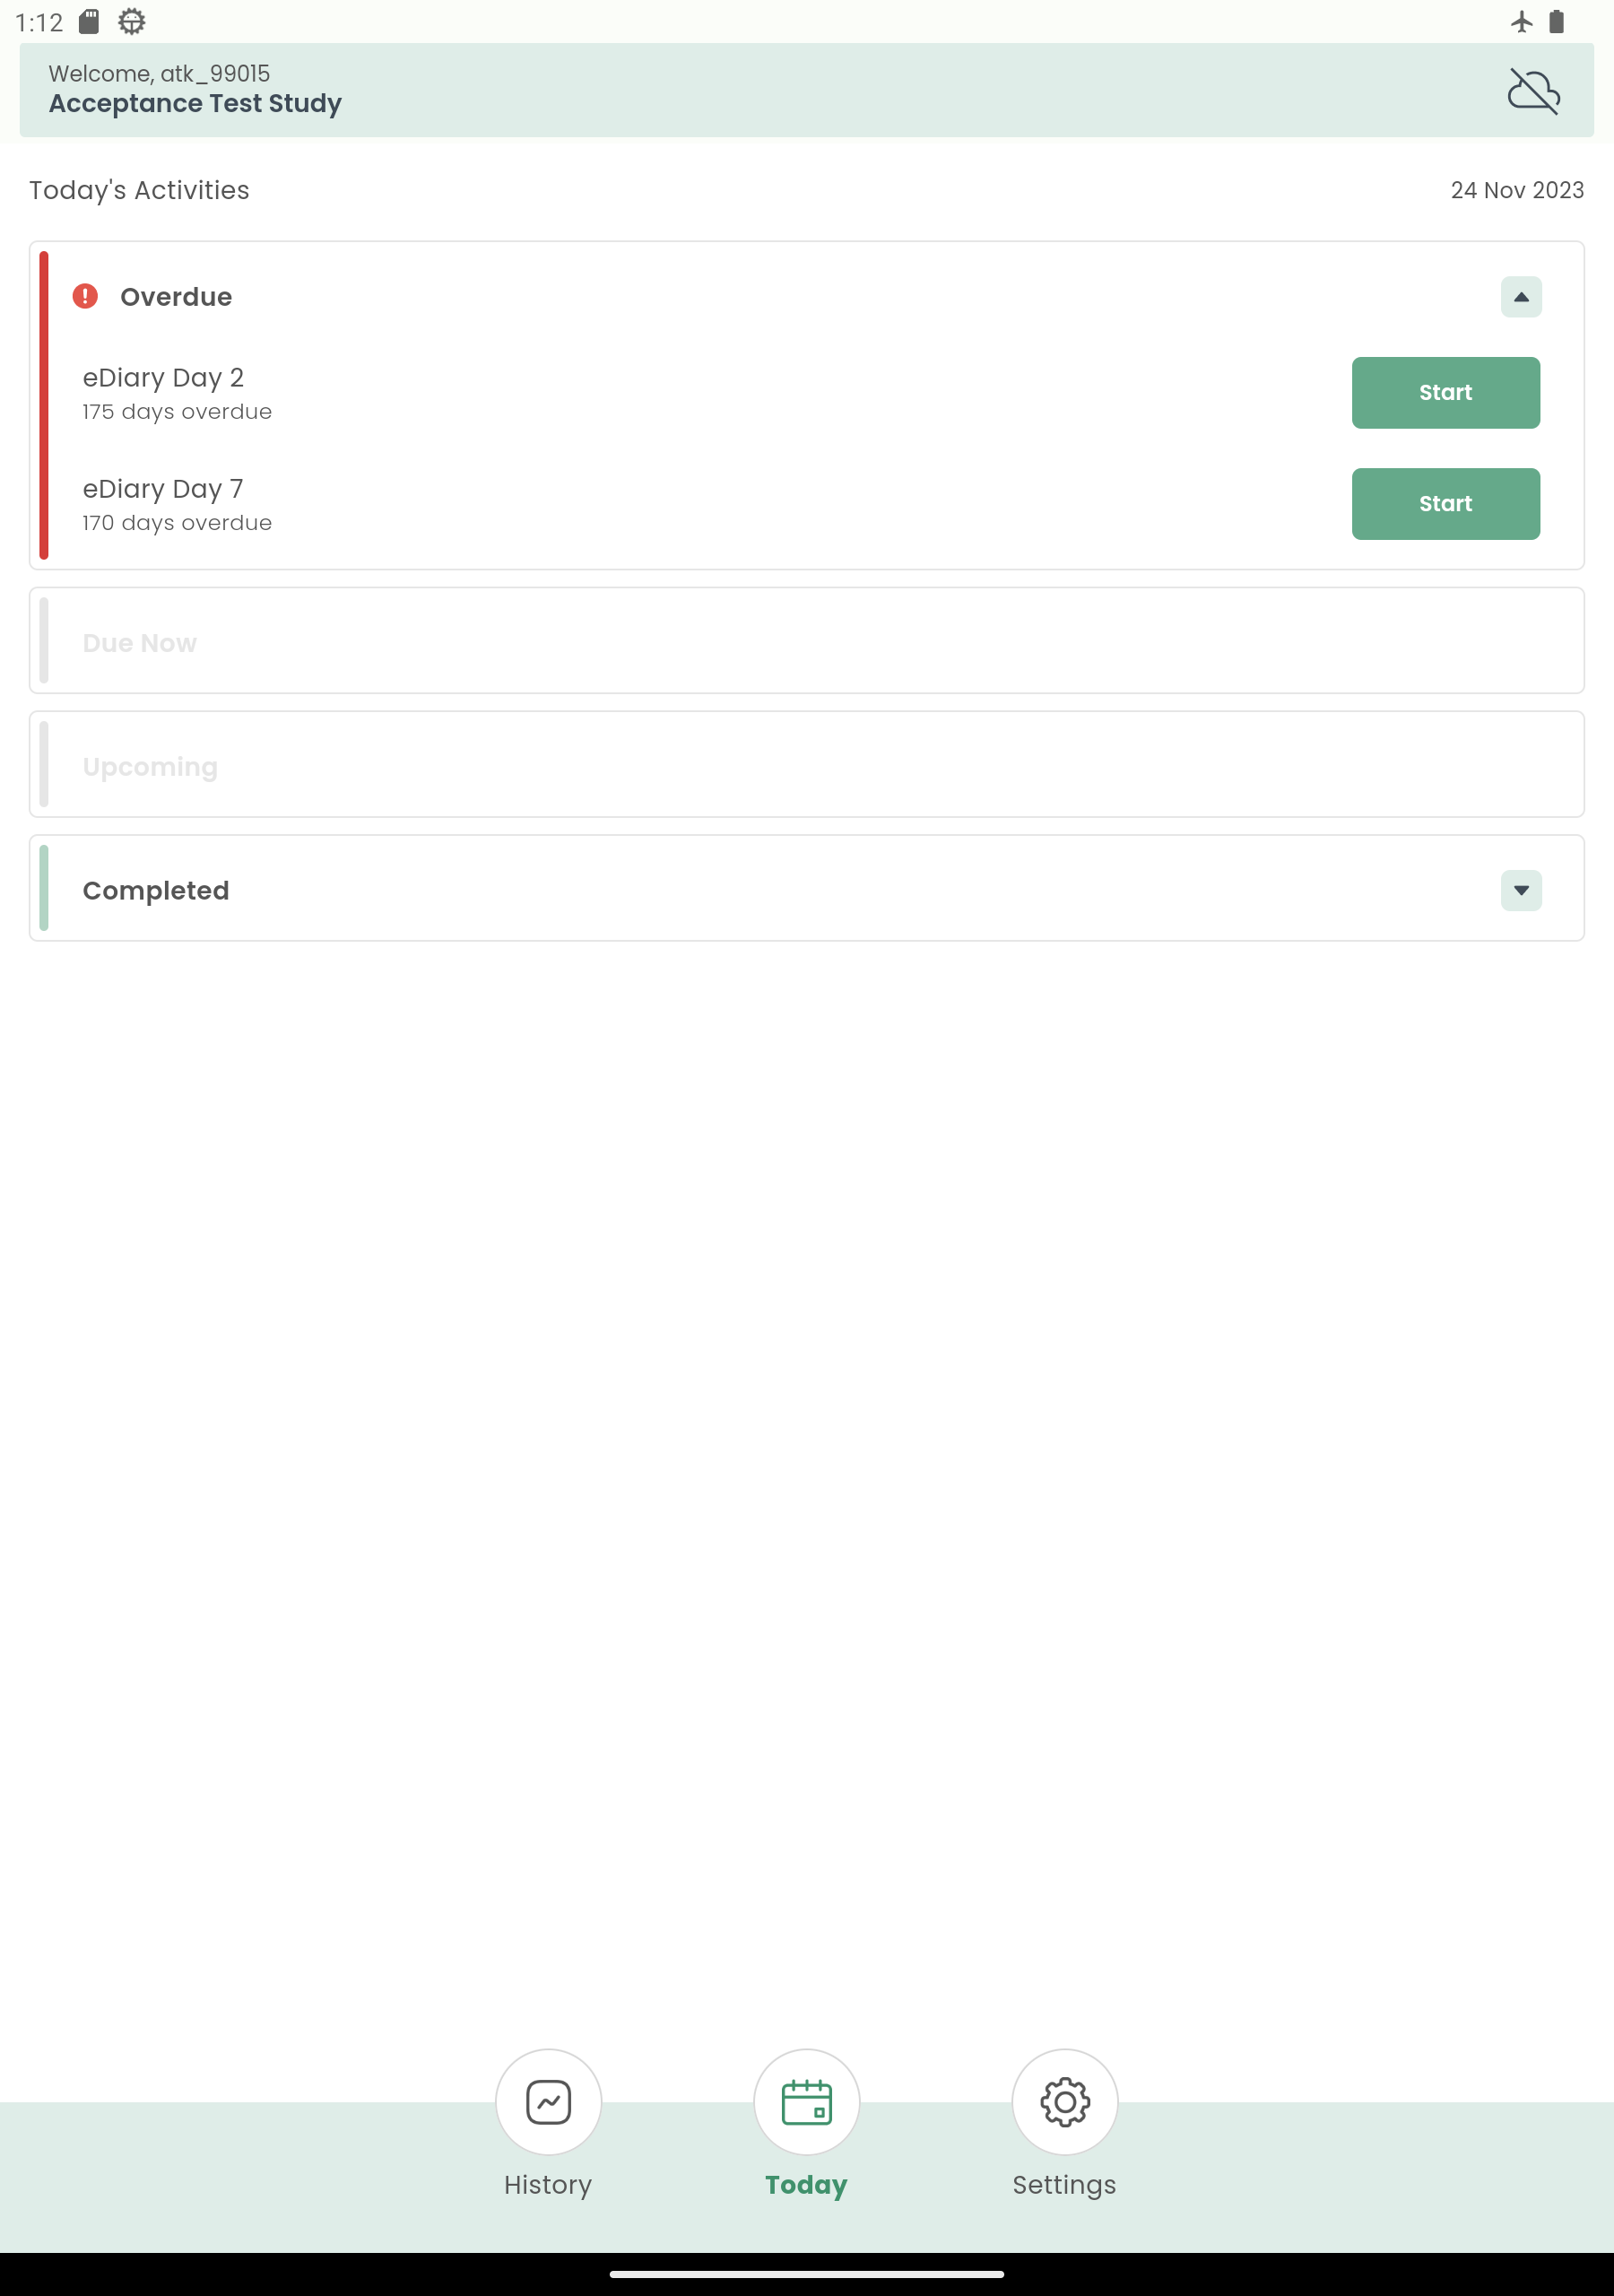
Open DFengage, login with your pincode. Click next to eDiary Day 2 (plate 32).
Click Today's date, Select a date of
02 Jun 2023. Click , then .What time is it? enter
5:30 PM, click , the time field shows as17:30:00. Click .Confirm you have reviewed the instructions by checking (enabling) Read and Understood (Continue to next screen). Complete the remaining eDiary Day 2 questions by entering the following and clicking on each screen:
Pain = Quite a bit
Redness = Not at all
Swelling = A little bit
Itching = A little bit
Nausea/Vomiting = Not at all
Headache = Not at all
Fatigue = Very Much
General felling unwell = Quite a bit
Joint aches = Not at all
Muscle aches = A little bit
Other Symptoms? = N
Did you take medication for any of these symptoms? = N
Click to save the questionnaire.

Click , confirm eDiary Day 2 as Pending with the current date and time of completion, and eDirary day 1 is synced.

Close DFengage applicaiton.
Switch off airplane mode on your device or otherwise re-connect to the internet.
Open DFengage, login with your pin code. Go to and confirm you are shown as online. If the eDiary Day 2 questionnaire is still shown as Pending, click to send the questionnaire to the server. Once complete, confirm that eDiary Day 2 is shown as sent with the expected date and time.

Close DFengage applicaiton.