Table of Contents
- 17.1. Introduction
- 17.2. Tests & Requirements
- 17.3. Begin Module 17. DFweb Data Entry.
- 17.4. Verify DFweb version information, logging into DFweb and DFweb site certificate verification.
- 17.5. Copying URL and changing user passwords.
- 17.6. Creating a new subject, entering subject data.
- 17.7. Adding, modifying and resolving queries.
- 17.8. Adding, reviewing and downloading subject documents.
- 17.9. Add an Electronic Signature (eSign) to a set of completed subject records.
- 17.10. Verify removal and Re-applicaton of eSignatures.
- 17.11. End Module 17. DFweb.
![[Warning]](../../imagedata/warning.png) | Warning |
|---|---|
Optional Module. The DFweb Data Entry module requires the DFWS feature (web services API). If your DFdiscover server is not licensed for this feature, do not complete this module. DFweb is compatible with all web browsers that support the HTML5 standard, including the following web browsers:
|
Verify DFweb version information, logging into DFweb and DFweb site certificate verification.
Copying URL and changing user passwords.
Creating a new subject, entering subject data.
Adding, modifying and resolving queries.
Adding, reviewing and downloading subject documents.
Add an Electronic Signature (eSign) to a set of completed subject records.
Verify removal and Re-applicaton of eSignatures.
Verify DFweb saves eSignature task data to the specified save level.
Estimate of Time Required: 25 Minutes
-
Start DFATK as described in Module 1 (Installation & Initialization).
-
Click followed by to begin this module. Click .
![[Note]](../../imagedata/note.png) | Note |
|---|---|
Save the |
| Note |
|---|---|
All remaining tests performed in this module have been completed using Google Chrome. Results and/or test steps may vary with other browsers. |
-
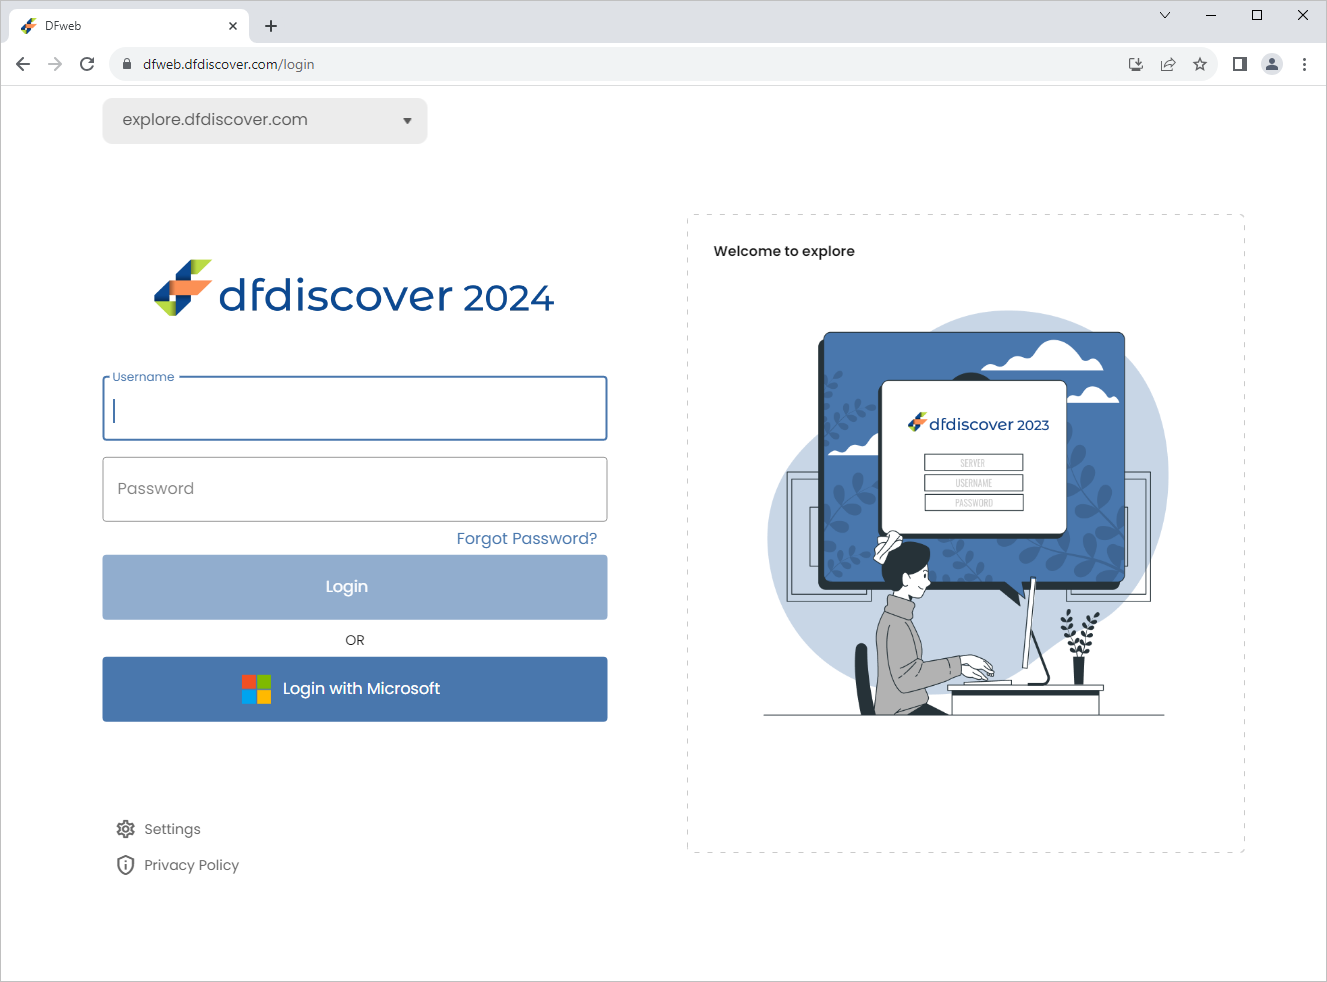
Open a web browser and navigate to https://dfweb.dfdiscover.com/login, Click
 Settings, verify the version information: DFweb Version 5.8.X is displayed.
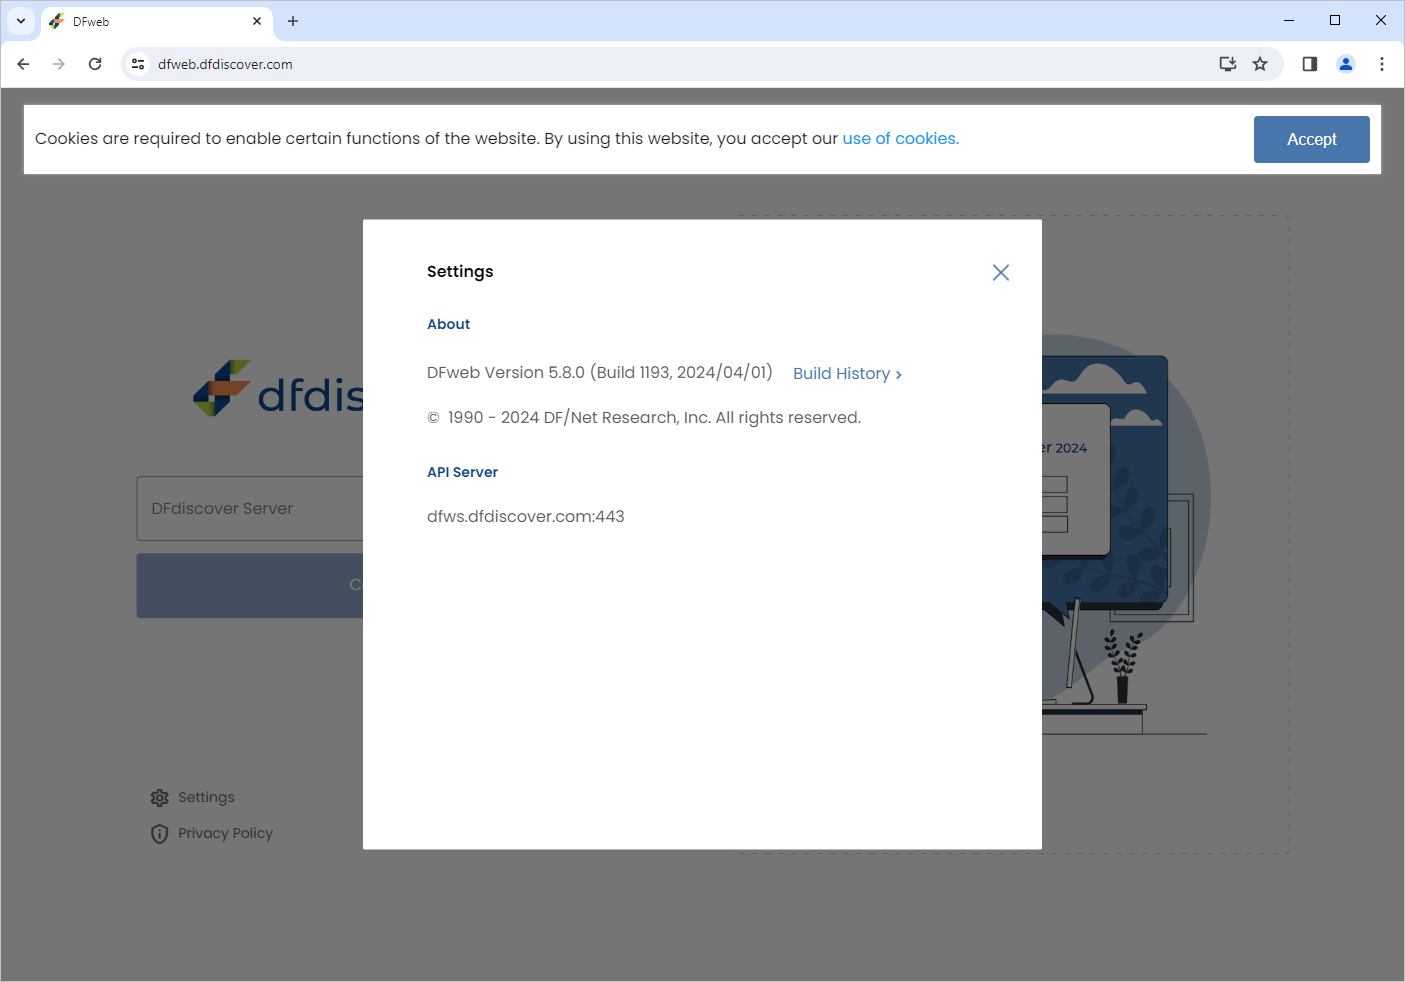
-
Click X to close the Settings window. In the DFweb login dialog, enter the DFdiscover Server name that has been provided by your administrator. Click .
-
Enter
site_monitorin the Username field and the previously assigned password in the Password field. Click to login.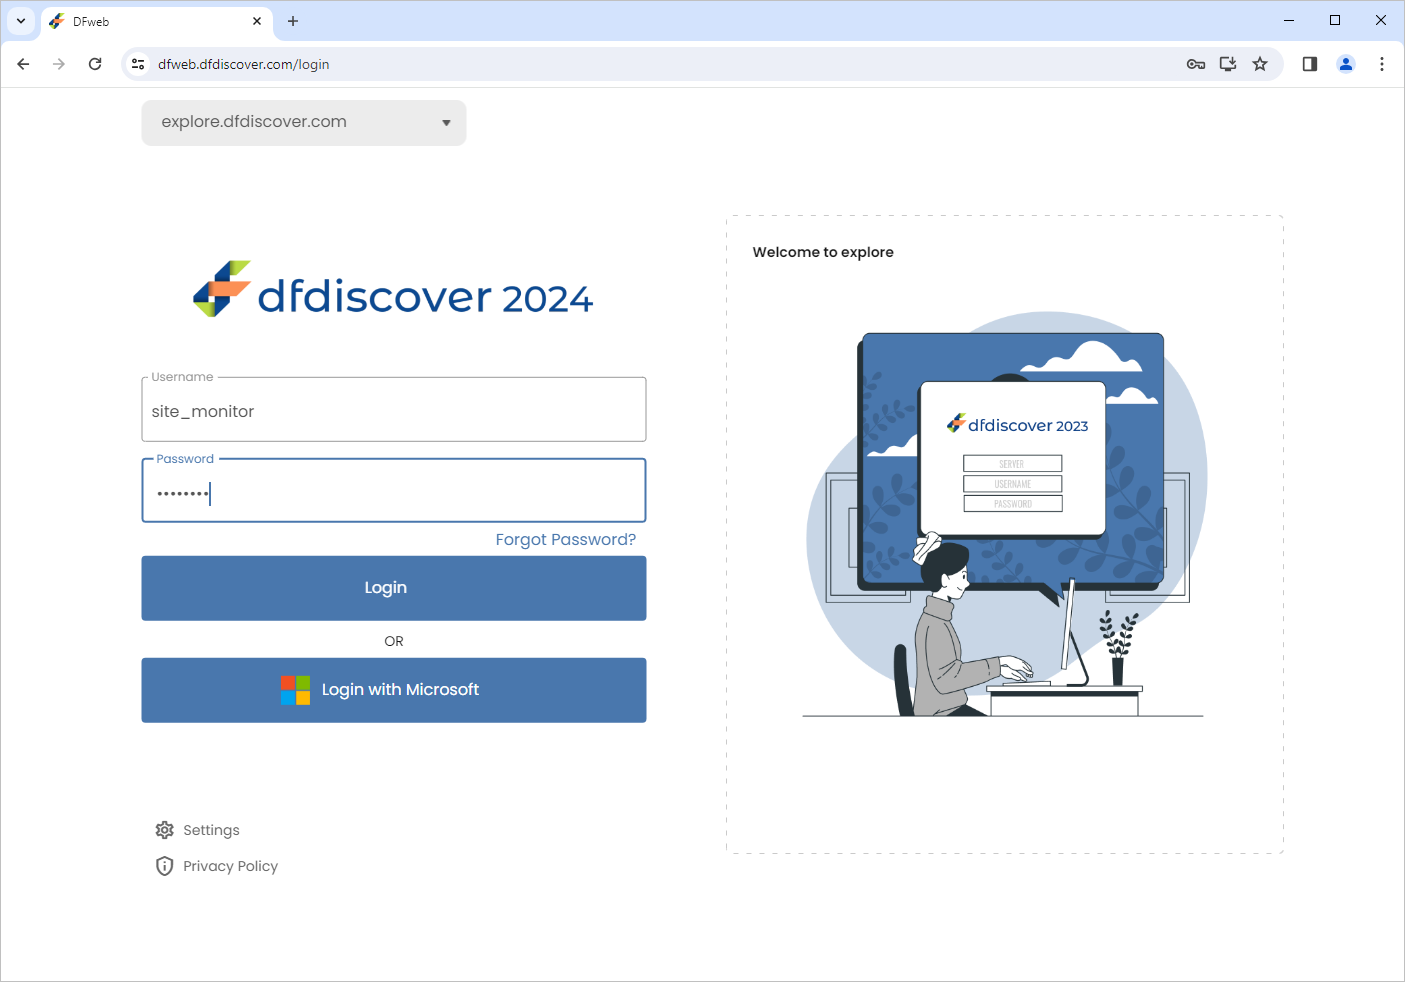
-
A list of subjects for Hospital #99 is displayed.

-
Click
 from the web browser address bar. Select . The website trust certificate is displayed for the current DFweb address, click or X to close the window.
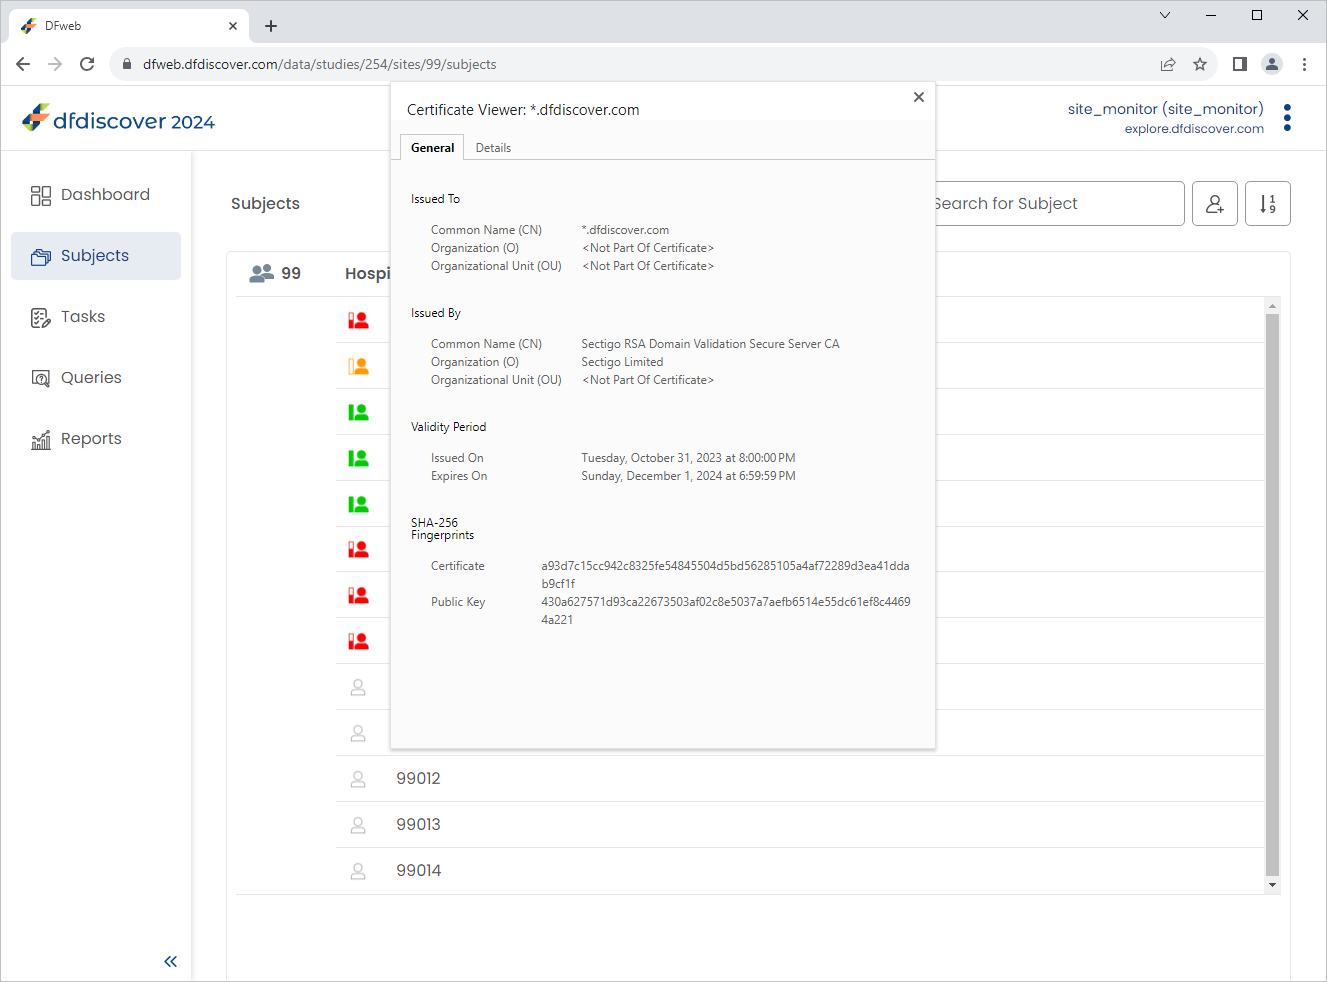
-
From the Subjects list, click Subject 99002 to open the 0: Screening Visits 1:Form 1 page.
-
Copy the DFweb URL by clicking
 > .
> . -
Open a new browser tab, paste the copied URL into the new browser tab, click Enter. The pasted URL in the new tab re-directs you to the DFweb login page. Login again using
site_monitorcredentials, upon logging in confirm you are taken to the same subject data record as the previous web browser tab. Close the web browser tab. -
Click
> > Change Password to view the Change Password window. Click .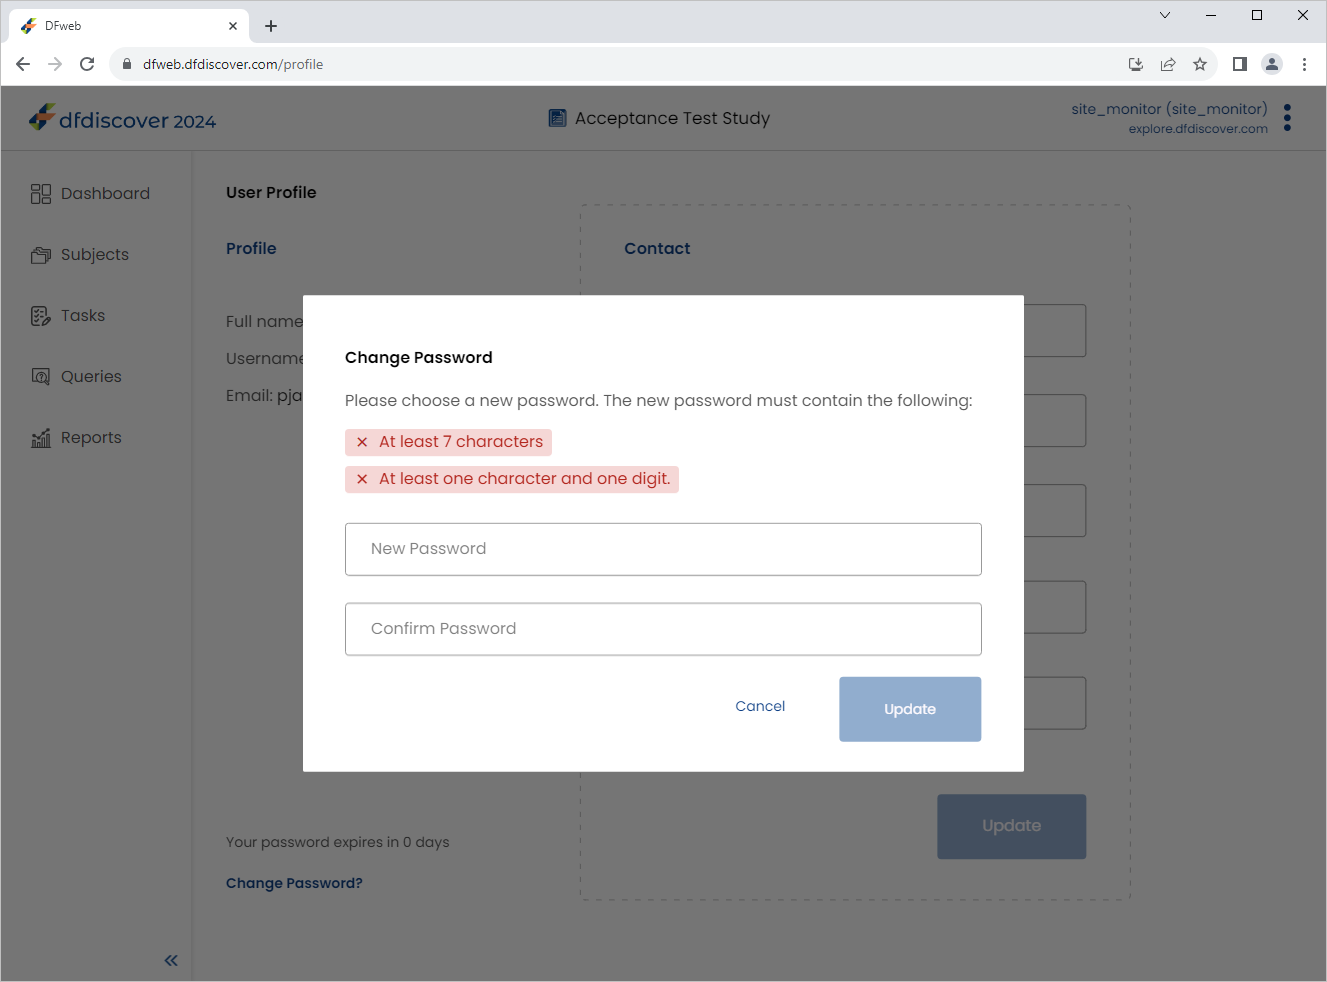
-
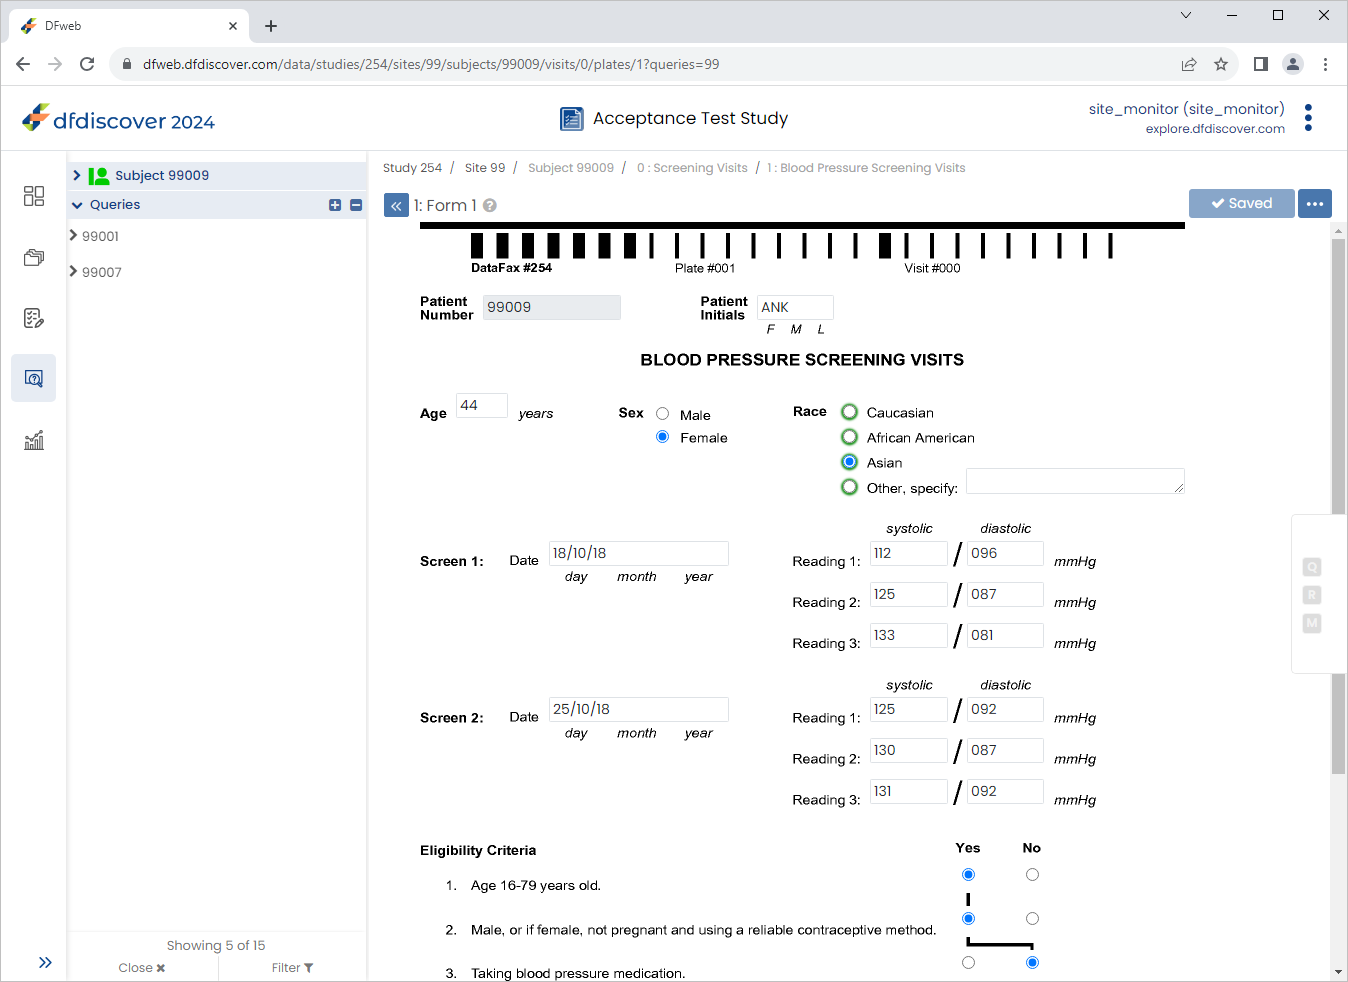
Click
 Subjects , select 99010 to open the 0: Screening Visits 1:Form 1 page.
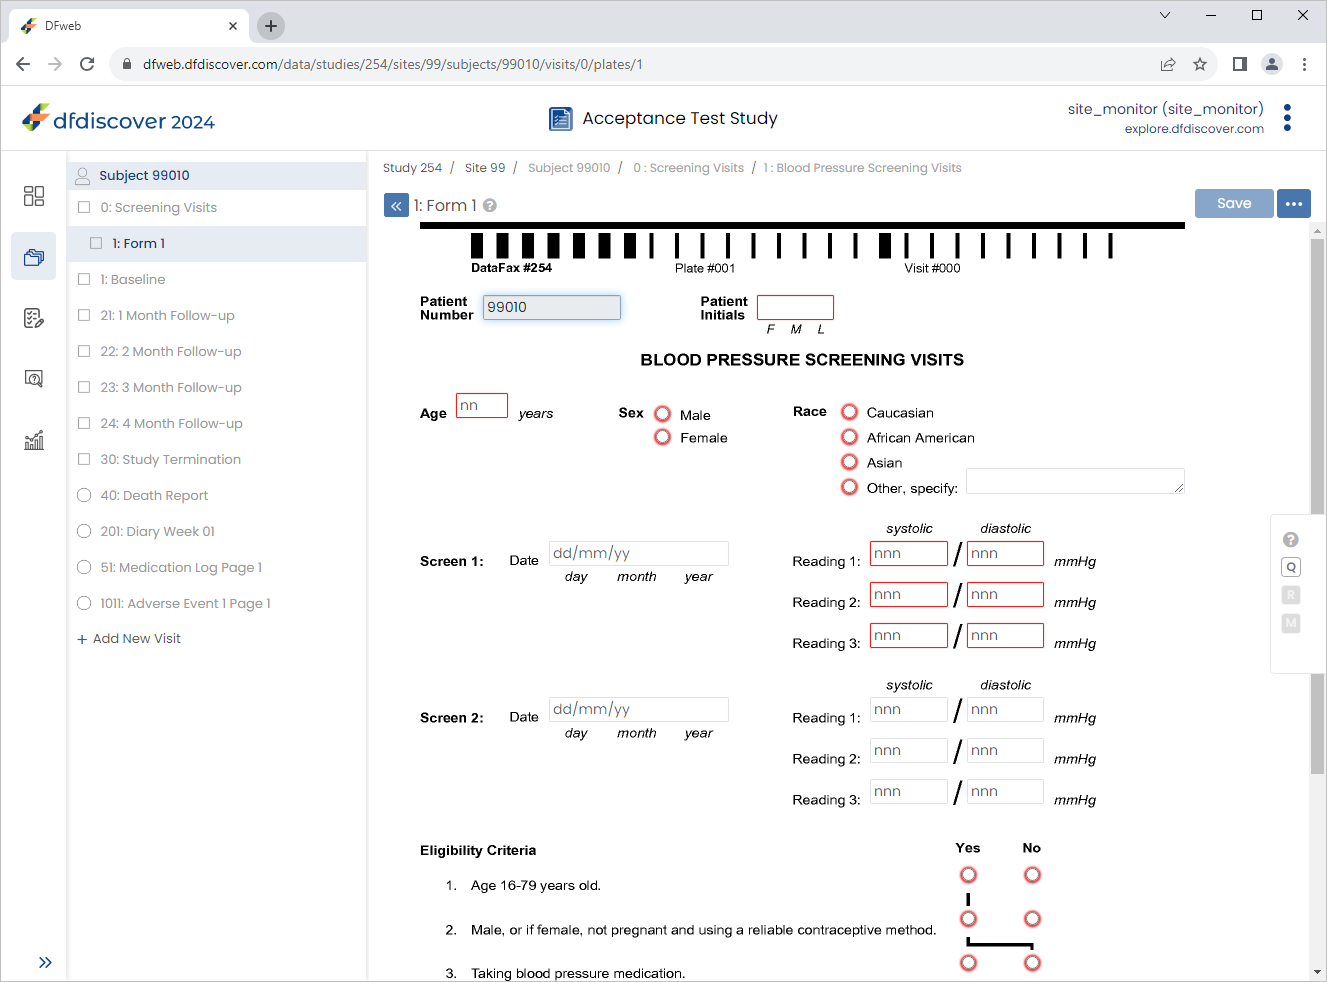
-
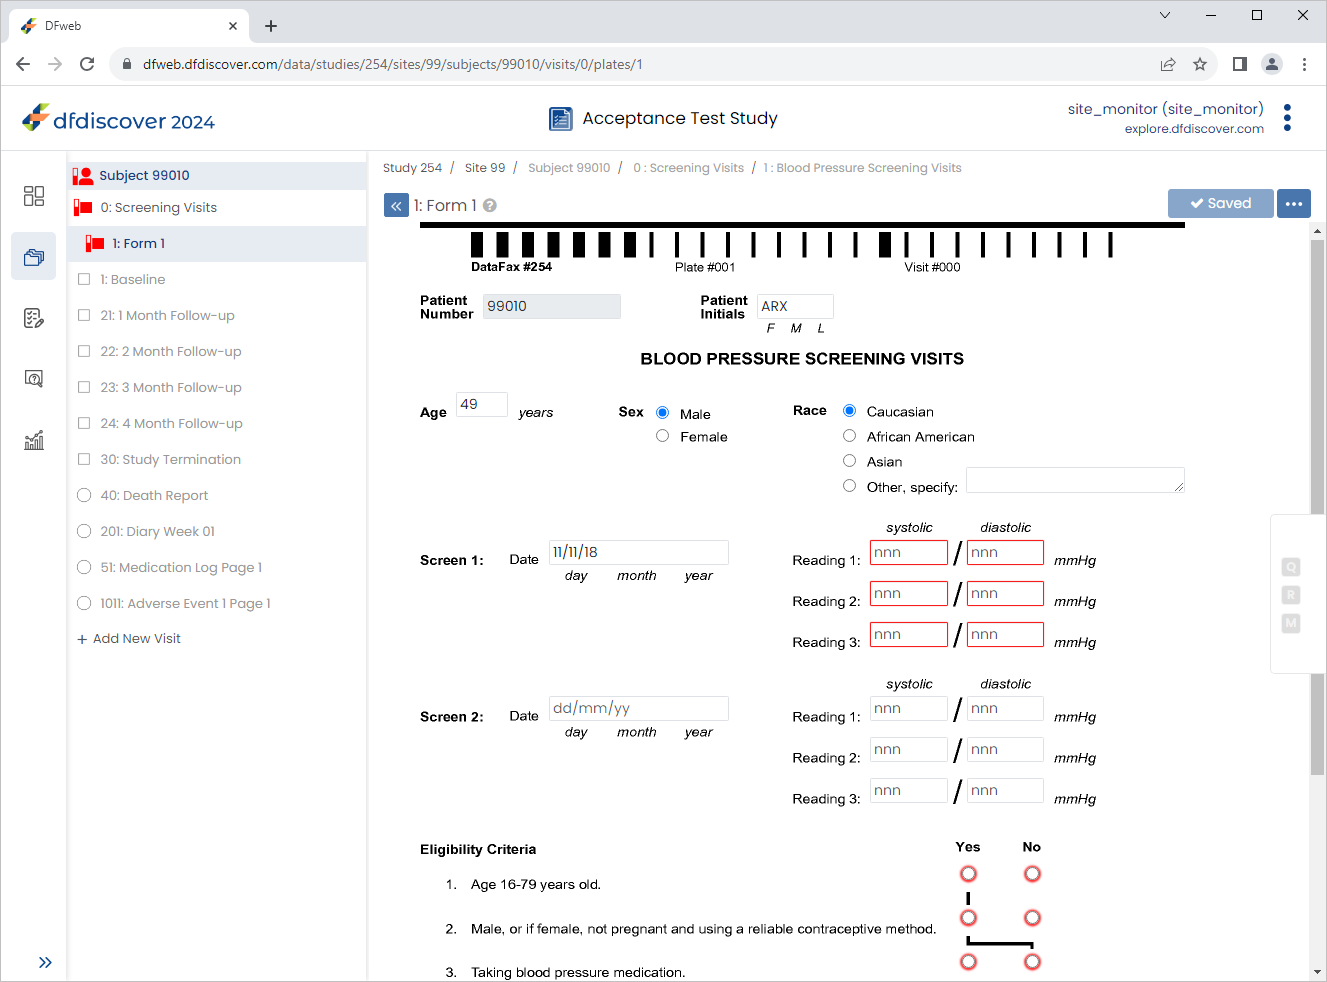
Click Patient Initials enter
ARX, Set:Age (years) =
49Sex = male
Race = caucasian
Screen 1 Date = Click
 icon, select
 11-Nov-2018
Click
 .
.
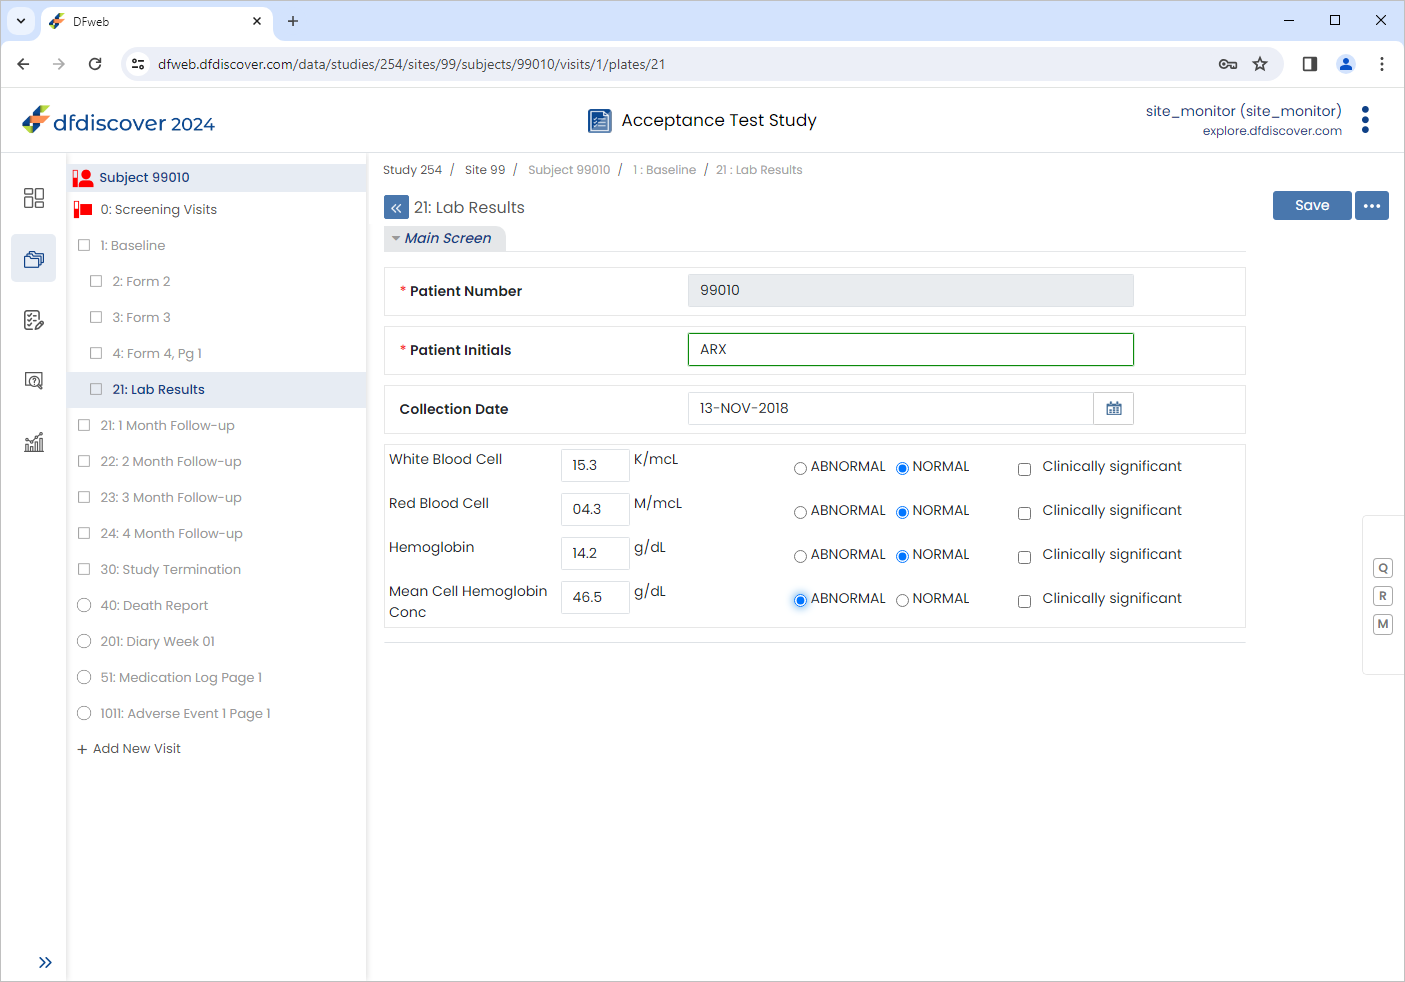
Select 1:Baseline > 21:Lab Results page. Click Patient Initials field.
Note The
SetInitedit check executes upon entry to the field. If the initials are available on 1 : Form 1 (previously entered), they are retrieved and populate the Patient Initials field.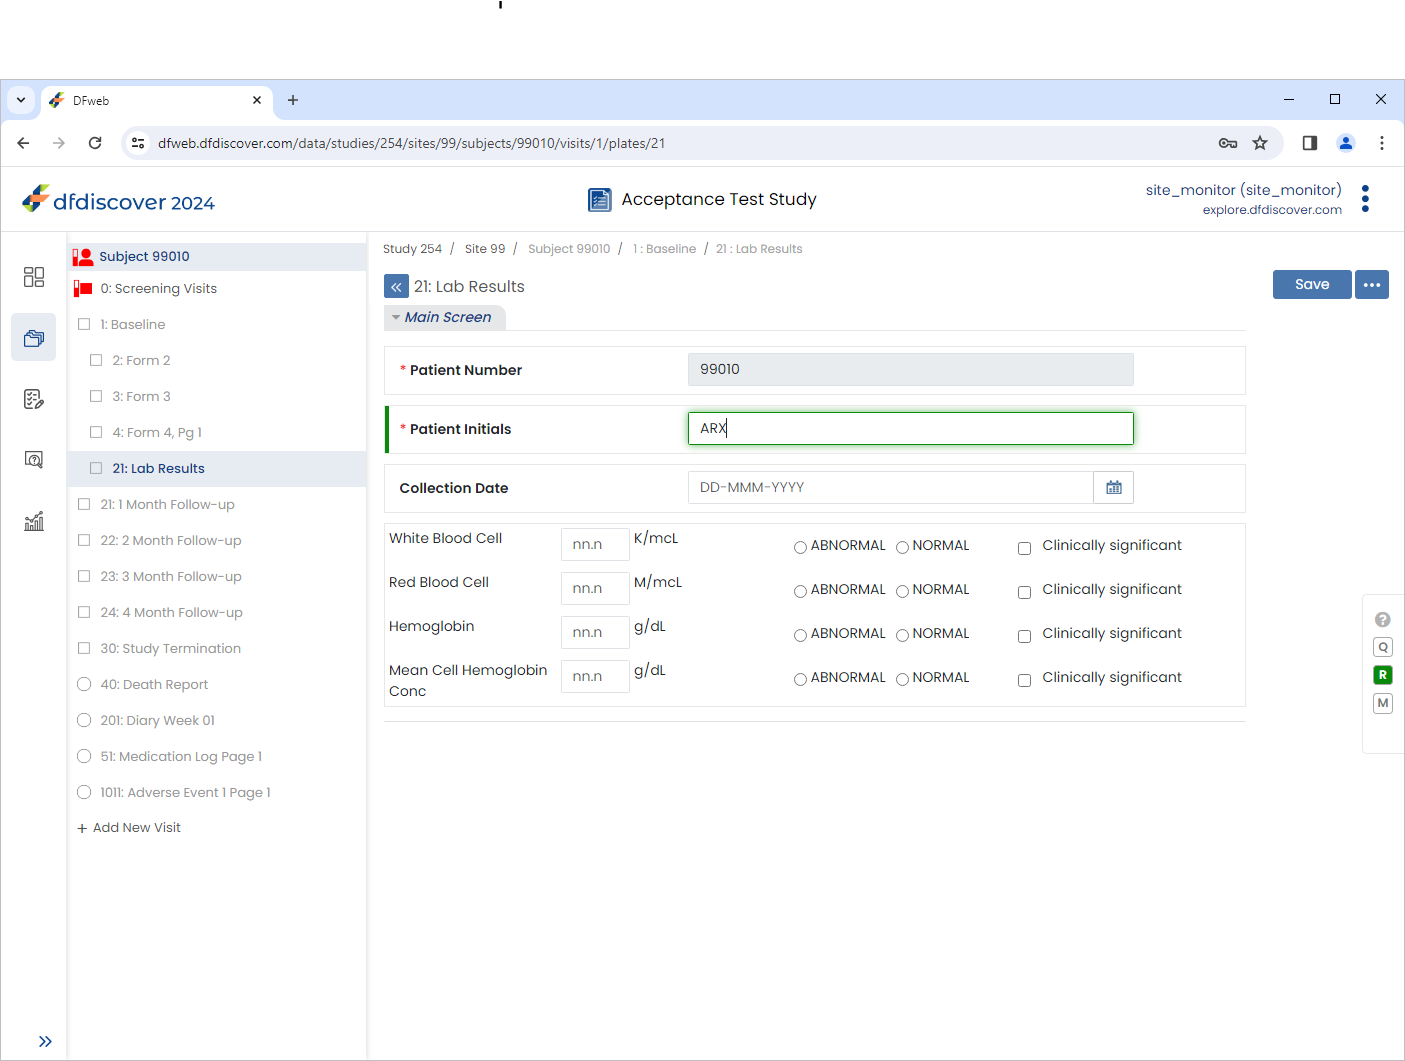
-
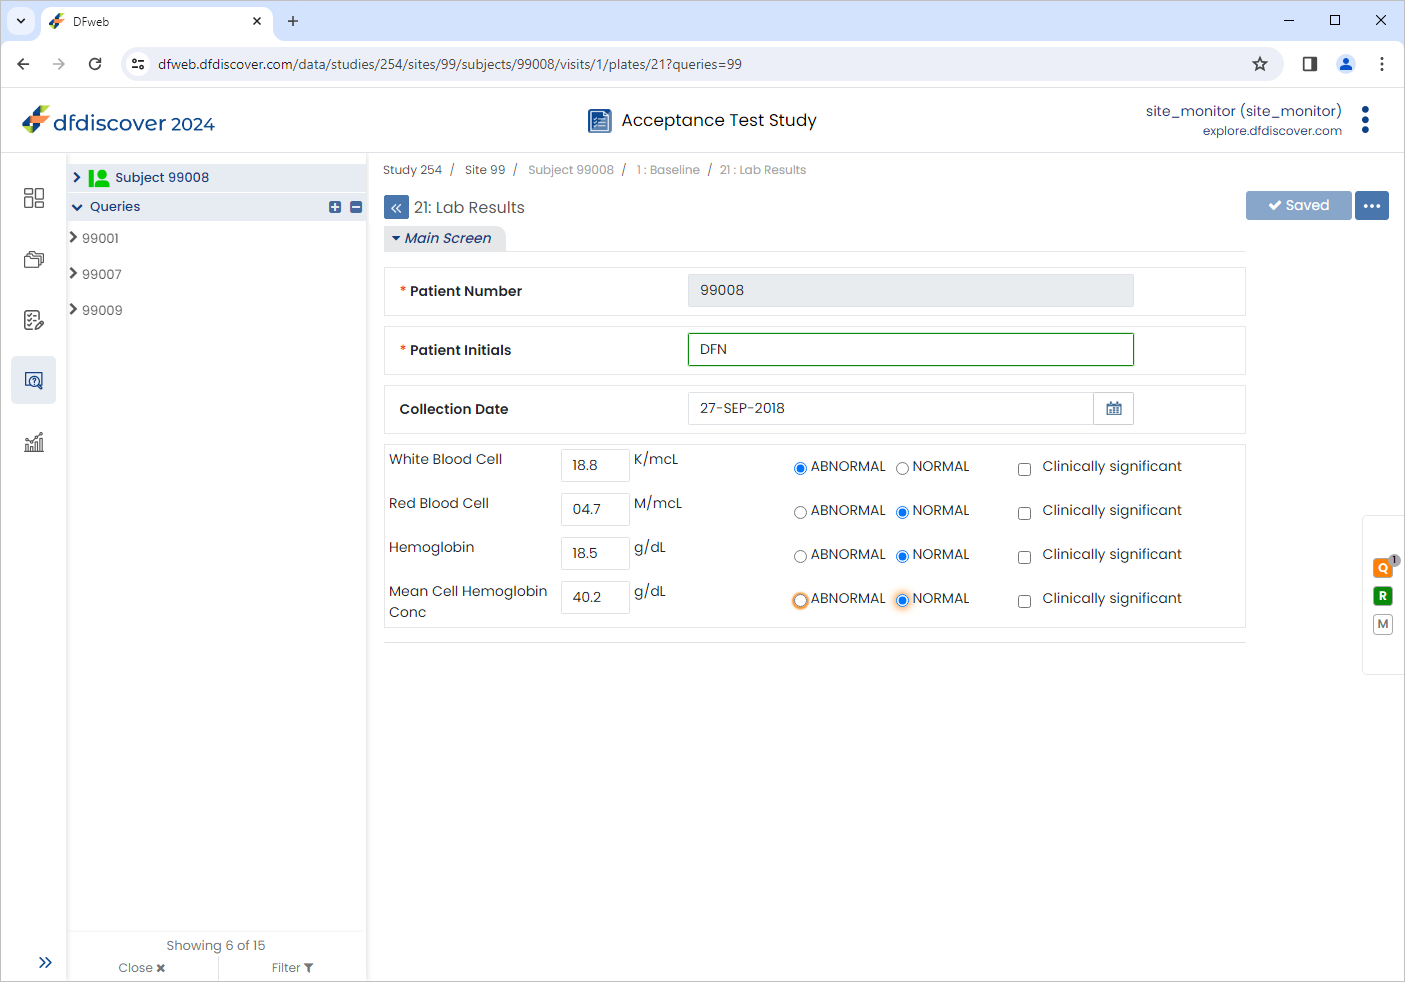
Set the remaining fields within the 21: Lab Results form as follows:
Collection Date =
13-NOV-2018White Blood Cell =
15.3, Check (enable) NORMALRed Blood Cell =
04.3, Check (enable) NORMALHemoglobin =
14.2, Check (enable) NORMALMean Cell Hemoglobin Conc =
46.5, Check (enable) ABNORMAL
-
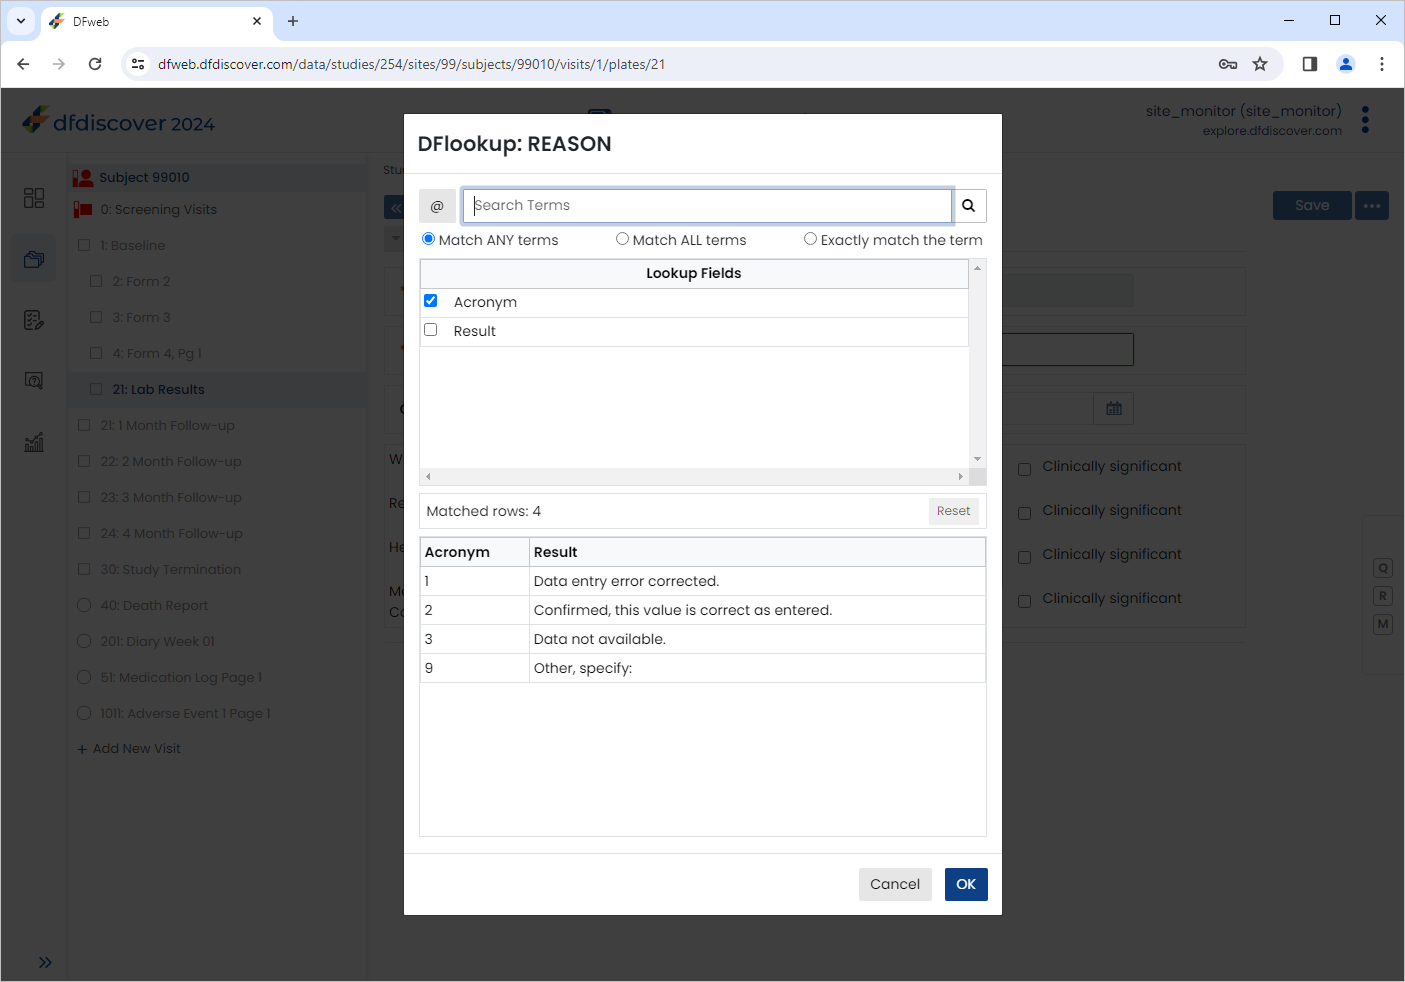
Click
 to open the Reason for Data Value dialog. Click next to Reason. The DFlookup: REASON dialog is displayed.
-
Select the Result of Confirmed, this value is correct as entered., Click , followed by then
.
-
Select 51: Medication Log Page 1 > 8: Form 8, Pg 51 page. Click Patient Initials field.
Note The
SetInitedit check executes upon entry to the field. If the initials are available on 1 : Form 1 (previously entered), they are retrieved and populate the Patient Initials field.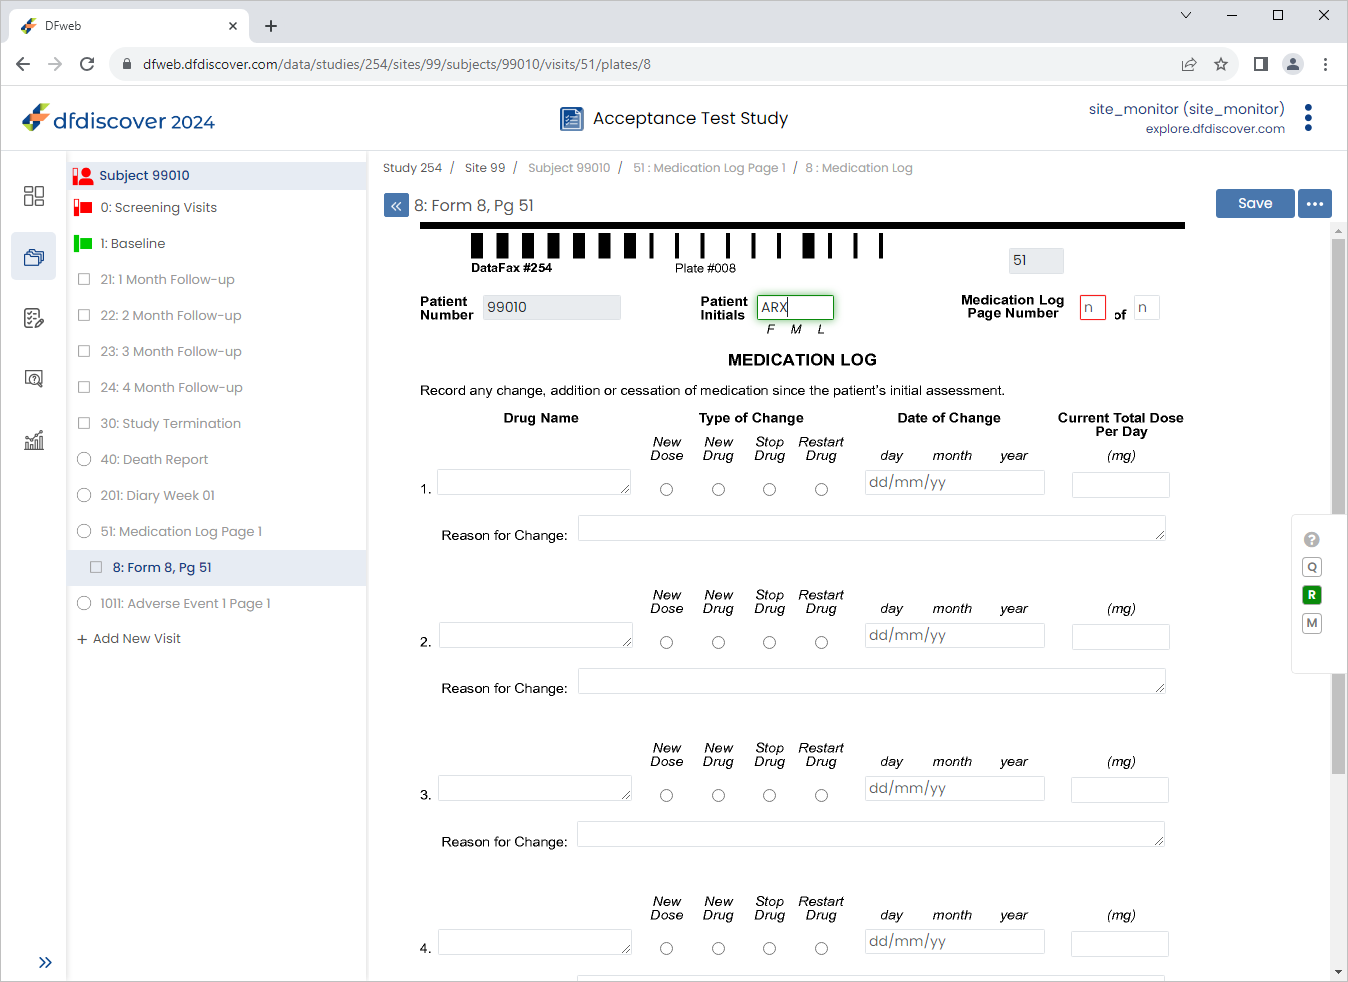
-
Press Tab. In the Medication Log Page Number field, enter values
1of1.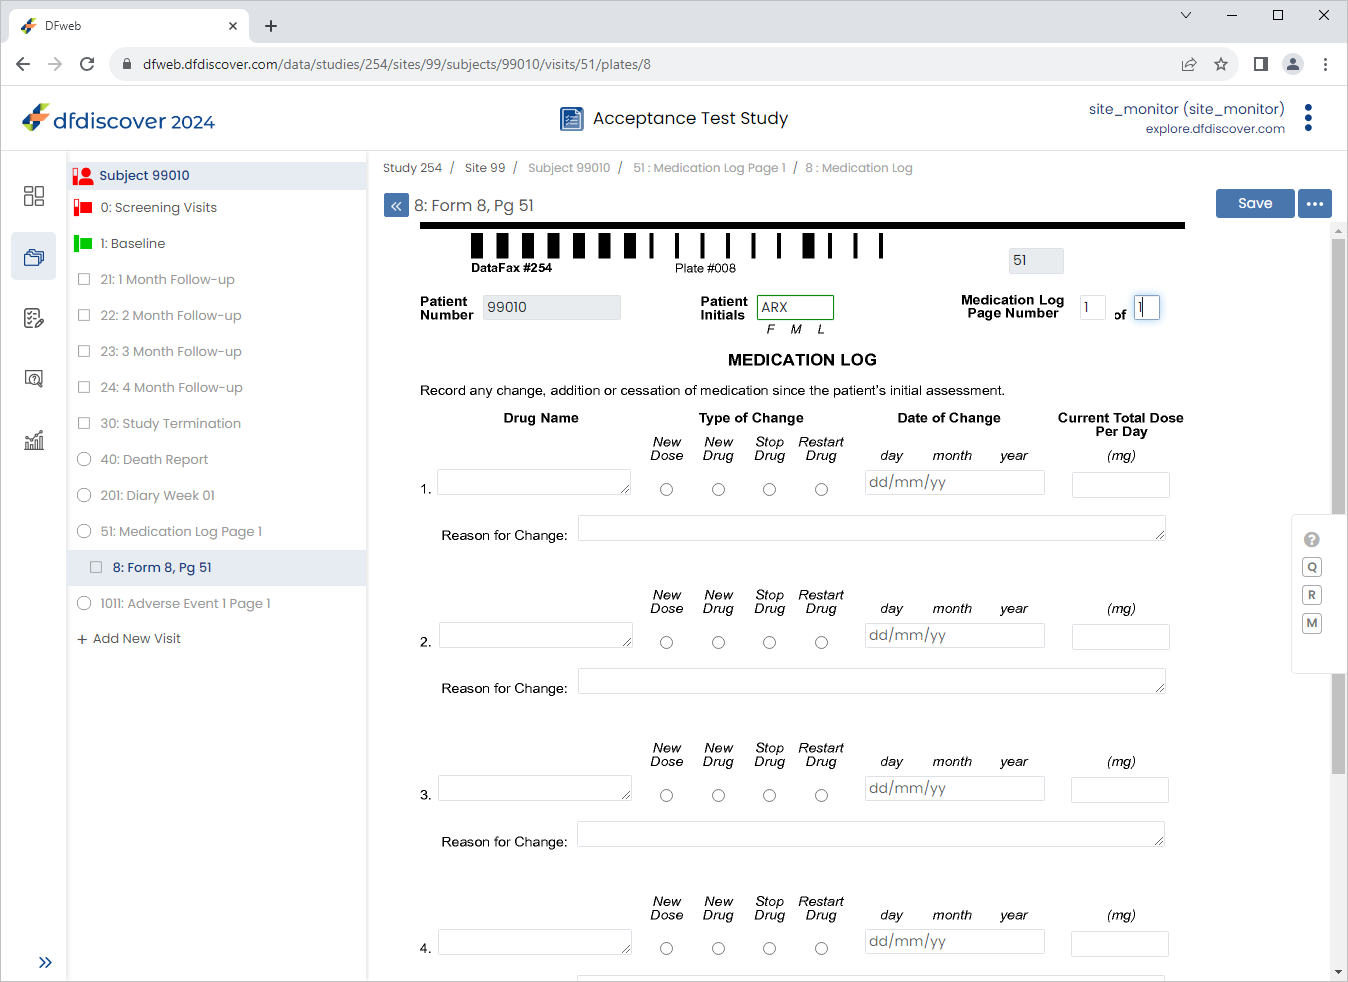
-
Press Tab to advance to 1. Drug Name field. Enter
Vitamin B-12in the 1. Drug Name text field, press Tab. Upon leaving the field, an edit check is executed and DFlookup: drugs dialog appears.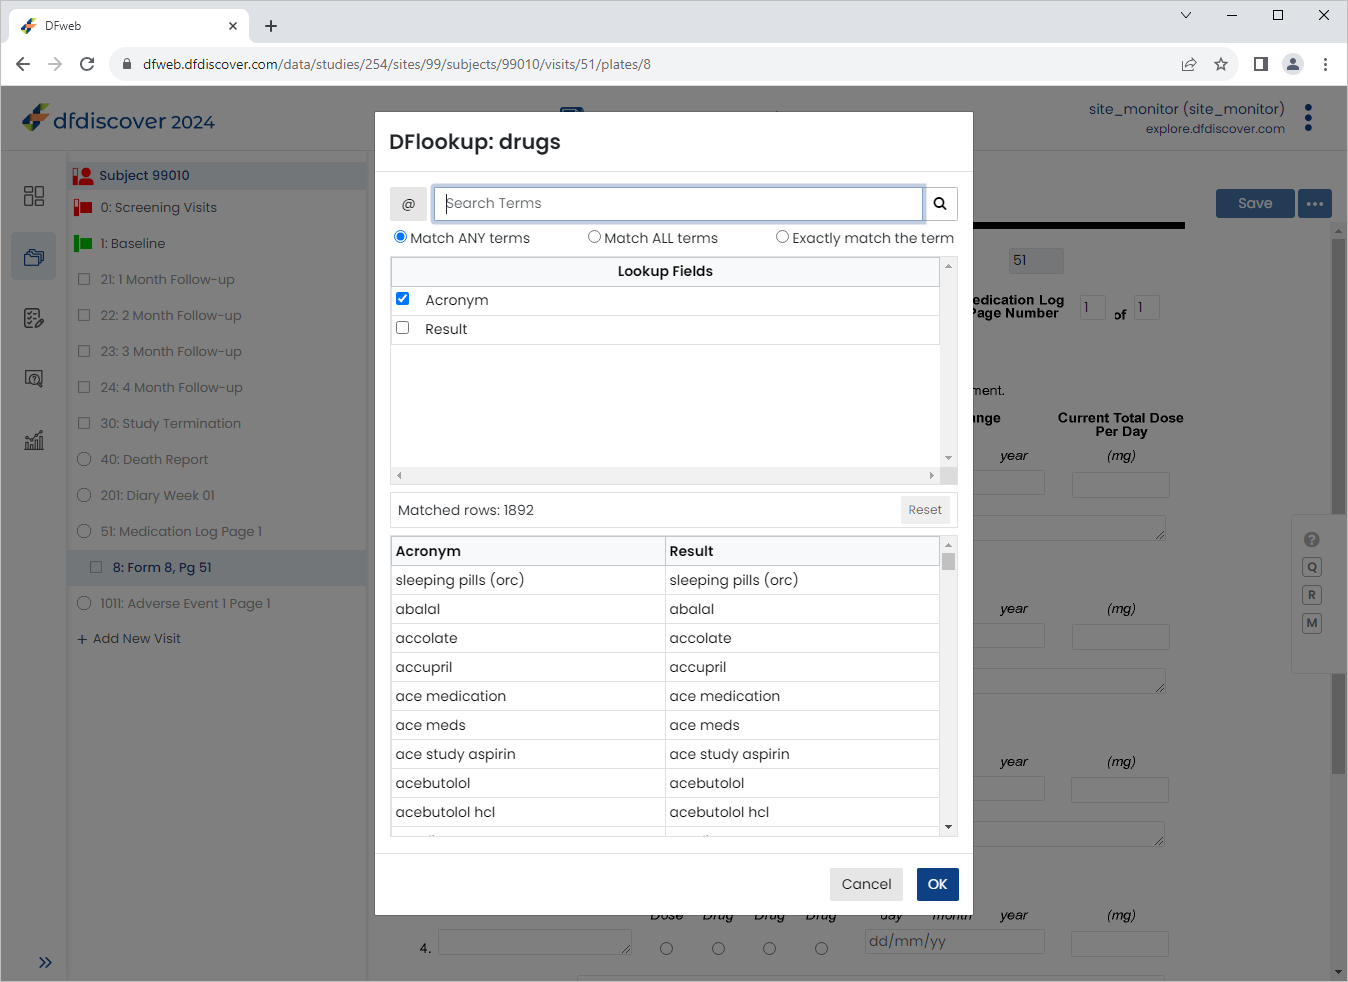
-
Enter
vitamin b12in the Search Terms, Check Match ALL terms and click to filter the results.
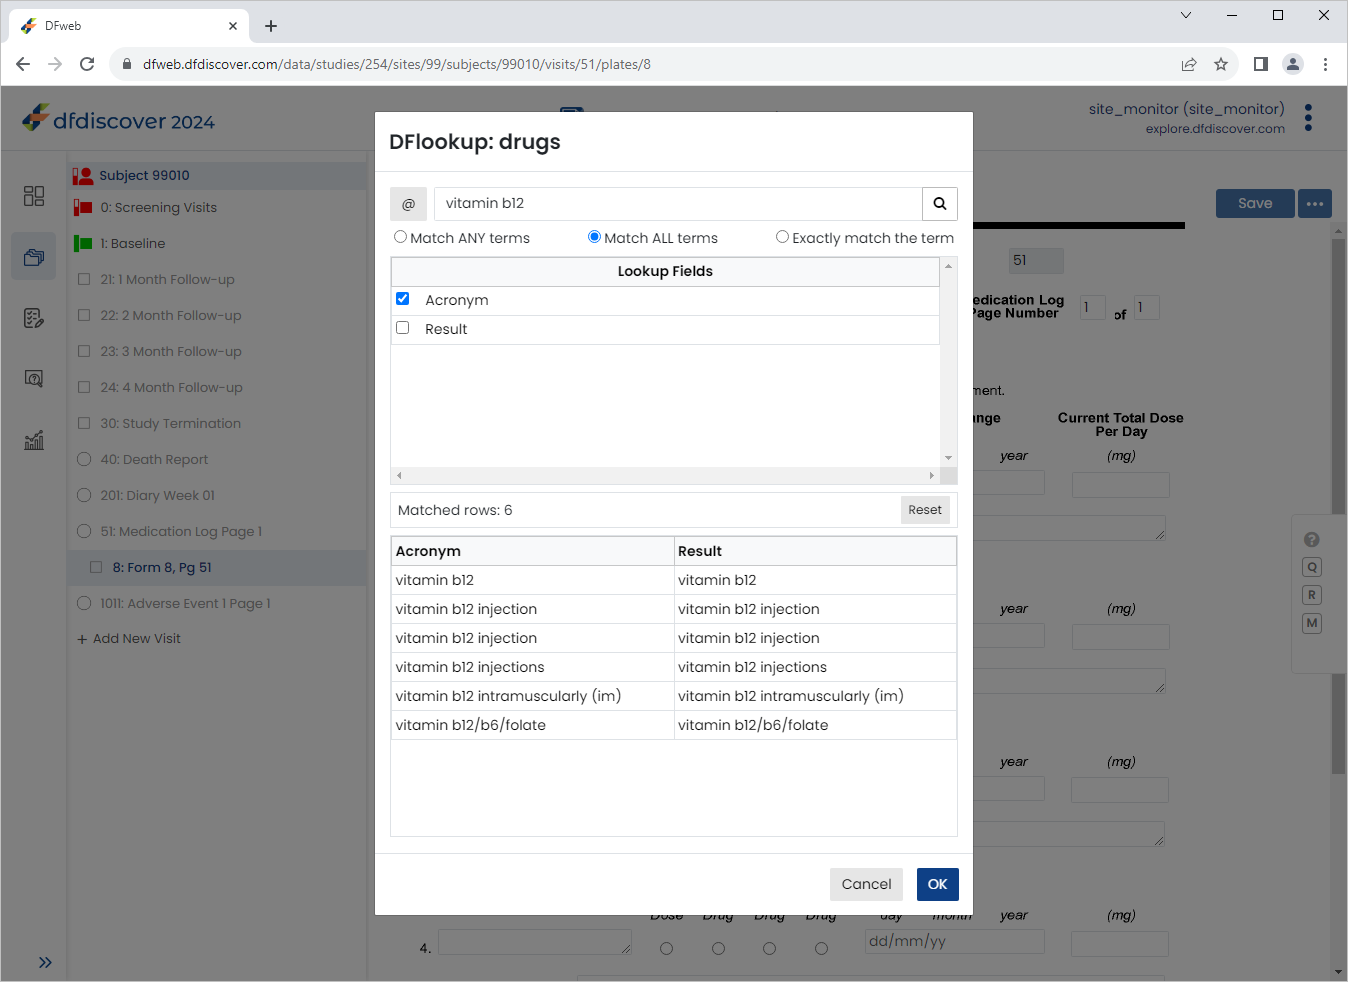
-
Select the result of vitamin b12 from the table. Click . The 1. Drug Name field becomes auto-populated with
vitamin b12result.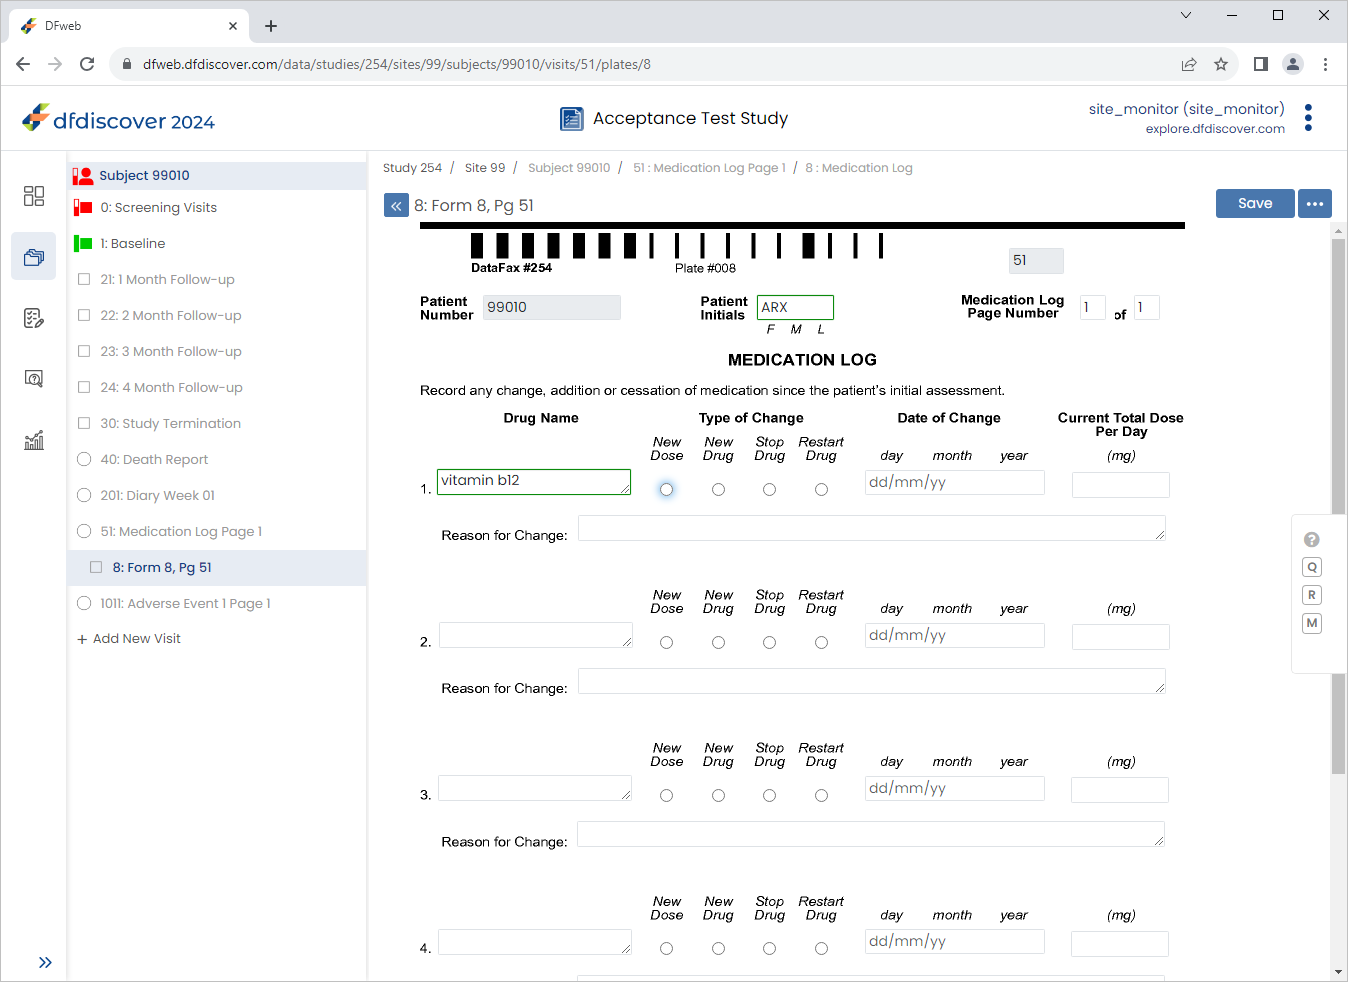
-
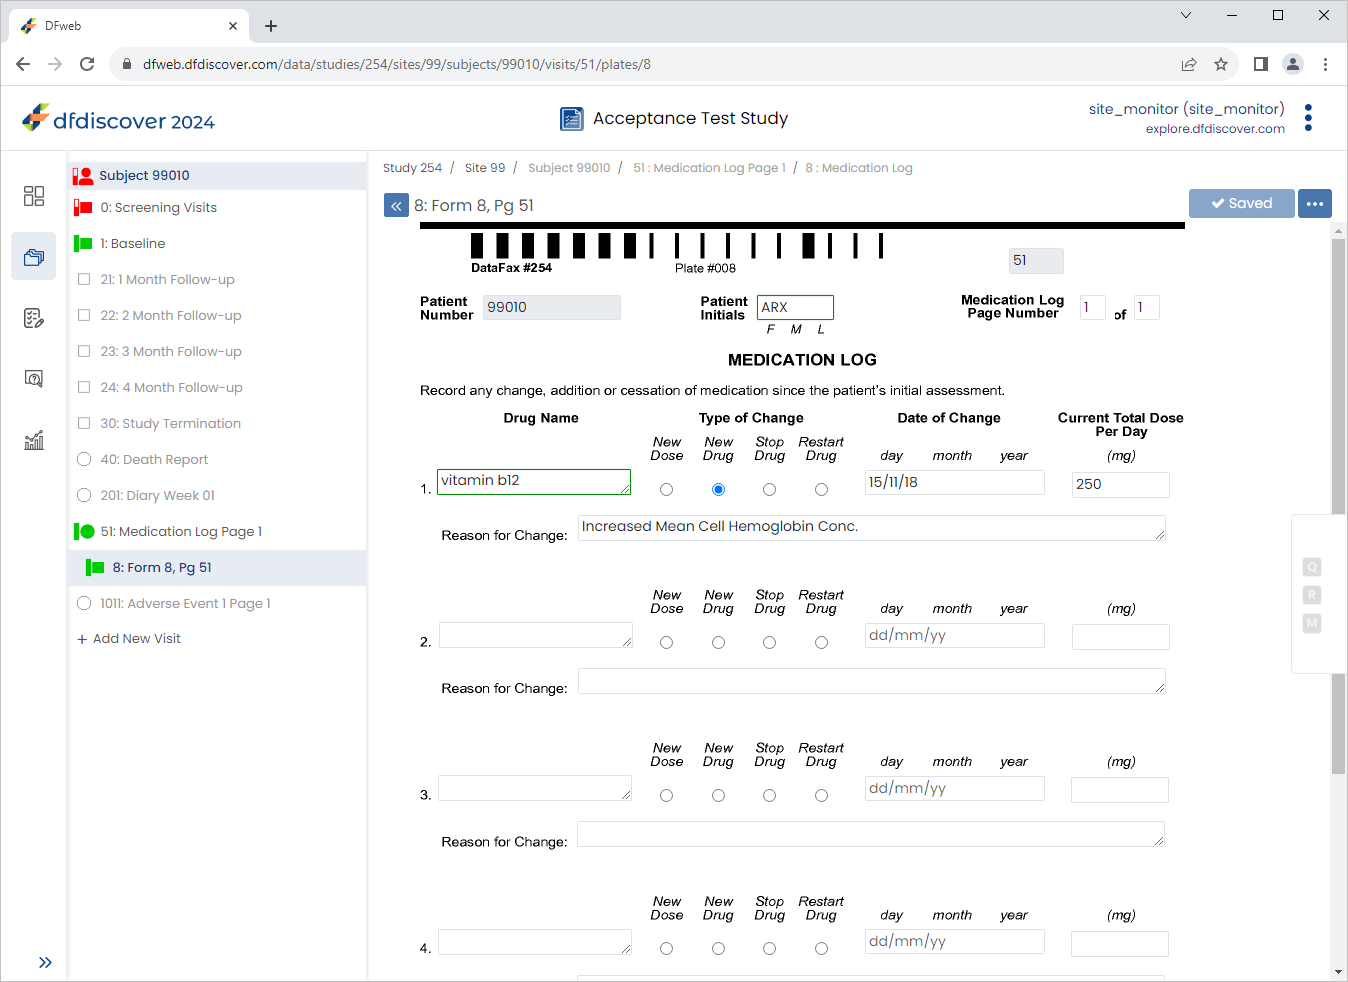
Beginning with the Type of Change field complete the remaining data fields as follows:
Type of Change = Select New Drug
Date of Change = Select
15/11/18Current Total Dose Per Day =
250Reason for Change =
Increased Mean Cell Hemoglobin Conc.
Click
.
-
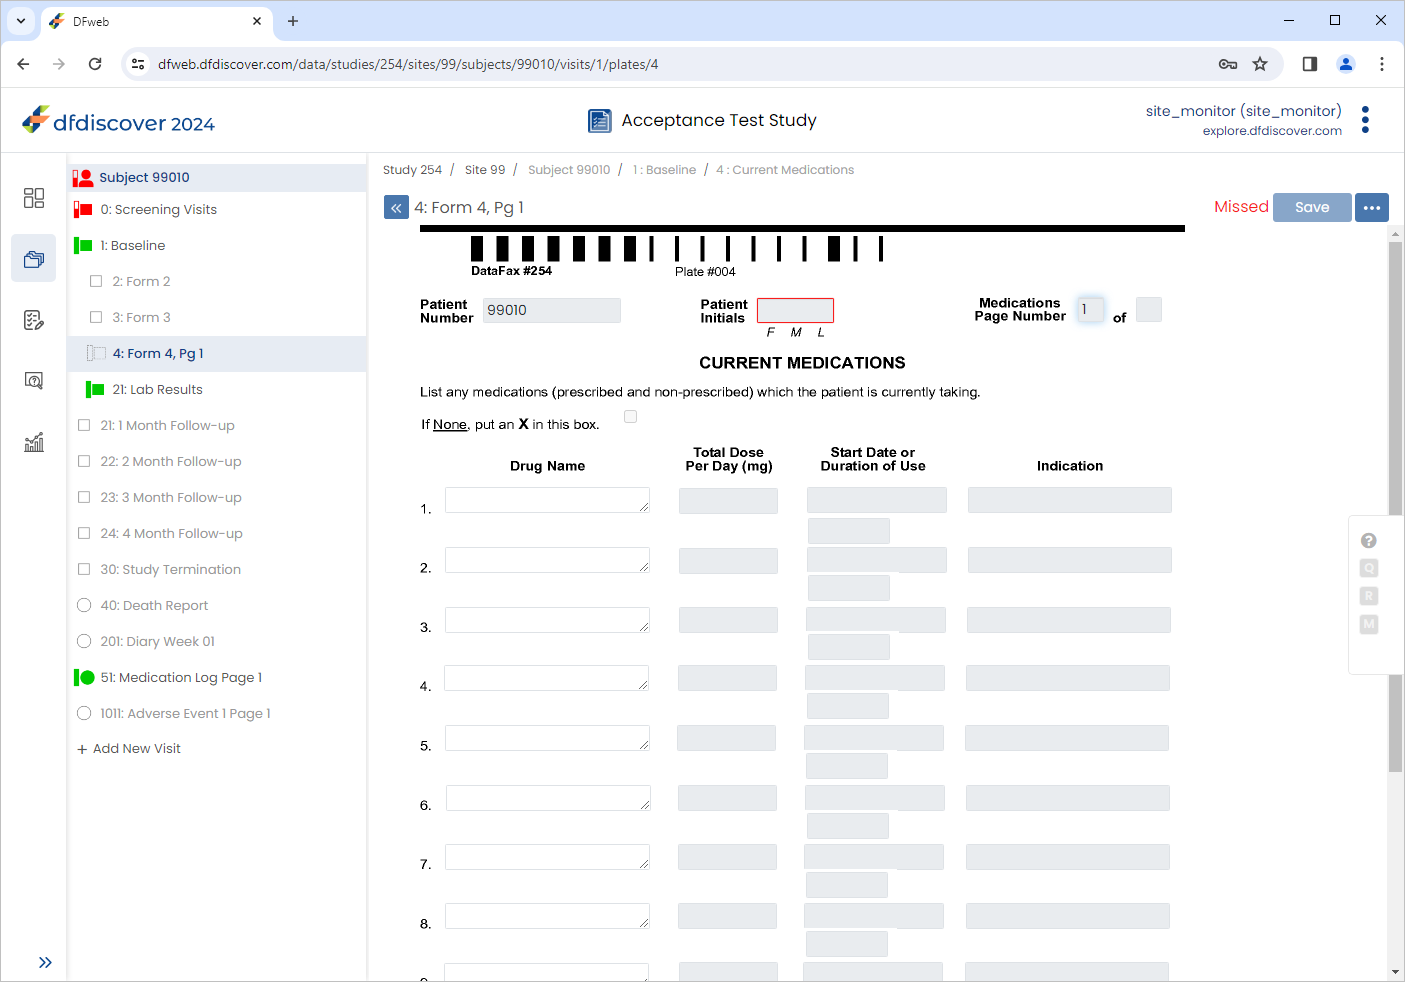
Select 1: Baseline > 4 : Form 4, Pg 1. Click
 > Set Page Missed to open the Set Page Missed dialog.
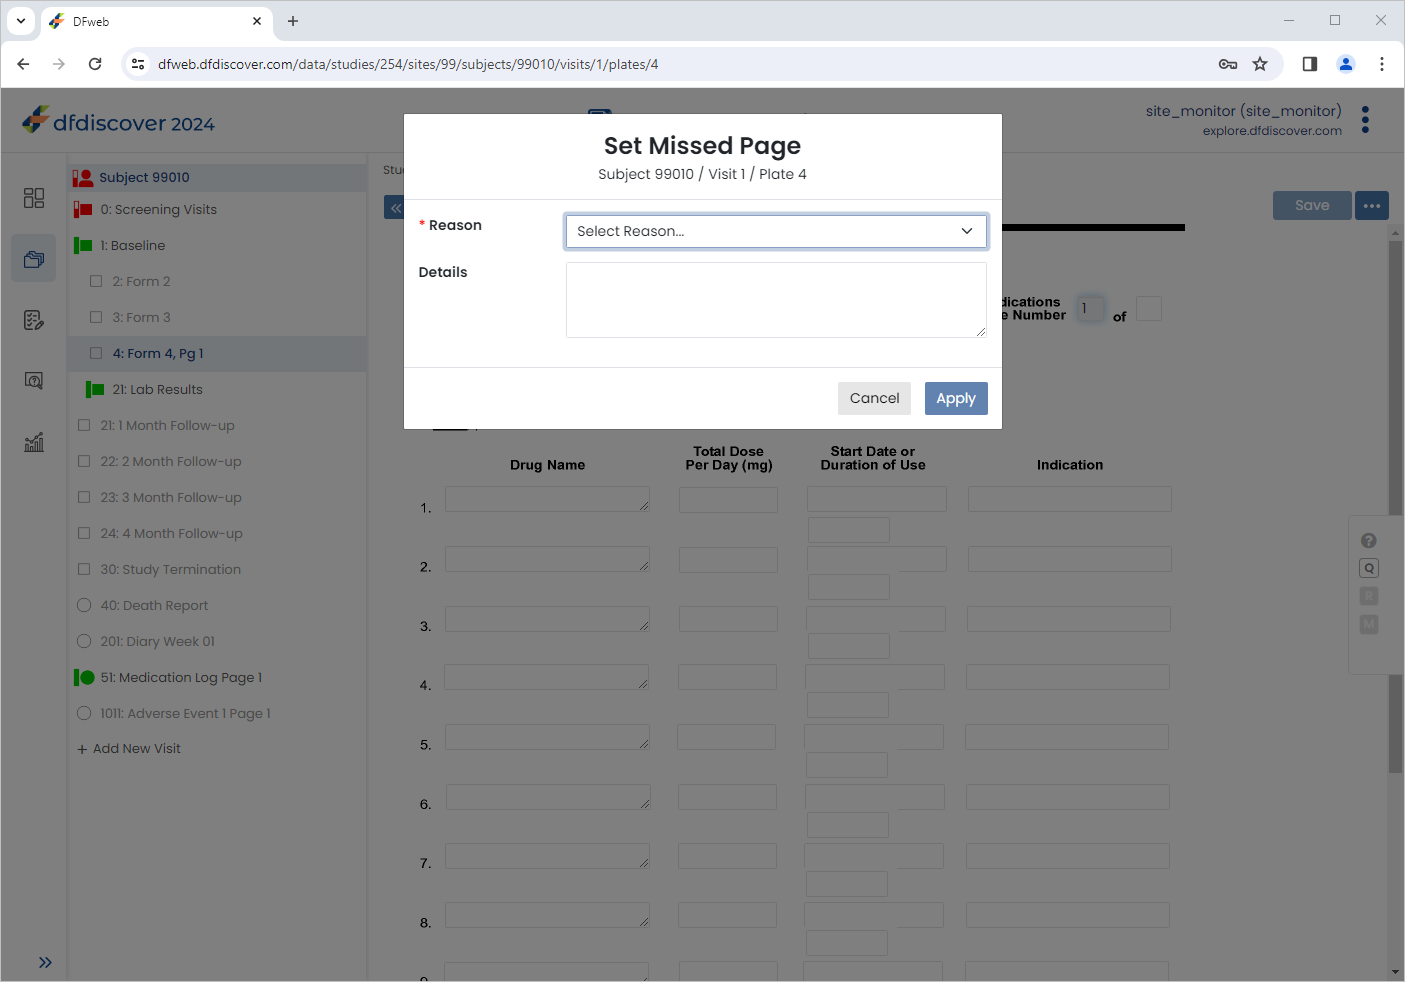
-
In the dialog, choose Other Reason value from the Reason pull-down list. Enter
Medication information provided on the Medication Log Page.as the Detail.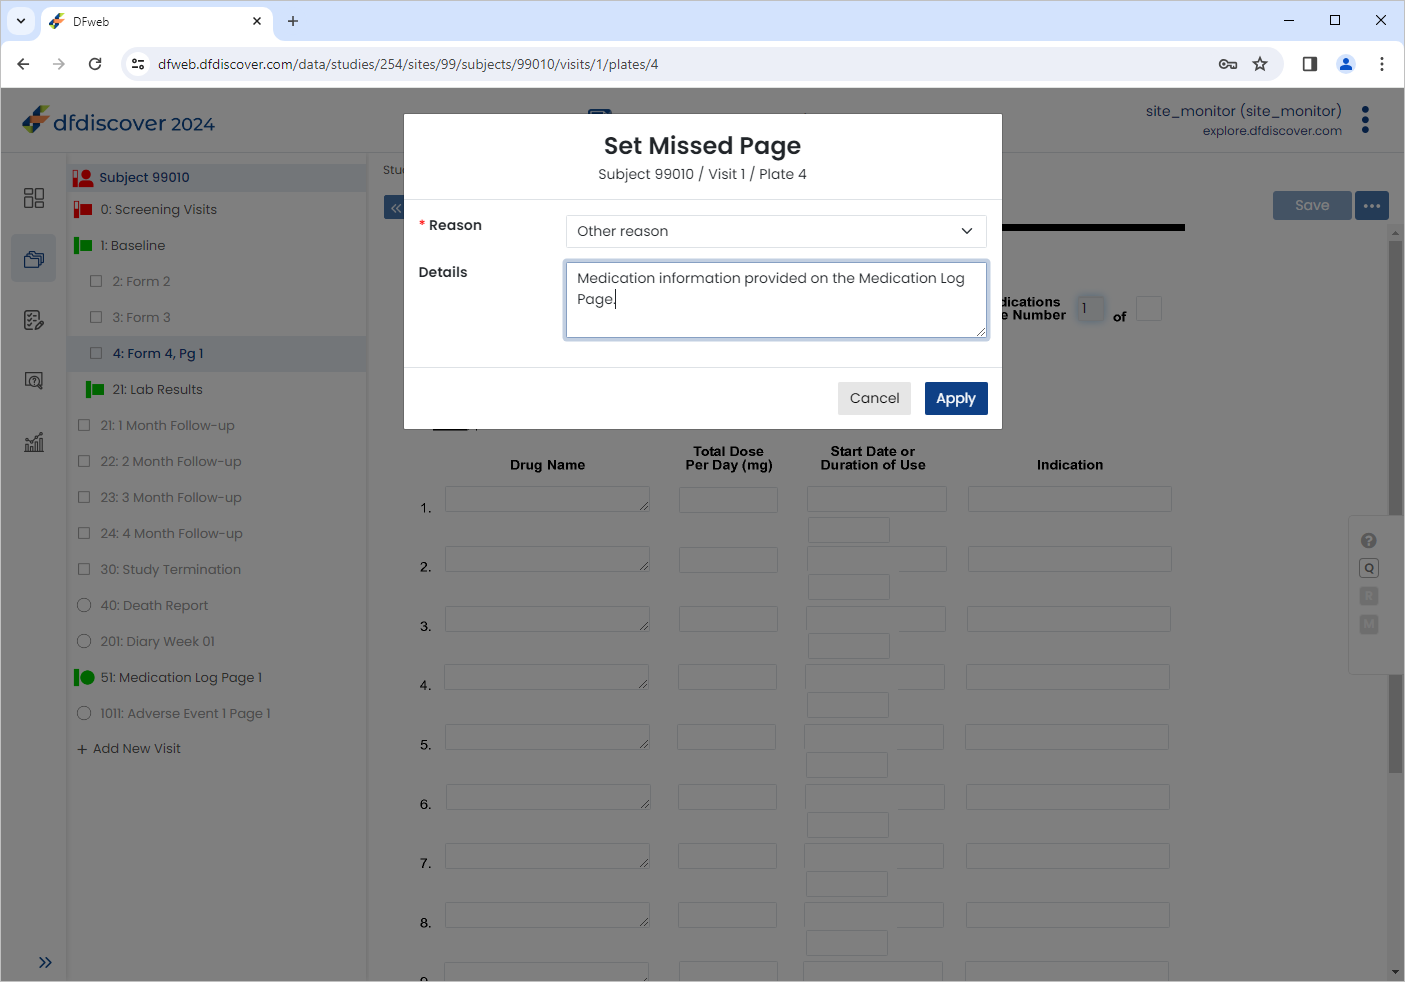
-
Click to register the page as missed.
-
Click
Subjects , select 99009 > 1: Baseline > 2: Form 2. Click > Unset Missed Page to open the Unset Missed Page dialog.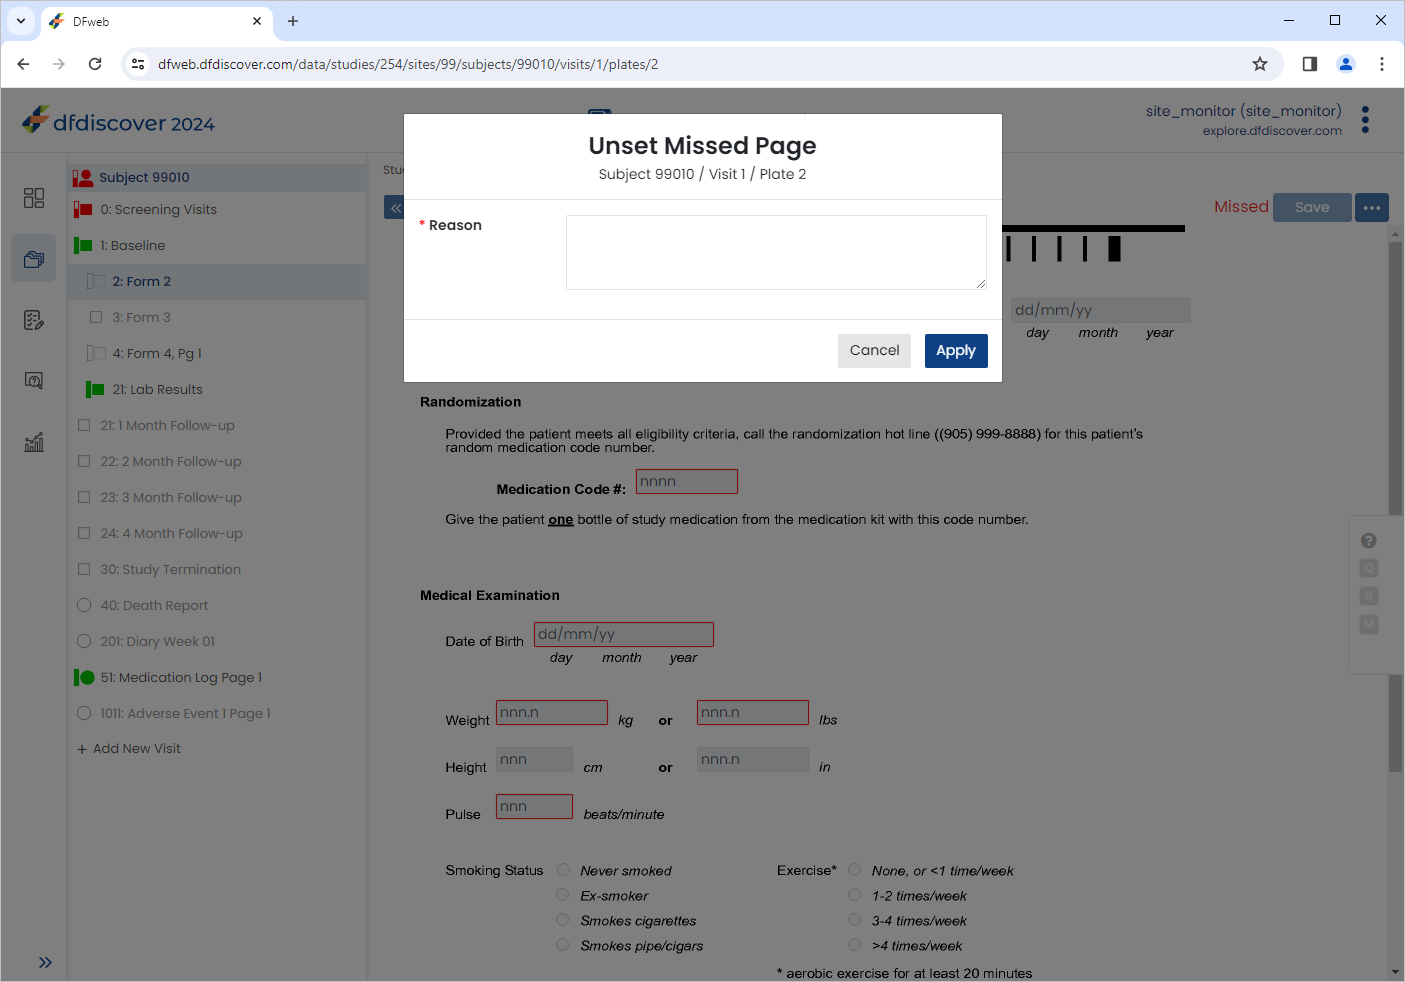
-
Enter a reason of
Data to be captured during chart review.. Click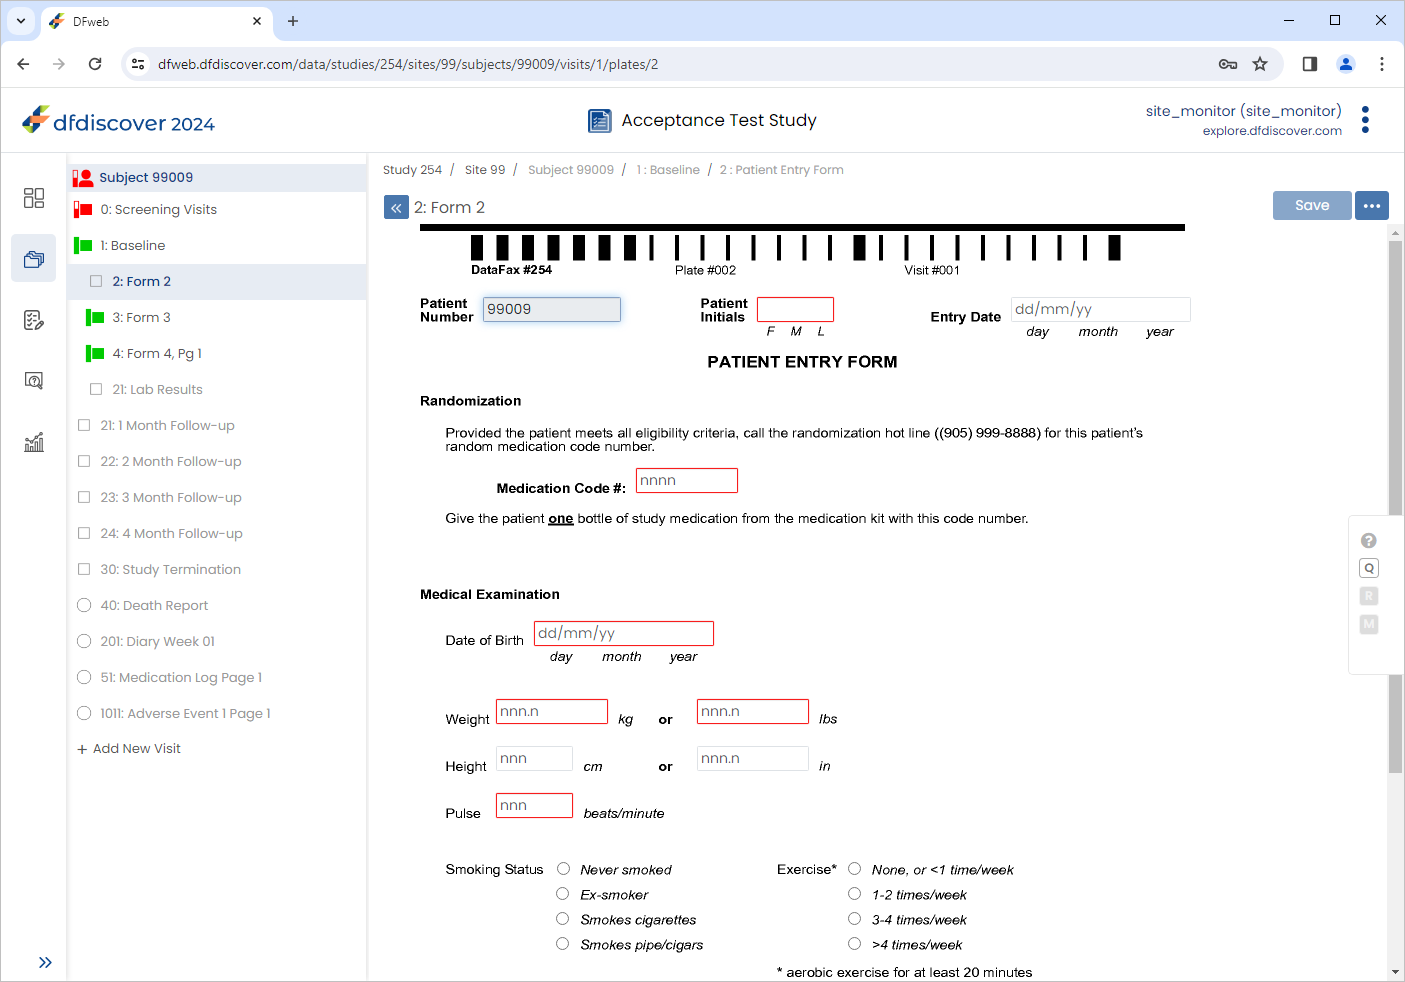
From the sidebar bar, Click
 . Locate and select the outstanding query for Subject 99008 > 0:Screening Visits > 1:Form 1.
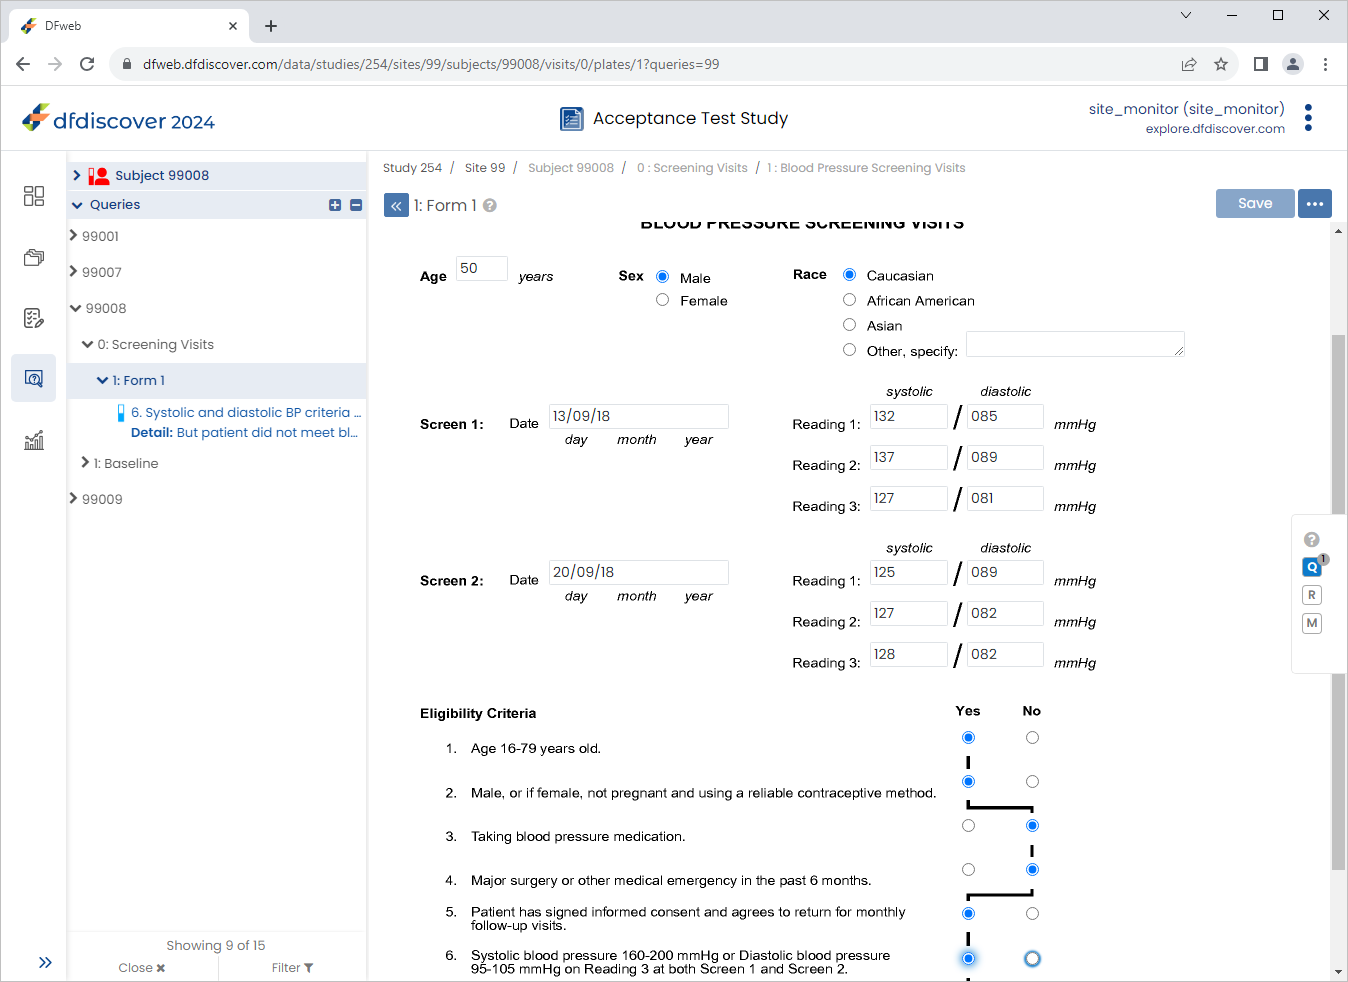
Change 6. Systolic and diastolic BP criteria from 'Yes' to 'No', Click
 then
then  , select Resolved from the Status drop-down list. Click , and to save the data record changes.
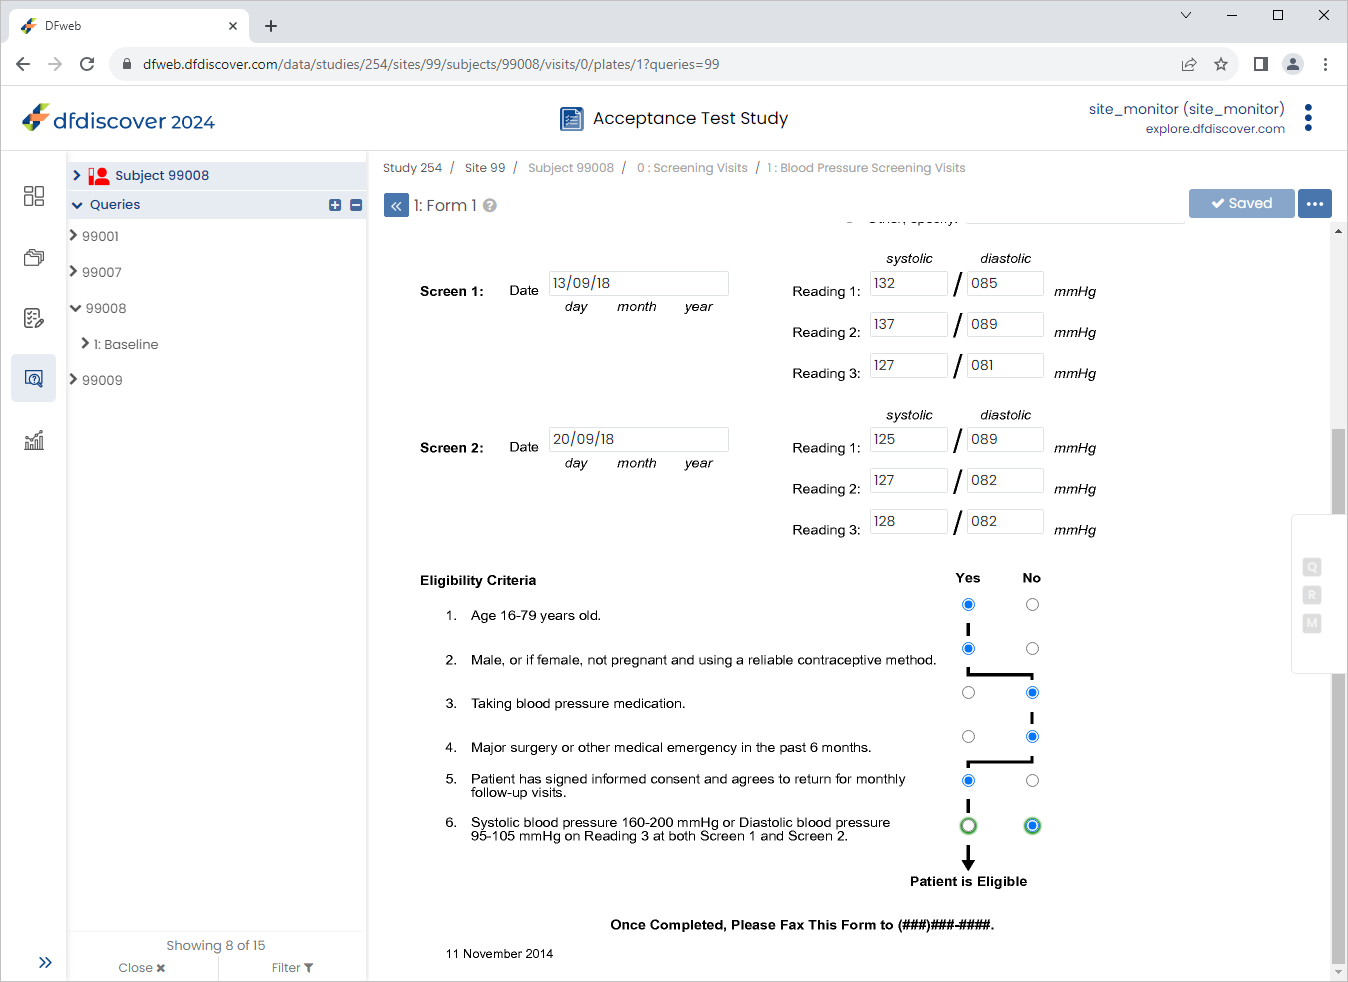
Click 99008 > 1:Baseline > 2: Form 2. Select Date of Birth (dd/mm/yy) query. Correct Date of Birth (dd/mm/yy) to
14/01/68.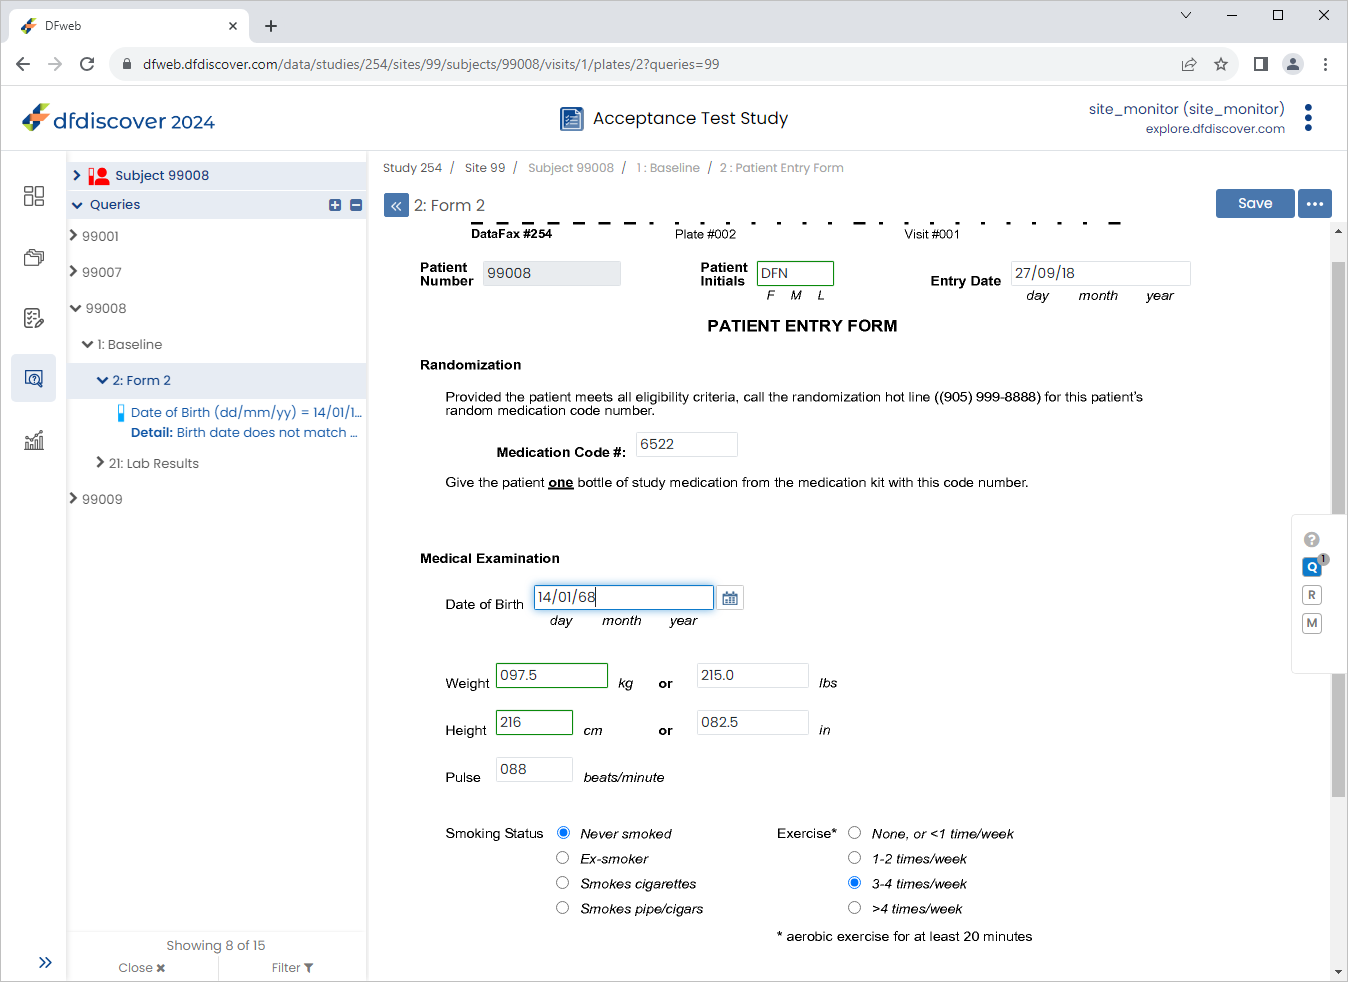
-
Click
then , select Resolved from the Status drop-down list. Click , to save the query changes. Click .

-
Click 21: Lab Results, select the outstanding query. Click
. Enter Lab value confirmed as out of range.in the Reason field. Click , followed by.
-
Click
 .
.

-
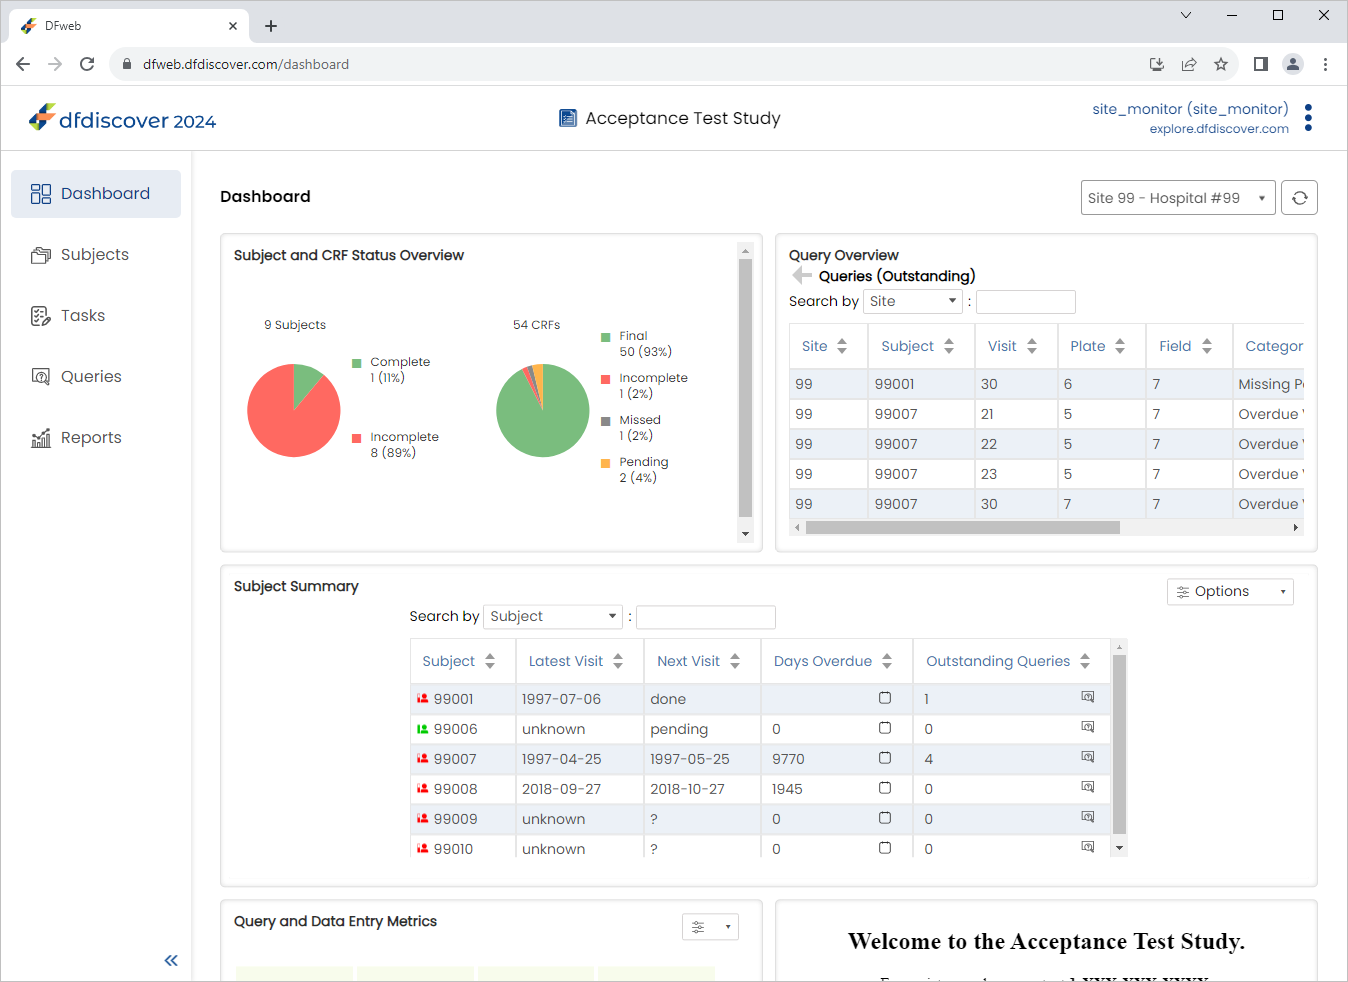
Within the Queries Overview dashboard, click Outstanding (Red portion) under the All Queries by Status pie chart. The Queries Overview table is displayed showing all oustanding queries for the site.
-
In the Queries Overview table locate and select the outstanding query for subject 99009.
-
Select Asian in the Race field. Click .
-
Return to the Dashboard page by Clicking
.
-
Within the Queries Overview dashboard, click Outstanding under the All Queries by Status pie chart. The Queries Overview table is displayed showing all oustanding queries for the site. Confirm the oustanding query for subject 99009 is no longer present.
From the sidebar, select
Subjects > 99008 > 1: Baseline > 21: Lab Results. Click > Manage documents to open the Manage documents window.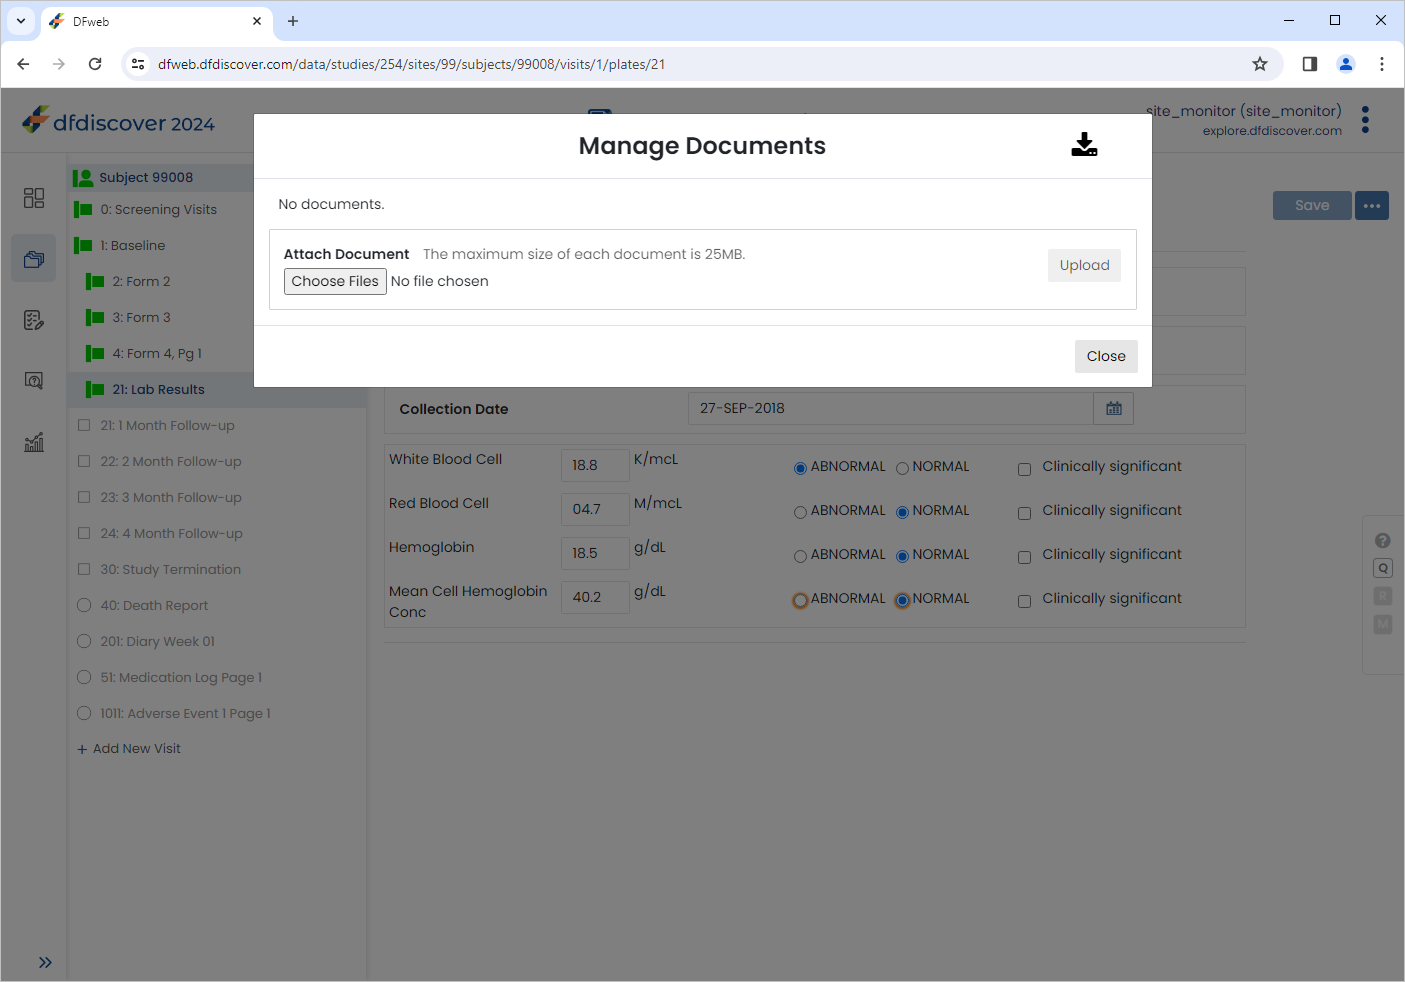
Click , select the previously saved
labreport99008_module17.pdf(Refer to Step 2). Click > to upload the document.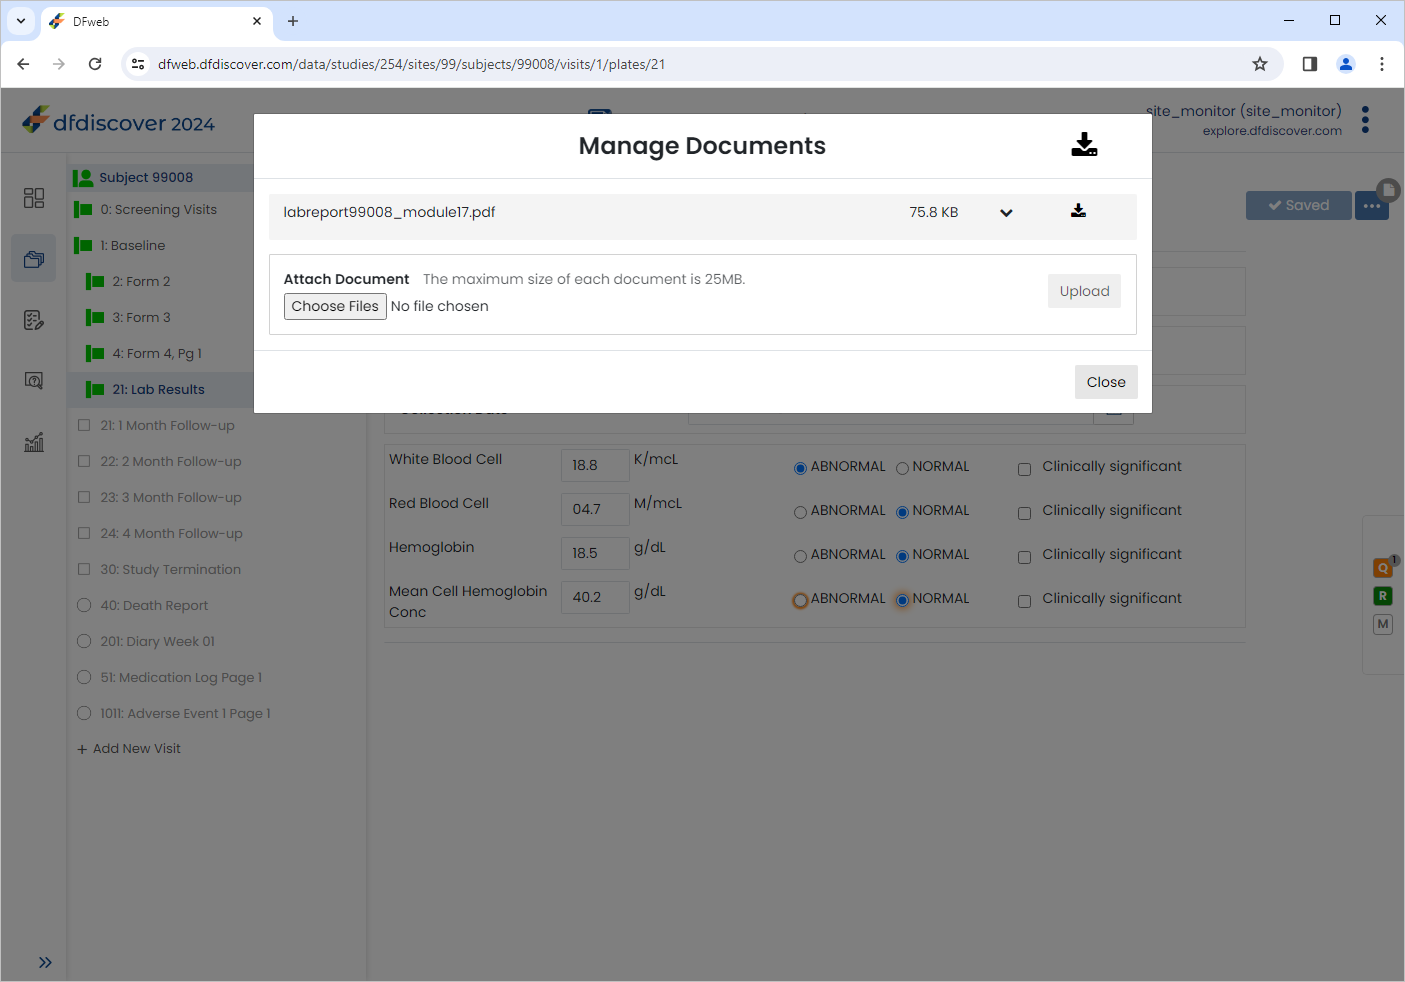
Click
 to view the newly uploaded document.
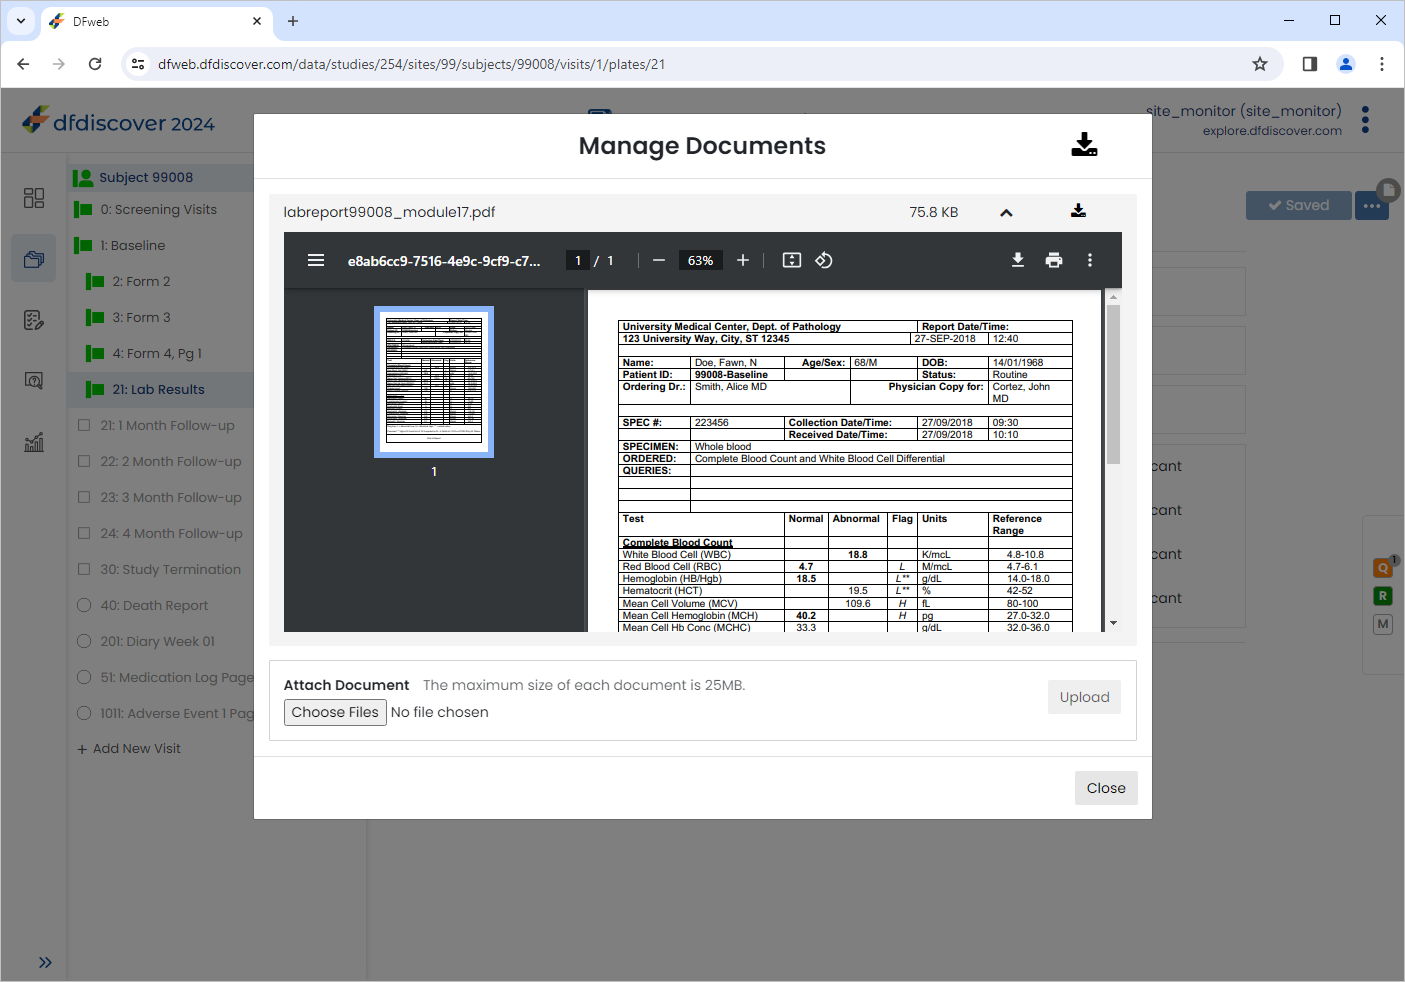
The document can be zoomed in/out by using the navigation buttons within the document window.
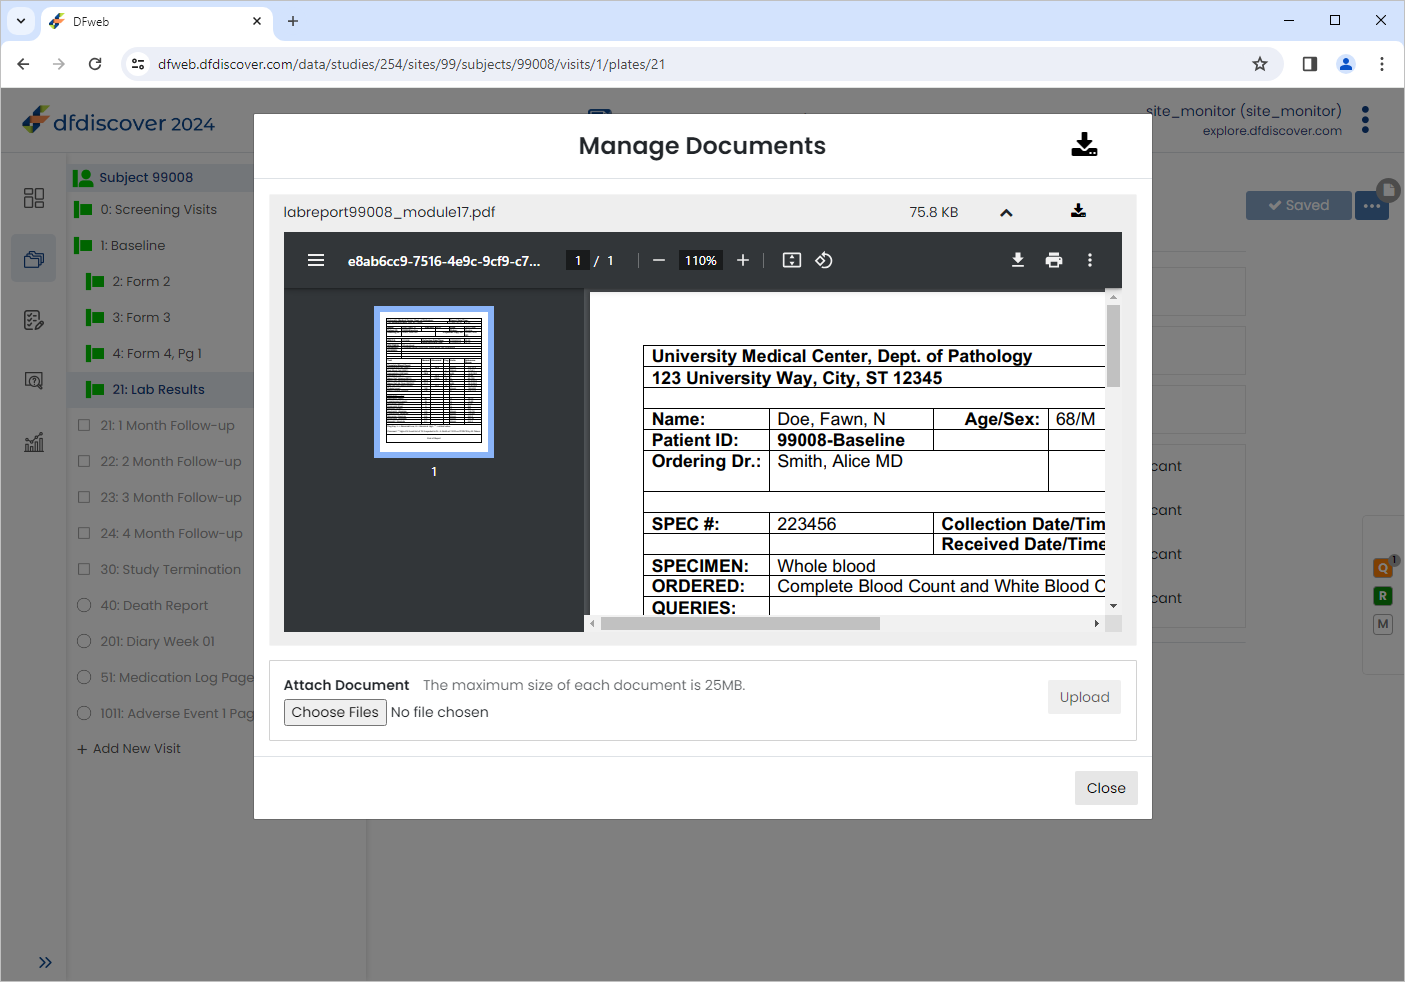
Click to close the Manage Documents window. Notice the
icon has now changed to  indicating the data record now has associated documents.
Click
> to exit DFweb.
| Note |
|---|---|
|
eSignatures require password permission to be set in the user role at the DFadmin level. The Password permission must be granted for the specific eSignature plate. |
-
In the DFweb login dialog, enter
site_investin the Username field and the previously assigned password in the Password field. Click to login. -
As user
site_investhas 2FA enabled, enter security code received by email as previously defined.Note Refer to Section 1.8, “Creating user accounts and assigning study permissions.” as a valid email address is required for
site_investto receive 2FA codes. -
From the Subjects list, click Subject 99011 > 30: Study Termination > 7: Form 7.
-
Click Patient Initials enter
SIG, Set:Final Visit Date =
03/06/221. Did the patient complete the entire 16 week study? = No
Check (enable) Moved away
2. Last does of study medication was taken on = Check (enable) Unknown
Click
to save and eSign the Study Termination form.
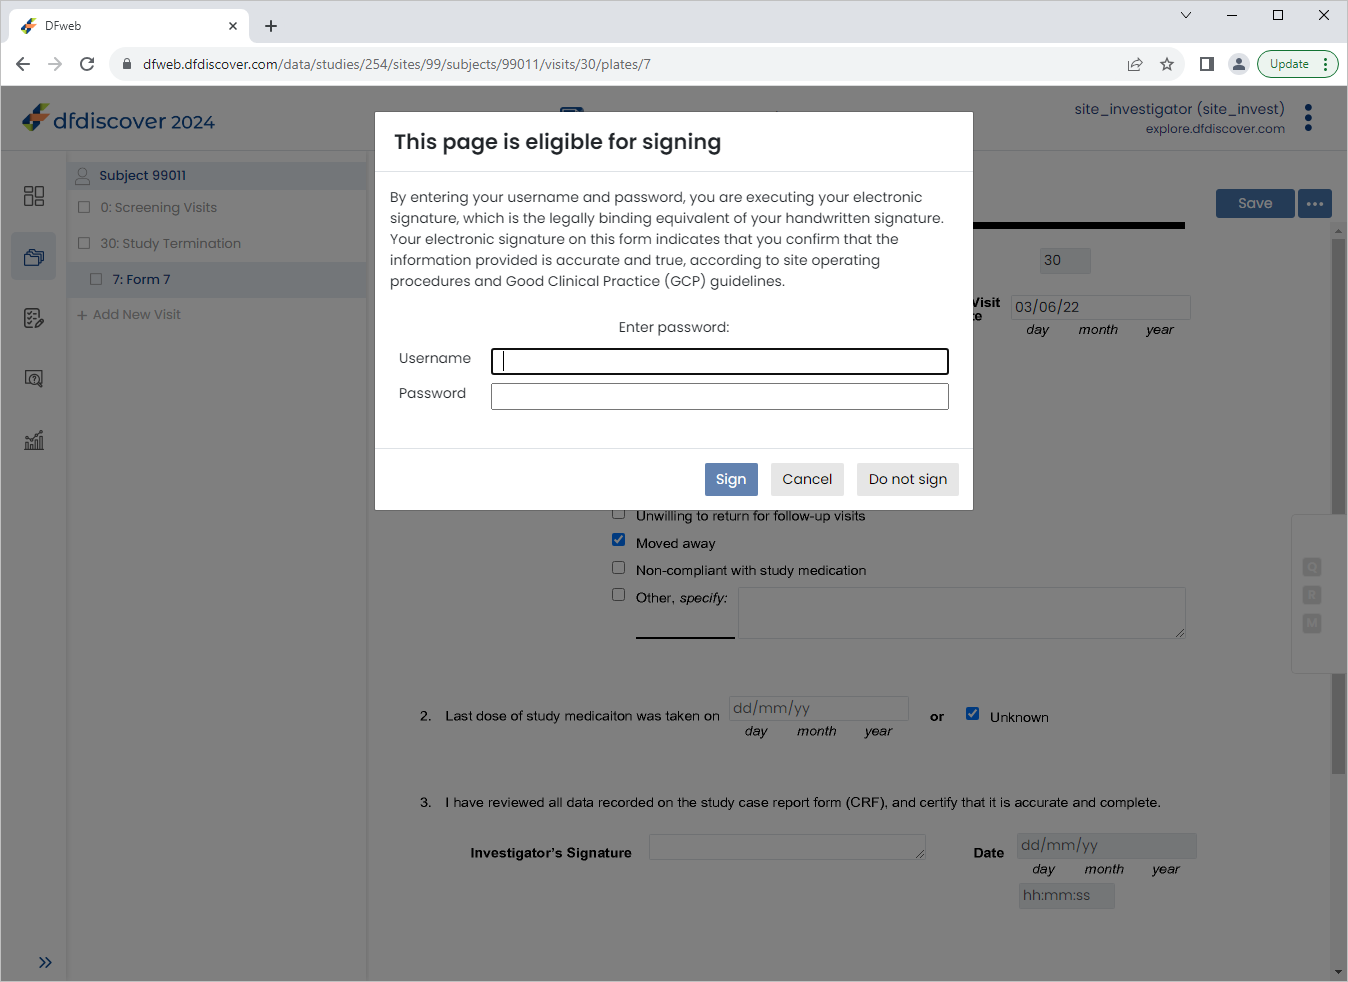
-
In the dfpassword confirmation dialog enter the user name
site_investand the corresponding password. Click to apply the electronic signature to the current page.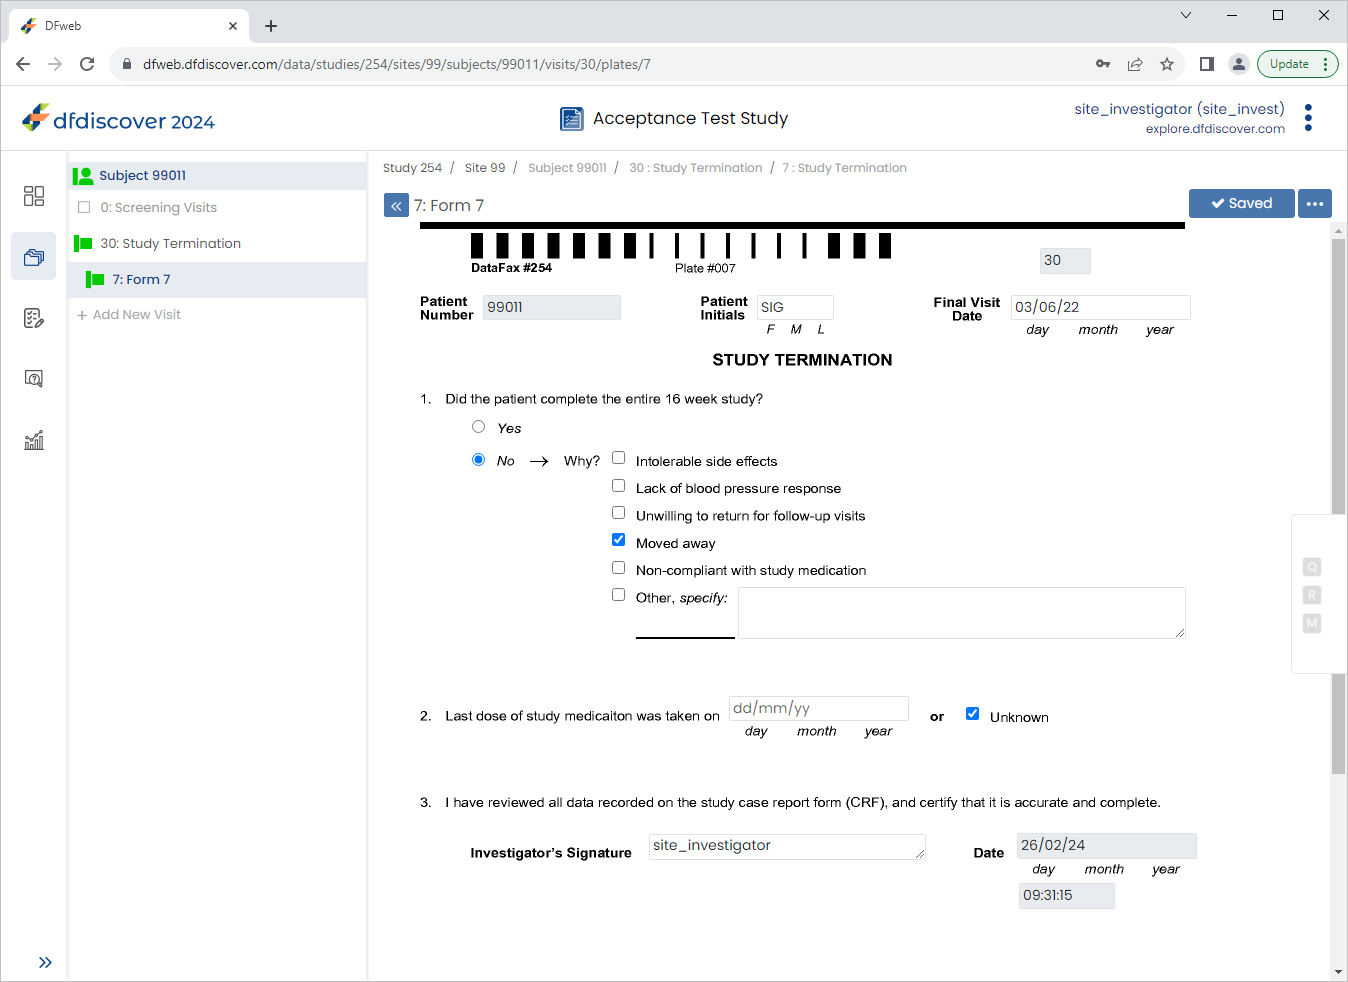
-
Examine the 3 eSignature fields at the bottom of the page.
-
Click
> to exit DFweb.
-
In the DFweb login dialog, enter
site_monitorin the Username field and the previously assigned password in the Password field. Click to login. -
From the Subjects list, click Subject 99011 > 30: Study Termination > 7: Form 7.
-
Click 2. Last dose of study medication was taken on field. Click
 to open the Add Query dialog. In the dialog, set:
-
Category = Missing
-
Enter
Investigator to confirm last dose taken with subject during clinic visit.in the Note field. -
Click > .
-
-
Press Tab to advance to the Unknown field. Un-check (disable) the checkbox. Click
.

-
Click
> to exit DFweb. -
In the DFweb login dialog, enter
site_investin the Username field and the previously assigned password in the Password field. Click to login. -
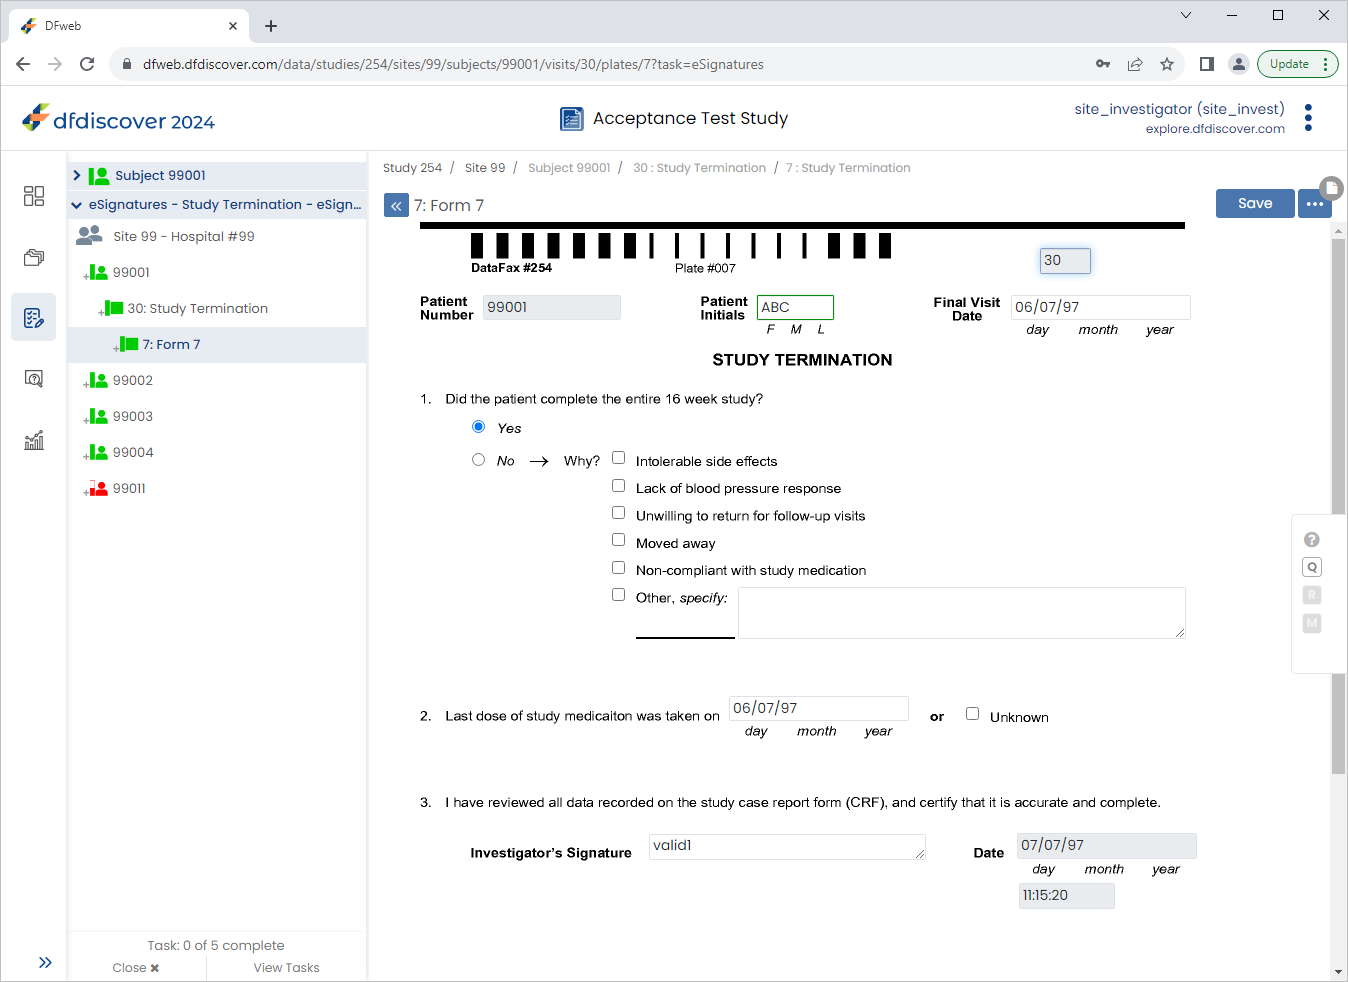
From the sidebar, Click
 Tasks.
-
Locate the eSignatures - Study Termination - eSignatures task. Click .
-
From the Subjects list, click Subject 99011 > 30: Study Termination > 7: Form 7.
-
Click the 2. Last dose of study medication was taken on field. Click
then . Select Resolved from the Status drop-down list. Enter Confirmed date of last medication dose verbally with subject during clinic visit.in the Note field. Click , .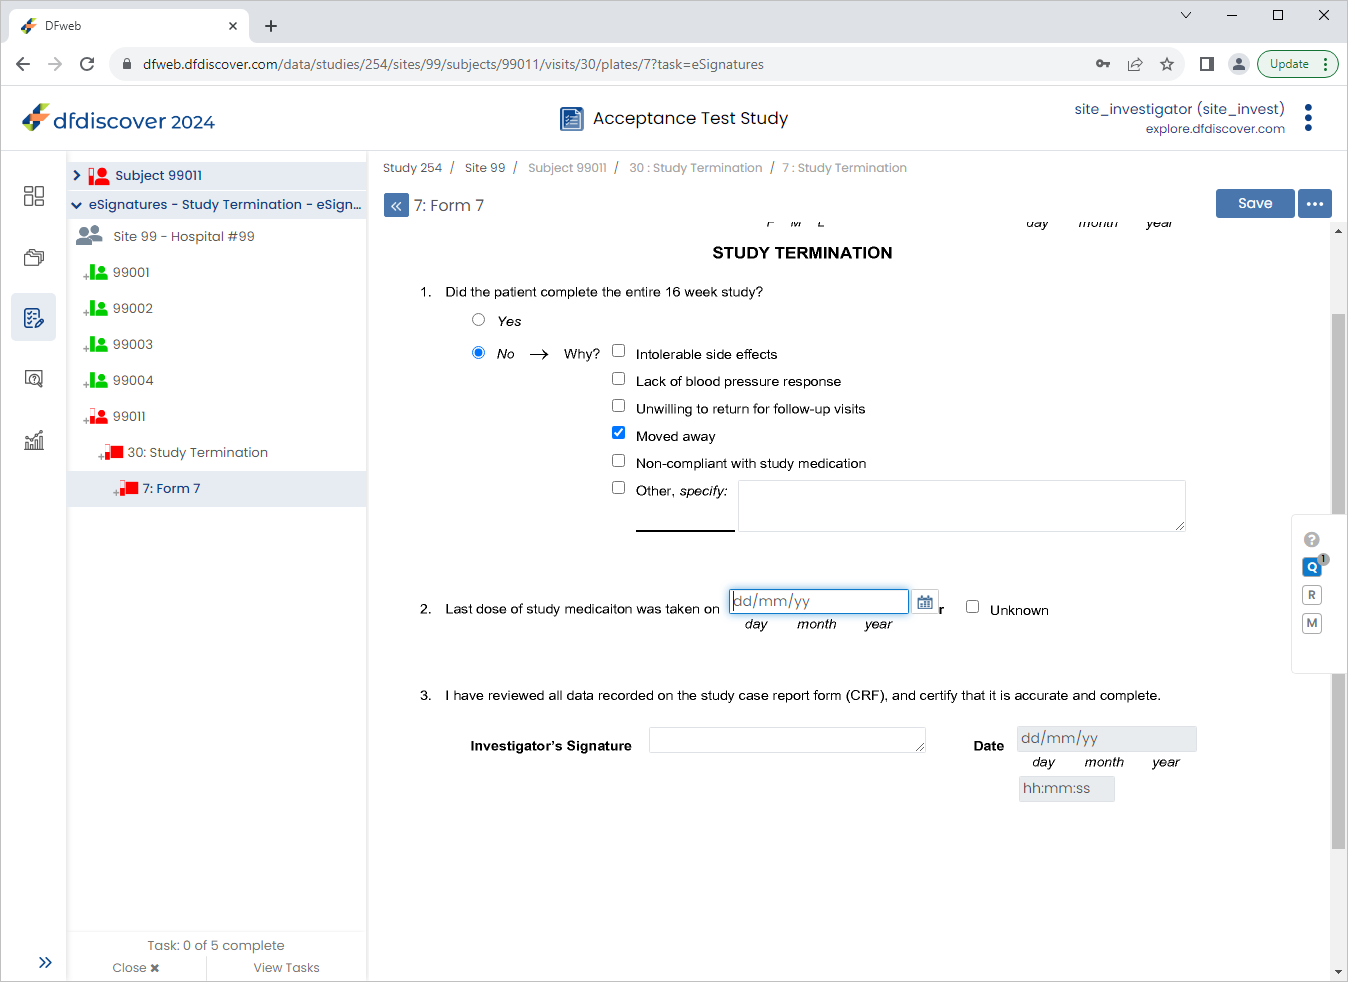
-
Enter the 2. Last dose of study medication was taken on date as
02/06/22. Click.
-
In the dfpassword confirmation dialog enter the user name
site_investand the corresponding password used for login in Section 13.6, “Add an Electronic Signature (eSign) to a set of completed subject records.”. Click to apply the electronic signature to the current page.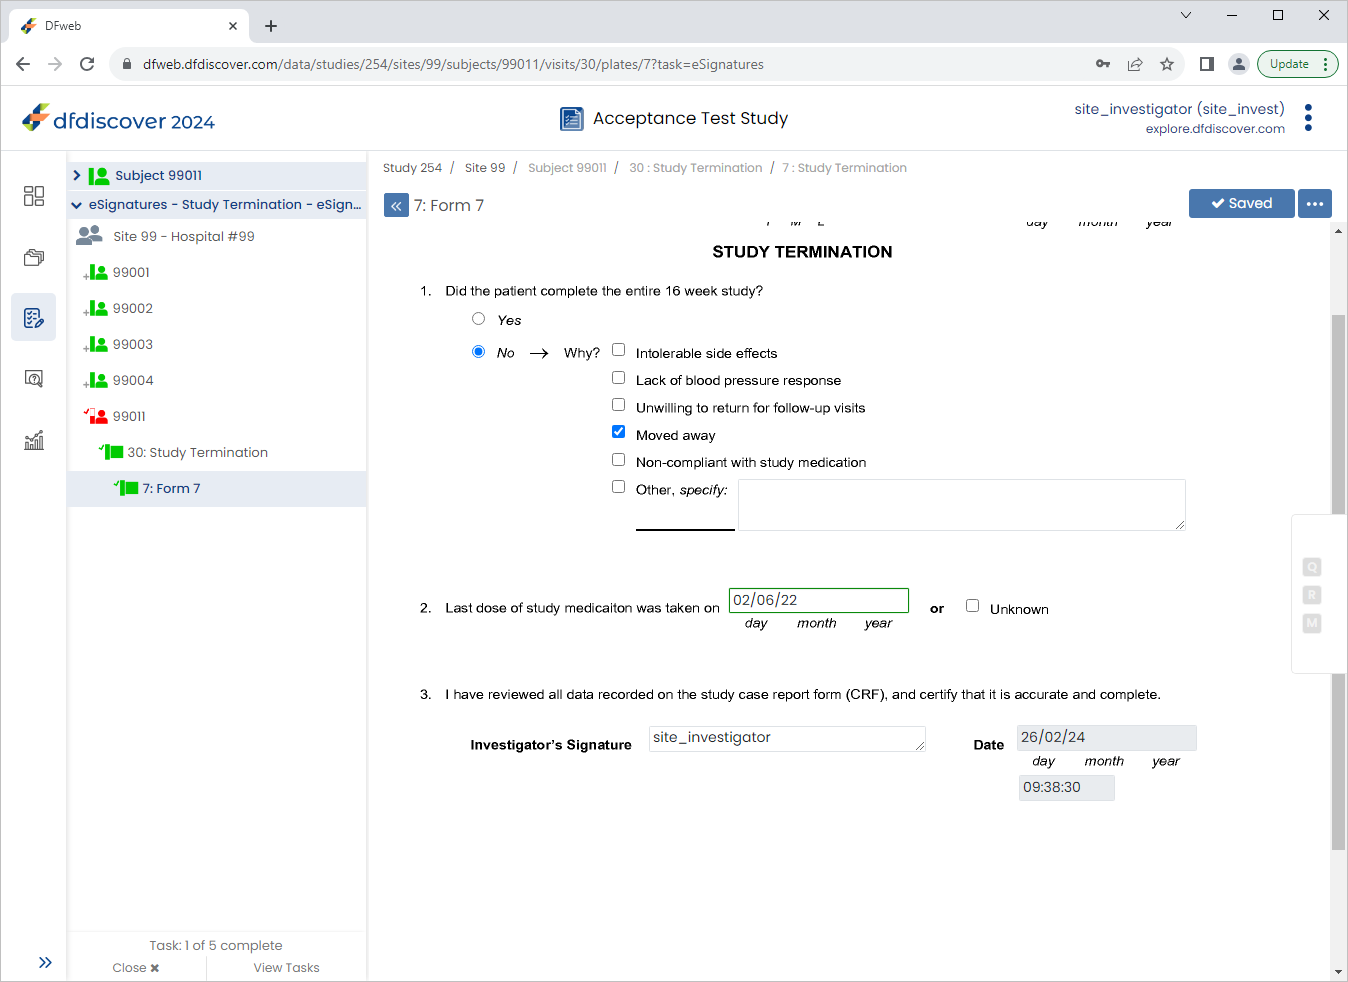
-
Examine the 3 eSignature fields at the bottom of the page.
-
Click to close Tasks view. In the resulting warning dialog click .
-
Click
> to open the Page History window. The Page History is displayed, Click to close the window.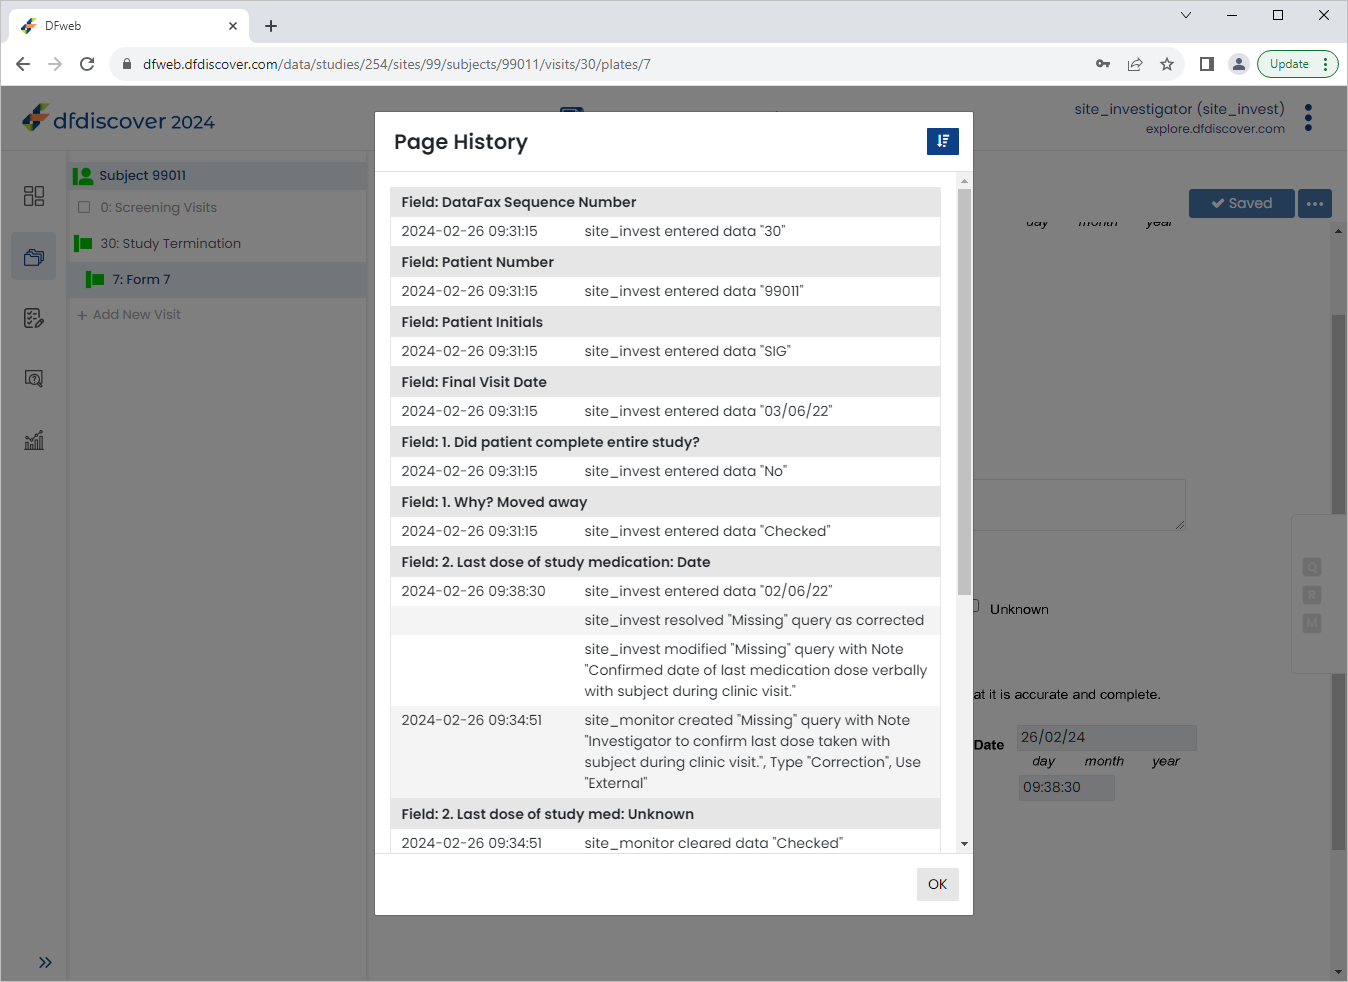
-
Click
 , enable (toggle on) Grouped View.
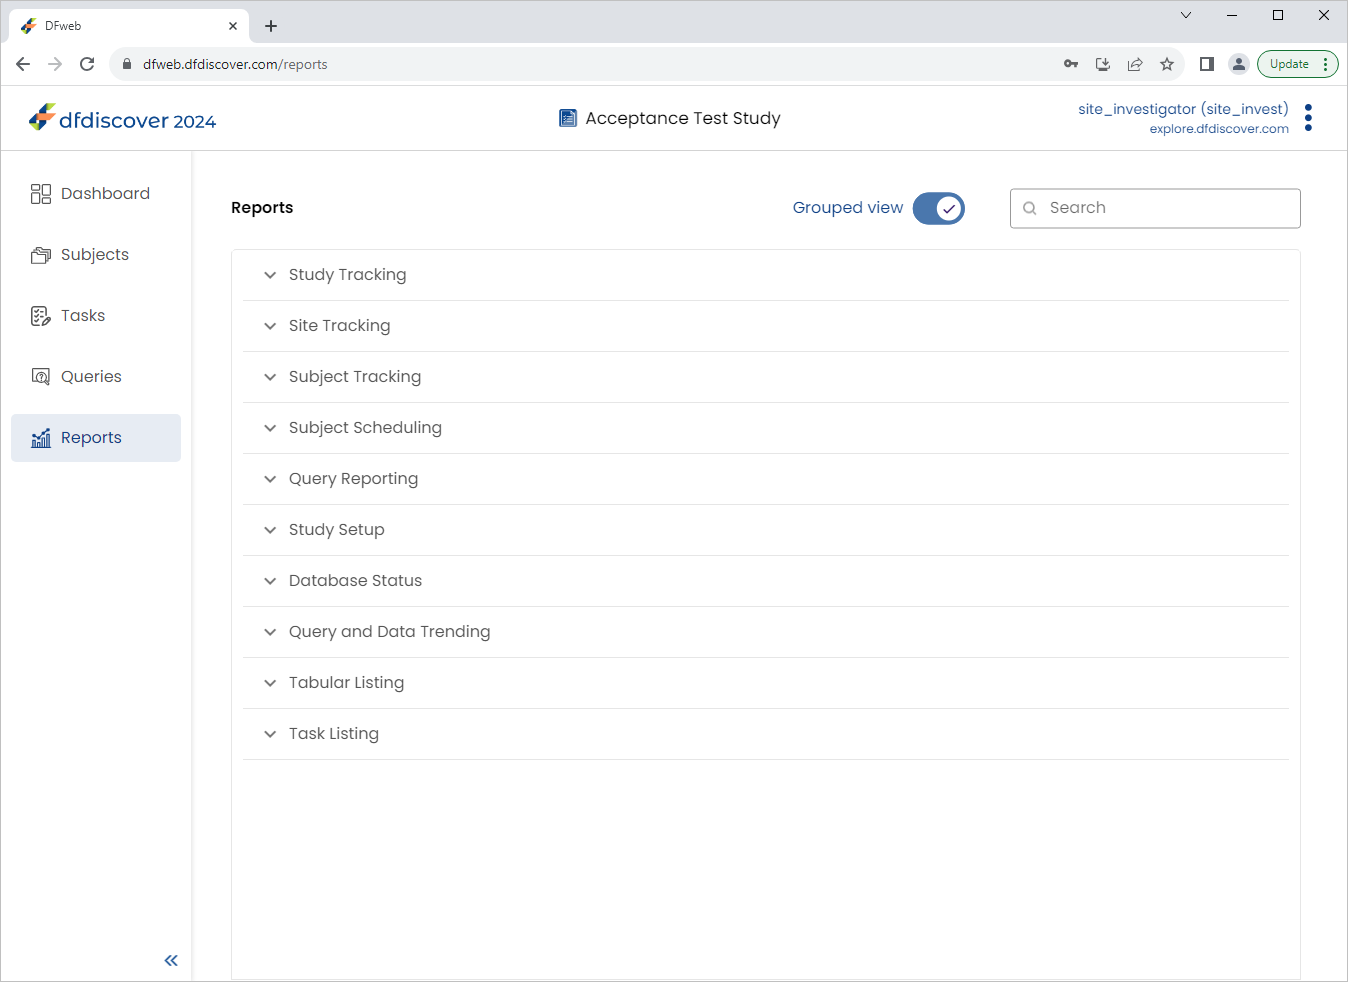
Expand (click) Subject Tracking to view the available reports. Select History of Changes.
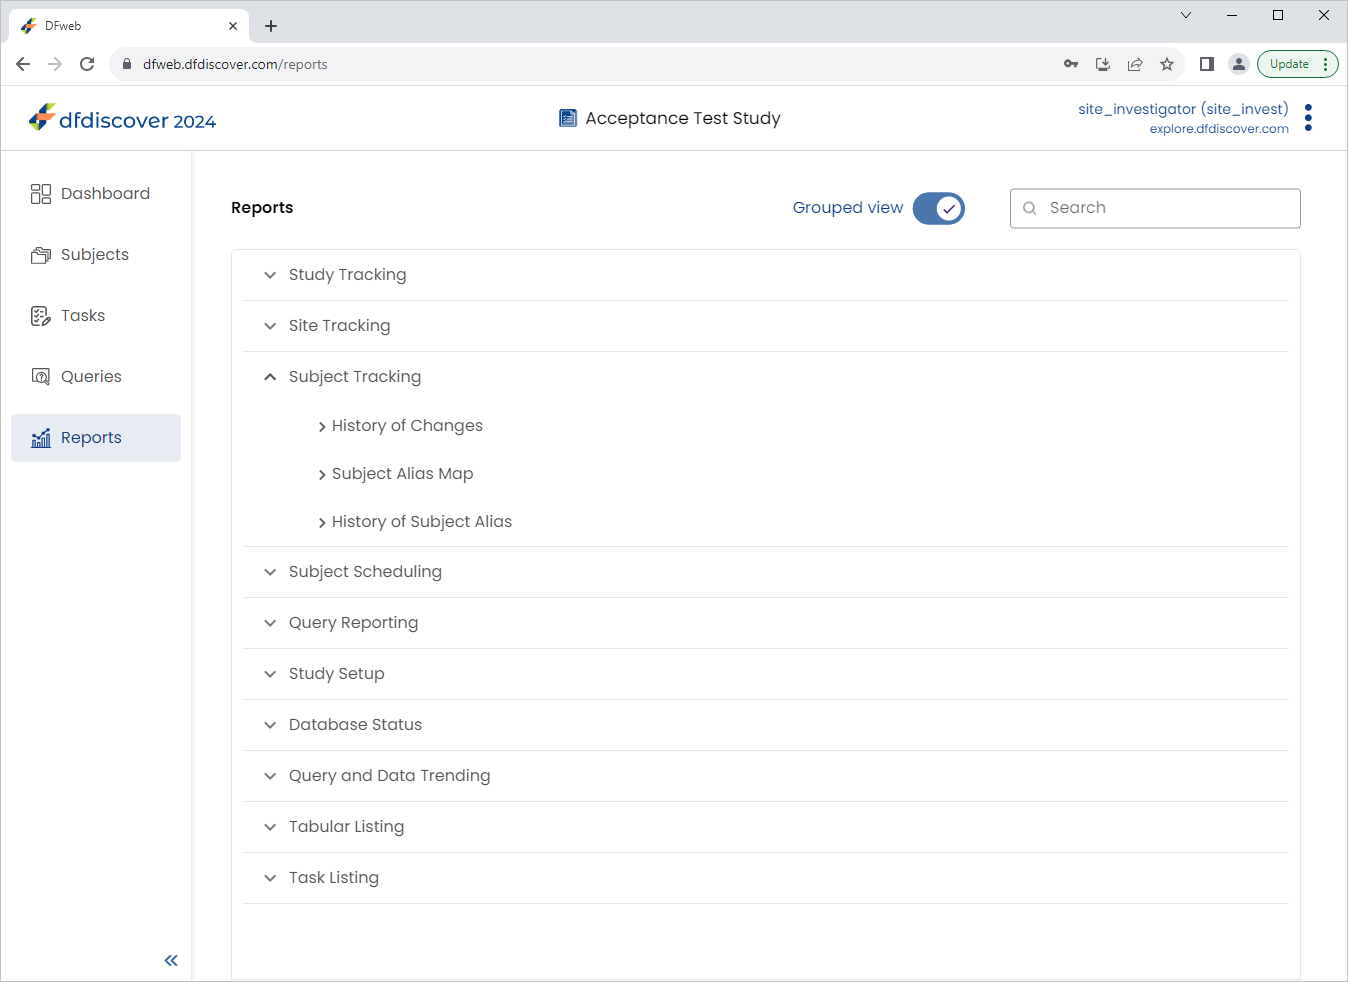
Click Subject Tracking to view the available reports. Select History of Changes.
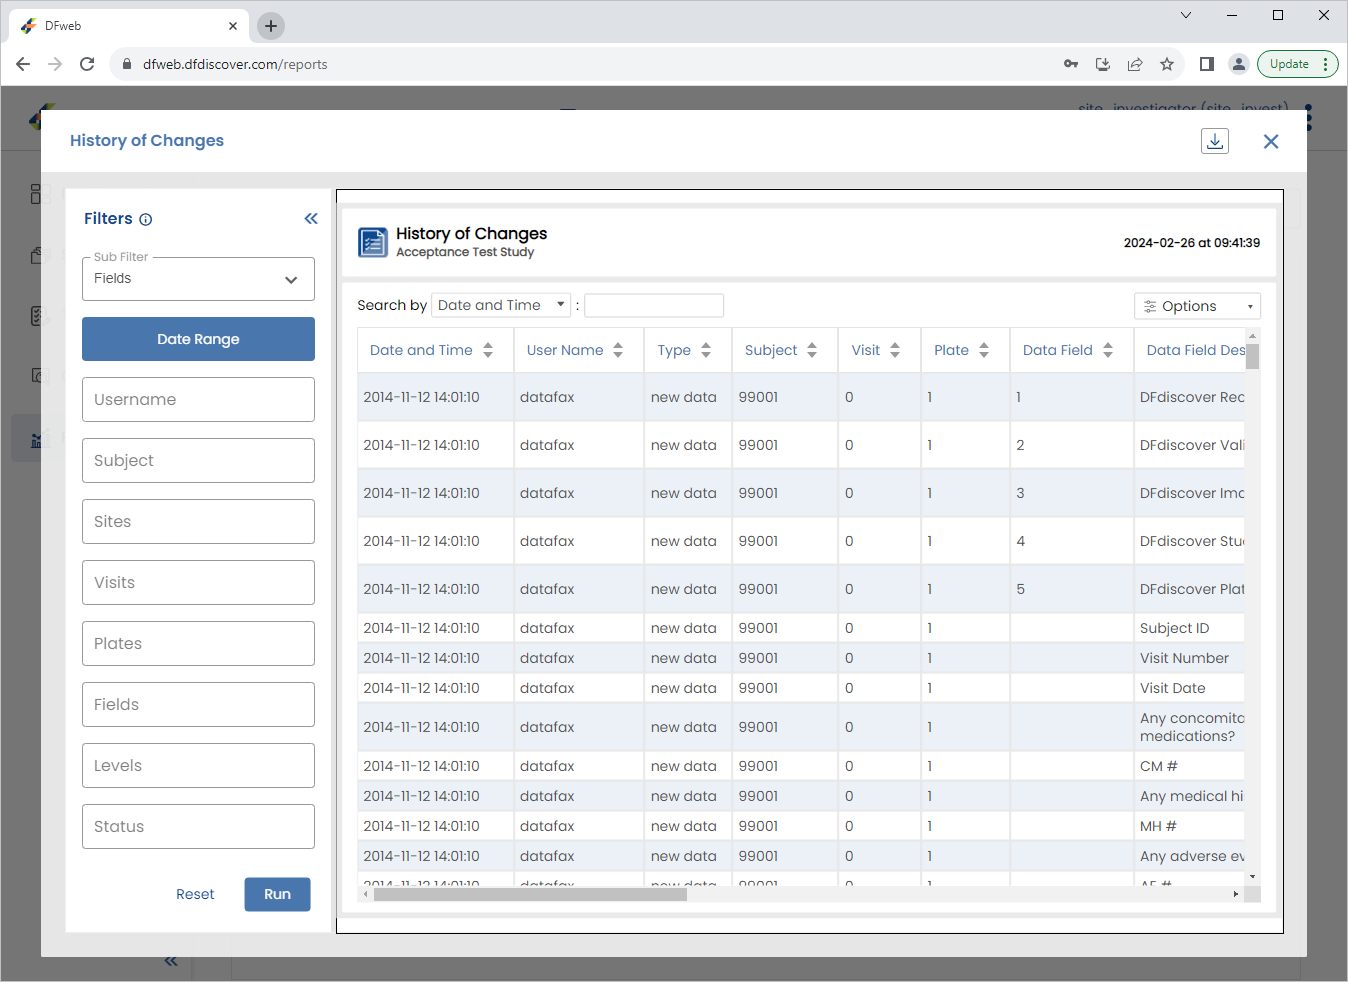
Enter
99011in the Subject field, click Date Range in the resulting dialog select the current date and click > . The History of Changes report updates to display the requested data. Click X to close the report.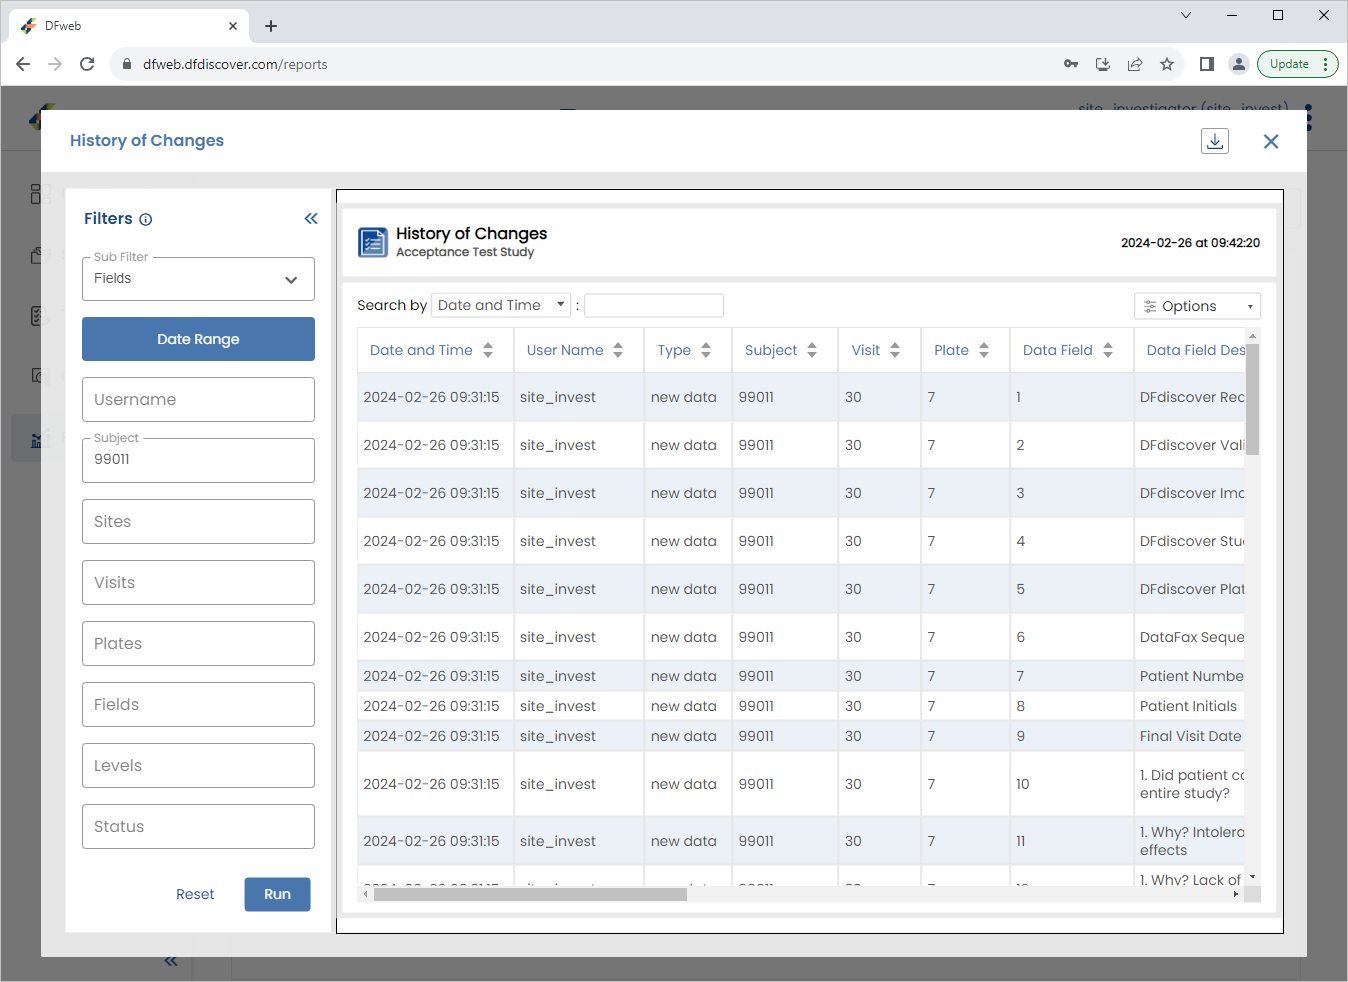
-
Click
> to exit DFweb.
-
Start DFexplore, login as
data_managerand choose 254 Acceptance Test Study as described in Section 1.7, “How to start DFexplore”. -
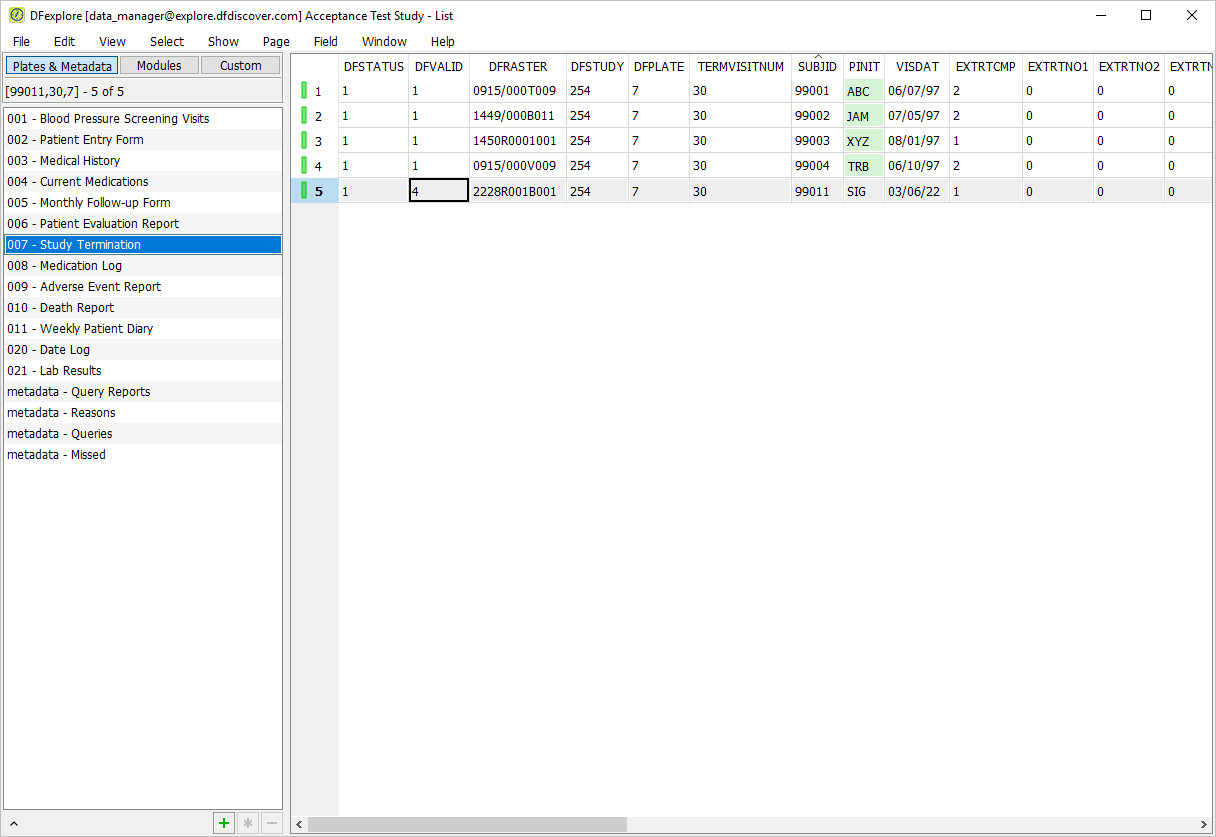
Select > . Click 007 - Study Termination. Confirm DFVALID displays as "4" for subject 99011.
-
Select > to close DFexplore.