Table of Contents
- 8.1. Tests & Requirements
- 8.2. Begin Module 8.
- 8.3. Retrieve a set of records for entry by Double (2nd pass) Data Entry (DDE).
- 8.4. Perform DDE such that discrepancies exist between the new DDE values and the original data values.
- 8.5. Programmed edit checks execute as expected during DDE.
- 8.6. Verify the audit trail of DDE data.
- 8.7. End Module 8
Retrieve a set of records for entry by Double (2nd pass) Data Entry (DDE).
Perform DDE such that discrepancies exist between the new DDE values and the original data values.
Programmed edit checks execute as expected during DDE.
Verify the audit trail of DDE data.
Estimate of Time Required: 20 Minutes
-
Start DFATK as described in Module 1 (Installation & Initialization).
-
Click followed by to begin this module.
-
Start DFexplore.

-
In the DFexplore login dialog, enter the name for DFdiscover Server that has been provided by your administrator. Enter
valid1in the Username field and the previously assigned password in the Password field. Click to login.
-
From the list of available studies, select the 254 Acceptance Test Study then click to open its database.
-
Select > to open the Select by Data Fields dialog, set:
Mode = DDE
Save level = 3 - Level 3
Check (enable) Enable edit checks
Search = By program

-
Enter
DFmkdrf.jnl -t 150101-181231 -u valid1 -image yesin the Program field. Click to apply the retrieval criteria.![[Note]](../../imagedata/note.png)
Note The above program command will retrieve all data records entered from 2015/01/01 to 2018/12/31 by user
valid1and include the CRF images if they exist. -
Click to retrieve all records that match the specified criteria.
-
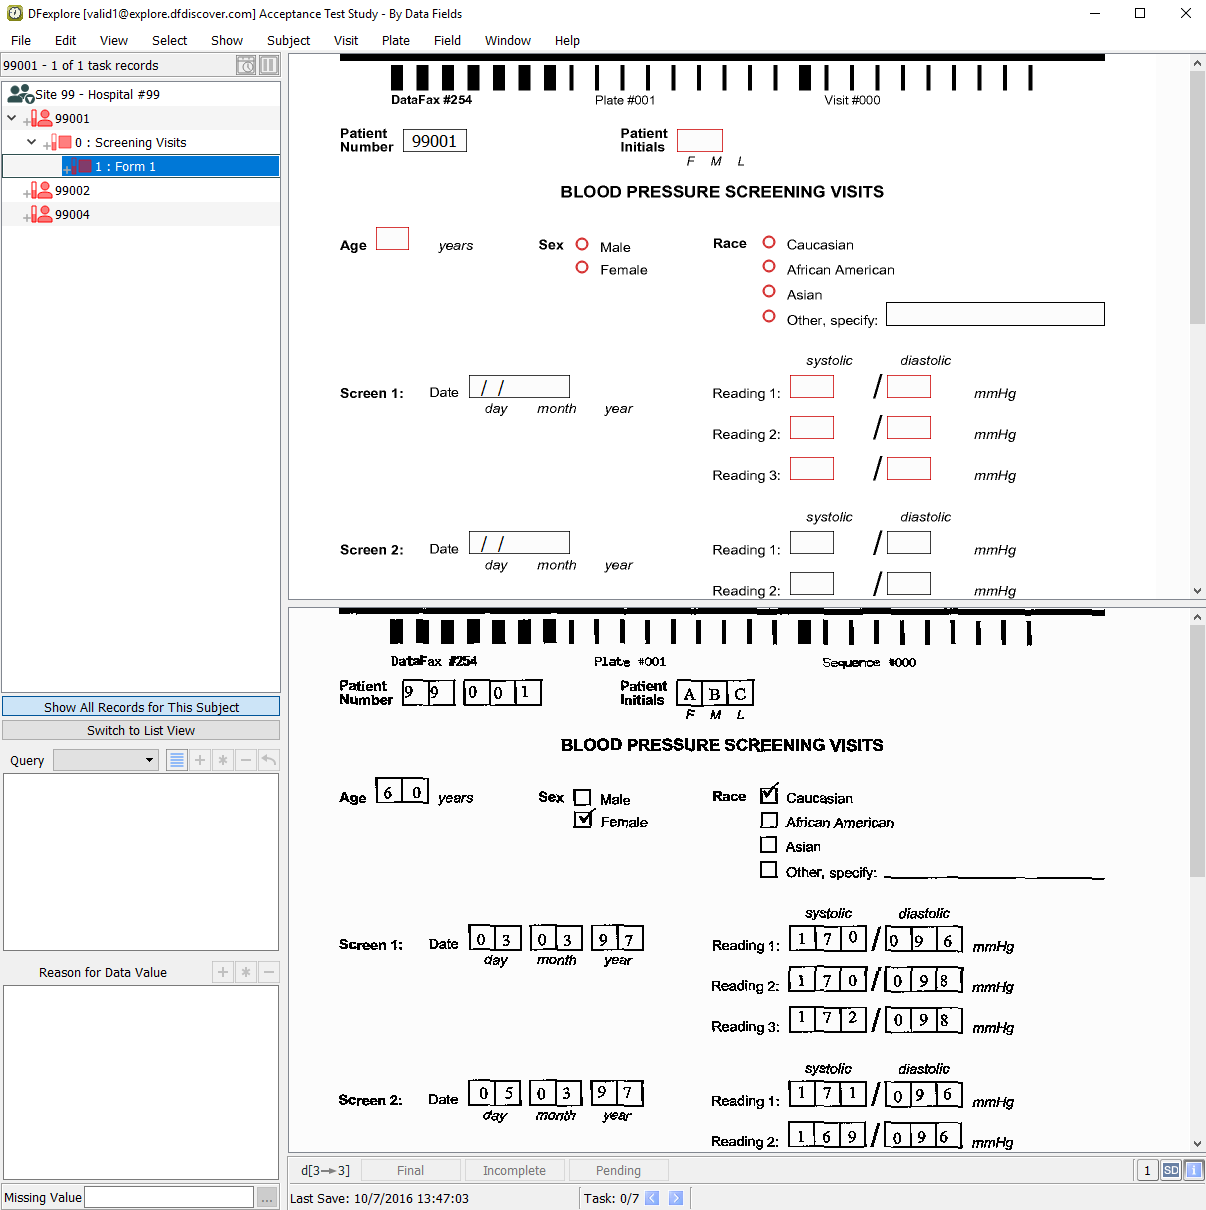
Double-click Subject 99002 to open the subject for double data entry.

Note DDE mode presents the user with records in which all data fields, except the Patient Number, are blanked.
-
On the Blood Pressure Screening Visits form for Subject 99002, press Tab to advance through the fields, entering the data values as they appear on the corresponding CRF image. When Sex becomes the current field, check the Female response instead of the Male response. Press Tab to exit the field.
-
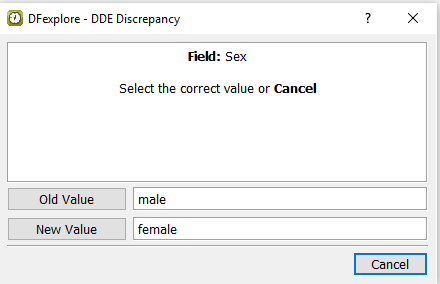
In the DDE Discrepancy dialog, click to apply the newly entered value of
female. Confirm that the ismaleand the isfemale.
-
Select Pending from the Status pull-down list. Enter
Value changed to Female during double data entry.in the Reason field. Click to save the new value and reason for data change.
Note An orange field indicates that there is a reason or query that is pending approval by the study's central data management site.
Press Tab to advance through the remainder of the fields on the Blood Pressure Screening page, correctly entering the data values as they appear on the corresponding CRF image. Verify that the Save information bar at the bottom of the screen indicates that the saved page will be assigned a record level of 3.
Press Tab to exit the last data field so that the save buttons get the focus. Click to save the page to the database.
Double-click entry for 9: Form 9, AE Report 011 in the record list to open the Adverse Event Report.

Click anywhere on the page background to make the page active. Press Tab to exit the auto-filled Adverse Event Identifier field and the Patient Number field to advance to the Patient Initials field. Upon entry the Patient Initials field, the correct initials
JAMautomatically occupy this field as a result of the edit checkSetInitdescribed in Module 5: Fax Data Entry.Note If there are no discrepancies during DDE, queries and reasons (if available) added to the field during original data entry, are brought forward. When meta data is brought forward, the field changes to the color associated with the type of meta data.
Press Tab to advance through the fields, entering the data values as they appear on the corresponding CRF image. When Description becomes the current field, enter
Nausea and vomiting. Press Tab to exit the field.
-
In the DDE Discrepancy dialog, click to apply the newly entered text
Nausea and vomiting. Upon leaving the Description field, theDrugLookupedit check is executed and DFlookup:aecodes dialog appears. Click to close the DFlookup:aecodes dialog.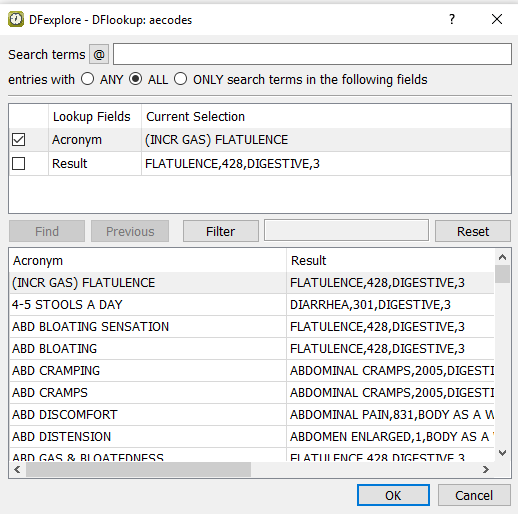
-
Continue tabbing through the remainder of the fields on this page, up to and including the Investigator's Signature field. Without entering any values, Press Tab to exit this field and the DDE Discrepancy dialog appears. In the dialog, confirm the is
Dr. John Snowand the is(none). Click .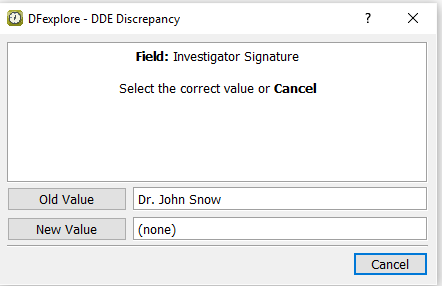
Enter the date as it appears on the CRF image. Press Tab to exit the last data field so that the save buttons at the bottom of the screen become active. Click to save the page to the database and assign a record level of 3.
-
Double-click Subject 99002 in the record list, click 2: Form 2 to make the Patient Entry Form the current page. Click anywhere on the page background to make the page active. Confirm that the Patient Number is correct then press Tab to advance to the Patient Initials field. Confirm the initials
JAM. Press Tab to advance through and enter the fields as they appear on the CRF image up to and including the Date of Birth field. Press Tab to exit the Date of Birth field and examine the field color.
-
Leave the Weight (kg) field blank per the CRF and press Tab to advance to the Weight (lbs) field.
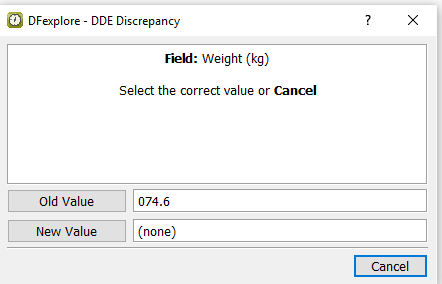
The discrepancy is detected because the edit check
WeightEquivthat calculates the weight in kg, executes on exit of the Weight (lbs) field and therefore has not yet been triggered. In the DDE Discrepancy dialog, click .Enter the correct data value in the Weight (lbs) field, press Tab to exit the field.
-
Leave the Height (cm) field blank per the CRF and press Tab to advance to the Height (in) field.

The discrepancy is detected because the edit check
HeightEquivthat calculates the height in cm, executes on exit of the Height (in) field and therefore has not yet been triggered. In the DDE Discrepancy dialog, click .Enter the correct data value in the Height (in) field, press Tab to exit the field.
Beginning with the Pulse field, enter the data values as they appear on the CRF image. When the save buttons become active, click . The record must be signed-off as “Incomplete” as a result of the query present on the Date of Birth field.
Double-click Subject 99002 >1 : Form 1 (Blood Pressure Screening Visits).
-
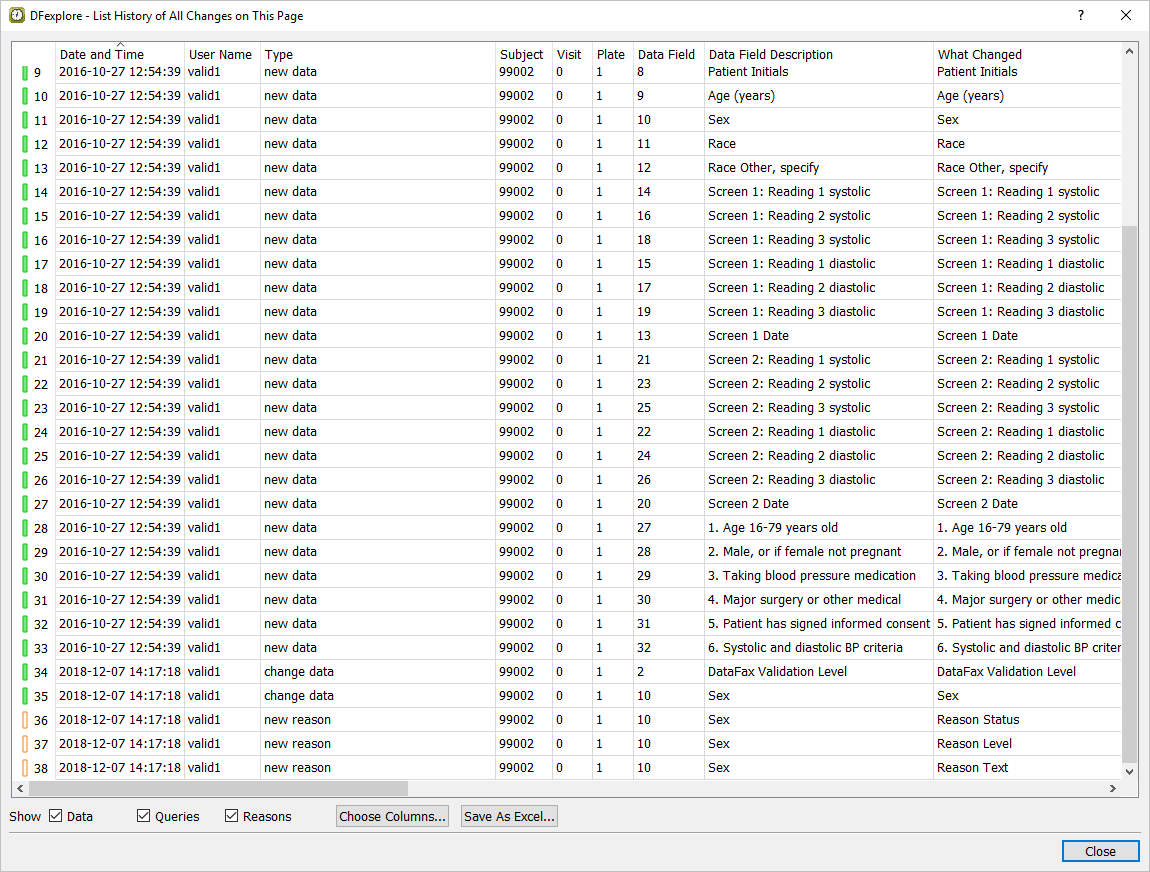
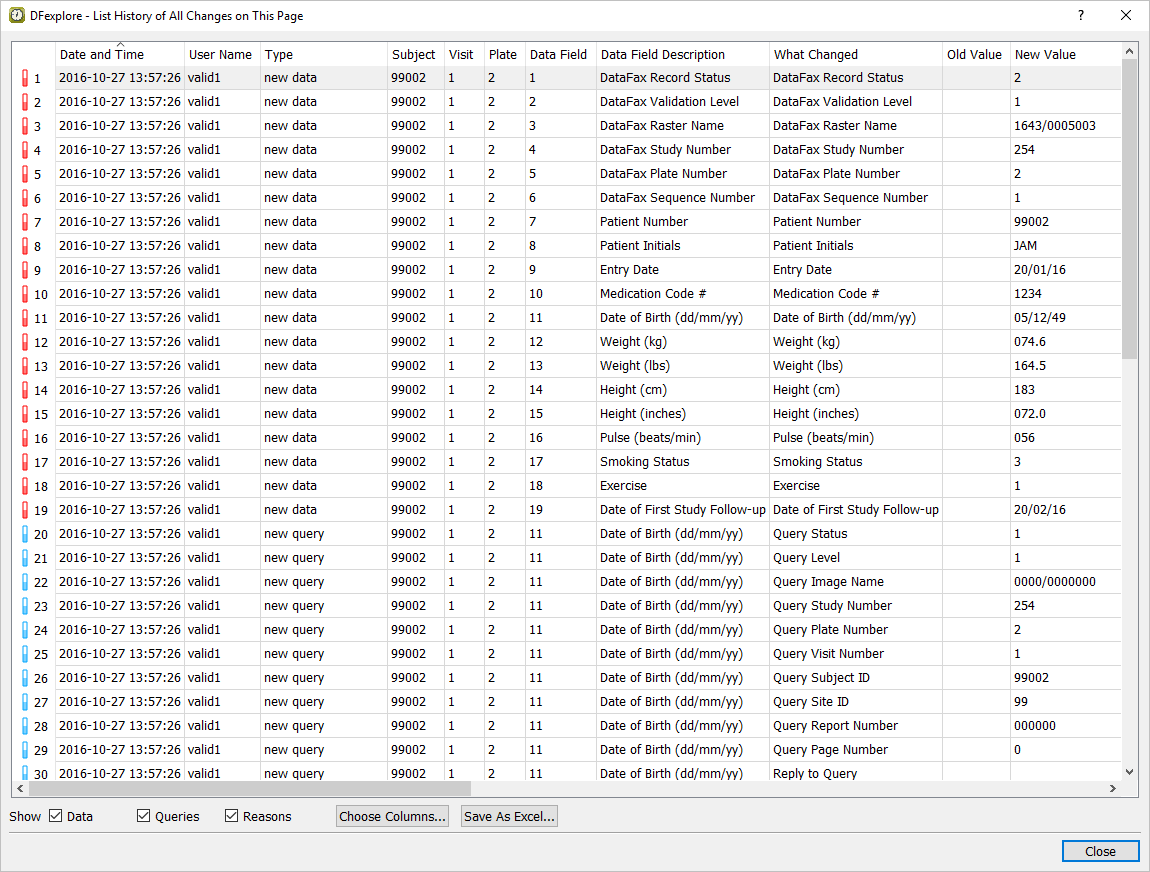
Select > to display the current record's history from the system journal files. Locate those entries that contain the date on which DDE was performed in this module.
-
Click in the resulting dialog enter
99002-history.xlsxas the Output File . Check Open output file after export, click . Click to close the dialog. -
Double-click Form 2 for Subject 99002 to make it the active page. Select > to display the current record's history from the system journal files. Locate those entries that contain the date on which DDE was performed for this module.
Click .
-
In the record list window, select Form 9 for Subject 99002 to make it the active page. Select > to display the current record's history from the system journal files. Locate the entry for the Description field and confirm that existing multiple queries in this field are listed.

Select > to release the DDE task record set and exit DFexplore.