Table of Contents
- 12.1. Tests & Requirements
- 12.2. Begin Module 12.
- 12.3. Submit corrected case report forms into the study database and verify that all CRFs have arrived successfully in the new record queue.
- 12.4. Retrieve submitted CRFs using DFexplore Image View.
- 12.5. Enter Form 2, Subject 99001, resolve outstanding queries, and save the corrected CRF to the database.
- 12.6. Enter Form 2, Subject 99002, resolve outstanding queries, and save the corrected CRF to the database.
- 12.7. Enter Form 4, Subject 99004.
- 12.8. Enter Form 2, Subject 99004, resolve outstanding queries, and save the corrected CRF to the database.
- 12.9. Select and resolve a query in a field that has multiple queries.
- 12.10. Review and approve a pending query reply for Form 1 for Subject 99002.
- 12.11. Review, correct and approve a pending query reply for Form 1, Subject 99007.
- 12.12. Confirm query resolution by examining the database status.
- 12.13. End Module 12.
Submit corrected case report forms into the study database and verify that all CRFs have arrived successfully in the new record queue.
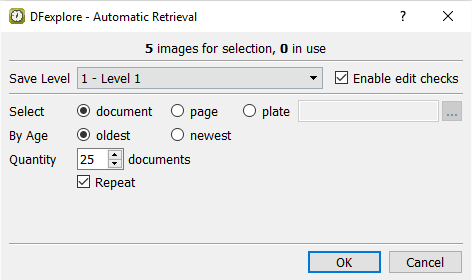
Retrieve submitted CRFs using DFexplore Image View.
Enter Form 2, Subject 99001, resolve outstanding queries, and save the corrected CRF to the database.
Enter Form 2, Subject 99002, resolve outstanding queries, and save the corrected CRF to the database.
Enter Form 4, Subject 99004.
Enter Form 2, Subject 99004, resolve outstanding queries, and save the corrected CRF to the database.
Select and resolve a query in a field that has multiple queries.
Review and approve a pending query reply for Form 1 for Subject 99002.
Review, correct and approve a pending query reply for Form 1, Subject 99007.
Confirm query resolution by examining the database status.
Estimate of Time Required: 30 Minutes
-
Start DFATK as described in Module 1 (Installation & Initialization).
-
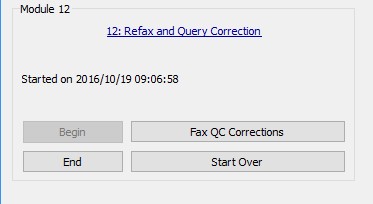
Click followed by to begin this module.
-
In the Control Panel section for Module 12, click to submit a set of corrected case report forms. Clicking more than once will result in multiple documents arriving in the new Image queue. Wait for 2-3 minutes before proceeding with remaining tests.
-
Start DFexplore.

-
In the DFexplore login dialog, enter the name for DFdiscover Server that has been provided by your administrator. Enter
valid1in the Username field and the previously assigned password in the Password field. Click to login.
-
From the list of available studies, select the 254 Acceptance Test Study, then click to open its database.
-
Select > . In the Preferences dialog, click
 from Image View section. Select (enable) When the revised record is saved for the duplicate resolution setting. Click to save and close the Preferences dialog.
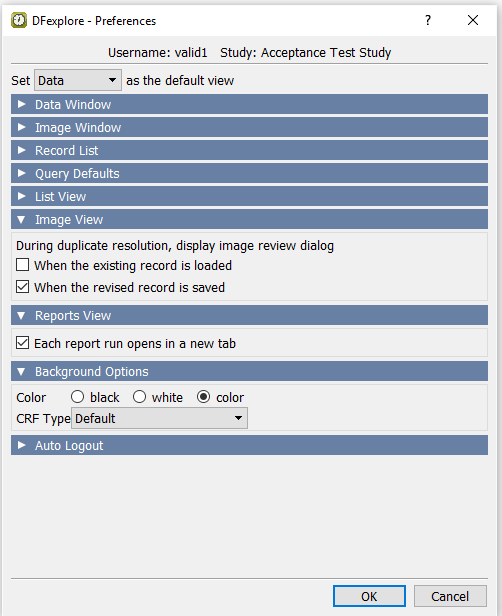
-
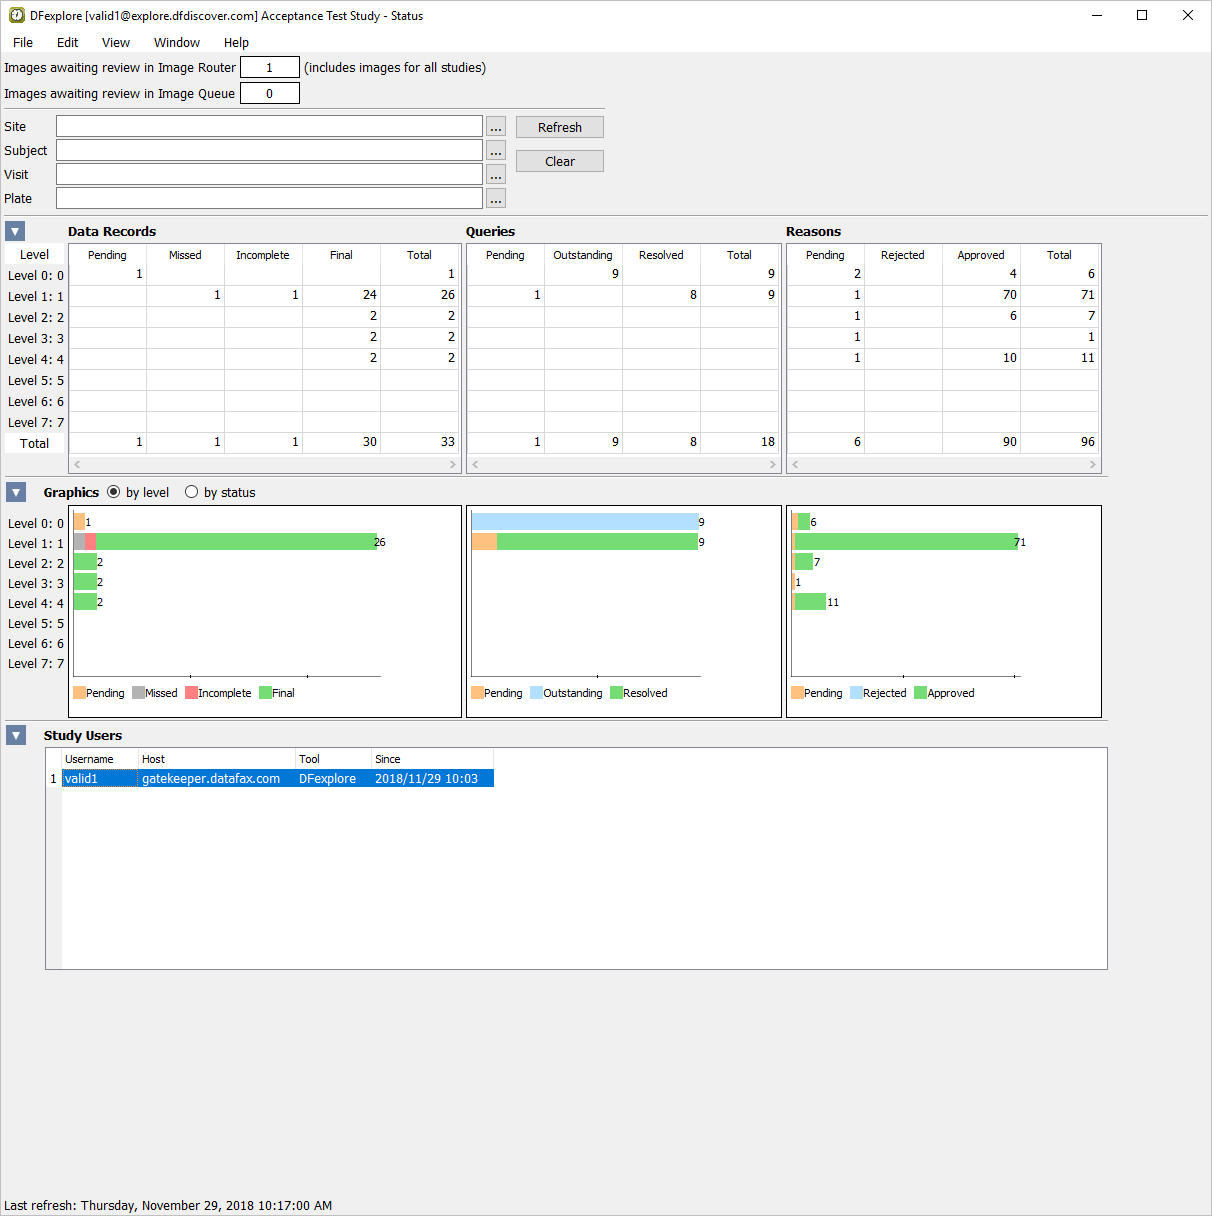
Select > . Examine the information displayed for the Image Queue, Data and Queries tables.
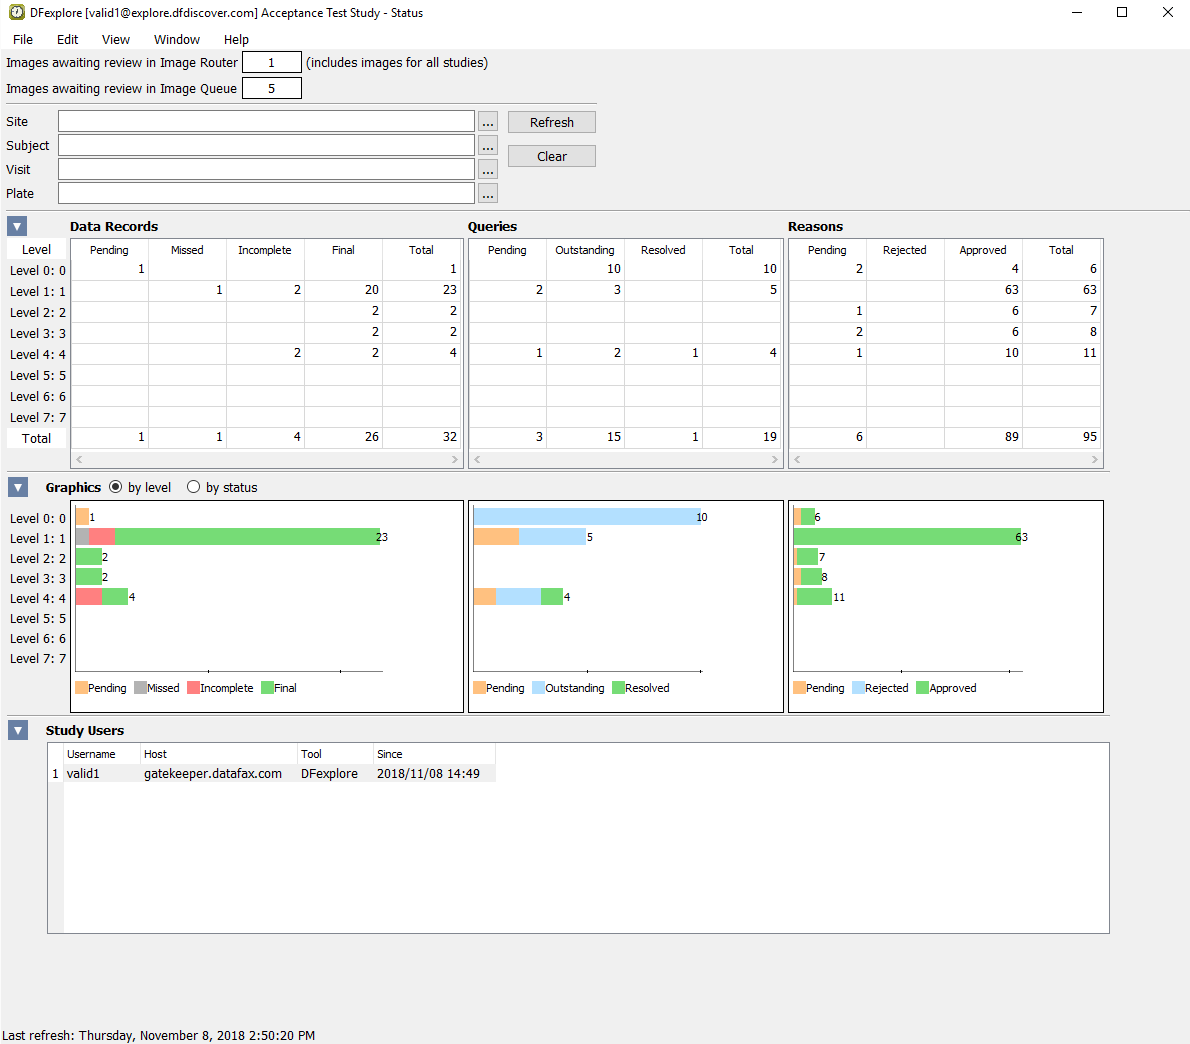
![[Note]](../../imagedata/note.png)
Note The number of pages awaiting review in the Image Router may be different from that shown here as this number includes pages for all studies on the DFdiscover server, not only those that belong to the 254 Acceptance Test Study.
-
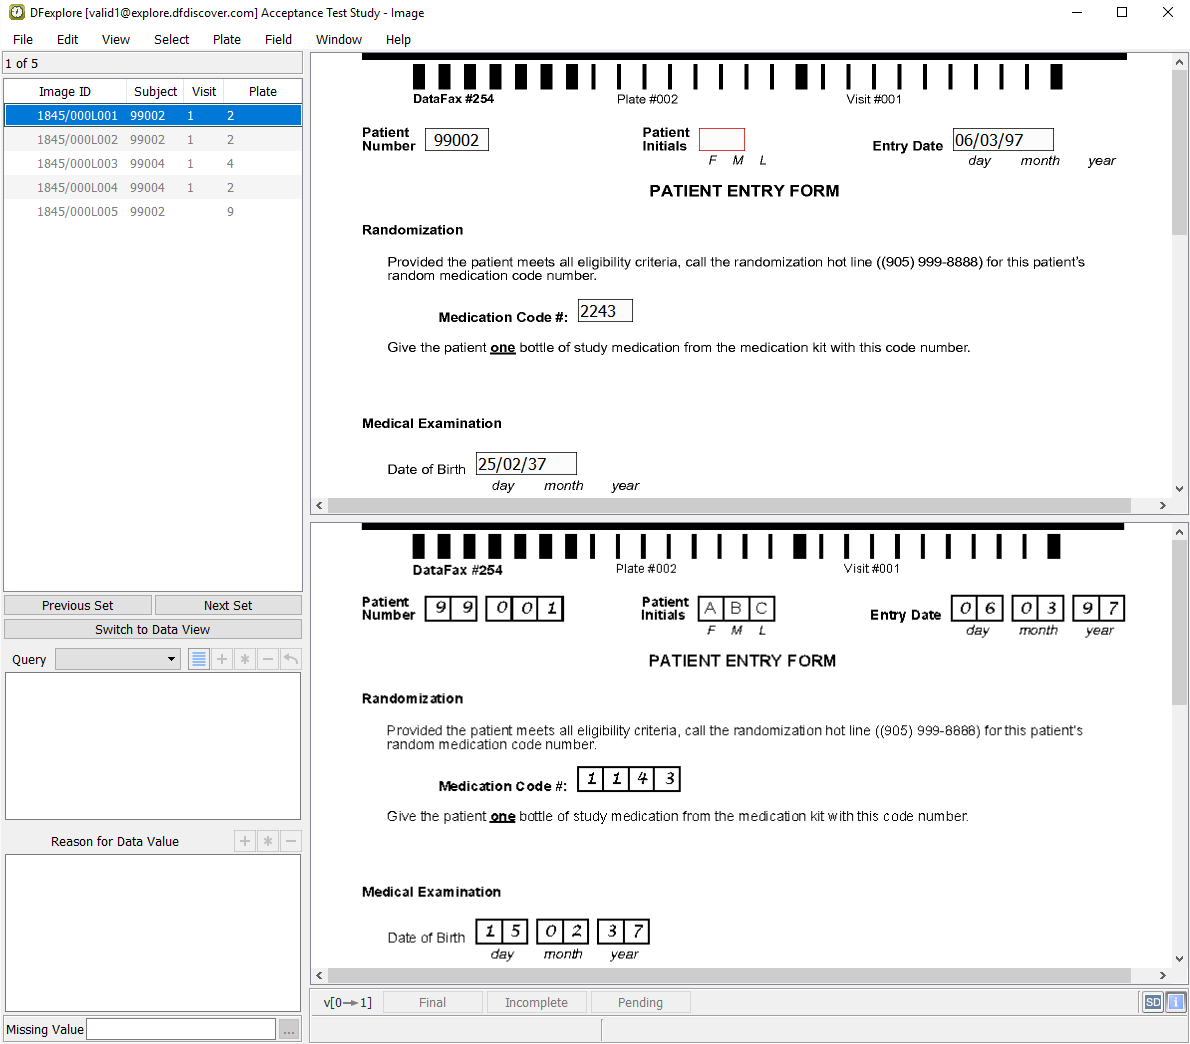
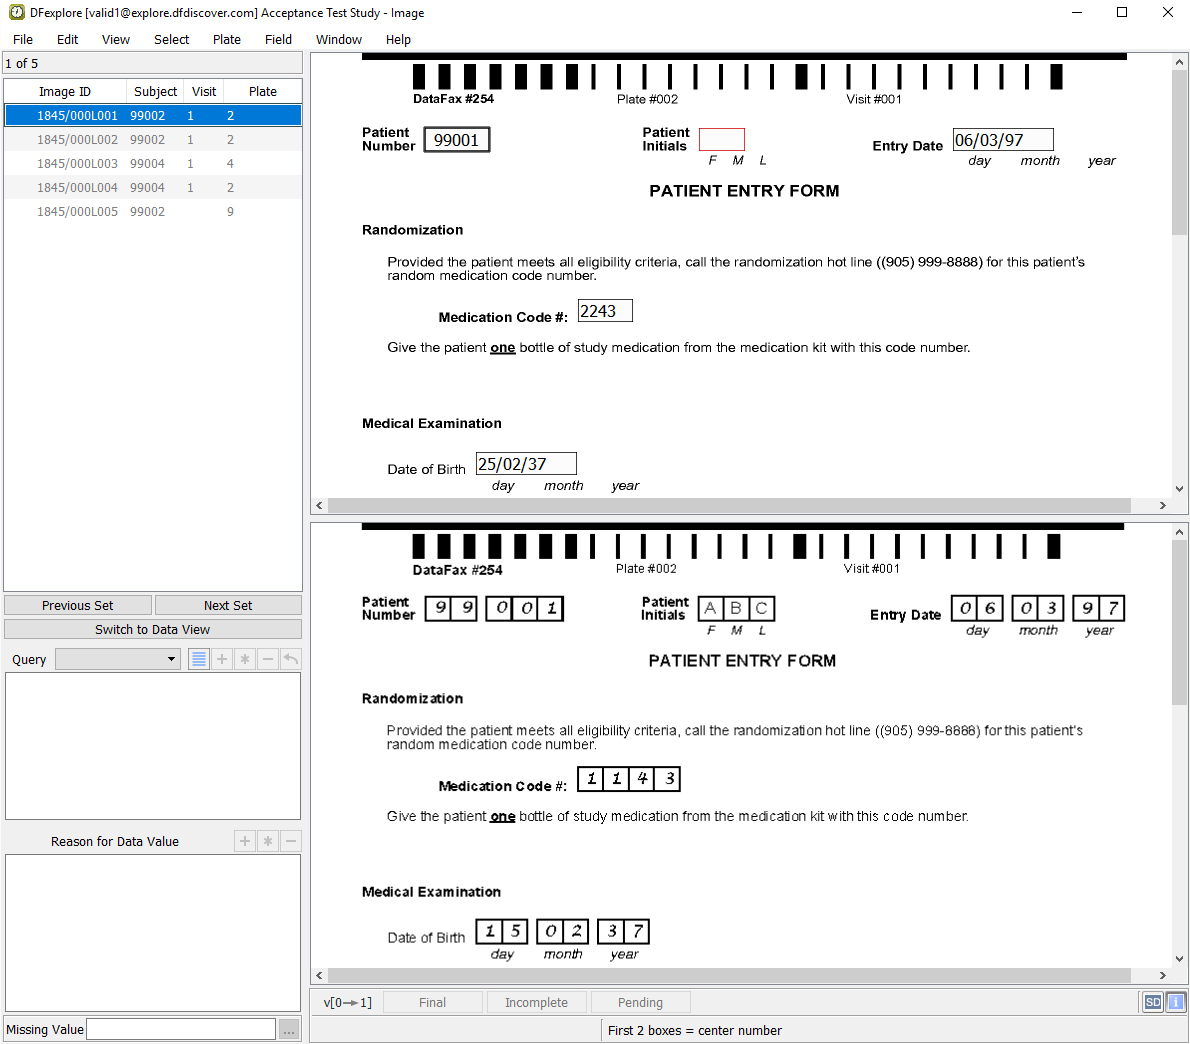
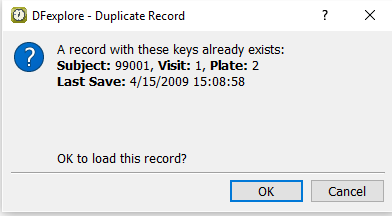
With the Patient Entry Form for Subject 99001 as the current page, click anywhere on the page background to make the page active for data entry. Beginning with the Patient Number field, verify that the correct Subject 99001 is displayed. If the Patient Number is incorrect, correct it and press Tab to exit the field.
Note In your normal image entry process, you must always pay careful attention to the accuracy of the ICR data. You will need to do the same here. It is possible that the new pages contain ICR errors that you will need to correct during entry. In particular, it is important that you correct any key fields (visit and/or patient numbers) that may have been mis-read as these are critical to the identification and storage of the data. Note that the ICR data records on your screen may not match exactly those shown in the examples throughout this module.
-
Click to load the data from the existing Subject 99001, Patient Entry Form.
-
Press Tab to advance from field to field, and verify that data is the same as that found on the CRF image. Note that some fields may contain values that have been assigned by edit checks. Stop when the Smoking Status field becomes the current field. Examine the details in the Query window. Enter the data as it appears on the image.
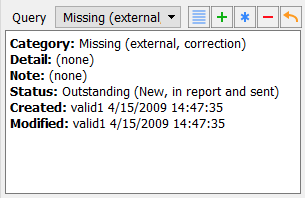
Note When data is entered into a field that contains an outstanding missing value query of type Correction, the query is automatically resolved by DFdiscover as the missing data has now been provided. The color green indicates that the query has been resolved.
-
Continue tabbing through the remaining fields on the page to verify that the data in the fields is the same as the CRF image. Once the save buttons become active at the bottom of the record, click to save the corrected page to the database.
-
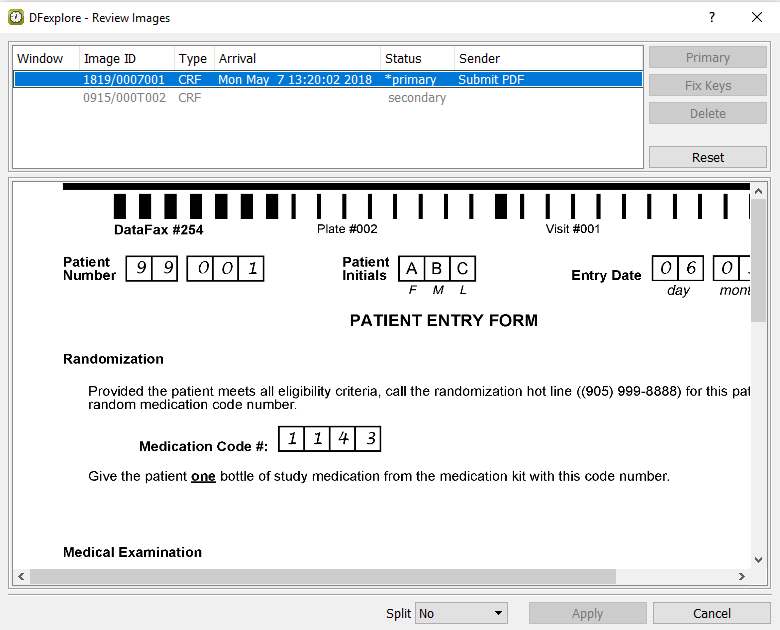
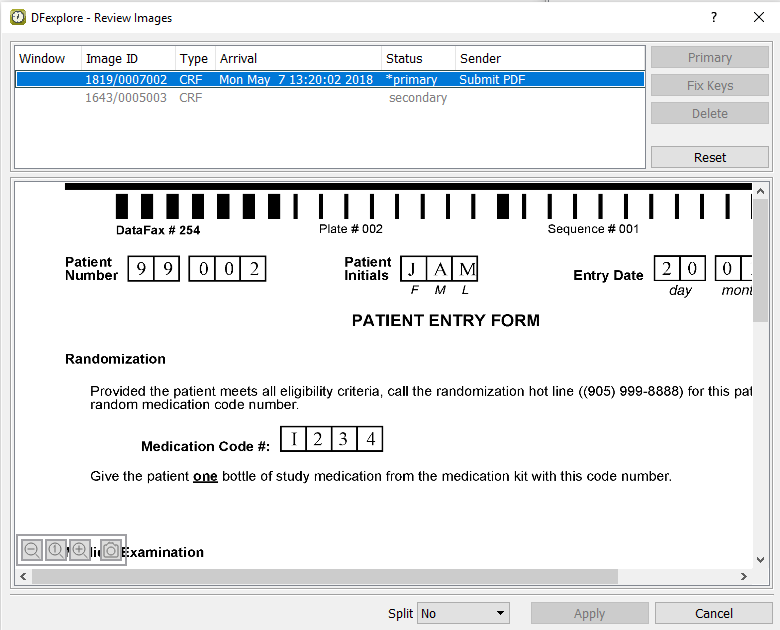
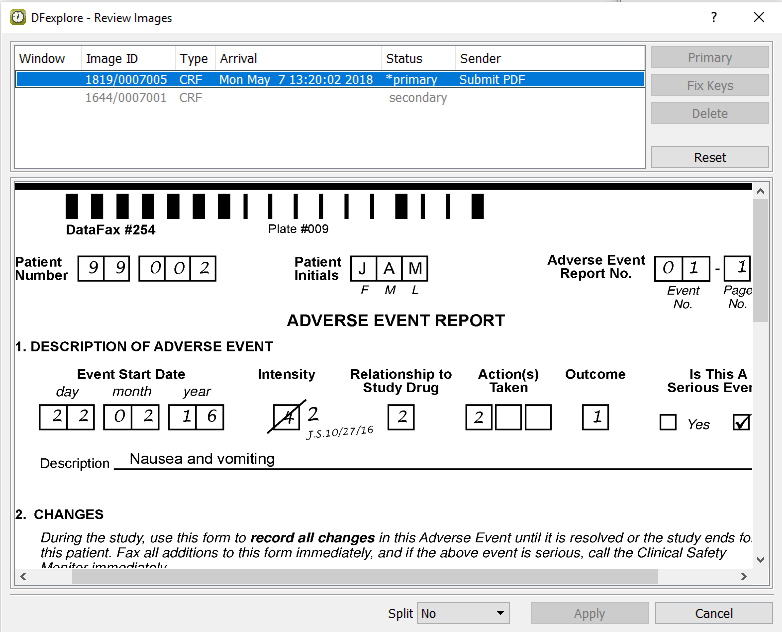
Using the scroll bars, examine the primary image and locate the corrected Smoking Status field to verify that this is the same image that was saved with the corrected data record in Section 12.5, “Enter Form 2, Subject 99001, resolve outstanding queries, and save the corrected CRF to the database.”. Click to exit the Review Images dialog.
-
Return to the saved page for Subject 99001 by selecting it from the Image queue list. Examine the bottom right corner of the main data entry screen.

-
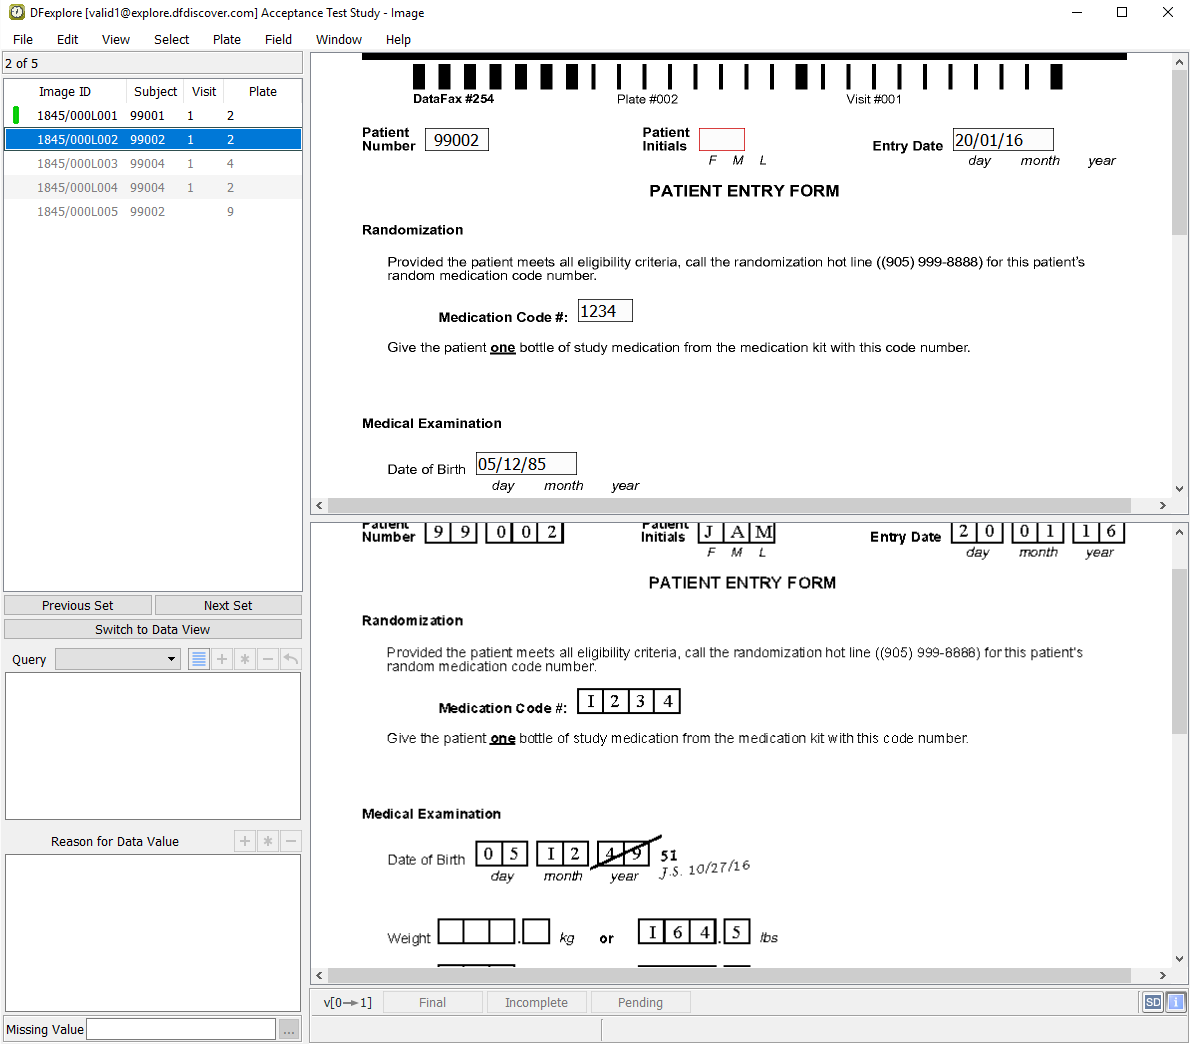
From the new image queue list, click the 2nd entry in the list (Subject 99002) to make it the current page. Click anywhere on the page background to make the page active for data entry. Beginning with the Patient Number field, enter the correct subject
99002and press Tab to exit the field.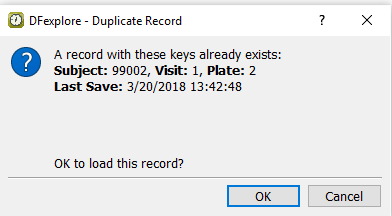
-
Click to load the data from the existing Subject 99002, Patient Entry Form.
-
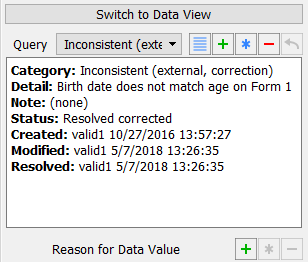
Press Tab to advance from field to field, and verify that data is the same as that found on the CRF image. Stop when the Date of Birth field becomes the current field. Examine the details in the Query window.
-
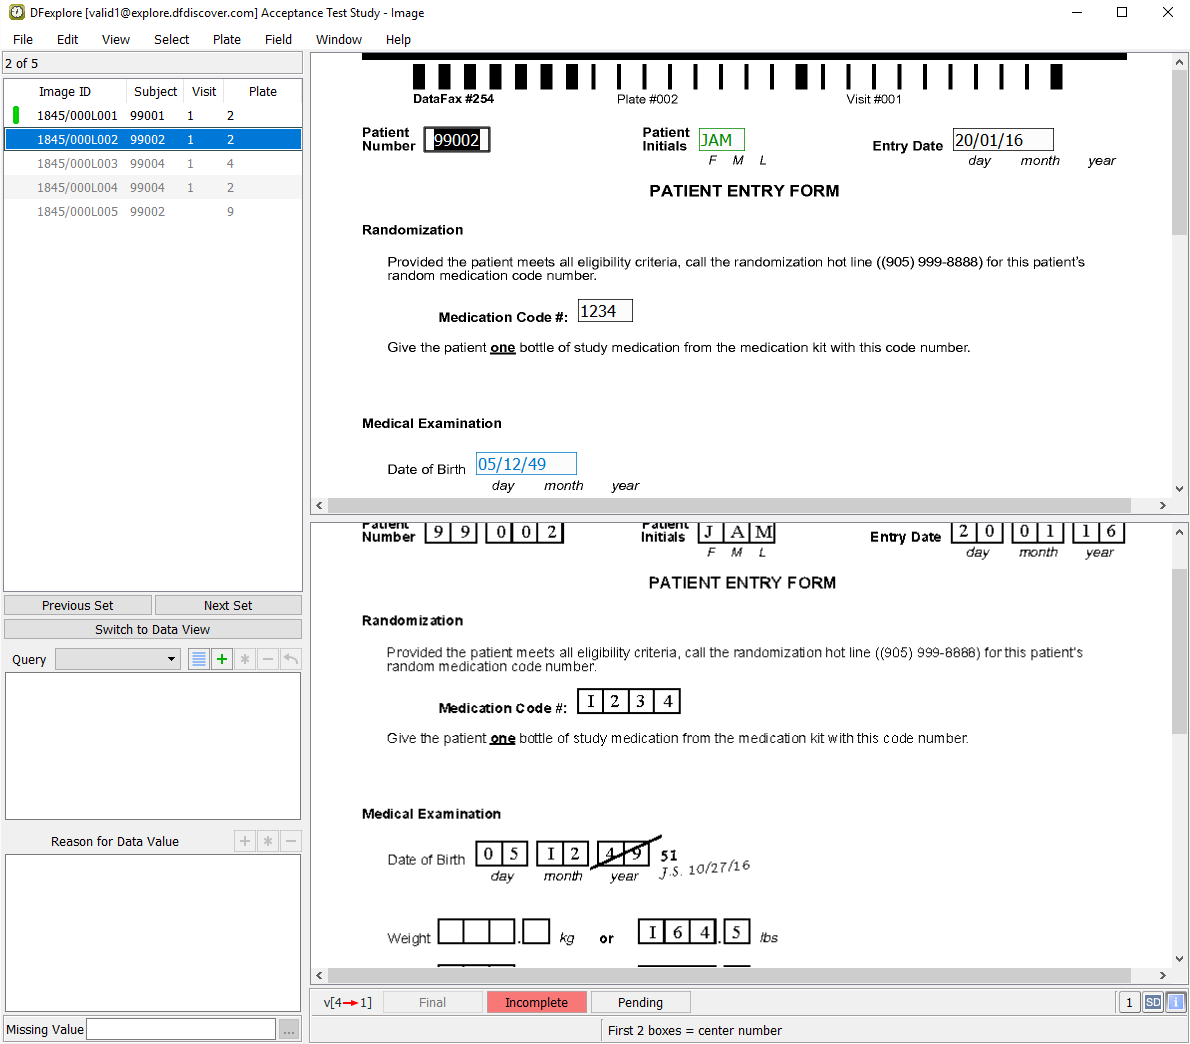
Enter the corrected date value as it appears on the image of the CRF
05/12/51. With Date of Birth as the current field, select > .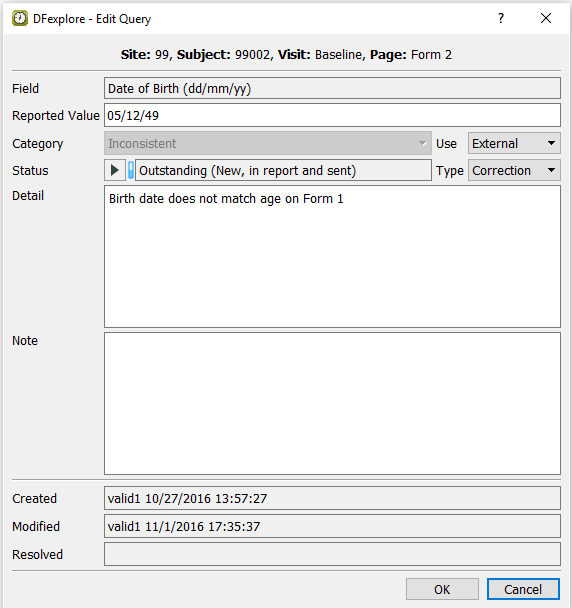
-
Select Resolved corrected from the Status pull-down. Click to apply the change to the query status. Examine the Query window.
-
Continue tabbing through the remaining fields on the page to verify that the data in the fields is the same as the CRF image. Note that some fields may contain values assigned by edit checks. Once the save buttons at bottom of the record become active click to save the corrected page to the database.
-
Using the scroll bars, examine the primary image and locate the corrected Date of Birth field to verify that this is the same image as was saved with the corrected data record in Section 12.6, “Enter Form 2, Subject 99002, resolve outstanding queries, and save the corrected CRF to the database.”. Click to close the Review Images dialog.
-
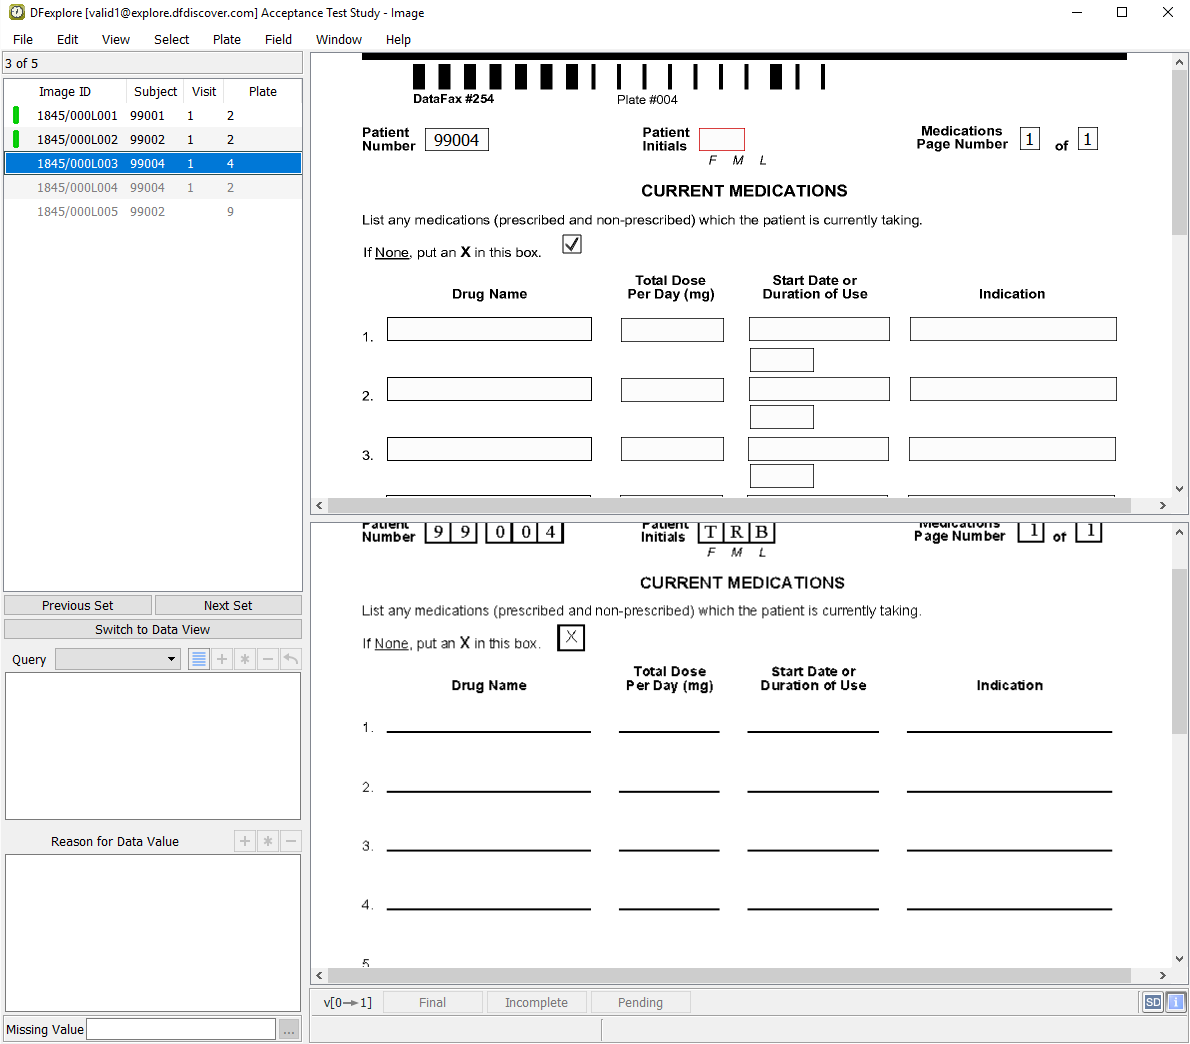
Click anywhere on the page background to make the page active for data entry. Beginning with the Medications Page Number field, enter
1as shown on the CRF image. Press Tab to exit the field and move to the Patient Number. Enter the number shown on the CRF image and leave the field.Note The Current Medications form for Subject 99004 has been flagged as Missing in the Quality Control report of Module 10. As a result, arrival of this plate will not trigger the Duplicate Record warning because the page does not currently exist in the study database.
-
Enter all fields on the data record as they appear on the CRF image. Once the save buttons at bottom of the record become active, click to save the entered page to the database.
Note The Review Images window does not appear upon saving Form 4, Subject 99004 because a duplicate page does not exist in the database for this set of keys.
-
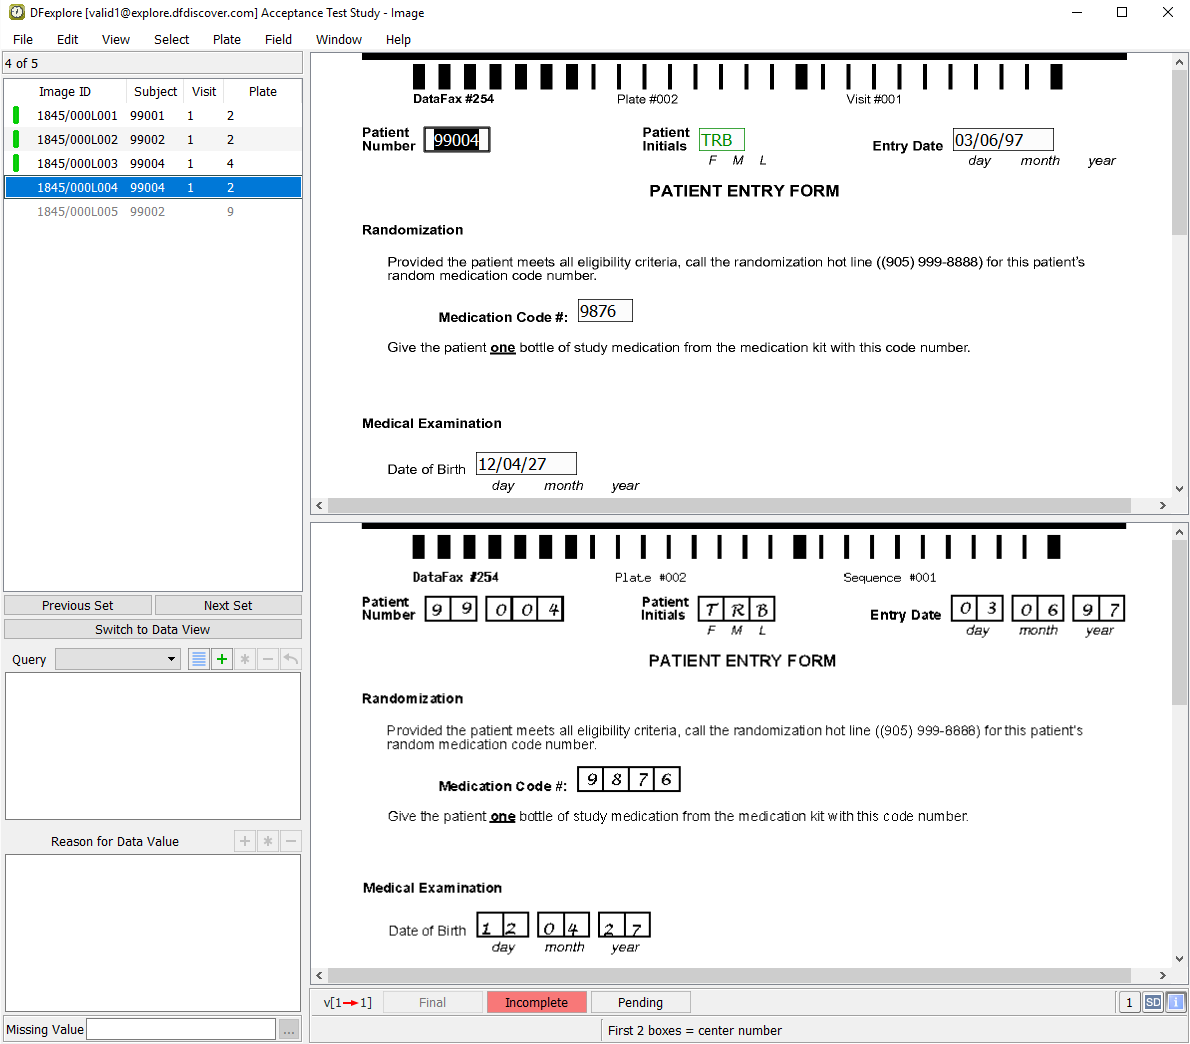
Click anywhere on the page background to make the page active for data entry. Beginning with the Patient Number, enter
99004as shown on the CRF image. Press Tab to exit the field.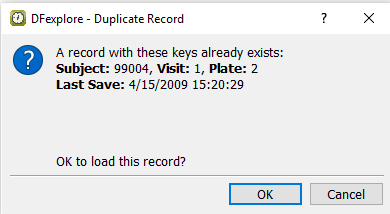
-
Click to load the data from the existing Subject 99004, Patient Entry Form.
-
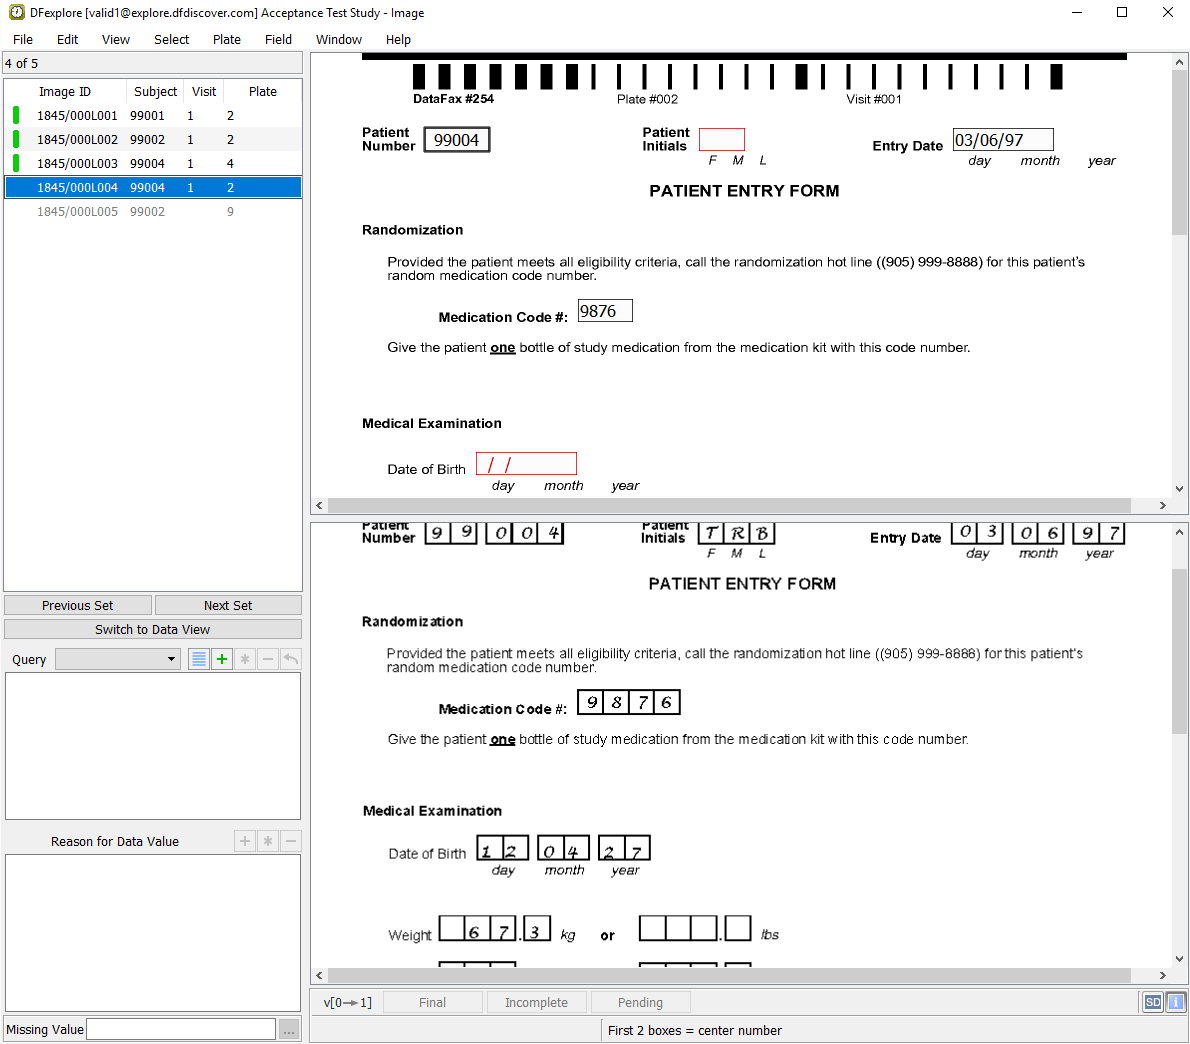
Press Tab to advance from field to field, and verify that data is the same as that found on the CRF image. Note that some fields may contain values assigned by edit checks. Stop when the queried Pulse field becomes the current field. Examine the details in the Query window.
-
Enter the correct response as it appears on the image of the corrected CRF. Examine the details in the Query window and press Tab to exit the corrected Pulse field.
-
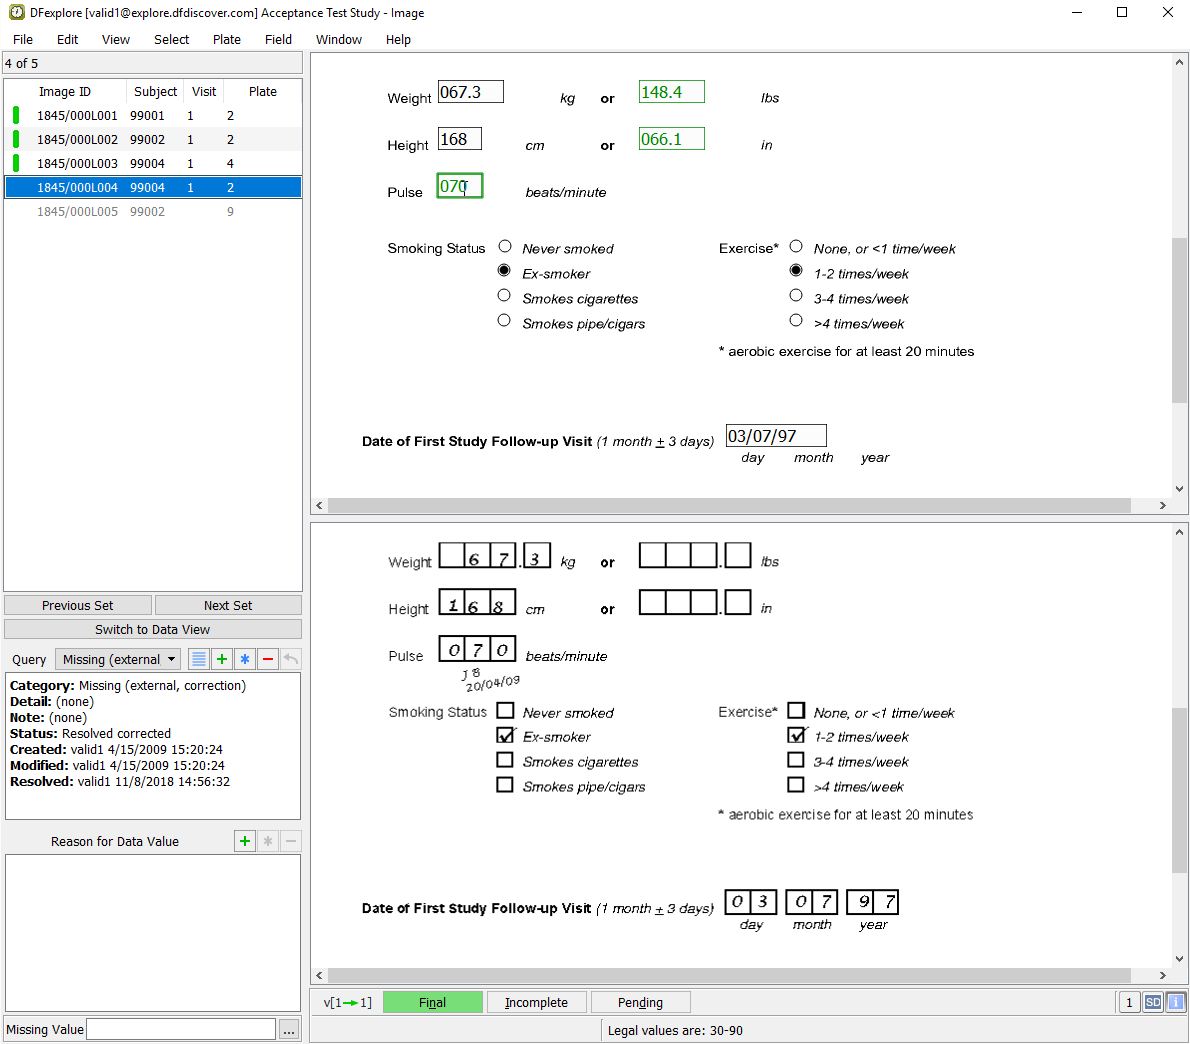
Continue tabbing through the remaining fields on the page to verify that the data in the fields is the same as the CRF image. Once the save buttons at the bottom become active, click to save the corrected page to the database.
Using the scroll bars, examine the primary image and locate the corrected Pulse field to verify that this is the same image as was saved with the corrected data record in Step 3. Click to close the Review Images window.

-
With the Adverse Event Report Form for Patient Number 99002 as the current plate, click anywhere on the page background to make the page active. Beginning with the Adverse Event Report No. field, enter the value as shown on the CRF image. Press Tab to exit this field and advance to the AE Identifier field. Upon entering the AE Identifier field, the edit check
AESEQNUM2automatically complete this field. Press Tab to exit the AE Identifier field to advance to the Patient Number field. Verify that the correct Subject 99002 is displayed for the Patient Number field. If the number is incorrect, correct it and press Tab to exit the field.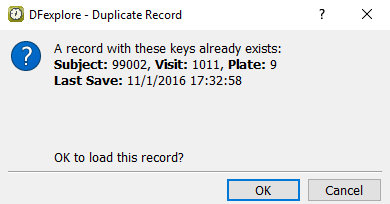
-
Click to load the data from the existing Subject 99002, Adverse Event Report Form.
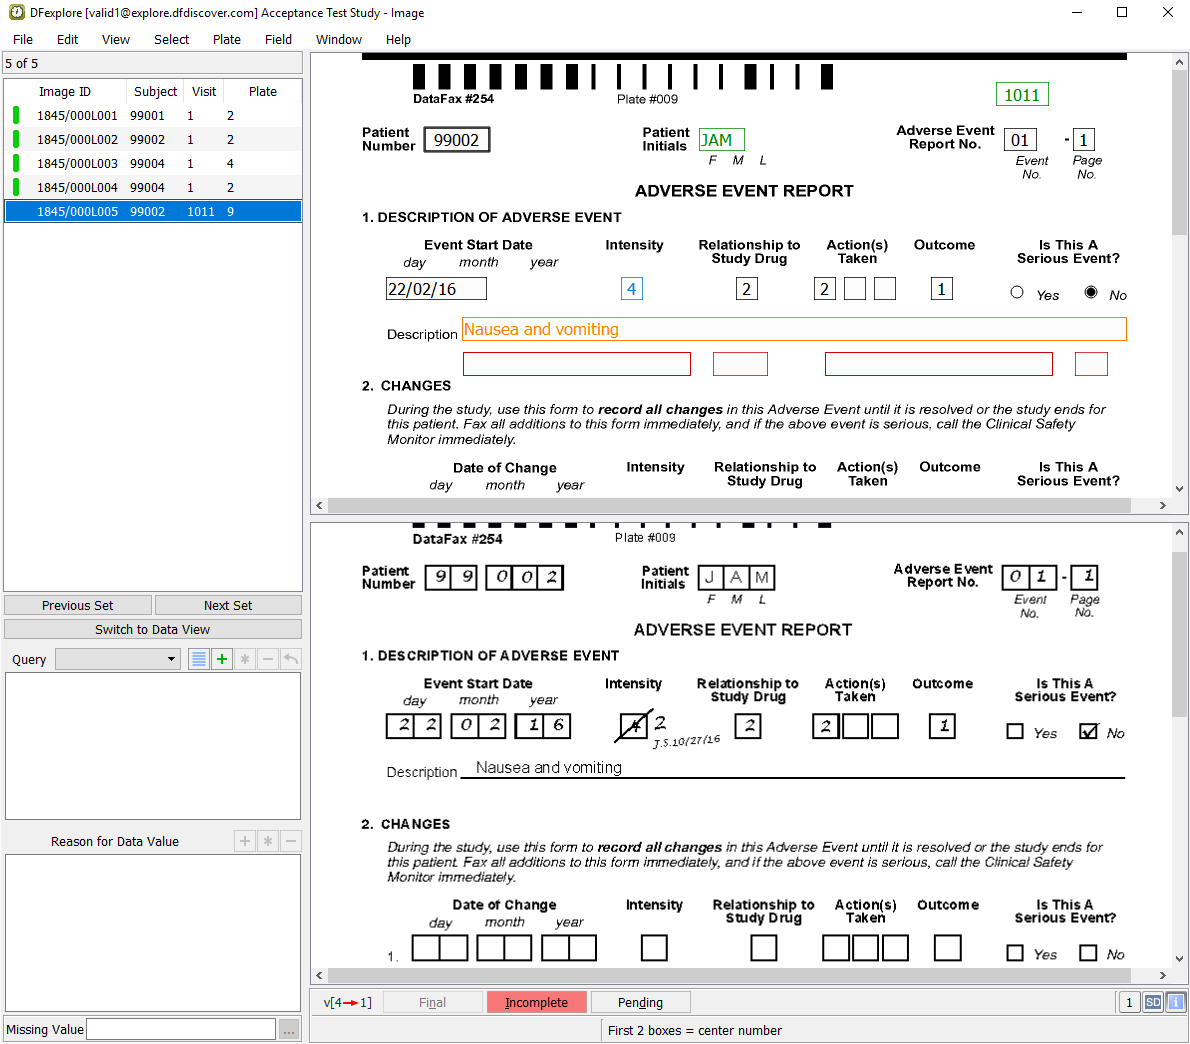
-
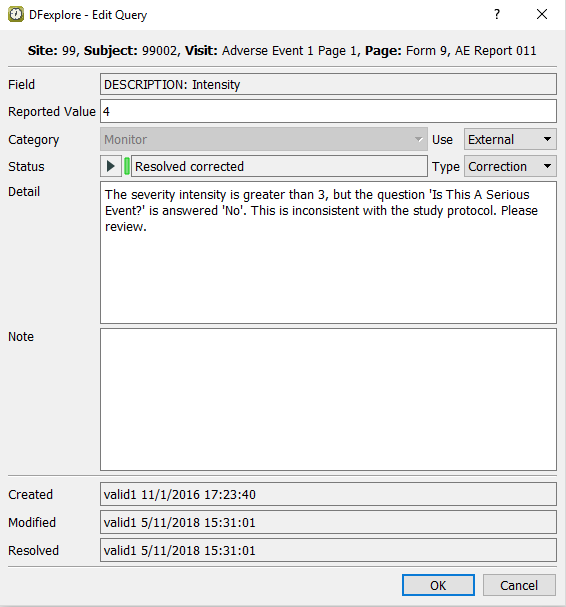
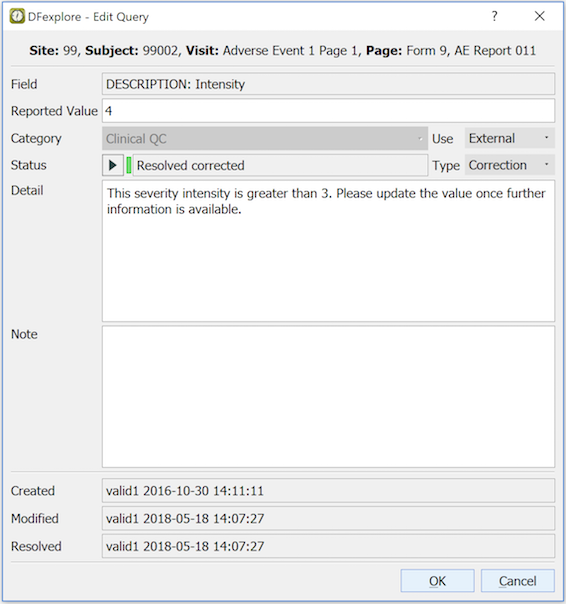
Correctly enter each data field on the page per the CRF image, up to the Intensity field. Confirm that the Intensity field has a value of 4, and contains 2 unresolved queries.
-
Enter the correct value
2for Intensity field per the CRF image. Examine the details in the Query window.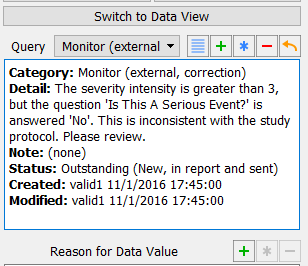
-
Select > . Choose Resolved corrected from the Status pull-down. Click to apply the edits.
-
With the focus still on the Intensity field, examine the details in the Query window. Select the Clinical QC query from the Query drop-down, and examine its details.
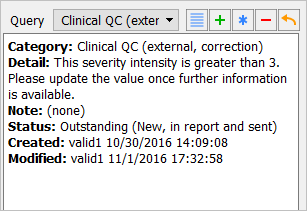
-
Select > in the dialog, choose Resolved corrected from the Status pull-down. Click to apply the edits.
-
Press Tab to advance through the fields, and verify that the data is the same as that found on the CRF image. Note that upon leaving the Description field, the
DrugLookupedit check is executed and DFlookup:aecodes dialog appears. Click to close the DFlookup:aecodes dialog.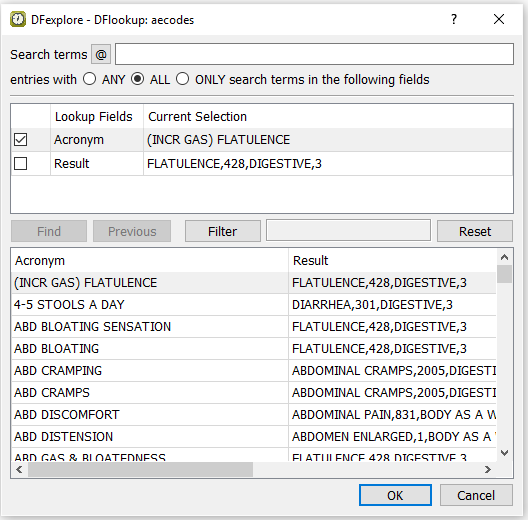
-
Continue tabbing through the remaining fields on the page and verify that the data in the fields is the same as the CRF image. Once the save buttons become active at the bottom of the record, click to save the corrected page to the database. Upon clicking the , the Review Images dialog appears. Click to close the Review Images window.
-
-
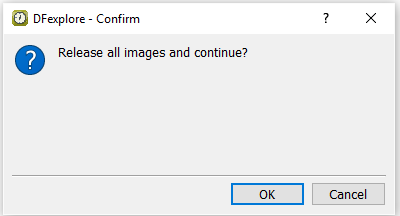
Click in the confirmation dialog to release the Image View records and open Queries View.
-
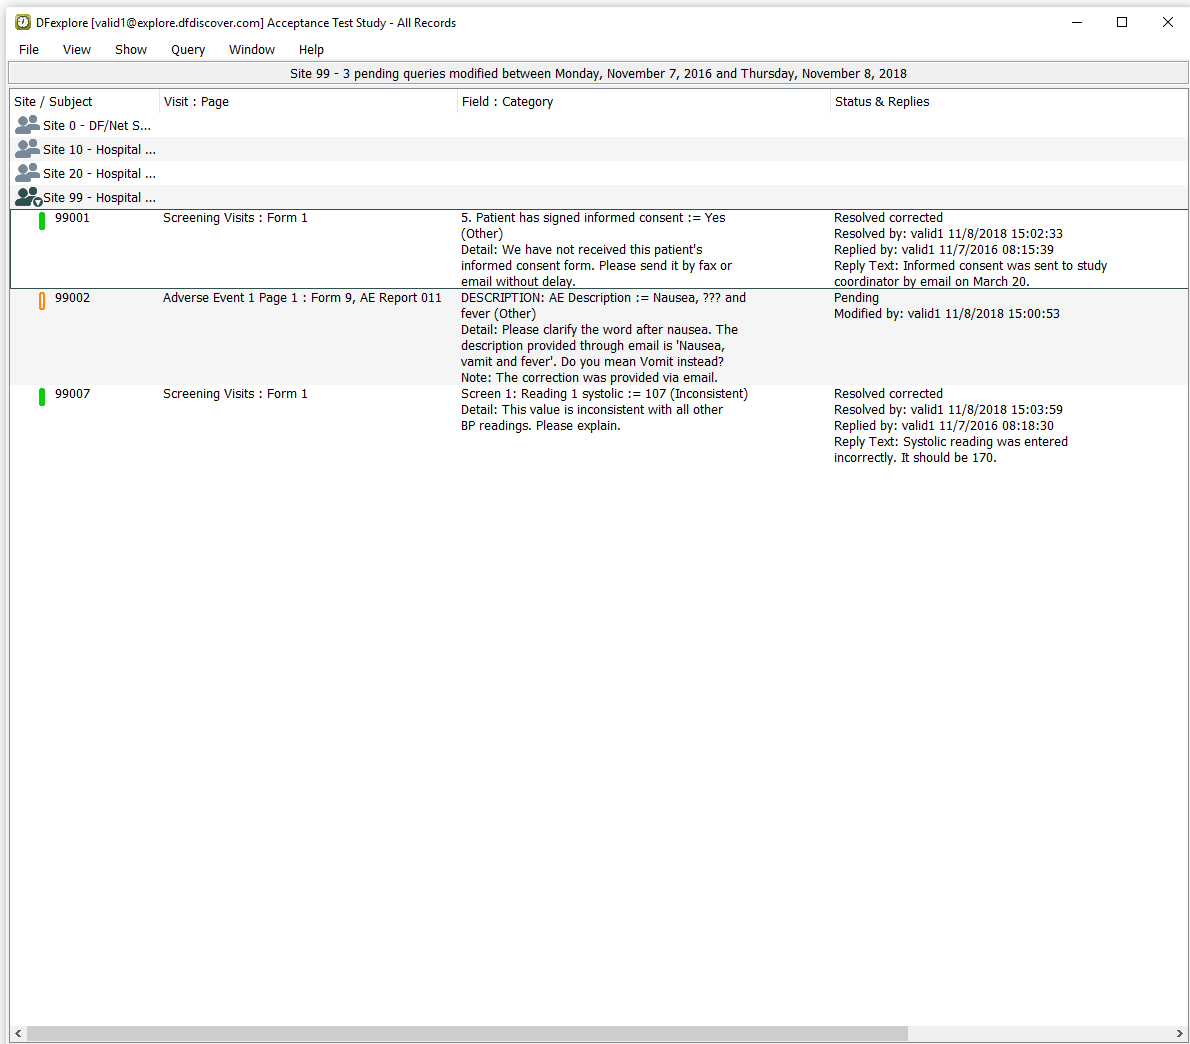
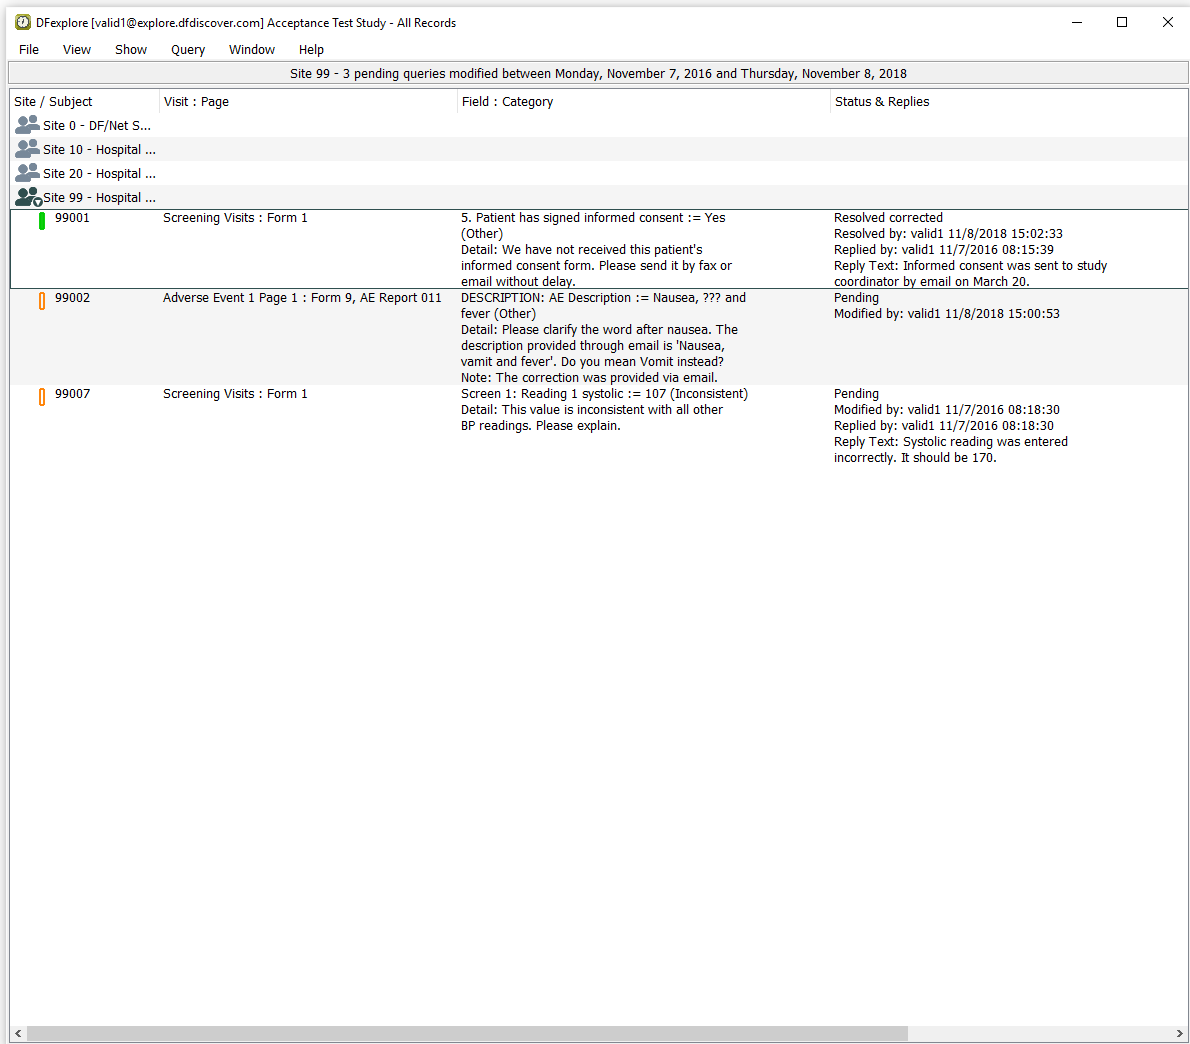
Select > to display only queries for which a resolution is pending. Double-click Site 99 - Hospital #99 entry to display all pending queries.
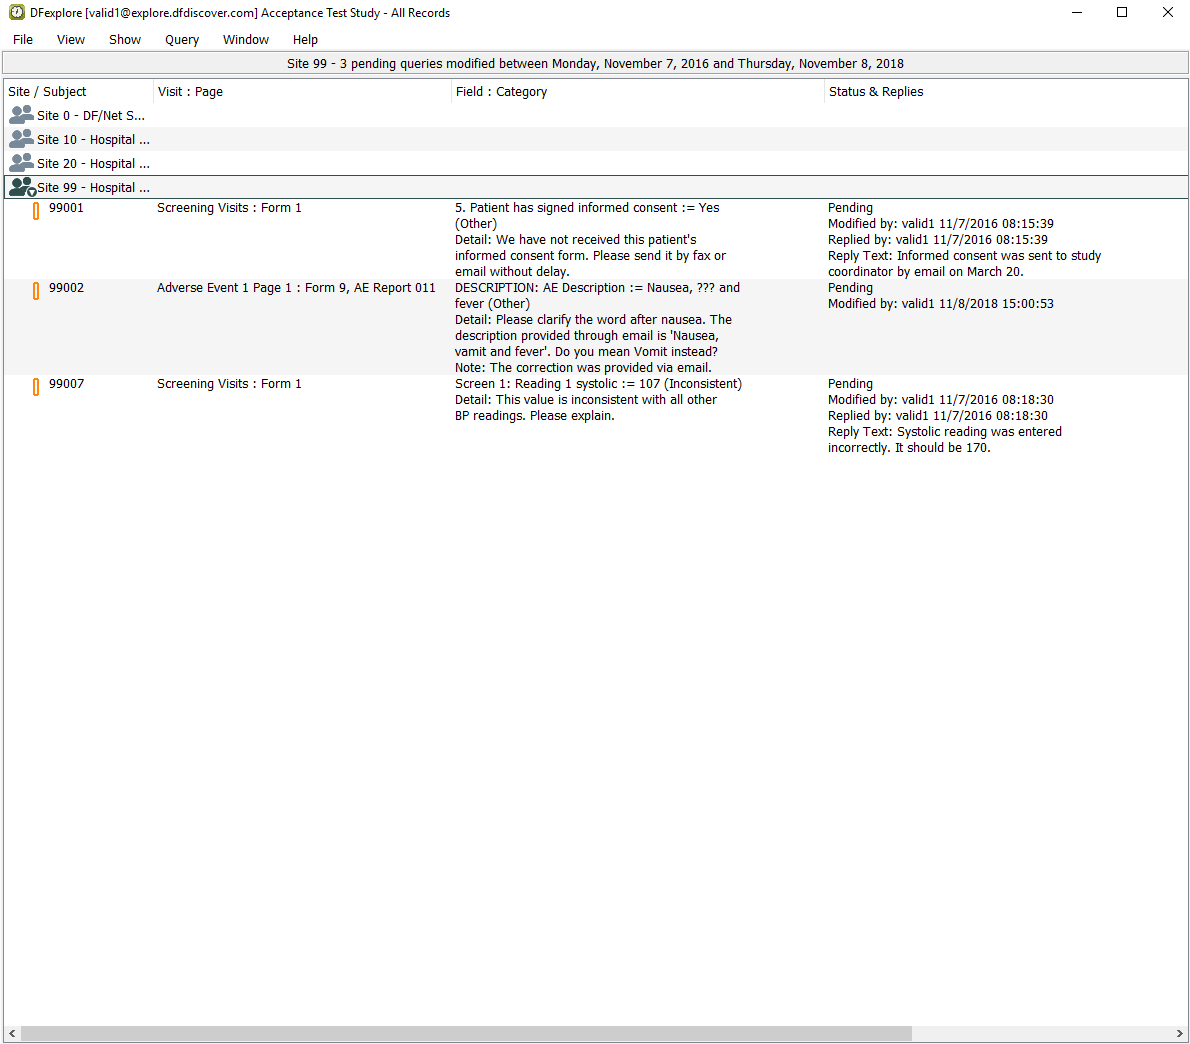
-
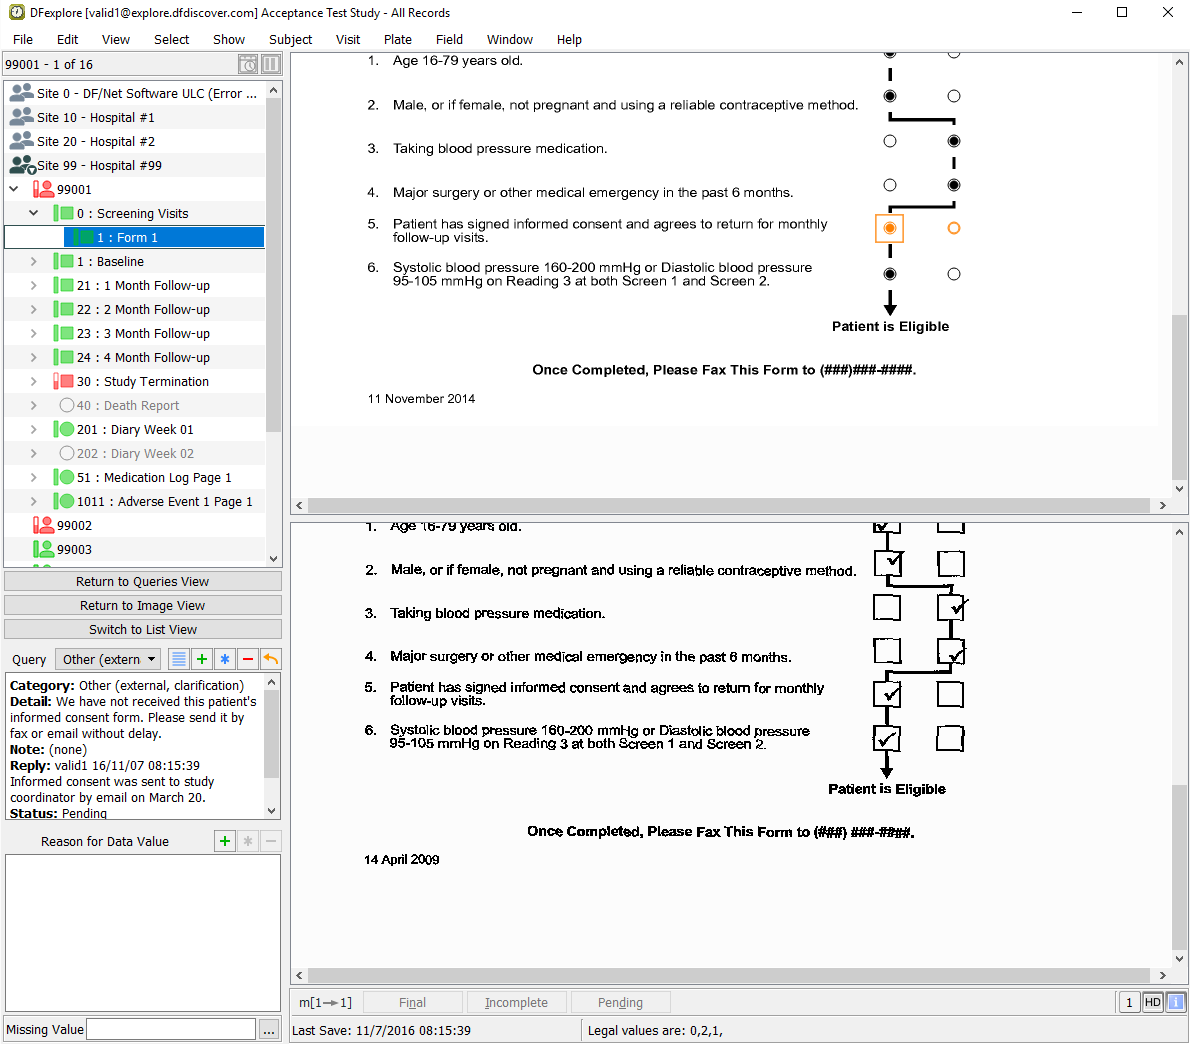
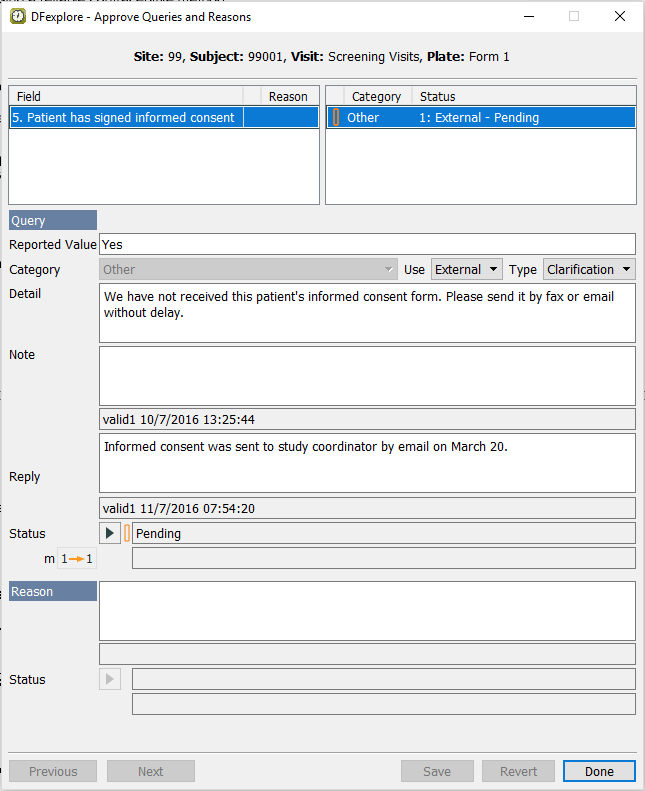
Locate the pending query for Subject 99001, 5. Patient has signed informed consent. Double-click the query to make the queried field and page the current page. Examine the information in the Query window.
-
Select > to review all queries and reasons that are present on the current page.
-
Choose Resolved corrected from the Status pull-down. Enter
Signed informed consent was received March 20, 2009.in the Note field.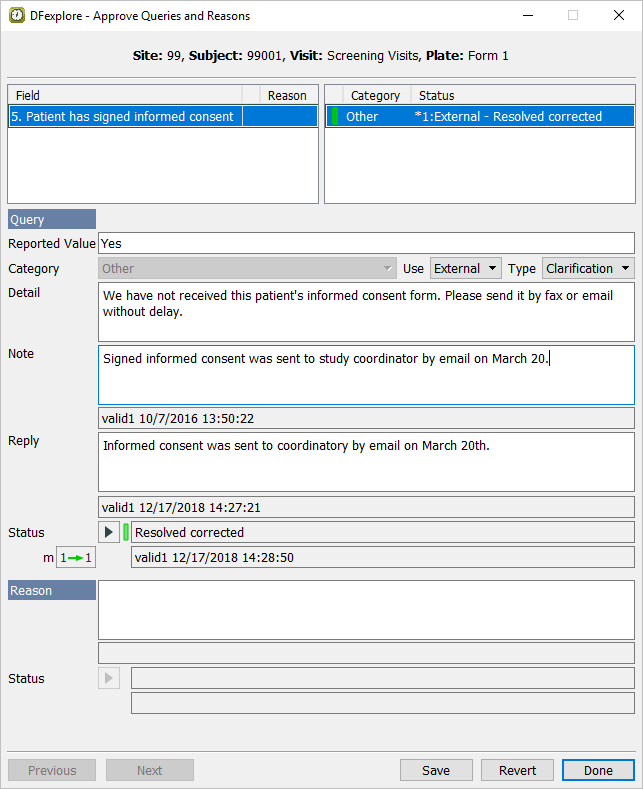
-
Click to apply the Resolved corrected status to the query. Click to close the Approve Queries and Reasons dialog.
-
Do not change any other data or meta data on the screening visits page for Subject 99001. Make the save buttons at the bottom of the screen active and click to save the data record and query to the database.
In the record list window, click to return to Queries View to process the pending query for Subject 99007.
-
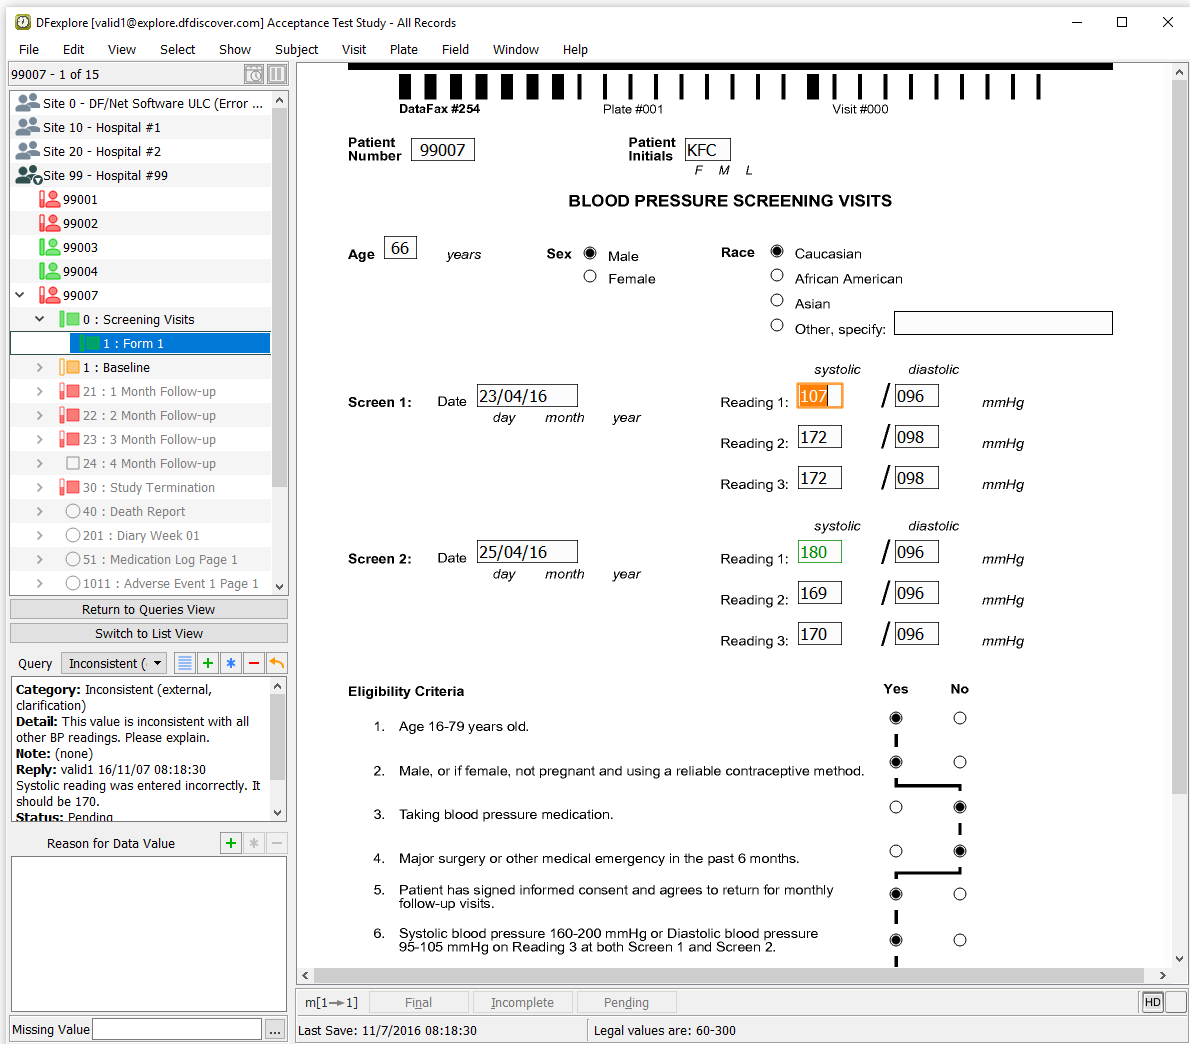
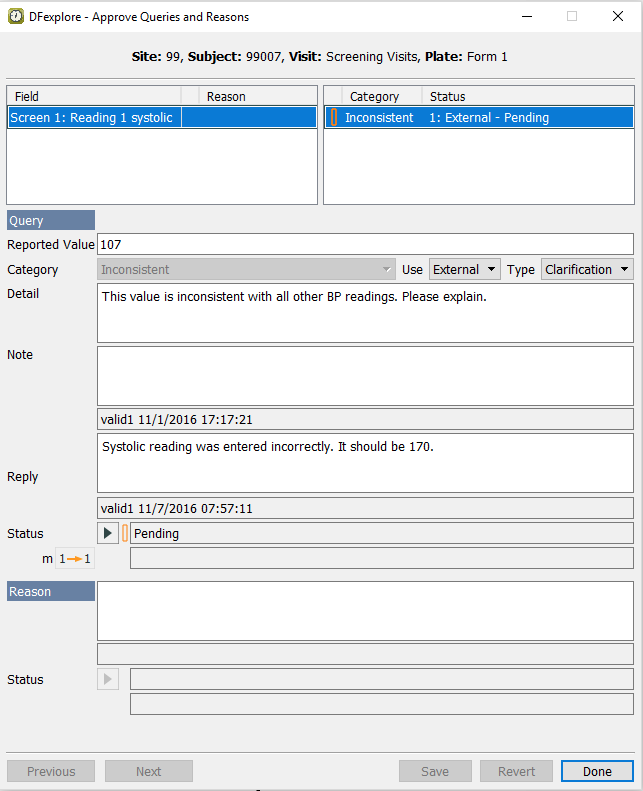
Locate the pending query for Subject 99007, Screen 1: Reading 1 systolic. Double-click the query to make the queried field and page current. Examine the information in the Query window.
-
Select > to review all queries and reasons that are present on the current page.
-
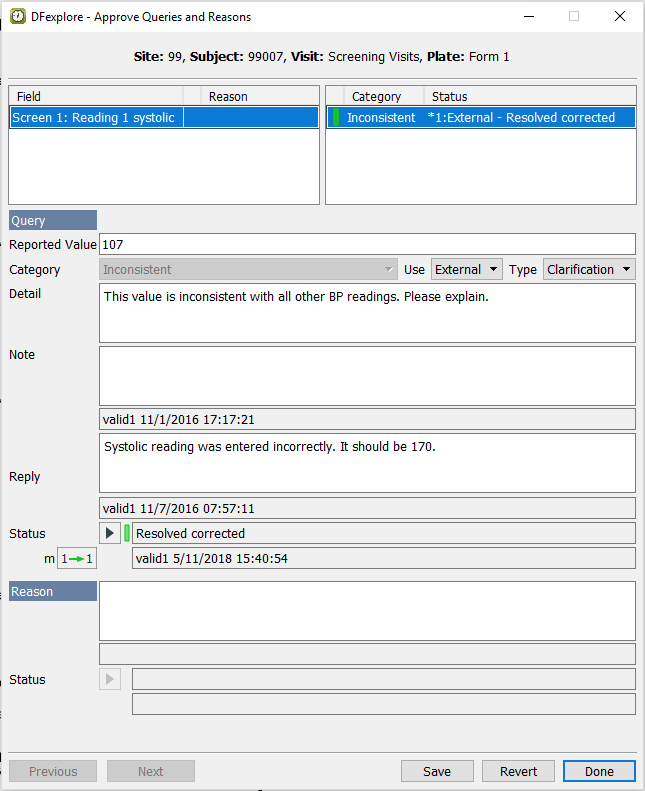
Choose Resolved corrected from the Status pull-down.
-
Click to apply the Resolved corrected status to the query. Click to close the Approve Queries and Reasons dialog.
-
The query reply indicates that the systolic blood pressure value should be
170. With the focus still on the Screen 1: Reading 1 systolic field on the page, change the value to170. -
Click to save the data record and query to the database.
-
In the record list window, click to return to Queries View.