Table of Contents
- 13.1. Tests & Requirements
- 13.2. Begin Module 13.
- 13.3. Export date values from the database in calender format and save the exported data to a file on the local computer.
- 13.4. Export date values from the database and save the exported data to a file on the local computer.
- 13.5. Examining data values according to user-specified criteria.
- 13.6. Query the database for specific data values.
- 13.7. Create a DFsas job file according to user-specified criteria.
- 13.8. Create a SAS job file and data files using the DFsas job file criteria.
- 13.9. Compare the contents of SAS data files with the actual data in the database.
- 13.10. End Module 13.
Export date values from the database in calender format and save the exported data to a file on the local computer.
Export date values from the database and save the exported data to a file on the local computer.
Examining data values according to user-specified criteria.
Query the database for specific data values.
Create a DFsas job file according to user-specified criteria.
Create a SAS job file and data files using the DFsas job file criteria.
Compare the contents of SAS data files with the actual data in the database.
Estimate of Time Required: 30 Minutes
-
Start DFATK as described in Module 1 (Installation & Initialization).
-
Click followed by to begin this module.
All data exported in the following tests will be output to the DFexplore List View screen rather than saved to a file. List View does have 3 save options: Export Data, Save Data Retrieval File and Save As PDF.
If you do not have a printer connected to the server, the case report form page for Subject 99006 will not be printed. If you did not set up an email in Step 6, the CRF will not be emailed to you. A copy of the Subject 99006 CRF can be obtained from the back of the manual. You will need to reference this page in several of the tests in this module.
-
Start DFexplore.

-
In the login dialog, enter the name for DFdiscover Server that has been provided by your administrator. Enter
valid1in the Username field and the previously assigned password in the Password field. Click to login.
-
Highlight the entry for 254 Acceptance Test Study then click to continue.
-
Select > .
-
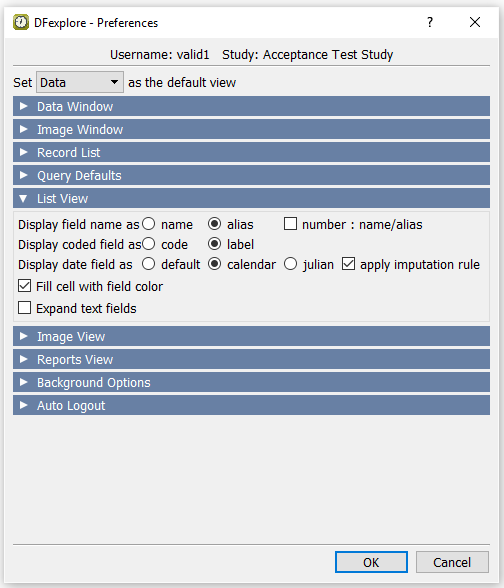
Select > . In the dialog, locate the List View panel. Click
 Enter the List View settings as follows:
Display field name = alias
Display coded field = label
Display date field = calendar
Check (enable) apply imputation rule
Check (enable) Fill cell with field color
Uncheck (disable) Expand text fields
-
Click to close the dialog.
-
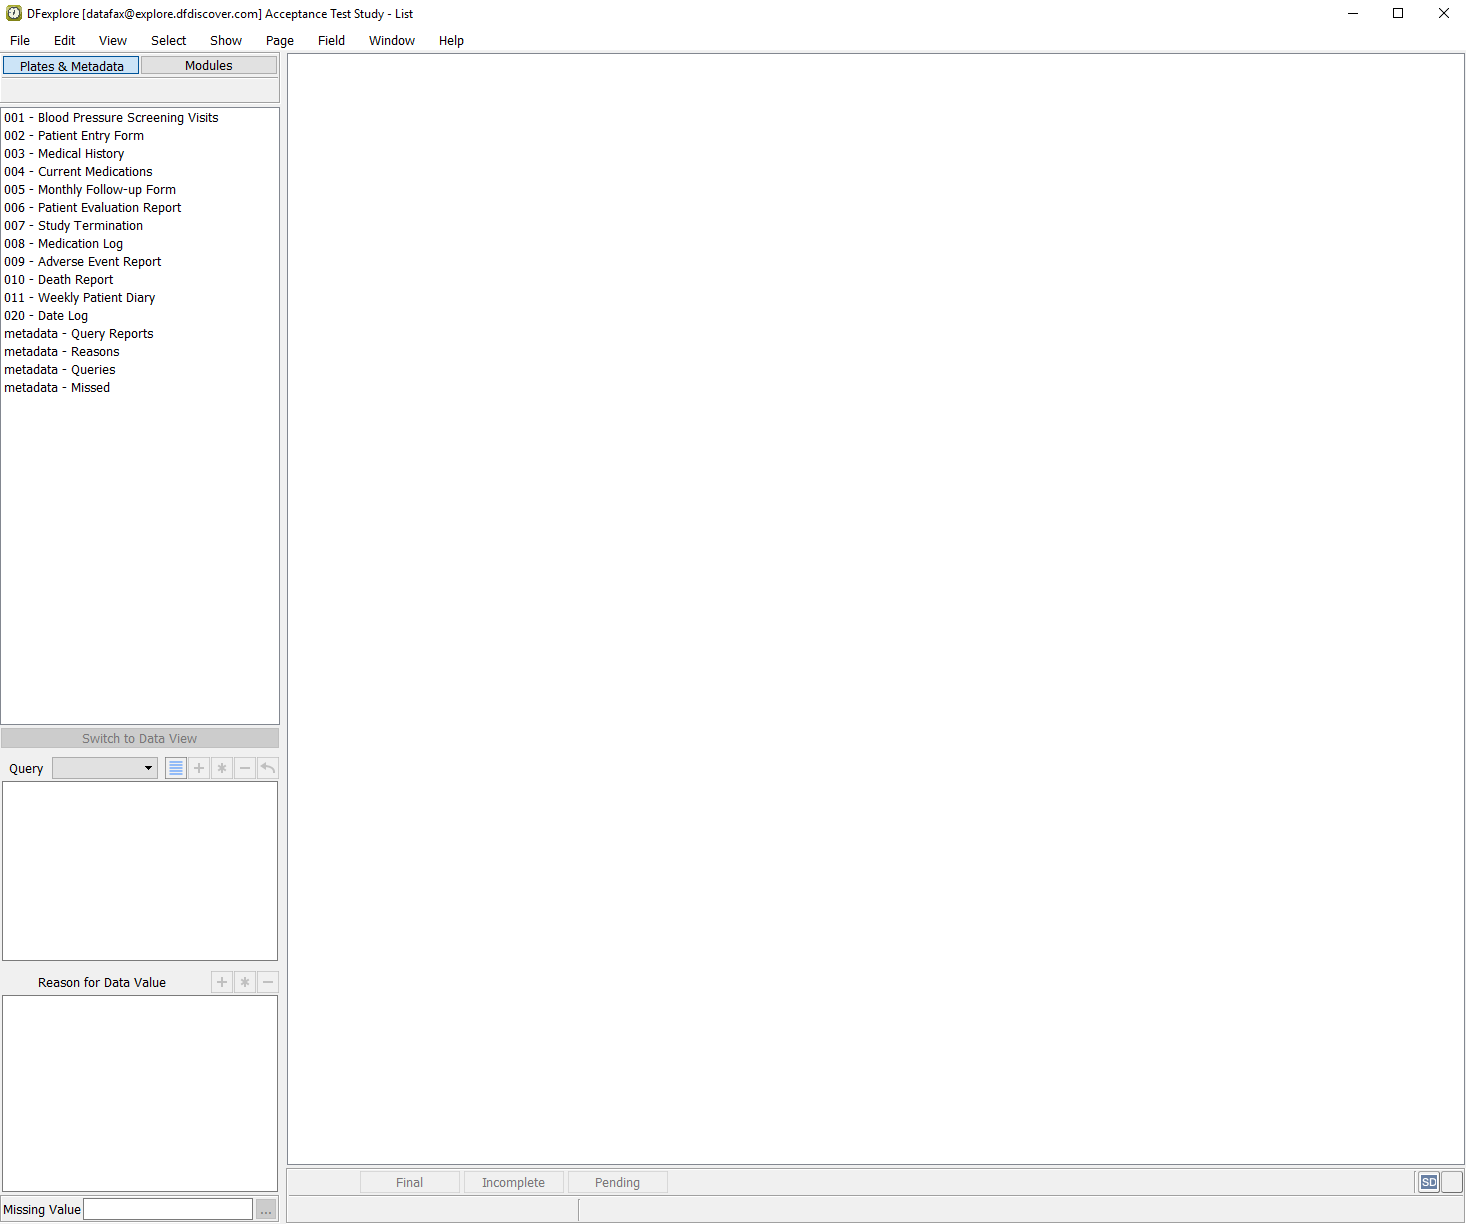
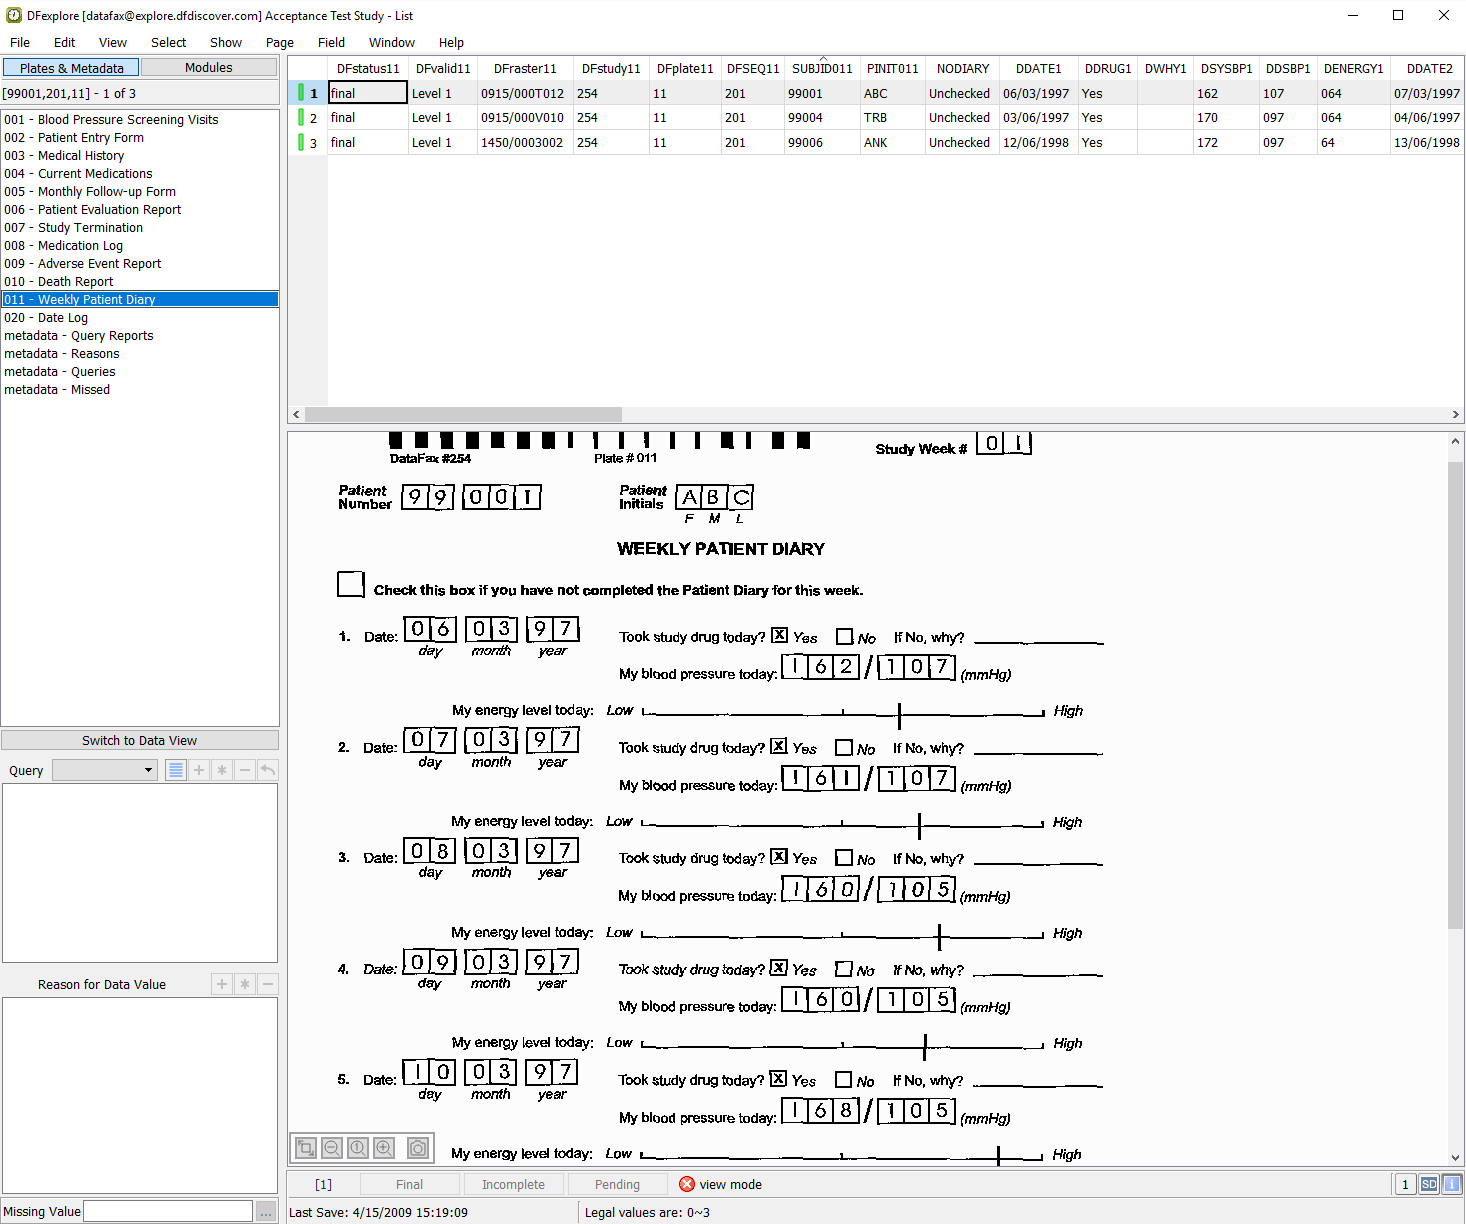
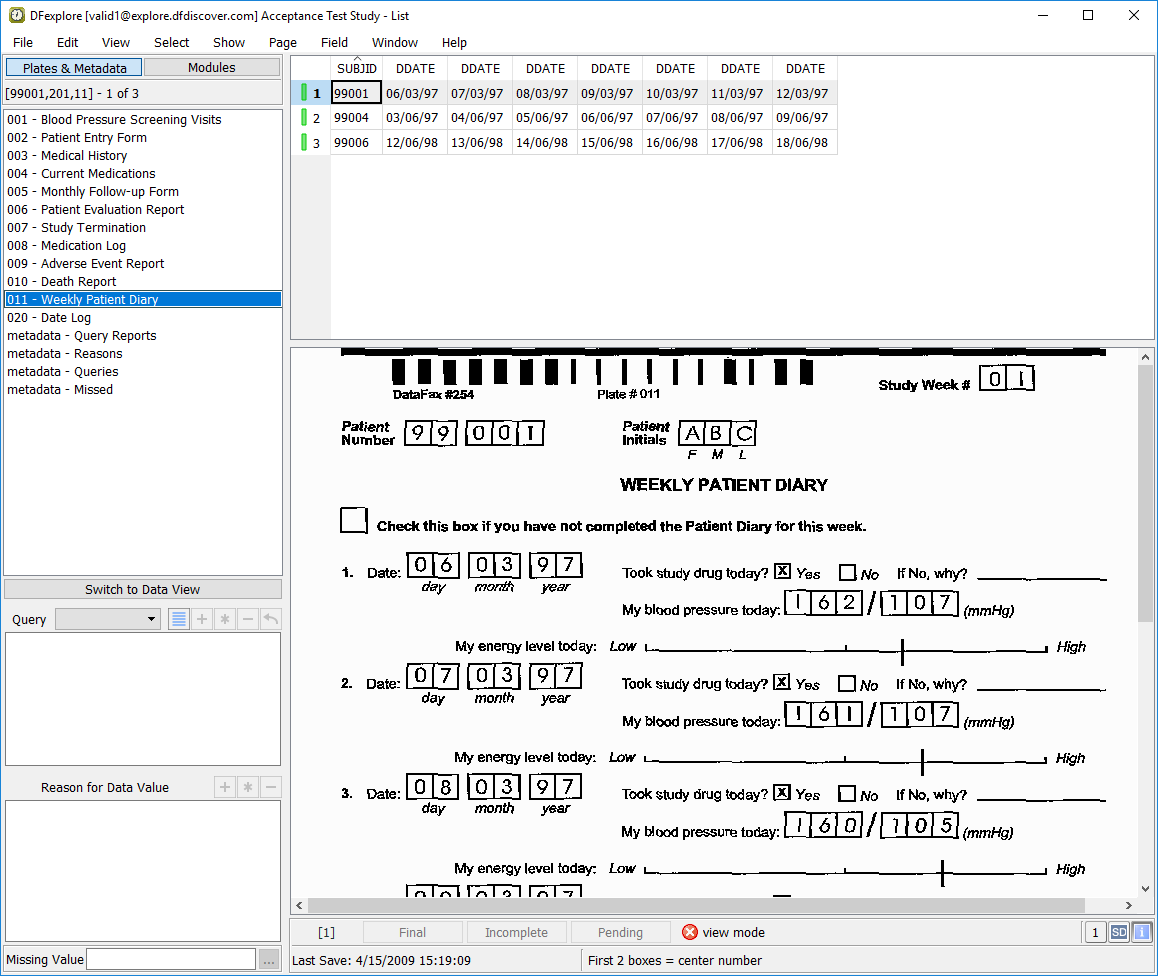
In the main List View window, Plates & Metadata panel, click 011 - Weekly Patient Diary in the list of plates.
-
Select > to show the tabular listing of all data fields and their properties defined for the plate. In the Field Selection window, click . Now mark the individual check boxes for the field numbers 7, 10, 16, 22, 28, 34, 40, and 46, to display only plate 011-Weekly Patient Diary date fields.
-
Click to apply the field selection criteria and close the dialog.
-
Examine each of the exported date fields. Locate the field column for DDATE1 in the table. This is field 10, 1. Date on the Weekly Patient Diary page. In Section 3.12, “Submit a copy of the newly setup Plate 11 into the study database and retrieve the page in DFexplore Image View.” this field was defined with the format
dd/mm/yy(a 2-digit year). Verify that field 10 has been correctly exported in calendar (4-digit year) format. -
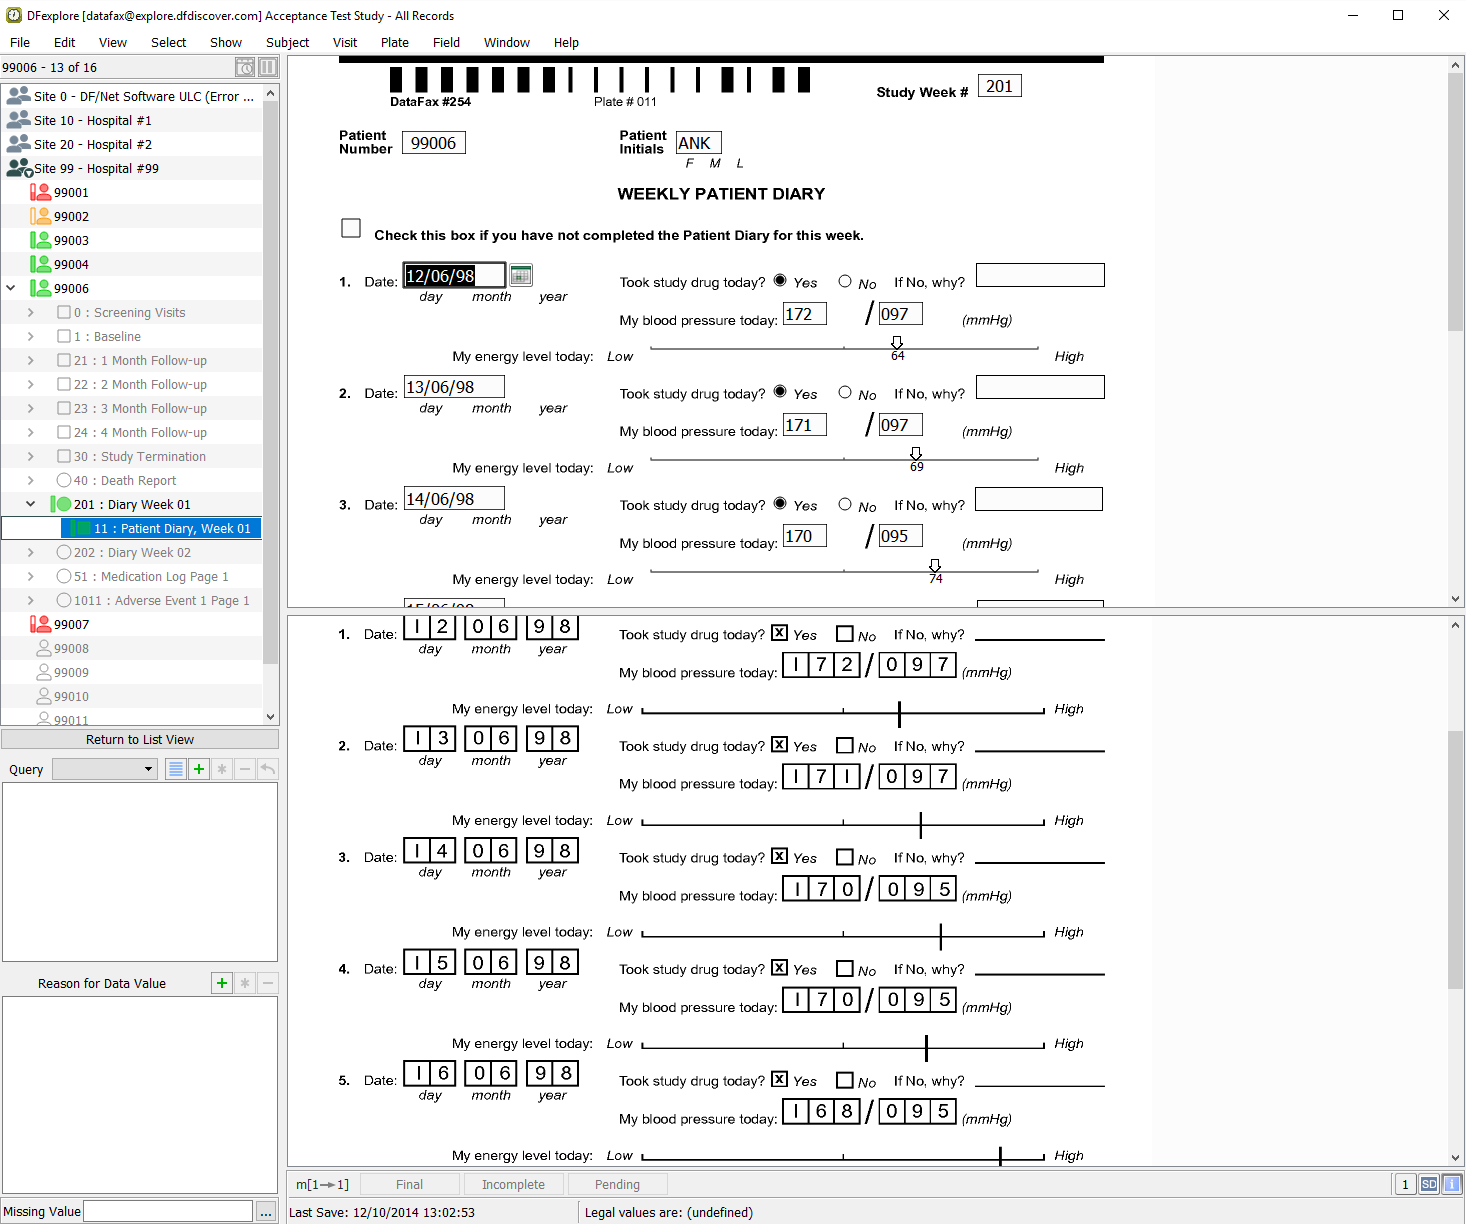
Double-click DDATE1 cell for ID 99006 in the table. This takes you to the corresponding date field in the Weekly Patient Diary page in Data View. Confirm that the date values are the same as those on the printed Weekly Patient Diary for Subject 99006.
-
In the record list panel, click to be taken back to the date fields in List View. Confirm that the date values displayed are the same as those on the printed Weekly Patient Diary, except now in calendar (4-digit year) format.
-
Select > . In the List View panel, choose julian as the value of Display date field. Click to apply the settings and close the dialog. Confirm that the the exported date values are now in julian format.

-
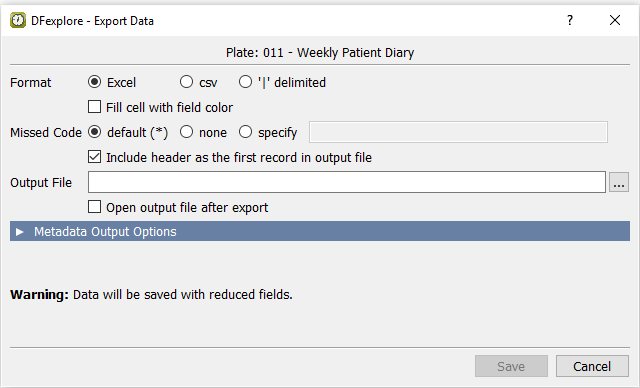
Select > to save the dates to a local file. In the dialog, set:
Format = Excel
Missed Code = default (*)
Check (enable) Include header as the first record in output file
-
Click next to Output File. Choose a directory in the file selection dialog, enter
module13_dates.xlsxas the filename, and click . Click to create/write the file and close the dialog.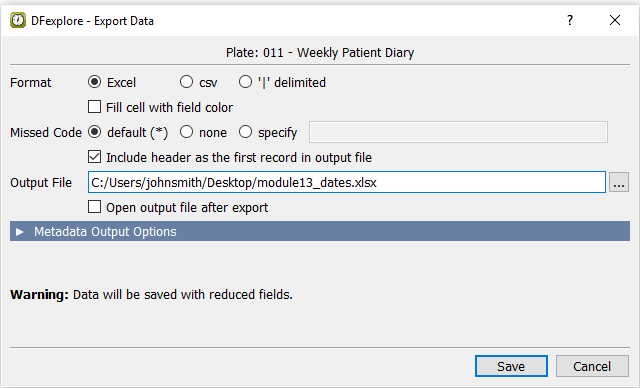
-
Using the computer's file explorer, locate the file
module13_dates.xlsx. Open the file, confirm the contents and then close the file.
-
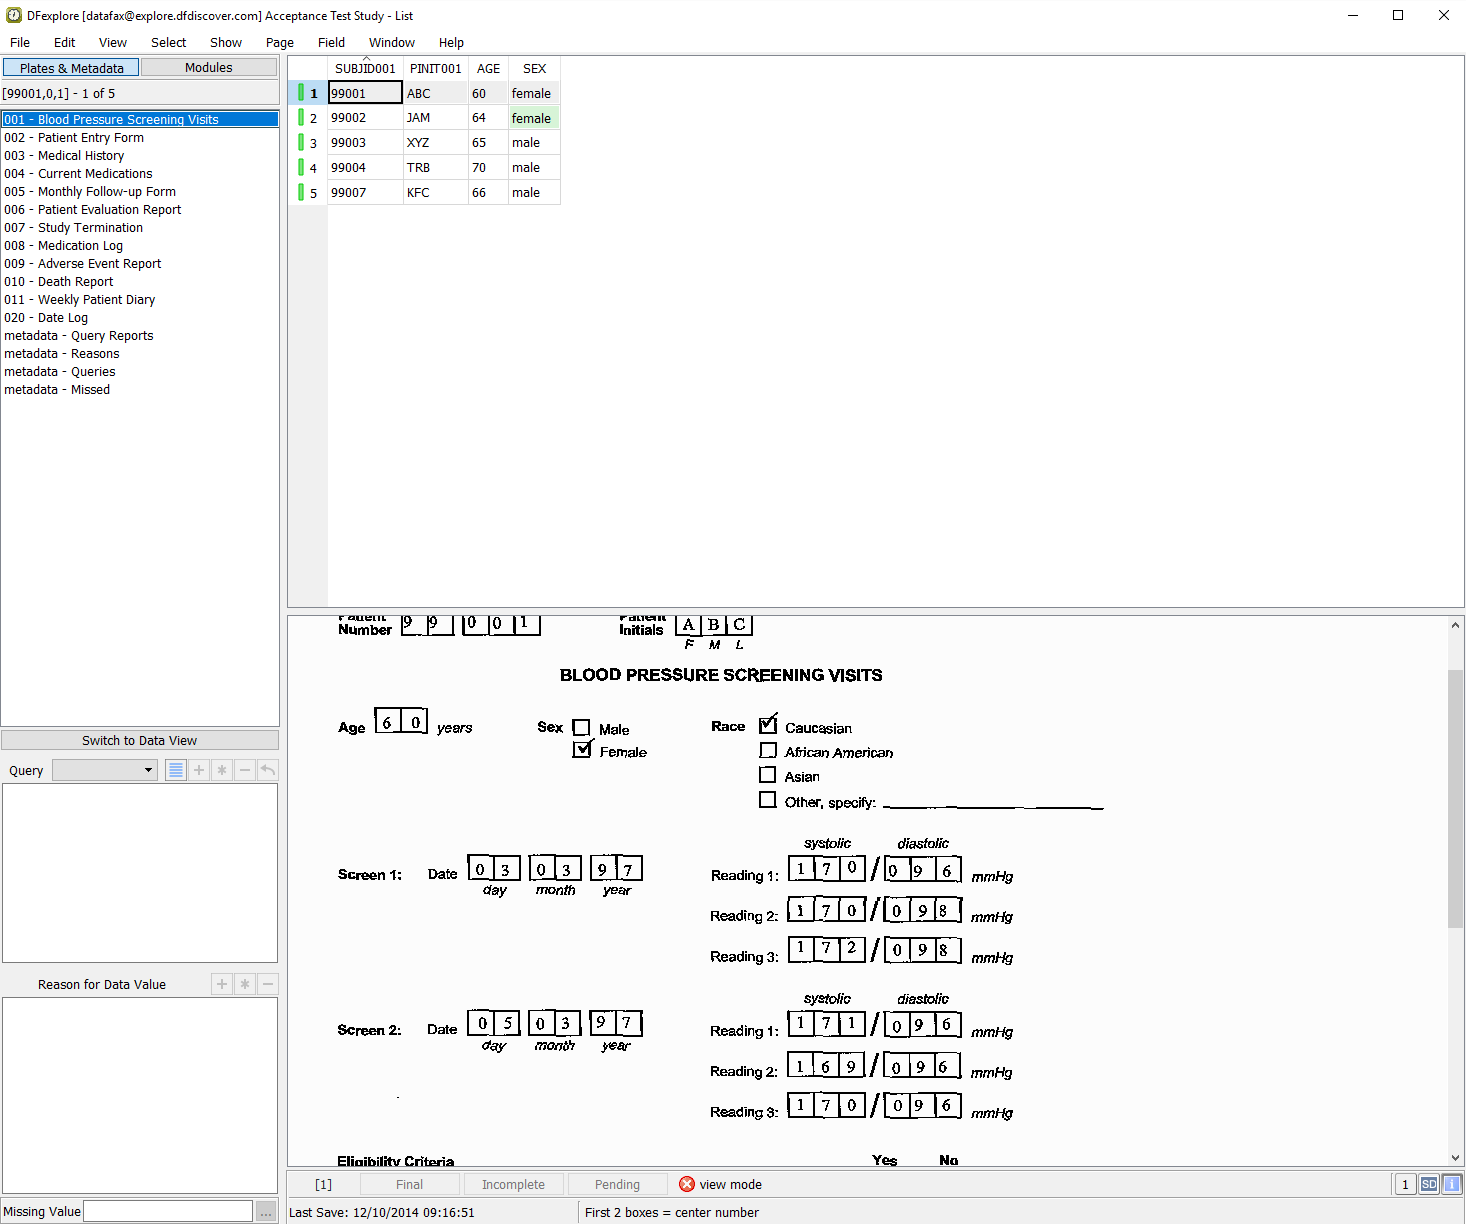
Return to List View. From the list of plates, select plate 001 - Blood Pressure Screening Visits to make it current.
-
Select > . Click . Mark the check boxes for fields 7 (SUBJID), 8 (PINIT), 9 (AGE) and 10 (SEX).
-
Click to apply the field selection criteria and close the dialog. Examine each of the data fields.
-
To search for specific subject data, select > . Enter
99003in the Subject field.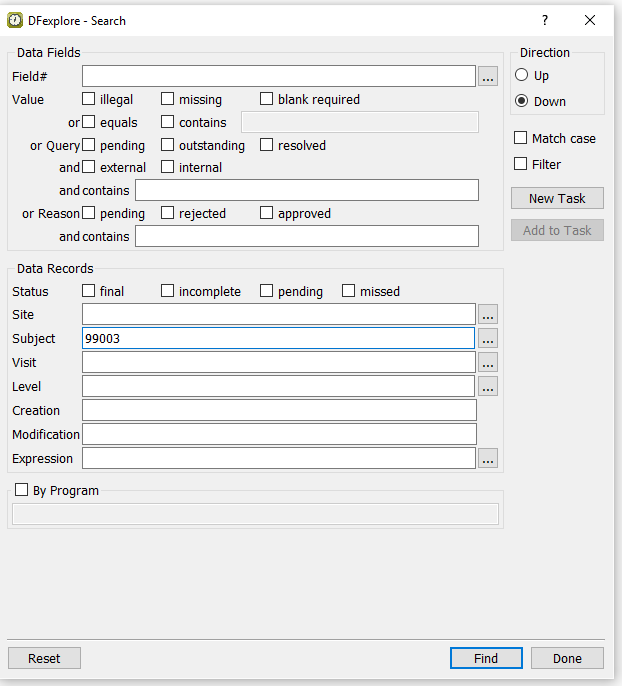
-
Click to start the search. Examine the message in the bottom-left corner of the dialog as well as the highlighted entry in the List View table.
-
Click to locate a 2nd match (if one exists) in the List View table.
-
Click to create a task set of records that match the search criteria. In the resulting dialog, change the Mode to View.
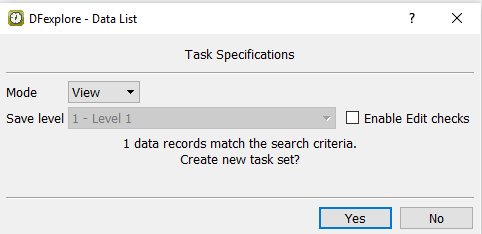
-
Click in the Data List dialog to create the task set. Examine the message in the bottom-left corner of the Search dialog, then click to close the dialog.
-
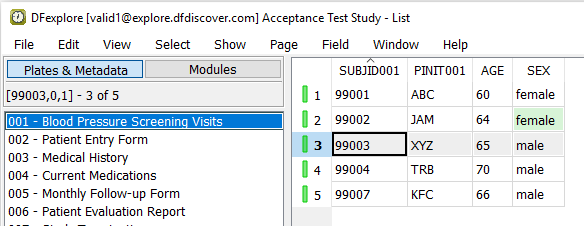
Click to open Data View and review the List View task record. Examine the Data View record list and confirm that only the task record for Subject 99003 is displayed. Click .
-
Select > . In the dialog, locate the List View panel. Choose default for Display date field. Click to save the setting and close the dialog.
-
Click 007 - Study Termination to make it the current page. Select > to open the Search dialog opens.
-
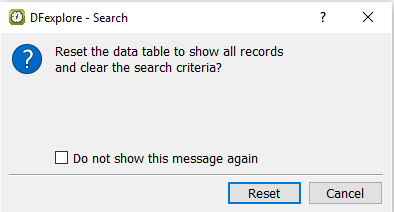
Click and in the resulting dialoag to clear all previously specified search criteria.
-
Click next to the Expression field. The Expression Editor dialog opens.
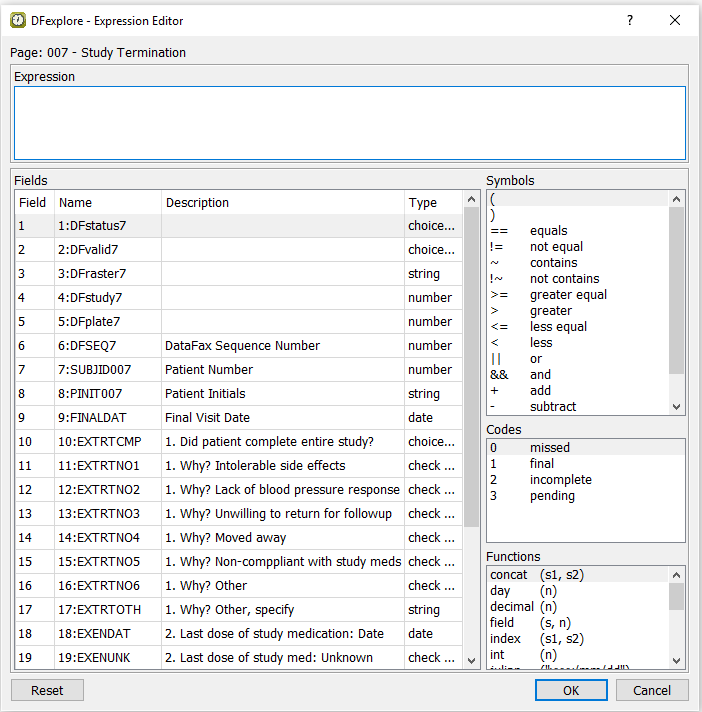
-
For the first part of the query, select 9:FINALDAT from the Fields table. Next, click in the Symbols list. Choose julian from the Functions list. In the Expression field, enter the date
"1997/01/01"(including the quotes). Close the parentheses. To build the second part of the query, click From the Symbols list, followed by field 9:FINALDAT from the Fields table. Next, click in the Symbols list. Choose julian from the Functions list. In the Expression field, enter the date"1997/06/30"(including the quotes). Close the parentheses. Click .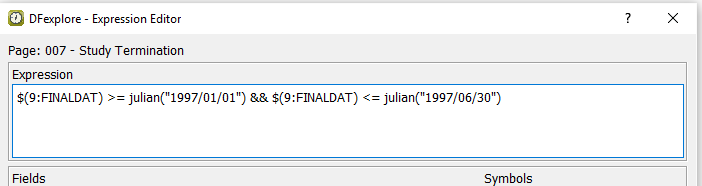
-
Click to locate all subjects that have study termination dates that match the specified search expression.
-
Click to locate the next match.
-
Do not continue the search and click to close the Search dialog.
-
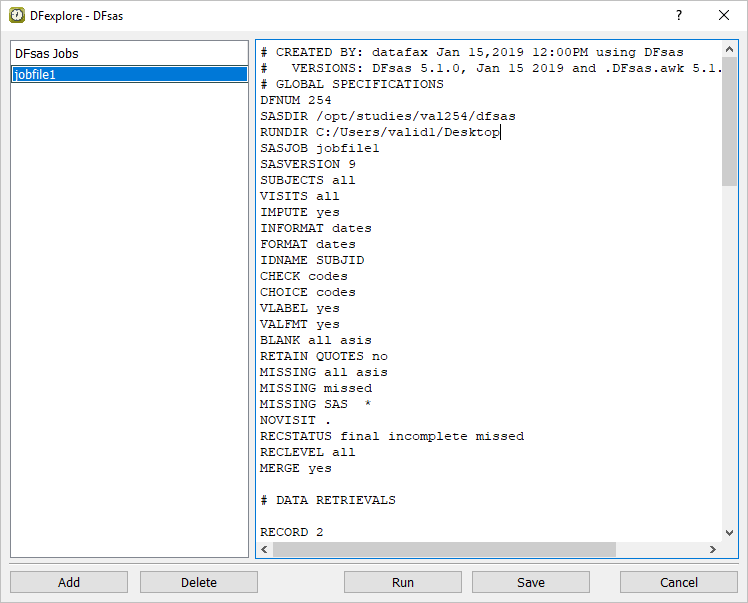
Select > . The DFsas dialog opens.

![[Note]](../../imagedata/note.png)
Note If you have previously executed this module as
valid1, the DFsas Jobs panel may display jobfile1 and possibly other files. If jobfile1 is already in the list, highlight jobfile1 and click before continuing with this module. -
Click to create a new DFsas job.

-
Enter SASJOB =
jobfile1. Click RUNDIR to display the system file selection dialog. Choose a directory to the save "jobfile1" and click .
Note The RUNDIR directory was specified as
C:\Users\valid1\Desktopin this example. Given the directory structure on your local computer, you may have chosen a different value for RUNDIR. -
Click PLATES to view all defined study plates. From the list, hold Control key (hold Command on OS X) and click the entries for 002 - Patient Entry Form and 009 - Adverse Event Report to highlight them. Click . Choose FIELDS = include all.

-
In the Optional panel set:
Check (enable) only calendar for Date Formats
String Size = as is
Field = use alias
Click to create and add
jobfile1.
-
Click in the summary confirmation dialog.
-
Edit the SUBJECTS global specification in the new
jobfile1by selecting it from DFsas Jobs panel. In the main window, change the textSUBJECTS alltoSUBJECTS 99001,99002. This will limit the created SAS data files to subjects 99001 and 99002 only.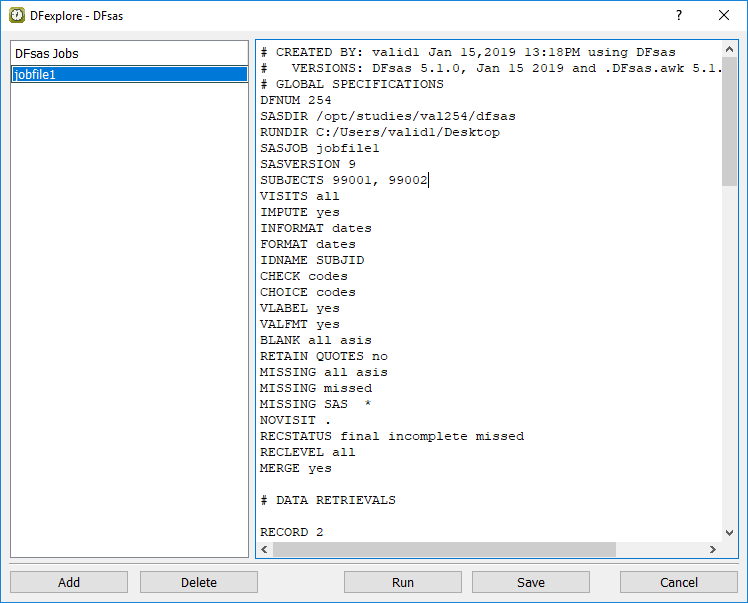
-
Locate the global specifications for CHECK and CHOICE. Change
CHECK codestoCHECK labelsandCHOICE codestoCHOICE labels.
-
Click to save the changes. In the resulting confirmation dialog, choose replace existing job and click .

-
In the DFsas window, highlight
jobfile1. Click to create SAS job and data files.
-
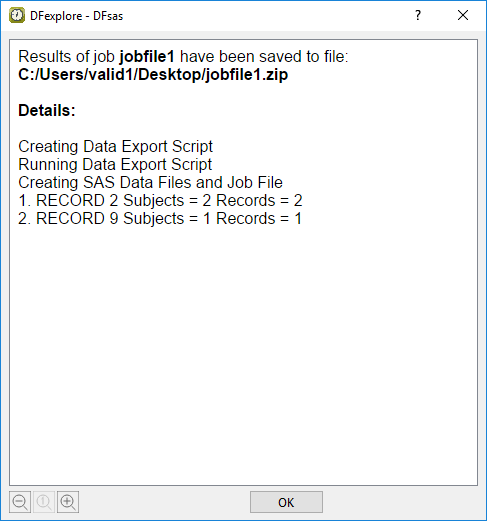
In the confirmation dialog, do not check Force DFsas to include all specified plates. The SAS job and data files will not include empty plates. Click to continue and run the DFsas job. After a pause while the job runs, the results dialog appears. Click to close the dialog.
-
Using the operating system file explorer, locate the directory previously specified as the value of RUNDIR. Confirm that
jobfile1.zipis present. Double-clickjobfile1.zipto unzip the file. Open thejobfile1folder and confirm that the filesjobfile1,jobfile1.sas,jobfile1.d01andjobfile1.d02are present. -
With a text editor application, open the data file
jobfile1.d01. Examine the contents and confirm that it contains 2 data records - one for each of subjects 99001 and 99002. Print the file (you will need to reference this printed output in Section 13.9, “Compare the contents of SAS data files with the actual data in the database.”) and then close the text editor application. -
With the same text editor application, open the data file
jobfile1.d02. Examine the contents and confirm that it contains 1 data record. Print the file (you will need to reference this printed output in Section 13.9, “Compare the contents of SAS data files with the actual data in the database.”) and then close the text editor application.
-
Click to dismiss the DFsas dialog. Select > . Without changing any settings, click .
-
Select > to change from List View to Data View. In the record list, double-click icon for the open Subject 99003 to close the subject binder. The list now displays all subjects for Site 99 - Hospital #99.

-
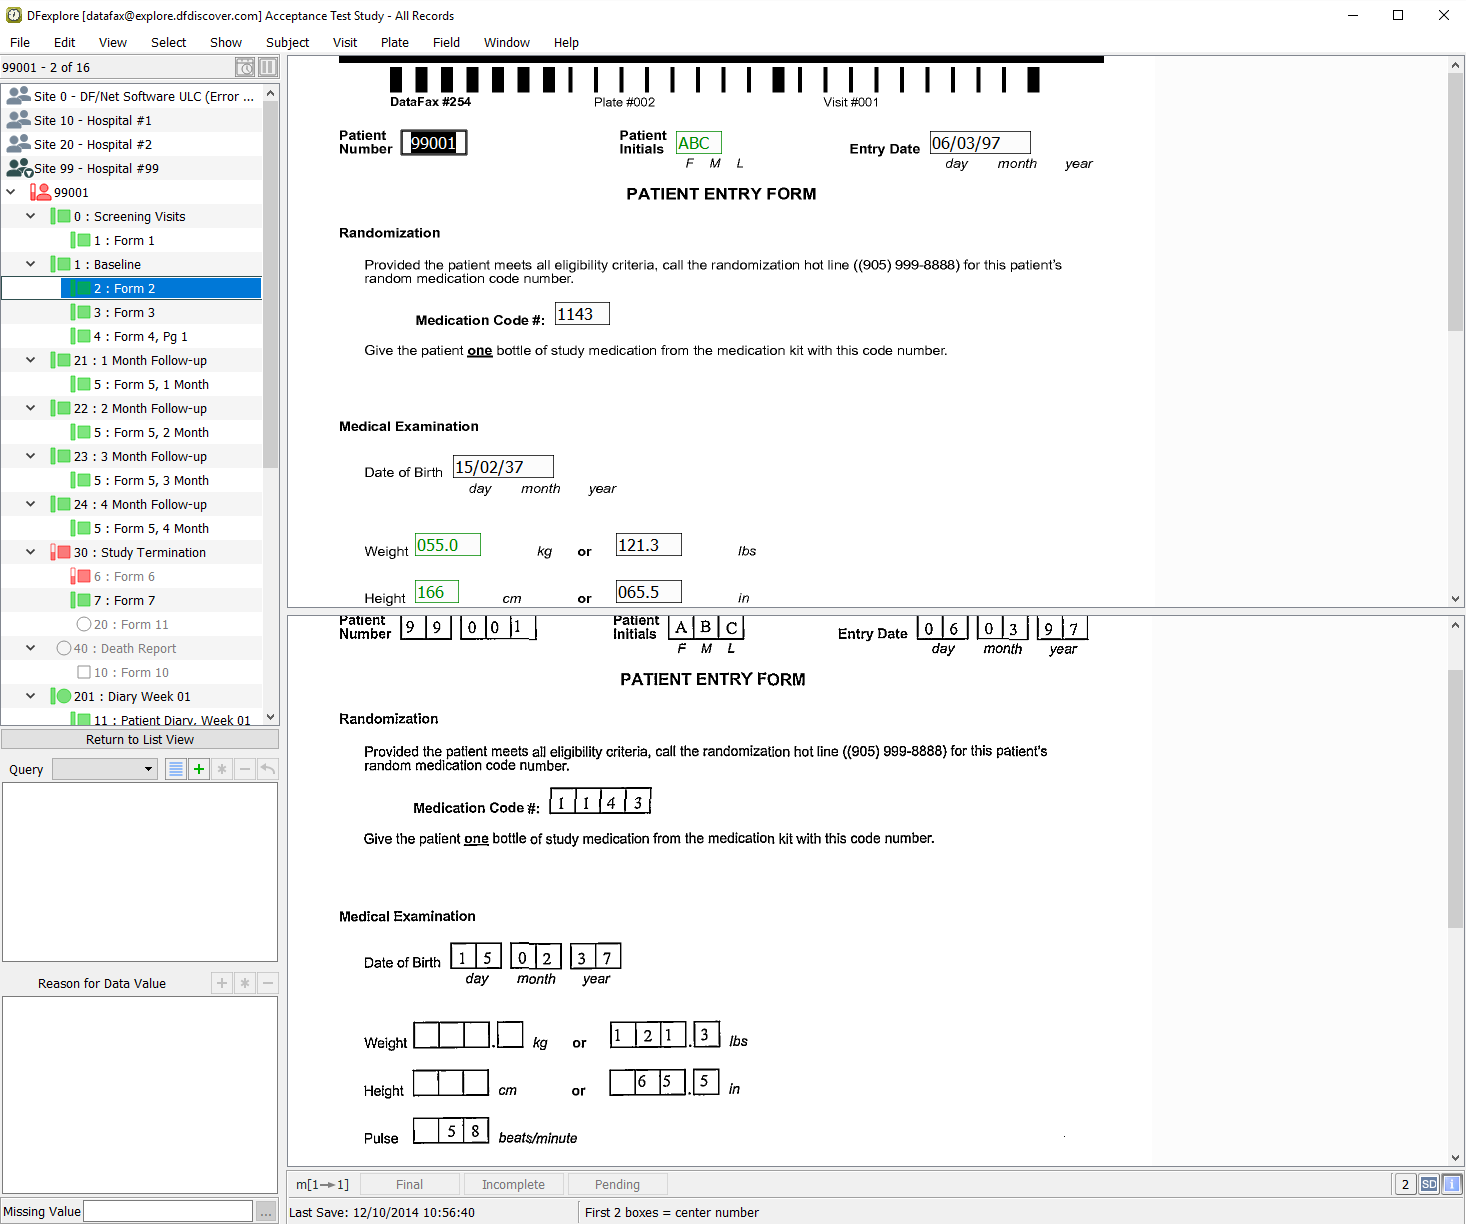
Double-click Subject 99001. Select > . Locate the entry for Form 2 (plate 2) and select it from the list to open the data record.
-
Compare the values in each field of the data record in DFexplore with those values in the printout of the data file
jobfile1.d01. -
Double-click Subject 99002 from the record list. Select > . Locate the entry for Form 2 (plate 2) and select it from the list to open the data record.

-
Beginning with Subject 99002, Baseline, Form 2, compare the values in each field of the data record in DFexplore with those values in the printout of the data file
jobfile1.d01. -
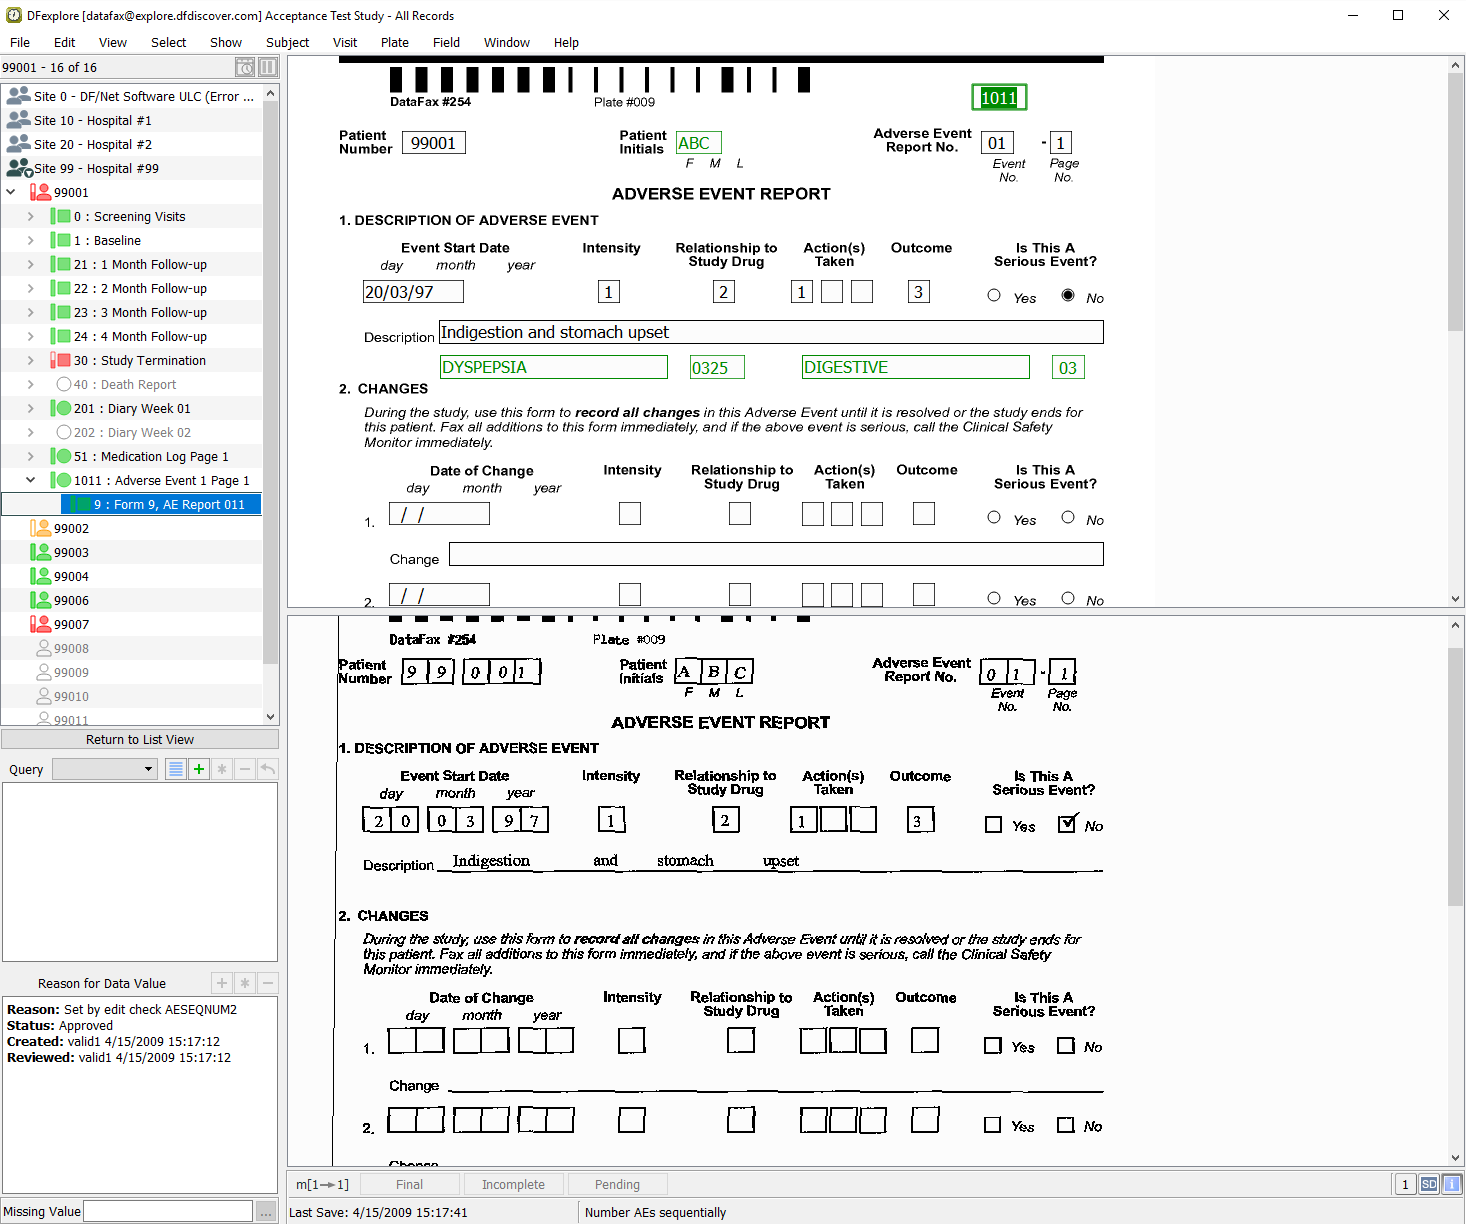
Double-click Subject 99001 to re-open the subject binder. Select > . Locate the entry for Form 9 (plate 9) and select it from the list to open the data record.
-
Compare the values in each field of the data record in DFexplore with those values in the printout of the data file
jobfile1.d02. -
Select > to close DFexplore