This chapter describes the functions located under the menu.
One or more fields can be copied and pasted to create new fields on the same or different plates. To select a single field, click it in the CRF window. To select multiple fields, hold the shift key while clicking each field to be copied, or while holding the shift key, click and drag a bounding box over the desired fields. To select all fields on the current plate use > .
After selecting fields, use > to copy them to the DFsetup clipboard. The size, properties, and screen location of the selected fields are all included in the copy.
The clipboard holds only one copy at a time. Making a new copy overwrites any previous copy. Copies are not preserved across login sessions.
To create new fields, the most recent copy can be pasted from the clipboard to any plate. When > is selected the following dialog appears which allows you to make changes to the copied names and descriptions while pasting the new fields.
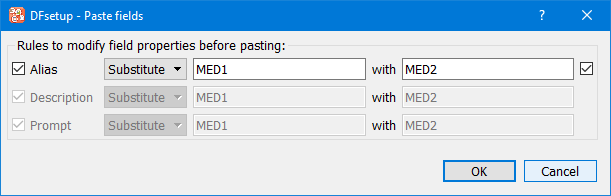
In this example, all instances of 'MED1' in the copied fields properties are replaced with 'MED2' in the pasted fields.
Before clicking to paste the new fields onto the current plate, the new field names and descriptions can be modified from the copied values by:
pre-pending something to the current value,
appending something to the current value, or
substituting text in the current value with new text.
Making changes in this dialog is optional and a warning appears after clicking if you have not created unique field names using the prepend, append or substitute feature.
After clicking the pasted fields appear in the CRF window, offset slightly from the position of the copied fields, and highlighted to indicate that they are selected. The pasted fields can then be moved to the desired location on the page by clicking them, holding the mousebutton, and dragging them as a set. After releasing the mousebutton, click anywhere in the CRF window to end the paste operation, or if you want to cancel the operation at this point select > to remove the pasted fields.
After pasting, the new fields may be selected to modify field properties or change tab order.
One or more fields on the current plate can be deleted by selecting them in the CRF window and then selecting > . A confirmation dialog appears. If delete is confirmed, the fields are removed from the CRF window. The change is made permanent the next time you select > to save all pending DFsetup changes to the DFdiscover server.
The number that appears in the center of each field widget in the CRF window has the following uses:
it corresponds to the order in which data fields are visited when using the tab or return keys to traverse fields in DFexplore,
it may be used in edit checks to refer to data fields, and is particularly useful in generic edit checks,
it may be used to reference data fields in some DFdiscover reports, shell level programs and DFexplore views, and
it corresponds to the order in which data fields are stored in the data and audit trail records in the study database.
To change the field order on the current plate select > .
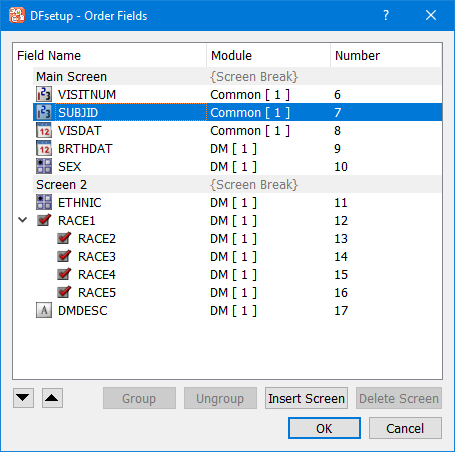
This dialog allows moving fields up/down using either the mouse in a drag and drop operation or using the up/down arrow buttons. Fields can also be grouped/ungrouped using the buttons as labeled. Multiple fields must be selected in the field list before > can be selected. Similarly, at least one grouped field must be selected to enable menu item. Drag and drop using the mouse can also be used to add/remove fields to a group.
Screens provide the software with information about the ideal place in the eCRF to split the screen content to accommodate viewing on different screen sizes in DFcollect and DFweb.
To add screens, select the field that should begin the next screen, and click . The screen break can be titled, which could be used as a header for different sections in an eCRF. Screen name can be edited by selecting a screen item and double-clicking with the left mousebutton. Any screen without fields is discarded without warning. Click to apply order, grouping and screen changes, or to make no changes.
Two or more neighboring fields on the current plate can be grouped by selecting them and selecting > . A circle with the order number of the first field in the group appears to the right of each field widget included in the group.
Grouping fields in an eCRF allows for the visual grouping of multiple check or choice type fields. Grouping is ideal when there are several related fields that have code labels. The Prompt of the first field in the group is used as the prompt for the group by default, and the field prompts for all other fields are not displayed.