Table of Contents
- 3.1. Preparation
- 3.2. Module and Field Definition
- 3.3. Field Location
- 3.4. Creating New Fields by Copy & Paste
- 3.5. Reordering Data Fields, Screens and Grouping
- 3.6. Modifying Plates that Contain Data
- 3.7. Adding & Deleting Plates
- 3.8. Modifying Style, Module & Field Definitions
- 3.9. Modifying a Data Entry Widget
- 3.10. eSignature Module and 21 CFR Part 11 Compliance
The following steps need to be completed before starting to define new data fields in DFsetup.
-
Global study specifications have an impact on field definitions and thus need to be considered before defining fields.
-
The CRF plates on which the data fields are defined need to be brought into DFsetup. Alternatively, if data is collected via EDC then eCRF plates can also be added using > .
-
When possible, importing style, module and field definitions from other studies, or a special CRF library database, saves a lot of work. All you require is view permission for the source study setup.
-
A label and other properties need to be specified for each imported plate.
-
Every data field needs a style.
-
All fields must be defined within a module before mapping them to a plate.
All fields on a plate require a definition within a module or modules. Each field is derived from a style that describes the common properties for fields of any given type or usage. Modules are created and edited using > from the main menu. The following diagram provides an overview of styles, fields and modules.

Modules are groups of fields that may repeat on a plate or plates. The following example shows a CRF window that contains 10 unique data fields out of which 6 diary fields repeat for each day of the week. Thus, a module for 6 diary fields can be created and it's instances are added to this plate, mapped to each group of diary fields.
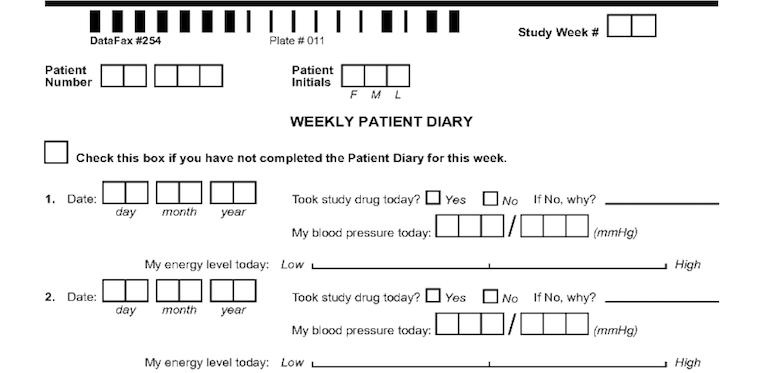
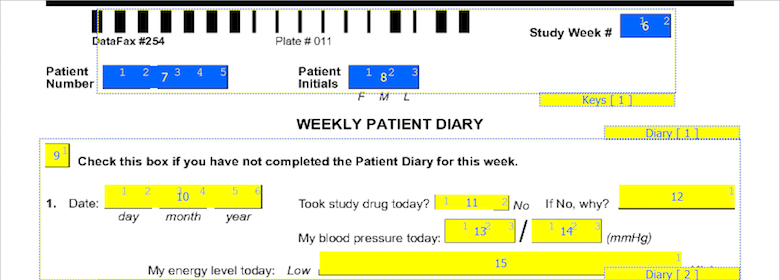
Every plate has key fields. If the visit number is not part of the barcode, then the first required field on the plate is the visit number for the plate. The next required variable is the subject ID. These variables recur for each plate and are easily grouped into a module. Let's call this module "Keys". Subject initials are sometimes included on CRF pages and can also be included in the "Keys" module. Our example also has a date field for recording the actual date for the Sunday of the diary entry. This can also be included in the "Keys" module. Define four fields - the repetition number (representing the study week #), the subject ID, the subject initials and the date of the first diary entry. Lets call these fields DIARYWK, SUBJID, PINIT and PDDAT. Depending on where you are in the study definition process, SUBJID and PINIT as well as the Keys module may already be defined. When you define DIARYWK, keep in mind that you can have one or more repetition number fields defined in your module as different plates use repetition numbers in different ways. In our example, the repetition number for this plate cannot overlap with visit numbers used for subject scheduling or for other recurring plates. The required key fields DIARYWK and SUBJID must be defined with the following properties:
Visit.
used to identify each visit for a plate, e.g. clinic visits numbers, AE report numbers, log form numbers, etc.
integer in the range 0-65535
located either in the barcode immediately following the plate number, or as the first data field on the plate.
if in the barcode, the visit number is limited to the range 0-511
if in the first data field, the field type must be numeric (i.e. number, choice, check or VAS), and appears as data field #6.
Need: essential.
Hidden: no.
Alias: if fixed in the style it must include the plate number to make it unique, e.g. VISIT$(plate).
Display & Store: must both be the same length (1-5 digits).
Format: optional, may contain a fixed component, e.g. 7nn, but may not contain delimiters, i.e. no '.', '-', or other characters.
Subject.
used to identify each subject in a clinical database, or each clinic and clinic personnel in a trial management database
must have the same field properties on every plate, and thus typically has all properties locked in a user defined style
integer in the range 0-281474976710655
located immediately after the visit number, and appears as data field #7
Need: essential
Hidden: no
Alias: if locked in the style it must include the plate number to make it unique, e.g. ID$(plate)
Legal: optional, may be defined using $(ids) which evaluates to all subject IDs specified for each site in the sites database file. If used, the $(id) meta-word cannot be combined with any other specifications.
Display & Store: must both be the same length (1-15 digits)
Format: optional, may contain a fixed component, e.g. nn5nn, but may not contain delimiters, i.e. no '.', '-' or other characters
The following example shows the properties for the diary start date on the CRF in the preceding example. The field properties supported by DFdiscover are described in Styles, and are not repeated here.
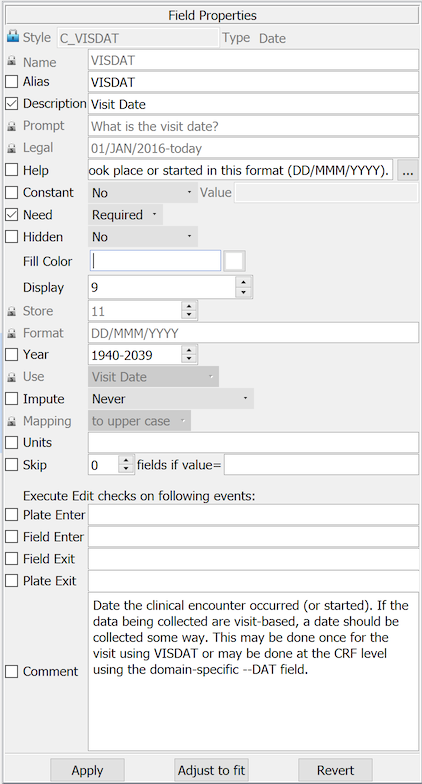
A field named 'VISDAT', previously created in the modules dialog for this particular field was selected from the Plates-Modules-Fields list.
Several properties are locked in this style and cannot be changed.
An open check box appears beside unlocked properties. All of these properties should be set and locked at the field instance level.
To modify field properties after a field has been defined, select the field, make the revision and click to save it. More than one field can be modified at the same time if they share the same style using Shift-Select to select all of the fields, making the revision in the Field Properties dialog and then clicking . A confirmation dialog appears indicating the field properties that have been changed. Properties can be deselected in this dialog. Only those properties that remain selected are applied to the selected fields when is selected to save the changes.
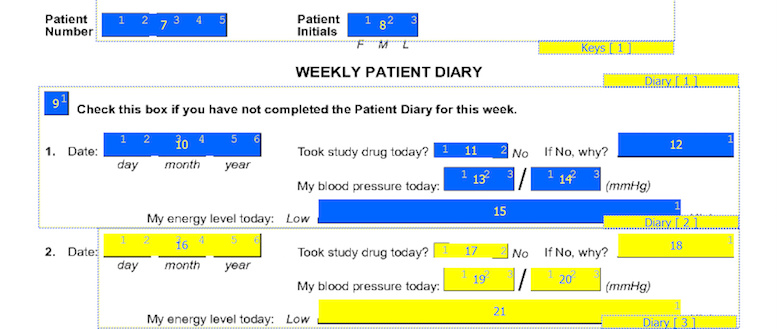
Other fields on the CRF also require modules and styles. In our example, the next 6 variables represent diary data recorded for the first day. These variables repeat for subsequent days. Since modules can repeat on a CRF page, a single module for the fields in a diary daily entry can be reused for each day. Let's call this module the "DIARY" module. The six variables are defined in this module based on the data requirements implied by the CRF page.
In pure EDC studies, where the data may never exist on paper, data entry screens can be created for DFexplore by using Add eCRF Plate option in DFsetup. Data fields can be added to eCRF plates by dragging fields or modules from the plate-module-field navigation window and dropping them on the eCRF plate.
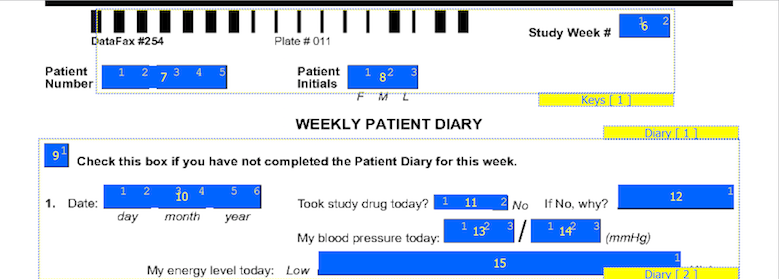
On CRF plates, data fields can be added by dragging out data entry widgets and selecting respective field from plate-module-field navigation window. The following example shows what the data entry widgets look like after defining the 10 CRF data fields. The field number appears in the middle of each data entry widget.
The first 7 fields on each CRF page are always the same. There are 5 fixed header fields: record status, workflow level, image link, study number, and plate number which do not appear as data entry widgets. Field 6, the key field used to distinguish repetitions of a study plate (due to the plate repeating over several visits), may appear in the barcode, but in this example it is the first data field defined on the page. Field 7 is always the key field for the subject ID.
The order in which boxes on the CRF were clicked is shown in a smaller font inside each box and should be reviewed to confirm that the boxes have been clicked in the correct order (left to right).
Paper-based CRF backgrounds. By default, for a CRF with a paper-based background, the boundary is an 8.5 x 11 inch space. The boundary is expanded if a larger CRF image is imported for the data entry background. DFsetup prevents fields from being created or dragged outside this region and any fields pasted from another plate that would fall outside this region are automatically positioned within the boundary. It is possible for data fields to fall outside the boundary if they were defined on a larger version of the CRF background or imported from another study. Such fields are visible outside the boundary and should be re-positioned within it, otherwise they may not be visible in DFexplore.
DFsetup and DFexplore can accommodate both landscape and portrait backgrounds. However DFdiscover is able to perform ICR, and DFexplore is able to print CRFs, only for CRFs in portrait orientation and sized for US letter and A4 pages. Landscape and larger backgrounds must only be used for electronic data capture. Testing has included page sizes up to 14 inches (both horizontal and vertical).
eCRF. An eCRF is limited in length to 4 US letter pages, or 44 inches, and 8.5 inches in width. There is no specific number of fields in this restriction; the actual number of fields will vary based upon the sum of the lengths of the individual fields.
As modules and fields are added to an eCRF, a warning will be displayed as the page length approaches the limit. The warning has the following appearance. As the warning indicates, additional fields beyond the limit are not visible. Use to display and review all of the fields, ideally deleting some so that the total layout length is within the 44 inch limit.
The first step in mapping field is to add the modules containing the field definitions for the current plate. The next step is to map a field to its location on the CRF plate. This is done by clicking the boxes that make up the field or by dragging a data entry widget over the desired location in the CRF window. Once a data entry widget has been created it can be moved using the arrow keys or by dragging it with the mouse. Holding the shift key while using the arrow keys moves the data entry widget in large steps. To cancel the creation of a new data entry widget at this stage click anywhere in the screen background. A new data field only becomes permanent when a field is selected from a module included for the current plate and applied.
Table 3.1. Locating data fields in the CRF window
| Field | Type | CRF Design | To Locate Data Field | Module |
|---|---|---|---|---|
| Study Week # | number | 2 boxes | click the left box then the right box | KEYS |
| Subject ID | number | 5 boxes in 2 groups | click each box from left to right | KEYS |
| Subject Initials | string | 3 boxes | click each box from left to right | KEYS |
| Start Date | date | 6 boxes in 3 groups | click each box from left to right | KEYS |
| Took study drug today? | choice | 2 check boxes | click each box from left to right | DIARY |
| Why not | string | 7 cm line | drag data entry widget from left to right | DIARY |
| Systolic BP | number | 3 boxes | click each box from left to right | DIARY |
| Diastolic BP | number | 3 boxes | click each box from left to right | DIARY |
| Time | number | 4 boxes in 2 groups | click each box from left to right | DIARY |
| Energy | VAS | 10 cm line | drag data entry widget from left to right | DIARY |
The following sections describe how to locate each data type in more detail.
Number & Date | Numbers are typically designed with a separate box for each digit. The individual boxes are necessary if you plan to fax the forms and want the ICR software to read them. A data entry widget is created by clicking each of the boxes from left to right. The order is important and must always be left to right. Dates are created in the same way, by clicking the boxes, from left to right, for each of the 3 parts: day, month and year. Dates must include all 3 parts, but the parts can appear in any order, have a part delimiter (e.g. a slash) or not, and can use numeric or 3 character months, which can appear exactly as entered or be mapped to upper- or lowercase for consistency. Both dates and numbers can include delimiters but they are not relevant when setting field location. Instead delimiters are added in a format specification (described later). |
Time | Times are similar to dates. The CRF is designed with a separate box for each digit. Times include two or three 2-digit parts: hours and minutes and optionally seconds. |
Choice |
Choice fields consist of 2 or more mutually exclusive options and come in 2 versions:
|
Check | Check fields appear on a CRF page as a single box which can be checked or left blank. A data entry widget is created for these fields by clicking the box and then entering a numeric code and a text label for the 2 response options: blank and checked. |
Text | Text fields typically appear on a CRF page as horizontal lines on which the users print their response. A data entry widget is created by dragging out a rectangular box over the text line. This is done by clicking one corner of the desired location and holding the left mouse button down while dragging the mouse to the opposite corner. While dragging in an upward direction (lower-left corner to upper-right corner), widget height is constrained to the DFdiscover default of .25 inches. While dragging in a downward direction (upper left corner to lower-right corner), it is constrained by the choice of 'Maximum Box Height' in the 'Guides' section of Global Settings. When the mouse is released a new widget is created in the foreground color. The widget can be moved if necessary to adjust its location in the CRF window by holding the left mousebutton down over the widget and dragging it to the desired location. Multi-line text widgets can also be created. This is done by holding the Control key (or Command key on Macs) while dragging out a rectangular box over a blank area of the CRF. If space is not available on the CRF for a data entry widget large enough to hold the desired text a single line widget can be used with a database store length greater than the display length on screen. In such cases the height of the text field automatically expands into a multi-line text box when the the user enters the field in DFexplore, and returns to its display size when the user leaves the field. |
VAS (Visual Analog Scale) | Data entry widgets are created for horizontal Visual Analog Scales, like the 'energy level' question in the example above, by dragging out a rectangular box the same length as the VAS scale and positioning it on top of the scale line. DFexplore also supports vertical VAS fields but these fields cannot be read by the ICR software. Data entry widgets for vertical Visual Analog Scales are created by dragging out a box at each end of the scale. The boxes must we wide enough to display a numeric value and must be positioned so that the top edge of the upper box corresponds to the top end of the scale and the bottom edge of the lower box corresponds to the bottom of the scale. |
Hidden Field | Data entry widgets can be created for fields that do not appear on the CRF page by dragging out a data entry widget anywhere in the CRF window and defining it like any other data field. Such fields are sometimes used for coding or other central office purposes. Whether a user sees such fields in DFexplore is determined by whether their study role includes permission to see hidden fields. All field types can be created this way. For choice fields a box for each choice must be created, but all other field types can be created by dragging out a single data entry widget. In most cases, you do not want to print labels and boxes for hidden fields on the CRF pages imported into DFsetup because all users can see what is printed on the CRF backgrounds. The only thing that is hidden for a hidden field is its database value. |
Any number of fields on the current plate can be copied into the DFsetup clipboard, and then pasted to create new data fields on the same plate or another plate in the study setup. Copied fields remain in the clipboard until replaced by another copy, and can be pasted as many times as needed to create new fields. The copy and paste steps are as follows.
Select Fields To Be Copied
Fields in the current selection set are shown using the foreground color. A field is selected by clicking it with the mouse. Other fields can be added to create a selection set by holding down the shift key while clicking each field.
A group of fields can also be selected by holding the shift key down and then clicking and holding the left mousebutton while dragging a box around the desired fields.
You can also select all the fields in a module by clicking the module label or selecting the module from the Plates-Modules-Fields list.
There is no method for removing a single field from the current selection. Instead you must cancel the entire selection set and start over. To cancel the current selection click anywhere in the background (while not holding the Shift key).
Copy the Selected Fields
Select > to copy the current selection to the DFsetup clipboard.
Paste the Copied Fields
Select > to create the new fields. The dialog shown below appears first.
The names and descriptions of the copied fields can be modified for the new fields by: pre-pending, appending or substituting specified strings. This is optional, and does not change the values in the clipboard copy.
To make the same change to all three field properties, check the box beside the first row. This propagates changes made to this row to the other 2 rows.
Click to paste the new data fields onto the page or to abort the paste operation.
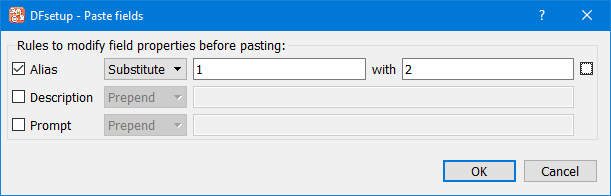
In this example all occurrences of '1' in the copied fields are replaced with '2' in the field names of the pasted fields.
Position the New Fields
The pasted data fields appear offset just below the copied fields and must be moved into position on the page. This is done by clicking and holding the left mousebutton over any one of the pasted fields and then dragging the entire set of fields into position.
To end the paste operation, leaving the pasted fields in their current position, left-click anywhere in the CRF window background. Individual fields can then be selected and dragged if necessary to adjust their final position.
Edit the New Fields
After creating the new fields you may need to edit some of the field properties to finish their definition. This is done by selecting each field and editing in the Field Properties panel.
The field number displayed in the center of each data entry widget identifies the order in which fields are traversed during data entry. When setting up a new plate it is important to review the field numbers and reorder them as needed to achieve the desired field traversal.
![[Important]](../../imagedata/important.png) | Important |
|---|---|
The field order displayed on each plate is also the order in which fields are stored in data records and the audit trail journal files. Revising field order after data has been collected is possible. DFdiscover reorders fields on data records and saves the previous study setup for use in creating audit trail reports. However all necessary revisions cannot be automated; edit checks for example might contain code referring to fields by position and/or number that need to be revised. Before proceeding it is essential to consider all of the study components that may be affected and follow the instructions described in Modifying Plates that Contain Data. |
To reorder data fields select > and use the dialog illustrated below.
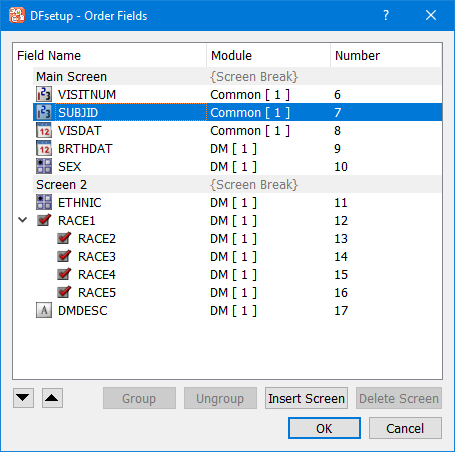
This dialog allows moving fields up/down either by drag and drop operation with the mouse or using the up/down buttons. The field number displayed in the last column identifies the order in which fields are traversed during data entry.
Fields can also be grouped/ungrouped using the buttons as labeled. Multiple fields must be selected in the field list to enable Group button. At least one grouped field must be selected to enable Ungroup option. Drag and drop using the mouse can also be used to add/remove fields to a group.
To add screens, select the field that begins the next screen, and click . The screen break can be titled, which could be used as a header for different sections in an eCRF. Any screen without fields is discarded without warning.
Screens provide the software with information about the ideal place in the eCRF to split the screen content to accommodate for viewing on smaller screen sizes in DFcollect and DFweb.
Because the field numbers on each plate match the order in which fields are stored in the study database, inserting, or deleting fields after data has been collected must be done with care as described in this section.
DFdiscover provides support for field numbering changes that occur after data has been collected, because fields have been reordered, added, inserted or deleted. Such changes can only be made using the Exclusive or Developer modes in DFsetup. When setup changes are saved DFdiscover will:
permanently and irretrievably delete any data fields that have been deleted in the study setup
add blank values for any data fields that have been added to the setup
reformat existing data records to match the new field order
update queries and reasons so they remain attached to the correct data fields
save the old setup specification, and add setup revision records to the study journal files so that the audit trail report are able to keep track of the field changes
But this is all that DFdiscover can do automatically. In addition you may need to make the following revisions manually:
Edit checks that refer to fields on the revised plate by number or using the @T relative position notation may need to be revised because of field number and/or position changes.
Shell scripts that use DFexport.rpc to export data records for custom reports, plate arrival triggers,
dfexecuteedit check functions, or other tasks performed by custom programs may need to be modified to deal with the new field order.DFsas job files used to create SAS® data sets containing data from revised plates may need to be modified to account for any new or deleted fields.
Task and List View definitions for the revised plate may need to be corrected.
If DFsqlload is used to export study data to an SQL database the table definition is updated and the restructured data reloaded the next time DFsqlload is run. However, you may need to revise SQL procedures stored in your SQL database to deal with the plate revisions.
If you need to modify the data field list on a plate but are unable or unwilling to make the manual modifications required by a change in field numbering you may want to make your changes in a way that preserves the existing field numbers. This can be accomplished as described below.
Enter DFsetup in Exclusive Access Mode
No other user can be in the study database while these changes are being made.
Import the Revised CRFs
Import the revised CRF pages as described in Import CRFs. Because the plate number on a revised CRF already exists in the study setup, the import dialog will show Replace beside the plate number. This indicates that the new CRF page will replace the existing one. You do not need to import all CRF pages, only the ones to be modified.
Adjust Field Positions
Any fields which no longer appear in the correct locations should be selected and moved to their new positions on the CRF. When doing this be sure you do not change the field numbers. If you need to change the field traversal order this can be done by applying edit checks as described below.
Deleting Fields or Modules
Do not delete data fields or modules if you want to be able to retrieve this data in the future or you want to be able to create an audit trail tracing the history of these fields using > in DFexplore. When a field or module is deleted from the study setup, DFdiscover permanently deletes any values that exist for these fields, and the fields themselves, when the setup changes are saved. Also it is important to realize that you cannot re-create deleted fields in the setup to bring them back, because each new field gets a new internal field tracking number, even if the field is given the same name and appears on the same plate. A re-created field has no link to any previously deleted version of that field.
Instead of deleting fields you no longer want to appear in DFexplore we recommend that you hide them, either by setting the Hidden field property to 'Yes' so that users without permission for hidden fields do not see them, or by using edit check function
dfaccess.If you decide to delete fields or modules, and then use report DF_ATmods to produce an audit trail showing the history of all changes on the plate that contained these fields, the report shows the history of the deleted fields and the point at which they were deleted. This is true even if you also delete the plate itself.
Adding Fields or Modules
When a new field is created, it is automatically assigned the next field number after the last one on the plate and thus does not change the numbering of existing fields. The new field must already be defined in a new or existing module.
If you do not want the new fields to be positioned at the end of the plate drag them to the desired location on the CRF page, but leave the field numbers unchanged. We will fix field traversal in the next step.
When fields are added to the end of a plate DFdiscover will reformat the existing data records to insert the new fields with blank values. Thus the data records will change but the field order will not change for all of the data collected so far.
Changing Field Traversal Order
By default DFexplore traverses data fields in field number order when a user tabs through the data fields on the plate. If you have reordered fields or positioned new fields between existing fields, this is no longer the desired field traversal order. An edit check can be used to achieve the desired order, without changing field numbers, as illustrated below.
# Run: on field exit
# Use: change backward and forward fields traversal
# Arg: f1 = next field on backward traversal
#      f2 = next field on forward traversal
edit GOTO(number f1, number f2)
{
       if( dfdirection()>0 ) dfmoveto(@[f2]);
  else if( dfdirection()<0 ) dfmoveto(@[f1]);
}
For example, if a new field numbered 44 has been positioned between fields 15 and 16 use edit check GOTO as follows:
On exiting field 15: GOTO(14,44)
On exiting field 16: GOTO(44,17)
On exiting field 44: GOTO(15,16)
A similar approach can be used to skip over "deleted" fields (which are not really deleted, just no longer relevant). For example field 22 could be skipped by adding GOTO(21,23) as a field entry edit check on field 22. This has no effect if the user clicks on field 22 with the mouse but is skipped when keyboarding through the fields.
Test The Revised Plate
First review the revised plate in the DFexplore List view to verify that any new fields appear at the end of the data records, as expected. Then build a task set containing the revised plates using > in the DFexplore Data view, and tab through the fields to check: field traversal order, edit check behavior, and data field values.
Other Revisions
Although this procedure does not change the numbering of existing data fields you may need to make revisions to include any new fields you have added in: edit checks, DFsas jobs, shell scripts, and task and list view definitions. Any required modifications are much less complicated than would have been the case had you changed field numbering on the plate.
Deleting Plates
A plate can be deleted from the study setup by selecting > , and then removing the plate from the study Visit Map using > . Deleting a plate deletes the plate definition from the study setup and makes it impossible to enter new data records or retrieve existing data records for the deleted plate.
Deleting a plate has no effect on other plates.
Important Do not delete a plate (or data field) and then re-create it. Each new data field gets a new internal field tracking number, thus any such re-created fields would be considered new with no link to the deleted fields, even if you define them with the same field name on the same plate number.
When the setup is saved DFdiscover deletes the data values for all deleted fields. It thus becomes impossible to retrieve them. Also since the study setup no longer includes the definition of deleted fields it is not possible to generate an audit trail report that focuses just on the deleted fields. To show the history of deleted fields DF_ATmods must be run to show all changes on the relevant plate.
Hiding a Plate
Instead of deleting a plate you may simply want to hide it from some or all users. A plate can be hidden from selected users by changing the role definitions set for all DFexplore users in DFadmin.
Simply removing a plate from the study visit map, while making it impossible to enter new data records for that plate, does not prevent users from retrieving and changing existing data records, unless the records are hidden using
dfneedin the DFopen_patient_binder edit check. If this is not done the existing data records are shown as unexpected (by the current study visit map) in the subject binder.Adding New Plates
Since each plate is stored in a separate data file a new plate can be added at any time with no impact on existing plates. The process is the same as the steps followed to create the original study plates. PDF files containing the new CRF images are imported, and given new plate numbers. New styles, modules and data fields can then be created as needed for the new plates. As soon as the new plates are added to the study visit map, they become available in DFexplore for data entry. This can be done while users are logged in to DFexplore but such users do not see the new plates unless they exit and re-enter the study, or the next time they login.
Adding New Versions of Existing Plates
Sometimes the revisions required to an existing CRF plate are so extensive that it is not possible to simply modify the existing plate as described in Modifying Plates that Contain Data. Instead a new version of the CRF page with a new plate number may be required. As described above adding a new plate can be done at any time, but how do we tell DFdiscover that this new plate is a new version of an existing plate?
To accomplish this we need to make some changes to the study visit map and add some new cases to the conditional visit map. First, if the old version of the plate was required at some visits the visit map must be changed to make the new version required and move the old version to the optional plate list. And if the old version was optional the new version needs to be added to the optional list so that both versions appear in the optional list.
The final step is to add two new conditions to the conditional visit map, one that declares the new version unexpected if the old version has been entered, and another which declares the old version unexpected if the new version has been entered.
During a new study setup you may decide to create and apply a new style to fields you have already defined, or modify some of your previous style, module or field properties. Changes you make at the style level follow these rules:
properties you lock at the style level are automatically applied to all modules with fields that use that style.
style properties you define but do not lock (i.e. default suggestions) are automatically applied to any field that uses that style if that property is not already locked at the module or field level.
Style default suggestions can be useful when defining new fields, but in most cases you should apply the field level lock to all properties not locked in the style or module, so that any change in the default style suggestions are not applied to existing data fields.
| Important |
|---|---|
Style, module and field properties can be modified in any way you want before data collection begins, but if data has already been entered you must not change field, module and style properties in a way that would conflict with the storage or interpretation of the existing data values. |
If data exists in the database for fields you plan to redefine follow these rules:
Do not change the label of coded fields if this would change the meaning of existing data values. For example, if a field is coded 1=yes and 2=no, do not change the coding to reverse the meaning to 1=no and 2=yes.
Do not change the field storage length if values already collected would not fit in the new storage length. DFdiscover does not automatically truncate all existing values in these fields, but if someone resaves the data record, either after modifying some field or just to move it to a new workflow level, any oversized fields are truncated.
Do not change the format of date fields if this would make existing data values invalid. For example, changing a date format from dd/mm/yy to mm/dd/yy would switch the meaning of the day and month components of all existing date values.
Changing a numeric format in a way that expands the values that can be saved does not change the numeric value of existing database values. For example, if the format is changed from nn.nn to nn.nnn, an existing value of 12.34 would simply become 12.340 if the record is retrieved and resaved in DFexplore. But doing the opposite, reducing the size or precision of a data field, does make existing values incompatible with the new format. For example, changing the format from nn.nnn to nn.nn, would truncate existing numeric values and changing a format from nnn to nn might mean that some current values no longer fit in the data field.
Changing the format does not automatically change the data fields in the database. When an affected data record is retrieved, DFexplore displays a warning dialog showing the affected fields. Then, after reviewing and perhaps correcting the changes, the record must be saved to store the newly formatted values in the study database. If you are sure that all values fit in the new format and do not want to review the changes, the records can be retrieved and batch validated in DFexplore.
Do not change names unless you are willing to also change all of the places where they are used, e.g. edit checks, SQL snapshots, and DFsas job files.
There is no harm in changing data field descriptions, but there is one consequence you need to understand. When a new data query is created the data field description is added to the query, and becomes part of the query record. The field description in existing data queries is not updated when a data field description is changed. Changing the description only affects data queries created after the change is made.
-
There is no harm in changing legal value definitions during a study. It is not uncommon to expand the legal range to allow a wider range of values to be considered legal. Since all existing fields meet an expanded range, an expanded legal range presents no problem.
Decreasing the legal value list is also allowed and has no effect on values that have already been collected, even if they are now illegal. The only consequence is that some data records that have been saved with status
finalmay no longer qualify for this status. Nevertheless, the status of such data records are not changed, unless they are resaved in DFexplore. If you want to do this, the easiest way is to open the data records in DFexplore's List View and sort on the modified data field. You can then double-click each now illegal value to jump to the Data View and resave the data record with statusincomplete, perhaps after adding a data query to the now illegal values. -
There is no harm in adding a new code to an existing choice field. This does not affect any of the existing codes, and thus does not change the interpretation of existing data fields. However, adding new coding options to a choice field may require modifications to the CRF to add check boxes for the new choice options.
If the CRF layout of a data fields changes (e.g. to add check boxes for new choice options, change the layout of existing choice options, change a text field from single line to a multi-line box, increase the number of digits in a numeric field, etc.) you do need to import a modified CRF background and change the data entry widget to match the new field design. Proceed as follows; we'll use adding a new choice option as an example:
Modify the CRF page to add the new choice box options and save it as a PDF file.
Open the module view and select the module and field you wish to modify. Add the new choice option to the field properties and save it.
Import the revised CRF page using > to replace the existing CRF background image. This has no effect on the data fields already defined on this plate.
Adjust the position of data fields on the new CRF background, as needed by dragging them to their new locations on the page.
Drag the widget for the choice field to be changed out of the way, and then click each of the boxes making up the field, just as though you were defining it all over again.
When all choice boxes have been identified, click the choice field widget that you moved out of the way. A dialog appears asking if you want to relocate the data field to the new boxes you have just checked.
Click . The data entry widget you moved out of the way vanishes and the revised field definition moves to the new data entry widget you just created.
This same procedure can be used to reassign any data field to a new data entry widget.
| Important |
|---|---|
Remember that changes to the study setup are not permanent until you select > . Changes can only be tested after saving, when the new setup becomes available. Remember as well that DFexplore reads the setup only once when it starts - to reload a new setup requires restarting DFexplore. |
The eSignature module provides a fully compliant default record signing mechanism that meets 21 CFR Part 11 requirements without additional edit check programming and testing. The eSignature module can be instanced on any page. The case where a single signoff page covers a range of pages is not implemented. It is possible to batch sign pages, making the job of maintaining compliance a bit easier.
DFdiscover comes preloaded with the eSignature module. When you create a new study definition, or import an existing study definition from an older version of DFdiscover [2], the eSignature module appears in the list of modules.
The eSignature module has five predefined fields:
SigName: the full name of the signer. The system determines this by matching the login username with the user definition in the permissions database.SigDate: the date of signing, from the signer's computer and local timezone.SigTime: the time of signing, from the signer's computer and local timezone.SigReasonChoice: the reason for the signing, as a choice.SigReasonString: the reason for the signing, as a text string.
There are several features that must be implemented for proper utilization of an eSignature in DFdiscover.
The eSignature module must be added to each plate that requires signing.
Each of
SigName,SigDate,SigTimeand one of eitherSigReasonChoiceorSigReasonStringmust be instanced on each such plate.To map the fields to the CRF requiring eSignature, the plate must be designed to accommodate it's use.
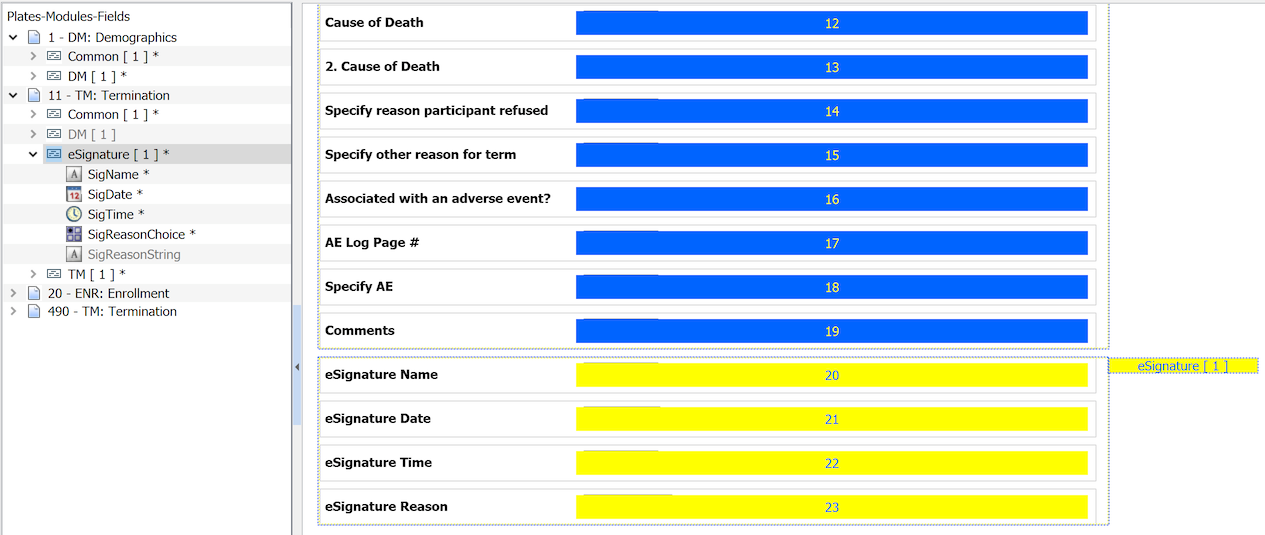
For an eCRF plate, it is sufficient to drag the needed fields from the eSignature module to the plate definition.
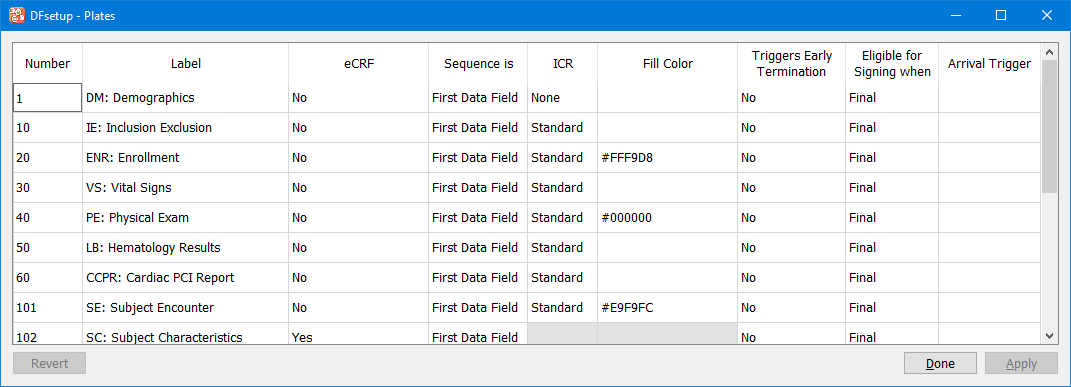
In the plate properties dialog, the plates that require eSignature must also have the Eligible for signing when choice set to one of Final (the default setting) or Final or Incomplete. Either choice is acceptable - the proper choice will be defined by the needs of the study workflow.
eSignature permission must be granted by an administrator.
To be able to sign a page, the DFexplore user must, for whatever role they are using, have the P permission checked.
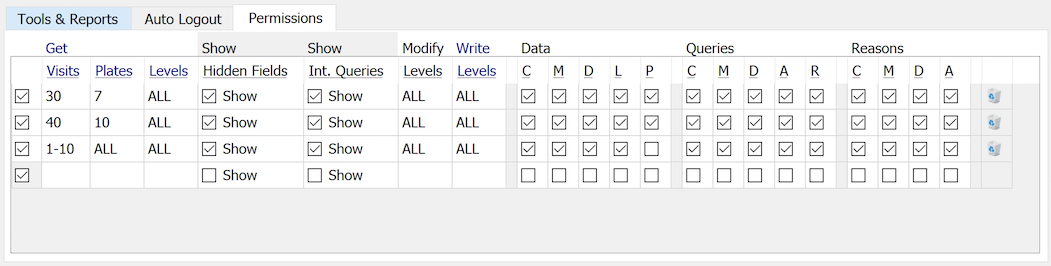
In this example, eSignature permission is granted for plates 7 and 10, as defined with two lines in the permissions part of the role definition.
When the current plate contains fields from the eSignature module, the logged-in user has eSignature permission, and the Eligible for Signing when condition is met for the status of the current record, the user will be required to sign the record whenever there are changes and they save it. To sign the record, the user is prompted for their username and password credentials on the first record signing during a given DFexplore session and then just their password on subsequent signings in the same DFexplore session.
Once the credentials are accepted, the eSignature fields are automatically populated. Any changes to the data on a signed plate will remove the eSignature (by blanking the eSignature fields) and will again require signing by a user with permission to e-sign when the eligiblity conditions for signing are met.
If the credentials are not accepted in a DFexplore session, the system will re-prompt for the username and password to be entered. Multiple consecutive attempts to sign with invalid credentials will cause the signing to fail, the user to be logged out and a notification email to be sent to the administrator. The specific number of consecutive attempts is determined and set by the administrator.
[2] The eSignature module was updated in DFdiscover 2018 Version 5.1.0 to additionally include a reason for the signature. All versions provide name of signer, date and time of signing.