Table of Contents
- 7.1. Modules
- 7.2. Plates
- 7.3. Styles
- 7.4. Edit checks
- 7.5. Lookup Tables
- 7.6. General Dialog Controls
- 7.7. Sites
- 7.8. Missing Value Codes
- 7.9. Query Category Map
- 7.10. Sort Map
- 7.11. Lookup Tables Map
- 7.12. Visit Map
- 7.13. Page Map
- 7.14. CRF Type Map
- 7.15. CRF Background Map
- 7.16. Conditional Terminations
- 7.17. Conditional Cycles
- 7.18. Conditional Visits
- 7.19. Conditional Plates
- 7.20. Query Titles
- 7.21. Query Covers
- 7.22. Query Messages
This chapter describes the functions located under the menu.
Field definitions are added to modules using this dialog. A list of modules and the fields contained in them appear on the left side of the dialog. The individual module and field properties appear on the right.

Module List. The module list contains the module and field definitions for your study database. Use this part of the modules dialog to manage your modules and the fields they contain.
Module Properties. Module properties include the module name and a short description of what the module is for.
Module Options. Module options allow you to create a new module and clone or delete an existing module.
: Create a new module without any fields. Fields are then added and managed using the Field options buttons.
: Create a copy of an existing module including all of its fields. The module name provided for the cloned module must be unique. Field names within the cloned module remain the same as those in the original module provided that the Global Field Setting Field Name must be unique across all module definitions is disabled (unchecked). If this setting is checked, during the clone, field names will be modified to maintain uniqueness by appending an underscore and number to the original field. Field names and other field properties may be edited in the Field Properties window.
: Delete an existing module and all of its fields. If the module and its fields are defined on one or more plates, the module cannot be deleted. Module usage can be determined by selecting the module from the list and examining the Module Usage window.
Field Properties. The field properties area of the modules dialog is where you define each field in your database.
Field Options. Field options allow you to create a new field and clone or delete an existing field.
: Create a new field within the selected module. Provide a style and a data type. Enter all properties that are common to all planned instances of the field. Leave instance-specific properties unlocked or unspecified.
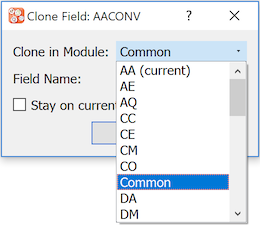
: Create a clone of a field. Complete the Clone Field dialog.
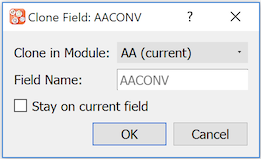
Fields can be cloned within the current module (default) and can also be cloned to a different module. For the latter, choose the destination module from the Clone in Module drop-down list.
The cloned field requires a name that is unique within the destination module. Specify a Field Name. After the field is cloned, the default behavior is to switch the focus to the new field in the destination module. Mark Stay on current field to override this behavior and leave the focus on the current field in the current module.
: Delete an existing field. If the selected field is in use on one or more plates, it cannot be deleted. Field usage can be determined by selecting a field from the list and examining the Field Usage window. As fields are mapped to plates, all fields and the module they belong to are listed in this part of the dialog.
After adding eCRF plates or importing blank CRF images ( Import CRFs), use the Plates dialog to enter a descriptive label and other properties for each unique plate in the study database.

Recent edits are shown in bold and, when the focus is on the cell, also have a red arrow that can be used to undo the change. Click to save the changes and to dismiss the Plates dialog. A confirmation dialog appears if you attempt to quit without saving changes.
Label. A descriptive label not exceeding 100 characters is required for each plate. This label is used in Query Reports to identify missing pages, and as the data statement label in SAS® job files created by DFsas.
eCRF. eCRF plates do not contain barcodes and are therefore only suitable for entry via EDC.
Sequence. By clicking this cell 2 options are available to indicate whether the key field to identify the visit field number if predefined (or in the barcode), or is in the first user-defined data field of the plate.
If a plate is never repeated, and thus will appear only once in the study database with a single visit number, the visit number can be predefined or included in the CRF barcode. If the plate may be repeated, different visit numbers will be required to distinguish the different records. In this case it is typical to design the CRF page with the visit number as the first data field (as either a choice or numeric field) that is selected by whoever is completing the form (for EDC studies) or completed by whoever submits the form (for paper-based studies).
ICR. This is only relevant to CRF plates if pages will be faxed or emailed to the DFdiscover server. DFdiscover ICR can be used to read the data fields on a faxed CRF page and create an initial data record for review by data management staff. There are 3 options:
none - do not perform ICR on any of the fields on the current plate
standard - perform ICR on new faxed pages, but if the page is a refax discard all ICR'ed values when the existing data record is brought forward for comparison with the new faxed page.
merge - perform ICR on new faxed pages, and retain the ICR'ed values for any blank fields in the existing data record when it is brought forward for comparison with the new faxed page, except for those blank fields which are supported by a reason in the study database.
The DFdiscover ICR algorithms can read check boxes (in check and choice fields), numbers (in numeric and date fields), 3-character months (in dates that use this format), plus and minus signs (in signed numeric fields) and visual analog scales.
The ICR algorithm uses the legal range specifications for each field to determine whether it read a legal value. If the value is illegal the field is left blank. Choice fields for which more than one box was checked are also left blank as this is always an illegal response.
Fill Color. Fill Color defined at the plate level is inherited by fields as default color. This color is used to paint/fill the area between the data entry widget and the CRF background color. When using color and higher resolution data collection CRF images, the appearance is greatly improved by also filling areas around data entry widgets in a color sensitive manner. Ensuring that Fill Color is set to match the surrounding area of data entry widget on CRF background will improve overall visual experience. Fill color if not defined (i.e. blank ) at the plate level, the color specified in Study-Global Settings is used.
Triggers Early Termination. There are various ways to signal the termination of subject follow-up for each cycle defined in the study visit map. One way is to design a special CRF form that is used by the clinical sites to record the date and reason that follow-up is terminating early for a specified cycle for a specified subject. The visit number on the early termination plate must be included within a cycle in the study visit map. This identifies which cycle is terminating early. See Visit Map for additional information on cycles and cycle termination.
Eligible for Signing when. This is relevant for plates where e-signatures fields are defined. If e-signature fields are defined for this plate, the subject record will be signed with user's signature upon save based on this selection. There are 2 options:
Final - When record status is changed to Final.
Final or Incomplete - When record status is changed to either Final or Incomplete.
Plate Arrival Trigger. Plate arrival triggers are used to run specified program on the DFdiscover server on arrival of a new record for a specified plate. For example a trigger might be used to send someone an email message on arrival of a serious adverse event form. Plate arrival triggers execute on the following events:
when a barcoded CRF page arrives provided the barcode can be read,
when a page is identified and sent to the study using the Image Router function,
when data records are imported to the new record queue using DFimport.rpc with the
-noption, unless explicitly suppressed by also including the-soption.
![[Important]](../../imagedata/important.png) | Important |
|---|---|
If an image cannot be identified on arrival and thus ends up in DFrouter, the plate arrival trigger will be delayed until the page has been identified using DFexplore. |
Plate arrival triggers are UNIX shell programs that may take arguments. Plate arrival triggers have the following requirements:
They must be "installed" in either the study
ecbinor DFdiscoverecbindirectory - this "registers" them to DFdiscover. If the program is registered in both locations the study level takes precedence.The program name cannot contain any of the following characters:
/ space | ` $ ; & *The program arguments cannot contain any of the following characters:
| ` $ ; & *
Two arguments are automatically added to the end of the command line, in the following order:
full path to the image file
the data record created by ICR or imported
Plate arrival triggers are executed immediately following the ICR step for both incoming documents and pages identified using DFexplore, and the ICR results are passed to the program. However, when a plate is imported to the new record queue ICR does not occur, and the imported data record is passed to the program instead.
As an example, suppose we want to send a notification to the study adverse event monitors (Jack and Jill) whenever a new adverse event form arrives (plate 200) asking them to review it within 24 hours. In addition we want to notify the study data manager (John) so that he can check that the review occurred on time. The plate arrival trigger for plate 200 might look like this:
AEnotification.shx "jack@company.com jill@company.com" "john@company.com"
The script, stored in the study ecbin directory that does the work,
might look something like this:
#!/bin/sh
# AEnotification.shx "jack@company.com jill@company.com" "john@company.com"
# send email to SAE monitors when an adverse event arrives

TO=$1
CC=$2
CRF=$3
DATA=$4
SUBJECT="New adverse event for study XYZ"

/usr/bin/mailx -s "$SUBJECT" -r "$CC" -c "$CC" "$TO" << END
A new adverse event report (plate 200) for study XYZ
arrived today: `date`
The ICR results are:
$DATA

Please review this form within 24 hours.
Thank you.
END
You can also modify these plate properties using the Plate Properties dialog.
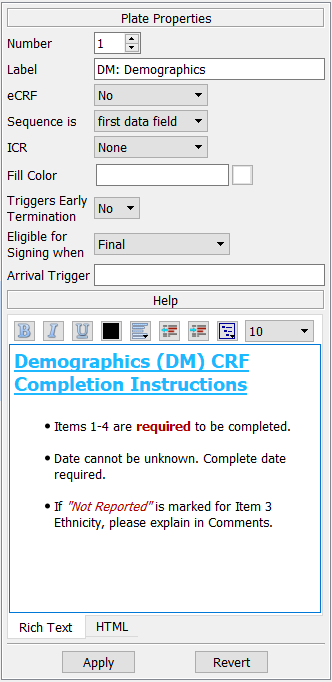
This dialog may also be used to specify an optional plate level help message.
Each Help message can be formatted
using the Rich Text editor, or HTML code can be entered
or pasted using the HTML editor.
In DFexplore, this help message is available to users when they select
> .
Default Styles. When defining a data field you start by selecting a style that has the desired data properties. DFdiscover includes the following predefined styles:
SimpleNumber - for numeric fields
SimpleDate - for dates
SimpleTime - for times
SimpleDateYYYY - for dates with 4-digit years
SimpleString - for text fields
SimpleChoice - for fields with 2 or more mutually exclusive check boxes
SimpleCheck - for fields with a single check box
SimpleVAS - for visual analog scales
These styles should be reviewed and modified as needed. For example, the date format defined in the SimpleDate style should be changed to match the date format used in the study. The DFdiscover default styles cannot be deleted.
Visit Date Usage. Use must be set to Visit Date for each date that is relevant to subject visit scheduling. This includes the date of each baseline, scheduled follow-up, and termination or abort visit (including date of death if recorded). The Visit Date use may also be assigned to optional visit dates. The visit date fields on the study CRFs identify the date on which the visit occurred. Thus, there should be only one field with the visit date property set for each visit. If the visit date use is assigned on more than one plate within a visit, it is expected that all of these date fields will have the same value.
eSignature Usage.
An eSignature module is included by default for all studies.
The module has five fields - SigName,
SigDate, SigTime,
SigReasonChoice and
SigReasonString.
Respectively each have their Use property set to
eSignature Name,
eSignature Date,
eSignature Time,
eSignature Reason and
eSignature Reason.
See eSignature Module and 21 CFR Part 11 Compliance for
additional information.
Study Specific Styles. Study specific styles should also be defined for data field types that appear repeatedly in the study definition, e.g. Subject ID, Yes/No questions, and any repeating block of questions, e.g. medical history items, medication usage, etc. You can define as many study specific styles as needed. Each style is identified by a unique style name comprised of letters, digits, spaces and the '_' character. Each style name must begin with a letter or digit, and cannot exceed 15 characters in length.
Styles can include both fixed properties which are locked in the style and cannot be changed when defining a data field that uses the style, and default properties which are not locked in the style and can be changed when defining a data field. Styles thus serve both to simplify the definition of individual data fields, and more importantly to enforce consistency among data fields that share some of the same properties: coding, legal ranges, edit checks, etc.
Ideally you should define the styles you will need before starting to define individual data fields, but styles can be created as the need arises. Be sure to consider the required properties of all of the data fields that will use each new style you create so you can decide which properties to lock in the style.
Modifying Styles. A style definition can be changed at any time. Properties that were previously defined at the field level can be over-ridden by specifying and locking a value in the style. When this is done all fields that use the style will inherit the newly locked style property.
Styles can also be changed by unlocking a previously locked property. When this is done the data fields that use the style will continue to hold the property's previous value. No changes will occur unless the user decides to edit the now unlocked property for some or all of these data fields.
![[Warning]](../../imagedata/warning.png) | Warning |
|---|---|
Styles can be changed at any time. Once study data has been entered into the database, be careful not to change anything that would conflict with data that has already been collected. Examples of properties that should not be changed include:
|
Styles Dialog. This dialog is used to define and manage all study styles:
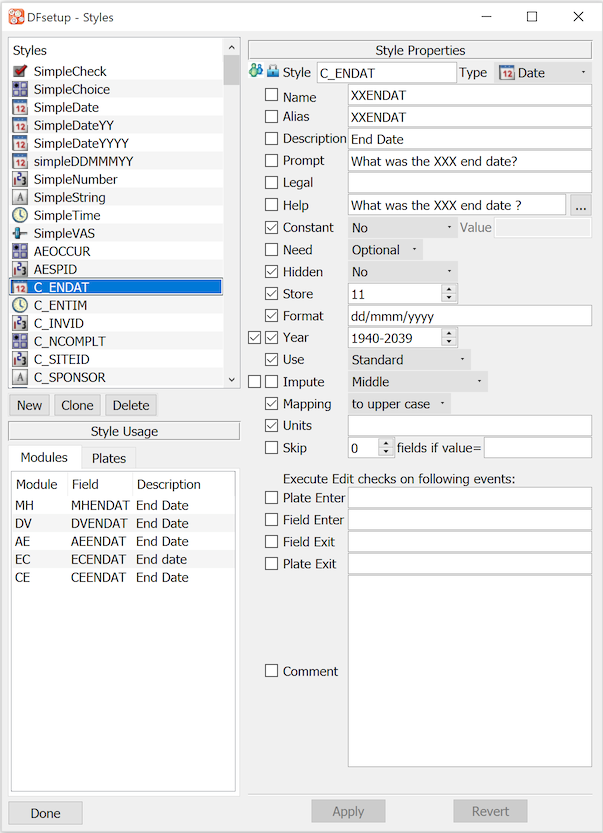
The components of this dialog include:
Styles: list of currently defined styles
Style Properties: data field properties for the selected style,
C_ENDATin this exampleChecked Properties: are locked in the style and cannot be changed when defining a data field
Style Usage: data fields that use the selected style
New: define a new style
Clone: define a new style starting with a copy of the selected style
Delete: delete the selected style
Apply: save changes to the selected style, requires > to become permanent
Revert: undoes changes made to the style, but only those which have not yet been applied
Done: dismiss the dialog
The data field properties displayed in the right panel depend on the selected field type (check, choice, date, time, number, string, visual analog scale). We will start by describing the common properties and then describe those that are specific to each data type.
Style. Each style is identified by a name consisting of letters, digits, underscores and spaces, at most 15 characters long and beginning with a letter. A dialog will appear requesting the new style name whenever you select or . Existing style names can be modified in the Style Properties panel, provided the style name remains unique.
Type. This property identifies the underlying data type from the list of available data types:
choice - a field consisting of up to 98 choices, only one of which may be selected. Each choice has a code and a label, and a special code and label for cases in which no box was selected. The codes are stored in the study database and labels are stored in the study schema.
check - a field consisting of a single box which may be checked or unchecked. A code and label are defined for each of these 2 states. The code is stored in the study database and the label in the study schema.
number - a field consisting of digits, with or without embedded delimiters (e.g. decimals, commas, etc.) and with or without a leading plus or minus sign.
date - a field consisting of a day, month and year part in any order and with or without delimiters, as specified in a format specification.
time - a field containing hours and minutes, or hours, minutes and seconds.
string - a text field with specified screen display and maximum storage lengths.
VAS - a visual analog scale for measuring subjective characteristics where a continuous scale is more appropriate than a discrete scale. It is typically represented by a horizontal line, representing a dimension (e.g. pain) with labels at either end (e.g. none, excruciating) which research subjects use to mark their position along the dimension.
For more details on each supported data type see Data Types. The properties panel changes on selecting the field type to display the properties appropriate to each type, as described in Type Specific Properties.
Name.
Each data field is required to have a name.
The name must be unique within all module definitions for the study,
but it does not have to be unique across the entire study. For instance,
it would be common for a field name to repeat across instances of a
module definition.
The name must be at most 80 characters in length, begin with a letter
and consist of only letters, digits, and underscores.
The name is case sensitive and so MED1, Med1 and med1, for example,
each define a unique field name.
This name is used in the edit check language and
by DFsas when creating SAS® data sets.
Alias. The alias of a data field is a string that uniquely identifies the field across the entire study. The alias property shares the same limits as the name property with respect to length and character set. Each data field should have an alias that is different from all other aliases used to define data fields in the study. An alias may also contain meta-words (a name may not).
Most aliases are defined at the module or field level, not in the style,
with one exception.
An alias can be defined in the style for
fields which appears only once on any given plate, like subject ID and initials,
by using the meta-word for plate number like this: PID_.
This evaluates to $(plate)PID_001 on plate 1, PID_002 on plate 2, etc.
and will thus be a unique alias.
Description.
A description, up to 40 characters long, must be specified for each data field.
It is used to identify data fields in Query Reports and as the field label
in SAS® data sets created by DFsas, and thus must uniquely identify each data field.
Descriptions can be fixed in the style if they include meta-words, like $(plate)
which make them unique,
or a default description can be included and then modified at the data
field level, to reduce typing and provide an initial template.
But most often the description is unlocked and blank in the style.
Prompt. A prompt, up to 256 characters long, may optionally be specified for each data field. It is used to display the question text or item label for the data field on plates without a CRF background image or eCRF, if it differs from the field description.
Legal. An optional comma delimited list of legal values and ranges can be specified, using a dash (-) or tilde (~) for inclusive range specifications, as illustrated in the examples below:
0,3-8,20,22,30-39 for a numeric field
-5.0~-2.5,2.5~5.0 for a numeric field with negative values
01/01/06-31/06/07, 01/09/07-today for a date field
ABC,XYZ,A B,"A,B" for a string field
$(choices)for check and choice fields
If a legal value includes commas it must be enclosed in double quotes. For example quotes are needed here: "JAN 01,2008"~today for a date with format 'mmm dd,yyyy', but not here: JAN 01 2008~today for a date with format 'mmm dd yyyy'.
Quotes are not required when the legal value contains spaces as in the following example: Dr. A,Dr. B,Dr. C.
The meta-word $(ids) can be used as the legal specification
for the subject ID field. This indicates that
only subject ID numbers specified in the sites database are legal,
and is the recommended way to specify legal subject IDs.
DFdiscover does not prevent the entry of illegal values but highlights the field with the illegal color (red) if an illegal value is entered. If the Legal value property is not specified the field will only turn red if Need is specified as required or essential and the field is left blank. If metadata (a query or reason) is attached to a data field the metadata color (blue, orange or green) takes precedence over the illegal value color.
If there are any illegal fields on a data record DFexplore prevents the user from saving the record with status 'Final', unless the user has provided a reason explaining each illegal value, or replied to a query on the illegal values. This rule applies at all workflow levels, including level 7.
Data queries classified as requiring 'correction' (not 'clarification'), and which have query categories 'illegal' or 'missing' are automatically resolved when the data field is corrected according to the following rules.
Queries classified with category 'illegal' are automatically resolved
if one of the values specified in the Legal property is entered into the data field.
If the Legal property is unspecified these queries will not auto-resolve.
This applies to all field types. For example, a blank choice field which has an
illegal value query will only auto-resolve on selecting one of the choice options
if the Legal property contains the $(choices) specification.
If the Legal property is specified, a query classified with category 'missing' will be automatically resolved only when one of the specified legal values is entered into the data field. If the Legal property is not specified, any entry will resolve a 'missing' value query.
Help.
An optional help message can be displayed at the bottom of the DFexplore
window or in the metadata editor panel when the focus rests on the data field.
In DFexplore users can also see this help message from
> .
Help messages can include meta-words
(see Meta-Words).
For example, the legal value list can be included
in the help message as in 'Legal values are: $(legal)'.
Help message can be either formatted using Rich Text editor or HTML code can be entered
or pasted using the HTML editor. The tool button in front of Help property can be used
to launch the help editor window.
Constant. If a field is preset to a constant value, the Constant property is set to yes and the constant value is given. The value must adhere to the rules for the field - field type, format, store length.
Need. One of 3 values must be specified for this property:
Optional. for fields that may be completed with a data value or missing value code. Optional fields are legal when left blank.
Required. for fields that may be completed with a data value or missing value code, but are considered illegal when blank.
Essential. for fields that must be completed with a data value. Essential fields do not accept missing value codes. They are considered illegal if blank or if they contain a missing value code (which can arise if a previously optional or required field is changed to essential).
Key fields (subject and visit numbers) are always essential, regardless of how the need property is specified.
None of the need options prevent users from entering illegal values, but entering an illegal value does prevent the user from saving the data record with status Final. As for illegal data values, fields that are illegal because they are required or essential but blank also prevent the data record from being saved with status Final.
Reason. The reason level (1-7) identifies the minimum workflow level at which changing the data field requires a reason. For example, if the reason level is set to 3, a user can change the value without specifying a reason if the data record is currently below level 3, but a reason must be provided if the record is at level 3 or higher. If the reason level is set to anything between 1-7, an additional option 'Only if changing a non-blank value' becomes available. If this option is checked, a reason for data change will only be required if the record exists at or above the specified level and the field's value was not blank prior to being changed. By default, this option is unchecked which means that the field's original value will be ignored - a reason for data change will be required for any change to the field if the record exists at or above the specified level.
The reason property set in the style or the data field definition is only used if the global setting (see Global Settings) is set to 'per field'. A global setting of 'never' is equivalent to specifying 'none' for all data fields, and a global setting of 'always' is equivalent to specifying level 1 for all data fields.
In DFexplore the reason dialog automatically appears when a reason is required. The dialog displays the reason, if any, for the current value, a text widget in which to enter a reason for the new value, and buttons to either record the new reason or revert to the previous value.
This property is optional. If 'none' is selected a reason is not required for data changes, with one exception. If a field already has a reason associated with its current value, then changing the value requires the entry of a new reason, regardless of the setting for this property at field, style or global levels.
Hidden. Data fields can be hidden (data entry widget not visible) or masked (data entry widget is visible but unavailable, and no data can be entered). By default, data fields are not hidden. If a data field is classified as hidden or masked users require permission to see it in DFexplore. Permission to see hidden or masked fields is set in the study roles defined in DFadmin and may differ by plate and visit, but not by level. A field cannot be hidden or masked at some workflow levels and visible at others.
Hidden or masked fields can be located anywhere on the plate, and are used for fields that only certain users need to use, for example:
dictionary coding fields not present on the study CRFs
fields for a reviewer's initials and date signifying completion of some task
a date stamp completed by a batch edit check indicating the investigator payment run in which the assessment was included.
This field property only affects whether users can access the hidden or masked fields in the DFexplore Data and List views. It has no effect in DFbatch. Edit checks on hidden or masked fields a user cannot see will not be triggered in DFexplore. This applies to all edit checks on hidden or masked fields: plate entry and exit edit checks, as well as field entry and exit edit checks. While hidden or masked fields are skipped and their edit checks ignored, they can be read and set by other edit checks both interactively and in batch.
This field property has no effect on DFexport.rpc or DFsas. Thus users with permission to create and run DFsas jobs in DFexplore will be able to create and export SAS® data sets containing hidden or masked fields.
Display, Store and Widget Lengths. The Display length, which must be specified for string, numeric and date fields, determines the number of characters that will be displayed on one line of the data field in DFexplore, while the Store length determines the number of characters that can be saved in the database, and also whether the data field needs to expand vertically to allow data reaching the store length to be entered.
The length of the data field widget drawn on the screen determines the region of the CRF that will be covered by the data field in DFexplore. The widget length may exceed the display length, and often does when clicking boxed data fields. This allows the boxes to be completely covered in the DFexplore data entry window. Thus, data field widgets will not automatically shrink if you draw them longer than required by the display length.
Clicking changes the length of the data field widget to match the specified display length. The adjustment is made to the right edge of the widget, with the restriction that widget length cannot exceed the right edge of the data entry screen. If matching the specified display length would exceed this boundary, the widget increases to the right as far as possible and the display length is then decreased to match the new widget length.
Remember that any text and graphics that lie beneath the data field widgets will be hidden on the DFexplore data entry screen. This is what you want when the field is designed using data entry boxes, as in CRFs designed for faxing and ICR, so should not be used on such data fields.
Fill Color. Fill color is used to paint/fill the difference area between the data entry widget and CRF background color. Particularly with color and higher resolution data collection CRF images, the appearance is greatly improved by also filling areas around data entry widgets in a color sensitive manner. Ensuring that Fill Color is set to match the surrounding area of data entry widget on CRF background will improve overall visual experience. Fill color if not defined (i.e. blank) at the field level, the color specified in Plate properties is used.
Units. This is a string value recording what units are used for the current field values.
Skip. An optional rule may be specified to skip one or more fields following the current field when the current field has one or more specified values. The rule has 2 parts as shown in the style dialog above: the number of fields to be skipped and the data value or values that trigger the skip.
To indicate that more than one value can trigger the skip enter a comma-delimited list of values and ranges, e.g. 1-3,5,7.
Two meta-words can be used in skip specifications.
Specify $(blank) to trigger the skip when the current field is blank,
!$(blank) when it is not blank,
$(legal) when it contains one of the values specified in the legal values property
or a missing value code,
and !$(legal) when it does not contain one of the legal values
or missing value codes.
The $(legal) meta-word cannot be combined with other values and only refers to the
values specified in the legal values property. If this property is blank the skip
rule will never be met.
The $(blank) meta-word can be combined with other values, except $(legal).
For example, if the current field is a choice field and you want to skip fields if
none of the choice boxes was selected (i.e. the field is blank) or if one of the boxes
corresponding to choice codes 1-3 was selected,
the skip specification would be: $(blank),1-3.
The Skip rule is evaluated on a forward exit from the field using the tab or return key in DFexplore. It is not evaluated on a backward exit using Shift-Tab or Shift-Return, or on a direct move to another field using the mouse.
If the rule is met the focus jumps directly to the data field following the number of fields being skipped. The fields are skipped regardless of whether they are blank or contain data values, and are not changed in any way by being skipped. Any field entry or field exit edit checks that might exist on the fields being skipped will also be skipped since these fields never get the focus.
More complicated rules and/or different skip behavior can be implemented using edit checks.
Edit checks. Edit checks are user defined programs used to implement data consistency checks, lookup tables, computed values, and many other types of programmed behavior (see Programmer Guide, Edit Checks Edit checks).
Edit checks can be triggered in DFexplore when the plate first appears on screen (plate enter), when the user moves into a data field (field enter) or leaves a data field (field exit), or when the user saves the data record (plate exit). All edit checks are attached to data fields by entering the edit check name and parameters (if any) in one or more of these 4 edit check widgets. It is perfectly legal for an edit check to be triggered more than once, for example on field exit and again on plate exit. It is also legal to trigger more than one edit check on the same event by entering a list of edit checks separated by commas and/or spaces. If more than one edit check is entered in any of the 4 edit check widgets they will be executed in order from left to right, on the designated plate or field enter or exit event.
Edit check Execution
Edit checks are processed in the following order:
On Plate Entry: all fields are examined in field number order. Any plate entry edit checks are executed before moving to the next field.
On Field Entry: by keyboard or mouse, forward or backward, any field entry edit checks are executed.
On Field Exit: by keyboard or mouse, to move to any other field or to the Save buttons, any field exit checks are executed.
On Plate Exit: all fields are again examined in field number order. Any plate exit edit checks are executed before moving to the next field.
| Important |
|---|---|
|
Edit checks can also be executed in batch mode, see Programmer Guide, Batch Edit checks. Batch mode simulates a user retrieving each specified data record, tabbing through all data fields, and then saving the record. Thus the order of edit check execution proceeds just as it does interactively, but with the following differences:
edit checks on hidden fields always run in batch mode regardless of who is running the batch,
dfaccessstatements are ignored during batch processing,dfmovetostatements are ignored during batch processing thus all fields are traversed.
Edit check programs can be entered, checked and published using the > dialog described in Edit checks.
Comments. Internal documentation for the field can be stored in the comments property. Comments are only visible when editing a field definition; they are not displayed, nor accessible, anywhere else. A comment has a maximum length of 1500 characters.
Coding.
Check fields consist of a single box, that is either checked
or not checked, while choice fields have 2 or more boxes, at most
one of which may be checked.
In both data types, either the field has no response
(no box is checked) or a single box is checked.
A numeric code and descriptive text label are required for each box
and defines the meaning of that box being checked.
Additionally, a numeric code and text label are required for the
"no response" case, where no box is checked.
Within a field definition, each numeric code must be a unique
integer value, in the range 0-65535 (inclusive).
Text labels have a maximum length of 32 characters
and are also generally unique, but are not required to be.
Only the numeric code is stored in the database (and hence one needs to be
aware of the implications of changing a numeric code once a study has
started to receive data), while the text label appears in reports
and is for readability purposes only.

A numeric code and text label must be specified for each of the 2 possible states: the box is checked or not checked.
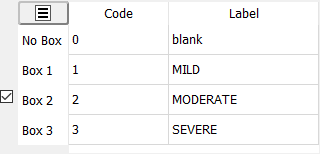
A numeric code and text label must be specified for each choice box and for the case in which no box is checked.
Box 1, Box 2, etc. corresponds to the order in which the boxes were checked in the CRF window.
Use.
Choice fields can have Use set to
Standard or
eSignature Reason.
eSignature Reason is set and locked for the
SigReasonChoice field in the eSignature module.
Legal.
The meta-word $(choices) may be used in the legal specification for choice fields.
It evaluates to all specified codes, including the code for no choice.
However, if need is specified as 'Required' or 'Essential' the field will still
be flagged as illegal if no choice is selected.
It is also possible to specify the codes directly, e.g. 0-4 for the choice field and 0-1 for the check field in the examples above. But remember to include the 'No Box' code as a legal value for 'Optional' fields, otherwise they too will be flagged as illegal when blank.
Coding. It is possible to associate labels with specific numeric values, as illustrated below, although this is not commonly used.
It is not necessary to specify labels for all possible numeric values, but labels are mandatory for the codes present in the coding table. If display mode is set to labels (e.g. in DFexplore List View) and a label does not exist the numeric value is displayed instead.
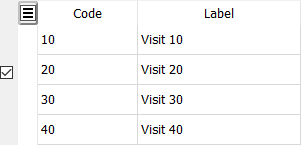
To associate labels with numeric values enter the numeric value in the Code column and a text label in the Label column.
Display and Store. For numeric fields, the limit for the subject ID number is 15 digits at maximum. The limit for any other numeric field is 10 digits (including the leading signs and the decimal points) at maximum. the display and store length must be the same. You cannot store more digits than are displayed on screen.
If a format is specified the store and display length must equal the format length. DFsetup will display a warning and will not allow a field definition to be saved if a mismatch occurs.
Format. An optional format may be specified for numeric fields comprised of:
an 'n' for each digit in the number
a decimal or other delimiters
fixed components, e.g. a leading digit
a leading 'S' if a sign (+/-) is required
a leading 's' if a sign (+/-) is optional
Table 7.1. Number Format Examples
| Format | Description |
|---|---|
| none | If no format is specified any positive or negative integer or decimal value that fits in the display length may be entered. Any legal range specification e.g. -5.5~+5.5 may be specified. The display and store length must allow for signs and decimals. |
| nnn | This format allows any integer between 0 and 999. The legal range specification (if any) may only include positive values, e.g. 80-230. The display and store length must be 3. |
| nn.n | This format allows any number between 0 and 99.9. The legal range (if any) may only include positive values, e.g. 5.0-69.1. The display and store length must be 4. |
| snn | This format allows any integer between -99 and 999. If a faxed CRF is used the data field must have 3 boxes with the first box reserved for an optional plus or minus sign. when the sign is provided, ICR will not read the content in the first box. The legal range (if any) may include negative values, e.g. -25~+25. The display and store length must be 3. |
| Snn | This format allows any integer between -99 and +99. If a faxed CRF is used, the data field must have 3 boxes with the first box reserved for a required plus or minus sign. The plus sign is required for positive values. The legal range (if any) may include negative values, e.g. -25~+25. The display and store length must be 3. |
| nnnnnnnnnnnnnnn |
This special format (Subject ID number field in its maximum length)
allows integers between 0 and 281474976710655.
The legal range specification (if any) may only include non-negative values,
e.g. 0-222222222222222. The display and store length must be 15.
|
| nnnnnnnnnn |
This special format (numeric field other than Subject ID number in its maximum length)
allows integers between -2147483647 and 2147483647.
The legal range (if any) may only include positive value, e.g. 1111111111-1222222222.
The display and store length must be 10.
|
If an integer or decimal format is specified, e.g. 'nnn' or 'nn.nn', and the user does not enter all of the required digits DFexplore will auto-complete the value on field exit by adding leading and/or trailing zeros where needed to match the specified format. For example, 22 is converted to 022 to match format nnn, 2.2 is converted to 02.20 to match format nn.nn. This does not occur if no format is specified, or a format is specified that contains anything other than 'n's or a single decimal.
| Important |
|---|---|
The '|' character is used as the field delimiter in data records and thus cannot be included in data fields or in formats. DFsetup and DFexplore both block any attempt to use it. |
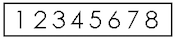
Single Rectangular Box. Most numeric fields are defined using a separate box for each digit, but it is also possible to define a numeric field consisting of a rectangular box containing pre-printed or hand-written digits. To define such fields click inside the box, select a numeric style, and set the store and display lengths equal to the number of digits the field will contain.
When users complete such fields on a paper CRF all of the specified digits must be included, otherwise the ICR will fail and leave the field blank. Users should be instructed to enter leading zeros, leave a clear gap between each digit, and print large without touching the top and bottom of the box.
For pre-printed numbers ICR accuracy is best for 18 pt Avant Garde-Book with a spread of 15-20% to clearly separate the individual digits. The rectangular box used for these fields should be 1/3 inch high and wide enough to hold all of the digits without crowding. Whether pre-printed or hand-written, digits should be positioned mid-way between the upper and lower edges of the box and clearly separated from each other, as shown in the example below.
These fields should not have a format statement. Delimiters and decimals are not allowed.
The 2 types of numeric fields are demonstrated in the following examples.
| 1. |
For This CRF Field  |
Length & Format 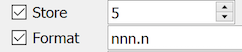 |
| 2. |
 |
 |
Table 7.2. Numeric Field Examples
| Format | Length | + or - Sign | CRF Field Design | Value Range | Note |
|---|---|---|---|---|---|
| nnn.n | 5 | unsigned | [][][].[] | 0.0 to 999.9 | |
| snn.n | 5 | optional | [][][].[] | -99.9 to 999.9 | |
| Snn.n | 5 | required | [][][].[] | -99.9 to +99.9 | |
| 2nn.n | 5 | unsigned | 2[][].[] | 200.0 to 299.9 | |
| none | 4 | optional | rectangular box | -999 to 9999 | |
| nnnnnnnnnnnnnnn | 15 | unsigned | [][][][][][][][][][][][][][][] | 0 to 281474976710655 | For Subject ID number field only |
| nnnnnnnnnn | 10 | unsigned | [][][][][][][][][][] | 0 to 2147483647 | |
| Snnnnnnnnn | 10 | Required | [][][][][][][][][][] | -999999999 to 999999999 | |
| Snnnnn.nnn | 10 | Required | [][][][][][][][][][] | -99999.999 to 99999.999 | |
| snnnnnnnnn | 10 | optional | [][][][][][][][][][] | -999999999 to 2147483647 | |
| Snnnnnnnnnn | 11 | Required | [][][][][][][][][][][] | -2147483648 to +2147483647 | |
| none | 10 | optional | [][][][][][][][][][] | -999999999 to 2147483647 |
Display and Store Length. Because the width of computer screens is limited, the length of text fields displayed on screen is often set shorter than the maximum that can be entered and stored in the study database. Multi-line text fields can be created by holding the Control key (or Command key on Macs) while dragging out a rectangular box for the field. However, the space available on many CRF pages is only sufficient for a one-line text field. In such cases the height of the text field automatically expands into a multi-line text box when the user enters the field, and returns to its display size when the user leaves the field.
Format. Specifying a format is rare but possible for string fields. String formats use '^' as a place-holder for characters that can be entered by the user. All other parts of the format are considered fixed. For example, 'Model #^^^' could be used for a string field that must start with 'Model #' followed by up to 3 other characters.
If a format is specified its length must match the display and store length, with one exception. If the format ends in a single '^' character, as in 'Model: ^', the display and store length are honored and text can be entered from the position of the '^' character to the end of the store length.
Use.
String fields can have Use set to
Standard,
eSignature Name or
eSignature Reason.
eSignature Name is set and locked for the
SigName field in the eSignature module.
eSignature Reason is set and locked for the
SigReasonString field in the eSignature module.
Mapping. Mapping can be used to automatically set all characters to upper- or lowercase as the user types.
This field can store a maximum of 50 characters in the study database.
In the DFexplore data window the field is only 15 characters long but when the user moves into the field it automatically expands to display all 50 characters.
All characters are automatically converted to uppercase as they are typed.
This field begins with 'Model #' followed by a maximum of 3 characters.
Examples: 'Model #123', 'Model #A-4', 'Model #7'
Values entered into this field will be displayed with the full format only after the user enters all 5 digits.
Examples: '325.00 mg', '082.50 mg', '000.25 mg'
Format. A time format can be one of two choices - hh:mm or hh:mm:ss if seconds are also to be recorded by this field.
Use.
Use will typically be set to Standard.
If the time is the
SigTime field
of the eSignature module, then Use is locked to
eSignature Time.
Display and Store. Display and store length is always the same and depends on the date format.
Format. A date format is comprised of:
'dd' or 'DD' for day
'mm', 'MM', 'mmm', or 'MMM' for month
'yy', 'YY', 'yyyy', or 'YYYY' for year
and may include optional spaces and/or delimiters between the parts
A date format is created by arranging these components to match the date format used in the study definition. DFdiscover supports day, month and year components arranged in any order and separated by any delimiter or no delimiter and thus can support all commonly used date formats.
A 3 character-month component indicates that English date acronyms will be used: Jan, Feb, Mar, Apr, May, Jun, Jul, Aug, Sep, Oct, Nov, Dec.
If lowercase is used the specified component can be filled with zeros to indicate that the value is unknown, while if uppercase is used the component cannot be unknown and zeros are not allowed. For example: if format is mmm/dd/YYYY then DEC/00/2008 can be entered for an unknown day in December 2008, and 000/00/2008 can be entered for an unknown day in 2008. It is not reasonable for the day to be known but the month to be unknown, nor for the day and/or month to be known but the year to be unknown, thus such date formats, and partial dates are not considered valid.
Delimiters between the components are optional and can include any character, including spaces. The following are all unusual but perfectly legal date formats: yymmdd, yy-dd-mm, yyyy: mmm.dd, Y=yy M=mm D=dd. However, before getting too creative you should consider what's legal in any other software you plan to use (like SAS).
Year. This property is used to specify the century for 2-digit years. If the box at the end of this property is checked the value specified in > is used.
Use.
A date can have three settings for the Use property:
Standard, Visit Date
and eSignature Date.
In most cases Use is set to Standard,
with the exception of two special ones: Visit Date
indicates that this date field is to be used for scheduling, and
eSignature Date is for a date field that is used to
store the date that a record was e-signed
(this use is generally locked in the SigDate
field in the eSignature module).
Impute. When a partial date is entered by filling the day or day and month components with zeros a rule may be specified for imputing a valid date for use in edit checks, scheduling calculations, and when exporting the data. This property does not change the storage of partial dates, which always contain the zeros entered by the user. Thus it remains possible to export partial values without imputation even when imputation is specified. The imputation options include the following:
Never: no imputation is performed, partial dates are invalid.
Beginning: a missing day is imputed as the 1st day of the month, and a missing day and month is imputed as the 1st day of the year.
Middle: a missing day is imputed as the 15th of the month, and a missing day and month is imputed as July 1st.
End: a missing day is imputed as the last day of the month, and a missing day and month is imputed as the last day of the year.
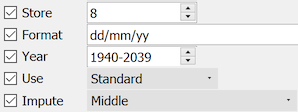
This date format is comprised of day, month, then year, with each component separated by a '/', e.g. 01/07/66 for July 1, 1966.
The format uses 2-digit years which are interpreted as being in the range 1940-2039.
Missing day and month components are allowed and imputed to the middle of the month or year whenever a valid value is required.
The only type specific property for visual analog scales is coding, which is comprised of 3 specifications:
Precision. the number of decimal places in the scale value.
Left Value. the minimum value, corresponding to a mark at the left end of the scale.
Right Value. the maximum value, corresponding to a mark at the right end of the scale.
Positive and negative integer values are allowed, thus a scale can be defined with a range of: -1 to 1, -10 to 10, -100 to 0, 0 to 7, etc.
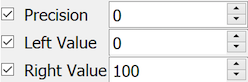
This example illustrates the most common scoring method, an integer in the range 0-100.
Basic editing of a code or label is started by single clicking the corresponding cell. Standard text editing shortcuts and context menu are accessible.
Validation. Entered data is validated, and the following errors are highlighted:
Codes out of the valid range 0-65535 or empty codes. If not corrected, when the cell with such a code loses focus, the code with the label is erased.
Duplicate codes are permitted during editing but the coding table may not be saved with duplicate codes.
Duplicate labels, in particular empty duplicate labels, are permitted and no empty labels are allowed for numeric field codes.
Coding Table Menu.
Additional functionality for coding tables is available from
the coding table menu
( )
located at the upper-left corner of the coding table.
The menu has three actions:
)
located at the upper-left corner of the coding table.
The menu has three actions:
-
display the advanced table editor, described in the following section.
-
erase all entries with empty labels.
remove all table entries.
Selecting displays the Edit Coding dialog. The dialog consists of a table with the data from the coding table and a set of tools for advanced editing. The basic editing of a cell can be activated by a double-click. For convenience of editing, if a code is deleted and the cell loses focus, the label is not erased. The single click action is reserved for selection or deselection of a cell or several cells with mouse gestures and optional Ctrl key.
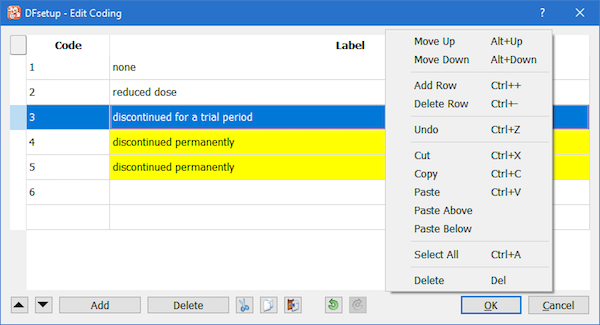
 :
Move whole rows of the selected cells up (i.e. only code-label pairs may be moved), enabled when a cell or several cells are selected.
:
Move whole rows of the selected cells up (i.e. only code-label pairs may be moved), enabled when a cell or several cells are selected.
 :
Move whole rows of the selected cells down, enabled with selection.
:
Move whole rows of the selected cells down, enabled with selection.
: Add empty rows above the selected cells, enabled when a cell or several cells are selected contiguously; the number of rows with selected cells control the number of empty rows added.
: Remove rows from the table, enabled when whole rows are selected.
 and
and  are enabled with selection.
 :
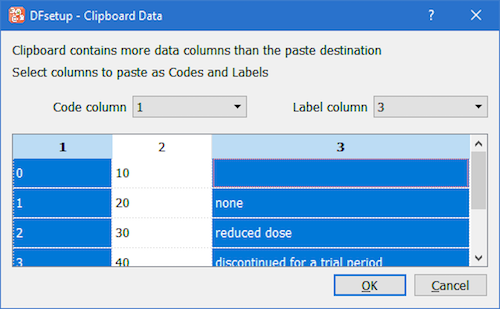
The action depends on the selection made and the clipboard data pasted. The data is expected to be in
the table format, i.e. cells are separated by a Tab symbol, each row ending with a line break.
If no selection is made, the clipboard data will be appended to the existing data starting from the code column.
If selection exists, the clipboard data will overwrite the existing data starting from the first selected cell, a cell
with the lowest (row,column) index. In a situation when the clipboard contains a single column of data, and the first selected cell
is a code, the data will be pasted as codes (if valid); if first selected is a label cell, the data will be pasted
as labels. If the clipboard data and the destination do not match, the Clipboard Data assistant automatically opens, see the next sub-section.
:
The action depends on the selection made and the clipboard data pasted. The data is expected to be in
the table format, i.e. cells are separated by a Tab symbol, each row ending with a line break.
If no selection is made, the clipboard data will be appended to the existing data starting from the code column.
If selection exists, the clipboard data will overwrite the existing data starting from the first selected cell, a cell
with the lowest (row,column) index. In a situation when the clipboard contains a single column of data, and the first selected cell
is a code, the data will be pasted as codes (if valid); if first selected is a label cell, the data will be pasted
as labels. If the clipboard data and the destination do not match, the Clipboard Data assistant automatically opens, see the next sub-section.
 and
and  are used to reverse (undo/redo) operations.
Selection dependent context menu and shortcuts are also available.
The Edit checks dialog is used to enter, verify and publish edit checks for use in both DFexplore and DFbatch.
In the edit check dialog, illustrated below, edit check source files are listed in the left panel. Edit checks specific to the current study appear in black, while global edit checks, which are available to all studies, appear in blue. Global edit checks can only be defined, modified, cloned and deleted by a DFdiscover administrator, but they can be viewed by study administrators and regular users who have been granted permission to use the edit checks editor in DFsetup.
The special source file, DFedits, appears at the
top of the list.
It must be present - without it, it is not possible to publish edit
checks to DFexplore.
All other edit check source files must be referenced in
DFedits using # include directives.
Study and global edit check source files are stored in the STUDY_DIR and /opt/dfdiscover ecsrc
directories respectively on the DFdiscover server.
When a source file is selected
it is retrieved from the server and displayed in the text edit window
where it can be modified and saved back to the server.
For documentation on edit check programming see Programmer Guide, Edit Checks Edit checks.

The buttons at the bottom of the dialog are used to manage the edit check source files. These buttons include:
: create a new empty edit check file.
: create a copy of the selected edit check file.
: rename the selected edit check file.
: delete the selected edit check file.
: import a copy of an edit check file from another study.
: reload last saved version.
: commit changes made to an edit check file to the server. As for all configuration dialogs, saves are immediate.
: make edit checks available to DFexplore. Confirm that there are no syntax errors before publishing.
: dismiss the dialog.
When a source file is selected, the code is displayed in the main window where it can be modified, searched and printed. If Syntax highlighter is checked, the code is colored: green for comments, blue for reserved words in the edit check language, red for quoted strings, and black for everything else.
To find an edit check or function within a source file that contains many edit checks and functions, select the edit check or function name from the Edit checks drop-down. The window is scrolled so that the match is positioned at the top.
To find all of the data fields that use the current edit check, switch to the Usage view and then click . Each of the data fields that uses the edit check is displayed in the scrolling list. Double-clicking any of the rows highlights the referenced plate and data field in the main application window.
Any edit check source file can be checked for syntax errors by selecting it and clicking . Errors and warnings are presented in the Results view. When checking a source file other than DFedits, references to edit checks or functions that are in other source files will be flagged with warnings. Check Suppress warnings to prevent this behavior, which may make it easier to locate errors.
Users with 'DFdiscover-Developer' permission are able to reload published edit checks while working in DFexplore. This is particularly useful when testing edit checks. Users without 'DFdiscover-Developer' permission get the most recently published version of the edit checks when they login to DFexplore.
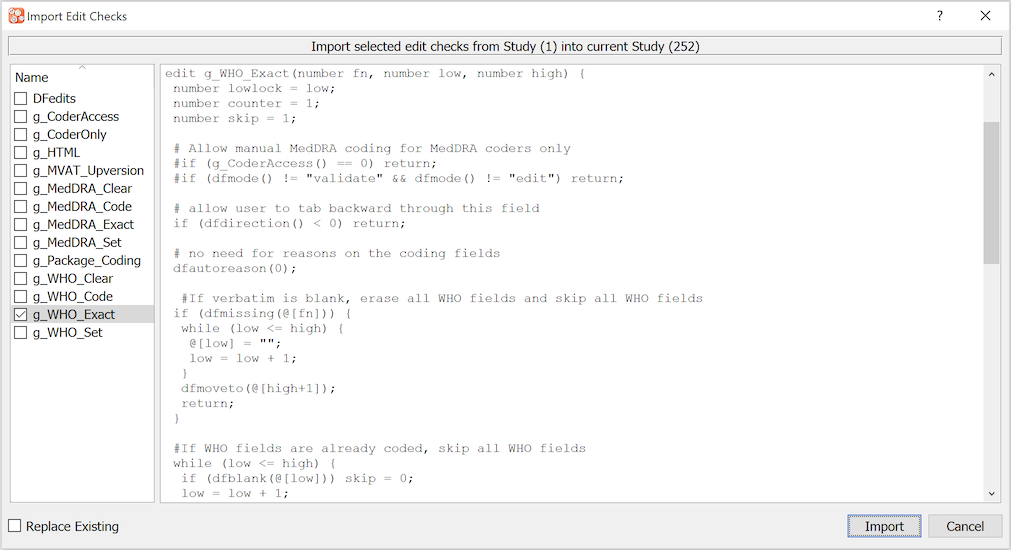
Clicking displays a dialog of other studies from which edit checks might be imported.
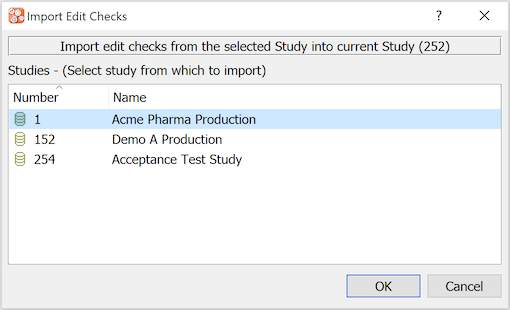
When a source study is selected the edit check source files for that study are listed in a separate dialog. Any of these files can then be selected, reviewed and copied to the current study. Check Replace Existing to overwrite any edit checks with matching names in the current study.
Study lookup tables can be created and modified using the dialog illustrated below. All lookup tables registered in the study and DFdiscover lut directories are listed in the left panel. When a lookup table is selected it is retrieved from the DFdiscover server and displayed in the text edit window on the right. Only study level lookup tables can be modified and saved. Lookup tables stored at the DFdiscover level are displayed in blue. These files must be managed by a DFdiscover administrator.
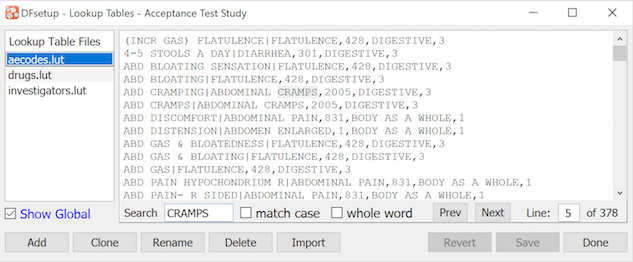
: create a new empty lookup table
: create a copy of the selected lookup table
: rename the selected lookup table
: delete the selected lookup table
: copy a lookup table from another study
: reload last saved version
: save changes to the selected lookup table
: put the dialog away
All of the actions performed by the buttons have permanent effects on the contents of the study lookup table directory on the DFdiscover server. If you delete a lookup table by mistake you will have to recover it from your most recent server backup.
Lookup tables are used by edit checks which can retrieve an entry matching a specified search string or display the entire lookup table to allow users to make a selection during data entry.
Lookup tables are stored in the study lookup table directory (study/lut)
as plain text files structured in one of 3 ways:
2 Field Lookup Tables
Each row in these lookup tables has 2 fields separated by a '|' character. The first field is what the edit check searches for and the second field is what it returns. In the example illustrated below, if the edit check function
dflookupwas asked to search for 'CHF' it would find and return the string 'congestive heart disease'.CAD|coronary artery disease CHF|congestive heart failureSingle Field Lookup Tables
In lookup tables that do not contain the '|' field delimiter the text entry in each row serves as both the search and return value. Examples include lookup tables that contain the names of investigators, medications or procedures that are valid values for a particular data field.
Multi-Field Lookup Tables
A flexible, multi-field lookup table structure can be utilized in DFdiscover.
#N:LL Term|Pref Term|SOC Term|LL Code
#L:Low Level Term|Preferred Term|System Organ Class|Low Level Code
#F:1|1-4
Abdomen enlarged|Abdominal distension|Gastrointestinal disorders|10000045
Abdomen mimicking acute|Acute abdomen|Gastrointestinal disorders|10000047
Abdominal cramp|Abdominal pain|Gastrointestinal disorders|10000056
These lookup tables contain 3 header rows that define the structure of the table.
The first row begins with '#N:' followed by a short column name for each field. This appears above the scrolling list of entries in the lookup dialog displayed by an edit check.
The second row begins with '#L:' followed by a longer descriptive label for each field. This appears in the top section of the lookup dialog where the field values for the current row are displayed, and where the user can indicate which fields to search.
The third row begins with "#F:" followed by 2 fields: the 1st lists the fields to be searched by
dflookupfor a match and the 2nd lists the fields to be returned when a match is found or selected by the user. If multiple return fields are specified they are returned to the edit check as a '|' delimited string, which can be parsed usingdfgetfield.
The return value can also be parsed in older lookup tables.
In the example shown below, if dflookup is given the search string 'CHF' it
will return 'congestive heart disease, heart', which could then be split into
2 separate strings: 'congestive heart disease' and 'heart' using dfgetfield.
CAD|coronary artery disease, heart
CHF|congestive heart failure, heart
KF|kidney failure, kidney
In addition to lookup tables used by edit checks, lookup tables can also be created for standardized queries and reasons, which can be selected when creating a new query or reason in DFexplore. These must be 2 field lookup tables consisting of a short acronym followed by the query or reason:
DATE|This is not a valid date. Please correct or clarify.
ELIG|This subject does not appear to be eligible. Please correct or clarify.
REQ|This value is required and cannot be left blank.
Lookup tables are assigned an arbitrary descriptive file name when they are
created and a second typically shorter name by which they are called in
edit check function dflookup.
This pairing of names is done in a separate configuration file, the
Lookup Tables Map.
A lookup table that is not registered in this map
will not be available to edit checks.
The study configuration dialogs described in the following sections have the same controls:
View: select a study configuration dialog
Copy: copies the selected row (
)
Paste: insert previously copied row above the current row (
)
: open a new blank row below the current row
: delete current row
: replace all rows with sites from another study
: add or replace rows with site info from a file
Search: case insensitive string match on all fields
: reload last saved version
: check last saved version
: save to DFdiscover server
: quit the dialog
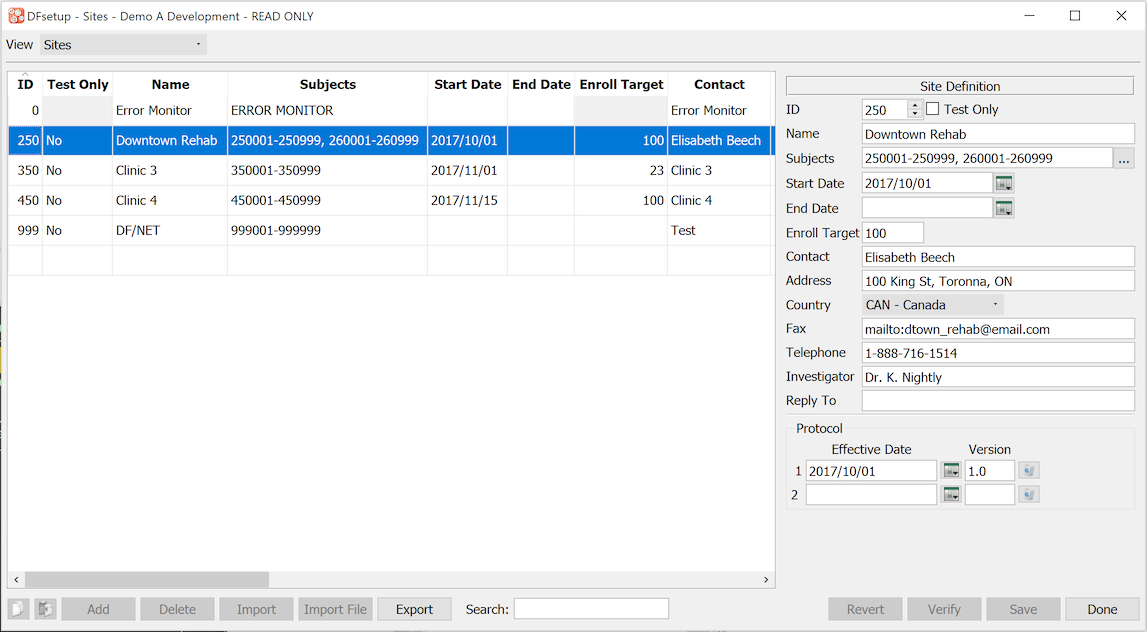
The Sites dialog is used to enter contact information and subject IDs for each clinical site participating in the study. Associating subject IDs with sites is a critical component of this dialog.
Click to commit all changes to the DFdiscover server. Saves can be performed site by site or delayed until all changes have been completed. However, save is not possible if any of the required fields are left blank for any site.
The verification report checks the current version of the sites database stored on the DFdiscover server; ensure that the most recent changes are saved before clicking .
At least 1 site must be specified for each study. If no sites are specified DFexplore will automatically assign all subjects to site number 0.
The specifications for each site can be changed at any time during the study, including while data entry is occurring in DFexplore. If a subject ID is moved from one site to another while someone is doing data entry in the old site, the subject will continue to be available to that user until the study is closed. Thus it is possible that the subject may appear in DFexplore under both the old and new sites for a short period of time. However, record locking will continue to ensure that only one user at a time can enter or modify the subject's data.
When a subject ID is moved from one site to another, any outstanding queries will be included in the next Query Report sent to the new site, and all queries (regardless of status and which site created them) will continue to be visible when the subject is viewed in DFexplore. However, the site field in query records is only updated if the query is included in a Query Report for the new site, or is modified and saved in DFexplore.
The components of each site specification include:
ID [required]. numeric value in the range 0-21460 inclusive, which uniquely identifies each clinical site participating in the study.
Name [required]. name of the site, clinic, hospital or institution.
Subjects [required]. comma delimited list of all subject IDs and ranges belonging to the site. Each subject can belong to one and only one site.
-
Start Date. the date, in yyyy/mm/dd format, for when the site is expected to start, or has started, enrolling subjects.
End Date. the date, in yyyy/mm/dd format, for when the site is expected to stop, or has stopped, enrolling subjects.
Enroll Target. number of subjects that the site is expected to enroll.
Contact [required]. the name of the primary contact to whom Query Reports will be addressed.
Address. postal/street address.
Country. 3-character code from the ISO 3166-1 list of approved country codes. The categorical setting can be used for grouping in reports.
Fax. space-delimited list of fax numbers and/or email addresses, used by DF_QCfax to deliver DFdiscover Query Reports. The field may be left blank for sites that are not meant to receive Query Reports. If fax numbers are specified, each fax number must contain all of the digits required to dial the destination fax machine (i.e. long distance code, country code, area code - as needed) and may be formatted to aid readability e.g. (789)-123-4567. Each email address must start with the prefix mailto: followed by the complete email address, e.g. mailto:jack@somewhere.com. Fax numbers and email addresses cannot contain spaces.
-
Telephone. telephone number of the contact person.
Investigator. the name of the principal investigator at the site.
Reply To. email address of the person at the study central office who will receive any replies to Query Reports that were sent to the site by email. This value appears in the
From:address of emails that deliver Query Reports to the email addresses specified in the Primary Fax list. This provides a real email address that the site can respond to and is also the address that will receive email transmission failure notifications. If a Query Report is sent via email and this field is blank, reply emails from the site, or email transmission failures, will be delivered to the DFdiscover problem mail recipient defined by the DFdiscover administrator in DFadmin.Protocol. up to 5 protocol version and effective date pairs. The Effective Date is the first date on which the Version is in place at the site. Multiple Effective Date are expected to be in chronological order. The values are accessible via edit check functions and are implicitly used in the
dfprotocolinfofunction.
A special entry must be included in the sites database for an error monitor who is typically someone at the study coordinating site. This special site is identified by the string ERROR MONITOR in the Subjects field. Any data records with subject IDs that do not belong to one of the clinical sites are automatically assigned to the error monitor site. This might occur for example if the sites database is modified after subjects have been entered. Only one error monitor site can be defined for each study. By default site number zero is used for this special site, but this can be changed to any valid site number.
Site information can be imported into the sites dialog from a text file by using . The file may be in DFdiscover, CSV or another delimited format, and may contain only some or all of the required fields, in any order. When this option is selected the following dialog appears.
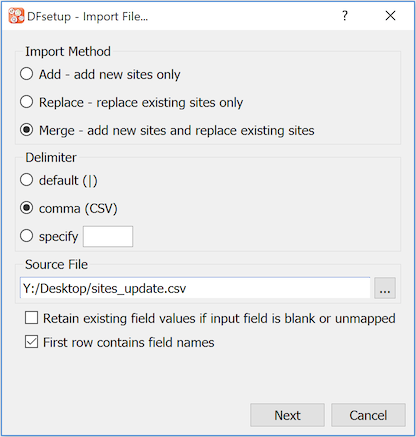
When using 'Replace' or 'Merge', if the input file lacks some of the required fields, or you wish to ignore some of the input fields and keep existing values, select 'Retain existing field values'. When is selected a dialog will appear that can be used to identify how fields in the input file map to fields in the sites dialog. When the mapping has been completed select to load the records into the sites dialog. Any new records and modifications to existing fields will be shown in bold. Select to write the changes to the DFdiscover server, or to undo the changes and reload the existing site records into the sites dialog.
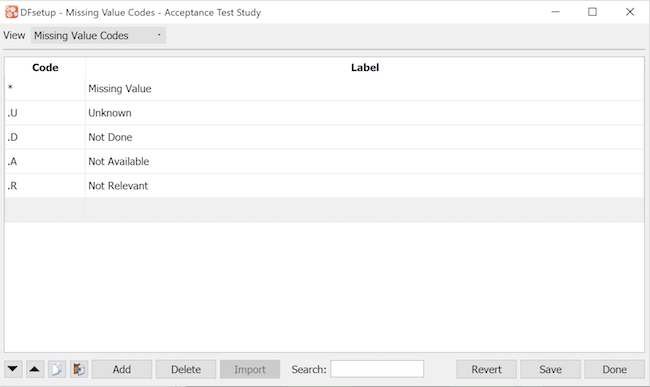
This dialog is used to enter missing value codes and labels. In DFexplore missing value codes can be assigned to any optional or required data field, and can be thought of as pre-approved reasons for missing data. DFexplore does not allow missing value code assignment to essential fields.
DFdiscover imposes no restrictions on the choice of missing value codes but all data fields use the same missing codes thus be careful not to define something as a missing code if it might be a valid entry for some data fields. Also consider restrictions imposed by other software you plan to use (like SAS®).
The control buttons at the bottom of the window are the same for all study configuration dialogs. See General Dialog Controls for a description.
This dialog is used to design custom query categories for a study. These are in addition to the predefined categories: Missing, Illegal, Inconsistent, Illegible, Fax Noise, Other, Missing Page, Overdue Visit, and EC Missing Page. DFdiscover predefined query categories cannot be deleted.
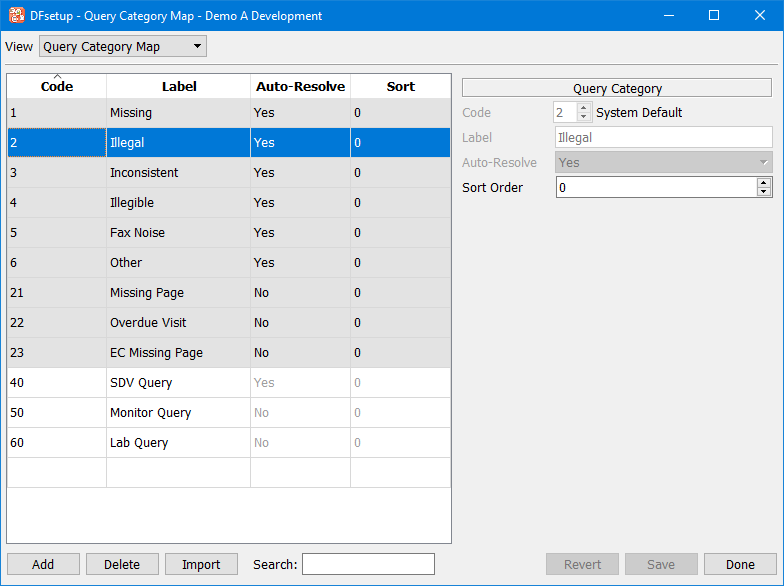
Query categories are entered as follows:
Open a New Row
Either select the last row of the table (always empty) or another row and click Add to open a new empty row below it.
Code
A code value ranging from 30 to 99 (inclusive) must be entered in the 1st column of the table or in the Code section of the Query Category Map panel on the right. Codes do not need to be entered in sequential order. The same code value may not be used twice.
Label
A Label must be entered in the 2nd column of the table or in the Label section on the right. This label will be used as the identifier for the category in the option list available when adding a query in DFexplore. This label must have 20 characters or less and the same label may not be used twice.
Auto-Resolve
The auto-resolve property controls whether or not adding a reason to an external query of this type also changes the query status to 'pending'. Types may be set to be resolved automatically by selecting 'Yes' in the Auto-Resolve option list on the Query Category Map panel.
Sort
The Sort option is used to control the order in which the categories will appear in the option list available when adding a query in DFexplore. Categories may be assigned any integer value between -2147483648 and 2147483647. They will be displayed in DFexplore in ascending by sort value, then by code value (types with higher positive values will be placed at the bottom of the option list, while categories with high negative values will be placed at the top of the list. 0 is the default sort value, as well as the value assigned to the predefined types. Sort values may only be entered in the Sort section of the Query Category Map panel.
A user-defined query category may be deleted; however, any query with the deleted category will be re-labeled with a default label of "Query category ##", where "##" is the code value of the deleted category. It is important to consider the impact caused by the loss of the category label when deleting user-defined query categories.
The Sort Map dialog is used to specify the order in which data queries are to appear within each subject in Query Reports.
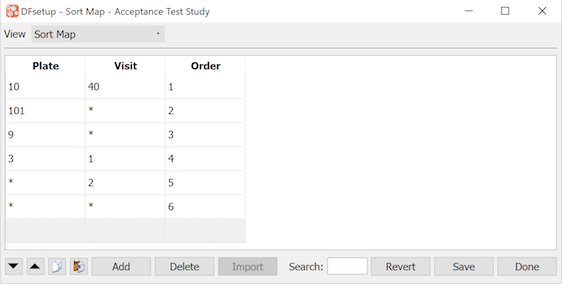
In this example queries are printed:
1st for plate 10, visit 40
then all queries on plate 101
then all queries on plate 9
then plate 3, visit 1
then all other visit 2 plates
then all other queries
When an asterisk '*' is used to signify all plates or visits, queries are printed in ascending numerical order for plates or visits within that sort map entry. Thus in the example queries on plates 101 and 9 will be printed in ascending order by visit number, with all plate 101 queries printed first.
The last entry is not required. It represents the default order that prints queries sorted in ascending numerical order by plate within visit.
The control buttons at the bottom of the window are the same for all study configuration dialogs. See General Dialog Controls for a description.
The dialog illustrated below, is used to enter a lookup table name by which each lookup file will be known in edit checks and DFexplore.
There are 3 reserved lookup table names: 'QC' for standard queries, QCNOTE for standard query note text and 'REASON' for standard reasons. These names tell DFexplore where to find these lookup tables when a user clicks the lookup buttons in the add query and add reason dialogs. All other names are for use in edit checks and can be created using any string of letters and numbers.
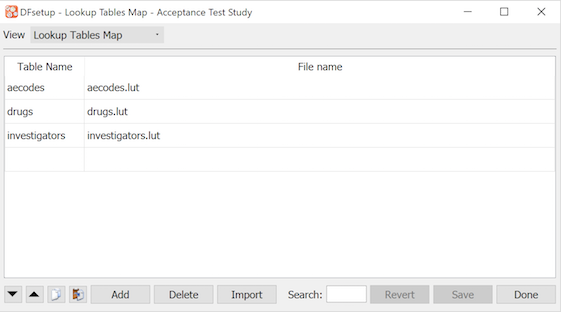
A table name (left column) must be specified for each lookup table file (in the right column).
The 'lut' file name extension shown in this example is not required.
The control buttons at the bottom of the window are the same for all study configuration dialogs. See General Dialog Controls for a description.
The Visit Map dialog is used to enter specifications describing the set of study CRFs and subject scheduling requirements. It must include all subject visits and repeated forms, and each visit must include a list of all CRF plates that are required or optional.
The visit map specifications are used to generate a blank CRF binder in DFexplore for each new subject and is thus required before data entry can begin. The order of visits in each subject binder corresponds to the order in which they are entered in the visit map. The order of pages within each visit corresponds to the Display Order specified for the plates of the visit. If no Display Order is specified, plates will be displayed in the default order of all required plates for the visit followed by all optional plates for the visit.
The study visit map is also used by report DF_QCupdate to calculate the follow-up schedule for each subject, and to generate data queries for missing pages and overdue visits.
A visit map can be simple, comprised of a few easily defined visits as illustrated below, or complex with multiple cycles and conditions that determine what is required and when. Detailed documentation of DFdiscover visit map features can be found in the appendix at Subject Visit Scheduling. It should be studied carefully and a visit map plan should be created before finalizing the study CRFs.
This section describes how to use DFsetup to enter and check your visit map specifications, it does not attempt to explain the different visit types or scheduling options, nor the rules that determine how they are used - for this see Subject Visit Scheduling.
The control buttons at the bottom of the window are the same for all study configuration dialogs. See General Dialog Controls for a description.
Visits are entered as follows:
Open a New Row
Either select the last row of the table (always empty) or another row and click to open a new empty row below it. The order in which visits appear in the table must correspond to the order in which they are performed during the study. The location can be adjusted after the visit is defined by using the up and down arrows.
Visit or Cycle
Select the Visit button at the top of the Visit or Cycle Definition panel.
Visit Type
Select the appropriate visit type: screening, baseline, scheduled, optional, etc. from the option list below the Visit button. Each visit type has special meaning and behavior. The one letter acronym for the selected visit will appear in the 1st column of the visit map table.
Visit Number
Enter the visit number in the 2nd column of the table. Some visits use a series of numbers to distinguish different reports, as illustrated for the medication change logs, adverse event logs and subject diaries in the example shown above. A visit number series can be entered using a dash (-) or a tilde (~). If a dash is used DFexplore adds a new blank page with the next visit number as soon as the last page is entered. If a tilde is used the visit number series does not appear in the DFexplore record navigation list. To enter these assessments the user must select Assessment-Add New Assessment and select the desired assessments from a dialog. This method is useful for assessments that occur rarely or that you do not want to display in the DFexplore navigation list. It can even be used for single assessments, like the death report shown in the example.
It is legal to enter a comma-separated list of visit numbers and ranges. However, it is not possible to mix dash (-) and tilde (~) ranges in the same list. If a dash range appears anywhere in the list, any tildes will also be interpreted as though they were dashes.
Visit Acronym
A short acronym can be entered in the 3rd column of the table for those visits that will appear in the subject status list of the standard DFdiscover Query Report. This value is used to identify the first, last and next scheduled visits.
Visit Label
A visit label must be entered in the 4th column of the table. It is used in the subject binder in DFexplore and in overdue visit queries and thus needs to clearly identify each visit.
Visit Date Field
If the visit is scheduled or has a date that signals termination of subject follow-up a visit date field must be specified. Select the appropriate visit date from the list of database fields that have been defined with the use property set to Visit Date.
Visit Scheduling
If a visit is scheduled a scheduling method must be specified. Most visits are scheduled a specified number of days following the cycle baseline visit, but there are two exceptions.
Screening visits can be unscheduled or scheduled a specified number of days following the first screening visit - which itself cannot be scheduled.
The last cycle termination visit is sometimes defined as occurring within a specified date window using a type W visit, for which the scheduling options are illustrated in the following examples (which all assume that the study VisitDate format is yyyy/mm/dd).
on a specific date: e.g.
on 2008/12/01This schedules the final follow-up visit on Dec 1, 2008 for all subjects.before a specific date: e.g.
before 2008/12/01This converts the last scheduled follow-up visit for each subject before Dec 1, 2008 into the termination visit.after a specific date: e.g.
after 2008/12/01This converts the first scheduled follow-up after Dec 1, 2008 into the termination visit.between two specific dates: e.g.
between 2008/11/01~2008/11/30 .25In this example all final follow-ups are scheduled for November 2008. The scaling factor (.25 in the above example) spreads the visits out over the termination interval. It should be set to the termination window width (days) divided by the usual inter-visit interval (days). In the above example a scaling factor of .25 would be appropriate for the 1 month termination window if the usual gap between follow-up visits is 4 months.
Overdue Allowance
Visits are considered overdue when the overdue allowance has expired. Thus for example if a visit is scheduled to occur between day 100 and 110 (after baseline) it can be scheduled to occur on day 100 with a 10 day overdue allowance. The overdue allowance should be increased in a paper-based study to allow additional time for completion and faxing of data forms and level 1 data entry by central data management staff.
Required Plates
A comma delimited list of plate numbers and ranges can be specified, e.g. 5,10-13,20,27-29. The order determines the order in which required plates will appear in the subject binders in DFexplore. If a Display Order is specified, plates will appear in the order corresponding to the Display Order.
Optional Plates
A comma delimited list of plate numbers and ranges can be specified. The order determines the order in which these optional plates will appear in the DFexplore subject binders, where optional plates are identified by circular icons and listed below the required plates identified by square icons. Optional plates must be included in the visit map to make them available for data entry.
Display Order
A comma-delimited list of required and optional plate numbers and ranges can be specified. The order of plates specified here will determine the order in which the plates will be displayed in the subject binder in DFexplore. Required and optional plates can be inter-mixed in the Display Order to customize the order of pages within each assessment. Not all required and optional plates for the visit need to be specified in Display Order. If Display Order does not contain a list of all required and optional plates, the plates listed in Display Order will come first, followed by all required plates excluded from Display Order, then all optional plates excluded from Display Order. If Display Order is empty, the default plate order (all required plates followed by all optional plates) will be used to create the subject binder.
Missed Visit Plates
If a special missed visit plate has been defined to record reasons for missed visits it will be used when a users sets a visit as missed in DFexplore, if not that the default missed visit dialog will be used. Only 1 missed visit plate can be defined for a visit, but it is possible (but unusual) to have different missed visit plates for different visits.
Cycles are containers for visits with a common baseline.
If a visit map includes only one baseline visit, cycles need not be defined. But if visits are grouped into sets each with their own baseline and scheduling then cycles must be used.
Cycles may be required, optional or conditional and may be scheduled in a number of ways. Different subjects may move through a different set of cycles during the course of the study based on conditions triggered by data values recorded in the study database.
This section describes how to use DFsetup to enter and check your cycle specifications, it does not attempt to explain how the different cycle options work or what they mean - for this see Subject Visit Scheduling.
The example below shows the definition of a conditional cycle for long-term follow-up after completion of the treatment cycle.
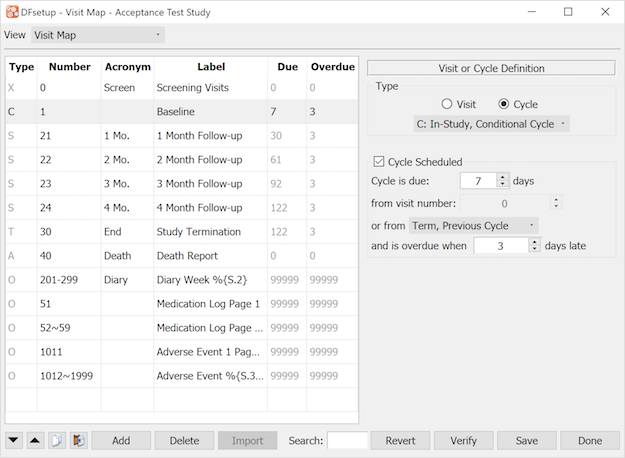
The control buttons at the bottom of the window are the same for all study configuration dialogs. See General Dialog Controls for a description.
Cycles are entered as follows:
Open a New Row
Either select the last row of the table (always empty) or another row and click to open a new empty row below it. The cycle record must immediately precede the visits that comprise the cycle. The order in which cycles appear in the table must correspond to the order in which they are performed during the study. The location of the cycle record can be adjusted after the cycle is defined by using the up and down arrows.
Visit or Cycle
Select the Cycle button at the top of the Visit or Cycle Definition panel.
Cycle Type
Select the appropriate cycle type from the option list below the Cycle button. Each cycle type has special meaning and behavior. The one letter acronym 'C' will appear in the 1st column of the visit map table to identify cycle start records. The same acronym appears for all cycle types.
Cycle Number
Enter the cycle number in the 2nd column of the table. Cycle number 0 must be used for all screening visits, cycle 1 for the first in-study cycle, and the other cycles must follow in sequential order.
Cycle Acronym
This field is not used and cannot be defined.
Cycle Label
A cycle label can be entered in the 4th column of the table.
Cycle Scheduled
Check this box if the cycle is scheduled and enter the scheduling method and overdue allowance. Cycles may be scheduled from a preceding visit, from the baseline of the first cycle or preceding cycle, from the visit date on which some condition occurred, or as shown in the example from the termination of the preceding cycle.
Verifying your work is highly recommended. The verification report checks the current version of the visit map and all of the conditional maps (see below) stored on the DFdiscover server; thus, Save changes before clicking .
Data queries are identified in DFexplore and Query Reports by: subject ID, visit number, plate number and field description. While subject ID and field description are always meaningful, in many studies the visit number and plate number are meaningless to the clinical sites and should be replaced by a more descriptive label. This is the purpose of the page map.
In addition to replacing visit and plate numbers in Query Reports, page map labels also appear in the DFexplore Queries and Data views where they replace the plate label in the queries list and in the subject binder navigation list respectively.
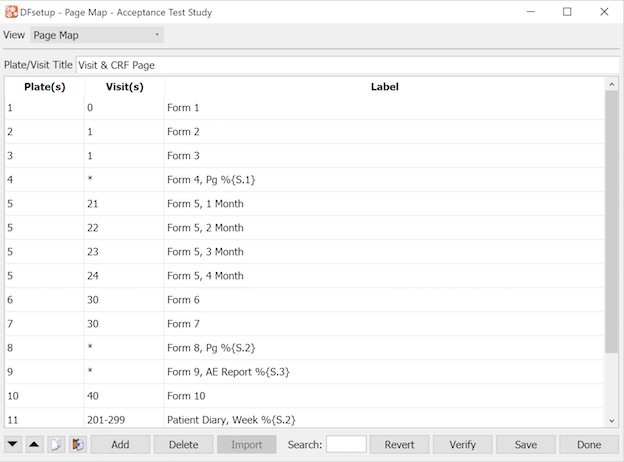
When creating Query Reports using DF_QCreports, if a page matches more than 1 entry in this table the first entry with the following specifications is used, where # stands for an explicit numeric value
plate #, visit #
plate #, visit *
plate *, visit #
plate *, visit *
In DFexplore the order of entries in the table is important. If a page matches more than 1 entry the first entry wins.
Page map specifications are optional. Any page which does not have a page map entry will be identified by its assessment and plate numbers.
The control buttons at the bottom of the window are the same for all study configuration dialogs. See General Dialog Controls for a description.
The Plate/Visit Title is optional, and is only relevant in the short version of Query Reports, where it appears as a title over the page map labels on the correction section of each report. If specified it should be no more than 17 characters long. If not specified the default title is 'PLATE SEQNO'
The plate and visit entries may contain a single value or range, a comma-delimited list of values and ranges, or an asterisk (*) to represent all possible values.
In the long version of Query Reports created by DF_QCreports page map labels have a maximum length of 32 characters. This is achieved when variable labels are set to their maximum length (40 characters) in > . More compact Query Reports can be created by setting variable labels to 25 characters in > , in which case page map labels are then limited to 17 characters. Page map labels will be truncated in Query Reports if they exceed these limits.
The above limits do not apply in DFexplore where page map labels may be more than 100 characters long, although practically they should be kept smaller.
The label entry may include any of the following substitutions. Remember to account for the maximum length of substituted values when computing final label lengths.
%P is replaced by the plate number without zero padding.
%S is replaced by the visit number without zero padding.
%{P.n} is replaced by the last n digits of the 3-digit zero padded plate number.
%{n.P} is replaced by the first n digits of the 3-digit zero padded plate number.
%{S.n} is replaced by the last n digits of the zero padded visit number.
%{n.S} is replaced by the first n digits of the zero padded visit number.
%{S.a.b} is replaced by b characters of the zero padded visit number starting from character position a.
%n is replaced by the value of field number n from the relevant data record. Only one field value substitution is allowed per label.
%n:d this notation is for check and choice fields; field n is decoded and its label is used. Only one of these substitutions is allowed per label.
If the field used by Page Map is set to be Hidden or Masked in DFsetup, the label for the plate will be substituted with XXX.
If the field used by Page Map is set to be Hidden or Masked using dfaccess
edit check function, the label with data value will still be displayed.
This dialog is used to create CRF types so that CRFs can be tagged by categorization (e.g. language). The CRF types must be defined in this map in order to be selected when importing CRF backgrounds of different types (refer to
Import CRFs for details) and to be available as selection options in DFexplore Preferences (refer to DFexplore User Guide, User Settings
SettingsUserUser SettingsUser Settings) and in the dfpref edit check function (refer to Programmer Guide, Edit Checks
Edit checks).
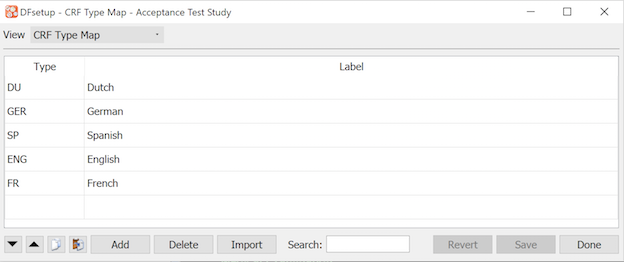
Each CRF category must have a specified type name (max 8 characters) and label (max 20 characters).
When CRFs are imported, they may be tagged with a specific visit number (refer to Import CRFs for details). If a CRF tagged with a visit number is also used at other visits, use this table to link it to the additional visits.
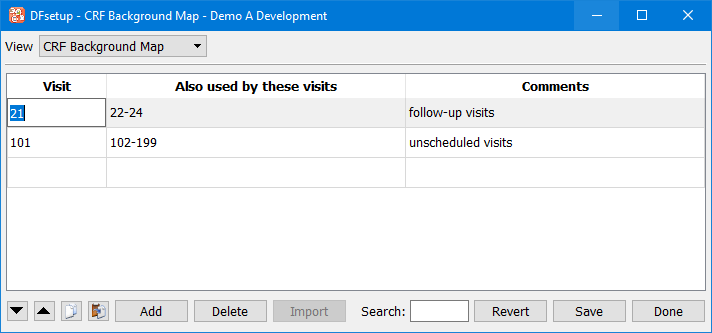
The Conditional Terminations dialog is used to specify database conditions that terminate subject follow-up.
An early termination condition ends subject follow-up for the cycle that contains the visit (specified in the IF statement) that triggered the condition. An abort condition terminates all follow-ups for all cycles.
When a termination condition is met the VisitDate of the visit (specified in the IF statement) at which the condition was met becomes the termination date. When more than one termination condition is met the earliest VisitDate becomes the termination date. DFdiscover will not schedule visits beyond the termination date nor call such visits overdue.
This section shows how to use DFsetup to enter conditional termination specifications. For a detailed description of this and other visit scheduling features see Subject Visit Scheduling.
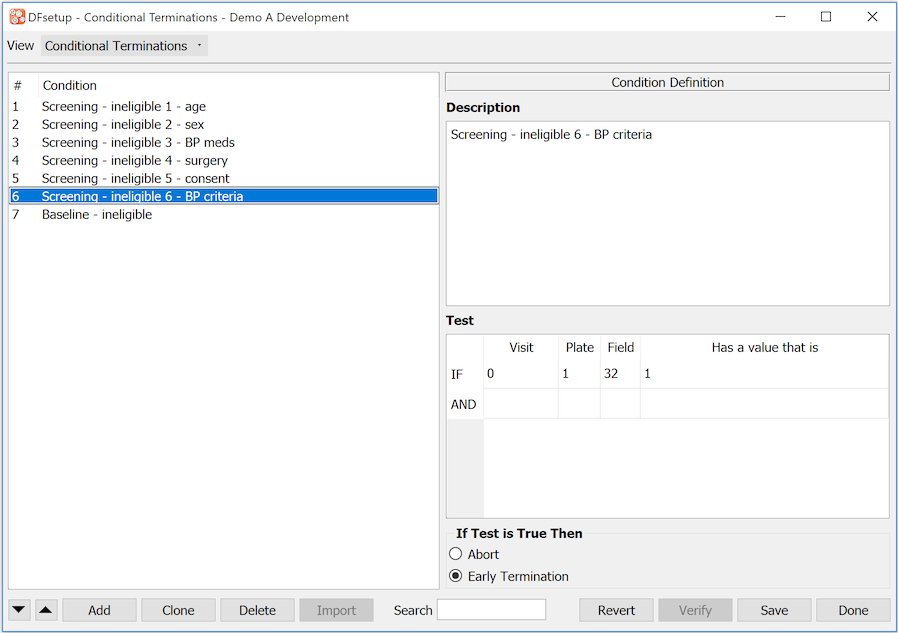
This example illustrates:
Description:
-for each condition the first line of the description is displayed in the Condition List.
Test:
-this test is true if field 32 on plate 1 at visit 0 equals 1.
If Test is True Then:
-subject follow-up terminates for the cycle containing visit 0
The control buttons at the bottom of the window are the same for all study configuration dialogs. See General Dialog Controls for a description.
All of the conditional maps perform database tests in the same way. The capabilities are described in the Conditional Tests section.
The Conditional Cycles dialog is used to specify database conditions which can override the visit map specifications and make any cycle required, optional or excluded.
This section shows how to use DFsetup to enter conditional cycle specifications. For a detailed description of this and other visit scheduling features see Subject Visit Scheduling.

This example illustrates how conditional subject scheduling can be implemented when multiple visit cycles have been specified in the visit map.
If the subject is in treatment group "B" (field 12 on plate 2 at visit 1 = "B")
And the subject agrees to continue in the trial at the end of cycle 1 (field 34 on plate 5 at visit 24 = 1)
Then the subject proceeds to the first visit in cycle 3, and is not expected to complete any of the visits in cycle 2.
The date on which cycle 3 is expected to start is determined by the cycle scheduling method specified in the visit map.
A comma-delimited list of cycle numbers and ranges can be specified if a condition effects more than one cycle.
The control buttons at the bottom of the window are the same for all study configuration dialogs. See General Dialog Controls for a description.
All of the conditional maps perform database tests in the same way. The capabilities are described in the Conditional Tests section.
The Conditional Visits dialog is used to specify database conditions which can override the visit map specifications and make any visit required, optional or excluded.
This section shows how to use DFsetup to enter conditional visit specifications. For a detailed description of this and other visit scheduling features see Subject Visit Scheduling.
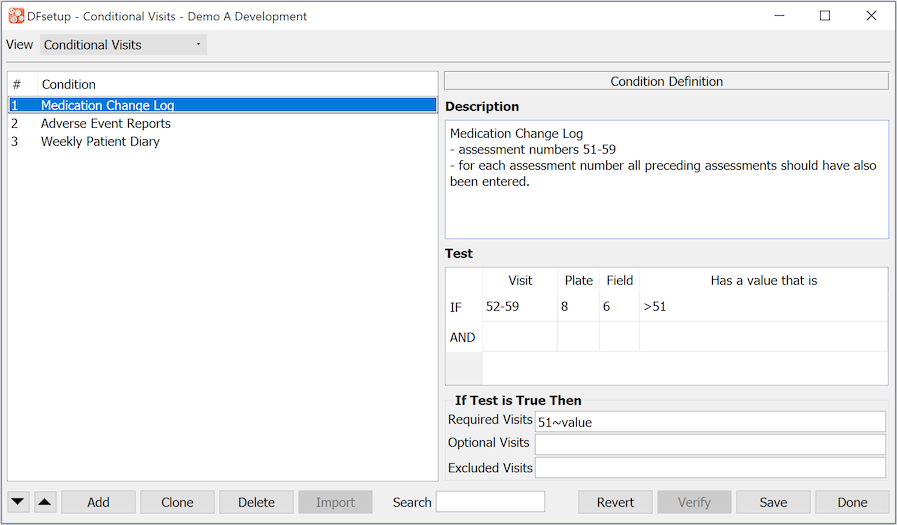
This example illustrates how the conditional visit map can be used to check for gaps in a sequential assessment number series.
Medication log pages use assessment numbers 51-59 in order.
If a medication log page is entered with a log number greater than 51 (field 6 on plate 8 at visit 52-59 is > 51)
Then all lower numbered assessments in the series should also be in the database (required visits 51~value),
where value is the value of the field specified in the IF statement that met the condition (i.e. field 6 the assessment number).
If a condition makes a visit required the scheduling specifications in the visit map (if any) determine when the visit is due and overdue.
The control buttons at the bottom of the window are the same for all study configuration dialogs. See General Dialog Controls for a description.
All of the conditional maps perform database tests in the same way. The capabilities are described in the Conditional Tests section.
The Conditional Plates dialog is used to specify database conditions which can override the visit map specifications and make any plate required, optional or excluded.
These conditions only take effect once the visit has occurred and at least one plate for the visit has been entered into the study database. If you need to specify a condition for a visit that has only one plate use the conditional visit map not the conditional plate map.
This section shows how to use DFsetup to enter conditional plate specifications. For a detailed description of this and other visit scheduling features see Subject Visit Scheduling.
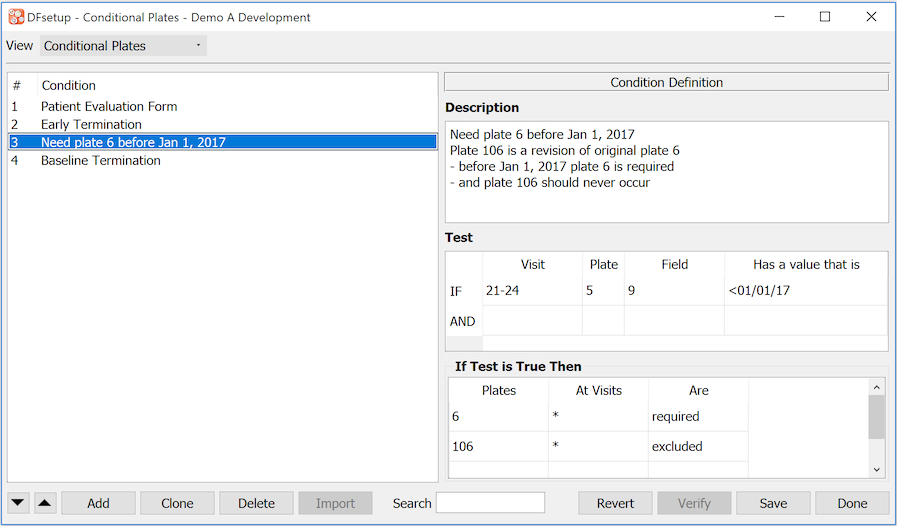
This example illustrates how the conditional plate map can be used for CRF plate version control.
The study started with plate 6 as one of the required plates at each follow-up. During the trial this plate was revised to create a new version, which was given plate number 106.
The new version came into effect on Jan 1, 2017.
2 conditions are required for version control, one of which is shown here.
For follow-up visits performed before Jan 1, 2017 (field 9 on plate 5 at visit 21-24 is <01/01/17)
plate 6 is required
plate 106 is not expected
The Subject Scheduling > Subject Unexpected report (or the legacy DF_PTunexpected report) can be used to list any unexpected plates or visits that have been entered into the database.
The control buttons at the bottom of the window are the same for all study configuration dialogs. See General Dialog Controls for a description.
All of the conditional maps perform database tests in the same way. The capabilities are described in the Conditional Tests section.
The title at the top of each page and above each of the 3 sections of the Query Reports created by DF_QCreports can be customized as illustrated in the following example.
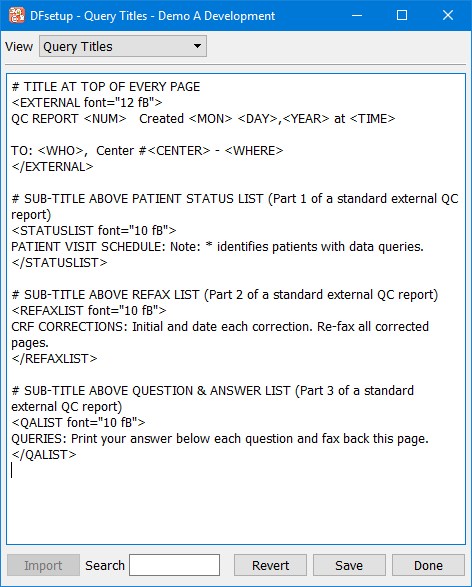
Query Titles can have any or all of the following parts:
EXTERNAL - page title for external Query Reports
INTERNAL - page title for internal Query Reports
STATUSLIST - sub-title above subject status list
REFAXLIST - sub-title above refax/correction queries
QALIST - sub-title above clarification queries
The control buttons at the bottom of the window are the same for all study configuration dialogs. See General Dialog Controls for a description.
The following rules must be followed when defining Query Titles.
Title specifications must be formatted exactly as illustrated in the example.
The opening and closing tags for each section must appear on new lines by themselves with no leading or trailing space or text.
No space is allowed within the opening and closing tag except before the word font.
Anything entered outside of a tagged block is ignored.
A
#character may be used to indicate a comment line but#is not strictly needed, and has no special meaning inside a tagged block.The font value must be enclosed in double quotes. Limited font specifications may be included within the opening tag. The leading number sets the point size (10 or 12 are recommended). Available font types include:
fB for bold fH for normal helvetica fCW for constant width The font specification is optional. Without it, font="10 fCW" is used for Query Report titles and font="10 fB" is used for the sub-titles for the three sections of the report.
The following variables may be included in the Query Report titles which appear at the top of each page, but not in the sub-titles above the subject status, refax and question & answer sections. The study name comes from the study configuration file maintained by DFadmin, clinical site information comes from the sites database, and date/time come from the system clock on the DFdiscover server.
Table 7.3. Variables available for use in QCcovers, QCmessages, and QCtitles
| Variable | Use in External | Use in Internal | Meaning | ||
|---|---|---|---|---|---|
<STUDYNAME> | yes | yes | study name | ||
<SITE>
[a] | yes | no | site ID | ||
<WHO> | yes | no | primary site contact | ||
<WHERE> | yes | no | site affiliation | ||
<MAIL> | yes | no | site mailing address | ||
| yes | no | primary fax number (to which Query Reports are sent) | ||
<FAX2> | yes | no | secondary fax number | ||
<PHONE1> | yes | no | primary contact's phone number | ||
<PI> | yes | no | principal investigator | ||
<PHONE2> | yes | no | principal investigator's phone number | ||
<REPLYTO> | yes | no | email address to which replies made to emailed Query Reports will be sent | ||
<NUM> | yes | no | external report name composed of site ID, date (yymmdd), and page, e.g. 025-080115-01. | ||
<NAME> | yes | yes | external report name composed of site ID and date only, e.g. 025-080115 | ||
<PAGE> | yes | yes | page number of Query Report | ||
<DAY> | yes | yes | two-digit day of month | ||
<MON> | yes | yes | three-character month of year | ||
<YEAR> | yes | yes | four-digit year | ||
<WKDAY> | yes | yes | three-character day of week | ||
<TIME> | yes | yes | time of day (hh:mm:ss AM/PM), e.g. 01:12:22 PM | ||
<DATE> | yes | yes | date (ddd mmm dd hh:mm:ss yyyy), e.g. Tue Jan 15 14:34:07 2018 | ||
[a] The variable
| |||||
This dialog is used to specify cover sheets for external Query Reports as illustrated below.
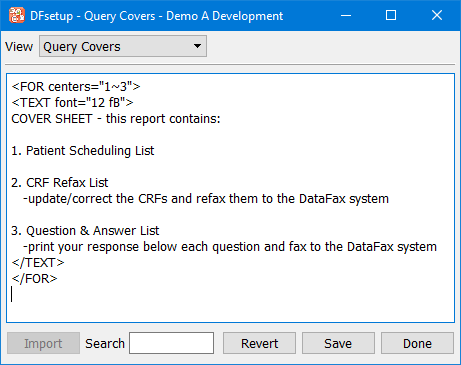
This example shows a simple cover sheet which will be used for external Query Reports created for sites 1-3.
The control buttons at the bottom of the window are the same for all study configuration dialogs. See General Dialog Controls for a description.
Each cover sheet begins with a <FOR center="#list"> [3] tag which identifies the site(s) that will receive the cover sheet and ends with a </FOR> tag. The site number list is a comma-separated list of numbers and ranges.
The body of each cover sheet is defined in a <TEXT> block, nested within the FOR block. Variable substitutions and font specifications may be performed as previously described for Query Titles. Aside from variable substitution, all other text appears exactly as formatted within the TEXT block. Blank lines used to double space text will be preserved. The default font for cover sheet text is 10 point constant width.
It is possible for some sites to receive cover sheets while others do not, and for different sites to receive different cover sheets. Different cover sheets are created for different sites by adding a <FOR> block for each cover sheet.
If a site number is included in the <FOR> block of more than one cover sheet the <TEXT> blocks are concatenated to form the Query Report cover sheet for that site.
Cover sheets can be modified at any time. The last set of specifications saved to the DFdiscover server will be used when external Query Reports are created by DF_QCreports.
The Query Messages dialog is used to add messages to external Query Report cover sheets for specified sites, as illustrated below.

This example includes 2 messages, one for sites 1 and 2, and another for sites 2 and 3.
Site 2 will receive both messages. Note the blank line at the end of the 1st message. This will separate the messages on the cover sheet.
The control buttons at the bottom of the window are the same for all study configuration dialogs. See General Dialog Controls for a description.
Query Messages have the same structure as Query Covers, consisting of a <TEXT> block nested within a <FOR> block, and support the same font and variable substitutions.
Any messages directed to a site are appended to the site's cover sheet. If no cover sheet has been defined for the site, the messages will be added to a blank cover sheet. If multiple cover sheets and multiple messages have been directed to the same site, the cover sheets are first concatenated followed by all of the messages, in the order in which they are defined in Query covers and Query Messages.
While messages could be added to the <TEXT> blocks defined within Query Covers, the use of a separate study configuration file for messages allows you to keep the static header in cover sheets separate from messages, whose content and relevance to different sites will likely change quite often during the course of the study.
[3] For backwards compatibility, center is still required in this context but the meaning of the value is the same as site.