Table of Contents
Users must be granted permission to access DFdiscover studies. A DFdiscover user account is created using the Users tab in DFadmin, and involves entering user contact information, preferences and study permissions. This account is required for both DFdiscover and DFexplore. In addition, a UNIX user account is required for DFdiscover, but not for DFexplore.
DFdiscover user accounts can be modified by any DFdiscover administrator or study administrator, but there are limitations.
-
Only a DFdiscover administrator can grant and revoke DFdiscover system and study administrative privileges for other users.
-
A study administrator can create and update study roles and DFdiscover user accounts, and can grant and revoke study roles to any user in the DFdiscover user database. Study administrators are restricted to performing these functions in their own studies.
To administer user permissions, two applications are available: the Users dialog described here and the command-line application Programmer Guide, DFuserdb.
Click the Users tab to display the Users view.
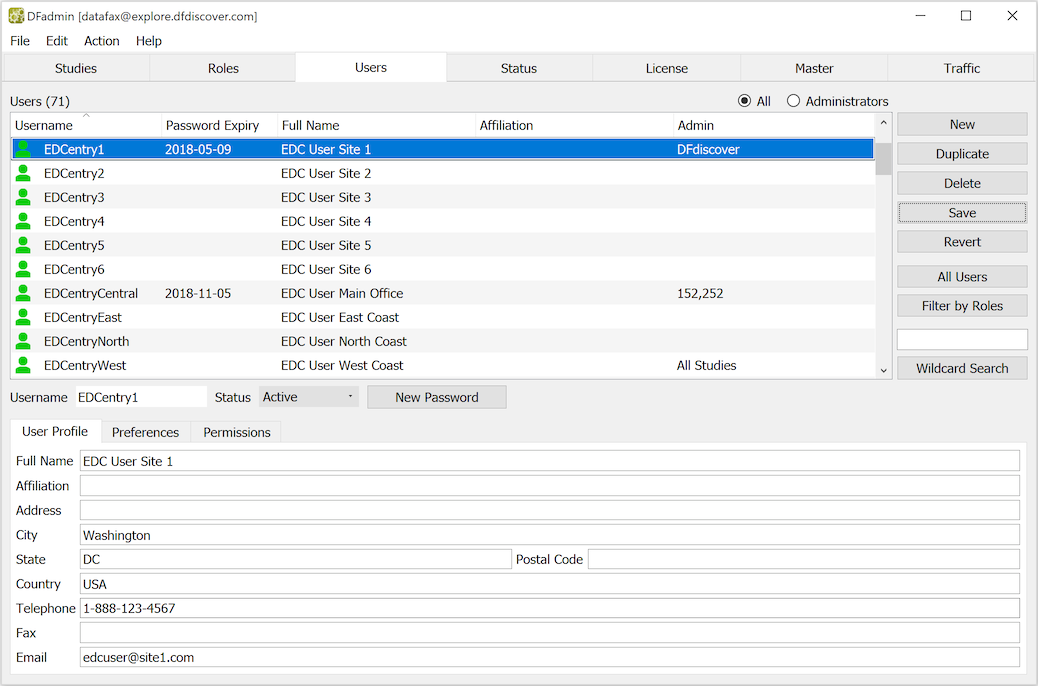
The Users list displays each user's: username, password expiry date, full name, affiliation and administrative privileges. DFdiscover administrators are shown as DFdiscover, study administrators are shown as All Studies or the list of study numbers they are allowed to administer. A blank password expiration date indicates that the user has not yet been assigned a password.
The following actions are available.
All |
Show all users currently defined in the DFdiscover users database. |
Administrators |
Show DFdiscover system and study administrators only. The Admin column shows 'DFdiscover' if the user is a DFdiscover administrator, 'All Studies' if the user has permission to administer all studies, and a list of DFdiscover studies if the user has permission to administer selected studies. |
New |
Add a new DFdiscover user account. |
Duplicate |
Add a new DFdiscover user with the same account details and permissions as an existing user. |
Delete |
Inactivate a DFdiscover user account and remove it from the list of displayed users. Once defined a user account is never actually deleted; thus users listed in study audit trails can always be identified. |
Save |
Save any changes made to current user account or user permissions. |
All Users |
Show users without applying any study role filtering. If 'All' choice is selected (from the All or Administrators choices), all DFdiscover users will appear in the list. Otherwise, only DFdiscover system and study administrators will be displayed. |
|
Select this option to filter the users list by study roles. | |
|
Select this option to display users that contain a specified text string in either the Login, Full Name or Affiliation fields. Wildcard matches are not case sensitive and include the following options:
Thus for example:
| |
Status |
must be set to Active to enable a user login, and may be set to Inactive at any time to disable it. The head icon appears as an empty outline if login is disabled. Inactivating a user login retains all user information, compared to 'Delete' which removes it. |
|
Select this button to generate a temporary password for the user to use on their initial (or next) login, at which time the user will be prompted to change the temporary password. The system-generated password conforms to the requirements specified under the Master tab. It can be modified by editing the password field, but the value must conform to the password rules.
When a new password is saved, the list of users is updated and the new password expiry date is displayed. | |
|
Enter user contact information. Only the Email address is required for proper DFdiscover operation. Without a valid email address, users will not be able to reset their own password using the the option in the DFexplore, DFsetup and DFsend login dialogs. [7] If the user is an administrator, their email address is also used as the sender identification when they perform certain actions, for example when they restrict a study. It is strongly recommended that an email address is required for each registered user. | |
|
Record the user's preferred language and contact method (fax or email). This information is not currently used by DFdiscover. | |
Permissions |
Define the roles a user is granted in different studies. A user must have at least one role in one study. |


Users are not able to access any DFdiscover applications until they have been registered as a DFdiscover user.
![[Note]](../../imagedata/note.png) | Usernames |
|---|---|
|
A DFdiscover username is a unique and permanent user identifier. Once created, a new user account is retained in the DFdiscover users database even if the user is deleted. While it is possible to reactivate a deleted user account and modify it for use by a different user, this is not recommended if the user account has been used to process data for any study, as it could result in confusion in the interpretation of audit trail reports. When adding a new user, chose the username carefully and make sure that it has been entered correctly before saving a new user account. |
-
Click .
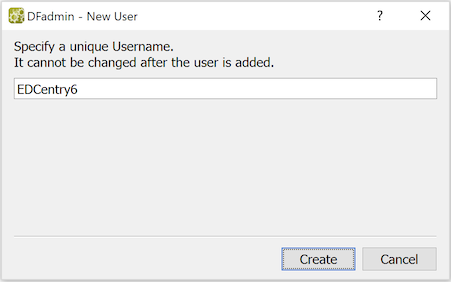
Enter the new user's unique username.
Users are uniquely identified by their username, which must consist of 16 characters maximum from the list: A-Z, a-z, 0-9, underscore. The first character of the username must be from the list: A-Z, a-z.
-
Click to add the user and exit the dialog.
If the username is associated with a deleted user account, a confirmation dialog opens asking if you wish to re-activate the deleted user account. Click to retrieve the deleted user account information including user contact info, preferences and permissions, all of which can then be modified as needed.

The previous section described the steps required to add a new user account from scratch. When creating a new user account that will have study roles and permissions identical or similar to an existing user, it may be easier to duplicate an existing user.
-
Select the user whose permissions will be duplicated.
Highlight the user in the Users list.
-
Click .
The Duplicate dialog appears. The dialog appearance is almost identical to the Add dialog,
-
Enter the new user's username.
Users are uniquely identified by their username, which must consist of 16 characters maximum from the list: A-Z, a-z, 0-9, underscore. The first character of the username must be from the list: A-Z, a-z.
-
Click to create the duplicate user.
The new user account is created, with data copied from the duplicated user, and the new username is displayed in the Users list. The new user account can then be modified as needed to correct contact information, preferences and permissions.
Deleting a DFdiscover user account changes the account status to deleted, but does not actually remove it from the DFdiscover users database. A user is locked when it is selected in DFdiscover and thus cannot be deleted if it is currently locked by another DFdiscover or study administrator.
-
Select the user to be deleted.
Highlight the user in the Users list.
-
Click
A confirmation dialog appears. Click to confirm the deletion, thereby deleting the user from the Users list and revoking all of their DFdiscover permissions, or click to cancel the delete action.
| Deleting an active user |
|---|---|
|
It is safe to delete a user who is currently logged in and working in a DFdiscover study. Users issuing commands from a terminal window will be affected on the very next command, but deleting a user will not have an immediate effect on users of DFdiscover applications, including DFexplore. User permissions are checked when an application is started. Thereafter, the permissions are not checked again until the application is re-started. An active user will be able to continue working until they exit the application. |
Filtering the user list is an easy way to find users who have specified roles for specified studies. It can also be used to find users who do not have specified roles.
-
Click .
The dialog lists all DFdiscover studies and the roles for each study. Individual study roles can be selected, or all roles for a study can be selected, using the check boxes beside study and role names. After selecting studies and study roles, use the toggle options at the top of the dialog to indicate whether you want to list users who have any of the selected roles, or conversely list users who have none of the selected roles. After performing an initial search, you can refine it by marking Search within users currently listed, from the last filter. If this box is not checked filtering is applied to all registered DFdiscover users.

-
Click to apply the filter.
Users who meet the filter specifications are listed in the Users list in the main window. After filtering users, click All Users to restore the complete list of registered DFdiscover users.
User permissions come from the roles they are assigned within each study. The creation of study roles is described in Chapter 7, DFadmin - Roles. This section describes how study roles are assigned to users.
Users can perform different roles at different clinical sites within the same study, and can perform different roles for different subjects within the same site, but a user cannot perform different roles for the same subject within the same study. [8]
A user who performs different roles at different sites within a study, will be limited to the database permissions associated with the role they perform at each site. For example, a user might be able to enter medical history data for all subjects at one site but only view it for all subjects at a different site. This role differentiation only affects database permissions (i.e. permission to view, create, modify and delete data and metadata). Users with multiple roles have access to the super set of DFexplore views, DFdiscover applications, DFdiscover reports and Study reports, derived from all of the roles they are assigned in one study. Thus these permissions can vary among studies but not within a study.
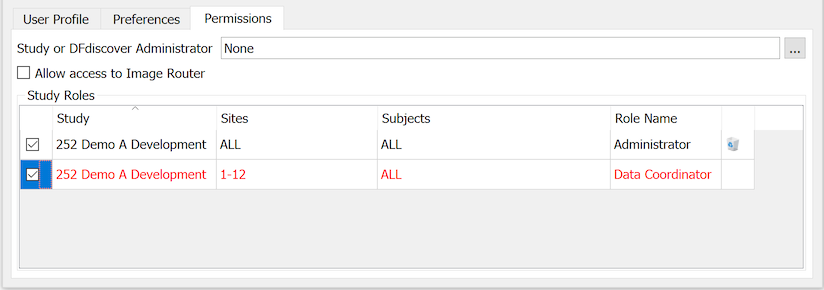
Permissions for DFdiscover studies are specified in the Permissions view.
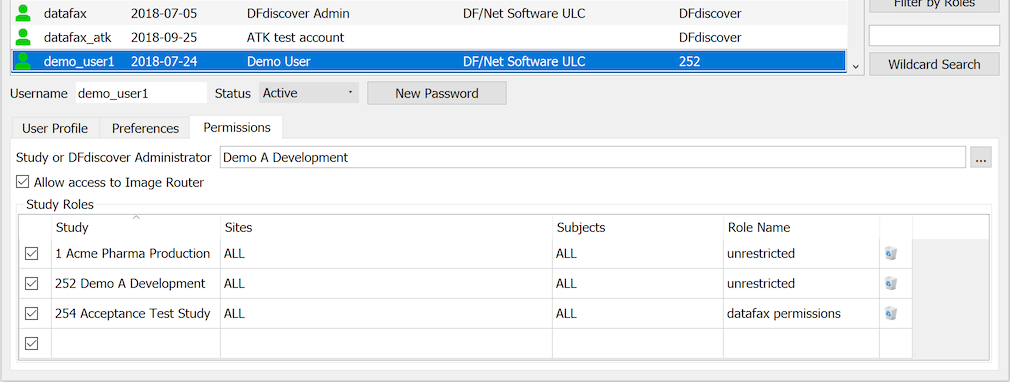
User permission specifications include the following elements:
Study or DFdiscover Administrator |
Only a select subset of users should be given this global privilege. Any user can be assigned DFdiscover or study administrative privileges. Click the button located at the right end of this widget. 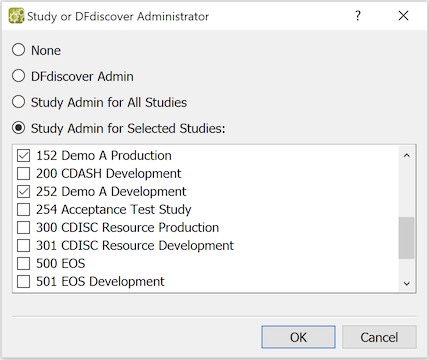 Choose the correct option ( None removes any previous admin permissions) and mark studies to include as needed. |
|
The Image Router displays document pages that could not be identified, and is used to route any CRF pages among them to the appropriate study database. Selecting this option gives the user permission to use this application. It is important that only coordinating site staff with an understanding of all studies have this permission. | |
Status |
Mark the checkbox at the left end of each row in the permission table to activate the permissions specified by the row when checked, and deactivate them when the box is not checked. This can be used to temporarily revoke permissions without deleting them from the table. |
Study |
Enter the study number or select the study from the study list. If a valid study number is entered, the field automatically displays the study name. The study must be specified before the other cells of the table are entered. |
Sites |
The sites, at which the user performs the role, are specified by entering ALL or * (indicating all sites), or a range of valid study sites. e.g. 1,5-8,98,99 |
Subjects |
The subjects, for which the user performs the role, are specified by entering ALL or * (indicating all subjects at the specified sites), or a range of valid subject IDs . e.g. 1001-1099,1301-1399 |
Role Name |
Yype the study role name or pick it from the list of study roles. Since roles are defined separately for each study, the study must be specified before a valid role can be entered. |
A row highlighted in red indicates one of the following errors:
-
An invalid entry in at least one of the cells in the row.
-
Conflicting study roles, indicating that different roles have been specified for some set of study subjects within one or more sites.
New study permissions are added as follows:
-
Select the first empty row in the permissions table.
-
Specify the Study.
-
Specify the Sites.
-
Specify the Subjects.
-
Specify the Role.
-
If none of the values appear in red the row will be accepted as valid, the delete (trash can) icon will appear at the right end of the row, and a new empty row will be added to the permissions table.
-
When all of the rows needed to specify the user's study permissions have been completed, select the DFadmin menu item > to save the current permissions. Changes made to user permissions are not saved until they are saved explicitly using > .
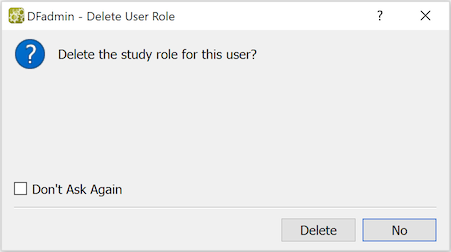
To delete a specific database permission specification (table row), click the corresponding delete icon (
 ). A confirmation dialog is displayed, warning you that the user permissions are affected by this modification to the role definition. Click to confirm and proceed with the deletion; otherwise, click to cancel the deletion.
Study permissions can be changed by clicking and overwriting a cell and then pressing Enter or Tab to verify that the value is valid. Rows highlighted in red indicate errors.
If a set of permissions containing errors is saved the rows containing errors are dropped if they were newly defined, or revert to their previous valid values if the error was introduced by a modification.
The DFdiscover client applications preserve settings for each user so that they can be retrieved and applied during subsequent login sessions. These settings include previous DFdiscover servers, proxy settings, main window sizes and positions, and the settings in application preference dialogs. User passwords are never included.
The settings are stored on the local computer in a unique location defined by the user login account. The settings are also separated by application and, where appropriate, by study.
Specifically, the settings are stored locally in these locations:
-
macOS and Linux:
$HOME/.config/$TOOLNAME_db/$TOOLNAME.db, where$HOMEis the login directory for the user. -
Windows:
%APPDATA%\$TOOLNAME_db\$TOOLNAME.db, where%APPDATA%is generally theAppData\Roamingsub-folder of the user's login directory.
$TOOLNAME is one of
DFexplore,
DFsend,
DFATK,
DFadmin or
DFsetup.
Generally speaking, users do not know, or need to know, that these settings files exist.
It is possible to streamline or standardize the settings for multiple users by creating one or more session setting files and then sharing those files with (new) users. This will give them the advantage of having certain settings pre-configured and standardized.
It is possible to share the settings file between the three supported operating systems. So it is possible to define the settings with an application on macOS and share that same file with users on macOS, Windows and Linux.
The file to be shared must match the
$TOOLNAME. It is not possible to create a settings file for one application and share it for another application - this will certainly cause problems and/or unexpected behavior.
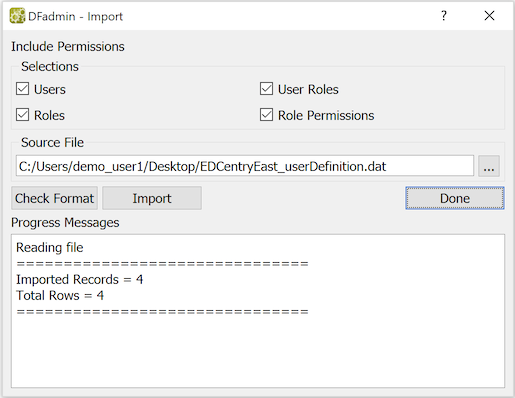
Study roles, permissions, role assignments to users, and user contact information can be imported from an ASCII file. Import will overwrite any matching specifications that already exist. The import dialog includes options for selecting the type of records to be imported (i.e. Users, User Roles, Roles and Role Permissions) from the import file. The import file must be formatted as described in
Table 14.20, “DFuserdb.log”, excluding the Record Time Stamp and Modifier fields.
Importing Users, Roles and Permissions
-
Select >
-
In the Selections section of the dialog select the types of data you wish to import.
-
Specify the Source File name or pick a file using the file selection button.
-
Click
Any invalid entries will be displayed. will be enabled only if there are no invalid records.
-
Click . Progress and errors messages are displayed while importing.
-
Click to close the Import dialog.
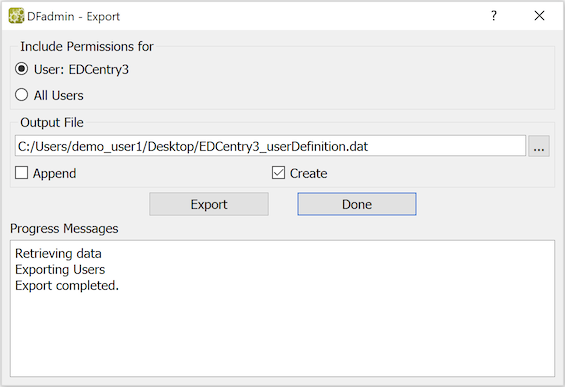
All user account information, including study permissions, can be exported to an ASCII file, with the output format described in
Table 14.20, “DFuserdb.log”.
Exporting Users
-
Optionally, highlight the user to be exported (if export is to be limited to a single user).
-
Select > .
-
In the dialog, select the current user or all users.
-
Enter an Output File name or pick the file using the file selection button.
-
Choose Append to write the exported data to the end of file, or Create to overwrite the file with the exported data.
-
Click . Progress and errors messages are displayed while exporting.
-
Click to close the Export dialog.