Table of Contents
- 9.1. Introduction
- 9.2. User Preferences
- 9.3. Navigation
- 9.4. Working on a Task
- 9.5. Selecting Data Fields
- 9.6. Searching Data Records
- 9.7. Functions
- 9.8. Saving Defined Views
- 9.9. Exporting Data Records
- 9.10. Exporting a Data Retrieval File
- 9.11. Exporting SAS Data Sets
- 9.12. Importing Data Records
- 9.13. Metadata - Queries, Reasons, Query Reports and Missed Records
- 9.14. List View Menus
List View is a read-only, spreadsheet-like presentation of study data. List View provides functionality to export data in various formats including Excel. List View also provides two ways of looking at your data - by Plates & Metadata or by Modules. List View is the only view that presents data in a module-based view.
As in all other views, what you see and what you can do depends on your user role and permissions for the current study.
Plates & Metadata. In Data View only one data record is displayed at a time. In List View all data records for a selected plate can be displayed at once. Each row is a data record and each column is a data field. This view is useful for comparing data records, searching for particular values, or scanning for data problems. Outlier values can be identified by sorting the spreadsheet on any column - click the field name at the top of a column to sort.
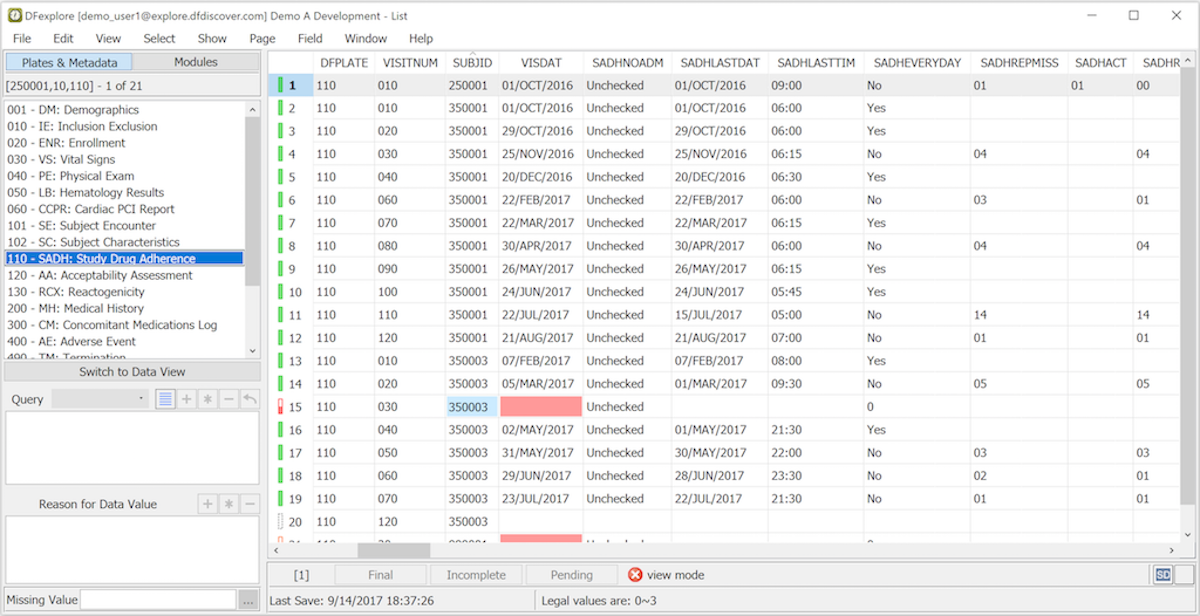
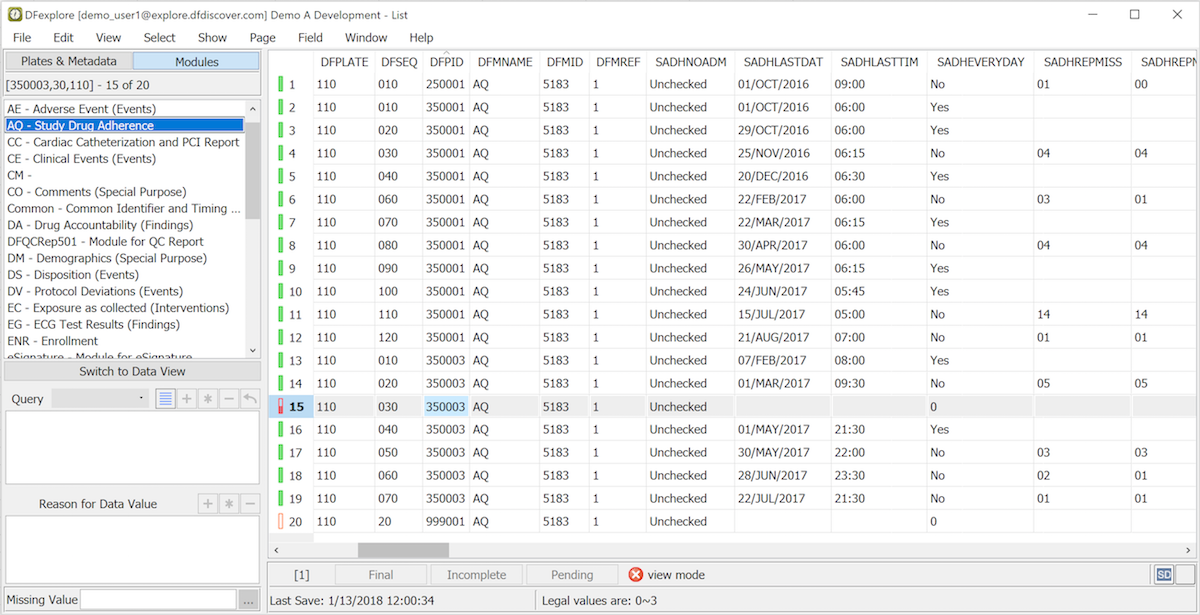
Modules. In Module List View, all data associated with a module is displayed in a single spreadsheet view. Key information is provided in the first six columns followed by three module reference fields, then the user-defined data fields within the module. If there are fields that are not referenced on a particular plate, the unreferenced field cells are shown in grey. Modules that have not been used on any plate are ignored.
As in Data View, the cells in the spreadsheet can be color-coded to identify: illegal values (red), rejected reasons and outstanding queries (blue), pending reasons and query replies (orange) and approved reasons and query replies (green). Queries, reason and missing value code are displayed in the metadata panels when a cell is selected that has these attributes, and any images associated with a data record can be reviewed when a record with images is selected.
List View does not support data editing. Double-clicking any cell in the table switches to that data field in Data View where edits can be made (and saved). Clicking in Data View takes you back to the original cell in List View. Any changes that are made to the data record, or to its queries and reasons, while in Data View are displayed when you return to that record in List View.
All data records are retrieved from the DFdiscover server when you select a new page in List View, so the spreadsheet is up-to-date each time you select a new page. Also, DFexplore retrieves the current version of each data record when you select it in the spreadsheet, again the record is up-to-date at that instant. However, changes made since the records were retrieved, arising from other users or batch edit checks, are not automatically displayed; some or all rows in the table may become out of date while you are viewing them. As needed, update all records in List View at any time using > .
The List View section of the Preferences dialog, available from > can be used to customize the appearance of List View. Preferences can be used to enable/disable field color-coding and text expansion, determine whether field codes or code labels are displayed, select column labels (field Name, field Alias and prepend with field number), and select the display format for date fields. All selections made in the preferences dialog are study specific and are retained across DFexplore sessions.
To display the data records stored in the study database for a particular CRF page or module, select it from the list in the left panel. Within the data table you can select any cell with a mouse click, use the left/right keys to move across the fields in a data record, and use the up/down keys to move across data records.
The default record sort order is ascending by subject ID and within subject ascending by visit number. The rows of the data table can be sorted on any column by clicking the column label. Each click toggles the sort order between ascending and descending. Use shift-click to sort on a second column, in the current sort order within the currently sorted column.
The keys (subject ID, visit, page) of the current record and the number of data records in the table are always visible in the upper-left corner. The workflow level at which the current record was last saved appears along with the date and time at the bottom. If a Help message has been defined for the current data field it is shown in the help message window, also at the bottom.
If a set of task records was assembled in Data View it remains in effect on switching to List View; only those CRF pages or modules and data records that met the task criteria are displayed. To see all CRF plates in the page list and all data records in the data table select > and > respectively. To see all modules and all data records, select > .
This does not cancel the task set.
Task records can still be identified by the T icon
that appears on each task record in the data table.
To cancel a task and see all data records choose > in List View or Data View.
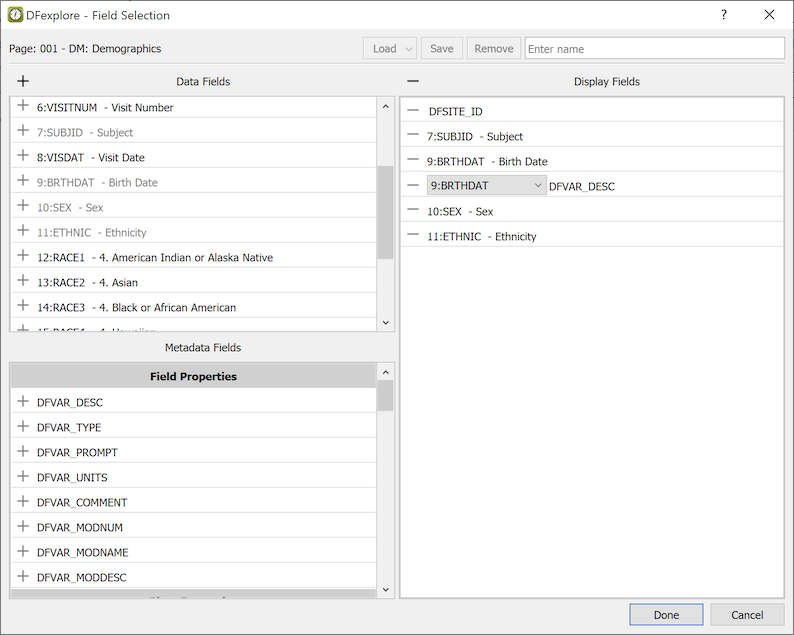
To select a subset of the data fields, or to include metadata fields, on the current plate or module, select > . The field selection dialog has 3 main sections:
Display Fields. The fields that have been selected for display in List View and/or for export.
Data Fields. Fields from the current plate or module.
Metadata Fields. Metadata from the set of fields, module, plate, page, visit, image, site, subject and study properties.
Fields can be selected for inclusion by clicking the plus icon
(  )
beside each field or by using drag and drop to add
them to the Display Fields list.
Click the plus icon at the top of the Data Fields list
to select all fields of the selected plate or module,
in their default order.
Fields can be reordered using drag and drop within the Display Fields list.
)
beside each field or by using drag and drop to add
them to the Display Fields list.
Click the plus icon at the top of the Data Fields list
to select all fields of the selected plate or module,
in their default order.
Fields can be reordered using drag and drop within the Display Fields list.
Once added, individual fields can be removed from the Display Fields
list by clicking the minus icon
(  )
beside each field.
All fields can be removed from the Display Fields list by clicking
the minus icon at the top of the Display Fields list.
)
beside each field.
All fields can be removed from the Display Fields list by clicking
the minus icon at the top of the Display Fields list.
In addition to plate or module List view data, study metadata can be included. Metadata available for the selected plate or module is displayed in the Metadata Fields list. Metadata fields are grouped into categories: Field Properties, Module Properties, Plate Properties, Page Properties, Visit Properties, Image Properties, Site Properties, and Study Properties.
Metadata fields can be selected using the plus sign beside each field or using drag and drop to add them to the Display Fields list. Once added, metadata fields can be removed from the Display Fields list using the minus icon beside each field. Fields can be reordered using drag and drop within the Display Fields list.
Several metadata keywords, DFVAR_DESC through DFVAR_COMMENT, as well as any custom properties at the field level, or at the module level when a plate is selected, are properties of each data field. Use the field drop-down list to further indicate for which field the property is requested. In the example, metadata DFVAR_DESC (the field description) is selected for the field BRTHDAT.
Custom properties at the study, plate, module, and variable level are included with other study metadata where values have been defined for the selected plate or module. Futher details on custom properties can be found in Study Setup User Guide, Custom Properties. The complete list of metadata fields and their meaning can be found in Programmer Guide, Including Metadata in Output.
The Search dialog, available from , can be used to find records within the current plate or module that meet specified criteria. If the Filter option is selected the record list is reduced to those records that meet the search criteria when selecting at the bottom of the dialog, otherwise this button is replaced by a button, and the focus simply traverses those fields that meet the search criteria each time the button is pressed.
Clicking next to the Subject ID field opens another dialog for Selecting Subjects based on Criteria, which implements subject selection based on multiple criteria across multiple plates.
The Search dialog can also be used to add data records from the current plate or module into a Task set. After entering the record selection criteria, click to display a task confirmation dialog (for Mode and Edit checks options) after which the selected records are flagged with the task icon to show that they belong to a new task set. becomes active and can be used, after entering a new set of record selection criteria, to add more records to the current task set. This can be repeated as necessary to build a task set.
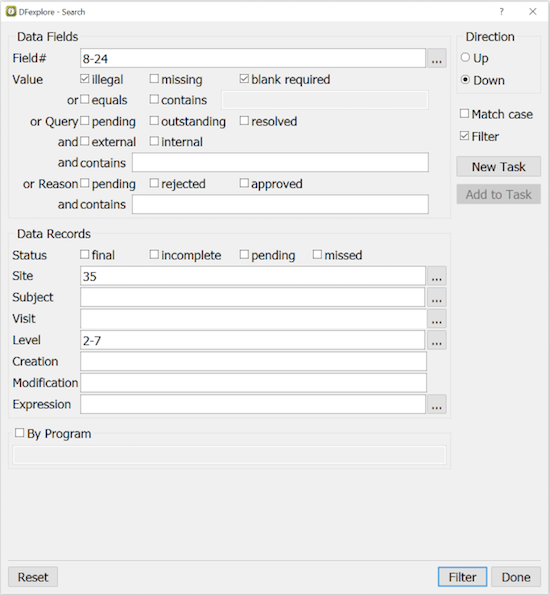
In this example, the current record list is filtered to show only those records for which: fields 8-24 are illegal or blank but required, site is 35 and workflow level is 2-7.
After specifying the search criteria, click to start the search. A dialog appears showing the number of records that meet the search criteria and asking for confirmation before filtering the record list to display only these records.
To be selected records must meet one or more of the criteria specified in the Data Fields section and all of the criteria specified in the Data Records section.
To undo a Filter and display all data records for the current plate or module, select > . To undo a Task and remove the 't' icon from all records select > .
The Search dialog includes an expression editor that can be used to create simple algebraic statements describing the desired data records. Expressions can be entered directly in the text widget or by clicking the Fields, Symbols, Codes and Functions in the appropriate order.
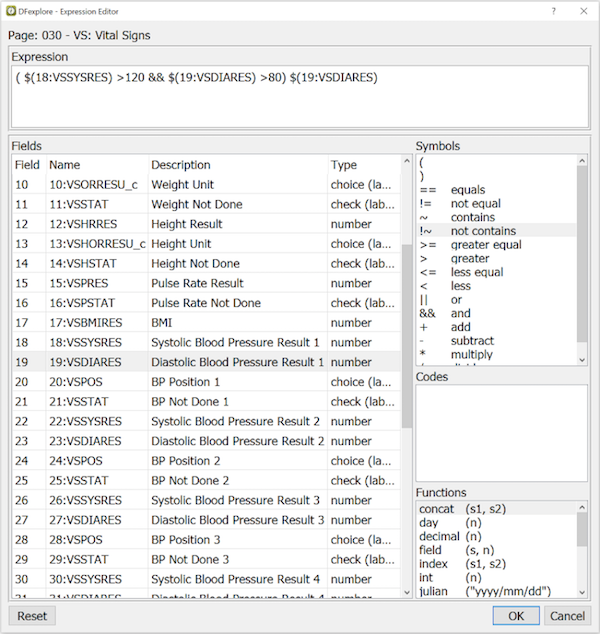
This example selects subjects with a first systolic blood pressure reading above 120 and a first diastolic blood pressure above 80. Click to add this expression to the Search dialog.
![[Note]](../../imagedata/note.png) | Numeric Codes and Code Labels |
|---|---|
|
Expressions must be created using code labels, when labels are being displayed in List View. If numeric codes are being displayed, expressions must test for codes, not labels. |
Several functions are available for use in constructing expressions.
concat(s1,s2) | Test the concatenation of 2 strings. e.g. to find records where the concatenation of 2 fields named 'Mtype' and 'Mnum' combined to give the value 'A1234': concat($(Mtype),$(Mnum)) == "A1234"
|
day(n) | Test for a day of the month in a date, e.g. to find records where 'Screen 1 Date' occurred on or after the 15th of any month: day($(S1DATE)) >= 15
|
decimal(n) | Test the decimal component of a number, e.g. to find records where weight is not a whole number: decimal($(WEIGHT)) > 0
|
field(s,n) | Test a specified word in a string, e.g. to find records where the 2nd word in a drug name is "ACID": field($(DRUGNAME),2) == "ACID"
|
index(s1,s2) | Find the character position in string s1 where string s2 first occurs. e.g. in the following statement local variable 'X' is set to 3: number X = index("A56GH9","6GH") ;
|
int(n) | Test the integer value (truncated) of a field. e.g. to find a subject's current age in years at visit date 'VDATE' using the subject's birth date stored in field 'BDATE': number age = int((VDATE-BDATE)/365.25) ;
|
julian("yyyy/mm/dd") | Determine the julian equivalent to a date, e.g. to find records where 'Screen 1 Date' occurred after Nov.15,2017: $(S1DATE) > julian("2017/11/15")
|
length(s) | Test field length, e.g. to find initials shorter than 3 characters length($(PINIT)) < 3
|
month(n) | Test for a month in a date, e.g. to find records created in June of any year: month($(DFCREATE)) == 6
|
substr(s1,n1,n2) | Test a sub-string of a specified field, e.g. to find records where the middle subject initial is "X": substr($(PINIT),2,1) == "X"
|
time("hh:mm:ss") | Convert string representation of a time to a time value, e.g. to find records created after 6pm: time($(DFCREATE)) > time("18:00:00")
|
today() | Test against today's date, e.g. to find records created today: julian($(DFCREATE)) == today()
|
tolower(s) | Convert a string to lowercase, e.g. to find records containing "inuit" in the Race Other field, ignoring case: tolower($(RACEOTH) == "inuit"
|
toupper(s) | Convert a string to uppercase, e.g. to find records containing "INUIT" in the Race Other field, ignoring case: toupper($(RACEOTH) == "INUIT"
|
year(n) | Test for a year in a date, e.g. to find records modified in 2017: year($(DFMODIFY)) == 2017
|
If the expression builder does not have the capabilities you require, searching
can also be performed using a custom program specified in the last option
at the bottom of the Search dialog. Custom programs must be stored in the study ecbin
directory and must generate a data retrieval file as output.
DFdiscover includes 2 standard programs,
and
(described in Section A.5, “Selecting Subjects based on Criteria”),
which can also be used for this purpose.
When searching 'By Program' the Filter option must be enabled. When is clicked the record list is reduced to show only those records identified by the program. If in addition to the 'By Program' option the 'Expression' builder or any of the other options in the 'Data Records' section are used, records are selected only if they meet all of criteria specified by all of these options. If any of the 'Data Fields' options are used the set of records selected is further reduced to include only those records that meet at least one of the field level criteria.
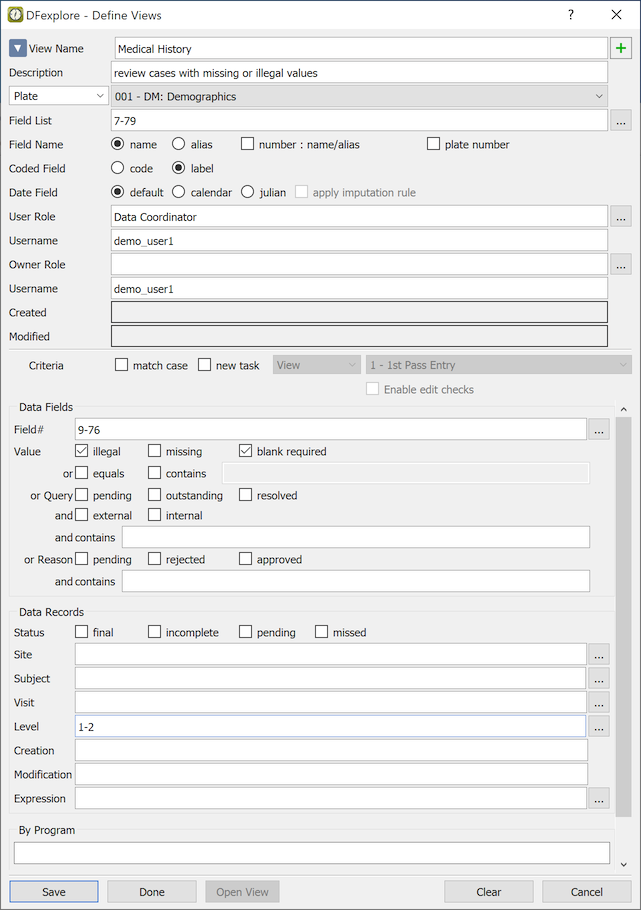
List views consisting of specified data fields, field order and record selection criteria can be defined for use by specified users and/or roles using > to display the Define Views dialog. List views can also be accessed via the list action buttons available at the bottom of the , or panels.

The actions, in left-to-right order, are define, edit, and delete a view.
The steps to define a view are:
Click
 ,
click New View and then enter a name and description.
,
click New View and then enter a name and description.
Select the plate or module and data fields, in the desired order. If no fields are specified all fields in plate or module order are used.
Select list view options. These override your Preference settings for List View when the view is selected.
Specify the roles and usernames to identify those who can use the view and those who own and can change it.
Specify the record selection criteria. If none are specified all data records for the plate or module are retrieved when the task is selected.
Click next to the Subject ID field to open another dialog for Selecting Subjects based on Criteria, which implements subject selection based on multiple criteria across multiple plates.
To form a new task set from the imported records, choose one of the Create a new task set containing ... options, and specify the task Mode, Save Level and whether to Enable Edit checks if you switch to Data View to review or modify a data record. If a new task is created, any previous task is canceled when the view is selected.
| Note |
|---|---|
This dialog is available to users who have 'List - create Views' permission and can only be used by one person at a time. |
Once views have been defined, users can select a view by clicking or using > . This displays a dialog showing the predefined view names and descriptions. The current view, if any, is canceled when a new view is selected.
If no records meet the selection criteria for a selected view, the dialog reports that no records were found, the view is canceled, and the spreadsheet returns to its base state, showing all data fields and data records. The current view can be canceled at any time to return to the base state by selecting > .
Canceling the current view does not cancel the current task set (if any). The spreadsheet returns to the base state showing all data fields and data records but any task records remain flagged. Clearing the current task set is a separate operation which is performed using > .
If you have permission to save data, the records currently displayed in List View can be written to a local file by selecting > .
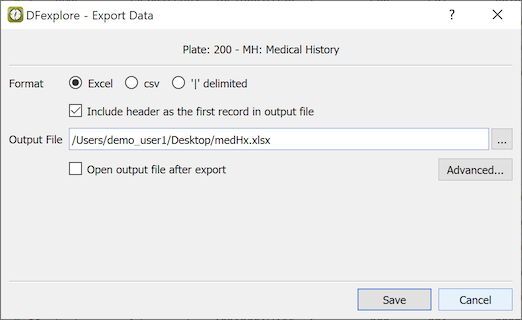
To export the data records displayed in the current List View specify:
a field delimiter, or Excel format,
if field names should be included as column names in the first output row, and
an output file location.
Any data fields that have been hidden using > are not exported. The message Warning: Data will be saved with reduced fields appears at the bottom of the dialog when this is the case.
A Data Retrieval File (DRF) containing the key fields of the records currently displayed in List View can be written to a file on your local disk by selecting > and using the dialog.

On entering an output directory/folder and pressing Return any existing DRFs in that location are listed.
Output can be written to a new DRF or an existing DRF can be selected and overwritten.
To export the records displayed in List View to a DRF specify:
an output file
a short descriptive label for the DRF
a comment for record level DFexplore help
whether output overwrites or appends to the output file
An existing DRF can be selected and deleted using .
Users with permission can create and export data sets in SAS format to a file location on their local disk by selecting > and using the dialog.
For instructions on creating and running DFsas jobs, refer to Programmer Guide, DFsas: DFdiscover to SAS.
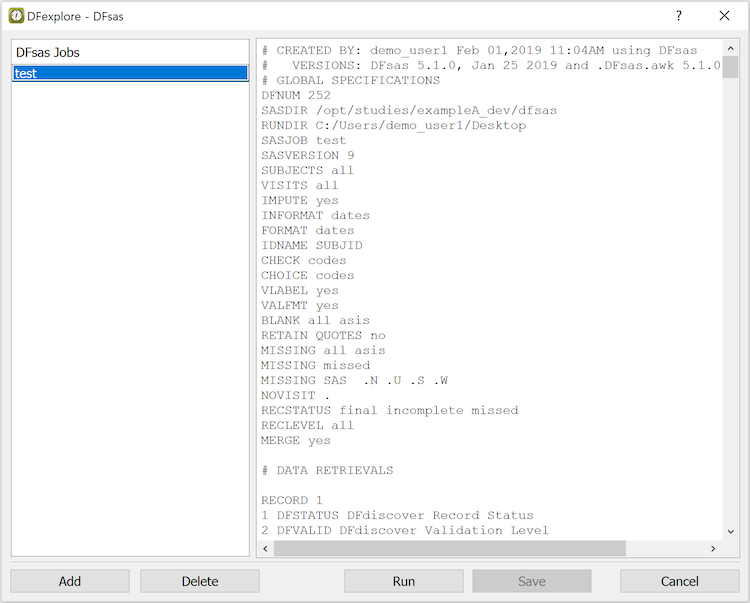
DFexplore works with DFsas job files located in the study dfsas directory on the DFdiscover study server. All existing DFsas job files are listed when the DFsas window is opened and the list is updated if any new jobs are added.
Selecting a job file loads it into the text window where it can be edited and saved back to the study server.
Selecting Run executes DFsas for the current job, which creates SAS job and data files and returns them to the local computer in a .zip file which is stored in the specified RUNDIR.
New DFsas job files can be created by clicking and using the dialog. The new job file appears in the text window and can be edited (as described in Programmer Guide, DFsas: DFdiscover to SAS) to create the desired DFsas job file.
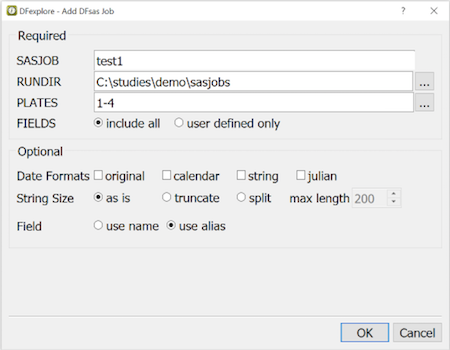
The following can be specified when adding a DFsas job:
SASJOB: new DFsas job file name
RUNDIR: location on the local computer where SAS job and data files are stored.
PLATES and FIELDS: a DFsas job file can include some or all data fields on some or all study plates
Date Formats: optional, see below
String Size: long text can be truncated or split into multiple fields
Field: use name (default) or use alias when there are repeating modules and where field aliases are unique accross the study.
If no plates are specified or 'ALL' is specified, all user defined plates in the range 1-500 plus DFdiscover plates 510 (reasons) and 511 (queries) are included in the DFsas job.
If no date format options are specified, dates are exported using the format and imputation specifications in the study setup. Alternatively, one or more of the following specifications can be selected:
original - turns off imputation, outputs the value exactly as stored in the study database, and creates a date informat for SAS.
calendar - performs imputation as specified in the study setup, converts 2 digit years to 4 digit years, and creates a date informat for SAS.
string - turns off imputation, outputs the value exactly as stored in the study database, and creates a character informat for SAS.
julian - performs imputation as specified in the study setup, converts the date to a julian number, and does not create an informat statement as SAS does not need one for numbers.
Date imputation can be turned off for all dates, regardless of study setup specifications and regardless of which date formats are selected, by specifying 'IMPUTE no' in the global statements.
After saving a DFsas job file it can be executed at any time by selecting Run. A confirmation dialog appears with one option: Force DFsas to include all specified plates. Select this option if you want to include all of the plates specified in the DFsas job file, even if they do not currently contain any data records. If this option is not selected, a SAS data statement is only created for plates with data records.
After confirming that you wish to execute the selected DFsas job, DFdiscover runs DFsas on the study server and returns a .zip file, containing a SAS job file and a data file for each plate, to the specified RUNDIR on your local computer.
Data from labs and other sources can be imported to a DFdiscover plate by selecting > in List View and following the steps listed below. Permission to use this feature must be granted in your study role.
Each imported data record may either create a new data record in the study database or replace an existing data record, having the same keys (ID, visit, plate). If a replacement record is imported all of the data fields on that record are replaced; it is not possible to replace only some fields while leaving others unchanged. If a replacement record is imported with status=7(delete) the database record is deleted.
Import options may be set to add the reason 'Set by DFexplore Import' to any field that is changed, and to add automatic queries for missing and illegal values. All imported data records, plus any reasons and queries generated during import, are logged in the study audit trail by date, time and the username performing the import.
-
Select the Input Data File
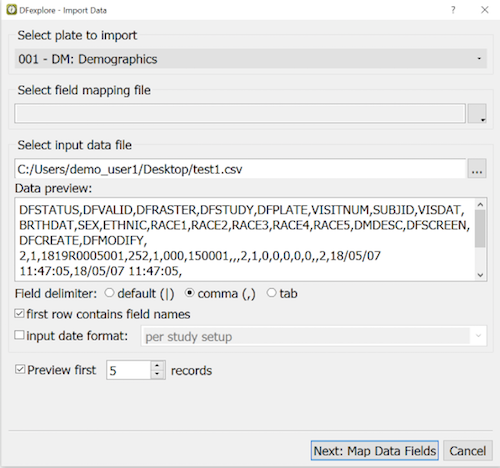
Select the import destination, i.e. the database plate.
If imports from the same source recur, the mapping of input fields to study database fields can be saved to a mapping file and reused.
When the input data file is selected the first 3 records are displayed in a preview window.
The input field delimiter must be one of: '|', comma or tab.
Having field names in the first input row is useful as an aid to field mapping, but it is not necessary.
If the date format used in the input data records differs from the format used in the study plate, choose the input date format to convert dates to the format used in the plate.
If the input file is very large, specifying a small number of records to preview allows you to quickly verify that the mapping and data appear correct before loading all of the input data records.
Click .
-
Map Data Fields
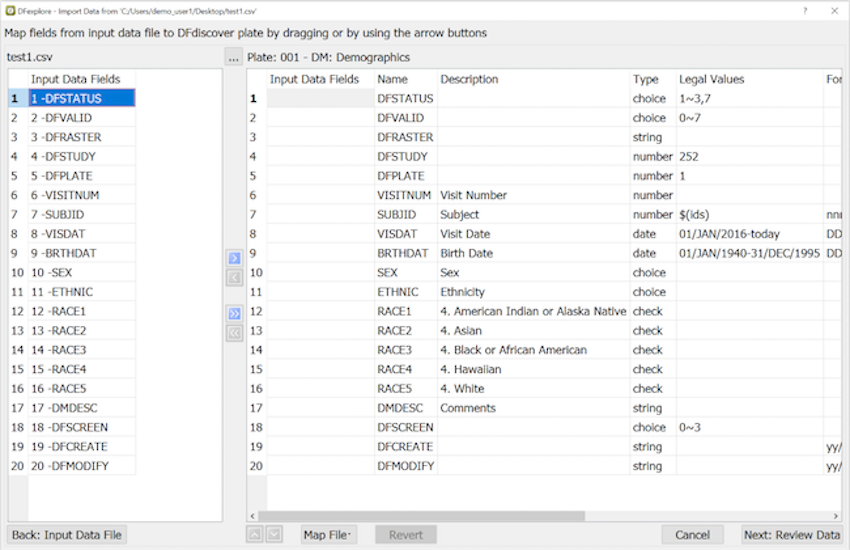
To specify the mapping of input fields to database fields simply drag fields from the left panel to the right panel beside the corresponding Generic Name for the field in the study database, or use the buttons to move the current input field in the left panel to the next available slot after the current input field in the right panel. For example, clicking the right arrow button in the above dialog moves input field '1 -DFSTATUS' to Plate 001 field 1 DFSTATUS.
The double arrows move all fields to the right panel, or back to the left panel, and can be used when all fields in the input records exactly match fields in the destination plate.
Once moved to the right panel, input data fields can be matched with the correct generic name by dragging them with the mouse or by using the up and down arrow buttons.
If the input file contains fields that are not included in the plate they can be omitted. It is not necessary to match and import all fields from the input records.
If the plate contains fields that are not included in the input file a value can be specified under Value if not mapped, otherwise the field is blank in all imported data records. If the word
todayis specified for an un-mapped date field the current server date is inserted when the data records are imported.The only field that is required in the input file is the subject ID. The visit key field can be specified in the Value if not mapped column, as can any other field that you want to set to the same fixed value for all input records.
Database records for a specified plate and visit can be deleted by importing a file that contains only the subject ID, and then specifying the relevant visit number and setting status=7 in the Value if not mapped column. No other fixed values are required.
Plate fields
DFRASTER,DFSTUDYandDFPLATEare set automatically and need not be mapped, but if they are then DFRASTER is treated as a key field which must match an existing record when importing replacement records in 'Replace' mode, and must equal0000/0000000when importing new records in New mode.The time stamps,
DFCREATEandDFMODIFY, cannot be mapped. They are completed by the server when records are imported.During mapping click to review the current mapping of data records, and to return to the mapping dialog.
If other data files with the current mapping are imported in the future, the mapping can be saved to a file using > .
If you forgot to specify a saved mapping file in the previous dialog it can also be selected in the mapping dialog using > .
Click to undo the current mapping and start over, or to abort the data import action.
When mapping is complete, click .
-
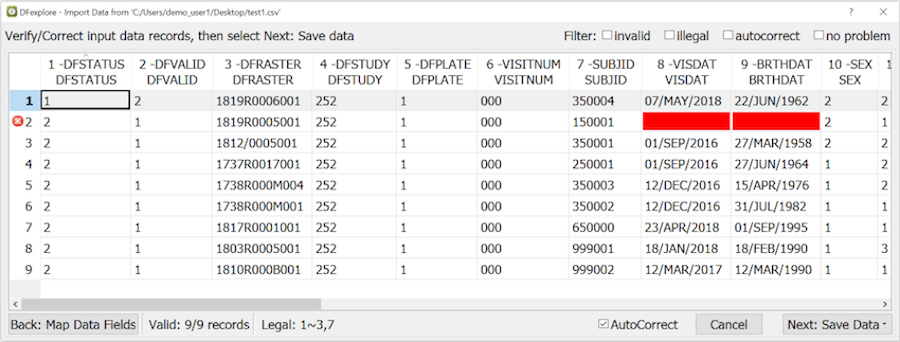
Review Input Data Records
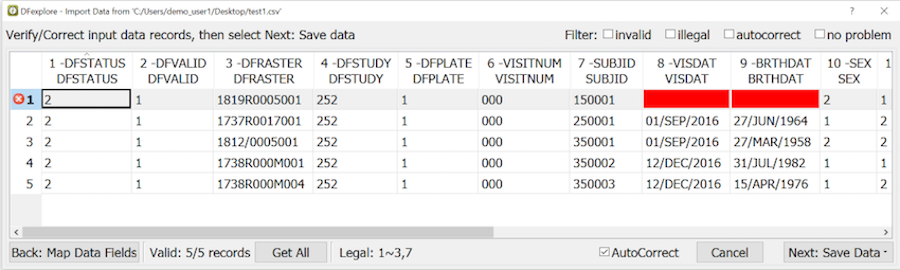
The spreadsheet previews a subset of the data records. Scroll left and right to verify that all fields have been mapped correctly.
Click to load all remaining input records - specifically 5 as illustrated in the example.
Problem fields are identified by color: magenta for invalid values which prevent the record from being imported, yellow for values which are auto corrected on import, and red for illegal values, which are imported as is.
Check AutoCorrect to reveal how the yellow fields will be corrected.
Corrections can also be made by editing the values in the spreadsheet.
The data records can be filtered using the check boxes to display any combination of records with invalid, illegal and autocorrect values, or records with no problems at all.
-
Auto corrections that change the input value include:
Strings longer than the field store length are truncated
Numbers are truncated to the number of decimal places in the field format
Numbers greater than the field store length are imported as blank fields
Undefined codes in choice and check are imported as the field's blank value code
Invalid dates are imported as blank fields
Auto corrections that merely change the format of the input value include:
String and date mapping is applied if specified in the field setup
Leading zeros are added where required by the field format
Leading zeros are removed where not required by the field format
Leading '+' signs are removed from unsigned fields
Input date format is converted to database format if specified in step 1
-
Save Data Records
After the action, click for a file selection dialog. Alternatively, click to present the Import Records to DFdiscover Database dialog.
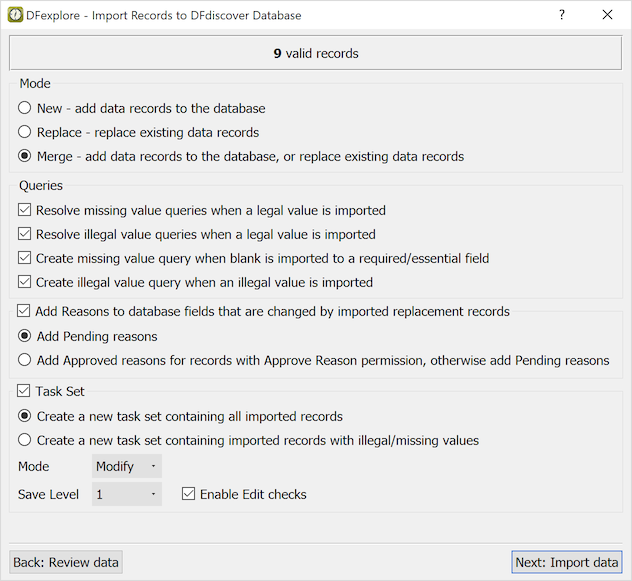
Choose Mode.
New: all input records have keys (ID,visit,plate) that do not already exist in the study database. Only new records are imported; any replacement records are rejected.
Replace: all input records have keys (ID,visit,plate) that already exist in the study database. Only replacement records are imported; any new records are rejected.
Merge: the input contains both new and replacement records. All are imported.
In the Queries section, it is recommended to resolve missing and illegal value queries if a legal value is imported, otherwise the queries do not correspond to the corrected values and will likely confuse users. None of the other query categories can be logically auto corrected in this way and thus remain unchanged.
Queries can also be created automatically during import to flag missing and illegal values. If these options are selected existing queries are not modified or replaced, new queries are only created for fields that do not already have a query.
Mark Add Reasons to database fields that are changed by imported replacement records to automatically add a standard reason,
Set by DFexplore Import, to database fields that are changed when a replacement record is imported. Reason status can be set toPendingorApproved. To setApprovedstatus, the user must have permission to approve reasons on the records being imported. If this is not the case reasons are created with thePendingstatus. Reasons that are created during import replace any existing reasons on the fields that are changed. The previous reasons are available in the audit trail, for example by selecting > .Mark Task Set to create a task that allows review of the imported data records when import is complete. The task set can contain all imported records or only those with illegal / missing values. This will be useful to review any queries generated during import. The task set must also include settings for Mode, Save Level and Enable Edit checks.
Click .
-
Confirm Import Data
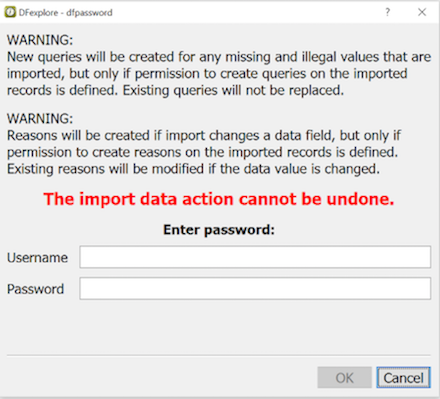
If the options to create queries and reasons were enabled in the previous dialog, two warnings will appear, as a reminder of the implication of those settings.
To start data import, enter user credentials for the study in the Username and Password fields. Click to proceed, or to return to the previous dialog.
-
Review Results
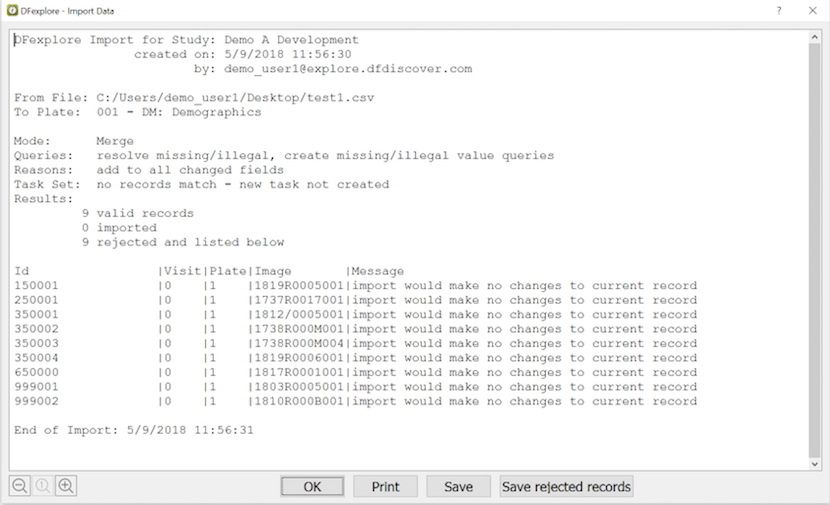
The Import Data dialog appears when the import is complete, with a summary of the import specifications and results.
If any records are rejected, they are displayed in this dialog along with the reason they are rejected. Click to save these records so that the problem(s) can be resolved and the import can be re-attempted.
We recommend keeping a record of all data imports by printing or saving this report. While the audit trail shows any new records and data changes made during import by: date, time and the username who performed the import, it does not distinguish between data entered and saved in Data View and records that were imported in List View.
Input data records may be rejected for the following reasons:
The database record is currently locked by another user
Mode=Replace but the record does not exist in the study database
Mode=Replace/Merge and input keys match a database record but
DFRASTERdiffers from the current database valueMode=Replace/Merge and input keys match a database record but input record is identical to the database record
Mode=New but the record already exists in the study database
Mode=New but
DFRASTERis mapped and is not equal to 0000/0000000User does not have the permissions needed to import the record
In addition to displaying subject data records List View also displays queries, reasons, returned Query Reports and records that have been classified as 'missed'. Users who have permission to see a data record automatically have permission to see queries and reasons attached to fields on that record. Permissions for Query Reports must be granted explicitly through plate 501, otherwise Query Reports do not appear in List View. Missed data records follow the same permissions as regular data records.
Changes can only be made in Data View. Double-clicking anywhere on a metadata record in List View switches the view to Data View with the focus on the field that was double-clicked. Click in Data View returns you to the field that was double-clicked in List View.
For roles without "Show Hidden Fields" permissions and fields with Hidden/Masked property, no query or reason is displayed in List View.
Queries can be searched using > . This dialog shows the number of queries that meet all of the current search criteria. The next to the Subject ID field opens another dialog for Selecting Subjects based on Criteria which implements subject selection based on multiple criteria across multiple plates. After entering new criteria click to update the counts.
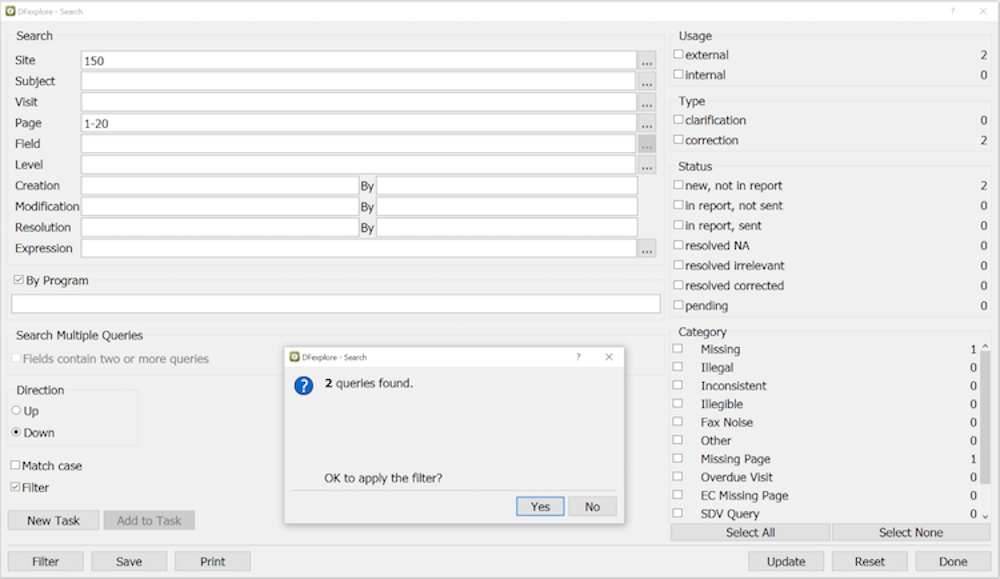
In this example 2 queries match all of the specified criteria.
Click or to output the criteria and counts shown in this dialog.
Click to select these 2 queries and remove all others from the current list view.
Click to put the data records with these queries into a new task set.
After clicking , new criteria can be specified to narrow the search further within the previously filtered set.
Records matching new search criteria can be added to a current task list by clicking .
If you submit Query Reports to the sites they may respond by writing directly on a printed copy of a report and submitting it back to DFdiscover. Returned Query Reports are not subject CRFs and thus are not displayed in a subject binder. They can however be processed in Image View, just like data records, and saved in the study database with key fields: ID equal to the Query Report number (composed of the site number and Query Report creation date), and Sequence equal to the Query Report page number. Any Query Reports that have been saved in this way can be reviewed in List View.
If you have permission to modify returned Query Reports you are able to correct
any errors that might have been made when the key fields were entered.
To make corrections, select > to set mode to anything
except View, and then select
> to
display the Change Keys dialog.
Like subject data records, Query Report pages can be filtered using the Search dialog, and the current set of pages can be printed or saved in a PDF file by selecting these options from the menu.
Workflow tasks can also be performed on Query Reports in List View. For example, new Query Reports are typically saved at level 1 when they arrive in Image View. Someone may then have the task of reviewing them and moving them to level 2 to indicate that they have been reviewed. To perform this task select > to set Mode to Validate and Level to 2. Next selecct > to find the Query Report pages that are currently at level 1. After reviewing each page, save it by selecting or . This moves the page to level 2. Use the search dialog again at any time to find the pages that currently have incomplete status.
This section describes the List view options available under the , , and menus in the application menubar. The options available under the remaining menus have already been described for the Data view.
The menu is similar to all other views (data, queries, and reasons) with the exception of the following items:
-
- Users with permission can create and export data sets in SAS format to a file location on their local disk. Refer to Exporting SAS Data Sets for further information. For instructions on creating and running DFsas jobs, refer to Programmer Guide, DFsas: DFdiscover to SAS.
-
- Users with permission can import data from labs and other sources to a DFdiscover plate with this feature. Refer to Importing Data Records for further information.
-
- Users with permission can export data records. Refer to Exporting Data Records for further information.
The menu is used to select the data records (rows) and data fields (columns) to be displayed in the List view table. The options include:
-
- cancel current task set (if any) and show all data records for the CRF page currently selected in the left panel of the List view dialog. When canceling a task set a new mode and save level can be specified in a pop-up dialog.
-
- select and arrange the data fields page to be displayed from the current page.
-
- specify criteria used to find data records, reduce the rows in the List view table to those meeting the specified criteria, and/or to create a new task set.
-
- select data records (rows) and data fields (columns) using a predefined view.
-
- cancel previous By View selection to display all data records and data fields for the current page.
-
- define views for oneself and/or for other users.
-
- export predefined data views to a local plain text file.
-
- import data views from a local plain text file.
-
- update all data records for the current page from the study server to get new records that may have been added or changes that may have been saved since the view was opened.
The menu is used to select the study page types and individual records to be displayed in the List view table. The options include:
-
- show all page types defined for the study
-
- show only those page types included in the current task set
-
- show all data records for the currently selected page type
-
- show only those data records included in the current task set