Table of Contents
Image View is used to enter new data records from paper case report forms (CRFs) that have been sent to the DFdiscover study server, or to enter new data records from hardcopy CRF pages you have in hand and do not plan to scan into the system.
When a DFdiscover server receives a scanned CRF page it reads the barcode to identify the study and CRF plate, routes the page to the study, and then uses ICR (intelligent character recognition) to read the data fields and complete a first draft of a new data record. These records are stored outside the study database. They must be reviewed and saved to the study database to become available to users in Data View.
DFdiscover ICR reads check/choice boxes, numbers, dates and visual analog scales, and accuracy depends on how clearly each field has been completed. Any ICR errors must be corrected, all text fields must be manually entered, and comments written in the margins must be reviewed and perhaps entered as reasons or missing value codes.
Use Tab or Return to move forward through the data fields, and Shift+Tab or Shift+Return to move backwards. This will ensure that you traverse all field entry and field exit edit checks designed to assist data entry. When necessary the 2 screens will scroll together to show the same data fields in the data and CRF windows. You can also use Ctrl+T or Ctrl+B to scroll the CRF image screen by itself to the top or bottom respectively to check something that has scrolled by. Alternatively, if you have a large monitor the screen can be split vertically to display a full page on each side (see User Settings).
While entering new records, click to move backward in the list of new records to get an earlier set, or click to move forward in the new record list to get the next available set. Records that have already been entered or that are currently being entered by another user will be skipped. The Next and Previous direction depend on whether you selected to sort by 'oldest to newest' or 'newest to oldest' in the record selection dialog (see below). The meaning of 'Set' also depends on what you selected in this dialog - it could be one or more documents or a specified number of records with specified visit and/or plate numbers.
If you have many CRF pages that need to be entered but not sent into DFdiscover, you can use Image View in EDC Data Entry mode to enter these pages or use Data View to perform the same task. The only difference is that data entry in Data View is performed within one subject binder at a time, while Image View allows you to work independent of subject binders.
New records are typically saved to the study database at workflow level 1 but it is possible to save new records directly to other levels. Image View is typically used only by data entry staff at the study coordinating site; this option is not normally made available to clinical sites.
Image View supports 4 options for building a set of records to be entered. These include: and for entering data from previously submitted (fax, email, DFsend) CRF pages, for entering data from hardcopy CRF pages or other sources held outside of DFdiscover, and which applies automatic record selection rules that have been predefined for a particular user or study role using .
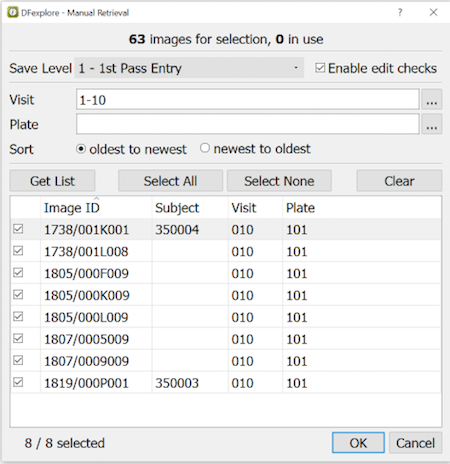
facilitates the easy selection of specific records from the list of pages awaiting data entry, or searching for records with specified plate and/or visit numbers.
Since visit 1-10 were specified, only these visits were listed when was clicked.
If ICR was able to read the key fields (ID, Visit and Plate) they will appear beside each page name (yyww/ffffppp, where yy=year, ww=week, ffff=fax, ppp=page). Records can be selected individually using a mouse click to select one record and Shift-click to select all records between the last selection and the Shift-click record, or all records can be selected using .
To assemble the selected records click .
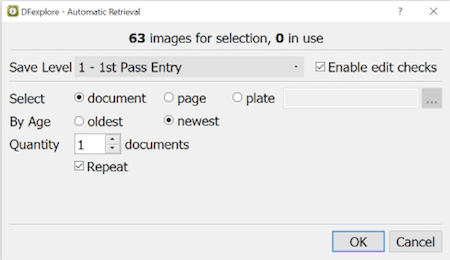
allows users to get a specified number of documents, pages or plates at a time, and repeat this process as desired, by clicking . This avoids having to return to the record selection dialog after each set has been entered.
The current status of the new record queue is updated and displayed at the top of Record Retrieval dialog each time it is opened. In this example there are 63 CRF pages awaiting data entry of which 0 are currently locked by other users.
We recommend selecting one document at a time and processing the oldest documents first, but it is possible to select a specified number of pages, to only enter specified CRF plates, or to enter the most recent arrivals first.
is used to build a specified set of blank data entry screens for data entry from sources residing outside of DFdiscover.
Some or all of the keys may be specified. If subject IDs alone are specified, a complete CRF book, as defined in the study visit map (consisting of all required and optional visits and all required, optional and missed visit plates), will be created for each specified subject ID. A maximum of 999 subject IDs and 10,000 data records can be included in each EDC Data Entry set. If subject ID is not specified, you must indicate the number of cases to be created.
If data entry is interrupted, only those records that have been saved to the database will exist in the database; building a set of blank screens does not automatically put blank records into the database.
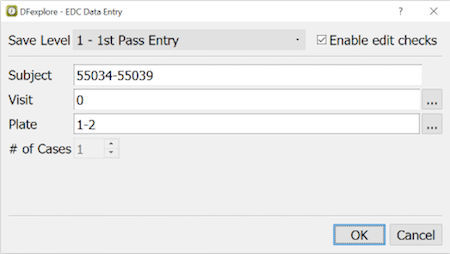
This example creates data entry records for visit 0 plates 1 and 2 for each of subjects 55034 to 55039, 12 records in total.
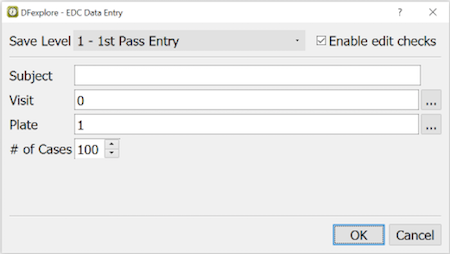
This example creates 100 data entry records for visit 0 plate 1. The subject IDs have not been specified and thus must be entered before each record is saved.
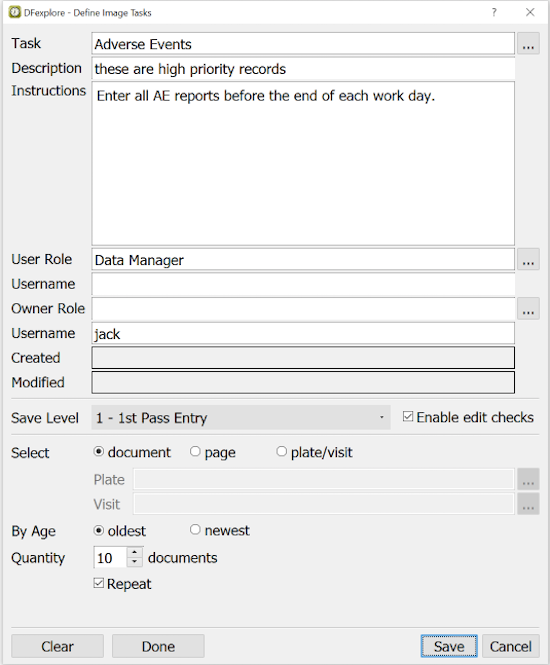
is used to build a specified set of data entry records following a task specification. To define a new task, click at the end of the Task input field. Select from the list and then complete the task definition dialog. This example shows a task created by 'jack' for users with the 'Data Manager' role. Since jack owns the task only he can modify it.
You cannot save entered records in Image View for which you do not have permission. However, it is possible to select an image for which ICR failed to read the keys, and then after entering the keys discover that you cannot save the record. Also if ICR misreads the keys and you have limited permissions, you may be prevented from seeing a page that you should see in the list of received pages. These limitations argue against giving the clinical sites access to Image View, except perhaps for EDC Data Entry only.
Whether using manual or automatic record retrieval, set the Save Level to the workflow level at which new records are to be saved. Typically level 1 is chosen, but it is possible to save new records to any workflow level.
New data entry is always performed in Validate mode, which allows records to be saved even if no changes are made. The mode and workflow levels are shown beside the Save buttons. For example Save v[0->1] indicates that you are in Validate mode, and that data and metadata records will be moved from workflow level 0 to workflow level 1, when you click or . New records saved with Pending status (to indicate that data entry was not completed) are saved to the study database but remain at workflow level 0.
The check box, Enable Edit checks, can be used to enable or disable edit checks during new data entry. Typically edit checks are enabled during new data entry but you may want to delay them to a later stage in your data management workflow process.
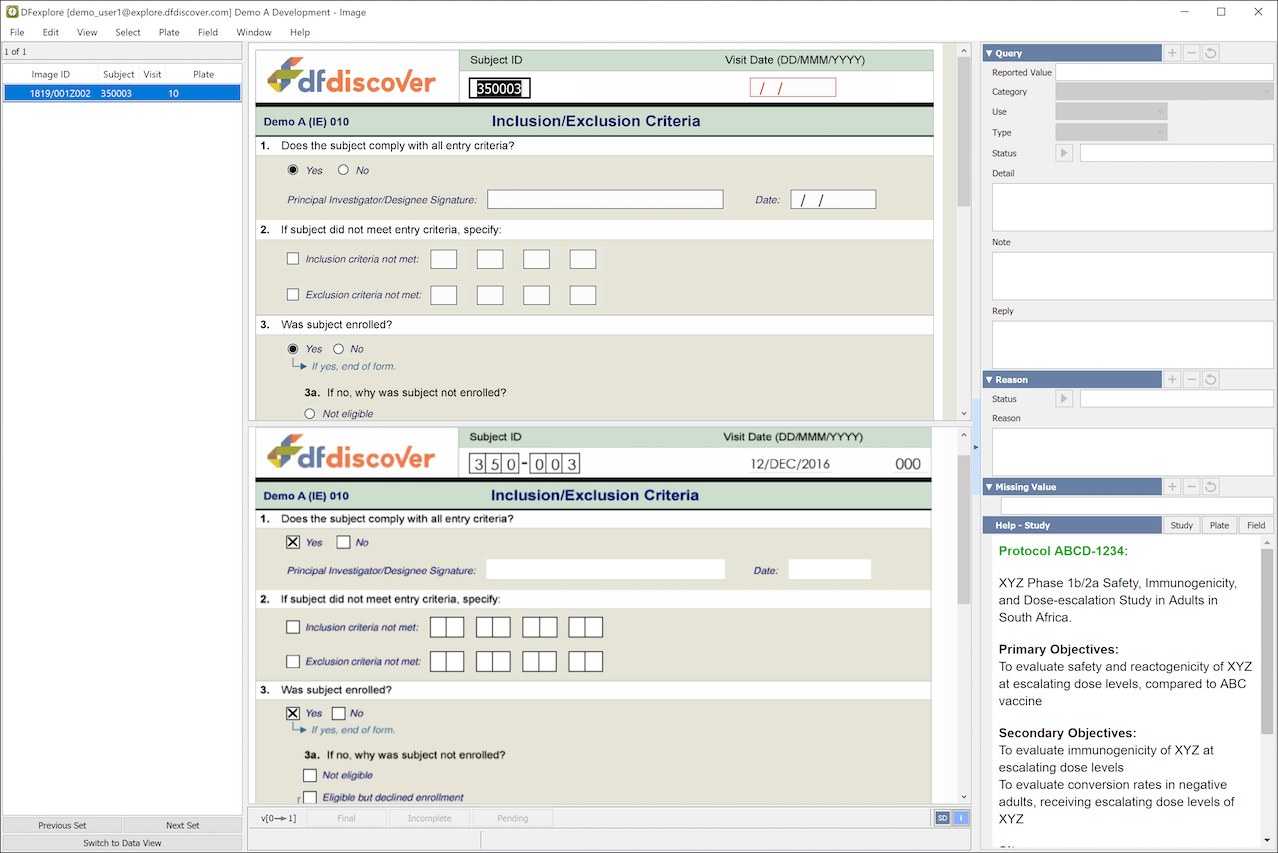
Data entry is performed as already described for the Data View. The main difference is that ICR will have already completed many of the data fields and thus the task is to compare the ICR reading with what was written on the CRF page, and to correct any ICR errors and enter any text fields (which are not read by ICR).
If NA or other missing value codes have been written on the CRF, the corresponding missing value code can be selected from the Field menu or using the Missing Value widget in the bottom left corner of the screen. After applying a missing value code in either of these ways, keyboard shortcut Control+M (Command+M on macOS) can be used to apply the same missing value code to other data fields.
If explanations have been printed in the margins, they can be entered using the Reasons widget, also located in the bottom left corner of the screen.
If you need to know when a CRF page arrived or the sender identification, select > .
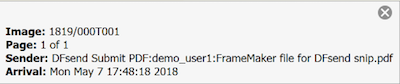
In this example the current CRF page is page 1 of a 1 page document. The Sender may be the identification of the sending fax machine, or the username that submitted the document. The Image is a unique identifier created by DFdiscover for each CRF page.
It is not unusual for a CRF page to be corrected and resubmitted. For each new record, DFdiscover checks to see if the keys (ID, Plate and Visit) match an existing database record. If a match is found you will be asked if you want to load the existing data record (including reasons and queries) into the data entry window. This will allow you to compare the newly arrived CRF page with the current version of this data record in the study database. DFdiscover will not allow you to enter a matching record into the database without first loading the existing data record. When you save a matching record you will be updating the existing data record with any changes you make; and the new CRF image will become the primary image associated with the data record.
The old image is not deleted, and can be reviewed at any time by selecting > or by clicking the image count button in the bottom-right corner of the DFexplore window. The Review Images dialog shows the date and time each image arrived and allows you to change which image is classified as the primary copy, correct keys if an image has become attached to the wrong data record, or delete images that are no longer needed.
If you process more than one image for the same data record in the same session the last image saved will become the primary image and the previous ones will become secondary. The split screen in fax view shows only the current data record + primary image. Thus returning to a secondary image in the fax view record list will display the image but not the data record. This helps to ensure that users realize they are looking at a secondary image that has been superseded by another image in the record list.
After loading the existing data record, if you discover that you have made a mistake, select > to undo all changes to the current record.
The new High Definition (HD) Images Setting, together with the grayscale and color image handling, is a significant new feature in DFdiscover, which helps modernize DFdiscover by displaying higher quality images.
The default setting is to display standard definition (SD) images (100 dpi) in order to reduce loading time and save cost. The central data management office can enable HD images (300 dpi) to be received for a study via DFadmin. Individual users can determine whether they wish to view the HD images in DFexplore. In other words, in DFdiscover 2016.0.0, users can receive and display HD images if enabled at the study level by the central office. However, if HD images are not enabled centrally or the documents are not imaged at high definition locally (e.g. if they are scanned at 100 dpi and not 300 dpi), they will not be available in DFdiscover to users.
To enable the HD setting in DFexplore, click the button at the the lower-right corner of the the screen in Image View:
 , which will change to:
 If there is an HD version of the image available, the screen will refresh with the HD image. If HD is not enabled at the study level or an HD image was not transmitted, the SD/HD toggle will change to:
 If there is no HD version of the image available, the HD setting will be enabled but the SD image will be displayed.
Like other screen settings such as previous screen location and size, the HD setting is stored locally in user's device-specific settings. This allows you to easily work over a slower laptop connection with HD mode disabled but enable HD mode on another device, an office computer perhaps, which has a fast internet connection.
Also, users are able to export HD images using DFpdfpkg -hd The default behavior for DFpdfpkg is to export SD images only.
![[Important]](../../imagedata/important.png) | Important |
|---|---|
|
High Definition (HD) is only applied to documents which arrive via email attachments, DFsend, or > , and is not applied to faxed documents. |
Each new page has 4 keys which together uniquely identify it: the DFdiscover study number, plate number, visit number and subject ID. The study and plate numbers are always in the barcode, the visit number can appear either in the barcode or as the first data field on the page, and the subject ID always appears as the first data field following the visit number. It is critical that these keys are correct, and they should be carefully checked before a new record is saved to the study database.
If ICR has misread a subject ID or visit number data field, they can be corrected by modifying the data field. However, to correct the keys as they appear in the barcode, you must select > and use the Change Barcode dialog.
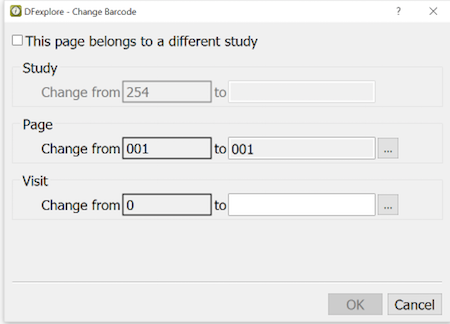
When the Plate and/or Visit number are changed the correction will appear immediately in the new record list, but if the study number is changed the page is sent to the Image Router and will be removed from the new record list of the current study.
While entering new records you can open the current subject binder to review and/or modify other records, using at the bottom of the record list. Before switching to Data View you will be asked if you want to save or discard any changes you have made to the current Image View record.
The subject binder opens to the current Image View record in Data View. This record will be tagged with the letter 't' in the record list to identify it as the current Image View task record. This record cannot be modified while in Data View, and will display: View only: record in use by Fax view in the message window at the bottom of the screen. The switch button, now labeled , can be used to return to the current Image View record and continue with data entry when you are finished reviewing other records in Data View.
Each set of CRF pages retrieved using the 'Automatic' or 'Manual' method is locked by the user who selects them. This is a lock on the image ID, not on the keys, which may at this point be blank or incorrect. These image locks prevent other users from trying to enter the same new pages in Image View. In large studies, with hundreds of pages arriving each day and several users working together to perform new data entry, it is best to minimize the number of pages that each person retrieves at a time. We recommend getting 1 document at a time.
When entering these records a record level database lock is requested for the key fields (ID, visit, plate) as soon as you move into a non-key field. You will not be able to change data or metadata, or save the record, if someone has the subject binder locked in Data View, or if someone is currently entering another record with the same 3 keys in Image View. However, it is possible for multiple users, all working in Image View, to simultaneously enter new data records with different visit and/or plate numbers for the same subject ID.
The only difference between EDC Data Entry and entering a set of records from submitted CRFs is that EDC Data Entry records do not have images and thus do not have image locks.
While working in Image View it is possible to switch to Data View to review and/or modify other records for the same subject ID. When you select Switch to Data View the record level database lock acquired on the key fields in Image View is released, a Data View subject level lock is immediately requested, and the subject binder is then opened to the same page that was being entered in Image View. If the subject ID lock is obtained, enter Data View in Edit mode with the lowest write level; which means that existing records which are modified and saved will remain at their current workflow level, and any new data or metadata data will be saved at the lowest write level.
If the subject ID lock cannot be obtained, Data View can still be accessed in View Only. However, because the record level database lock was released it is possible that upon returning to Image View further data entry will be prevented due to another user now having the database lock on that record.
If the subject ID lock is obtained on switching to Data View, any record in the subject binder can be modified (provided you have modify permission) except for the originating Image View record, which will be displayed in View Only mode. This record must be entered in Image View. You can easily return to it by selecting Switch to Image View that takes you back to this record in the Image View record list.
When a new record is saved in Image View and you move to another record, the database lock is released and the record becomes available to other users. All saved data records remain in the Image View list until they are released or the next set of new records is retrieved. This facilitates returning to a previously entered record to review or modify it. But remember that it is possible to discover that another user has modified or even deleted the record since you last saved it.
This section describes the options available under the menu labels Select and Plate in the application menubar. Only those options that are unique to Image View are included. All other menus and options are the same as already described for Data View.
The menu is used to select pages from the new record queue for data entry. The options include:
-
- as described above this dialog is used to specify how records are assembled for data entry.
-
- use this option to display the list of records awaiting data entry and manually select those you want to enter next.
-
- use this option to build a set of blank records for data entry from hardcopy CRF pages held outside of DFdiscover.
-
- this option allows users to select a predefined new data entry task.
-
- use this option to specify a task for new data entry, including record selection rules, grant users/roles permission to use the task, user instructions, etc.
-
- export predefined image tasks to a local plain text file.
-
- import image tasks from a local plain text file.
-
- this option applies the current record retrieval specifications to assemble the next set of records for new data entry.
-
- this option allows users to return to the previous set of records, but only records still remaining in the new queue will be displayed; any already entered or now in use by other users cannot be accessed.
The menu includes the following options:
-
- this menu item has pull rights for 'Final', 'Incomplete' and 'Pending' which are equivalent to saving changes using the buttons at the bottom of the screen.
-
- undoes all changes to the data, queries and reasons on the current page.
-
- this option is used to review all of the images attached to the current data record, and is only available if the current record has more than one image.
-
- as described above this dialog is used to make corrections to the values of barcoded key fields.
-
- this option deletes the current image from the new fax queue. If the image and its corresponding data record have been entered and saved to the database, returning to the image entry in the new record lists and then deleting the page will prompt the user for both a reason for the deletion and their password.
-
- this option shows the arrival date and time, and fax sender ID of the current CRF page
-
- lists each field with a problem on the current page including: required fields that are blank, illegal values, outstanding queries and rejected reasons
-
- report all changes made to data fields on the current page. For moderate to large databases, this action can take a considerable amount of time to run.