Table of Contents
DFserveradmin is a server-based application that is used to:
start and stop the DFdiscover services.
request SSL certificate signing from DF/Net Research, Inc. (DFnet).
manage your DFdiscover license and see usage statistics.
run study diagnostics.
check and fix study file permissions.
DFserveradmin must be started from the command-line by the system root.
There are no options required or recognized by this application.
Invoking DFserveradmin at the command-line displays the main user interface for the application. If DFdiscover is currently running the green start icon is displayed in the header. The stop icon is displayed if DFdiscover is not running.
The functionality of DFserveradmin is grouped into several tabbed windows. Related functions appear in the same tabbed window. The purpose of each window appears in the name of the tab. Click the corresponding tab name to access its tabbed view and functionality.
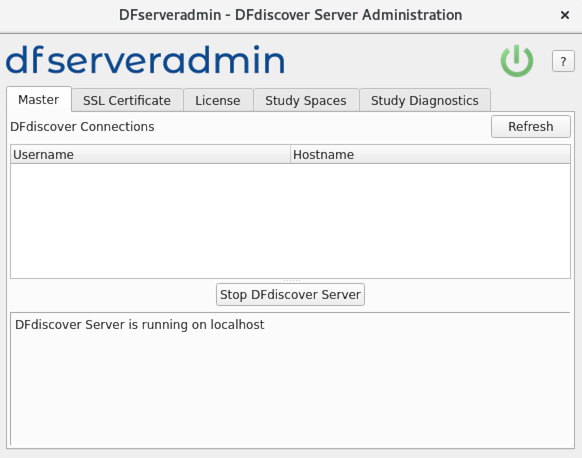
DFserveradmin opens with the Master view visible.
On an operational system, any connections to the DFdiscover server are listed. It is not recommended that you stop DFdiscover with live connections, as this will disconnect these sessions without warning the user that made the connection. The list of users is not updated in real time. Click to refresh the user list with current connections.
Click to start DFdiscover.
Click to stop DFdiscover.
Progress messages are logged to the messages panel.
Additional startup information may also be logged to
/tmp/dfstartlog.
Client applications cannot connect to your DFdiscover server unless a signed, and current, SSL certificate is in place on the server. Signed SSL certificates are typically valid for a period of 1 or 2 years.
When installed, a signed SSL certificate tells any client applications attempting a connection that the server is known, can be trusted and that communication is encrypted.
There are several commercial certificate signing authorities. Some clients prefer to have a signed certificate from one of these authorities. For these clients, a commercial certificate can be acquired independently and installed, as described in Installing a Signed Certificate.
Alternatively, DFnet can act as the signing authority for your server certificate. There is no additional charge for this service.
To use DFnet as your certificate signing authority, click the SSL Certificate tab.
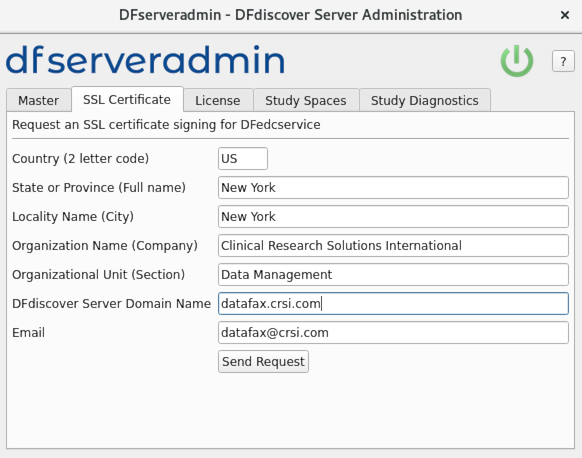
A new system does not have a signed certificate, so this dialog must be completed and submitted for signing to DFnet. Responses are required for all fields. The responses are visible to any user that selects > in their client application. Further, the DFdiscover Server Domain Name value must exactly match the fully qualified domain name (FQDN) of your server. Otherwise, users will be presented with a certificate warning dialog each time that they login to your server.
Click to email the unsigned SSL certificate request to DFnet for processing.
You can expect an email response containing a signed certificate
within 24 hours on business days.
In the interim, it is still possible to proceed as DFserveradmin also generates
a self-signed certificate that is valid for 10 days.
The signed certificate will be emailed back to the email address that
was specified as the Email Address in the certificate
request procedure.
Typically it will appear as a small (~2KB) attachment named
edccert.pem.
![[Note]](../../imagedata/note.png) | Outgoing email |
|---|---|
|
The certificate signing request is emailed to DF/Net Research, Inc. from the machine
where the DFserveradmin application was executed.
This machine must be able to send email to an external recipient
(DFnet).
If that is not possible, the files
|
The signed certificate, whether received from DFnet or from a commercial
signing authority, must be installed in the location referenced
by the certificate keyword in the
/opt/dfdiscover/lib/DFedcservice.cf file.
For example, this DFedcservice.cf file:
master localhost
key /opt/dfdiscover/lib/edckey.pem
certificate /opt/dfdiscover/lib/edccert.pem
documentroot /opt/dfdiscover/edcdocs
identifies /opt/dfdiscover/lib/edccert.pem as the
location of the server certificate.
To install a new, or update an existing, certificate, save the signed certificate to this location.
A signed certificate is typically valid for one or two years and must be renewed on an annual basis.
Before starting the DFdiscover server, a valid license must be installed. Click the License tab to display the License view.
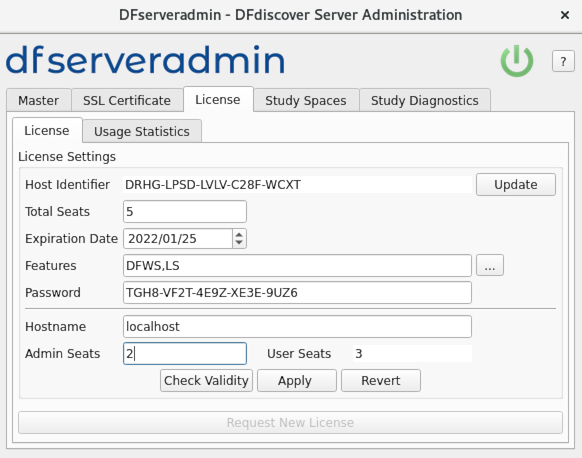
On new installations, click to display the license request form.
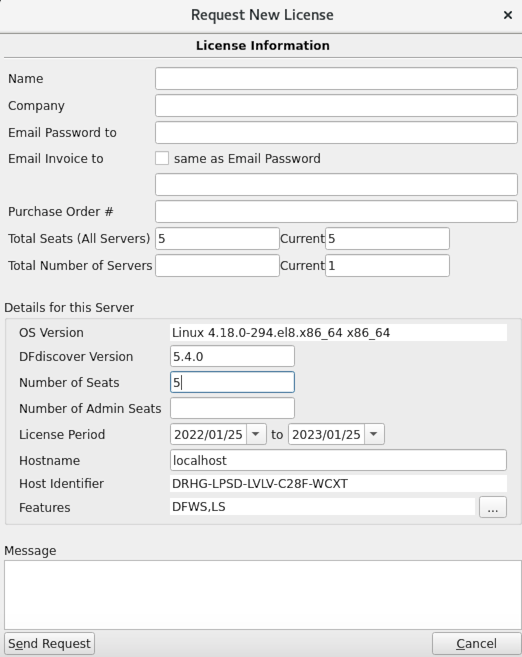
Complete the form, editing any pre-filled fields as required. Click to submit the license request to DFnet for processing. A server password will be emailed back to the address provided.
Note that issuing a license is not an "automatic" email response, and is subject to review and verification by DFnet staff. Normally you can expect a response with 24 hours if your request is made during technical support hours.
Before new studies can be registered in DFadmin, the UNIX directories that serve as the root for DFdiscover study directories must be created from the UNIX command-line and then registered as DFdiscover Study Spaces.
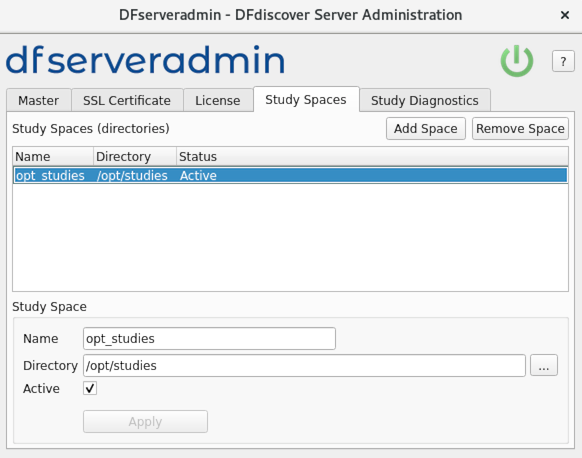
When adding a new study in the DFadmin Studies dialog, the administrator then selects one of the predefined study spaces and enters only a study folder name. This ensures that administrators can only create study directories in locations that have been approved by the UNIX administrator.
| Note |
|---|---|
|
No part of a study space can itself be a DFdiscover study directory.
For example, Study spaces and directories must be unique, case-insensitive and cannot include the follow characters: \ ` ' $ ; & * < > | and SPACE |
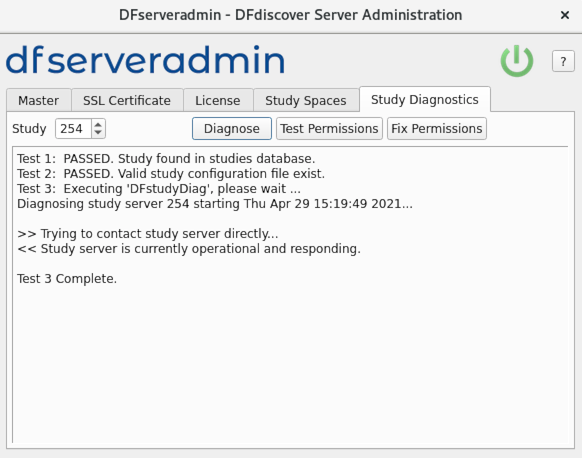
If you are having problems connecting to a study, this utility may help
in troubleshooting the problem. This function is equivalent to running
/opt/dfdiscover/utils/DFstudyDiag on your study at
the command-line in a terminal session.
Select a study number and click . The output is displayed in the output window. For more information, see Programmer Guide, DFstudyDiag,
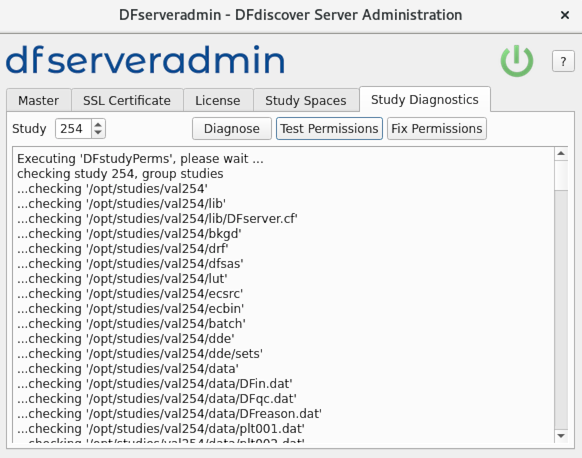
If you suspect you are having problems with file-level permissions,
this utility may help in troubleshooting and fixing the problem. This
function is equivalent to running
/opt/dfdiscover/utils/DFstudyPerms on your study at
the command-line in a terminal session.
Select a study number and click either to troubleshoot, or to fix any problems. Any problems or corrections are listed in the output window. For more information, see Programmer Guide, DFstudyPerms,