Table of Contents
Traffic is the general description for three related features:
-
incoming document processing, known as Inbound
-
outgoing document processing, known as Outbound
-
received document receipt processing, known as Auto Reply
These features are all administered in the Traffic tab of DFadmin.
DFdiscover can be configured to send a receipt back to selected clinical sites each time that a document is received from them. Also, incoming document processing can be blocked from any sender that is not registered with DFdiscover. Both features are administered in DFdiscover through an option known as Auto Reply.
Auto Reply is intended as a debugging aid within DFdiscover, assisting in the diagnosis of clinical sites from whom document reception is unreliable. Once the problem is diagnosed it is no longer necessary for this feature to remain enabled for that site.
There is a great deal of work that DFdiscover does to automatically process and route incoming documents. In this section, the process is described in detail.
Incoming and outgoing faxing from DFdiscover is accomplished by third-party software, HylaFAX; or by using a third-party fax outsourcing service, Protus/MyFax. For purposes of this description, both are generically referred to as the "Fax software". The DFdiscover Inbound and Outbound services act as overseers and provide additional end-user functionality and rely on the Fax software to interact with the modem devices.
![[Important]](../../imagedata/important.png) | Faxes and email |
|---|---|
|
In addition to receiving faxes via the traditional physical fax machine, DFdiscover is also capable of receiving incoming documents via email and DFsend. Once a fax or document has been received to disk, the handling of both input streams is identical. This alternate input stream is described in Processing of an incoming email. |
DFdiscover relies on an email message from the HylaFAX software to initiate its incoming fax processing. In the case of installations using the Protus solution, a Protus fax daemon runs in the background and periodically polls for new faxes arriving at the Protus servers. Incoming fax processing by DFdiscover is event driven; the processing software executes only when a fax has arrived. If there are no recently arrived faxes requiring processing, no Inbound service will be running. Each time a new fax arrives, the Inbound service is dispatched by the master daemon to process that fax. If multiple new faxes arrive at or near the same time, the master daemon will dispatch the first fax to the Inbound service, queue the additional faxes, and then de-queue each fax as the Inbound service completes the previous fax. Incoming faxes will never be discarded because there is no Inbound service available. The fax will be queued by DFdiscover (freeing HylaFAX or the Protus service to receive the next fax) until the service is available.
DFdiscover routes an incoming document from the Fax software, email, or DFsend to its ultimate destination within DFdiscover. The remainder of this section describes each step in detail.
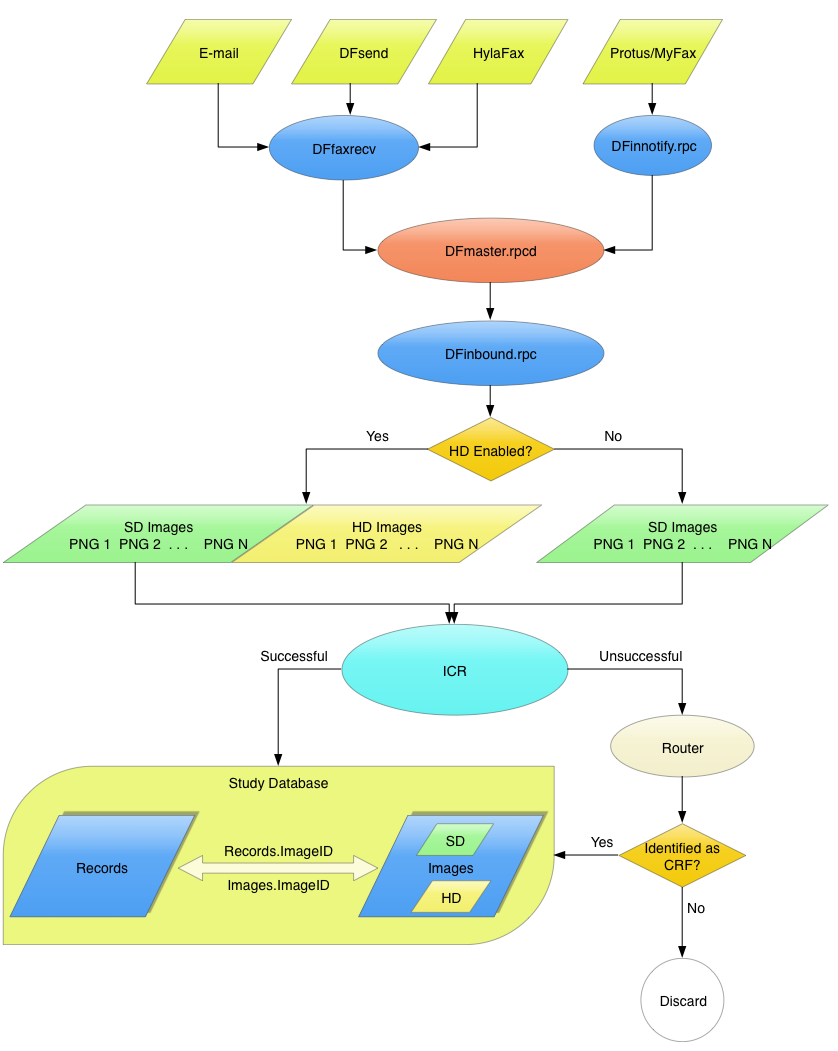
Processing of an incoming document
-
Document arrives and is received by the Fax software
-
HylaFAX configurations: When a completed CRF containing
Npages is sent from a fax machine at an investigator site to a fax modem running the Fax software, the fax modem answers the call and creates a file for receipt of the fax document in the DFdiscover incoming fax directory. As receipt of the fax progresses, the size of the incoming file increases. Transmitted in standard resolution, a typical fax page requires approximately 25 Kilobytes of disk space.When transmission is complete, a mail notification message is sent to user
datafax. Receipt and processing of the fax transmission by the Fax software is complete.If the transmission enters the system via an email message, alternate processing takes place during this step and the next. That processing is described in Processing of an incoming email.
The email message sent by the Fax software (or received directly via email) is parsed by the DFfaxrecv application that checks the message content for validity. The message content is valid if the following conditions are true:
-
the sender of the message is the Fax software
-
the subject of the message indicates a newly arrived fax
If the message content is valid, the filename is then passed to the master to signal it that this file needs processing.
-
-
Protus configurations: A completed CRF containing
Npages is sent from a fax machine at an investigator site to the Protus fax server. The fax is received and is stored in their server for later retrieval by DFdiscover. The Protus fax daemon process running on the DFdiscover server periodically checks to see if any new faxes have arrived in the Protus fax server. If a new fax is present, it is downloaded and placed into the DFdiscover incoming document directory. Once each document has been downloaded and transferred to DFdiscover, the Protus fax daemon deletes the fax from the Protus fax server and notifies the master daemon that a new document has arrived.
-
-
DFdiscover master assigns the Inbound service to process the fax
In dealing with incoming fax documents, the responsibility of the master daemon is to assign the fax to the Inbound service.
If the Inbound service is busy processing another fax, the master records the incoming fax's name in a FIFO queue for future processing. Subsequently, when the Inbound service completes processing of the previous fax, the master dispatches the first fax from the queue.
As soon as the Inbound service starts, it sends the master a message to indicate that it has started to process the assigned fax. The master updates its inbound database to indicate that the service is processing.
-
DFdiscover identifier is assigned to the fax
Immediately after the Inbound service has notified the master that it has started processing the assigned fax, it requests a unique DFdiscover identifier for that fax from the master. The master consults sequence files in /opt/dfdiscover
/workto determine the identifier.From the fax name, the master determines the year and week in which the fax arrived. It uses this to construct a 4-digit number,
YYWWwhereYYis the last two digits of the year (minus the century) andWWis the week within that year (01 to 53).The master searches for a file named
.seqYYWWin /opt/dfdiscover/work. If no such file exists, the master returns the identifier of1to the incoming daemon and creates the sequence file.seqYYWW> recording2as the file contents. If the file does exist, its contents are returned as the DFdiscover identifier, and then incremented by one before being written back to the file.The DFdiscover identifier supplied by the master to the Inbound service represents the sequencing of when a fax arrived within a particular year and week. For example, the third fax to arrive during the week of September 16, 2017 would have a
YYWWvalue of1738(the 38th week of 2017) and a sequence number of0003. The unique DFdiscover identifier for that fax then becomes1738/0003. Because of the algorithm used to generate the identifier, DFdiscover can guarantee that the identifier is unique within the DFdiscover installation.For the remainder of this description,
YYWW/FFFFwill be used as the example DFdiscover identifier.Another point to note here is that these unique fax identifiers are being assigned before the fax is processed, and thus before there is any possibility of determining which study the fax belongs to. As a result all fax identifiers are unique, not just within each DFdiscover study, but across all DFdiscover studies being managed on the same DFdiscover installation.
Important It is extremely important that the sequence files, used to assign these unique fax identifiers, not be manually edited or deleted. Deleting a sequence file will cause the sequencing for that
YYWWcombination to be reset to1, which will result in non-unique fax names. Fortunately, DFdiscover will detect this condition and prevent old faxes from being overwritten by new faxes with the same name. Even after a particularYYWWhas passed in time, it is important to leave the sequence files in case it is ever necessary to retrieve and re-process a fax file from the archives. -
Inbound service archives the fax
If the value of
INBOUND_ARCHIVE_DURATIONin the daemon's configuration is any number greater than 0, a copy of the received fax is made (without alteration to the fax) in the archive directory. The location of the archive directory is determined by evaluating theINBOUND_ARCHIVE_DIRparameter in the daemon's configuration. The name assigned to the archive copy is theYYWW/FFFFidentifier. -
Inbound service decompresses the fax
The Inbound service breaks the original
N-page fax into its individualNpages. This occurs in the incoming daemon's work directory.The conversion creates 100 dpi PNG files, as well as 300 dpi PNG files if High Definition (HD) images are enabled in DFadmin. There is exactly one PNG file created for each page in the fax. Hence an
N-page fax document createsN1-page PNG files. The page names for the PNG files are determined from the DFdiscover identifier. In the Inbound service's working directory, the sub-directoryYYWWis created (if necessary) containing files named0.FFFF1 0.FFFF2 0.FFFF3 ... 0.FFFFNThe files are then renamed so that the page number within the fax is leading zero-padded to three digits.
Important An important point to be aware of here is that the original fax files cannot be archived in a separate directory for each study. The main reason for this is that there is no guarantee that DFdiscover will be able to uniquely link a single fax with a single study. A site involved in multiple studies may send CRFs for more than 1 study in the same fax transmission. You might even use more than one DFdiscover study number to keep separate databases (e.g. lab data, clinic data, endpoint adjudication reviews, etc.) for the same study. Also a fax might not contain any barcoded CRFs. Consequently all received fax files across all studies are archived to the same fax archive directory.
Conversion of the original fax to PNG files is complete. The Inbound service indicates this to the master by sending it a message containing the name of the archived fax, the number of pages it contains, the fax's receipt date and time stamp (or the email transmission's receipt date and time stamp), the sender identifier of the fax (for faxes, this is transmitted by the sending fax machine; for emails, this is the sender's email address) and whether or not the fax was archived. The master records this information by appending it to the file /opt/dfdiscover
/work/fax_log. This log file is in plain text format and can easily be consulted to determine a particular document's context. In fact, this is the file that is consulted by client applications like DFexplore to determine context. -
Each fax page is put in standard DFdiscover orientation
At this point in the incoming processing there are one or more PNG files named
0.FFFFPPP. Processing now proceeds sequentially and repeats separately for each page. If page processing fails at any step, the PNG file is moved to the unidentified fax routing directory, /opt/dfdiscover/identify, where the page can be subsequently viewed and dealt with manually using the DFexplore Image Router function.The width of the page is tested to ascertain that it is within a reasonable tolerance of being a US-letter or A4 page in portrait orientation. Then the height of the page is tested to be within the same tolerance.
The service then begins searching for the DFdiscover barcode signature line near the top of the page (within the top 2.5" of the page). If the line cannot be found, it is assumed that the page is wrong-side up, it is flipped right-side-up and the line search is repeated.
After the signature line is found, the vertical offset between the right end and left ends of the line is used as the measure of skew inherent in the entire page. An angle of rotation is calculated using the arctangent of the vertical offset divided by the length of the line. The entire page image is then rotated by this angle around the left corner of the signature line. The assumption here is that the same degree of correction is required across both the length and width of the page. Occasionally, this assumption fails, and skew correction is not as good as it might be, but in general the correction is adequate and better than if no correction had been applied at all.
When rotation completes, the resulting page image is then shifted so that the top of the signature line is coincident with the top of the page and the left end of the signature line is 0.5" from the left edge of the image. This is the standard DFdiscover orientation for a CRF image. All images must be in this orientation before they can be scanned for their DFdiscover barcode.
-
Inbound service scans page for barcode
In standard DFdiscover orientation, the barcode for a CRF can be found starting an inch from the left edge of the image and down 0.125" from the top of the image. A readable barcode contains either 17 or 26 vertical bars, evenly spaced at 0.25" intervals, each of thickness 0.04" or 0.12". The 0.04" bars are counted as having value 1 while the 0.04" bars have value 0. The concatenation of 0s and 1s for the first 8 bars is evaluated as a binary number and assigned to the study number, the next 9 bars constitute the plate number, and, if present, the last 9 bars constitute the sequence number. For more information on DFdiscover CRF barcoding, consult Barcode User Guide.
The newly rotated and shifted page image is then written to a file named
FFFFPPPand the original version of the page in0.FFFFPPPis deleted. At the same time, a placeholder record for the data that will be ICRed from the image is written to the fileDFrecin.###where###is the study number that was scanned from the initial part of the barcode. IfDFrecin.###already exists, the new record is appended to the file; otherwise, the file is created. Although unlikely, it is possible for one fax to contain CRFs from multiple studies and hence multipleDFrecin.###files may be created. The purpose of eachDFrecin.###file is to temporarily record the:- fax page name
- study number
- and plate number
in preparation for the next phase, ICR, of the Inbound service.
As previously noted, pages which fail any of the preceding steps are moved to the unidentified images routing directory, /opt/dfdiscover
/identify. Pages that have passed all of the steps will be ICRed and then added to the new pages input queue for a study, where they can be retrieved and reviewed in DFexplore, and finally entered into the study database. -
ICR processing occurs for each identified page
When all pages have completed the barcode reading step, the ICR software is launched by the incoming daemon. ICR processing begins by scanning for file names that begin with the
DFrecinprefix. For each such file that is found, the study number is determined by stripping the last three digits from the file name. The Inbound service then attempts to make a connection with the database server for that study number. If the connection is successful, the service requests the location of the ICR template file and the CRF pages directory from the study database server.For each record in the
DFrecinfile, the plate number is extracted from the 5 th field and the image identifier is extracted from the 3 rd field. These two pieces of information together with the already read ICR template permit the software to scan the CRF image for data fields.ICR can read hand-written numbers, check boxes, dates (containing digits and characters), and visual analog scales, but not hand-written text. ICR will fail to read a value and leave the field's value as blank, if any one or more of the following conditions is true:
-
the field type is string, meaning that the contents are hand-written text
-
the field cannot be located on the CRF
-
the read value is illegal when tested against the field's legal range
-
more than one choice has been marked for a choice field
ICR is not data entry The ICR step should be viewed only as an assist to data entry, not as a complete replacement for it. It is important that all records be reviewed to complete blank fields, correct any ICR errors, pick up corrections and comments written by investigators in the margins of the CRF, and flag missing data with queries. All of these tasks can be performed by study personnel through DFexplore.
-
-
Pages and data are sent to the study database
When ICR processing completes on a CRF page, the resulting data record is assigned a workflow level of
0and is sent via a network message to the study database server, which appends it to the study input queue for new faxes file. The corresponding image file is moved from the Inbound service's working directory to the study's CRF pages directory. The corresponding record fromDFrecinis then deleted. If a connection to the study server cannot be established (i.e., the study server may be in read-only mode), the CRF images are sent to the DFdiscoveridentifydirectory, instead of to the study'spagesdirectory.When all of the records in a
DFrecinfile have been processed, the file will be empty and it is deleted. Since the fax image files have also been moved to the study's CRF pages directory, the Inbound service working directory is empty and is deleted. The service will report an error if this condition is not true.Incoming fax processing by DFinbound.rpc is now complete. Before termination, the Inbound service sends a fax completion notification message to the master and then exits.
Processing of an incoming email
-
Document arrives by email
DFdiscover is also capable of accepting CRFs that are received by email. The following requirements for emailed CRFs must be met:
-
The recipient of the message must be user
datafaxon the DFdiscover server. If emails are arriving from external locations, email routing must allow email to reach the DFdiscover server. -
The sender of the message is not user
datafaxor any email address that contains the phraseMAILER-DAEMON. -
The body of the message must contain one or more PDF or TIFF files encoded as MIME attachments. Other attachment types will be silently ignored. If no attachments can be processed, the email will be bounced with a Data Format error.
-
Each TIFF attachment may contain one or more CRF pages. The TIFF images may be color, grayscale and black-and-white, at least 100 dpi resolution, and no more than 300 dpi resolution.
-
The mail application (typically sendmail on the UNIX platform) must have permissions to write to the /opt/dfdiscover
/incomingdirectory. Typically this means that the directory must have access and write permissions for everyone, unless the user id (root,uucp, ordaemon) that executes the mail application belongs to thestudiesgroup.
-
-
Message body is decoded
The decoding is performed by the DFdiscover DFfaxrecv application which breaks out the individual attachments. TIFF attachments are saved to /opt/dfdiscover
/incomingwith names in the formemail#######-###.tmp. PDF attachments are saved to /opt/dfdiscover/incomingwith names in the formemail#######-###.pdf. These PDF files are then passed to DFgs to convert them to TIFF files with names in the formemail#######-###.tmp. -
DFdiscover master is notified
The DFfaxrecv application notifies the master of the arrival of the new images. If DFdiscover is not operational at the time, the transmission remains queued in this directory. It will subsequently be de-queued and processed automatically by DFdiscover when it restarts.
-
Regular processing resumes
The remainder of the processing of the email transmission follows the same procedure already described in Processing of an incoming document.
Through DFdiscover, it is possible to send documents to one or more recipients directly from your computer. Users will exercise this feature most via DF_QCfax, one of the standard DFdiscover reports, which sends Query Reports to the participating sites of a study.
DFdiscover manages outgoing traffic with the Outbound service that behaves like the UNIX lpd daemon. It is always running in the background (unlike the Inbound service which only executes when there is an incoming document to process), and it works from a spool directory. Programmers can interface with the outgoing daemons via the shell-level commands DFsendfax (to queue a document for sending), DFfaxq (to monitor the status of the outbound queue), and DFfaxrm (to remove a document from the queue). These DFdiscover utilities are described in Programmer Guide, Shell Level Programs.
Faxes that arrive at one of the fax modems on a DFdiscover server are received by HylaFAX, which subsequently informs the DFdiscover master daemon that there is a fax that needs to be processed. The master then assigns the fax to the incoming fax daemon for processing. These are the basic actions of the Inbound service.
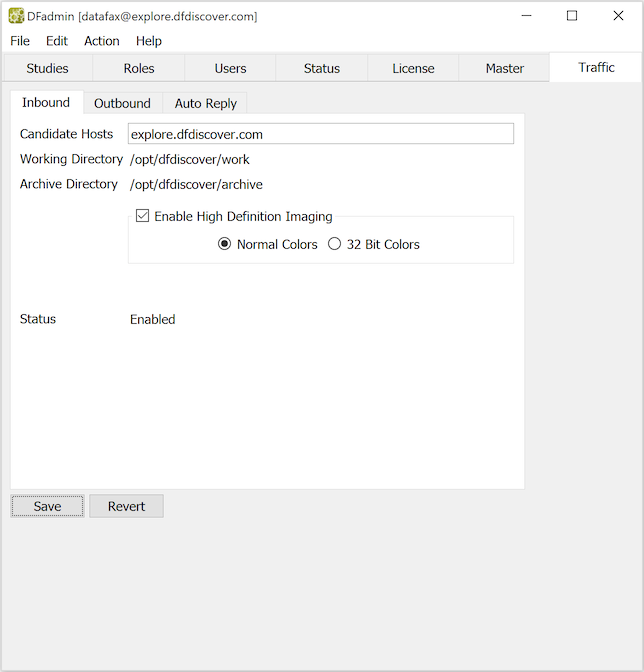
The Inbound feature must be defined before DFdiscover will be able to process incoming documents. The definition and configuration of the Inbound feature is done in the Inbound view.
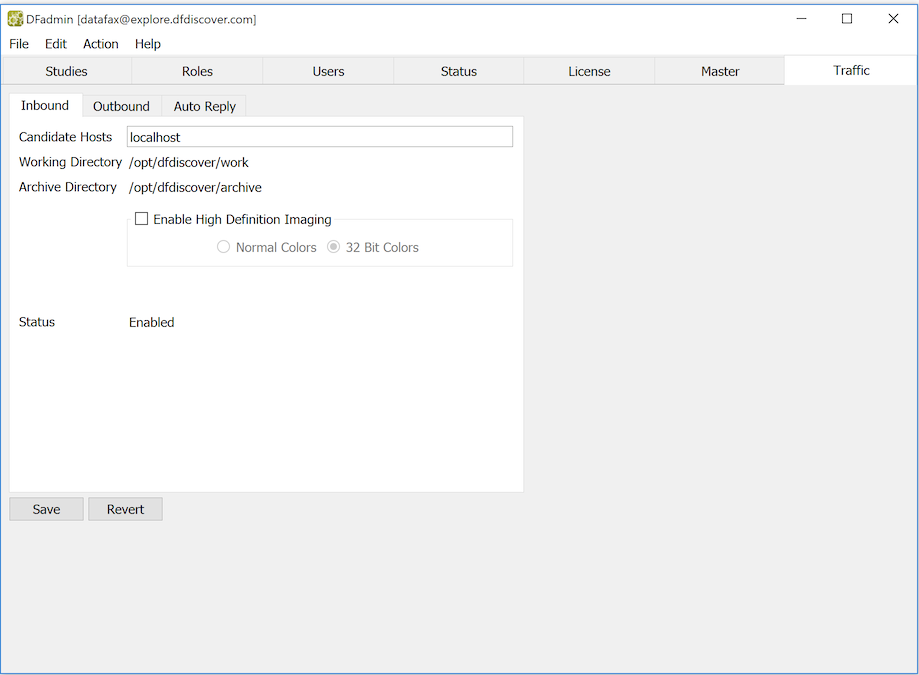
When DFdiscover is started for the first time, DFdiscover will identify that there is no Inbound service defined and it will define and configure it with default values. In most environments, these default values will not need to be changed. However, if re-configuration is needed, only the candidate host can be changed using DFadmin:
-
Candidate Hosts. Enter the host names (comma-delimited) of all computers that the master can consider as candidate CPUs where the Inbound service might be permitted to run. In 99% of all cases, only one hostname is needed and that is the hostname of the master.
Candidate Hosts also require slave daemons The Inbound service can only run on machines that are also running slaves. If a candidate host is specified that is not also running a slave, that candidate will never be chosen.
-
Working Directory. The working directory must be writable by user
datafax, and is typically defined with the same value as the DFdiscover work directory,/opt/dfdiscover/work. To change its value, the inbound configuration file/opt/dfdiscover/lib/DFinbound.cfmust be directly edited by the DFdiscover administrator.The working directory is temporary space only - once an incoming document is processed, the working directory becomes empty again.
-
Archive Directory. This is a directory where the Inbound service stores the original documents (TIFF or PDF). It must be writable by user
datafax. Since the files may be large, this should be a directory with lots of available space. Also this directory should be monitored regularly to make sure that space is available for archiving of incoming transmissions (see Archive File Maintenance for more information). To change its value, the inbound configuration file/opt/dfdiscover/lib/DFinbound.cfmust be directly edited by the DFdiscover administrator.
After making any changes, select > to save the changes and re-configure the Inbound service. Modifications can be made regardless if the Inbound service is currently enabled. If the Inbound service is processing while its configuration is modified, the modifications will not take effect until the next incoming document is processed.
In the Inbound view, Status is a read-only field that shows the current status of the Inbound service. Typically, the service is always enabled, which means that it can process incoming documents as they arrive. However, the service can also be disabled by the administrator - when disabled, documents continue to arrive, but they wait in a queue and are not processed by DFdiscover until the Inbound service becomes enabled.
The possible statuses are:
-
Enabled, on-line, and available for processing each incoming document -
Disabled, off-line, incoming documents are queued and not processed
To change the status of the Inbound service, select one of:
-
> Enable the currently disabled Inbound service.
-
> Disable the currently enabled Inbound service.
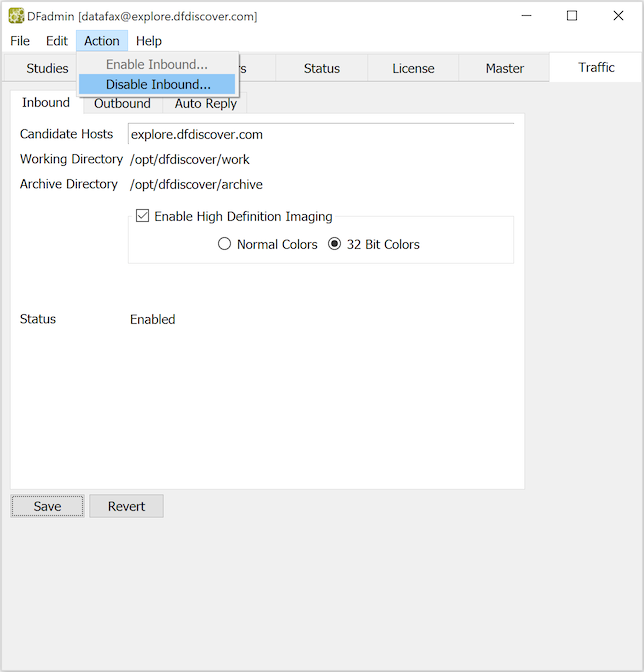
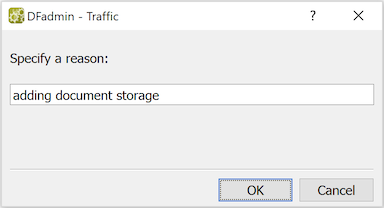
A reason can be provided to describe why the Inbound service is being disabled. A reason is not required but is recommended particularly if the server is administered by more than one person. When the Inbound service is disabled the reason appears in the Status field of the Inbound view.
DFdiscover accepts incoming documents via fax, email and DFsend. Documents that are transmitted via fax can have only one resolution, 100 dpi (SD, or standard definition) - this is part of the G3 fax standard. Documents that arrive via email or DFsend may have higher resolution if they were scanned at higher resolution at the sending site. For such documents it is possible to instruct DFdiscover to also image and store them on the server at a higher resolution, namely 300 dpi (HD, or high definition).
While it may seem preferable to image documents at the highest available setting, there are several considerations:
-
High definition images require more disk storage space on the DFdiscover server.
-
High definition images require more bandwidth, and hence time, to transmit to an DFexplore client. On the client side, each user may also choose whether to request HD or SD.
-
DFdiscover will always keep an SD version of each page of each document. If high definition is also enabled, the HD version is also kept, thereby further increasing storage requirements.
-
If the source documents are in color or contain shaded areas that need to be maintained, then high definition should be enabled. With HD enabled, one can also select the color fidelity in the imaged document. In general, the Normal Colors setting is acceptable for clinical study documents. Use 32 Bit Colors only if the source document has photographic detail that needs to be preserved. If 32 Bit Colors is enabled, the stored images are significantly larger (up to 10 times) than a SD image (and hence will also take longer to transmit) - be mindful of this before enabling. For most documents, there is no discernible improvement in quality with 32 Bit Colors over Normal Colors.
In general, if the existing SD quality is sufficient, there is no need to enable HD.
When high definition is enabled or disabled, the new setting is applied only to documents that are received after the changed setting is saved. DFdiscover does not retrospectively re-image previously received documents.
There is a similar setting at the client end, in DFexplore. Those details are not described here but, in summary, the end user is able control whether they wish to request HD or SD images. Over low-speed or low-bandwidth connections, SD is more efficient and hence preferred. Selecting HD in such an environment can result in slower image loads and decreased DFexplore performance.
Documents which require transmission from DFdiscover to external sites, typically participating investigative sites, are handled by the Outbound service.
The Outbound service must be defined and configured before DFdiscover is able to send outgoing documents. The definition and configuration of the Outbound feature is done in the Outbound view.
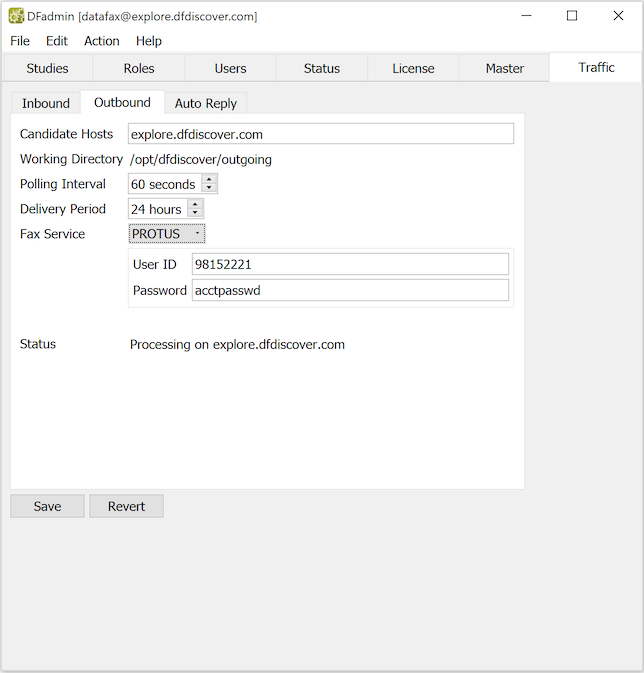
When DFdiscover is started for the first time, DFdiscover identifies that there is no Outbound service defined and it will define and configure one with default values. In most environments, these default values do not need to be changed. However, if re-configuration is needed, the following parameters can be changed:
-
Candidate Hosts. Enter the host names (comma-delimited) of all computers that can be considered as candidate computers where the Outbound service might be permitted to run. In 99% of the cases, only one hostname is needed and that is the hostname of the master.
Candidate Hosts also require slave daemons The Outbound service can only run on machines that are also running slaves. If a candidate host is specified that is not also running a slave, that candidate will never be chosen.
-
Working Directory. The working directory must be writable by user
datafaxand is defined by default with the same value as the DFdiscover work directory,/opt/dfdiscover/work. To change its value, the outbound configuration file/opt/dfdiscover/lib/DFoutbound.cfmust be directly edited by the DFdiscover administrator. It cannot be changed using DFadmin.The working directory is temporary space only - once an outgoing document is sent, the working directory becomes empty again.
The permissions on the files queued for outgoing transmission are such that only user
datafaxcan read or write them. This prevents any other user from being able to tamper with an outgoing document before it is delivered. -
Polling Interval. This value is the number of seconds that the Outbound service will wait between checks for new requests in the outgoing document queue. The Outbound service runs in a loop where it checks the queue for work, does whatever work may need to be done, then sleeps for the specified number of seconds before beginning the loop again. A recommended value is anywhere in the 20 to 60 second range.
-
Delivery Period. This value is the maximum number of hours that the Outbound service will wait for a reply from HylaFAX as to the disposition of a document that has been queued for faxing. If a reply is not received in this time period, DFdiscover considers the transmission of that document to have been a failure; resources are freed, any failure commands for the document are executed, and the queue entry is removed. A reasonable value is in the 8 to 16-hour range.
If a large number of documents is typically being queued, be careful not to make this value so small that even under normal circumstances, HylaFAX would not be able to reply in time as it would still be processing the large volume of documents.
-
Fax Service. You can select the Fax Service your DFdiscover server is setup for. EMAIL, HYLAFAX or PROTUS service can be used for fax handling services.
-
EMAIL. Email services will be used for fax handling. Ensure that external email is configured on your DFdiscover server -
postfixis a common email service. Configuration ofpostfixor other email services is beyond the scope of this document. -
HYLAFAX. HylaFAX software will be used for fax handling. Ensure that HylaFAX is installed on the DFdiscover server.
-
PROTUS. Protus service requires UserID and Password values for accessing the Protus server. The UserID and Password is provided to you by Protus or your Protus service provider. [10] These credentials are required to setup DFdiscover for using Protus service. Protus IP Solutions is an application service provider that offers an Internet fax service targeting Personal, Small Business and Corporate users sold under the brand name MyFax. Protus solutions are sold both directly and through a network of worldwide partners, including major service providers. Additional information is available at www.protus.com or www.myfax.com. If you use Protus services, you do not need fax lines or modems. You receive a toll-free number with the equivalent of 24 modems behind it that your sites use as your fax number. Faxes are received and stored by a Protus server until requested by the DFprotusfax daemon DFdiscover uses for this purpose. Faxes are retrieved and processed through the normal DFdiscover channels while faxes to be sent are uploaded to the Protus server for sending. All communication is encrypted using SSL encryption. Some of the advantages in using Protus for a DFdiscover installation are as follows.
-
The cost of installing and maintaining individual phone lines and fax modems, as well as long distance charges for outgoing faxes are eliminated.
-
No special serial port multiplexer cards or drivers are required on your DFdiscover server.
-
You pay per use vs. carrying excess capacity. Instant capacity is available on demand.
-
The cost of the service is minimal. There is a monthly account charge which includes the first 100 outbound and 200 inbound faxes.
-
Data transfers are initiated at the DFdiscover server end. If your DFdiscover server is down for backup, upgrading, or other reasons (power failure?), Protus stores your incoming faxes until your DFdiscover server is back running and incoming faxes are requested. Fax service is always available to your sites.
-
Protus provides full tracking, reporting and audit for compliance to HIPAA, GLB and SOX.
Since the Protus server is location-neutral, study sites databases must be configured differently. All numbers must be fully qualified. Fax numbers in North America require a leading "1", followed by the area code and number. All other fax numbers require a leading "011", followed by the country code and number. Dash and bracket delimiters may be used to aid readability. For example, a fax number in North America of 905-555-1234 could be entered as 1-905-555-1234, 1(905)555-1234, 19055551234, etc.. To use the Protus Internet Fax service with DFdiscover you will need to set up an account and have the Protus XML integration services (or "Web services") enabled. Email notifications need to be disabled and the fax file format must be set to TIFF. If you are having problems using Protus, verify that the service is set up correctly. To setup an account suitable for use with DFdiscover directly with Protus IP Solutions, please contact:
Richard Solomon
Sr. Sales Representative, Major Accounts
j2 Global
2 Gurdwara Rd, Suite 300
Ottawa, Ontario
Canada K2E 1A2
<rsolomon@protus.com>
tel: (888) 733-0000 extension 7642
tel: (613) 733-0000 extension 7642
-
-
After making any changes, select > to save the changes and re-configure the Outbound service. Modifications can be made regardless of whether or not the Outbound service is currently enabled. If the Outbound service is processing while its configuration is modified, the modifications will not take effect until the next outgoing document is processed.
In the Outbound view, Status is a read-only field that shows the current status of the Outbound service. Typically, the service is always processing, which means that it can process outgoing requests as they are issued. However, the service can also be stopped by the administrator - when stopped, outgoing fax requests are not processed until the Outbound service is re-started.
The possible statuses are:
-
Processing on, on-line, running onhostnamehostname, and available for processing each outgoing fax request -
Disabled, off-line, outgoing fax requests cannot be processed
To change the status of the Outbound service, select one of:
-
> Start the currently stopped Outbound service.
-
> Stop the currently processing Outbound service. Documents that are currently being transmitted will complete transmission but documents waiting in the queue will not be processed until the Outbound service is started again.
Auto reply is a debugging feature useful for diagnosing problems with sites that have ongoing difficulty submitting CRFs to DFdiscover. The feature works by sending a receipt to selected sites when documents from them arrive into DFdiscover. The receipt contains information about when the document was received, how many pages it contained, etc. A site that is having difficulty sending can then wait for their Auto Reply receipt before sending more CRFs - this will tell them immediately if there is a problem.
Auto Reply is configured in DFadmin's Auto Reply view.
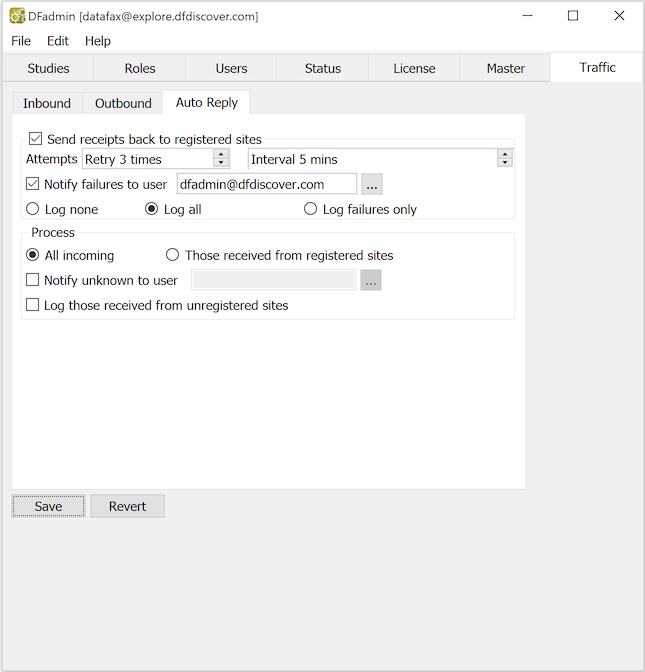
The configuration parameters that can be altered are:
-
Send receipts back to registered sites. Enabling this checkbox enables basic Auto Reply processing. When enabled, DFdiscover faxes or emails a confirmation of receipt for each document received from a registered site. Registered sites require a unique sender id for identification by DFdiscover. Hence, receipts are not sent to all sites that submit documents, but only to those that are registered. The remaining options are relevant only with this setting of the option.
With this option is not checked, Auto Reply is turned off and receipts are never sent to any site, whether a registered site or not.
-
Attempts. When sending receipts, how many attempts should be made and at what interval?
-
Notify failures to user. If an Auto Reply receipt cannot be sent, should a notification be sent to an internal administrator, and if so, to whom?
-
Log. This is a choice field. When set to Log none, no log will be kept of receipts that are sent back. This log is not necessary and nothing in DFdiscover requires or references it; its purpose is purely informational. Setting this option to Log all configures DFdiscover to log every attempt to send a receipt. To log only those receipts that could not be sent, set this option to Log failures only.
-
Process. This is a choice field that optionally allows DFdiscover to filter documents that originate from an unknown sender. When set to All incoming DFdiscover uses normal Inbound processing, where all received documents are processed. If the option is set to Those received from registered sites , only documents that arrive from registered sites are processed, all other documents from unregistered sites are discarded. This latter setting must be used with great care, as documents from unregistered sites will be deleted without further warning.
-
Notify unknown to user. This setting applies only when All incoming is also set. If a document is received from an unregistered site, should a notification be sent to an internal administrator, and if so, to whom?
-
Log those received from unregistered sites. This setting applies only when All incoming is also set. If a document is received from an unregistered site, should a log record be written? Log records are written to
sitefax_log, which is described in Table 14.38, “sitefax_log”.
After making any changes, select > to save the changes and re-configure the Auto Reply service. The changes will be applied starting with the next incoming document that is received.
Prior to enabling reply fax processing by setting, a database of registered sites must be initiated. It does not need to be complete at this time. Since reply fax processing is based on the sender identification, the registered sites database is implemented at the generic DFdiscover level, not at the study specific level. At the study specific level, some of the same sites will appear in the studies database. This is expected, noting that the information required for the study sites database (which identifies where Query Reports will be sent) is different information than that required for the registered sites database (which identifies from where faxes are sent).
A registered sites database must be created directly on the server. No special editor is included in DFdiscover for the creation or modification of this file, however, it is easily updated with a simple text editor. New sites can be added, existing sites modified, and sites deleted while the reply fax feature is enabled.
It is a plain text file, named
/opt/dfdiscover/lib/DFsites.db, that identifies the
clinical sites that will receive fax or email receipts.
The format of this file is documented in
Table 14.15, “ DFsites.db”.
Example 10.1. Typical records from DFsites.db
1|General Hospital|905-999-9876|1-905-999-9876|/opt/studies/xyz/replyfax/reply.001
1|St. Elsewhere|elsewhere@hospital.com|mailto:person@hospital.com|/opt/studies/abc/replyfax/reply.001
For the successful operation of reply fax and the registered sites
database, each site must transmit a unique sender identification string.
This can be a fax number or email address. The replyfax field (field 4) of each
DFsites.db record may also consist of a fax number or
email address.
Comparison between the sender identification and the replyfax field
is always performed case-insensitive.
Sites which do not need fax or email receipts are not required to be included in this file.
The 5th field of each site registration record identifies the name of a text file to be used as a template for that site's fax receipt. The same receipt file may be shared across sites simply by referencing the same file in the 5th field of each site record that shares the file. Conversely, each site might use or require a separate receipt, for example, to allow for different languages.
The requirements for a fax receipt are documented in
Table 14.12, “DFreceipt.sample”.
An example, shown in Example 10.2, “Example ReplyFax receipt file”,
illustrates a fax receipt.
Example 10.2. Example ReplyFax receipt file
      DFDISCOVER RECEIPT FOR STUDY XYZ
To: %s
From: XYZ STUDY coordinating site
Re: recently received fax from fax machine %g

A %p page fax was received at %t on %d.

If this does not agree with your fax log, please contact:
Jane Wright at 905-999-8888, extension 7777

THANK YOU FOR YOUR CONTINUING SUPPORT
The symbols %s, %g, etc are
placeholders for information that is filled in by DFdiscover during the
composition of the receipt for an individual fax.
[10]
DFadmin does not accept the &,
| or = characters. If the
password provided by Protus contains any of those characters, request
another password.